


CONTENTS |
|
Precautions................................................................................................................................................. |
1 |
How to Handle Discs.............................................................................................................................. |
1 |
Lithium Battery Cell Warnings................................................................................................................ |
1 |
Installation .................................................................................................................................................. |
2 |
Prepare Radio........................................................................................................................................ |
2 |
Mount Radio....................................................................................................................................... |
2-3 |
Wiring Connections................................................................................................................................ |
3 |
Removal of the Main Unit ....................................................................................................................... |
3 |
Control Panel Button Locations.................................................................................................................. |
4 |
General Operation...................................................................................................................................... |
5 |
Turn Unit On/Off..................................................................................................................................... |
5 |
Adjust Volume (VOL) ............................................................................................................................. |
5 |
Adjust Menu Options (SEL).................................................................................................................... |
5 |
Set the Clock (CLK) ............................................................................................................................... |
5 |
Change the Source (SRC) ..................................................................................................................... |
5 |
Loudness On/off (LOUD) ....................................................................................................................... |
5 |
Preset Equalizer (EQ)............................................................................................................................. |
5 |
Mute On/off (MUTE) ............................................................................................................................... |
5 |
Reset System (RESET) ......................................................................................................................... |
5 |
Radio Operation ......................................................................................................................................... |
6 |
Switch Between US and EU Frequency ................................................................................................ |
6 |
Change Bands (BAND).......................................................................................................................... |
6 |
Manual Tuning (|<< / >>|)....................................................................................................................... |
6 |
Auto Seek Tuning (|<< / >>|).................................................................................................................. |
6 |
Automatic Music Search (AMS) ............................................................................................................. |
6 |
Store/Recall Preset Stations (1 - 6) ....................................................................................................... |
6 |
Local/DX (LOC) ..................................................................................................................................... |
6 |
Stereo/Mono (ST) .................................................................................................................................. |
6 |
Disc/USB/Card Operation........................................................................................................................... |
7 |
Insert Disc/USB/SD................................................................................................................................ |
7 |
Eject Disc/USB/SD................................................................................................................................. |
7 |
Play/Pause............................................................................................................................................. |
7 |
Next/Previous Track............................................................................................................................... |
7 |
Fast Forward/Backward ......................................................................................................................... |
7 |
Track Search.......................................................................................................................................... |
8 |
Track/Folder Navigation......................................................................................................................... |
8 |
Remote Control ........................................................................................................................................ |
9 |
Remove Insulating Sheet ..................................................................................................................... |
9 |
Replace Lithium Battery Cell................................................................................................................ |
9 |
Remote Control Operation ................................................................................................................... |
9 |
Button Names and Locations................................................................................................................ |
10 |
Troubleshooting........................................................................................................................................ |
11 |
........................................................................................................................................... |
12 |
ii
PRECAUTIONS
How to Handle Discs
Handle a disc by its edges. Do not touch the playing side.
Before inserting a disc, wipe the disc outward from the disc center with a clean, soft, dry and lint-free cloth. Do not use solvents or thinners such a petrol/benzene or cleaners.
After removing a disc from the disc slot, place the disc in a sleeve or case to keep it clean and prevent scratches.
Do not stick paper or tape on the disc surface. If there is glue (or adhesive) on the disc surface, remove it before using the disc.
Lithium Battery Cell Warnings
Cell leakage may cause damage to the remote control.
Do not throw cells into as this may cause an explosion.Keep battery cells out of reach of children.
1

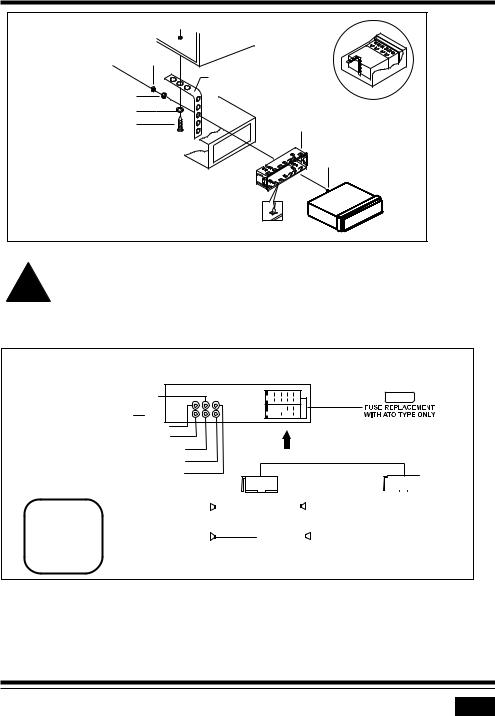
INSTALLATION
Prepare Radio
1.Before you begin, disconnect the battery negative terminal.
2.Remove the transport screws.
3.Remove chassis from the mounting sleeve.
BRACKET KEY
PLASTIC TRIM OUT
BRACKET KEY
If you want to remove the chassis from the mounting sleeve, remove the plastic trim out from both sides. Next, insert the two bracket keys into the left and right side of the chassis, as illustrated, to separate the chassis from the housing.
Mount Radio
Refer to the “Installation Diagram” to install the unit.
1.Bend the tabs on the mounting sleeve, where necessary, to ensure than the front part of the main unit will remain into the vehicle dash opening.
2.Insert radio into the mounting sleeve.
3.Use a metal strap to secure the rear part of the chassis using the hardware indicated.
4.Make wiring connections, as illustrated in the “Wiring Diagram.”
5.Install the plastic trim out.
2
INSTALLATION (CONT.)
INSTALLATION |
|
|
DIAGRAM |
DASH BOARD |
|
HEX NUT |
|
|
|
METAL MOUNTING STRAP |
|
SPRING WASHER |
CONSOLE |
|
PLAIN WASHER |
||
|
||
TAPPING SCREW |
MOUNTING SLEEVE |
|
|
HEX BOLT |
-Only use speakers with 4 ohms impedance.
!- Do not attach the control panel to the chassis before wiring is complete.
-The maximum current of the Amp Remote trigger is 200mA.
Wiring Connections
WIRING
DIAGRAM
White:Front Left PRE-AMP Output
Radio Antenna 

AUX-Left input
AUX-Right input
Red: Front Right PRE-AMP Output
Red: Rear Right PRE-AMP Output
White: Rear Left PRE-AMP Output

 15
15


15A
CAUTION
+12V DC
NEGATIVE
GROUND
Purple + |
|
|
|
Green + |
|
|
|
|
|
|
|
|||
|
|
|
|
|
|
|
|
|
|
|||||
|
|
|
|
|
|
|
|
|
|
|||||
Rear Right Speaker |
|
|
|
|
|
|
Rear Left Speaker |
|
|
|
|
ACC + (Red) |
||
|
|
|
|
|
|
|||||||||
|
|
|
|
|
|
|||||||||
Purple/Black - |
|
|
|
Green/Black - |
|
|
|
GND - (Black) |
||||||
|
Gray + |
|
|
|
White + |
|
ANT + (Blue) |
|||||||
Front Right Speaker |
|
|
|
|
|
|
Front Left Speaker |
Power B + (Yellow) |
||||||
|
|
|
|
|
|
|||||||||
Gray/Black - |
|
|
White/Black - |
|
|
|
|
|
|
|
||||
Removal of the Main Unit
1.Remove the metal strap from the main unit.
2.Remove the plastic trim out from the main unit.
3.Insert a bracket key into the left and right side of the main unit and draw the unit out of the mounting sleeve.
3
 Loading...