


Bosch NGP936UC, NGT932UC, NGP932UC, NGT936UC, NGP732UC Manual
...USE AND CARE MANUAL
for
GAS COOKTOPS
with FULL SURFACE GRATES
30" MODELS |
36" MODELS |
NGT73, NGP73 |
NGT93, NGP93 |
To the Installer: Leave this manual with the cooktop. To the Consumer: Retain this manual for future reference

Dear Bosch Cooktop Owner
Thank you and congratulations on your purchase of a Bosch cooktop. Whether you are an expert chef or a beginning cook we believe that you will find your Bosch cooktop exceeds your expectations for a modern gas cooktop. You will take great pride in the quality of construction of these fine cooktops.
We also ask that you read this manual thoroughly before using your new cooktop. This is especially important if you have never before used a gas cooktop. Please pay particular attention to the Safety Instructions printed at the front of the book and the numerous safety hints and cautions placed throughout this manual. Also, be sure to familiarize yourself with the proper operation of the cooktop and its cleaning and maintenance procedures. Adherence to these instructions and procedures will assure that you realize the full potential of your new cooktop.
For even more information visit our website at www.boschappliances.com to learn about your cooktop as well as other top quality Bosch appliances. If you have any questions, please contact us at 1-800-944-2904. For additional information, write to us at:
BOSCH
BSH Home Appliances Corp.
5551 McFadden Avenue
Huntington Beach, CA 92649
Note: The Bosch cooktop referred to throughout this manual is manufactured by BSH Home Appliances Corp.
Table of Contents
Safety Instructions ....................................... |
1-2 |
Operating Instructions |
|
Features of Your Cooktop ................................... |
3 |
Sealed Burners ......................................................... |
4 |
Burner Caps ............................................................. |
4 |
Grates ........................................................................ |
4 |
Burner Control Knobs ...................................... |
4-5 |
Electronic Ignition/Reignition ............................... |
5 |
Typical Flame Characteristics .............................. |
5 |
Power Failure ........................................................... |
5 |
Proper Cookware ................................................... |
6 |
Cooking Chart ......................................................... |
7 |
Care and Cleaning |
|
Cleaning the Cooktop............................................ |
8 |
Cooktop Cleaning Chart ................................... |
8-9 |
Problem Solver |
|
In Case of a Power Failure .................................... |
5 |
Before Calling for Service ................................... |
10 |
Consumer Services |
|
Warranty ................................................................. |
11 |
How to Obtain Service ........................................ |
10 |
Data Plate Information ....................... |
Back Cover |
! IMPORTANT SAFETY INSTRUCTIONS
Read all instructions before using this appliance.
! WARNING:
If the information in this manual is not followed exactly, a fire or explosion may result causing property damage, personal injury or death.
Do not store or use gasoline or other flammable vapors and liquids in the vicinity of this or any other appliance.
WHAT TO DO IF YOU SMELL GAS:
•Do not try to light any appliance.
•Do not touch any electrical switch.
•Do not use any phone in your building.
•Immediately call your gas supplier from a neighbor’s phone. Follow the gas supplier’s instructions.
•If you cannot reach your gas supplier, call the fire department.
Installation and service must be performed by a qualified installer, authorized service agency or the gas supplier.
COOKTOP SAFETY
WARNING – To reduce the risk of fire, ! electric shock, or injury to persons, take
these precautions:
• This appliance is intended for normal family household use only. See the Warranty. If you have any questions, contact the manufacturer.
• Have the cooktop installed and grounded by a qualified technician. Have the installer show you where the gas shut-off valve is located.
• Do not repair or replace any part of the appliance unless specifically recommended in this manual. All other servicing should be referred to a qualified technician.
• For proper lighting and performance of the burners, keep the igniters clean and dry.
• In the event that a burner goes out and gas escapes, open a window or a door. Wait at least 5 minutes before using the cooktop.
• Do not obstruct the flow of combustion and ventilation air.
• Do not use aluminum foil to line any part of the cooktop.
• If the cooktop is near a window, be certain that curtains or any other window covering do not blow over or near the burners; they could catch on fire.
PAGE 1

! IMPORTANT SAFETY INSTRUCTIONS !
Read all instructions before using this appliance.
PERSONAL SAFETY
WARNING — TO REDUCE THE
!RISK OF INJURY TO PERSONS, IN THE EVENT OF A GREASE FIRE, OBSERVE THE FOLLOWING:
•In the event of a grease fire SMOTHER FLAMES with a close-fitting lid, cookie sheet, or other metal tray, then turn off the gas burner. BE CAREFUL TO PREVENT BURNS.Iftheflamesdonotgooutimmediately,EVACUATE AND CALL THE FIRE DEPARTMENT.
•Do not use water, including wet dishclothes or towels on grease fires. A violent steam explosion may result.
•NEVER PICK UP A FLAMING PAN. You may be burned.
•ALWAYShaveaworkingSMOKEDETECTORnear the kitchen.
•LEAVE THE HOOD VENTILATOR ON when flambéing food.
•Use an extinguisher ONLY IF:
•You know you have a Class ABC extinguisher, and you already know how to operate it.
•The fire is small and contained in the area where it started.
•The fire department is being called.
•You can fight the fire with your back to an exit.
•SMOTHER FLAMES from other types of food fires with baking soda. NEVER use water on cooking fires.
WARNING — TO REDUCE THE
!RISKOF BURN INJURIES DURING COOKTOP USE, OBSERVE THE FOLLOWING:
•Never use the cooktop to warm or heat a room.
•Children or pets should not be left alone or unattended in an area where appliances are in use. They should never be allowed to sit or stand on any part of the appliance.
•CAUTION: Do not store items of interest to children above or at the back of the cooktop .
•When using the cooktop: DO NOT TOUCH THE
BURNER GRATES OR THE IMMEDIATE SURROUNDING AREA.
•Use only dry potholders; moist or damp potholders on hot surfaces may cause burns from steam.
•Neverleavethecooktopunattendedwheninuse.
Boilovers cause smoking, and greasy spillovers may ignite. A spill on a burner can smother all or part of the flame or hinder spark ignition. If a boilover occurs, turn off burner and check operation. If burner is operating normally, turn it back on.
•During cooking, set the burner control so that the flame heats only the bottom of the pan and does not extend beyond the bottom of the pan.
•Take care that drafts like those from fans or forced air vents do not blow flammable material toward the flames or push the flames so that they extend beyond the edges of the pan.
•Always position handles of utensils inward so they do not extend over adjacent work areas, burners, or the edge of the cooktop.
•Wear proper apparel. Loose fitting garments or hanging sleeves should never be worn while cooking.
•In the event that personal clothing catches fire, DROP AND ROLL IMMEDIATELY to extinguish flames.
•Never let clothing, potholders, or other flammable materials come in contact with hot burners or hot burner grates.
•Use only certain types of glass, heatproof glassceramic, ceramic, earthenware, or other glazed utensils that are suitable for cooktop use.
•Do not clean the cooktop while it is still hot. Some cleaners produce noxious fumes when applied to a hot surface.
•CAUTION: Do not allow aluminum foil, plastic, paper or cloth to come in contact with a hot burner or grate. Do not allow pans to boil dry.
California Proposition 65 - Warning: Burning gas cooking fuel generates some by-products which are on the list of substances which are known by the State of California to cause cancer or reproductive harm. To minimize exposure to these substances, always operate
•Do not store flammable materials on or near the this unit according to the instructions contained in this
cooktop. |
booklet and provide good ventilation. |
PAGE 2

FEATURES OFYOUR COOKTOP
30" Models |
1 |
2 |
|
4
5
1 |
7 |
36" Models
4 |
6 |
1
2
5
4
8
3
|
1 |
|
|
7 |
|
|
3 |
|
4 6 |
|
8 |
|
KEY NO* |
LOCATION |
BTU RATE |
1 |
Left Rear |
9,100 |
2 |
Right Rear-30" |
11,000 |
3 |
Right Rear-36" |
9,100 |
4 |
Left Front |
12,500 - NGT Model |
|
|
15,000 - NGP Model |
5 |
Right Front-30", Simmer Burner |
6,500/950 |
6 |
Center Front-36", Simmer Burner |
6,500/950 |
7 |
Center Rear-36" |
11,000 |
8 |
Serial/Number/Data Plate |
|
* Key numbers 1-7 also correspond to the control knob location for the burner.
PAGE 3

COOKTOP OPERATION
The following pages explain how each feature on the gas cooktop works and how to get the best cooking results.
Follow these hints when cooking on the cooktop:
•Use proper cookware. (See Page 6.)
•Center the pan over the burner before turning the burner on.
•Refer to the Cooking Chart on Page 7 for suggested flame settings.
Sealed Burners
Your new cooktop has sealed gas burners. There are no burner parts under the cooktop to clean, disassemble or adjust. Your cooktop has two different burner cap sizes, large and medium. Match the pan to the size burner.
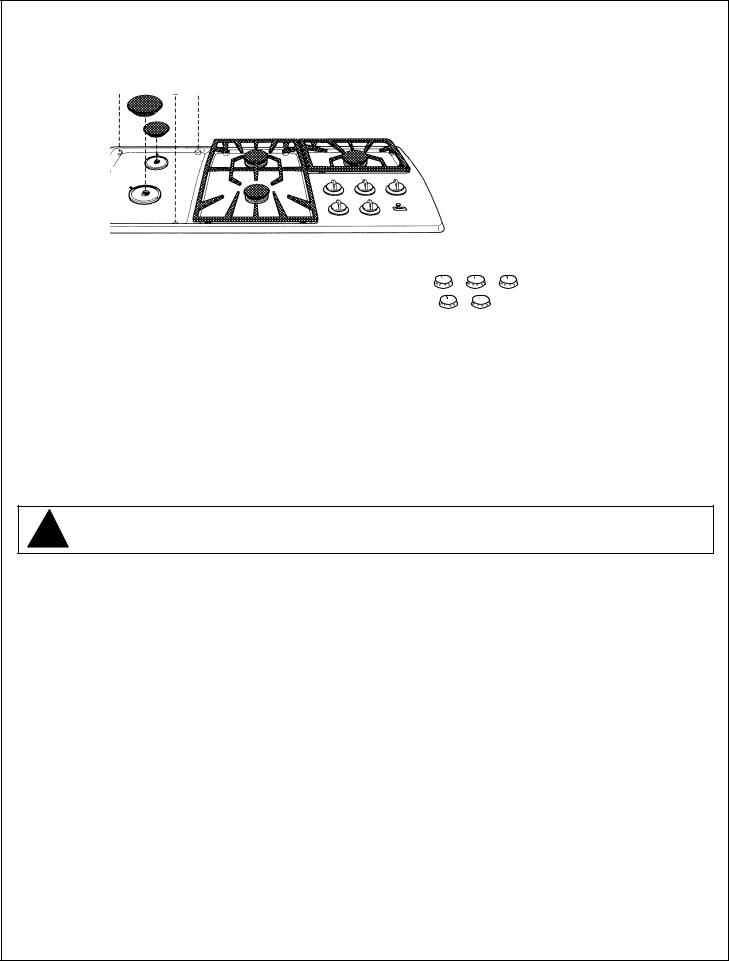
Burner Caps
Porcelain
Enamel Burner Cap
 Notch
Notch
Burner Base
The burner cap is porcelainized steel. On the underside of the cap is one locator which must fit into the corresponding notch on the burner base. If the burner cap is not placed correctly, the burner may not light or the flame may not burn completely or correctly.
! |
WARNING: To prevent flare-ups do not |
|
use the cooktop without all burner caps |
||
|
||
|
and all burner grates properly positioned. |
Burner Grates
The position of each double grate is labeled on the underside edge of the grate as shown in the figure below.
Single
(36" models only)
Universal |
Side |
Center |
(30" models only)
30" Models have two universal grates. Position the straight side in the center. They are interchangeable by rotating 180°.
36" Models have one side grate, one center grate and one single grate. Position the grates on the cooktop as illustrated above.
WARNING:To prevent flare-ups all grates must be properly positioned on the ! cooktop whenever the cooktop is in use. Each of the four feet must be placed into the corresponding dimples in the cooktop.
See illustration on Page 8. Do not use a grate if the rubber feet are missing or damaged.
Burner Control Knobs
Locator OFF
HI |
Knob Indicator Line |
Control
Knob
LO
.
STANDARD BURNER CONTROL
PAGE 4

COOKTOP OPERATION
Burner Control Knobs (continued)
The standard burner controls have an infinite number of heat settings with no fixed positions.
To operate: Select the appropriate control knob, push down and turn counterclockwise to the desired flame size. Turn OFF by turning the control knob clockwise to OFF.
A rubber grommet is located under each control knob.
To remove knob and grommet: With burner in the OFF position, gently lift knob up and off. Gently pull grommet toward center and lift out.
!
WARNING: Toavoidelectricshock,donot reach through opening into rough-in box.
To replace grommet and knob: Replace grommet by placing center groove around cooktop. The rubber grommet should be firmly attached around the cooktop opening. Place the control knob indicator line at the OFF position; press down firmly.
Electronic Ignition/Reignition
The cooktop uses electronic igniters to light the burners. There is no pilot light. Each burner has its own igniter. If a burner flame blows out during use, the burner will automatically reignite.
CAUTION: All igniters spark when any single burner is turned ON or the reignition system is activated. Do not touch any of the burners when the cooktop is in use.
The ignitor should be clean and dry for proper operation.
•Avoid getting water or food on the igniter.
•If the igniter is wet or soiled, it may spark without igniting the burner, or even spark continuously when a flame is present.
Note: If the burner does not light within 4 seconds, turn the burner off. Check to see that the cap is positioned correctly on the burner base and the igniter is clean and dry. If a burner still fails to ignite, see Before Calling for Service on Page 10.
Typical Flame Characteristics
The burner flame should be blue in color and stable with no yellow tips, excessive noise or fluttering. It should burn completely around the burner cap.
Foreign particles in the gas line may cause an orange flame during initial use. This should disappear with use. Check burner cap to make sure port holes are not obstructed. If the ports are clogged, see Before Calling for Service on page 10.
Note: An audible “pop” may be heard when the burner is turned off manually. The “popping” may be louder with LP gas than with natural gas. This is normal.
Power Failure
In the event of a power failure, the burners can be ignited manually.
If the cooktop is being used when a power failure occurs, turn all the burner control knobs to the OFF position. The burners can then be ignited manually by holding a match at the ports and turning the control knob to the HI position. Wait until the flame is burning all the way around the burner before adjusting the flame to the desired height.
CAUTION: The reignition feature will not work in the event of a power failure.
PAGE 5

PROPER COOKWARE
Cookware Characteristics
•Aluminum or copper bottomed pans conduct heat evenly.
•Steel pans, if not combined with other metals, may cook unevenly.
•Cast-iron cookware absorbs heat slowly and cooks more evenly at low-to-medium settings.
•Flat, heavy bottom pans provide even heat and stability.
DO NOT USE pans that are thin, warped, dented or ridged as they heat unevenly.
Match Pan Diameter to Flame Size
–The flame should be the same size as the bottom of the pan or smaller. Do not use small pans with high flame settings as the flames can lick up the sides of the pan.
–Oversize pans that span two burners are placed front to rear, not side to side.
Use Balanced Pans
–Pans must sit level on the cooktop grate without rocking.
–Center pan over burner.
Use a Lid That Fits Properly
– A well-fitting lid helps shorten the cooking time.
Pans that span 2 burners, i.e. griddles, roasters and fish poachers, may be used when placed front to back. Adjust flame equally to cook evenly. Use the Bosch accessory griddle on your Bosch Cooktop. To order, call the 800 number listed below.
Use a wok with a flat bottom. If using a round bottomed wok, use the Bosch accessory support wok ring. To order call the 800 number listed below.
For simmering stews and soups, or melting chocolate, use the Bosch simmer plate accessory. The simmer plate distributes the heat evenly and gently. The simmer plate is supplied with NGP models only, but is available separately for the NGT. Follow use and care instructions provided with the simmer plate.
Canners and pressure cookers must meet the same requirements as described above.
•After bringing contents to a boil, use lowest heat setting possible to maintain a boil or pressure (for pressure canners/cookers).
Bosch Customer Service — 800/944-2904
PAGE 6

COOKING CHART
|
FOOD |
Start Cooking |
Continue Cooking |
|
|
|
|
|
|
|
BREADS |
Med. – preheat skillet. |
Med. LO to Med. |
|
|
French Toast, Pancakes |
|
|
|
|
Grilled Sandwiches |
|
|
|
|
CEREALS |
Hl – cover, bring water |
Med. LO to Med. – |
|
|
Cornmeal, Grits, |
to a boil, add cereal. |
finish cooking according |
|
|
Oatmeal |
|
to package directions. |
|
|
CHOCOLATE |
LO to melt. |
Remove when melted. |
|
|
|
|
|
|
|
DEEP FRYING |
Hl – heat oil |
Med. HI to Hl – to |
|
|
|
|
maintain temperature. |
|
|
|
|
|
|
|
EGGS |
Hl – cover, bring |
OFF to LO – cook 3 |
|
|
Cooked in Shell |
water to a boil, add |
to 4 minutes for soft |
|
|
|
eggs, cover. |
cooked; or 15 to 20 |
|
|
|
|
minutes for hard cooked. |
|
|
|
|
|
|
|
Fried, Scrambled |
Med. to Med. HI – |
LO to Med. LO |
|
|
|
melt butter, add egg. |
finish cooking. |
|
|
|
|
|
|
|
MEAT, FISH, POULTRY |
Hl – until meat starts |
Med. LO to Med. – to |
|
|
Bacon, Sausage Patties |
to sizzle. |
finish cooking. |
|
|
|
|
|
|
|
Braising: Swiss Steak, |
Hl – melt fat, then |
LO to Med. LO – cover, |
|
|
Pot Roast |
brown on Med. HI to |
simmer until tender. |
|
|
|
Hl, add liquid, cover. |
|
|
|
|
|
|
|
|
Frying: Chicken |
Hl – melt fat, then |
LO – cover, finish |
|
|
|
brown on Med. |
cooking. |
|
|
|
|
|
|
|
Pan Frying: Lamb Chops, |
Med. HI to Hl – |
Med. to HI – |
|
|
Thin Steaks, Hamburgers, |
preheat skillet. |
brown meat. |
|
|
Link Sausage |
|
|
|
|
|
|
|
|
|
Simmering: Stewed |
Hl – cover, bring liquid |
LO to Med. LO |
|
|
Chicken, Corned Beef, |
to a boil. |
|
|
|
Poaching Fish |
|
|
|
|
POPCORN |
Med to Med. HI – cover, |
Med. to Med. HI – |
|
|
|
heat until kernels |
finish popping. |
|
|
|
start to pop. |
|
|
|
|
|
|
|
|
PRESSURE COOKER |
Med. HI to Hl – build |
Med. LO to Med. – |
|
|
Meat, Vegetables |
up pressure. |
maintain pressure. |
|
|
|
|
|
|
|
RICE |
Hl – cover, bring water |
LO to Med. LO – cover, |
|
|
|
to boil, add rice, cover. |
cook according to |
|
|
|
|
package directions. |
|
|
|
|
|
|
|
SAUCES |
Med. HI to Hl – cook |
LO to Med. LO |
|
|
Tomato Base |
meat/vegetables, |
|
|
|
|
follow recipe. |
|
|
|
|
|
|
|
|
White, Cream, Bernaise, |
LO to Med. LO – melt |
LO to Med. LO – |
|
|
Hollandaise |
fat, follow recipe. |
finish cooking. |
|
|
|
|
|
|
|
SOUPS, STEWS |
Hl – cover, bring |
LO to Med. LO – |
|
|
|
liquid to a boil. |
simmer. |
|
|
|
|
|
|
|
STIR FRY |
Hl – heat oil, add |
Med. HI to Hl – |
|
|
|
vegetables. |
finish cooking. |
|
|
|
|
|
|
|
VEGETABLES |
Hl – cover, bring |
Med. LO to Med. – |
|
|
Fresh |
water and vegetable |
cook 10 to 30 minutes, |
|
|
|
to a boil. |
or until tender. |
|
|
|
|
|
|
|
|
|
|
|
PAGE 7
CLEANINGTHE COOKTOP
The entire Cooktop can be safely cleaned by wiping with a soapy sponge, then rinsing and drying. If stubborn soil remains, follow the recommended cleaning methods below.
36" Model
CAUTION:
•Before cleaning, be certain the burners are turned off and the grates are cool.
•Always use the mildest cleaner that will do the job. Use clean, soft cloths, sponges or paper towels.
•Rub stainless steel finishes in the direction of the grain. Wipe area dry to avoid water marks.
•Do not clean removable cooktop parts in any self-cleaning oven.
•After cleaning, place all parts in their proper positions before using cooktop.
The cleaners recommended below and on the following page indicate cleaner types and do not constitute an endorsement of a particular brand. Use all products according to package directions.
WARNING: To avoid electrical shock hazard: If cleaning under the cooktop is ever required, ! switch off main power before reaching inside.
Cooktop Cleaning Chart
Cooktop Part / Material |
|
Suggested Cleaners |
|
Important Reminders |
|
|
|
|
|
|
|
Burner Base and |
• |
Detergent and hot water; rinse and |
• |
Do not soak burner caps. |
|
|
dry. |
• |
Do not scratch or gouge the port |
||
Burner Cap, underside |
|
||||
• Stiff nylon bristle-toothbrush to clean |
|
openings. |
|||
Aluminum Alloy |
|
||||
• |
Clean ports with a wire or straight- |
||||
|
port openings. |
||||
|
|
|
ened paper clip. |
||
|
• Abrasive cleansers: Brillo® or S.O.S.® |
|
|||
|
• |
Do not use a toothpick that may |
|||
|
|
pads. Rinse and dry. |
|||
|
|
|
break off. |
||
|
|
|
|
||
Burner Cap and |
• |
Hot sudsy water; rinse and dry |
• |
Acidic and sugar-laden spills |
|
exterior finish |
|
thoroughly. |
|
deterioate the porcelain enamel. Re- |
|
• |
Nonabrasive cleansers: Ammonia, |
|
move soil immediately. |
||
Porcelain Enamel |
|
||||
|
Fantastic®, Formula 409®. |
• |
Do not use wet sponge or towel on |
||
|
• Mild abrasive cleansers: Bon Ami®, |
|
hot porcelain. |
||
|
|
Ajax®, Comet®. |
• |
Do not soak burner caps. |
|
|
• |
Liquid cleaners: Kleen King®, Soft |
• |
Always apply minimal pressure with |
|
|
|
Scrub®. |
|
abrasive cleaners. |
|
|
• |
Stiff nylon bristle toothbrush to |
|
|
|
|
|
clean port openings. |
|
|
|
|
• |
Reassemble. Make sure that the |
|
|
|
|
|
cap is seated on the base and aligns |
|
|
|
|
|
with the notch. |
|
|
|
|
|
|
|
|
|
|
|
|
|
Continued, please turn page |
|
PAGE 8
Cooktop Cleaning Chart, continued from previous page
Cooktop Part / Material |
|
Suggested Cleaners |
|
Important Reminders |
|
|
|
|
|
Control Knobs / Plastic |
• |
Hot sudsy water; rinse and dry |
• |
See Warning page 8. |
|
|
immediately. |
• |
Do not soak knobs. |
|
• |
To remove knobs, lift straight up. |
• |
Do not force knobs onto valve |
|
|
|
|
shaft. |
|
|
|
• |
Do not use abrasive scrubbers |
|
|
|
|
or cleansers, such as BonAmi®, |
|
|
|
|
Ajax®, or Comet®. They may per- |
|
|
|
|
manently damage the finish or |
|
|
|
|
remove graphics. |
Grommet / Rubber |
• |
Hot sudsy water; rinse and dry im- |
• |
Do not soak grommets. |
|
|
mediately. |
• |
Do not pull on grommet when |
|
• |
To remove grommet, gently push |
||
|
|
removing or replacing. |
||
|
|
toward center and lift up. |
|
|
|
|
|
|
|
Exterior Finish / Stainless Steel |
• |
Nonabrasive cleaners: Hot water |
• |
Stainless steel resists most food |
|
|
and detergent, Fantastic®, Formula |
|
stains and pit marks providing the |
|
|
409®. Rinse and dry immediately. |
|
surface is kept clean and protected. |
|
• |
Cleaner polish: Stainless Steel |
• |
Never allow food stains or salt to |
|
|
Magic® to protect the finish from |
|
remain on stainless steel for any |
|
|
staining and pitting; enhances ap- |
|
length of time. |
|
|
pearance. |
• Rub lightly in the direction of pol- |
|
|
|
|
||
|
• Hard water spots: Household white |
|
ish lines. |
|
|
|
vinegar. |
• Chlorine or chlorine compounds |
|
|
• Mild Abrasive Cleaners: Kleen King® |
|||
|
|
in some cleaners are corrosive to |
||
|
|
stainless steel liquid cleaner, |
|
stainless steel. Check ingredients |
|
|
Cameo® aluminum & stainless steel |
|
on label before using. |
|
|
cleaner, Bon Ami®. |
|
|
|
• |
Heat discoloration: Bar Keepers |
|
|
|
|
Friend®. |
|
|
Grates / Porcelain Enamel on |
• |
Nonabrasive cleaners: Hot water |
• |
The grates are heavy; use care |
Cast Iron |
|
and detergent, Fantastic, Formula |
|
when lifting. Place on a protected |
|
|
409. Rinse and dry immediately. |
|
surface. |
|
• |
Mild abrasive cleaners: Bon Ami® |
• |
Blisters / crazing / chips are com- |
|
|
and Soft Scrub®. |
|
mon due to the extreme tem- |
|
• |
Abrasive cleaners for stubborn |
|
peratures on grate fingers and |
|
|
rapid temperature changes. |
||
|
|
stains: soap-filled steel wool pad. |
|
|
|
|
• Acidic and sugar-laden spills dete- |
||
|
|
|
||
|
|
|
|
riorate the enamel. Remove soil |
|
|
|
|
immediately. |
|
|
|
• |
Abrasive cleaners, used too vig- |
|
|
|
|
orously or too often, can eventu- |
|
|
|
|
ally mar the enamel. |
|
|
|
|
|
Igniters / Ceramic |
• |
Carefully wipe with a cotton swab |
• |
Avoid excess water on the igniter. |
|
|
dampened with water, ammonia or |
|
A damp igniter will prevent burner |
|
|
Formula 409®. |
|
from lighting. |
|
• |
Gently scrape soil off with a tooth- |
• |
Remove any lint that may be re- |
|
|
pick. |
|
main after cleaning. |
|
|
|
|
|
PAGE 9

PROBLEM SOLVER
BEFORE CALLING FOR SERVICE
IF BURNERS DO NOT IGNITE PROPERLY, CHECK FOR THE FOLLOWING:
•Make sure that the gas shut-off valve is in the ON position and the gas supply to the house is not shut off.
•Make sure the burner caps are properly positioned and the burner ports are not clogged. Clear ports with a wire or straightened paper clip if clogged.
•Make sure the igniters are clean and dry.
•Make sure that there is no draft in the room.
•Check the power supply. It should be properly grounded with the correct polarity. Make sure the unit is plugged in and the circuit breaker is not tripped.
•When the electrical power connection has been activated at the first power up or reconnected after an outage, the igniters may spark once or twice even though all burner knobs are in the off position.
For Authorized Service or Parts
We want you to be a satisfied customer. If a situation arises that has not been resolved to your satisfaction, please let us know. Call 800-944-2904 or write us at:
BSH Home Appliances Corp.
Customer Support
5551 McFadden Ave.,
Huntington Beach, CA 92649
Please include the Model Number, Serial Number and Date of Original Purchase / Installation with all communication. (See Back Cover)
PAGE 10

WARRANTY
BOSCH COOKTOP WARRANTY NGT73 / NGT93 / NGP73 / NGP93
WHAT IS COVERED
Full One Year Warranty
For one year from the date of installation or date of occupancy for a new, previously unoccupied dwelling, any part which fails in normal home use will be repaired or replaced free of charge. Save your dated receipt or other evidence of the installation/occupancy date. Bosch will pay for all repair labor and replacement parts found to be defective due to materials and workmanship. Service must be provided by a Factory Authorized Service Agency during normal working hours. For a Service Agency nearest you, please phone 800/944-2904.
WHAT IS NOT COVERED
1.Service by an unauthorized agency. Damage or repairs due to service by an unauthorized agency or the use of unauthorized parts.
2.Service visits to:
•Teach you how to use the appliance.
•Correct the installation. You are responsible for providing electrical wiring and/or gas installation and other connecting facilities.
WARRANTY APPLICATION
This warranty applies to appliances used in residential application. It does not cover their use in commercial situations.
This warranty is for products purchased and retained in the 50 states of the U.S.A., the District of Columbia and Canada. The warranty applies even if you should move during the warranty period. Should the appliance be sold by the original purchaser during the warranty period, the new owner continues to be protected until the expiration date of the original purchaser's warranty period.
BOSCH DOES NOT ASSUME ANY RESPONSIBILITY FOR INCIDENTAL OR CONSEQUENTIAL DAMAGES. Some states do not allow the exclusion or limitation of incidental or consequential damages, so the above limitation or exclusion may not apply to you. This warranty gives you specific legal rights and you may also have other rights which may vary from state to state or province to province.
SERVICE DATA
For handy reference, the serial tag information has been affixed to the back cover. For location of the serial tag on the product, see Page 3. Keep your invoice for warranty validation. To obtain service, see Page 10.
• Reset circuit breakers or replace home fuses.
3.Damage caused from accident, alteration, misuse, abuse, improper installation or installation not in accordance with local electrical codes or plumbing codes, or improper storage of the appliance.
4.Repairs due to other than normal home use.
5.Any service visits and labor costs during the limited warranty.
6.Travel fees and associated charges incurred when the product is installed in a location with limited or restricted access, (i.e., airplane flights, ferry charges, isolated geographic regions).
PAGE 11

NOTES

NOTES
 Loading...