


 Loading...
Bosch BGL6PET1, BGB6PET2, BGL6FAM1, BGL6POW1, BGL6HYG2 Instructions for Use
...Register |
your |
||
new |
|
||
|
|
||
device |
|||
MyBosch |
|
on |
|
now |
|||
|
|||
getfree |
|
and |
|
benefits: |
|||
bosch |
|
|
|
-home |
|||
|
.com/ |
||
welcome |
|||
Bagged vacuum cleaner
BGB6 |
BGL6 |
|
|
|
|
|
|
[en] |
User manual |
Bagged vacuum cleaner |
8 |
[es] |
Instrucciones de uso |
aspirador de suelo con bolsa |
25 |
[pt] |
Instruções de utilização |
Aspirador de pavimentos com saco |
43 |
[el] |
Οδηγίες χρήσης |
Ηλεκτρική σκούπα δαπέδου με σακούλα |
62 |
|
|
σκόνης |
|
[bg] |
Ръководство за употреба |
прахосмукачка за под с торба за прах |
84 |
[ru] |
Инструкция по эксплуатации |
Бытовой пылесос с мешком для пыли |
103 |
[ro] |
Instrucţiuni de utilizare |
aspirator de pardoseli cu pungă de praf |
124 |
[uk] |
Інструкція з експлуатації |
Підлоговий пилосос з мішком для пилу |
143 |
[ar] |
لامعتسلاا ليلد |
ةبرتأ سيكب تايضرأ ةسنكم |
162 |
[fa] |
هدافتسا لمعلاروتسد |
راد هسیک یقربوراج |
180 |
A B C D
E F G
H I J
K L M N
1

5
4
3
2
1
6
7
8
9
10
11
12
13
2

3 |
4 |
5 |
6 |
7 |
8 |
9 |
10 |
11 |
12 |
13 |
14 |
15 |
16 |
17 |
18 |

19 |
20 |
21 |
22 |
23 |
24 |
25 |
26 |
27 |
28 |
29 |
30 |
31

en |
|
Table of contents |
|
Safety............................................... |
9 |
General information.......................... |
9 |
Intended use..................................... |
9 |
Restriction on user group............... |
10 |
Safety instructions .......................... |
10 |
Preventing material damage ........ |
13 |
Environmental protection and |
|
saving energy................................ |
13 |
Disposing of packaging ................. |
13 |
Unpacking and checking.............. |
13 |
Unpacking the appliance and |
|
parts ............................................... |
13 |
Contents of package...................... |
13 |
Familiarising yourself with |
|
your appliance............................... |
14 |
Appliance ....................................... |
14 |
Overview of the controls1 ............... |
14 |
Overview of status displays............ |
15 |
Accessories................................... |
15 |
Before using for the first time ...... |
15 |
Installing the appliance .................. |
15 |
Inserting the batteries..................... |
16 |
Basic operation ............................. |
16 |
Setting the telescopic tube............. |
16 |
Switching on the appliance ............ |
16 |
Switching off the appliance ............ |
16 |
Starting vacuuming......................... |
16 |
Stopping vacuuming ...................... |
17 |
Controlling the power ..................... |
17 |
Starting turbo mode ....................... |
17 |
Stopping turbo mode ..................... |
17 |
Setting the floor tool ....................... |
17 |
Parking the appliance .................... |
17 |
Stopping and carrying the appli- |
|
ance................................................ |
17 |
Vacuuming with accessory ............ |
17 |
Vacuuming with the Multi-Use- |
|
Brush1 ............................................. |
17 |
Starting emergency mode.............. |
18 |
Stopping emergency mode............ |
18 |
Removing the appliance ................ |
18 |
Cleaning and servicing................. |
18 |
Cleaning products .......................... |
18 |
Cleaning the appliance .................. |
19 |
Cleaning the Remote-Power- |
|
Control handle................................ |
19 |
Opening the lid............................... |
19 |
Closing the lid ................................ |
19 |
Cleaning the dust compartment..... |
19 |
Changing the dust bag .................. |
19 |
Cleaning the motor protection fil- |
|
ter ................................................... |
19 |
Removing the exhaust filter1 .......... |
20 |
Cleaning the exhaust filter1 ............ |
20 |
Inserting the exhaust filter1 ............. |
20 |
Changing the batteries................... |
20 |
Troubleshooting............................ |
22 |
Malfunctions ................................... |
22 |
Transportation, storage and |
|
disposal ......................................... |
23 |
Disposing of old appliance ............ |
23 |
Disposing of batteries .................... |
23 |
Customer Service.......................... |
23 |
Product number (E-Nr.) and pro- |
|
duction number (FD) ...................... |
24 |
Warranty conditions........................ |
24 |
1 Depending on the appliance specifications
8

Safety en


 Safety
Please read the safety information to ensure that you use the appliance safely.
General information
You can find general information about this instruction manual here.
¡Read this instruction manual carefully. Only this will ensure you use the appliance safely and efficiently.
¡This manual is intended for the user of the appliance.
¡Follow the safety instructions and warnings.
¡Keep the instruction manual and the product information safe for future reference or for the next owner.
¡Check the appliance after unpacking it. Do not connect the appliance if it has been damaged in transit.
Intended use
Please read the information on intended use to ensure that you use the appliance correctly and safely.
Only use this appliance:
¡As specified in this instruction manual.
¡With genuine parts and accessories. Damage caused by using third-party products is not covered under the warranty.
¡For cleaning surfaces.
¡In private households and in enclosed spaces in a domestic environment at room temperature.
¡Up to an altitude of max. 2000 m above sea level.
Do not use the appliance:
¡For vacuum-cleaning persons or animals.
¡For vacuuming up harmful, sharp-edged, hot or burning substances.
¡For vacuuming up damp substances or liquids.
¡For vacuuming up highly flammable or explosive materials and gases.
9

en Safety
¡For vacuuming up ash or soot from tiled stoves and central heating systems.
¡For vacuuming up toner dust from printers and photocopiers.
¡For vacuuming up building rubble.
Disconnect the appliance from the power supply when: ¡ cleaning the appliance.
Restriction on user group
Avoid risks to children and vulnerable persons.
This appliance may be used by children aged 8 or over and by people who have reduced physical, sensory or mental abilities or inadequate experience and/or knowledge, provided that they are supervised or have been instructed on how to use the appliance safely and have understood the resulting dangers.
Children must not play with the appliance.
Cleaning and user maintenance must not be performed by children unless they are being supervised.
Safety instructions
Follow these safety instructions when using the appliance.
WARNING ‒ Risk of electric shock!
¡Improper repairs are dangerous.
Repairs to the appliance should only be carried out by trained specialist staff.
Only use genuine spare parts when repairing the appliance.
If the power cord of this appliance is damaged, it must be replaced by the manufacturer, the manufacturer's Customer Service or a similarly qualified person in order to prevent any risk.
¡If the appliance or the power cord is damaged, this is dangerous.
Never operate a damaged appliance.
Never operate an appliance with a cracked or fractured surface.
10
Safety en
Never pull on the power cord to unplug the appliance. Always unplug the appliance at the mains.
Never pull or carry the appliance by the power cord.
If the appliance or the power cord is damaged, immediately unplug the power cord or switch off the fuse in the fuse box.
Call Customer Service. → Page 23
Repairs to the appliance should only be carried out by trained specialist staff.
¡An ingress of moisture can cause an electric shock.
Only use the appliance in enclosed spaces.
Never expose the appliance to intense heat or humidity.
Do not use steamor high-pressure cleaners to clean the appliance.
¡If the insulation of the power cord is damaged, this is dangerous.
Never let the power cord come into contact with hot appliance parts or heat sources.
Never let the power cord come into contact with sharp points or edges.
Never kink, crush or modify the power cord.
¡Improper installation is dangerous.
Connect and operate the appliance only in accordance with the specifications on the rating plate.
Connect the appliance to a power supply with alternating current only via a properly installed socket with earthing.
The protective conductor system of the domestic electrical installation must be properly installed.
WARNING ‒ Risk of burns!
¡The filter systems may become warm during operation and may catch fire when used in conjunction with flammable substances or substances that contain alcohol.
Do not apply flammable substances or substances containing alcohol to the dust bag or filter.
When cleaning the appliance, do not use flammable substances or substances that contain alcohol.
11

en Safety
¡With an operating time of over 30 minutes, the wound power cord may overheat.
Pull out the power cord completely.
WARNING ‒ Risk of injury!
¡Moving parts and openings on the appliance may cause injury.
Keep clothing, hair, fingers and other body parts away from the openings on the appliance and the moving parts.
Never point the pipe or the nozzles towards eyes, hair, ears or mouths.
¡An appliance that falls may endanger people.
When vacuuming stairs, ensure that there are no persons underneath the appliance.
¡An extended power cord may lead to a tripping.
When taking a break from vacuuming, switch off the appliance and pull out the mains plug.
Retract the power cord.
¡The automatic cable retraction may endanger the user.
When the cord is being rewound automatically, ensure that the mains plug is not thrown in the direction of persons, body parts, animals or objects.
¡Batteries may explode.
Do not charge the batteries.
Do not short-circuit the batteries.
Do not throw batteries into a fire.
WARNING ‒ Risk of suffocation!
Children may put packaging material over their heads or wrap themselves up in it and suffocate.
Keep packaging material away from children.
Do not let children play with packaging material.
12

Preventing material damage
To prevent material damage to your appliance, accessories or any other objects, follow these instructions.
ATTENTION!
¡Placing the appliance on the hose may damage the hose.
Never place the appliance on the hose.
¡Worn or sharp-edged outsides of nozzles may damage sensitive hard floors, such as parquet or linoleum.
Regularly check the outsides of the nozzles for wear.
Replace the worn nozzle.
¡Dirt in the motor may damage the motor.
Never operate the appliance without a dust bag.
Never operate the appliance without the motor protection filter.
Never operate the appliance without the exhaust filter.
¡Improper handling of batteries.
Do not short-circuit the terminals.
Use the specified type of batteries only.
Do not use different battery types together.
Do not use new and used batteries together.
¡Leaking batteries may damage the handle.
Remove the batteries if you are not using the handle.
Safely dispose of the empty or defective batteries in an environmentally friendly manner.
Preventing material damage en
Environmental protection and saving energy
Help protect the environment by using your appliance in a way that conserves resources and by disposing of reusable materials properly.
Disposing of packaging
The packaging materials are environmentally compatible and can be recycled.
Sort the individual components by type and dispose of them separately.
Information about current disposal methods are available from your specialist dealer or local authority.
Unpacking and checking
Find out here what you need to note when unpacking the appliance.
Unpacking the appliance and parts
1.Take the appliance out of the packaging.
2.Take all other parts and the accompanying documents out of the packaging and place them to hand.
3.Remove any packaging material.
4.Remove any stickers or film.
Contents of package
After unpacking all parts, check for any damage in transit and completeness of the delivery.
13

en Familiarising yourself with your appliance
Note: The appliance comes with additional accessories depending on its features.
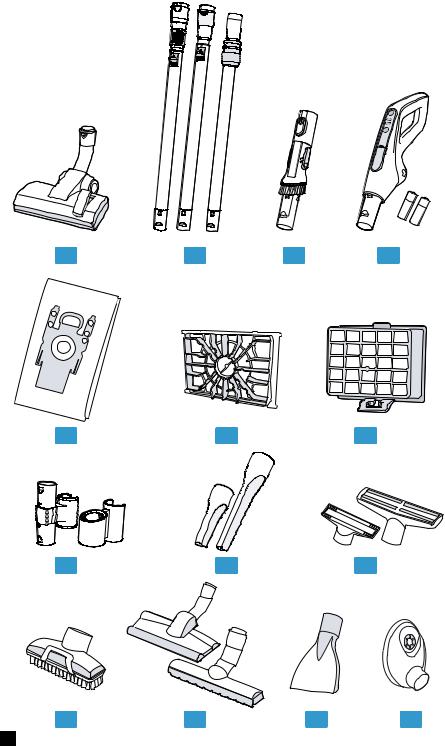
→ Fig. 
A |
Adjustable floor tool1 |
B |
Telescopic pipes1 |
C |
Multi-Use-Brush1 |
D |
Remote-Power-Control handle with |
E |
two AAA LR03 batteries |
Dust bags |
|
F |
Motor protection filter |
G |
HEPA hygiene filter1 |
H |
Accessory support1 |
I |
Crevice nozzles1 |
J |
Upholstery nozzles1 |
K |
Upholstery nozzle with clip-on brush |
ring1 |
1 |
Adjustable floor tool1 |
2 |
Telescopic tube with sliding switch 1 |
3 |
Hose |
4 |
Remote-Power-Control handle with |
5 |
two AAA LR03 batteries |
Infrared transmitter |
|
6 |
On/Off switch with infrared receiver |
7 |
Status display |
8 |
Parking aid |
9 |
Power cord |
10 |
Storage aid |
11 |
Bag change indicator |
12 |
Lid |
13 |
Handle |
1 Depending on the appliance specifications
L |
Hard floor nozzles1 |
M |
Mattress nozzle1 |
N |
Drilling nozzle1 |
1 Depending on the appliance specifications
Overview of the controls1
The controls are used to configure all functions of your appliance and to obtain information about the operating status.
Appliance controls
Familiarising yourself with your appliance
Familiarise yourself with the parts of your appliance.
Appliance
Note: Individual details and colours may differ, depending on the appliance model.
→ Fig. 
Symbol Use
¡ Switch on the appliance. ¡ Switch off the appliance.
Floor nozzle controls
Symbol Use
Vacuum rugs and carpets.
Vaccum parquet and hard floors.
1 Depending on the appliance specifications
14

Remote-Power-Control handle controls
Symbol Use
¡ Start vacuuming. ¡ Stop vacuuming.
Increase the power level.
Decrease the power level.
¡ Start turbo mode. ¡ Stop turbo mode.
Tip: Align the infrared transmitter on the Remote-Power-Control handle with the infrared receiver located on the On/Off switch.
Accessories en
Overview of status displays
The displays provide information about functions and statuses.
Symbol Use
Display status.
Change the dust bag.
Status displays
Operating status |
Status display |
Off |
Display is off. |
Standby |
Display pulses white. |
Vacuuming |
Display lights up |
|
white. |
Activate emergency |
Display rapidly flashes |
mode. |
white three times. |
Accessories
Only use original accessories. These have been made especially for your appliance. Here you can find an overview of your appliance's accessories and how to use them.
accessories |
Accessory number |
Use |
Replacement filter pack |
BBZ41FGALL |
Remove vacuumed material. |
Motor protection filter |
BBZ02MPF |
Protect the motor against con- |
|
|
tamination. |
HEPA hygiene filter |
BBZ154HF |
Clean the exhaust air. |
Hard floor nozzle with brush |
BBZ123HD |
Vacuum hard floors. |
ring |
|
|
Hard floor nozzle |
BBZ124HD |
Vacuum hard floors and car- |
|
|
pets. |
Before using for the first time
Prepare the appliance for use.
Installing the appliance
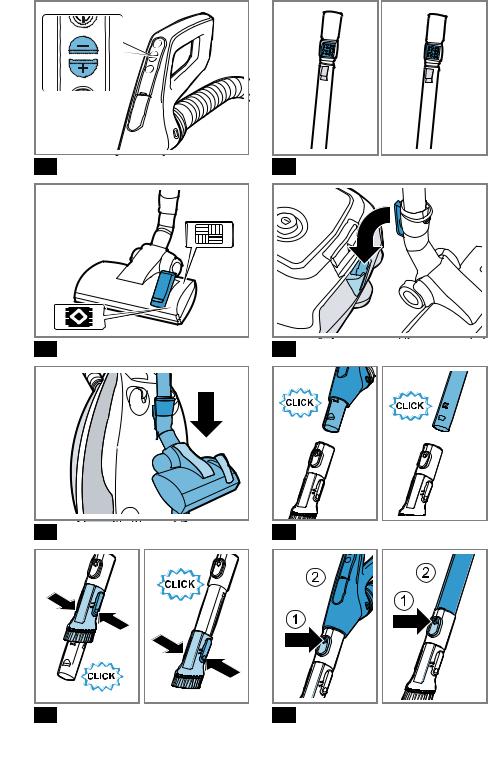
1.Push the handle onto the hose and lock it in place.
→ Fig. 
15

en Basic operation
2.Insert the hose adapter into the airintake opening in the lid and lock it in place.
→Fig. 
3.Connect the handle to the telescopic tube.
→Fig. 
4.Connect the telescopic tube to the floor nozzle.
→Fig. 
5.Place the accessory support 1 onto the telescopic tube.
→Fig. 
6.Place the crevice nozzle 1 from the bottom onto the accessory support
1.
→Fig. 
7.Place the brush ring 1 onto the upholstery nozzle 1.
→Fig. 
8.Place the upholstery nozzle1 with the brush ring 1 from above onto the accessory holder 1.
→Fig. 
Inserting the batteries
Insert the batteries into the Re- mote-Power-Control handle.
→ "Changing the batteries", Page 20
Basic operation
You can find out everything you need to know about operating your appliance here.
Setting the telescopic tube
1.Unlock the telescopic tube.
2.Set the required length of the telescopic tube.
→ Fig. 
Switching on the appliance
1.Hold the mains plug and pull it out to the required length.
2.Insert the mains plug into the socket.
3.Press  . → Fig.
a The status display pulses white. a The appliance is in standby mode.
Note: Risk of damage to the appliance caused by being in standby mode for too long. If you want to stop vacuuming for a longer period of time, switch off the appliance.
Switching off the appliance
1. Press  .
.
a The status display goes out and quickly flashes white three times
after a short time.
a The appliance switches off. Any functions currently in progress are cancelled.
2.Unplug the mains plug.
3.Briefly pull on the mains power supply cord and then let go.
a The power cord retracts automatically.
Starting vacuuming
Requirement: The appliance is in standby mode.
→ "Switching on the appliance", Page 16
Press  . → Fig.
a The status display lights up white. a The appliance starts at the highest
power level.
a The appliance starts in the most recently selected power level if vacuuming was stopped previously.
1 Depending on the appliance specifications
16

Stopping vacuuming
Press  .
.
a The appliance stops and the status
display pulses white.
a The setting for the power level is retained.
Controlling the power
1. Press  or
or  . → Fig.
a The power level is increased or decreased.
2.Turn the telescopic tube with air flow regulator to the required position.
→ Fig. 
a The power is controlled continuously.
Starting turbo mode
For particularly stubborn dirt, you can use turbo mode.
Press  .
.
a Turbo mode starts.
Stopping turbo mode
Press  .
.
a The appliance switches to the power level that was previously set.
Setting the floor tool
Use the switch to set the floor nozzle to the required base. → Fig. 
Parking the appliance
Tip: When taking shorter breaks from vacuuming, the floor nozzle can be placed in the parking aid.
Basic operation en
Slide the hook on the floor nozzle into the parking aid.
→ Fig. 
Stopping and carrying the appliance
1.Switch off the appliance.
→"Switching off the appliance", Page 16
2.Stand the appliance upright on its end.
3.Slide the hook on the floor tool into the parking aid.
→Fig. 
4.To overcome obstacles, carry the appliance by the handle.
Vacuuming with accessory
1.Place the required nozzle onto the telescopic tube or the handle.
2.After use, take the nozzle that is used from the telescopic tube or remove from the handle.
Vacuuming with the Multi-Use- Brush1
Note: Do not remove the Multi-Use- Brush after use. The suction power is not restricted by the fitted Multi-Use- Brush.
ATTENTION!
Vacuuming without the bristle ring pushed down can damage the surface.
Never vacuum with the bristle ring pushed up.
1.Push the Multi-Use-Brush onto the handle or the tube and lock it in place.
→ Fig. 
1 Depending on the appliance specifications
17

en Cleaning and servicing
2.Press the two locking catches on the bristle ring.
3.Push the bristle ring down and lock it in place.
→ Fig. 
a The Multi-Use-Brush is ready to use.
4.Vacuum using the Multi-Use-Brush.
→"Starting vacuuming", Page 16
→"Stopping vacuuming", Page 17
5.Press the two locking catches on the bristle ring.
6.Push the bristle ring upwards and lock it in place.
→Fig. 
7.Push the floor tool or the tube onto the Multi-Use-Brush.
8.Press the release button and remove the Multi-Use-Brush to remove.
→Fig. 
Starting emergency mode
If the Remote-Power-Control handle does not work, you can vacuum in emergency mode.
Requirement: The appliance is in standby mode.
→ "Switching on the appliance", Page 16
1. Press  .
.
a The status display goes out and quickly flashes white three times after a short time.
2.Press  while the status display is flashing.
a The appliance starts in turbo mode.
Stopping emergency mode
Note: After vacuuming, check the Re- mote-Power-Control handle.
→ "Troubleshooting", Page 22
Press  .
.
a The status display goes out and quickly flashes white three times after a short time.
Removing the appliance
1.Disconnect the connection between the floor nozzle and the telescopic tube.
→Fig. 
2.Disconnect the connection between the telescopic tube and the handle.
→Fig. 
3.Press the two locking catches together and pull the hose out of the appliance.
→Fig. 
Cleaning and servicing
To keep your appliance working efficiently for a long time, it is important to clean and maintain it carefully.
Cleaning products
Only use suitable cleaning products.
ATTENTION!
Using unsuitable cleaning products or incorrect cleaning may damage the appliance.
Do not use harsh or abrasive detergents.
Do not use cleaning products with a high alcohol content.
Do not use hard scouring pads or cleaning sponges.
Wash sponge cloths thoroughly before use.
18
Cleaning the appliance
Requirement: The appliance is switched off.
→ "Switching off the appliance", Page 16
1.Clean the appliance and the accessory with a soft cloth and a commercially available plastic cleaner.
2.Clean the infrared receiver located on the On/Off switch.
Cleaning the Remote-Power- Control handle
Tip: Clean the infrared transmitter on the Remote-Power-Control handle regularly. A dirty Remote-Power-Con- trol handle can lead to faults during operation.
Clean the Remote-Power-Control handle with a soft cloth and a commercially available plastic cleaner.
Opening the lid
Requirement: The appliance is switched off.
→ "Switching off the appliance", Page 16
1.Open the lid. → Fig. 
2.Fold up the lid completely.
Closing the lid
Tip: Check that the dust bag is not trapped between the lid and the appliance.
Requirements
¡The dust bag has been inserted.
¡The motor protection filter has been inserted.
¡The exhaust filter has been inserted.
Cleaning and servicing en
Close the lid and lock it in place.
Cleaning the dust compartment
Requirement: The dust bag has been removed.
→ "Changing the dust bag", Page 19
If required, vacuum the dust compartment using a second appliance or clean it with a dry duster or dusting brush.
a The dust compartment has been cleaned.
Changing the dust bag
If the inspection window of the filter change indicator lights up continuously when the nozzle is raised and at the highest power level, change the dust bag.
Requirement: The lid is open. → "Opening the lid", Page 19
1.To close the dust bag, pull the locking tab.
→Fig. 
2.Remove the full dust bag from the holder.
3.Dispose of the full dust bag.
4.Push the new dust bag into the holder until it clicks into place.
‒ Do not kink the dust bag.
→Fig. 
5.→ "Closing the lid", Page 19
Cleaning the motor protection filter
Tip: To achieve the best possible vacuuming results, tap out or wash the motor protection filter regularly. After vacuuming fine dust particles, clean or replace the motor protection filter in order to guarantee the appliance's suction.
19

en Cleaning and servicing
Requirement: The dust bag has been removed.
→ "Changing the dust bag", Page 19
1.In order to release the motor protection filter from the catch mechanism, pull on the side tabs.
→Fig. 
2.Remove the motor protection filter in the direction of the arrow.
3.Tap out the motor protection filter.
4.If the motor protection filter is very dirty, rinse it.
→Fig. 
5.Leave the filter to dry for at least 24 hours.
6.Refit the motor protection filter into the appliance and lock it in place at the top.
7.Insert the dust bag.
→"Changing the dust bag",
Page 19
8. → "Closing the lid", Page 19
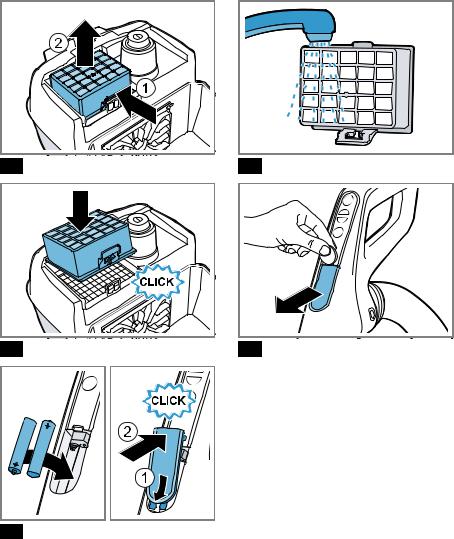
Removing the exhaust filter1
Requirement: The lid is open. → "Opening the lid", Page 19
1.Push the locking tab in the direction of the arrow and release the exhaust filter.
2.Remove the exhaust filter from the appliance.
→ Fig. 
Cleaning the exhaust filter1
For optimum performance, clean or replace the exhaust filter once a year.
Tip: After vacuuming fine dust particles, clean or replace the exhaust filter in order to guarantee the appliance's suction.
Note: The filtering effect of the exhaust filter is retained, even if the filter surface becomes discoloured.
Cleaning the HEPA hygiene filter
The HEPA hygiene filter consists of a filter unit.
Tip: To clean the filter unit thoroughly, you can clean the filter unit in the washing machine. To protect the rest of the laundry, place the filter unit in a laundry bag. Wash the filter unit at 30 °C using a gentle programme and the lowest spin speed.
Requirement: The exhaust filter has been removed.
→ "Removing the exhaust filter", Page 20
1.Tap out the filter unit.
2.Rinse the filter unit under running water.
→Fig. 
3.Leave the filter unit to dry for at least 24 hours.
4.Insert the filter unit into the appliance.
→"Inserting the exhaust filter", Page 20
Inserting the exhaust filter1
Requirement: The lid is open. → "Opening the lid", Page 19
1.Place the exhaust filter on the exhaust grille so that it clicks audibly into place.
→ Fig. 
2.→ "Closing the lid", Page 19
Changing the batteries
1.Remove the cover. → Fig. 
1 Depending on the appliance specifications
20
Cleaning and servicing en
Tip: Use an object such as a coin to open the cover.
2.Remove the empty batteries.
3.Insert the new batteries (AAA LR03).
→Fig. 
4.Close the cover.
→Fig. 
5.Dispose of the empty batteries in an environmentally friendly manner.
→"Disposing of batteries",
Page 23
21

en Troubleshooting
Troubleshooting
You can rectify minor faults on your appliance yourself. Read the troubleshooting information before contacting after-sales service. This will avoid unnecessary costs.
WARNING
Risk of electric shock!
Improper repairs are dangerous.
Repairs to the appliance should only be carried out by trained specialist staff.
Only use genuine spare parts when repairing the appliance.
If the power cord of this appliance is damaged, it must be replaced by the manufacturer, the manufacturer's Customer Service or a similarly qualified person in order to prevent any risk.
Malfunctions
Fault |
Cause |
troubleshooting |
|
The appliance is not work- |
The batteries are empty. |
Change the batteries in the Remote- |
|
ing. |
|
Power-Control handle. |
|
The Remote-Power-Control |
|
→ "Changing the batteries", |
|
|
Page 20 |
||
handle is not working. |
|
||
Wireless connection is |
The infrared transmitter on 1. Remove any foreign objects. |
||
the handle and/or the in- |
2. Clean the Remote-Power-Control |
||
faulty. |
|||
|
frared transmitter on the On/ |
handle and the appliance. |
|
|
Off switch are/is covered. |
→ "Cleaning the appliance", |
|
|
|
Page 19 |
|
|
|
→ "Cleaning the Remote-Power- |
|
|
|
Control handle", Page 19 |
|
|
The communication channel |
Establish a direct connection |
|
|
is faulty. |
between the infrared transmitter |
|
|
|
and the infrared receiver. |
|
Suction is reduced.
Filter change indicator is lit continuously.
The dust bag is full. |
Change the dust bag. |
|
Nozzle, telescopic tube or |
1. |
Dismantle the appliance. |
hose are blocked. |
2. |
Remove the blockage. |
|
|
|
Exhaust filter is dirty. |
Clean the exhaust filter. |
|
→ "Cleaning the exhaust filter", Page 20
22

Transportation, storage and disposal
Disposing of old appliance
Valuable raw materials can be reused by recycling.
1.Unplug the appliance from the mains.
2.Cut through the power cord.
3.Dispose of the appliance in an environmentally friendly manner.
This appliance is labelled in accordance with European Directive 2012/19/EU concerning used electrical and electronic appliances (waste electrical and electronic equipment - WEEE). The guideline determines the framework for the return and recycling of used appliances as applicable throughout the EU.
Disposing of batteries
Batteries should be recycled in an environmentally friendly manner. Do not dispose of the batteries in the household rubbish.
Dispose of batteries in an environmentally friendly manner.
Only for EU countries:
According to the European Guideline 2006/66/EC, defective or used battery packs/batteries, must be collected separately and disposed of in an environmentally correct manner.
Transportation, storage and disposal en
Customer Service
If you have any queries, are unable to rectify faults on the appliance yourself or if your appliance needs to be repaired, contact Customer Service. You can solve many problems yourself by consulting the information on eliminating faults in this instruction manual or on our website. If this is not the case, contact our Customer Service.
We always find an appropriate solution.
With any warranty claims we will make sure that your appliance is repaired by trained Customer Service technicians using original spare parts, including after the manufacturer's warranty has expired. Function-relevant genuine spare parts according to the corresponding Ecodesign Order can be obtained from Customer Service for a period of at least 7 years from the date on which your appliance was placed on the market within the European Economic Area.
Note: Under the terms of the manufacturer's warranty the use of Customer Service is free of charge.
Detailed information on the warranty period and terms of warranty in your country is available from our Customer Service, your retailer or on our website.
If you contact Customer Service, you will require the product number (E- Nr.) and the production number (FD) of your appliance.
The contact details for Customer Service can be found in the Customer Service directory at the end of the manual or on our website.
23
en Customer Service
Product number (E-Nr.) and production number (FD)
You can find the product number (E- Nr.) and the production number (FD) on the appliance's rating plate.
Make a note of your appliance's details and the Customer Service telephone number to find them again quickly.
Warranty conditions
You can make warranty claims for your appliance under the following conditions.
The guarantee conditions for this appliance are as defined by our representative in the country in which it is sold. Details regarding these conditions can be obtained from the dealer from whom the appliance was purchased. The bill of sale or receipt must be produced when making any claim under the terms of this guarantee.
24

Índice |
|
Seguridad ...................................... |
26 |
Advertencias de carácter gene- |
|
ral.................................................... |
26 |
Uso conforme a lo prescrito .......... |
26 |
Limitación del grupo de usua- |
|
rios.................................................. |
27 |
Indicaciones de seguridad............. |
27 |
Evitar daños materiales................ |
31 |
Protección del medio ambiente |
|
y ahorro ......................................... |
31 |
Eliminación del embalaje ............... |
31 |
Desembalar y comprobar ............. |
31 |
Desembalar el aparato y las pie- |
|
zas .................................................. |
31 |
Volumen de suministro .................. |
32 |
Familiarizándose con el apara- |
|
to .................................................... |
32 |
aparato ........................................... |
32 |
Vista general de los mandos1 ........ |
32 |
Vista general de los indicadores |
|
de estado ....................................... |
33 |
Accesorios .................................... |
33 |
Antes de usar el aparato por |
|
primera vez.................................... |
34 |
Montar el aparato........................... |
34 |
Insertar pilas................................... |
34 |
Manejo básico ............................... |
34 |
Ajustar el tubo telescópico............. |
34 |
Conectar el aparato ....................... |
34 |
Desconectar el aparato.................. |
34 |
Iniciar el aspirado........................... |
35 |
Detener el aspirado........................ |
35 |
Regular la potencia ........................ |
35 |
Iniciar el modo turbo ...................... |
35 |
Detener el modo turbo................... |
35 |
Ajustar la boquilla universal ........... |
35 |
1 Según el equipamiento del aparato
|
es |
Retirar el aparato ........................... |
35 |
Guardar y transportar el aparato ... |
35 |
Aspirar con accesorios .................. |
35 |
Aspirar con Multi-Use-Brush1 ......... |
36 |
Iniciar modo de emergencia .......... |
36 |
Detener modo de emergencia ....... |
36 |
Desmontar el aparato .................... |
36 |
Cuidados y limpieza...................... |
37 |
Productos de limpieza ................... |
37 |
Limpieza del aparato...................... |
37 |
Limpiar la empuñadura Remote- |
|
Power-Control................................. |
37 |
Abrir la tapa.................................... |
37 |
Cerrar la tapa ................................. |
37 |
Limpiar el colector de polvo .......... |
37 |
Cambiar la bolsa para polvo.......... |
38 |
Limpiar el filtro protector del mo- |
|
tor ................................................... |
38 |
Extraer el filtro de salida1 ............... |
38 |
Limpiar el filtro de salida1............... |
38 |
Insertar el filtro de salida1 .............. |
39 |
Cambiar las pilas ........................... |
39 |
Solucionar pequeñas averías....... |
40 |
Averías de funcionamiento............. |
40 |
Transporte, almacenamiento y |
|
eliminación de desechos.............. |
41 |
Eliminación del aparato usado ...... |
41 |
Desechar las pilas y baterías......... |
41 |
Servicio de Atención al Cliente.... |
41 |
Número de producto (E-Nr.) y |
|
número de fabricación (FD)........... |
42 |
Condiciones de garantía ................ |
42 |
25

es Seguridad


 Seguridad
Tener en cuenta la información sobre el tema de seguridad para poder utilizar el aparato de forma segura.
Advertencias de carácter general
Aquí puede encontrar informaciones generales sobre estas instrucciones de uso.
¡Leer atentamente estas instrucciones de uso. Solo así se puede utilizar el aparato de forma segura y eficiente.
¡Estas instrucciones están dirigidas al usuario del aparato.
¡Tener en cuenta las indicaciones de seguridad y advertencia.
¡Conservar las instrucciones y la información del producto para un uso posterior o para posibles compradores posteriores.
¡Después de desembalar el aparato, debe comprobarse su estado. En caso de haber daños debidos al transporte, no conectar el aparato.
Uso conforme a lo prescrito
Es preciso tener en cuenta las indicaciones sobre el uso conforme a lo prescrito para utilizar el aparato de forma correcta y segura.
Utilizar el aparato solo:
¡de acuerdo con estas instrucciones de uso.
¡con piezas y accesorios originales. Los daños provocados por el uso de otros productos no están cubiertos por la garantía.
¡para la limpieza de superficies.
¡en el uso doméstico privado y en espacios cerrados del entorno doméstico a temperatura ambiente.
¡hasta a una altura máxima de 2000 m sobre el nivel del mar.
No utilizar el aparato para:
¡aspirar personas o animales.
¡aspirar objetos afilados; succionar sustancias calientes, incandescentes o nocivas para la salud.
¡aspirar sustancias húmedas o líquidas.
¡aspirar materiales y gases inflamables o explosivos.
26

Seguridad es
¡aspirar cenizas, hollín de hornos de baldosa e instalaciones de calefacción central.
¡aspirar polvo de tóner de impresoras y fotocopiadoras.
¡para aspirar escombros o cascotes.
Desconectar el aparato de la fuente de alimentación cuando: ¡ se esté limpiando el aparato.
Limitación del grupo de usuarios
Evitar riesgos y peligros para niños y personas discapacitadas. Estos aparatos solo podrán ser usados por niños a partir de 8 años o personas cuyas facultades físicas, sensoriales o mentales estén mermadas o cuya falta de conocimientos o de experiencia les impida hacer un uso seguro de los mismos siempre que cuenten con la supervisión de una persona responsable de su seguridad o hayan sido instruidos previamente en su uso y hayan comprendido los peligros que pueden derivarse del mismo.
No dejar que los niños jueguen con el aparato.
La limpieza y el cuidado del aparato a cargo del usuario no podrán ser efectuados por niños si no cuentan con la supervisión de una persona adulta responsable de su seguridad.
Indicaciones de seguridad
Tener en cuenta estas indicaciones de seguridad al utilizar el aparato.
ADVERTENCIA ‒ ¡Peligro de descarga eléctrica!
¡Las reparaciones inadecuadas son peligrosas.
Solo el personal especializado puede realizar reparaciones e intervenciones en el aparato.
Utilizar únicamente piezas de repuesto originales para la reparación del aparato.
Si el cable de conexión de red de este aparato resulta dañado, debe sustituirlo el fabricante, el Servicio de Asistencia Técnica o una persona cualificada a fin de evitar posibles situaciones de peligro.
27
es Seguridad
¡Un aparato dañado o un cable de conexión defectuoso son peligrosos.
No poner nunca en funcionamiento un aparato dañado.
No hacer funcionar nunca un aparato con una superficie agrietada o rota.
No tirar nunca del cable de conexión a la red eléctrica para desenchufar el aparato. Desenchufar siempre el cable de conexión de red de la toma de corriente.
No tirar nunca del cable de conexión a la red eléctrica ni transportar el aparato tirando de él.
Si el aparato o el cable de conexión de red están dañados, desenchufar inmediatamente el cable de conexión de red o desconectar el fusible de la caja de fusibles.
Llamar al Servicio de Asistencia Técnica. → Página 41
Solo el personal especializado puede realizar reparaciones e intervenciones en el aparato.
¡La infiltración de humedad puede provocar una descarga eléctrica.
Utilizar el aparato solo en espacios interiores.
No exponer el aparato a altas temperaturas y humedad.
No utilizar limpiadores por chorro de vapor ni de alta presión para limpiar el aparato.
¡Un aislamiento incorrecto del cable de conexión de red es peligroso.
Evitar siempre que el cable de conexión de red entre en contacto con piezas calientes del aparato o fuentes de calor.
Evitar siempre que el cable de conexión de red entre en contacto con esquinas o bordes afilados.
No doblar, aplastar ni modificar nunca el cable de conexión de red.
¡Las instalaciones incorrectas son peligrosas.
Conectar y poner en funcionamiento el aparato solo de conformidad con los datos que figuran en la placa de características del mismo.
28

Seguridad es
Conectar el aparato solo a una fuente de alimentación con corriente alterna mediante un enchufe reglamentario con puesta a tierra.
La conexión de puesta a tierra de la instalación eléctrica doméstica debe estar instalada de acuerdo con las normas vigentes.
ADVERTENCIA ‒ ¡Peligro de quemaduras!
¡Los sistemas de filtro pueden calentarse durante el funcionamiento e incendiarse con el uso de productos inflamables o con contenido alcohólico.
No aplicar productos inflamables o que contengan alcohol en la bolsa para el polvo ni en los filtros.
No utilizar productos inflamables o con contenido alcohólico para la limpieza del aparato.
¡Si se aspira durante más de 30 minutos, el fragmento de cable de conexión a la red que se mantiene enrollado se puede sobrecalentar.
Desenrollar completamente el cable de conexión a la red.
ADVERTENCIA ‒ ¡Peligro de lesiones!
¡Las piezas móviles y las aberturas del aparato pueden causar lesiones.
Mantener la ropa, el pelo, los dedos y otras partes del cuerpo lejos de las aberturas del aparato y las piezas móviles.
No dirigir bajo ningún concepto el tubo o las boquillas hacia los ojos, el pelo, las orejas o la boca.
¡La caída del aparato puede ocasionar graves daños personales.
Al aspirar escaleras, es preciso asegurarse de que no haya nadie en una posición inferior con respecto a la del aparato.
¡Un cable suelto de conexión a la red puede provocar tropiezos.
Al interrumpir el aspirado, desconectar el aparato y retirar el enchufe.
Enrollar el cable de conexión a la red.
29

es Seguridad
¡El usuario puede sufrir daños cuando el cable se enrolla de forma automática.
Durante la recogida automática del cable, es preciso asegurarse de que el enchufe no pueda golpear personas, partes del cuerpo, animales u otros objetos.
¡Las pilas pueden explotar.
No cargar las pilas.
No cortocircuitar las pilas.
No arrojar las pilas al fuego.
ADVERTENCIA ‒ ¡Peligro de asfixia!
Los niños pueden ponerse el material de embalaje por encima de la cabeza, o bien enrollarse en él, y asfixiarse.
Mantener el material de embalaje fuera del alcance de los niños.
No permita que los niños jueguen con el embalaje.
30
Loading...