


Bosch BFL634GB1, BFL634GW1, BFL834GC1, BFR634GS1, BFR634GB1 Instructions for Use
...
3FHJTUFS ZPVS . OFXEFWJDFPO Z#PTDIOPXBOE HFUGSFFCFOFGJUT CPTDI IPNF DPN XFMDPNF
Microwave
BFL634G.1 BFR634G.1 BFL834G.1 BFR834G.1
[en] |
Instruction manual |
Microwave |
3 |
[el] |
Οδηγíες χρήσεως |
Φούρνος μικροκυμάτων |
23 |
[es] |
Instrucciones de uso |
Microondas |
43 |
[pt] |
Instruções de serviço |
Microondas |
63 |

Table of contents
8Intended use . . . . . . . . . . . . . . . . . . . . . . . . . . . . . 4
(Important safety information . . . . . . . . . . . . . . . 4
General information . . . . . . . . . . . . . . . . . . . . . . . . . . . 4 Microwave . . . . . . . . . . . . . . . . . . . . . . . . . . . . . . . . . . 5
]Causes of damage . . . . . . . . . . . . . . . . . . . . . . . . 7
7Environmental protection . . . . . . . . . . . . . . . . . . 7
Environmentally-friendly disposal . . . . . . . . . . . . . . . . . 7
*Getting to know your appliance . . . . . . . . . . . . . 8
Control panel . . . . . . . . . . . . . . . . . . . . . . . . . . . . . . . . 8 Controls . . . . . . . . . . . . . . . . . . . . . . . . . . . . . . . . . . . . 8 Display . . . . . . . . . . . . . . . . . . . . . . . . . . . . . . . . . . . . . 8 Further information . . . . . . . . . . . . . . . . . . . . . . . . . . . . 9 Cooking compartment functions . . . . . . . . . . . . . . . . . 9
KBefore using for the first time. . . . . . . . . . . . . . . 9
Initial use . . . . . . . . . . . . . . . . . . . . . . . . . . . . . . . . . . . 9
1Operating the appliance . . . . . . . . . . . . . . . . . . 10
Switching the appliance on and off . . . . . . . . . . . . . . 10 Operation . . . . . . . . . . . . . . . . . . . . . . . . . . . . . . . . . . 10 Selecting an operating mode . . . . . . . . . . . . . . . . . . . 10
^Microwave. . . . . . . . . . . . . . . . . . . . . . . . . . . . . . 11
Cookware. . . . . . . . . . . . . . . . . . . . . . . . . . . . . . . . . . 11 Microwave power settings . . . . . . . . . . . . . . . . . . . . . 11 Setting the microwave . . . . . . . . . . . . . . . . . . . . . . . . 11
OTimer . . . . . . . . . . . . . . . . . . . . . . . . . . . . . . . . . . 12
PProgrammes . . . . . . . . . . . . . . . . . . . . . . . . . . . . 13
Setting a programme . . . . . . . . . . . . . . . . . . . . . . . . . 13 Information on the programmes. . . . . . . . . . . . . . . . . 13 Resting time . . . . . . . . . . . . . . . . . . . . . . . . . . . . . . . . 14 Programme table . . . . . . . . . . . . . . . . . . . . . . . . . . . . 14
QBasic settings. . . . . . . . . . . . . . . . . . . . . . . . . . . 15
Changing the basic settings. . . . . . . . . . . . . . . . . . . . 15 List of basic settings . . . . . . . . . . . . . . . . . . . . . . . . . 15 Power cut . . . . . . . . . . . . . . . . . . . . . . . . . . . . . . . . . . 15 Changing the time . . . . . . . . . . . . . . . . . . . . . . . . . . . 15
DCleaning . . . . . . . . . . . . . . . . . . . . . . . . . . . . . . . 16
Cleaning agent. . . . . . . . . . . . . . . . . . . . . . . . . . . . . . 16
3Trouble shooting . . . . . . . . . . . . . . . . . . . . . . . . 17
4Customer service . . . . . . . . . . . . . . . . . . . . . . . . 18
E number and FD number . . . . . . . . . . . . . . . . . . . . . 18
en
JTested for you in our cooking studio. . . . . . . . 18
Defrosting . . . . . . . . . . . . . . . . . . . . . . . . . . . . . . . . . .18 Defrosting, heating up or cooking frozen food . . . . . .19 Heating . . . . . . . . . . . . . . . . . . . . . . . . . . . . . . . . . . . .20 Cooking . . . . . . . . . . . . . . . . . . . . . . . . . . . . . . . . . . .21 Microwave tips . . . . . . . . . . . . . . . . . . . . . . . . . . . . . .21
ETest dishes . . . . . . . . . . . . . . . . . . . . . . . . . . . . . 22
Cooking only using the microwave. . . . . . . . . . . . . . .22 Defrosting only using the microwave . . . . . . . . . . . . .22
Additional information on products, accessories, replacement parts and services can be found at www.bosch-home.com and in the online shop
www.bosch-eshop.com
3

en Intended use
8Intended use
Read these instructions carefully. Only then will you be able to operate your appliance safely and correctly. Retain the instruction manual and installation instructions for future use or for subsequent owners.
This appliance is only intended to be fully fitted in a kitchen. Observe the special installation instructions.
Check the appliance for damage after unpacking it. Do not connect the appliance if it has been damaged in transport.
Only a licensed professional may connect appliances without plugs. Damage caused by incorrect connection is not covered under warranty.
This appliance is intended for domestic use only. The appliance must only be used for the preparation of food and drink. The appliance must be supervised during operation. Only use this appliance indoors.
This appliance is intended for use up to a maximum height of 4000 metres above sea level.
This appliance may be used by children over the age of 8 years old and by persons with reduced physical, sensory or mental capabilities or by persons with a lack of experience or knowledge if they are supervised or are instructed by a person responsible for their safety how to use the appliance safely and have understood the associated hazards.
Children must not play with, on, or around the appliance. Children must not clean the appliance or carry out general maintenance unless they are at least 15 years old and are being supervised.
Keep children below the age of 8 years old at a safe distance from the appliance and power cable.
Always slide accessories into the cooking compartment the right way round.
(Important safety information
General information
:Warning – Risk of fire!
Combustible items stored in the cooking compartment may catch fire. Never store combustible items in the cooking compartment. Never open the appliance door if there is smoke inside. Switch off the appliance and unplug it from the mains or switch off the circuit breaker in the fuse box.
:Warning – Risk of serious burns!
■Accessories and ovenware become very hot. Always use oven gloves to remove accessories or ovenware from the cooking compartment.
■Alcoholic vapours may catch fire in the hot cooking compartment. Never prepare food containing large quantities of drinks with a high alcohol content. Only use small quantities of drinks with a high alcohol content. Open the appliance door with care.
:Warning – Risk of scalding!
■The accessible parts become hot during operation. Never touch the hot parts. Keep children at a safe distance.
■When you open the appliance door, hot steam may escape. Open the appliance door with care. Keep children at a safe distance.
■Water in a hot cooking compartment may create hot steam. Never pour water into the cooking compartment when the cooking compartment is hot.
:Warning – Risk of injury!
■Scratched glass in the appliance door may develop into a crack. Do not use a glass scraper, sharp or abrasive cleaning aids or detergents.
■The hinges on the appliance door move when opening and closing the door, and you may be trapped. Keep your hands away from the hinges.
4
:Warning – Risk of electric shock!
■Incorrect repairs are dangerous. Repairs may only be carried out and damaged power cables replaced by one of our trained after-sales technicians. If the appliance is defective, unplug the appliance from the mains or switch off the circuit breaker in the fuse box. Contact the aftersales service.
■The cable insulation on electrical appliances may melt when touching hot parts of the appliance. Never bring electrical appliance cables into contact with hot parts of the appliance.
■Do not use any high-pressure cleaners or steam cleaners, which can result in an electric shock.
■A defective appliance may cause electric shock. Never switch on a defective appliance. Unplug the appliance from the mains or switch off the circuit breaker in the fuse box. Contact the after-sales service.
:Warning – Hazard due to magnetism!
Permanent magnets are used in the control panel or in the control elements. They may affect electronic implants, e.g. heart pacemakers or insulin pumps. Wearers of electronic implants must stay at least 10 cm away from the control panel.
Microwave
:Warning – Risk of fire!
■Using the appliance for anything other than its intended purpose is dangerous and may cause damage.
The following is not permitted: drying out food or clothing, heating slippers, grain or cereal pillows, sponges, damp cleaning cloths or similar.
For example, heated slippers and grain or cereal pillows may catch fire, even several hours after they have been heated.The appliance must only be used for the preparation of food and drinks.
Important safety information |
en |
■Food may catch fire. Never heat food in heat-retaining packages.
Do not leave food heating unattended in containers made of plastic, paper or other combustible materials.
Do not select a microwave power or time setting that is higher than necessary. Follow the information provided in this instruction manual.
Never use the microwave to dry food. Never defrost or heat food with a low water content, e.g. bread, at too high a microwave power or for too long.
■Cooking oil may catch fire. Never use the microwave to heat cooking oil on its own.
:Warning – Risk of explosion!
Liquids and other food may explode when in containers that have been tightly sealed. Never heat liquids or other food in containers that have been tightly sealed.
:Warning – Risk of burns!
■Foods with peel or skin may burst or explode during, or even after, heating. Never cook eggs in their shells or reheat hard-boiled eggs. Never cook shellfish or crustaceans. Always prick the yolk when baking or poaching eggs. The skin of foods that have a peel or skin, such as apples, tomatoes, potatoes and sausages, may burst. Before heating, prick the peel or skin.
■Heat is not distributed evenly through baby food. Never heat baby food in closed containers. Always remove the lid or teat. Stir or shake well after the food has been heated. Check the temperature of the food before it is given to the child.
■Heated food gives off heat. The ovenware may become hot. Always use oven gloves to remove ovenware or accessories from the cooking compartment.
■Airtight packaging may burst when food is heated. Always observe the instructions on the packaging. Always use oven gloves to remove dishes from the cooking compartment.
■The accessible parts become very hot when in operation. Never touch hot parts. Keep children at a safe distance.
5

en Important safety information
■Using the appliance for anything other than its intended purpose is dangerous.
You are not permitted to use it to dry food or clothing or to warm slippers, grain or cereal pillows, sponges, damp cleaning cloths or the like.
This is because, for instance, overheated slippers, grain or cereal pillows, sponges and damp cleaning cloths, etc., may cause burns to the skin.
:Warning – Risk of scalding!
■There is a possibility of delayed boiling when a liquid is heated. This means that the liquid reaches boiling temperature without the usual steam bubbles rising to the surface. Even if the container only vibrates a little, the hot liquid may suddenly boil over and spatter. When heating, always place a spoon in the container. This will prevent delayed boiling.
:Warning – Risk of injury!
■Unsuitable ovenware may crack. Porcelain or ceramic ovenware can have small perforations in the handles or lids. These perforations conceal a cavity below. Any moisture that penetrates this cavity could cause the ovenware to crack. Only use microwave-safe ovenware.
■If using the appliance in microwave mode only, placing cookware and containers made of metal or featuring metal detailing inside the appliance may cause sparks when the appliance is operating. This may damage the appliance. Never use metal containers when using the appliance in microwave mode only.
:Warning – Risk of electric shock!
The appliance is a high-voltage appliance. Never remove the casing.
:Warning – Risk of serious damage to health!
■The surface of the appliance may become damaged if it is not cleaned properly. Microwave energy may escape. Clean the appliance on a regular basis, and remove any food residue immediately. Always keep the cooking compartment, door seal, door and door stop clean. ~ "Cleaning"
on page 16
■Microwave energy may escape if the cooking compartment door or the door seal is damaged. Never use the appliance if the cooking compartment door or the door seal is damaged. Contact the after-sales service.
■Microwave energy will escape from appliances that do not have any casing. Never remove the casing. For any maintenance or repair work, contact the after-sales service.
6
]Causes of damage
Caution!
■Creation of sparks: Metal – e.g. a spoon in a glass – must be kept at least 2 cm from the cooking compartment walls and the inside of the door. Sparks can irreparably damage the glass on the inside of the door.
■Foil containers: Do not use foil containers in the appliance. They damage the appliance by producing sparks.
■Operating the microwave without food: Operating the appliance without food in the cooking compartment may lead to overloading. Never switch on the microwave unless there is food inside. The short crockery test is the exception to this rule.
~ "Microwave" on page 11
■Moisture in the cooking compartment: Over an extended period of time, moisture in the cooking compartment may lead to corrosion. Allow the cooking compartment to dry after use. Do not keep moist food in the closed cooking compartment for extended periods of time. Do not store food in the cooking compartment.
■Extremely dirty seal: If the seal is very dirty, the appliance door will no longer close properly during operation. The fronts of adjacent units could be damaged. Always keep the seal clean. Never operate the appliance if the seal is damaged or missing. ~ "Cleaning" on page 16
■Microwave popcorn: Never set the microwave output too high. Use a maximum microwave output of 600 watts. Always place the popcorn bag on a glass plate. The door panels may crack if overloaded.
Causes of damage |
en |
7Environmental protection
Environmentally-friendly disposal
Dispose of packaging in an environmentally-friendly manner.
This appliance is labelled in accordance with European Directive 2012/19/EU concerning used electrical and electronic appliances (waste electrical and electronic equipment - WEEE). The guideline determines the framework for the return and recycling of used appliances as applicable throughout the EU.
7

en Getting to know your appliance
*Getting to know your appliance
In this section, we will explain the indicators and controls. You will also find out about the various functions of your appliance.
Note: Depending on the appliance model, individual details and colours may differ.
Control panel
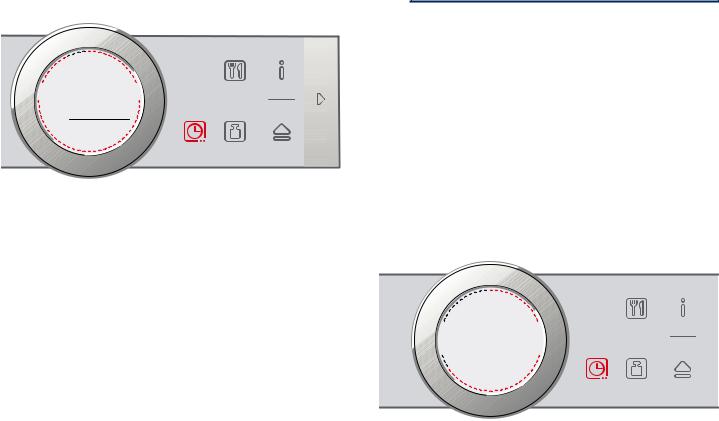
In the control panel, you can use the various buttons, touch fields and the rotary selector to set the required function of the appliance. The current settings are shown in the display.
The overview shows the control panel when the appliance is switched on with a selected operating mode.
|
|
|
|
|
Î:
[
P V
#
( Buttons
The buttons on the leftand right-hand side of the control panel have a pressure point. Press these buttons to activate them.
For appliances that do not have a stainless steel front, these two button touch fields do not have a pressure point.
0Touch fields
There are sensors under the touch fields. Simply touch the respective symbol to select the function.
8Rotary selector
The rotary selector is fitted so that you can turn it indefinitely to the left or right. Press it lightly and move it in the direction required using your finger.
@Display
You can see the current adjustment values, options or notes in the display.
Controls
180 |
Microwave output |
Selects 180 watts |
360 |
Microwave output |
Selects 360 watts |
600 |
Microwave output |
Selects 600 watts |
900 |
Microwave output |
Selects 900 watts |
s |
Time-setting options |
Select time-setting options |
|
|
|
% |
Programmes |
Selects a programme |
|
|
|
a |
Weight |
Selects the weight in the pro- |
|
|
gramme |
° |
Information |
Display notes |
|
|
Hold down (approx. 3 secs) to call |
|
|
up the basic settings |
v |
Automatic door opening |
Opens the appliance door |
|
|
|
The touch field, which has a value on the display that can be changed or displayed in the foreground, lights up red.
The individual controls are adapted for the various functions of your appliance. You can set your appliance simply and directly.
Buttons and touch fields
Here you can find a short explanation of the various buttons and touch fields.
Symbol |
|
Meaning |
Buttons |
|
|
|
|
|
ÿ |
on/off |
Switching the appliance on and |
|
|
off |
l |
start/stop |
Starting or stopping an operation |
|
|
|
Touch fields |
|
|
|
|
|
90 |
Microwave output |
Selects 90 watts |
|
|
|
Rotary selector
You use the rotary selector to change the adjustment values shown in the display.
In most selection lists, e.g. programmes, the first selection follows the last.
In some selection lists, e.g. duration, you have to turn the rotary selector back the other way when you reach the minimum or maximum value.
Display
The display is structured so that the information can be read at a glance in any situation.
The value that you can currently set is in focus. It is displayed in white lettering and underlined. The value in the background is displayed in grey.
8

Focus |
The value in focus can be changed directly with- |
||
|
out first being selected. |
||
|
After starting an operation, the cooking time is |
||
|
always in focus. |
||
Emphasis |
As you change the value in focus using the rotary |
||
|
selector, only this value is displayed larger. |
||
|
|
|
|
J |
P V |
D:HLJKW |
Î : |
Display ring
The display ring can be found around the outside of the display.
If you change a value, the display ring shows you where you are in the selection list. Depending on the settings area and length of the selection list, the display ring may be continuous or divided into segments.
As the cooking time counts down, one red segment disappears each second. After each full minute, all segments light up red again.
Further information
In most cases, the appliance provides notes and further information on the action just carried out.
Touch the ° field. The note is shown in the display for a
few seconds. Use the rotary selector to scroll to the end of longer notes.
Some notes are displayed automatically, for example as confirmation, or to provide an instruction or warning.
Cooking compartment functions
The functions in the cooking compartment make your appliance easier to use. This, for example, enables the cooking compartment to be well lit and a cooling fan to prevent the appliance from overheating.
Automatic door opening
The appliance door springs open if you activate the automatic door opening. You can fully open the appliance door manually.
The automatic door opening does not work in the event of a power cut. You can open the door manually.
Notes
■If you open the appliance door during operation, the operation is paused.
■When you close the appliance door, the operation does not continue automatically. You must restart the operation manually.
■If the appliance has been switched off for a long time, the appliance door will open after a time delay.
Before using for the first time |
en |
Interior lighting
When you open the appliance door, the interior lighting switches on. If the door remains open for longer than around five minutes, the cooking compartment lighting switches off again. When the automatic door opening is activated, the cooking compartment lighting switches on again.
For all operating modes, the cooking compartment lighting switches on as soon as the operation is started. When the operation has finished, the lighting switches off.
Cooling fan
The cooling fan switches on as required. The hot air escapes above the door.
The cooling fan may continue to run for a certain time after the operation.
Caution!
Do not cover the ventilation slots. Otherwise, the appliance may overheat.
Notes
■The appliance remains cool during microwave operation. Despite this, the cooling fan will still switch on. The fan may run on even when the microwave operation has ended.
■Condensation may form on the door window, interior walls and floor. This is normal and does not adversely affect microwave operation. Wipe away the condensation after cooking.
KBefore using for the first time
Before you can use your new appliance, you must make some settings.
Initial use
After connecting the appliance to the power or following a power cut, the settings for initial use are shown on the display. It may take a few seconds for the instruction to appear.
Note: You can change these settings at any time in the basic settings. ~ "Basic settings" on page 15
Selecting the language
1.Turn the rotary selector to set the required language.
2.Press the s field to confirm. The next setting appears.
Setting the time
1.Set the time using the rotary selector.
2.Press the s field to confirm.
A note appears in the display confirming that the initial use has been completed.
9

en Operating the appliance
1Operating the appliance
You have already learnt about the controls and how they work. Now we will explain how to set your appliance. You will learn about what happens when you switch the appliance on and off, and how to select the operating mode.
Switching the appliance on and off
Before you are able to set the appliance, you must switch it on.
Note: The timer can also be set when the appliance is switched off. Some displays and notes remain visible in the display after the appliance has been switched off.
Switch off your device when it is not being used. If no settings are applied for a long time, the appliance switches itself off automatically.
Switching on the appliance
Press the on/off button ÿ to switch on the appliance.
All touch fields light up red. The Bosch logo appears in the display, followed by the maximum microwave output.
The appliance is ready to use. The s field lights up red.
You can find out how to set the operating modes in the individual chapters.
Switching off the appliance
Press the on/off button ÿ to switch off the appliance. Any functions that may be running are cancelled. The time appears on the display.
Note: You can set whether or not the time should be displayed when the appliance is switched off in the basic settings.
Operation
Some operating steps are the same for all operating modes. In the following, you can learn about the basic operating steps.
Starting the operation
You must press the start/stop button l to start each operation.
After the operation starts, your settings are shown in the display. The display ring is also displayed, which shows the cooking time counting down.
Note: If the operation is paused due to the appliance door being opened, the operation must be restarted
using the start/stop button l after the door has been closed.
Pausing the operation
You can pause and restart the operation by pressing the start/stop button l.
Press the on/off button to delete all settings.
Notes
■Opening the appliance door also pauses the operation.
■The fan may continue to run after an operation is paused or cancelled.
Selecting an operating mode
After the appliance is switched on, the default operating mode is displayed. You can start this setting immediately.
If you want to select a different operating mode, you can find detailed descriptions of these modes in the appropriate chapters.
The following always applies:
1.Touch the appropriate field.
2.Turn the rotary selector to change the selection in focus.
3.If necessary, change other settings.
To do this, touch the appropriate field and change the value using the rotary selector.
4.Press the start/stop button l to start.
The appliance starts the operation.
10
^Microwave
You can use the microwave to cook, heat up or defrost food quickly.
To ensure optimum use of the microwave, please observe the notes on cookware and familiarise yourself with the data in the application tables at the end of the instruction manual. ~ "Tested for you in our cooking studio" on page 18
Cookware
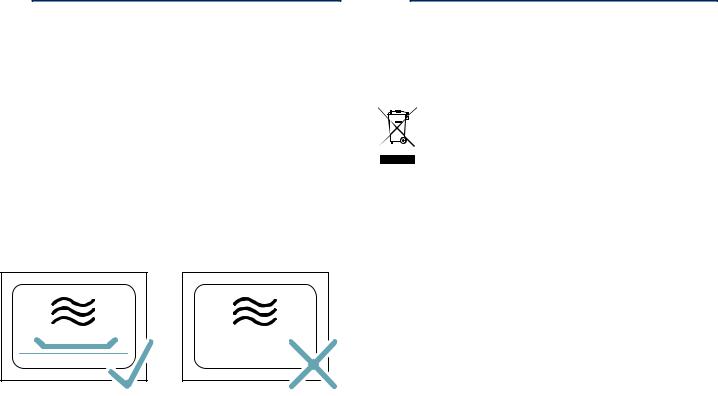
Not all cookware is microwavable. So that your food is heated and the appliance is not damaged, only use microwavable cookware.
Suitable cookware
Heat-resistant cookware made of glass, glass ceramic, porcelain, ceramic or heat-resistant plastic are suitable. These materials allow microwaves to pass through.
You can also use serving dishes. This saves you having to transfer food from one dish to another. You should only use cookware with decorative gold or silver trim if the manufacturer guarantees that they are suitable for use in microwaves.
Unsuitable cookware
Metal cookware is unsuitable. Metal does not allow microwaves to pass through. Food in covered metal containers will remain cold.
Caution!
Creation of sparks: Metal – e.g. a spoon in a glass – must be kept at least 2 cm from the cooking compartment walls and the inside of the door. Sparks can irreparably damage the glass on the inside of the door.
Cookware test
Never switch on the microwave unless there is food inside. The short cookware test is the only exception to this rule.
Perform the following test if you are unsure whether your cookware is suitable for use in the microwave.
1.Heat the empty cookware at maximum power for ½ to 1 minute.
2.Check the temperature of the cookware during this time.
The cookware should remain cold or warm to the touch.
The cookware is unsuitable if it becomes hot or sparks are generated.
In this case, stop the test.
:Warning – Risk of burns!
The accessible parts become very hot when in operation. Never touch hot parts. Keep children at a safe distance.
Microwave en
Microwave power settings
The following microwave power settings are available.
The microwave power settings do not always correspond to the exact wattage that the appliance uses.
Levels |
Food |
Maximum cook- |
|
|
ing time |
90 W |
For defrosting delicate foods |
1 hr 30 mins |
180 W |
For defrosting and continued cooking |
1 hr 30 mins |
360 W |
For cooking meat and for heating del- |
1 hr 30 mins |
|
icate foods |
|
600 W |
For heating and cooking food |
1 hr 30 mins |
900 W |
For heating liquids |
30 mins |
|
|
|
Default settings:
The appliance suggests a cooking time for each microwave power setting. You can accept this value or change it in the relevant area.
The maximum setting is designed for heating liquids only; it is not designed for heating food. After a certain period, the microwave's maximum power is gradually reduced to 600 W to protect the appliance. Full power is made available again after a cooling period.
Setting the microwave
Example: Microwave output 600 W, cooking time 5 minutes.
1.Press the on/off button ÿ to switch on the
appliance.
The appliance is ready to use. The maximum microwave output is displayed as the default value in the display. You can change this at any time.
2.Touch the field of the required microwave output.
|
|
|
|
|
Î |
|
|
: |
|
|
[ P V |
|
|
|
The microwave output and a default cooking time are shown in the display. The s field lights up red.
3.Turn the rotary selector to set the required cooking time.
P V 
& WLPH 7LPHU
11
en Timer
4. Press the start/stop button l to start.
VWDUW

 P V
P V 
Î :
VWRS
The cooking time counts down on the display.
Notes
■When you switch on the appliance, the highest microwave output always appears in the display as a suggestion.
■If you open the appliance door during use, the fan may continue to run.
Cooking time elapsed
An audible signal sounds. The operation has finished.
To stop the signal early: Touch the s field.
Press the on/off button ÿ to switch off the appliance.
Note: After touching the s button, the timer function appears; after a short time, it automatically disappears. Press the s again for the option to increase the cooking time.
Changing the cooking time
This can be done at any time.
Change the cooking time using the rotary selector. The operation continues.
Changing the microwave output
This can be done at any time.
Touch the field for the required microwave output.
The cooking time remains unchanged. The operation continues.
Note: If the set cooking time exceeds the maximum time for the microwave output of 900 W, it is reduced
automatically. The operation stops. Press the l button to start the operation.
OTimer
You can use the timer as a kitchen timer. The timer runs alongside other settings. You can set it at any time, even if the device is switched off. It has its own audible signal so that you can tell whether it is the timer or a cooking time which has elapsed.
Setting the timer
The maximum setting is 24 hours.
The higher the value, the longer the time intervals.
1.Touch the s field. The timer is displayed.
2.Set the timer duration using the rotary selector.
 W7LPHUP V
3. Press the s field to start.
Note: The timer will also start automatically after a few seconds.
The timer duration counts down. The display switches back after a short time. A timer symbol is also shown on the display.
When the timer duration comes to an end, a note appears and an audible signal sounds. You can cancel
the audible signal early by touching the s field.
Note: If an operating mode with a set cooking time is already running, the cooking time is highlighted. Touch
the s field to display the timer. The timer duration is
highlighted for a certain amount of time and can be altered.
Changing the timer
To change the timer, touch the s field. The timer is
displayed in white and in focus, and can be changed by using the rotary selector.
Cancelling the timer
If you want to cancel the timer, reset the duration on the timer to zero. Once the change has been applied, the symbol is no longer lit up.
12

PProgrammes
You can prepare food really easily using the various programmes. You select a programme and enter the weight of your food. The program then applies the most suitable settings.
Setting a programme
Example: "Defrost bread" programme, weight 250 g.
1.Press the on/off button ÿ to switch on the
appliance.
The appliance is ready to use.
2.Press the % field.
The first programme appears in the display.
3.Turn the rotary selector to set the required programme.
'HIURVW EUHDG
J
[ P V
4.Press the a field.
The default value for the weight appears in the display.
5.Turn the rotary selector to set the required weight.
J
:HLJKW
6.Press the start/stop button l to start.
The cooking time counts down on the display.
Notes
■The cooking time is calculated by the programmes.
■For some dishes, the display provides instructions for turning or stirring during preparation. Follow the information provided. Opening the appliance door pauses the operation. After closing the appliance door, restart the operation. If you do not turn or stir the dish, the programme runs as normal until it reaches the end.
Programmes en
Information on the programmes
Place the food in the cold cooking compartment.
Take the food out of its packaging and weigh it. If it is not possible to enter the exact weight, you should round it up or down.
For the programmes, always use microwavable cookware, for example made of glass or ceramic. Observe the cookware tips in the programme table.
A table of suitable types of food with appropriate weight ranges and the cookware required can be found in the section after the notes.
It is not possible to set a weight outside the weight range.
With many dishes, a signal sounds after a certain time. Turn or stir the food.
Defrosting:
■As far as possible, freeze and store food flat and in portion-sized quantities at -18 °C.
■Place the frozen food in flat cookware, such as a glass or porcelain plate.
■After defrosting in the appliance, leave the food to continue defrosting for a further 15 to 90 minutes until it reaches an even temperature.
■Bread should only be defrosted in the required amounts, as it quickly becomes stale.
■Liquid will be produced when defrosting meat or poultry. Drain off this liquid when turning meat and poultry and under no circumstances use it for other purposes or allow it to come into contact with other foods.
■After turning, remove any minced meat that has already defrosted.
■Whole poultry should be placed in the cookware breast-side down and poultry portions skin-side down.
Vegetables:
■Fresh vegetables: Cut into pieces of an equal size. Add one tablespoon of water for every 100 g vegetables.
■Frozen vegetables: This programme is only suitable for blanched, not pre-cooked vegetables. It is not suitable for frozen vegetables in a cream sauce. Add 1 to 3 tablespoons of water. Do not add water to spinach or red cabbage.
Potatoes:
■Boiled potatoes: Cut into pieces of an equal size. Add two tablespoons of water per 100 g of potatoes, and salt to taste.
■Unpeeled boiled potatoes: Use potatoes of the same thickness. Wash the potatoes and prick the skin. Place the wet potatoes in a dish. Do not add water.
Rice:
■Do not use brown or boil-in-the-bag rice.
■Add two to two-and-a-half times the amount of water to rice.
13

en Programmes
Resting time
Some dishes need to rest in the cooking compartment after the programme has ended.
Dish |
Resting time |
Vegetables |
Approx. 5 minutes |
Potatoes |
Approx. 5 minutes. First pour off the |
|
remaining water |
Rice |
5 to 10 minutes |
|
|
Programme table
Programme |
Suitable food |
Weight range in kg |
Cookware |
Defrosting |
|
|
|
|
|
|
|
Bread* |
Bread, whole, round or long; sliced bread; sponge |
0.20-1.50 kg |
Shallow cookware without lid |
|
cake, yeast cake, fruit flan, cakes without icing, cream |
|
Cooking compartment floor |
|
or gelatine |
|
|
|
|
|
|
Meat* |
Joints, flat pieces of meat, minced meat, chicken, pou- |
0.20-2.00 kg |
Shallow cookware without lid |
|
lard, duck |
|
Cooking compartment floor |
|
|
|
|
Fish* |
Whole fish, fish fillet, fish cutlet |
0.10-1.00 kg |
Shallow cookware without lid |
|
|
|
Cooking compartment floor |
|
|
|
|
Cooking |
|
|
|
Fresh vegetables** |
Cauliflower, broccoli, carrots, kohlrabi, leeks, peppers, |
0.15-1.00 kg |
Cookware with lid |
|
courgettes |
|
Cooking compartment floor |
|
|
|
|
Frozen vegetables** |
Cauliflower, broccoli, carrots, kohlrabi, red cabbage, |
0.15-1.00 kg |
Cookware with lid |
|
spinach |
|
Cooking compartment floor |
|
|
|
|
Potatoes** |
Boiled potatoes, unpeeled boiled potatoes, chopped |
0.20-1.00 kg |
Cookware with lid |
|
potatoes of the same size |
|
Cooking compartment floor |
|
|
|
|
Rice** |
Rice, long-grain rice |
0.05-0.30 kg |
Deep cookware with lid |
|
|
|
Cooking compartment floor |
*) Observe the signals given when it is time to turn the food **) Observe the signals given when it is time to stir the food
14

QBasic settings
There are various settings available to you in order to help use your appliance effectively and simply. You can change these settings as required.
Changing the basic settings
The appliance must be switched off.
1.Touch the ° field for approx. 3 seconds.
Instructions on how to proceed appear in the display.
2.Press the s field to confirm the instructions.
The first setting, "Language", appears in the display.
3.Turn the rotary selector to change the setting as required.
4.Touch the s field.
The next setting is shown in the display and can be changed using the rotary selector.
5.Touch the s field to go through all the settings and use the rotary selector to make changes as required.
6.When finished, press and hold the ° field for approx.
3 seconds to confirm the settings.
A note is shown in the display to confirm that the settings have been saved.
Cancelling
If you do not want to save the changes, you can press the on/off button to cancel. A note is shown in the display to confirm that the settings have not been saved.
List of basic settings
Depending on the features of your appliance, not all basic settings are accessible.
Setting |
Options |
Language |
Set the language |
Clock |
Set the current time |
Audible signal |
Short cooking time |
|
Medium cooking time* |
|
Long cooking time |
Button tone |
Switched on |
|
Switched off* |
|
(Button tone at on/off always on) |
Display brightness |
Scale with 5 levels |
|
Level 3* |
Clock |
Switched on* |
|
Switched off |
Night-time dimming |
Switched off** |
|
Switched on (Display dimmed between |
|
22:00 and 6:00) |
Demo mode |
Switched off* |
|
Switched on |
|
(only displayed during the first 3 minutes |
|
after the appliance has been reset or is |
|
used for the first time) |
|
|
Basic settings |
en |
Factory settings |
Reset |
|
Do not reset* |
*Factory setting (factory settings may vary depending on the appliance model)
Note: Changes to the language, button tone and display brightness settings take effect immediately. All other changes take effect after the settings have been saved.
Power cut
The changes you make to the settings are retained even after a power cut.
Only the settings pertaining to the initial use of the appliance need to be implemented once again following a power cut.
Changing the time
If you want to change the time, for example from summer to winter time, you have to change the basic setting.
The appliance must be switched off.
1.Touch the ° field for approx. 3 seconds. Notes on the process appear on the display.
2.Press the s field to confirm the notes.
The first setting "language" appears in the display.
3.Touch the s field.
The setting for the clock appears.
4.Turn the rotary selector to change the clock time.
5.Press and hold the ° field for approx. 3 seconds to
confirm the setting.
A note is shown on the display to confirm that the settings have been saved.
15

en Cleaning
DCleaning
With good care and cleaning, your appliance will retain its appearance and remain fully functioning for a long time to come. We will explain here how you should correctly care for and clean your appliance.
:Warning – Risk of burns!
The appliance becomes very hot. Never touch the interior surfaces of the cooking compartment or the heating elements. Always allow the appliance to cool down. Keep children at a safe distance.
:Warning – Risk of electric shock!
Do not use any high-pressure cleaners or steam cleaners, which can result in an electric shock.
:Warning – Risk of injury!
Scratched glass in the appliance door may develop into a crack. Do not use a glass scraper, sharp or abrasive cleaning aids or detergents.
Note: Unpleasant odours, for example after fish has been prepared, can be removed very easily. Add a few drops of lemon juice to a cup of water. Always place a spoon in the container to prevent delayed boiling. Heat the water for 1 to 2 minutes at maximum microwave output.
Cleaning agent
To ensure that the different surfaces are not damaged by using the wrong cleaning agent, observe the information in the table.
Do not use:
■Harsh or abrasive cleaning agents.
■Metal or glass scrapers to clean the door panels.
■Metal or glass scrapers to clean the door seal.
■Hard scouring pads or sponges.
■Cleaning agents with a high alcohol content.
Wash new sponge cloths thoroughly before use.
Area |
Cleaning agent |
Appliance front |
Hot soapy water: Clean using a dish cloth and |
|
then dry with a soft cloth. Do not use a metal or |
|
glass scraper for cleaning. |
Display |
Wipe down using a microfibre cloth or a |
|
slightly damp cloth. Do not wipe with a wet |
|
cloth. |
Stainless steel |
Hot soapy water: Clean using a dish cloth and |
|
then dry with a soft cloth. Remove flecks of |
|
limescale, grease, starch and albumin (e.g. |
|
egg white) immediately. Corrosion can form |
|
under such flecks. Special stainless-steel |
|
cleaning agents are available from the after- |
|
sales service or from specialist retailers. |
|
|
Area
Cooking compartment made of stainless steel
Cleaning agent
Hot soapy water or vinegar solution: Clean using a dish cloth and then dry with a soft cloth. Do not use oven spray or any other aggressive oven cleaners or abrasive materials. Scouring pads, rough sponges and pan cleaners are also unsuitable. These items scratch the surface. Allow the interior surfaces to dry thoroughly.
Door panels |
Glass cleaner: Clean with a dish cloth. Do not |
|
use a glass scraper. |
|
|
Door seal |
Hot soapy water: Clean with a dish cloth and |
Do not remove. |
do not scour. Do not use a metal or glass |
|
scraper for cleaning. |
|
|
16

3Trouble shooting
If a fault occurs, there is often a simple explanation. Before calling the after-sales service, please refer to the fault table and attempt to correct the fault yourself.
Tip: If a dish does not turn out exactly as you wanted, refer to the following chapter, where you will find lots of tips and notes relating to the optimum
Fault table
Trouble shooting |
en |
settings.~ "Tested for you in our cooking studio" on page 18
:Warning – Risk of electric shock!
Incorrect repairs are dangerous. Repairs may only be carried out and damaged power cables replaced by one of our trained after-sales technicians. If the appliance is defective, unplug the appliance from the mains or switch off the circuit breaker in the fuse box. Contact the after-sales service.
Fault |
Possible cause |
Remedy/information |
The appliance does not work or the |
The plug is not plugged into the mains |
Connect the appliance to the electricity supply |
display is not working |
Power cut |
Check whether other kitchen appliances are working |
|
||
|
The circuit breaker is faulty |
Check in the fuse box to make sure that the fuse for |
|
|
the appliance is OK |
|
Faulty operation |
Switch off the circuit-breaker for the appliance in the |
|
|
fuse box and switch it back on after approx. 60 sec- |
|
|
onds |
The appliance cannot be started |
The appliance door is not fully closed |
Close the appliance door |
Appliance does not heat up. |
The appliance is in demo mode |
Deactivate demo mode in the basic settings. |
The msymbol for demo mode is |
|
To do this, briefly disconnect the appliance from the |
shown in the display. |
|
mains (switch off the household fuse or the circuit |
|
|
breaker in the fuse box). Then deactivate demo mode |
|
|
in the basic settings within 3 minutes. |
The rotary selector has fallen out of |
The rotary selector has been accidentally disengaged. |
The rotary selector can be removed. Simply place the |
the support in the control panel. |
|
rotary selector back in its support in the control panel |
|
|
and push it in so that it engages and can be turned as |
|
|
usual. |
The rotary selector can no longer be |
There is dirt under the rotary selector. |
The rotary selector can be removed. To disengage the |
turned easily. |
|
rotary selector, simply remove it from the support. |
|
|
Alternatively, press on the outer edge of the rotary |
|
|
selector so that it tips and can be picked up easily. |
|
|
Carefully clean the rotary selector and its support on |
|
|
the appliance using a cloth and soapy water. Dry with |
|
|
a soft cloth. Do not use any sharp or abrasive materi- |
|
|
als. Do not soak or clean in the dishwasher. |
|
|
Do not remove the rotary selector too often so that the |
|
|
support remains stable. |
The interior lighting is not working |
The interior lighting is faulty |
Call the after-sales service |
Error message "Exxx"* |
|
If an error message is displayed, switch the appliance |
|
|
off and on again; if the message disappears, it was a |
|
|
one-off problem. If the fault occurs again or the error |
|
|
message is still displayed, please contact the after- |
|
|
sales service and provide the fault code. |
* Special features: |
|
|
Error message "E0532": Open and close the appliance door.
Error message "E6501": Switch off the appliance. Wait for 10 minutes. Switch the appliance on again.
17
en Customer service
4Customer service
Our after-sales service is there for you if your appliance needs to be repaired. We will always find an appropriate solution, also in order to avoid after-sales personnel having to make unnecessary visits.
E number and FD number
When calling us, please quote the full product number (E no.) and the production number (FD no.) so that we can provide you with the correct advice. The rating plate bearing these numbers can be found when you open the appliance door.
On some appliances with a steam-assisted cooking function, you will find the rating plate behind the control panel.
|
|
|
|
|
|
|
|
|
|
|
|
|
|
|
|
|
|
|
|
|
|
|
|
|
|
|
|
|
|
|
|
|
|
|
|
|
|
|
|
|
|
|
|
|
|
|
|
|
|
|
|
|
|
|
|
|
|
|
|
|
|
|
|
|
|
|
|
|
|
|
|
|
|
|
|
|
|
|
|
|
|
|
|
|
|
|
|
|
|
|
|
|
|
|
|
|
|
|
|
|
|
|
|
|
|
|
|
|
|
|
|
|
|
|
|
|
|
|
|
|
|
|
|
|
|
|
|
|
|
|
|
|
|
|
|
|
|
|
( 1U |
|
|
|
|
|
|
|
|
|
|
|
|
|
|
|
|
|
|
|
|
)' |
|
|
|
|
|
|
|
|
= 1U |
|
|
|
|
|
|
|
|
|
|
|
|
|
|
|
|
|
|
|
|
|
|
|
|
|
|
|
|
|
|
|
|
|
|
|
|
|
|
|
|
|
|
|
|
|
|
|
|
|
|
|
|
|
|
|
7\SH
To save time, you can make a note of the numbers for your appliance and the telephone number of the aftersales service in the space below in case you need them.
E no. |
|
FD no. |
|
|
|
|
|
After-sales service O
Please note that a visit from an after-sales service engineer is not free of charge in the event that the appliance has been misused, even during the warranty period.
Please find the contact data of all countries in the enclosed customer service list.
To book an engineer visit and product advice GB 0344 892 8979
Calls charged at local or mobile rate. IE 01450 2655
0.03 € per minute at peak. Off peak 0.0088 € per minute.
Rely on the professionalism of the manufacturer. You can therefore be sure that the repair is carried out by trained service technicians who carry original spare parts for your appliances.
This appliance corresponds to the standards EN 55011 and CISPR 11. It is a Group 2, Class B product.
Group 2 means that microwaves are produced for the purpose of heating food. Class B states that the appliance is suitable for private households.
JTested for you in our cooking studio
Here, you can find a selection of dishes and the ideal settings for them. We show you which microwave output is best for your dish. There are also tips about cookware and preparation methods.
Notes
■The values in the table always apply to the cooking compartment when it is cold and empty. Before using the appliance, remove all unnecessary cookware from the cooking compartment.
■The times specified in the tables are only guidelines. They will depend on the quality and composition of the food.
■Always use an oven cloth or oven gloves when taking hot cookware out of the cooking compartment.
:Warning – Risk of scalding!
When pulling out the cookware, hot liquid may overflow. Carefully pull the cookware out of the cooking compartment.
The following tables provide you with numerous options and settings for the microwave.
The times given in the tables are guidelines; they depend on the cookware used, and the quality, temperature and consistency of the food.
Time ranges are often specified in the tables. Set the shortest time first and then extend the time if necessary.
It may be that you have different quantities from those specified in the tables. There is a rule of thumb for operating the microwave: Double the amount = double the time, half the amount = half the time.
You can place the cookware in the middle on the cooking compartment floor. The food will then absorb the microwaves from all sides.
Defrosting
Place the frozen food in an open container on the cooking compartment floor.
Turn or stir the food once or twice during the defrosting time. Large pieces of food should be turned several times. When turning, remove any liquid that has been produced during defrosting.
Leave defrosted items to stand at room temperature for a further 10 to 60 minutes so that the temperature can even out. You can remove the giblets from poultry at this point.
Note: Place the ovenware on the cooking compartment floor.
18
|
|
Tested for you in our cooking studio |
en |
|
|
|
|
|
|
Dish |
Weight |
Microwave output in watts, |
Note |
|
|
|
time in minutes |
|
|
Whole pieces of beef, pork or veal (on the |
800 g |
180 W, 15 mins + 90 W, 15-25 mins |
Turn several times |
|
bone or boned) |
1000 g |
180 W, 20 mins + 90 W, 20-30 mins |
|
|
|
|
|
||
|
1500 g |
180 W, 25 mins + 90 W, 25-30 mins |
|
|
Meat in pieces or slices of beef, veal or pork |
200 g |
180 W, 5-8 mins + 90 W, 5-10 mins |
Separate the slices/pieces of meat when turn- |
|
|
500 g |
180 W, 8-11 mins + 90 W, 10-15 |
ing |
|
|
|
|
||
|
|
mins |
|
|
|
800 g |
180 W, 10 mins + 90 W, 10-15 mins |
|
|
Minced meat, mixed |
200 g |
90 W, 10-15 mins |
Freeze food flat if possible; |
|
|
500 g |
180 W, 5 mins + 90 W, 10-15 mins |
turn several times during defrosting and |
|
|
remove any minced meat that has already |
|
||
|
1000 g |
180 W, 15 mins + 90 W, 20-25 mins |
|
|
|
defrosted |
|
||
Poultry or poultry portions |
600 g |
180 W, 8 mins + 90 W, 10-15 mins |
Turn during defrosting; |
|
|
1200 g |
180 W, 15 mins + 90 W, 20-25 mins |
remove liquid that escapes during defrosting |
|
|
|
|
||
Fish fillet, fish steak or slices |
400 g |
180 W, 5 mins + 90 W, 10-15 mins |
Separate any defrosted parts |
|
Whole fish |
300 g |
180 W, 3 mins + 90 W, 10-15 mins |
Turn during defrosting |
|
|
600 g |
180 W, 8 mins + 90 W, 15-20 mins |
|
|
Vegetables, e.g. peas |
300 g |
180 W, 10-15 mins |
Stir carefully during defrosting |
|
Fruit, e.g. raspberries |
300 g |
180 W, 6-9 mins |
Stir carefully during defrosting and separate |
|
|
500 g |
180 W, 8 mins + 90 W, 5-10 mins |
any defrosted parts |
|
|
|
|
||
Butter, defrosting |
125 g |
180 W, 1 min. + 90 W, 1-2 mins |
Remove all packaging |
|
|
250 g |
180 W, 1 min. + 90 W, 2-4 mins |
|
|
Loaf of bread |
500 g |
180 W, 8 mins + 90 W, 5-10 mins |
Turn during defrosting |
|
|
1000 g |
180 W, 12 mins + 90 W, 10-20 mins |
|
|
Cakes, dry, e.g. sponge cake |
500 g |
90 W, 10-15 mins |
Separate the pieces of cake; |
|
|
750 g |
180 W, 5 mins + 90 W, 10-15 mins |
only for cakes without icing, cream or crème |
|
|
pâtissière |
|
||
|
|
|
|
|
Cakes, moist, e.g. fruit flan, cheesecake |
500 g |
180 W, 5 mins + 90 W, 15-20 mins |
Only for cakes without icing, cream or gela- |
|
|
750 g |
180 W, 7 mins + 90 W, 15-20 mins |
tine |
|
|
|
|
||
|
|
|
|
|
Defrosting, heating up or cooking frozen food
Take ready meals out of the packaging. They will heat up more quickly and evenly in microwaveable cookware. The different components of the meal may not require the same amount of time to heat up.
Food which lies flat will cook more quickly than food which is piled high. You should therefore distribute the food so that it is as flat as possible in the cookware. Food should not be placed in layers on top of one another.
Always cover the food. If you do not have a suitable lid for your cookware, use a plate or special microwave foil.
Stir or turn the food 2 or 3 times during cooking.
After heating, allow the food to stand for a further 2 to 5 minutes to allow the temperature to even out.
This will help the food retain its own distinct taste, which means it will require less seasoning.
Note: Place the ovenware on the cooking compartment floor.
Dish |
Weight |
Microwave output in watts, |
Note |
|
|
cooking time in minutes |
|
Menu, plated meal, ready meal |
300-400 g |
600 W, 8-13 mins |
Covered |
(2-3 components) |
|
|
|
Soup |
400 g |
600 W, 8-12 mins |
Cookware with lid |
Stew |
500 g |
600 W, 10-15 mins |
Cookware with lid |
Slices or pieces of meat in sauce, e.g. goulash |
500 g |
600 W, 10-15 mins |
Cookware with lid |
Fish, e.g. fillet steaks |
400 g |
600 W, 10-15 mins |
Covered |
Bakes, e.g. lasagne, cannelloni |
450 g |
600 W, 10-15 mins |
Cookware without lid |
|
|
|
|
19

en |
Tested for you in our cooking studio |
|
|
|
|
|
|
|
|
Dish |
|
Weight |
Microwave output in watts, |
Note |
|
|
|
cooking time in minutes |
|
Side dishes, e.g. rice, pasta |
250 g |
600 W, 3-7 mins |
Cookware with lid, add liquid |
|
|
|
500 g |
600 W, 8-12 mins |
|
Vegetables, e.g. peas, broccoli, carrots |
300 g |
600 W, 7-11 mins |
Cookware with lid, add 1 tbsp of water |
|
|
|
600 g |
600 W, 14-17 mins |
|
Creamed spinach |
450 g |
600 W, 10-15 mins |
Cook without additional water |
|
|
|
|
|
|
Heating
:Warning – Risk of scalding!
There is a possibility of delayed boiling when a liquid is heated. This means that the liquid reaches boiling temperature without the usual steam bubbles rising to the surface. Even if the container only vibrates a little, the hot liquid may suddenly boil over and spatter. When heating, always place a spoon in the container. This will prevent delayed boiling.
Caution!
Creation of sparks: Metal – e.g. a spoon in a glass – must be kept at least 2 cm from the cooking compartment walls and the inside of the door. Sparks can irreparably damage the glass on the inside of the door.
Notes
■Take ready meals out of the packaging. They will heat up more quickly and evenly in microwaveable cookware. The different components of the meal may not require the same amount of time to heat up.
■Always cover the food. If you do not have a suitable cover for your cookware, use a plate or special microwave foil.
■Stir or turn the food several times during the heating time. Check the temperature.
■After heating, allow the food to stand for a further 2 to 5 minutes to allow the temperature to even out.
■Always use an oven cloth or oven gloves when removing plates from the appliance.
Note: Place the ovenware on the cooking compartment floor.
Dish |
Amount |
Microwave output in watts, |
Note |
|
|
time in minutes |
|
Menu, plated meal, ready meal |
|
600 W, 5-8 mins |
- |
(2-3 components) |
|
|
|
Beverages |
125 ml |
900 W, ½-1 min. |
Always place a spoon in the container, do not |
|
200 ml |
900 W, 1-2 mins |
overheat alcoholic drinks; check occasionally |
|
while heating |
||
|
500 ml |
900 W, 3-4 mins |
|
|
|
||
Baby food, e.g. baby bottles |
50 ml |
360 W, approx. ½ min |
Bottles without teat or lid; shake or stir well |
|
100 ml |
360 W, ½-1 min. |
after heating and ensure that you check the |
|
temperature |
||
|
200 ml |
360 W, 1-2 mins |
|
|
|
||
Soup, 1 cup |
175 g each |
600 W, 1-2 mins |
- |
Soup, 2 cups |
175 g each |
600 W, 2-3 mins |
- |
Meat in sauce |
500 g |
600 W, 7-10 mins |
- |
Stew |
400 g |
600 W, 5-7 mins |
- |
|
800 g |
600 W, 7-8 mins |
- |
Vegetables, 1 portion |
150 g |
600 W, 2-3 mins |
- |
Vegetables, 2 portions |
300 g |
600 W, 3-5 mins |
- |
|
|
|
|
20
Tested for you in our cooking studio |
en |
Cooking
Notes
■Food which lies flat will cook more quickly than food which is piled high. You should therefore distribute the food so that it is as flat as possible in the cookware. Food should not be placed in layers on top of one another.
■Cook the food in cookware with a lid. If you do not have a suitable lid for your cookware, use a plate or special microwave foil.
■This will help the food retain its own distinct taste, which means it will require less seasoning.
■After cooking, allow the food to stand for a further 2 to 5 minutes to allow the temperature to even out.
■Always use an oven cloth or oven gloves when removing plates from the appliance.
Note: Place the ovenware on the cooking compartment floor.
Dish |
Amount |
Microwave output in watts, |
Note |
|
|
time in minutes |
|
Whole chicken, fresh, no giblets |
1200 g |
600 W, 25-30 mins |
Turn half way through the time |
Fish fillet, fresh |
400 g |
600 W, 7-12 mins |
- |
Fresh vegetables |
250 g |
600 W, 6-10 mins |
Cut the vegetables into pieces of equal size; |
|
500 g |
600 W, 10-15 mins |
add 1 to 2 tbsp water per 100 g of vegeta- |
|
bles; |
||
|
|
|
|
|
|
|
stir while heating |
Potatoes |
250 g |
600 W, 8-10 mins |
Cut the potatoes into pieces of equal size; |
|
500 g |
600 W, 10-15 mins |
add 1 tbsp water for every 100 g of potatoes; |
|
stir while heating |
||
|
750 g |
600 W, 15-22 mins |
|
|
|
||
Rice |
125 g |
600 W, 4-6 mins + |
Add double the amount of liquid |
|
|
180 W, 12-15 mins |
|
|
250 g |
600 W, 6-8 mins + |
|
|
|
180 W, 15-18 mins |
|
Sweet foods, e.g. blancmange (instant) |
500 ml |
600 W, 6-8 mins |
Stir the blancmange thoroughly 2 to 3 times |
|
|
|
using an egg whisk while heating |
Fruit, compote |
500 g |
600 W, 9-12 mins |
Stir while heating |
Microwave popcorn |
100 g |
600 W, 3-4 mins |
Always place the popcorn bag on the glass |
|
|
|
tray; |
|
|
|
observe the manufacturer's instructions |
|
|
|
|
Microwave tips
You cannot find any information about the settings for the quantity of |
Lengthen or shorten the cooking time according to the following rule of |
food you have prepared. |
thumb: Double the amount = double the time, half the amount = half the time |
The food has become too dry. |
Next time, set a shorter cooking time or select a lower microwave power set- |
|
ting. Cover the food and add more liquid. |
The time has elapsed but the food is not defrosted, hot or cooked. |
Set a longer time. Large quantities and food which is piled high require longer |
|
times. |
Time has elapsed but the food is overheated at the edge but not done |
Stir it during the cooking time and next time, select a lower microwave power |
in the middle. |
setting and a longer cooking time. |
After defrosting, the poultry or meat is defrosted on the outside but |
Next time, select a lower microwave output setting. Turn large amounts of |
not defrosted in the middle. |
poultry or meat several times. |
|
|
21

en Test dishes
ETest dishes
The quality and performance of the appliances are tested by test institutes using the following dishes.
In accordance with EN 60705, IEC 60705 or DIN 44547, and EN 60350 (2009)
Cooking only using the microwave
Dish |
Microwave output in watts, cooking time in minutes |
Note |
Custard, 1000 g |
600 W, 11-12 mins + 180 W, 8-10 mins |
Pyrex dish |
Sponge, 475 g |
600 W, 7-9 mins |
Pyrex dish, dia. 22 cm |
Meat loaf, 900 g |
600 W, 25-30 mins |
Pyrex cake dish, 28 cm long |
|
|
|
Defrosting only using the microwave
Dish |
Microwave output in watts, defrosting time in minutes |
Note |
Meat, 500 g |
"Meat" programme, 500 g |
Pyrex dish, dia. 24 cm |
|
or |
|
|
180 W, 8 mins + 90 W, 7-10 mins |
|
|
|
|
22

Πίνακας περιεχομένων
8Χρήση σύμφωνα με το σκοπό προορισμού. . . . .24
(Σημαντικές υποδείξεις ασφαλείας . . . . . . . . . . . |
24 |
Γενικά . . . . . . . . . . . . . . . . . . . . . . . . . . . . . . . . . . . . . . 24 Μικροκύματα . . . . . . . . . . . . . . . . . . . . . . . . . . . . . . . . . 25
]Αιτίες των ζημιών . . . . . . . . . . . . . . . . . . . . . . . . . .27
7Προστασία περιβάλλοντος . . . . . . . . . . . . . . . . . .27
Απόσυρση σύμφωνα με τους κανόνες προστασίας του περιβάλλοντος . . . . . . . . . . . . . . . . . . . . . . . . . . . . . . . . 27
*Γνωρίστε τη συσκευή. . . . . . . . . . . . . . . . . . . . . . .28
Πεδίο χειρισμού . . . . . . . . . . . . . . . . . . . . . . . . . . . . . . . 28 Στοιχεία χειρισμού . . . . . . . . . . . . . . . . . . . . . . . . . . . . . 28 Οθόνη ενδείξεων . . . . . . . . . . . . . . . . . . . . . . . . . . . . . . 28 Περισσότερες πληροφορίες. . . . . . . . . . . . . . . . . . . . . . 29
Λειτουργίες του χώρου μαγειρέματος . . . . . . . . . . . . . . 29
KΠριν την πρώτη χρήση. . . . . . . . . . . . . . . . . . . . . .29
Πρώτη θέση σε λειτουργία. . . . . . . . . . . . . . . . . . . . . . . 29
1Χειρισμός της συσκευής . . . . . . . . . . . . . . . . . . . .30
Ενεργοποίηση και απενεργοποίηση της συσκευής . . . . . 30
Λειτουργία . . . . . . . . . . . . . . . . . . . . . . . . . . . . . . . . . . . 30
Ρύθμιση του τρόπου λειτουργίας . . . . . . . . . . . . . . . . . . 30
^Ο φούρνος μικροκυμάτων. . . . . . . . . . . . . . . . . . .31
Μαγειρικό σκεύος . . . . . . . . . . . . . . . . . . . . . . . . . . . . . 31 Βαθμίδες μικροκυμάτων . . . . . . . . . . . . . . . . . . . . . . . . 31
Ρύθμιση του φούρνου μικροκυμάτων. . . . . . . . . . . . . . . 31
OΡολόι συναγερμ. . . . . . . . . . . . . . . . . . . . . . . . . . . .32
PΠρογράμματα . . . . . . . . . . . . . . . . . . . . . . . . . . . . .33
Ρύθμιση του προγράμματος. . . . . . . . . . . . . . . . . . . . . . 33
Υποδείξεις για τα προγράμματα. . . . . . . . . . . . . . . . . . . 33
Χρόνος ηρεμίας. . . . . . . . . . . . . . . . . . . . . . . . . . . . . . . 34 Πίνακας προγραμμάτων. . . . . . . . . . . . . . . . . . . . . . . . . 34
QΒασικές ρυθμίσεις . . . . . . . . . . . . . . . . . . . . . . . . .35
Αλλαγή των βασικών ρυθμίσεων. . . . . . . . . . . . . . . . . . . 35 Λίστα των βασικών ρυθμίσεων . . . . . . . . . . . . . . . . . . . . 35
Διακοπή ρεύματος. . . . . . . . . . . . . . . . . . . . . . . . . . . . . 35 Αλλαγή της ώρας . . . . . . . . . . . . . . . . . . . . . . . . . . . . . . 35
DΚαθαρισμός. . . . . . . . . . . . . . . . . . . . . . . . . . . . . . .36
Υλικά καθαρισμού . . . . . . . . . . . . . . . . . . . . . . . . . . . . . 36
3Βλάβες, τι μπορεί να γίνει; . . . . . . . . . . . . . . . . . .37
4Υπηρεσία εξυπηρέτησης πελατών. . . . . . . . . . . .38
Αριθμός E και αριθμός FD. . . . . . . . . . . . . . . . . . . . . . . 38
el
JΔοκιμάστηκαν για εσάς, στο δικό μας
εργαστήριο μαγειρικής . . . . . . . . . . . . . . . . . . . . . 38
Ξεπάγωμα . . . . . . . . . . . . . . . . . . . . . . . . . . . . . . . . . . . .38
Ξεπάγωμα και ζέσταμα ή μαγείρεμα κατεψυγμένων φαγητών . . . . . . . . . . . . . . . . . . . . . . . . . . . . . . . . . . . . .39
Ζέσταμα . . . . . . . . . . . . . . . . . . . . . . . . . . . . . . . . . . . . .40 Μαγείρεμα. . . . . . . . . . . . . . . . . . . . . . . . . . . . . . . . . . . .41
Συμβουλές σχετικά με τα μικροκύματα . . . . . . . . . . . . . .41
EΦαγητά δοκιμών . . . . . . . . . . . . . . . . . . . . . . . . . . 42
Μαγείρεμα με μικροκύματα "σόλο" . . . . . . . . . . . . . . . . .42 Ξεπάγωμα με μικροκύματα "σόλο". . . . . . . . . . . . . . . . . .42
Περαιτέρω πληροφορίες για τα προϊόντα, τα εξαρτήματα, τα ανταλλακτικά και το σέρβις θα βρείτε στο διαδίκτυο
(Internet): www.bosch-home.com και στο online-shop: www.bosch-eshop.com
23

el Χρήση σύμφωνα με το σκοπό προορισμού
8Χρήση σύμφωνα με το σκοπό προορισμού
Διαβάστε προσεκτικά αυτές τις οδηγίες. Μόνο τότε μπορείτε να χειριστείτε τη συσκευή σίγουρα και σωστά. Φυλάξτε τις οδηγίες χρήσης και συναρμολόγησης για μια αργότερη χρήση ή για τον επόμενο ιδιοκτήτη.
Αυτή η συσκευή προορίζεται μόνο για την τοποθέτηση. Προσέξτε τις ειδικές οδηγίες συναρμολόγησης.
Μετά την αφαίρεση από τη συσκευασία, ελέγξτε τη συσκευή. Σε περίπτωση ζημιάς κατά τη μεταφορά μην την συνδέσετε.
Μόνο ένας αδειούχος εγκαταστάτης επιτρέπεται να συνδέσει τις συσκευές χωρίς φις. Σε περίπτωση ζημιών που οφείλονται σε λάθος σύνδεση, δεν έχετε κανένα δικαίωμα εγγύησης.
Αυτή η συσκευή προορίζεται μόνο για την οικιακή χρήση και το οικιακό περιβάλλον. Χρησιμοποιείτε τη συσκευή μόνο για την παρασκευή φαγητών και ποτών. Κατά τη διάρκεια της λειτουργίας επιτηρείτε τη συσκευή. Χρησιμοποιείτε τη συσκευή μόνο σε κλειστούς χώρους.
Αυτή η συσκευή προορίζεται για χρήση μέχρι ένα μέγιστο ύψος 4.000 μέτρων πάνω από την επιφάνεια της θάλασσας.
Αυτή η συσκευή επιτρέπεται να χρησιμοποιηθεί από παιδιά από 8 ετών και πάνω και από άτομα με μειωμένες φυσικές, αισθητήριες ή πνευματικές ικανότητες ή με ανεπαρκή εμπειρία ή γνώση, όταν επιτηρούνται από ένα άτομο που είναι υπεύθυνο για την ασφάλειά τους ή έχουν λάβει σχετικές οδηγίες απ’ αυτό για την ασφαλή χρήση της συσκευής και έχουν κατανοήσει τους κινδύνους που μπορεί να προκύψουν.
Τα παιδιά δεν επιτρέπεται να παίζουν με τη συσκευή.Ο καθαρισμός και η συντήρηση από το χρήστη δεν επιτρέπεται να πραγματοποιηθούν από παιδιά, εκτός εάν είναι 15 ετών και άνω και επιτηρούνται.
Κρατάτε τα παιδιά που είναι κάτω των 8 ετών μακριά από τη συσκευή και το καλώδιο σύνδεσης.
Τοποθετείτε τα εξαρτήματα πάντοτε σωστά μέσα στο χώρο μαγειρέματος.
(Σημαντικές υποδείξεις ασφαλείας
Γενικά
:Προειδοποίηση – Κίνδυνος πυρκαγιάς!
Τα αποθηκευμένα στο χώρο μαγειρέματος εύφλεκτα αντικείμενα μπορούν να αναφλεγούν. Μην τοποθετείτε ποτέ εύφλεκτα αντικείμενα μέσα στο χώρο μαγειρέματος. Μην ανοίγετε ποτέ την πόρτα της συσκευής, όταν δημιουργείται καπνός μέσα στη συσκευή. Απενεργοποιήστε τη συσκευή και τραβήξτε το ρευματολήπτη (φις) από την πρίζα ή κατεβάστε/ξεβιδώστε την ασφάλεια στο κιβώτιο των ασφαλειών.
:Προειδοποίηση – Κίνδυνος εγκαύματος!
■ Τα εξαρτήματα ή τα σκεύη ζεσταίνονται πάρα πολύ. Απομακρύνετε τα καυτά σκεύη
ήεξαρτήματα από το χώρο μαγειρέματος πάντοτε με μια πιάστρα.
■Οι ατμοί του οινοπνεύματος μπορούν να αναφλεγούν μέσα στον καυτό χώρο μαγειρέματος. Μην παρασκευάζετε φαγητά με μεγάλες ποσότητες δυνατών οινοπνευματώδη ποτών. Χρησιμοποιείτε μόνο μικρές ποσότητες από δυνατά οινοπνευματώδη ποτά. Ανοίγετε προσεκτικά την πόρτα της συσκευής.
:Προειδοποίηση – Κίνδυνος ζεματίσματος!
■Τα προσιτά μέρη/εξαρτήματα ζεσταίνονται πολύ κατά τη λειτουργία. Μην ακουμπάτε ποτέ τα καυτά μέρη/εξαρτήματα. Κρατάτε τα παιδιά μακριά.
■Κατά το άνοιγμα της πόρτας της συσκευής μπορεί να εξέλθει καυτός ατμός. Ανοίγετε προσεκτικά την πόρτα της συσκευής.
Κρατάτε τα παιδιά μακριά.
■Με το νερό στον καυτό χώρο μαγειρέματος μπορεί να δημιουργηθεί καυτός υδρατμός. Μη χύνετε ποτέ νερό μέσα στον καυτό χώρο μαγειρέματος.
:Προειδοποίηση – Κίνδυνος τραυματισμού!
■Το γρατσουνισμένο γυαλί της πόρτας της συσκευής μπορεί να ραγίσει. Μη χρησιμοποιείτε ξύστρες γυαλιού, δυνατά ή τραχιά υλικά καθαρισμού.
24
■Οι μεντεσέδες της πόρτας της συσκευής κινούνται κατά το άνοιγμα και το κλείσιμο της πόρτας και μπορεί να μαγκωθούν. Μην απλώνετε τα χέρια σας στην περιοχή των μεντεσέδων.
:Προειδοποίηση – Κίνδυνος ηλεκτροπληξίας!
■Οι ακατάλληλες επισκευές είναι επικίνδυνες. Μόνο ένας τεχνικός της υπηρεσίας εξυπηρέτησης πελατών, εκπαιδευμένος από εμάς, επιτρέπεται να εκτελέσει τις επισκευές και να αντικαταστήσει τα χαλασμένα καλώδια σύνδεσης. Εάν η συσκευή έχει βλάβη, τραβήξτε το φις από την πρίζα ή κατεβάστε την ασφάλεια στο κιβώτιο των ασφαλειών. Καλέστε την υπηρεσία εξυπηρέτησης πελατών.
■Στα καυτά μέρη της συσκευής μπορεί να λιώσει η μόνωση των καλωδίων των ηλεκτρικών συσκευών. Τα καλώδια σύνδεσης των ηλεκτρικών συσκευών δεν επιτρέπεται να έρθουν ποτέ σε επαφή με τα καυτά μέρη της συσκευής.
■Μια εισχώρηση υγρασίας μπορεί να προκαλέσει μια ηλεκτροπληξία.Μη χρησιμοποιείτε συσκευές καθαρισμού υψηλής πίεσης ή συσκευές εκτόξευσης ατμού.
■Μια ελαττωματική συσκευή μπορεί να προκαλέσει μια ηλεκτροπληξία. Μην ενεργοποιείτε ποτέ μια χαλασμένη συσκευή. Τραβήξτε το φις από την πρίζα ή κατεβάστε την ασφάλεια στο κιβώτιο των ασφαλειών. Καλέστε την υπηρεσία εξυπηρέτησης πελατών.
:Προειδοποίηση – Κίνδυνος λόγω
μαγνητισμού!
Στο πεδίο χειρισμού ή στα στοιχεία χειρισμού είναι τοποθετημένοι μόνιμοι μαγνήτες. Αυτοί μπορούν να επηρεάσουν αρνητικά τα ηλεκτρονικά στοιχεία εμφύτευσης, π.χ. βηματοδότες καρδιάς ή αντλίες ινσουλίνης. Ως φορέας ηλεκτρονικών στοιχείων εμφύτευσης τηρήστε μια ελάχιστη απόσταση 10 cm από το πεδίο χειρισμού.
Σημαντικές υποδείξεις ασφαλείας |
el |
Μικροκύματα :Προειδοποίηση – Κίνδυνος πυρκαγιάς!
■Η μη ενδεδειγμένη χρήση της συσκευής είναι επικίνδυνη και μπορεί να προκαλέσει ζημιές.
Δεν επιτρέπεται το στέγνωμα από φαγητά ή ρούχα, το ζέσταμα από παντόφλες, σακουλάκια με σπόρους και δημητριακά, σφουγγάρια, υγρά πανιά και παρόμοια. Για παράδειγμα μπορούν να αναφλεγούν οι ζεστές παντόφλες, τα ζεστά σακουλάκια με σπόρους και δημητριακά ακόμα και μετά από ώρες.Χρησιμοποιείτε τη συσκευή μόνο για την παρασκευή φαγητών και ποτών.
■Τα τρόφιμα μπορούν να αναφλεγούν. Μη ζεσταίνετε ποτέ τρόφιμα μέσα σε συσκευασίες για τη διατήρηση της θερμοκρασίας.
Μη ζεσταίνετε ποτέ χωρίς επιτήρηση τρόφιμα σε δοχεία από πλαστικό, χαρτί ή άλλα εύφλεκτα υλικά.
Μη ρυθμίζετε ποτέ μια πολύ μεγάλη βαθμίδα ισχύος ή πολύ μεγάλο χρόνο μικροκυμάτων. Ακολουθήστε τα στοιχεία που αναφέρονται σε αυτές τις οδηγίες χρήσης.
Μην ξηραίνετε ποτέ τα τρόφιμα στο φούρνο μικροκυμάτων.
Μη ξεπαγώνετε ή μη ζεσταίνετε ποτέ τα τρόφιμα με μικρή περιεκτικότητα νερού, όπως π.χ. ψωμί, με πολύ μεγάλη βαθμίδα ισχύος μικροκυμάτων ή για πολύ χρόνο.
■Το λάδι φαγητού μπορεί να αναφλεγεί. Μη ζεσταίνετε ποτέ μόνο του το λάδι φαγητού στο φούρνο μικροκυμάτων.
:Προειδοποίηση – Κίνδυνος έκρηξης!
Τα υγρά ή άλλα τρόφιμα σε ερμητικά κλειστά δοχεία μπορούν να εκραγούν. Μη ζεσταίνετε ποτέ υγρά ή άλλα τρόφιμα σε ερμητικά κλειστά δοχεία.
:Προειδοποίηση – Κίνδυνος εγκαύματος!
■ Τα τρόφιμα με σκληρό κέλυφος ή πέτσα μπορούν, κατά τη διάρκεια, αλλά επίσης ακόμα και μετά το ζέσταμα, να σκάσουν με δύναμη. Μη μαγειρεύετε ποτέ τα αυγά στο κέλυφος ή μη ζεστάνετε ποτέ τα σφιχτοβρασμένα αυγά. Μη μαγειρεύετε ποτέ οστρακοειδή. Στα αυγά μάτια ή στα αυγά ποσέ πρέπει πρώτα να τρυπήσετε τον κρόκο. Στα τρόφιμα με σκληρό κέλυφος ή πέτσα, όπως π.χ. μήλα, ντομάτες, πατάτες ή λουκάνικα, είναι δυνατόν να σκάσει το κέλυφος ή η πέτσα. Πριν το ζέσταμα τρυπήστε το κέλυφος ή την πέτσα.
25

el Σημαντικές υποδείξεις ασφαλείας
■Η θερμότητα στις βρεφικές τροφές δεν κατανέμεται ομοιόμορφα. Μη ζεσταίνετε ποτέ βρεφικές τροφές μέσα σε κλειστά δοχεία. Απομακρύνετε πάντοτε το καπάκι ή το θήλαστρο. Μετά το ζέσταμα κουνάτε ή ανακατεύετε πάντοτε καλά. Ελέγχετε τη θερμοκρασία, προτού δώσετε την τροφή στο παιδί.
■Τα ζεστά φαγητά εκλύουν θερμότητα. Έτσι μπορούν τα μαγειρικά σκεύη να ζεσταθούν πολύ. Απομακρύνετε τα σκεύη ή τα εξαρτήματα από το χώρο μαγειρέματος πάντοτε με μια πιάστρα.
■Σε αεροστεγώς κλεισμένα τρόφιμα μπορεί να σκάσει η συσκευασία. Προσέχετε πάντοτε τα στοιχεία πάνω στη συσκευασία. Βγάζετε τα φαγητά πάντοτε με πιάστρες κουζίνας από το χώρο μαγειρέματος.
■Τα προσιτά μέρη/εξαρτήματα ζεσταίνονται πάρα πολύ κατά τη λειτουργία. Μην ακουμπάτε ποτέ τα καυτά μέρη/ εξαρτήματα. Κρατάτε τα παιδιά μακριά.
■Η μη ενδεδειγμένη χρήση της συσκευής είναι επικίνδυνη.
Μη ενδεδειγμένη χρήση είναι η ξήρανση τροφίμων, το στέγνωμα ρούχων, το ζέσματα παντοφλών, μαξιλαριών σπόρων ή δημητριακών, σφουγγαριών, υγρών πανιών καθαρισμού και άλλων παρόμοιων.
Για παράδειγμα οι υπερθερμασμένες παντόφλες, τα υπερθερμασμένα μαξιλάρια σπόρων ή δημητριακών, σφουγγάρια, υγρά πανιά καθαρισμού και άλλα παρόμοια μπορούν να οδηγήσουν σε εγκαύματα
:Προειδοποίηση – Κίνδυνος ζεματίσματος!
■Κατά το ζέσταμα υγρών μπορεί να προκύψει μια επιβράδυνση βρασμού. Αυτό σημαίνει, ότι θερμοκρασία βρασμού επιτυγχάνεται, χωρίς να ανεβαίνουν οι χαρακτηριστικές φυσαλίδες ατμού. Ήδη η παραμικρή δόνηση του δοχείου μπορεί να οδηγήσει σε ξαφνική υπερχείλιση και σε πιτσιλίσματα του καυτού υγρού. Κατά το ζέσταμα τοποθετείτε πάντοτε ένα κουτάλι μέσα στο δοχείο. Έτσι αποφεύγεται η επιβράδυνση του βρασμού.
:Προειδοποίηση – Κίνδυνος τραυματισμού!
■Το ακατάλληλο σκεύος μπορεί να ραγίσει. Τα σκεύη από πορσελάνη και κεραμικό υλικό μπορεί να έχουν πολύ μικρές τρύπες στις λαβές και στα καπάκια. Πίσω από αυτές τις τρύπες υπάρχει ένας κενός χώρος. Η υγρασία που έχει εισχωρήσει στον κενό χώρο μπορεί να σπάσει τα σκεύη. Χρησιμοποιείτε μόνο σκεύη, κατάλληλα για μικροκύματα.
■Μαγειρικά σκεύη και δοχεία από μέταλλο ή μαγειρικά σκεύη με μεταλλική διακόσμηση μπορούν σε περίπτωση καθαρής λειτουργίας μικροκυμάτων να οδηγήσουν στη δημιουργία σπινθήρων. Η συσκευή καταστρέφεται. Σε περίπτωση καθαρής λειτουργίας μικροκυμάτων μη χρησιμοποιείτε ποτέ μεταλλικά δοχεία.
:Προειδοποίηση – Κίνδυνος
ηλεκτροπληξίας!
Η συσκευή λειτουργεί με υψηλή τάση. Μην αφαιρέσετε ποτέ το περίβλημα.
:Προειδοποίηση – Κίνδυνος σοβαρής
βλάβης της υγείας!
■ Σε περίπτωση ανεπαρκούς καθαρισμού
μπορεί να υποστεί ζημιά η επιφάνεια της συσκευής. Μπορεί να εξέλθει ενέργεια μικροκυμάτων. Καθαρίζετε τακτικά τη συσκευή και απομακρύνετε αμέσως τα υπολείμματα των τροφίμων. Κρατάτε το χώρο μαγειρέματος, τη στεγανοποίηση της πόρτας, την πόρτα και τον αναστολέα της πόρτας πάντοτε καθαρά. ~ "Καθαρισμός"
στη σελίδα 36
■Από μια χαλασμένη πόρτα του χώρου μαγειρέματος ή από μια χαλασμένη στεγανοποίηση της πόρτας μπορεί να εξέλθει ενέργεια μικροκυμάτων. Μη χρησιμοποιείτε ποτέ τη συσκευή, όταν η πόρτα του χώρου μαγειρέματος ή η στεγανοποίηση της πόρτας έχουν υποστεί ζημιά. Καλέστε την υπηρεσία τεχνικής εξυπηρέτησης πελατών.
■Στις συσκευές χωρίς κάλυμμα περιβλήματος εξέρχεται ενέργεια μικροκυμάτων. Μην αφαιρείτε ποτέ το κάλυμμα περιβλήματος. Σε περίπτωση εργασιών συντήρησης ή επισκευής καλέστε την υπηρεσία τεχνικής εξυπηρέτησης πελατών.
26
 Loading...