


Radio / MD
Dallas RMD 169 US
Operating instructions

1 |
2 |
3 |
4 |
5 |
13 |
12 |
11 |
10 |
9 |
8 |
7 |
6 |
|
|
19 |
14 |
15 |
18 |
|
|
2 |
20
1 |
21 |
|
3
17 16
2

Contents |
|
Condensed instructions ................ |
4 |
Remote control RC 08 ................. |
11 |
Important ...................................... |
12 |
Read the following before using |
|
the unit .................................................. |
12 |
Traffic safety ......................................... |
12 |
Installation ............................................. |
12 |
Telephone mute .................................... |
12 |
Accessories .......................................... |
12 |
Guarantee ............................................. |
12 |
International hotline .............................. |
12 |
KeyCard anti-theft protection |
|
system ........................................... |
13 |
Switching on the unit ............................ |
13 |
Removing the KeyCard ........................ |
13 |
Teaching in a second KeyCard/ |
|
replacing a KeyCard ............................. |
13 |
Displaying the radio passport data ....... |
14 |
Visual display for anti-theft |
|
protection .............................................. |
14 |
Care of the KeyCard ............................. |
14 |
KeyCard lost/damaged ......................... |
14 |
Teaching in the new KeyCard .............. |
14 |
Input errors ........................................ |
14 |
Selecting the operating mode .... |
15 |
Enhancing display legibility ....... |
15 |
Radio operation with RDS ........... |
16 |
Activating/deactivating RDS ................. |
16 |
AF - alternative frequency .................... |
16 |
Selecting the frequency band ............... |
16 |
Station tuning ........................................ |
17 |
Paging through the transmission chains |
|
(FM only) ............................................... |
17 |
Changing the memory level (FM) ......... |
17 |
Storing stations ..................................... |
17 |
Automatically saving the strongest |
|
station with Travelstore ........................ |
18 |
Calling up stored stations ..................... |
18 |
Sampling stored stations with |
|
Preset Scan .......................................... |
18 |
Sampling stations with Radio Scan ...... |
19 |
Changing the sampling time (Scan) ..... |
19 |
Changing the sensitivity of the |
|
seek run ................................................ |
19 |
Toggling between stereo and mono |
|
(FM) ...................................................... |
19 |
Automatic bandwidth switching |
|
(SHARX) ............................................... |
19 |
PTY – Program Type ............................ |
20 |
Program type ........................................ |
20 |
MiniDisc mode/ |
|
CD changer mode ........................ |
22 |
Inserting a MiniDisc .............................. |
22 |
Removing the MiniDisc ......................... |
22 |
Activating MiniDisc mode ..................... |
22 |
MD text.................................................. |
22 |
Activating/deactivating MD text ............ |
22 |
Displaying the MD text.......................... |
22 |
Activating CD changer mode ................ |
23 |
Selecting the display type ..................... |
23 |
Selecting tracks and CDs ..................... |
23 |
Repeating tracks and CDs ................... |
23 |
TPM (Track Program Memory) ............. |
24 |
MIX ........................................................ |
24 |
SCAN .................................................... |
25 |
Assigning a name to CDs ..................... |
25 |
Deleting the CD name/TPM store using |
|
DSC-UPDATE ...................................... |
25 |
Clock - Time .................................. |
26 |
Setting the time ..................................... |
26 |
Displaying the time ............................... |
26 |
Correcting the time following an |
|
interruption to the power supply ........... |
26 |
Deactivating hours adjustment ............. |
26 |
Equalizer setting .......................... |
27 |
Adjustment instructions ........................ |
27 |
Adjusting the frequency level ............ |
27 |
Selecting a quality factor for the |
|
bass or mid-range ............................. |
28 |
Selecting the preset sound setting: ...... |
28 |
Tips on adjusting the equalizer ......... |
29 |
Programming with DSC ............... |
30 |
Overview of the factory default settings |
|
with DSC ............................................... |
32 |
Technical data .............................. |
32 |
Glossary of technical terms ....... |
33 |
Installation and |
|
connection instructions ............ |
138 |
DEUTSCH ENGLISH FRANÇAIS ITALIANO NEDERLANDS SVENSKA ESPAÑOL PORTUGUÊS
3
Condensed instructions
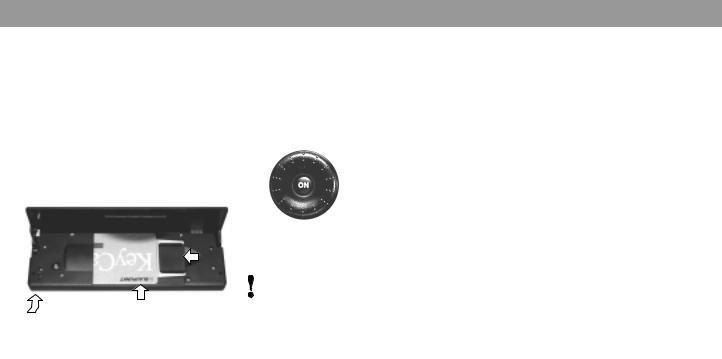
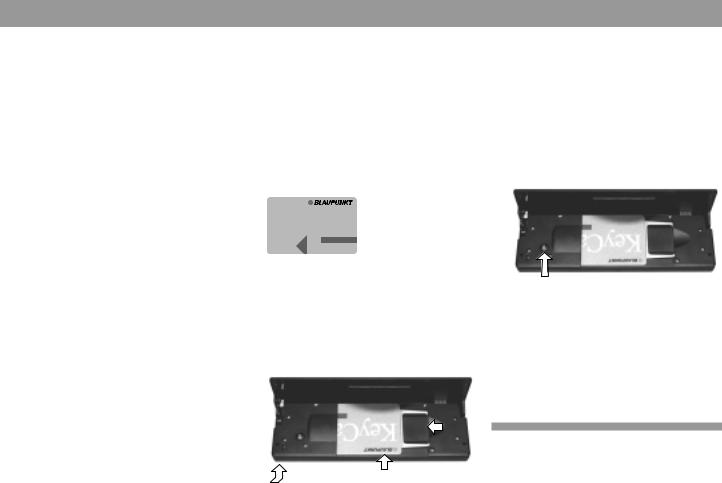
1Disengaging the fold-down control panel
Disengage the control panel to insert or remove the KeyCard and CD.
To disengage the control panel, press knob 1: the control panel folds down. The control panel cannot be removed, nor should it be used a shelf.
To re-engage the control panel, push it back into its original position (Arrow 3).
2
1
3
For safety reasons, the control panel must always be engaged whilst the vehicle is moving.
When leaving the vehicle, open the control panel and remove the KeyCard in order to prevent theft.
2ON
Switching on the unit
Insert the KeyCard and press ON briefly.
The unit is switched on in the last operating mode selected and with the previously selected volume.
Switching off the unit
Press ON for approx. 1 second.
The display can be adjusted for the desired viewing angle in order to improve legibility. Refer to “Improving the legibility of the display” if necessary.
Switching the sound on/off
Press ON briefly. “MUTE” appears on the display when the sound is switched off.
To switch the sound back on again, turn the volume knob 3.
Switching the unit on/off using the KeyCard
Insert/remove the KeyCard to switch the unit on and off.
Refer also to the description of the KeyCard anti-theft system @ in the condensed instructions.
Switching on/off by the ignition
The unit may be connected up such that it is switched on and off by the vehicle ignition.
When the ignition is switched off, a double beep reminds you to remove the KeyCard before leaving the vehicle.
Switching on whilst the ignition is off
With the ignition off (and the KeyCard inserted), proceed as follows to operate the unit:
Press ON when the double beep sounds.
The unit is switched on.
The unit switches itself off automatically after an hour’s use in order to prevent the vehicle battery from running down.
4
Condensed instructions
3Adjusting the volume
Turn the knob to adjust the volume.
The selected value is shown on the display. When switched on, the unit plays at the preselected volume (ON VOL).
ON VOL can be changed (refer to “Programming with DSC – ON VOL”).
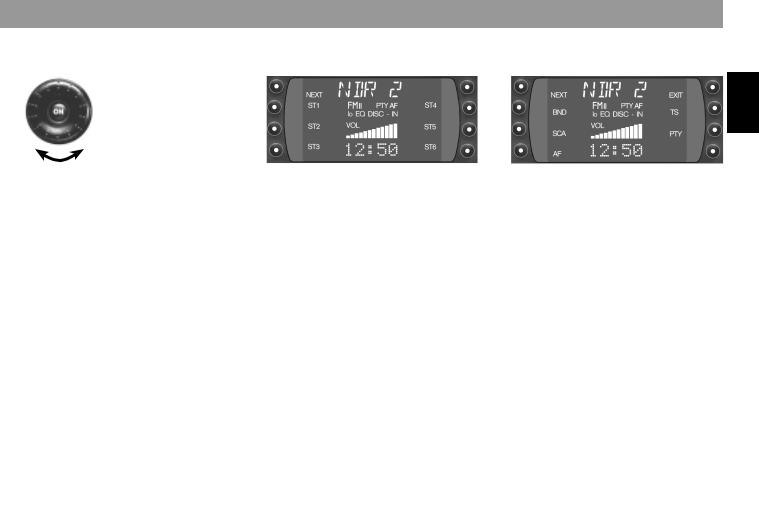
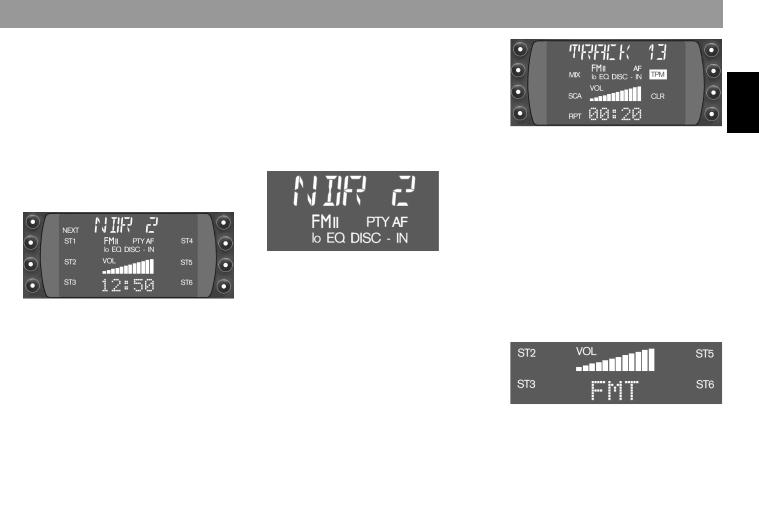
4Softkeys/display
Softkey = key with variable function. The functions shown in the display can be selected.
Radio mode
In radio mode, use TU to toggle between menu level 1 and menu level 2. The system automatically returns to menu level 1 when no key has been pressed for eight seconds.
Menu level 1
Station keys and memory levels
NEXT - FM
Switch between the memory levels FM I, FM II, FM T.
NEXT - AM, AMT
Switch between the AM and AMT frequency bands.
ST1 - ST6
ST1ST6 can be used on this menu level to store radio stations on the FM levels I, II and “T”.
You can store six stations each on the AM and AMT bands.
Store station –press one of the station buttons ST1ST6 until the station can be heard again (beep).
Call up station –select the frequency band. On FM, select the memory level using NEXT and press the appropriate station key briefly.
Menu level 2
Adjusting radio functions
NEXT - FM
Switch between the memory levels FM I, FM II, FM T.
NEXT - AM, AMT
Switch between the AM and AMT frequency bands.
BND
Select the frequency band and memory level (FM I, FM II, FM T, AM, AMT).
SCA - Scan
a) PTY is deactivated (logo is lit normally, not in reverse video)
Press SCA (Radio Scan) briefly – “SCAN” appears in the display alternately with the code of the sampled station. All stations on the frequency band which can be received are sampled briefly.
DEUTSCH ENGLISH FRANÇAIS ITALIANO NEDERLANDS SVENSKA ESPAÑOL PORTUGUÊS
5
Condensed instructions
Press SCA for approx. 1 second (Preset Scan) –
a beep sounds, “SCAN” appears in the display alternately with the code
of the sampled station.
The stations stored on the station keys and which can be received are sampled briefly.
Stopping Radio Scan/Preset Scan: Press SCA or the seek rocker again.
b) PTY is activated (logo appears in reverse video on the display)
Press SCA –
the stations transmitting the selected PTY program type are sampled briefly.
AF
(RDS mode/Alternative Frequency) RDS mode on/off: Select menu level 2 using TU and press AF briefly.
If “AF” appears in reverse video in the display, the radio automatically looks
for a frequency with better reception for the same station.
AF on/off: Select menu level 2 using TU and hold AF down.
EXIT
Press the key briefly to terminate or abort the adjustment process.
ENT (Enter)
Press briefly to accept/save the adjustments.
TS (Travelstore)
Press TS to switch from any frequency band to FMT or AMT. The six strongest stations are automatically stored. When they have been stored, the strongest station is selected and played.
PTY (Program Type)
PTY turns the station keys into program type keys.
“PTY” must first appear on the display in reverse video (press PTY if necessary).
A program type can now be stored and selected with each station key.
Call up PTY program types using the rocker << >> and save with the station
key (hold down for approx. 2 seconds until the beep sounds).
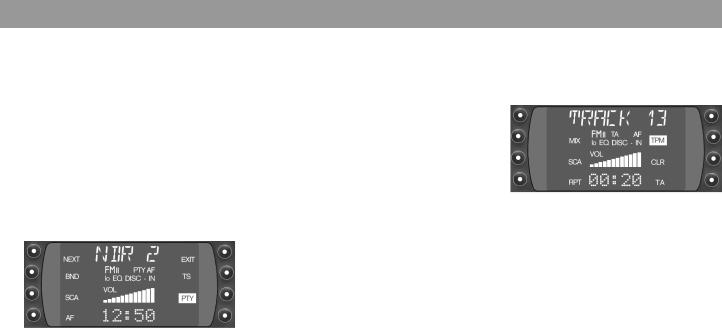
MiniDisc and CD changer mode
MIX, SCAN, RPT (repeat) and TPM can be selected in MiniDisc and CD changer mode by means of the corresponding softkeys.
MIX
MiniDisc and CD tracks can be replayed in random order.
You can select the following functions by pressing the MIX key:
-MIX MD/MIX CD = Tracks on the MiniDisc or CD (in CD changer mode) are played in random order. In CD changer mode, CDs are selected in numerical order, tracks are replayed in random order.
-MIX MAG (CD changer mode only) = All tracks in the magazine are played in random order.
-MIX OFF = Switches off function.
6

Condensed instructions
SCA - Scan
For sampling the tracks briefly (in CD changer mode, the tracks of all CDs).
Starting Scan:
Press SCA. The tracks are sampled briefly in ascending order. The sampling time can be adjusted.
(Refer to “Programming with DSC – SCANTIME”.)
Ending Scan:
Press SCA. The last track selected continues playing.
RPT - Repeat
MiniDisc tracks and, in CD changer mode, CD tracks and CDs, can be repeated.
Press the RPT key to select the following functions:
-REP TRCK = Repeat track
-REP CD = Repeat CD (only in CD changer mode)
-RPT OFF = Switches off function.
TPM - Track Program Memory For storing and playing preferred tracks in MiniDisc and CD changer
mode. Up to 30 MiniDiscs can be managed in MiniDisc mode and 99 CDs in CD changer mode with a maximum of 40 tracks each. (Refer to the “TPM programming” section.)
CLR
For clearing the TPM memory (refer to the “Clearing the TPM memory” section).
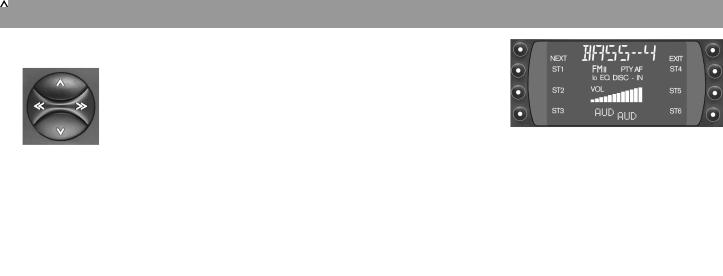
5DPE
For activating/deactivating the equalizer and changing the equalizer settings.
Activating/deactivating the equalizer: Press DPE until the beep sounds. When the equalizer is activated, “EQ” appears in the display.
Changing the equalizer settings: Press DPE briefly. Further information on changing the equalizer settings: “Equalizer settings”:
6 Rocker |
|
DEUTSCH |
|
|
|
||
Radio mode |
|
|
|
|
|
|
|
If the rocker is pressed on menu level |
ENGLISH |
||
2, menu level 1 is automatically called |
|||
|
|||
up. |
|
||
|
|
|
|
|
|
|
|
|
|
FRANÇAIS |
|
|
|
|
|
|
|
|
|
/ Station seek |
ITALIANO |
||
|
|||
Up |
|
||
Down |
|
||
<< / >> Up/down in steps |
|
||
|
|||
NEDERLANDS |
|||
(on FM, only when AF and PTY are |
|||
|
|||
deactivated) |
|
||
FM only: |
|
||
|
|||
<< / >> Page through the transmission |
SVENSKA |
||
chains when AF is activated and |
|||
|
|||
PTY deactivated, |
|
||
e.g.: NDR 1, 2, 3, 4, N-JOY ... . |
|
||
|
|
|
|
|
|
|
|
|
|
ESPAÑOL |
|
|
|
|
|
|
|
|
|
|
|
PORTUGUÊS |
|
|
|
|
|
7
Condensed instructions
MiniDisc and CD changer mode
CDC mode
Select CD
>> Up: Press briefly.
<<Down: Press briefly.
Select track
Up: Press briefly.
CUE - fast forward (audible):
Keep depressed
Down: Press twice or more in quick succession
Replay track from beginning:
Press briefly
REVIEW - fast rewind (audible):
Keep depressed
MD mode
Select track
 / >> Up: Press briefly
CUE - fast forward (audible):
Keep depressed
 / << Down: Press twice or more in quick succession
Replay track from beginning:
Press briefly
REVIEW - fast rewind (audible):
Keep depressed
Further functions of the rocker:
Further settings available with
AUD 8
DSC-MODE 7
PTY
The settings are available only if the corresponding function is activated.
7DSC (Direct Software Control)
You can adjust programmable default settings using DSC.
Further information: “Programming with DSC”.
8AUD
For adjusting the treble, bass, balance (left/right), fader (front/rear) and loudness settings.
Loudness = adjustment of the lowvolume sounds to the human ear.
Different treble, bass and loudness settings can be stored for the FM, AM, MD and AUX modes.
Adjustment procedure:
Select mode.
Press AUD once: “BASS” and the selected value appear on the display.
Select from the options using << / >>. Use  /
/ to change the settings.
The values selected are shown on the display. The last setting selected is stored automatically.
Particular feature of loudness:
The values can be selected between LOUD 6 and LOUD OFF by means of the rocker  /
/ .
.
Leaving AUD:
Press EXIT.
If no change is made within eight seconds, AUD is automatically switched off.
8
Condensed instructions
9DIS
Selecting various display modes. Radio mode
Press DIS briefly:
-Name of the selected station
-Currently selected frequency
-PTY code
A condition is that an RDS station can be received with an adequate field strength.
Press DIS for approx. two seconds: Toggle display between time and frequency band (incl. memory level in the case of FM).
MiniDisc mode
Press DIS briefly:
-Track number, time
-Track number, time played
Changer mode
Press DIS briefly:
-CD number, track number, time
-CD number, track number, time played
-CD name, track number
:Display
NDR2 |
- |
Station name |
FM |
- |
Frequency band |
I, II, T |
- Memory level I, II or Travel- |
|
|
|
store |
PTY |
- Program type is activated |
|
AF |
- |
Alternative frequency with |
|
|
RDS |
lo |
- Seek sensitivity can be se- |
|
|
|
lected with DSC |
EQ |
- |
Equalizer is activated |
DISC-IN |
- |
MiniDisc is inserted |
TRACK 13 - |
Track number |
|
or |
|
|
VIVALDI |
- |
CD name (CD changer mode) |
or |
|
|
CD 5 T 2 |
- |
CD number and track number |
|
|
(CD changer mode) |
MIX |
- |
Tracks can be played in ran- |
|
|
dom order |
SCA |
- |
Sample tracks |
RPT |
- |
Repeat function for MiniDisc/ |
|
|
CD changer mode |
TPM |
- |
Save and play preferred |
|
|
tracks |
CLR |
- |
Clear TPM memory |
FM I, II, T |
- |
FM memory level |
or |
|
|
AM, AMT |
- |
Frequency band |
or |
|
|
00:20 |
- |
Time (time played) |
or |
|
|
12:50 |
- |
Time |
DEUTSCH ENGLISH FRANÇAIS ITALIANO NEDERLANDS SVENSKA ESPAÑOL PORTUGUÊS
9
Condensed instructions
;CDC
Switch to changer mode (only if a changer is fitted).
If a changer is not fitted, AUX is selected. Condition: AUX ON must be selected in the DSC menu.
<MD
Switch to MiniDisc mode.
=TU (TUNER)
For switching to the radio mode, for toggling between FMI, FM II, TS (Travelstore), AM and AMT memory levels/ frequency bands.
>Slot for MiniDisc
When the MiniDisc is inserted with the label facing upwards it is automatically transported into the operating position. MiniDisc play mode is selected automatically.
?Visual anti-theft protection
The following conditions must be met if the LED is to flash as a visible antitheft protection measure:
The unit is switched off; The control panel is open; The KeyCard is removed;
The ignition is off and LED ON is selected in the DSC menu (factory default setting).
Further information: “Programming with DSC, LED ON/OFF”.
@KeyCard anti-theft protection system
The KeyCard must be inserted before the unit can be operated.

 KeyCard
Inserting the KeyCard
To disengage the control panel, press key 1. The control panel folds down. Insert the KeyCard with the contact surface facing downwards (see diagram). Engage the control panel.
2
1
3
Remove the KeyCard following the procedure in reverse.
Important: read the information under “KeyCard anti-theft protection system”.
AEject
Hold the key for MiniDisc ejection down for approx. 2 seconds: the MiniDisc is ejected.
For safety reasons, the control panel must always be engaged whilst the vehicle is moving.
When leaving the vehicle, open the control panel and remove the KeyCard in order to prevent theft.
10
Remote control RC 08
19
18
20
21
BV- / V+
Adjust the volume
CSRC (Source)
Select the operating mode
-Radio
-MiniDisc
-Changer mode (if a changer is connected)
DKeys <</>>,  /
/
Radio mode
Station seek
 Up
Up
 Down
Down
<</>> Up/down in steps (on FM only when AF is deactivated)
FM only:
<</>> Page through the transmission chains, if AF is on, e.g. NDR 1, 2, 3, 4, N-JOY ... .
MiniDisc and CD changer mode
CDC mode Select CD
>> Up: Press briefly << Down: Press briefly
Select track
Up: Press briefly
CUE - fast forward (audible):
Keep depressed
Down: Press twice or more in quick succession
Replay track from beginning:
Press briefly
REVIEW - fast rewind (audible):
Keep depressed
MD mode
Select track
 / >> Up: Press briefly
CUE - fast forward (audible):
Keep depressed
 / << Down: Press twice or more in quick succession
Replay track from beginning:
Press briefly
REVIEW - fast rewind (audible): Keep depressed
E
Switching replay on/off:
Press  briefly. “MUTE” appears on the display when the sound is switched off.
DEUTSCH ENGLISH FRANÇAIS ITALIANO NEDERLANDS SVENSKA ESPAÑOL PORTUGUÊS
11

Read the following before using |
Telephone mute |
the unit |
If a mobile phone is connected, radio and |
|
|
Before using the car radio, read the follow- |
MD/CD sound can be muted automatically |
ing instructions carefully. |
when the phone is in use (telephone mute). |
|
“PHONE” then appears on the display. |
Traffic safety
Traffic safety is of paramount importance. Always use your car radio system in a way which enables you to cope with the traffic situation.
Remember that your vehicle covers 45 feet a second at a speed of 32 mph.
In critical situations, do not operate the radio.
You must remain able to hear warning signals, for example from police and fire service vehicles, immediately and reliably.
Keep the volume therefore at a reasonable level whilst driving.
Installation
If you intend to install or modify the system yourself, read the installation and connection instructions at the end of the operating instructions before doing so.
Accessories
Only use accessories and spare parts approved by Blaupunkt.
The following Blaupunkt products can be used with this unit:
Remote control RC 08
The RC 08 infrared remotecontrol permits operation of the chief functions from the steering wheel.
Amplifier
All Blaupunkt amplifiers
12
CD changer
The following CD changers can be fitted directly:
CDC A 06, A 072, A 08, IDC A 09.
CD changers A 05 and A 071 can be fitted by means of the 7 607 889 093 adapter cable.
Guarantee
The unit is guaranteed in accordance with the statutory provisions of the country in which it was purchased.
Irrespective of the statutory provisions, Blaupunkt guarantees the unit for twelve months.
Should you have any questions concerning the guarantee, please consult your dealer. Your receipt suffices as proof of guarantee.
International hotline
Do you have any questions regarding operation of the unit, or do you require further information?
Simply give us a call.
You can reach us on the following numbers:
Tel. 800-266 25 28
Fax: 708-681 71 88
 Loading...