Black & Decker FL3WBD User Manual

Waterproof 3W LED Spotlight
INstruction Manual
BC
Catalog Number FL3WBD
Thank you for choosing Black & Decker! Go to www.baccusglobal.com
to register your new product.
PLEASE READ Before returning this product for any reason:
If you have a question or experience a problem with your purchase, go to
http://www.baccusglobal.com for instant answers 24 hours a day.
If you can’t find the answer or do not have access to the internet,
call 1-877-571-2391 from 9 a.m. to 5 p.m. EST, Mon. – Fri. to speak with an agent. Please have the catalog number available when you call.
SAVE THIS MANUAL FOR FUTURE REFERENCE.
|
|
Cat. # FL3WBD |
July 2013 |
|
|
Copyright © 2013 Baccus Global LLC |
Printed in China |
|
|
|
|
28 |
|
|
1 |
FL3WBD_ManualENSP_071713.indd 28-1 |
|
|
7/17/2013 7:26:47 PM |
|
|
||
|
|
|
|

This device complies with part 15 of the FCC rules. Operation is subject to the following two conditions: (1) this device may not cause harmful interference, and (2) this device must accept any interference received, including interference that may cause undesired operation.
This equipment has been tested and found to comply with the limits for a Class B digital device, pursuant to part 15 of the FCC Rules. These limits are designed to provide reasonable protection against harmful interference in a residential installation. This equipment generates, uses and can radiate radio frequency energy and, if not installed and used in accordance with the instructions, may cause harmful interference to radio communications. However, there is no guarantee
that interference will not occur in a particular installation. If equipment does cause harmful interference to radio or television reception, which can be determined by turning the equipment off and on, the user is encouraged to try to correct the interference by one or more of the following measures:
•Reorient or relocate the receiving antenna.
•Increase the separation between equipment and receiver.
•Connect the equipment into an outlet on a circuit different from that to which the receiver is connected.
•Consult the dealer or an experienced radio/TV technician for help.
Changes or modifications not approved by the party responsible for compliance could void user’s authority to operate the equipment.
READ ALL INSTRUCTIONS
 WARNING: Read all instructions before operating spotlight. Failure to follow all instructions listed below may result in electric shock, fire and/or serious injury.
safety guidelines / definitions
 DANGER: Indicates an imminently hazardous situation which, if not avoided, will result in death or serious injury.
 WARNING: Indicates a potentially hazardous situation which, if not avoided, could result in death or serious injury.
 CAUTION: Indicates a potentially hazardous situation which, if not avoided, may result in minor or moderate injury.
CAUTION: Used without the safety alert symbol indicates potentially hazardous situation which, if not avoided, may result in property damage.
RISK OF UNSAFE OPERATION. When using tools or equipment, basic safety precautions should always be followed to reduce the risk of personal injury. Improper operation, maintenance or modification of tools or equipment could result in serious injury and property damage. There are certain applications for which tools and equipment are designed. Manufacturer strongly recommends that this product NOT be modified and/or used for any application other than for which it was designed. Read and understand all warnings and operating instructions before using any tool or equipment.
IMPORTANT SAFETY INSTRUCTIONS
WARNING: This product or its power cord contains lead, a chemical known to the State of California to cause cancer and birth defect or other reproductive harm. Wash hands after handling.
INSTRUCTIONS PERTAINING TO RISK OF FIRE, ELECTRIC SHOCK, OR INJURY TO PERSONS
 WARNING – WHEN USING ELECTRICAL APPLIANCES, BASIC PRECAUTIONS SHOULD ALWAYS BE FOLLOWED, INCLUDING THE FOLLOWING:
•To reduce the risk of injury, close supervision is necessary when the spotlight is used near children.
•Use only attachments recommended or sold by the manufacturer.
WARNING: TO REDUCE THE RISK OF ELECTRIC SHOCK:
•Charge indoors only. Do not expose chargers to water or any other liquid.
•Use only the charger supplied by the manufacturer to recharge.
•When an extension cord is used:
2
–The marked rating of the detachable power supply cord or extension cord should be at least as great as the electrical rating of this appliance.
–The cord should be arranged so that it will not drape over the countertop or tabletop where it can be tripped over, snagged, or pulled on unintentionally (especially by children).
–The extension cord should be kept dry and off the ground.
 WARNING: FIRE HAZARD: Keep spotlight lamp away from materials that may burn.
CAUTION: TO REDUCE THE RISK OF INJURY OR PROPERTY DAMAGE:
•3W LED gets hot quickly. Do not touch hot lens, guard or enclosure.
•Never place the light face down on any surface when lit, charging or not in use. Never store the light face down on any surface.
•Never look directly into the light or shine the light into another person’s eyes.
•Keep sharp objects away from lens — it can crack or break.
•Do not expose this unit to extremely high temperatures.
•Do not drop or throw spotlight. It contains a nickel metal hydride rechargeable battery pack.
•Use only with AC or DC charging adapters that are provided with unit. Plug in the charging adapter at the spotlight first, then plug into the charging source.
•Do not overcharge: Recharge up to 5 hours maximum.
•After charging/recharging, disconnect charging adapter or extension cord and wait 5 minutes before use.
•Do not crush, cut, pull or expose charging adapter cords to extreme heat.
•Position charging adapter cords so they do not become entangled or become a safety hazard. Keep charging adapter cords away from sharp edges.
•Do not open body casing. There are no user-serviceable parts inside.
•Do not operate the spotlight without the lens in place.
•To reduce risk of damage to electric plug and cord, pull by plug rather than cord when disconnecting.
•Do not attempt to charge the unit if the charger is damaged – return the charger to manufacturer for repair or replacement.
INSTRUCTIONS PERTAINING TO Waterproof Spotlights
The rubber “O” ring acts to preserve the waterproof qualities of the spotlight. The “O” ring contacts the end cap to prevent water from entering the gap. An undamaged rubber “O” ring, rubber bezel and lens, and proper sealing of the end cap before use are very important.
 CAUTION: TO REDUCE THE RISK OF PROPERTY DAMAGE:
•Attempting to remove the rubber “O” ring; use of the unit with a damaged “O” ring, rubber bezel or lens; improper sealing of the waterproof end cap; and/or submerging this unit in depths greater than 6 feet may cause the unit to no longer be waterproof. Do not submerge the unit if these conditions exist or the unit could sustain permanent damage.
•Submerging this unit in depths greater than 6 feet and/or operating it in water temperature other than between 41ºF and 104ºF (5ºC and 40ºC) could result in leakage, warping or malfunction, causing permanent damage to the spotlight.
SAVE THESE INSTRUCTIONS
Introduction
Congratulations on purchasing your new spotlight. Read this Instruction Manual and follow the instructions carefully before using your new spotlight.
Features
•Waterproof in depths of up to 6’
•Ultra-bright 3 watt LED beam with Dimmer Selector Knob
•Safety cap protects 12 Volt DC Charging Port
•Comfortable pistol grip
•Battery/Charge Status LED Indicator
•Rechargeable, maintenance-free NIMH battery
•Optional 12 volt DC charging adapter available
3
FL3WBD_ManualENSP_071713.indd 2-3 |
|
|
7/17/2013 7:26:48 PM |
|
|
||
|
|
|
|

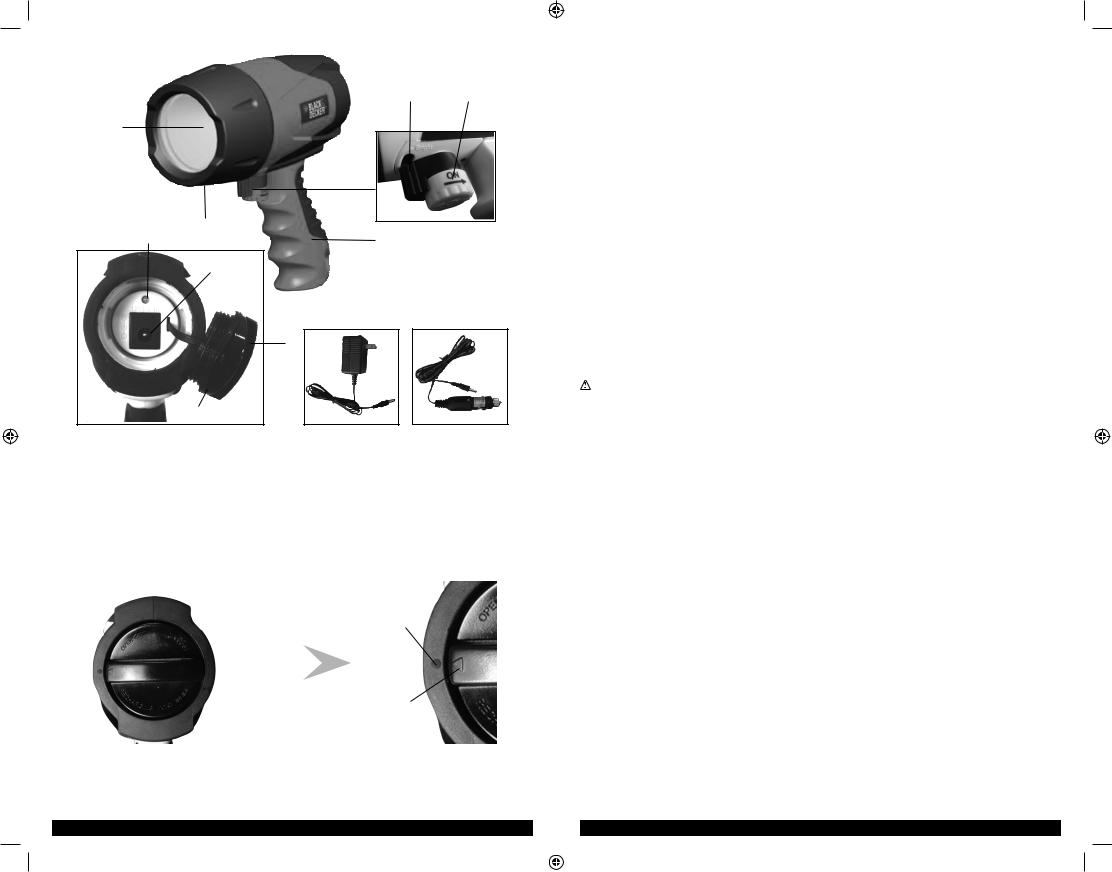
Controls and F
7 8
6
9
2 |
10 |
11 |
1
1. Rubber “O” ring
2. Translucent waterproof end cap (see detailed view on page 5)
3. 12 volt DC charging port (for use with 120 volt AC charger and 12 volt DC charger)
4. Battery/charge status LED indicator
5. Rubber bezel
6. 3 watt LED bulb
7. Dimmer selector knob
8. On/off power knob
9. Grip handle
10.120 volt AC charger
11.12 volt DC charger (optional accessory)
READING THE BATTERY/CHARGE STATUS LED INDICATOR
The battery and charging status LED indicator is located directly above the 12 volt DC charging port under the waterproof end cap on the back of the unit.
End Cap Detail |
|
|
|
Dot icon (For |
|
|
|
|
alignment to |
|
|
|
|
the triangular |
|
|
|
|
icon on the |
|
|
|
|
end cap) |
|
|
|
|
Triangular |
|
|
|
|
|
|
|
|
|
|
|
|
|
|
arrow |
|
|
|
|
icon (For |
|
|
|
|
alignment |
|
|
|
|
to the dot |
|
|
|
|
icon on the |
|
|
|
|
rear of unit) |
|
|
|
|
|
4
It lights or flashes in three colors to indicate the following:
When charging:
Green & Red (flashing alternately): Battery is overheated due to extensive use or recharging. The charging process will stop at this stage and will automatically resume after a cool down period of several minutes.
Green: Battery is in a fully charged state.
Orange: Battery is in a partially charged state.
Red: Battery needs to be recharged.
When operating:
Green: Battery is operating at full voltage.
Orange: Battery is operating at partial voltage.
Red: Battery is operating at low voltage, and should be recharged.
Red (flashing): Battery is operating at extremely low voltage. The built-in low voltage protection has activated and the unit will automatically shut down (after sounding several “beeps”). The unit must be recharged immediately.
When using the dimmer selector:
Green (flashing): The light is adjusting to dimmer setting. Red (flashing): The light is adjusting to brighter setting.
Charging/Recharging the Spotlight
This unit is shipped in a partially charged state. Charge unit after purchase and BEFORE first use using either the 120 volt AC charger or the optional 12 volt DC charger for approximately 3-5 hours. Charge after each use until the battery/charge status LED indicator lights green.
IMPORTANT: When the unit is not in use, we recommend that the battery is charged at least every 30 days.
CAUTION: TO REDUCE THE RISK OF PROPERTY DAMAGE:
•Make sure the unit is thoroughly dry before charging or recharging. If the unit has been submerged, wipe it dry with a soft cloth before opening the end cap. If water leaks into the charging port, the unit can sustain permanent damage.
•Never place the light face down on any surface when charging.
•Failure to keep the battery charged will cause permanent damage and result in poor performance.
Charging/recharging using the 120 volt AC charger
•Make sure the spotlight is turned off by rotating the on/off power knob to the furthest position clockwise.
•Unscrew (counterclockwise) the waterproof end cap on the back of the unit and remove it.
•Insert the barrel connector of the AC charger into the 12 volt DC charging port on the back of the unit. Insert the plug end into a (powered) standard North American 120 volt 60Hz outlet.
•Charge until the battery/charge status LED indicator lights green (approximately 3-5 hours).
•Replace the end cap on the unit, screwing clockwise until the triangular arrow on the end cap is pointing to the dot icon on the rear of unit. Make sure it fits securely, but do NOT overtighten.
Charging/recharging using the 12 volt DC charger (optional accessory)
•Make sure the spotlight is turned off by rotating the on/off power knob to the furthest position clockwise.
•Unscrew (counterclockwise) the waterproof end cap on the back of the unit and remove it.
•Plug the barrel tip of the supplied 12 volt DC charger into the 12 volt DC charging port.
•Insert the 12 volt DC plug end into the accessory outlet of your vehicle or other 12 volt DC power source.
•Charge until the green battery status LED lights (approximately 3-5 hours). DO NOT CHARGE FOR LONGER THAN 5 HOURS USING THIS METHOD.
•Replace the end cap on the unit, screwing clockwise until the triangular arrow on the end cap is pointing to the dot icon on the rear of unit. Make sure it fits securely, but do NOT overtighten.
Note: When using a vehicle’s 12 volt DC accessory outlet as a charging source, be aware that some vehicles require you to turn on the ignition to power the accessory outlet.
 WARNING:TO AVOID THE RISK OF PROPERTY DAMAGE:
•NEVER CONNECT THE UNIT TO A POSITIVE GROUNDED VEHICLE.
•The 12 Volt DC Adapter must only be connected to batteries with a nominal output voltage of 12 volts. The unit will not operate from a 6 volt battery and will sustain permanent damage if connected to a 24 volt battery.
5
FL3WBD_ManualENSP_071713.indd 4-5 |
|
|
7/17/2013 7:26:48 PM |
|
|
||
|
|
|
|
 Loading...