


BLENDER
KOMPERNASS GMBH · BURGSTRASSE 21 · D-44867 BOCHUM www.kompernass.com
ID-Nr.: KH527-12/08-V3
KH 527
BLENDER
Operating instructions
TEHOSEKOITIN
Käyttöohje
MIXER
Bruksanvisning
BLENDER
Betjeningsvejledning
ΜΠΛΕΝΤΕΡ Οδηγίες χρήσης
STANDMIXER
Bedienungsanleitung
KH 527
q
w
e
o
r
t
y u
i

CONTENT |
PAGE |
|
|
Safety Notices |
2 |
|
|
Intended Use |
2 |
|
|
Technical data |
3 |
|
|
Unpacking |
3 |
|
|
Items supplied |
3 |
|
|
Appliance description |
3 |
|
|
Preparing for use |
3 |
|
|
Operation |
4 |
Filling and mounting the mixer jug |
4 |
Selecting operating speeds |
4 |
Filling when in use |
4 |
Removing the mixer |
5 |
|
|
Useful tips |
5 |
|
|
Cleaning |
5 |
Cleaning the mixer |
5 |
Cleaning the motor block |
6 |
After cleaning |
6 |
|
|
Storage |
6 |
|
|
Disposal |
7 |
|
|
Warranty & Service |
7 |
|
|
Importer |
7 |
Read the operating instructions carefully before using the appliance for the first time and preserve this booklet for later reference. Pass the manual on to whomsoever might acquire the scale at a later date.
- 1 -

Safety Notices
To avoid the risk of a potentially fatal electric shock:
•Ensure that the motor block, the power cable and the power plug are never submersed in water or other fluids.
•Only use the appliance in dry rooms, never use it outdoors or in moist environments.
•Make sure that the power cable never becomes wet or damp during operation. Lay the cable such that it does not get clamped or otherwise damaged.
•Arrange for defective power plugs and/or cables to be replaced at once by qualified technicians or our Customer Service Department.
•Always remove the plug from the power socket after use. Switching off the appliance is not sufficient because the appliance receives power as long as the power plug is connected to the socket.
•Check to ensure that the appliance is in a serviceable condition before taking it into use. The appliance may not be used if there is recognisable damage on it, especially to the motor block and the glass mixing jug.
•Immediately remove the plug from the socket should you hear or smell anything unexpected from the appliance when it is in use or there is an evident malfunction.
To avoid overheating and the risk of fire:
•Do not use the appliance in locations with direct sunlight or in the vicinity of heat generating appliances.
•NEVER fill the mixing jug with boiling fluids! Allow these to cool to a handwarm temperature. Otherwise, the appliance could overheat and/ or the glass of the mixing jug could crack!
To reduce the risk of fire or injury:
•NEVER insert your hand or fingers in the mixing jug, especially when it is in use. The cutters are extremely sharp!
•DO NOT open the cover when the appliance is in operation. Should you do so, pieces of the foodstuff could be thrown out at high speeds!
•Do not insert cutlery items or mixing tools into the mixing jug when the appliance is in use. There is a considerable risk of injury should these make contact with the swiftly rotating cutters!
•In order to be able to react immediately in the event of danger, always have the appliance under supervision when it is in use.
•This appliance is not intended for use by individuals (including children) with restricted physical, physiological or intellectual abilities or deficiences in experience and/or knowledge unless they are supervised by a person responsible for their safety or receive from this person instruction in how the appliance is to be used.
•Children should be supervised to ensure that they do not play with the appliance.
Intended Use
This appliance is intended for ...
–the mixing, blending and stirring of foodstuffs as well as the crushing of ice cubes,
–exclusively for normal domestic amounts and only for private use in a domestic environment in dry rooms.
This appliance is not intended for ...
–the hacking of hard foodstuffs, such as nuts, seeds, large kernels or stalks,
–the processing of materials that are not foodstuffs,
–utilisation for commercial or industrial purposes,
–for use in moist environments or outdoors.
Use only the accessories and spare parts that are specified for this appliance. Other parts are possibly not sufficiently suitable or safe!
- 2 -

Technical data |
|
Appliance description |
Nominal voltage: |
220 - 240 V~ 50 Hz |
Nominal power |
|
consumption: |
550 Watt |
Max. capacity: |
1.75 l |
Protection class: |
II |
CO time: |
3 Minutes |
The C.O. Time (Continuous Operation) details how long an appliance may be used without the motor overheating and being damaged. When the specified C.O. Time has been reached, the appliance must be switched off until the motor has cooled itself down.
Unpacking
Before taking the appliance into use check to ensure
that ...
–the appliance is free of visible damage, including also the power cable and plug, all accessories and all appliance parts,
–all packaging materials are removed from the
appliance. Preserve the packaging so as to be able to store the appliance under protection or to transmit it through the post, e.g. for repairs.
•Carefully clean all components before using the liquidiser for the first time (see “Cleaning”).
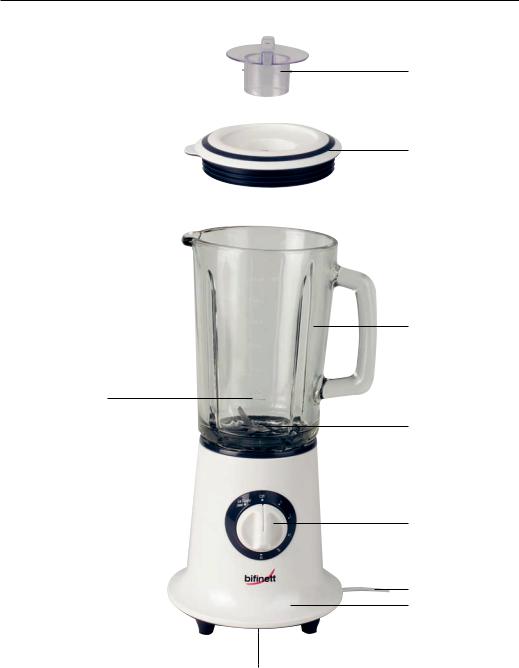
Items supplied
After unpacking, check to ensure all items are avail-able. Being supplied are:
1 x Motor block, with power cable and plug
1 x Mixer jug, with permanently assembled cutters
1 x Lid
1 x Filling cap
1 x Operating instruction
q Filling cap w Cover
e Mixer jug r Cutter
t Switch
y Power cable u Motor block i Cable storage o Scale
Preparing for use
When all components have been cleaned as described under “Cleaning”:
Position the appliance such that, ...
–the power plug is immediately accessible, so that it can be quickly withdrawn in the event of danger.
–the appliance stands firmly and without risk of slipping or tipping when under vibration.
–that the power cable y is not in the working area and thus not presenting a risk of being inadvertently snagged and tipping the appliance over.
- 3 -

Operation
Warning!
The motor switches itself off as soon as the mixing jug e is removed from the motor block u. It could then be overlooked that the appliance is still switched on. The motor will thus start of its own accord as soon as the mixing jug e is replaced on it:
Therefore:
•First insert the power plug into the wall socket when the mixer jug e is filled and mounted with its lid fitted and closed.
•Before mounting the mixing jug always check to see that the appliance is switched off or that the power plug has been removed.
•Before removing the mixer jug e, switch the appliance off, remove the power plug and wait for the motor to stop revolving.
Filling and mounting the mixer jug
Only fill the mixer jug e when it is removed from the motor unit.
Afterwards, firmly press the lid w onto the mixer jug e. Ensure that the pourer on the mixer jug e is also securely closed.
Insert the filling cap q into the lid opening and
secure it by turning it clockwise.
Place the ready filled and sealed mixer jug e onto the motor block u. Lightly turn the mixer jug e until you can press it down. The motor can start only when the mixer jug e is securely positioned.
Selecting operating speeds
When the mixer jug e is filled, completely sealed and securely fitted to the motor block u, you can then switch the appliance on.
Place the switch t on ...
–Level 1-3
for fluid or soft foodstuffs, for mixing, blending and stirring
–Level 3-5
for firmer foodstuffs or for hacking
–Level Ice Crush/Clean
for a short, powerful impulse operation, e.g. for crushing ice cubes or for cleaning. To avoid overburdening the motor the switch t does not lock into this position. Therefore, hold the switch t in this position for a short period.
Filling when in use
Warning!
Should you wish to insert further foodstuffs during operation, you may ONLY open the filling cap q provided for this purpose.
•Under no circumstance should you open the lid w. Pieces of the foodstuff could be thrown out at high speeds!
•Do not insert cutlery items or mixing tools into
the mixing jug e when the appliance is in use. There is a considerable risk of injury should these make contact with the swiftly rotating cutters r!
To insert something when the appliance is in operation, ...
turn the filling cap q anti-clockwise and remove it.
Afterwards, replace the filling cap q into the lid and secure it by turning it clockwise.
- 4 -

Removing the mixer
When the processing of the foodstuffs is complete:
Always first place the switch t into the OFF position ("0") and remove the power plug.
Wait until the motor has come to a complete standstill before lifting the mixer jug e straight up. It does not need to be turned.
Useful tips
–The best results when blending firm ingredients are achieved by placing small portions one after the other into the mixer jug e instead of inserting a single large portion.
–When processing firm ingredients, cut them into small pieces (2-3 cm).
–When mixing liquid ingredients begin first of all with a small measure of fluids. Gradually add more fluids to the mixture through the filling cap.
–The appliance can be stabilised by placing your hand on top of the closed liquidiser during operation.
–For the stirring of firm or very viscous foodstuffs it can be beneficial to use the impulse-operation, which helps avoid a blocking of the cutters r.
Cleaning
Caution!
Before starting to clean the liquidiser and its components:
•Ensure that the motor is switched off and the power plug removed from the socket.
Under no circumstance may the motor block u be submersed in water or other fluids.This could result in you receiving a fatal electric shock and the appliance could be damaged.
•Never open the housing of the appliance. This brings with it the risk of receiving a fatal electric shock.
•Never disassemble the cutters r and never reach into the mixer jug e. The cutters r are extremely sharp!
•Do not use solvents or abrasive cleaners on the plastic surfaces, they could be damaged by them.
Cleaning the mixer
So that you do not injure yourself on the cutters r, clean the mixer jug e only with a long handled dishwasher brush.
In a case of stubborn soiling, the mixer jug e can also be cleaned in a dishwasher. For this, always take the mixing jug e apart, as described later.
Clean the lid w and the filling cap q in a dishwasher or with the normal washing up.
If you clean the liquidiser directly after use, you can often achieve a satisfactory and hygienic level of cleaning with the following alternative:
Fill the mixer jug e with water, close the lid w and place the mixer jug e on the motor block
u.
Insert the power plug into the wall socket and activate the Ice Crush/Clean switch, causing the cutters r to rotate in the water with maximum revolutions.
- 5 -
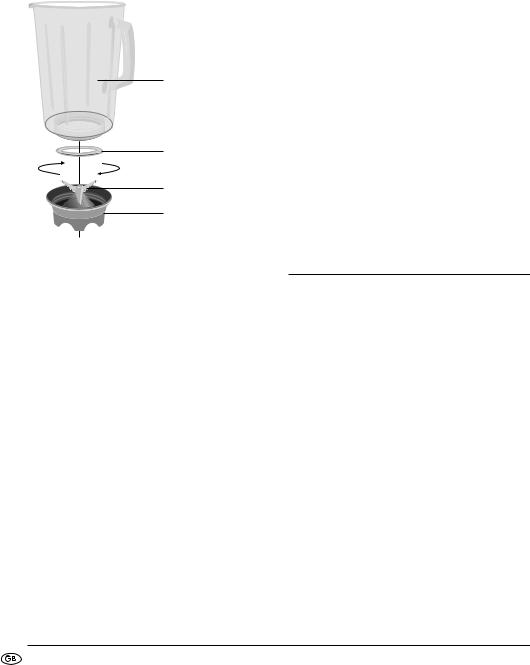
Should this not dislodge the soiling, you can separate the lower plastic part of the mixer jug e (with the cutters r) from the the glass part:
Remove the mixer jug e from the motor block u.
Turn the plastic part of the mixer jug e so that it separates itself from the glass part .
Attention!
Take care with the cutters . They are very sharp. Risk of injury!
Clean both parts thoroughly in a mild soapy solution or in a dishwasher.
Replace the plastic part of the mixer jug e back onto the glass part . Ensure that the sealing ring is correctly fitted.
Cleaning the motor block
Use a dry cloth or, at the most, a lightly moistened one for cleaning the plastic surfaces.
At every cleaning check that the contact switch in the receptor for the mixer jug e is not blokked by soiling residues. If you cannot dislodge any blockages with the corner of a piece of paper, make contact with Customer Services. Under no circumstances should you use a hard object, this could damage the contact switch.
Remove any possible residues on the underside of the motor block u only with a dry cloth or a stiff bristled brush. Ensure that nothing can enter through the ventilation opening of the appliance.
After cleaning
Allow all parts to dry well before re-assembling and re-using the liquidiser.
Storage
If you do not intend to use the liquidiser for an extended period, clean it thoroughly (see chapter "Cleaning").
Wrap the power cable y around the cable storage i on the base of the motor block u.
Store the liquidiser at a cool and dry location.
- 6 -
Disposal |
|
DES Ltd |
||||||
|
|
|
|
|
|
Do not dispose of the appliance in your |
Units 14-15 |
|
|
|
|
|
|
|
Bilston Industrial Estate |
||
|
|
|
|
|
|
|||
|
|
|
|
|
|
normal domestic waste. This product is |
Oxford Street |
|
|
|
|
|
|
|
subject to the European guideline |
Bilston |
|
|
|
|
|
|
|
|||
|
|
|
|
|
|
|||
|
|
|
|
|
|
2002/96/EC. |
WV14 7EG |
|
|
|
|
|
|
|
|
Tel.: 0870/787-6177 |
|
Dispose of the appliance through an approved dis- |
Fax: 0870/787-6168 |
|||||||
posal centre or at your community waste facility. |
e-mail: support.uk@kompernass.com |
|||||||
Observe the currently applicable regulations. |
|
|
||||||
In case of doubt, please contact your waste disposal |
|
Irish Connection |
||||||
centre. |
Harbour view |
|||||||
|
|
|
|
|
|
|
Howth |
|
|
|
|
|
|
|
Dispose of all packaging materials in an |
Co. Dublin |
|
|
|
|
|
|
|
environmentally responsible manner. |
Tel: 00353 (0) 87 99 62 077 |
|
|
|
|
|
|
|
|
Fax: 00353 18398056 |
|
Warranty & Service |
e-mail: support.ie@kompernass.com |
|||||||
|
|
|||||||
The warranty for this appliance is for 3 years from |
|
Importer |
||||||
the date of purchase. This appliance has been |
|
|
||||||
manufactured with care and meticulously examined |
|
KOMPERNASS GMBH |
||||||
before delivery. Please retain your receipt as proof |
|
BURGSTRASSE 21 |
||||||
of purchase date. Should a claim need to be made |
|
44867 BOCHUM, GERMANY |
||||||
under the warranty, please make contact by tele- |
|
|
||||||
phone with our service department. Only in this |
|
www.kompernass.com |
||||||
way can a post-free despatch for your goods be as- |
|
|
||||||
sured. |
|
|
||||||
The warranty covers ONLY claims for material and |
|
|
||||||
maufacturing defects, not for wearing or consuma- |
|
|
||||||
ble or for damage to fragile components. This pro- |
|
|
||||||
duct is for private use only and is not intended for |
|
|
||||||
commercial applications. |
|
|
||||||
The warranty will become void in the event of abusi- |
|
|
||||||
ve and improper handling, use of force and internal |
|
|
||||||
tampering not carried or approved by our authori- |
|
|
||||||
zed service branch. Your statutory rights are not |
|
|
||||||
restricted in any way by this warranty. |
|
|
||||||
- 7 -

- 8 -
SISÄLLYSLUETTELO |
SIVU |
|
|
Turvaohjeet |
10 |
|
|
Määräystenmukainen käyttö |
10 |
|
|
Tekniset tiedot |
11 |
|
|
Purkaminen pakkauksesta |
11 |
|
|
Toimituslaajuus |
11 |
|
|
Laitteen kuvaus |
11 |
|
|
Pystytys |
11 |
|
|
Käyttö |
12 |
Sekoitinosan täyttö ja asentaminen |
12 |
Nopeustason valitseminen |
12 |
Täyttö käytössä |
12 |
Sekoitinosan irrottaminen |
13 |
|
|
Hyödyllisiä ohjeita |
13 |
|
|
Puhdistus |
13 |
Sekoitinosan puhdistaminen |
13 |
Moottorilohkon puhdistaminen |
14 |
Puhdistuksen jälkeen |
14 |
|
|
Säilytys |
14 |
|
|
Hävittäminen |
15 |
|
|
Takuu & huolto |
15 |
|
|
Maahantuoja |
15 |
Säilytä käsikirja myöhempää käyttöä varten. Jos myyt laitteen, anna käsikirja uudelleen omistajalle!
- 9 -

Turvaohjeet
Välttääksesi sähköiskun aiheuttaman hengenvaaran:
•Varmista, ettei moottorilohkoa, virtajohtoa tai verkkopistoketta koskaan upoteta veteen tai muihin nesteisiin.
•Käytä laitetta ainoastaan kuivissa tiloissa, älä koskaan käytä sitä ulkona tai kosteassa ympäristössä.
•Pidä huolta siitä, ettei virtajohto kastu konetta käytettäessä. Vedä virtajohto siten, ettei se tartu, puristu tai vaurioidu muulla tavalla.
•Anna valtuutetun ammattihenkilöstön tai huoltopalvelun vaihtaa vaurioitunut verkkopistoke tai virtajohto välittömästi uuteen, jotta vaaroilta vältyttäisiin.
•Irrota pistoke pistorasiasta aina käytön jälkeen. Pelkästään virran katkaiseminen ei riitä, koska laitteessa on virtaa niin kauan, kunnes pistoke irrotetaan pistorasiasta.
•Tarkasta laitteen moitteeton kunto ennen jokaista käyttökertaa. Laitetta ei saa käyttää, jos siinä havaitaan vaurioita, erityisesti moottorilohkossa tai lasisessa sekoitinosassa.
•Irrota verkkopistoke välittömästi pistorasiasta, kun havaitset epätavallista ääntä tai hajua tai toimintahäiriön.
Ylikuumennusja tulipalovaarojen välttämiseksi:
•Älä käytä laitetta alueella, johon aurinko paistaa suoraan tai jossa esiintyy lämpöä synnyttävien laitteiden lämpövaikutusta.
•Älä koskaan täytä kiehuvia nesteitä sekoitinosaan. Anna niiden jäähtyä ensin kädenlämpöiseksi. Muutoin laite saattaa ylikuumentua ja sekoitinosan lasi haljeta!
Onnettomuusja loukkaantumisvaarojen välttämiseksi:
•Älä koskaan työnnä kättäsi sekoitinosaan, etenkään sen ollessa käynnissä. Terät ovat äärimmäisen teräviä!
•Älä avaa kantta, kun laite on käytössä. Muutoin elintarvikkeiden palasia voi singota ulos suurella nopeudella!
•On olemassa huomattava loukkaantumisvaara, näiden koskettaessa erittäin nopeasti pyöriviä teriä!
•Älä anna laitteen työskennellä ilman valvontaa, jotta voisit vaaran tullen heti reagoida.
•Tätä laitetta ei ole tarkoitettu sellaisten henkilöiden (mukaan lukien lapset) käyttöön, joiden rajoitetut, fyysiset, aistilliset tai henkiset kyvyt tai kokemuksen ja/tai tiedon puute estävät käytön, lukuun ottamatta tilanteita, joissa heitä valvoo turvallisuudesta vastaava henkilö tai joissa he ovat saaneet tältä ohjeita laitteen käytöstä.
•Lapsia tulee valvoa, jotta varmistettaisiin, etteivät he leiki laitteella.
Määräystenmukainen käyttö
Tämä laite on tarkoitettu ...
–elintarvikkeiden sekoittamiseen ja soseuttamiseen sekä jääpalojen murskaamiseen,
–ainoastaan kotitalouksissa tavanomaisille määrille ja ainoastaan yksityiseen kotikäyttöön kuivissa tiloissa.
Tätä laitetta ei ole tarkoitettu ...
–kovien elintarvikkeiden, kuten esim. pähkinöiden, kivien, suurten siementen tai varsien hienontamiseen,
–muiden materiaalien kuin elintarvikkeiden työstämiseen,
- 10 -

–ammattitai teollisuuskäyttöön,
–käytettäväksi kosteassa ympäristössä tai ulkona.
Käytä ainoastaan tälle laitteelle tarkoitettuja lisäja varaosia. Muut osat eivät välttämättä ole riittävän soveliaita tai turvallisia!
Tekniset tiedot
Nimellisjännite: |
220 |
- 240 V~ 50 Hz |
Nimellisteho: |
550 |
W |
Enimmäistäyttömäärä: |
1,75 l |
|
Suojausluokka: |
II |
|
LK-aika: |
3 minuuttia |
|
LK-aika (lyhytaikaiskäyttö) ilmoittaa, kuinka kauan laitetta voidaan käyttää moottorin ylikuumenematta ja vaurioitumatta. Ilmoitetun lyhytaikaiskäyttöajan (LK) jälkeen on laite pidettävä sammutettuna niin kauan, että moottori on jäähtynyt huoneen lämpötilaan.
Toimituslaajuus
Tarkasta pakkauksen avaamisen jälkeen toimituksen täydellisyys. Toimituslaajuuteen sisältyvät:
1 x moottorilohko, virtajohto ja verkkopistoke
1 x sekoitinosa, kiinteästi asennetulla leikkuuterällä
1 x kansi
1 x täyttökorkki
1 x käyttöohje
Laitteen kuvaus
q Täyttökorkki
w Kansi
e Sekoitinosa
r Leikkuuterä
t Katkaisin
y Virtajohto
u Moottorilohko
i Johtokela
o Asteikko
Purkaminen pakkauksesta |
|
Pystytys |
Varmista ennen laitteen käyttöä, että ...
–laite on vahingoittumaton, samoin kuin virtajohto verkkopistokkeineen sekä kaikki lisäja laiteosat,
–kaikki pakkauksen osat on poistettu laitteesta. Säilytä pakkausta laitteen suojattua varastointia tai sen lähettämistä varten, esim. korjaustapauk-
sessa.
•Puhdista huolellisesti kaikki osat ennen tehosekoittimen ensimmäistä käyttöä (katso “Puhdistus”).
Kun olet puhdistanut kaikki osat kohdassa "Puhdistus" kuvatulla tavalla:
Pystytä laite niin, että ...
–verkkopistoke on välittömästi käsillä, jotta se voitaisiin irrottaa pistorasiasta vaaratilanteessa.
–laite seisoo tukevasti ja liukumatta, jotta se ei kaatuisi värähdellessään.
–johto ei ulotu työskentelyalueelle ja ettei laitetta voida kaataa vahingossa virtajohdosta y vetämällä.
- 11 -

Käyttö
Varoitus!
Moottori sammuu heti, kun sekoitinosa e irrotetaan moottorilohkolta u. Silloin saattaa olla, ettei koneen päälläoloa välttämättä enää muisteta. Moottori käynnistyy silloin välittömästi heti, kun sekoitinosa e asennetaan:
Siksi:
•Työnnä verkkopistoke pistorasiaan vasta sitten, kun sekoitinosa e on asennettu paikoilleen valmiiksi täytettynä ja suljettuna.
•Varmista aina ennen asennusta, että laite on pois päältä tai verkkopistoke irrotettu pistorasiasta.
•Kytke se pois päältä ensin, irrota verkkopistoke ja odota, kunnes moottori on pysähtynyt, ennen kuin irrotat sekoitinosan e.
Sekoitinosan täyttö ja asentaminen
Täytä sekoitinosa e ainoastaan sen ollessa irti moottorilohkosta.
Paina sitten kansi w tiukkaan sekoitinosalle e. Varmista, että myös sekoitinosan e kaatonokka on suljettu.
Työnnä täyttökorkki q kannen aukkoon ja kierrä se kiinni myötäpäivään.
Aseta valmiiksi täytetty ja suljettu sekoitinosa e moottorilohkolle u. Kierrä sekoitinosaa e kevyesti, kunnes voit painaa sen alas. Moottori voi käynnis-tyä ainoastaan, kun sekoitinosa e on tiiviisti paikoillaan.
Nopeustason valitseminen
Kun sekoitinosa e on moottorilohkolla u valmiiksi täytettynä ja täysin suljettuna, voit käynnistää laitteen.
Kytke katkaisin t asentoon ...
–Taso 1-3
nestemäisille tai keskikiinteille elintarvikkeille, sekoittaaksesi ja soseuttaaksesi
–Taso 3-5
kiinteämmille elintarvikkeille tai hienontaaksesi
–Taso Ice Crush/Clean
lyhyttä, voimakasta impulssikäyttöä varten, esim. jääpalojen murskaamiseen tai puhdistamiseen. Kytkin t ei lukitu tähän asentoon, jotta moottori ei ylikuormittuisi. Pidä siksi kytkintä t tässä asennossa vain lyhyen aikaa.
Täyttö käytössä
Varoitus!
Kun haluat täyttää sekoittimeen jotakin käytön aikana, saat avata ainoastaan erikseen sitä varten tarkoitetun täyttökorkin q.
•Älä missään tapauksessa avaa kantta w. Elintarvikkeiden palasia saattaa singota ulos suurella nopeudella!
•Älä koskaan työnnä aterimia tai sekoitustarvikkeita sekoitusosaan e laitteen ollessa käytössä. On olemassa huomattava loukkaantumisvaara,
näiden koskettaessa r erittäin nopeasti pyöriviä teriä!
Voidaksesi täyttää sekoittimeen jotakin käytön aikana ...
kierrä täyttökorkki q ylös vastapäivään ja irrota se.
Työnnä lopuksi täyttökorkki q takaisin kannen aukkoon ja kierrä se kiinni myötäpäivään.
- 12 -

Sekoitinosan irrottaminen
Kun täytettyjen elintarvikkeiden työstäminen on lopetettu:
Aseta aina ensiksi katkaisin t pois päältä -asentoon ("0") ja irrota verkkopistoke.
Odota ensin, että moottori pysähtyy, ennen kuin irrotat sekoitinosan e suoraan ylöspäin nostamalla. Sekoitinosaa e ei saa tällöin kääntää.
Hyödyllisiä ohjeita
–Jotta saat parhaimmat tulokset soseuttaessasi kiinteitä aineksia, lisää ainekset sekoittimeen e vähitellen pienissä erissä, sen sijaan että täyttäisit suuren määrän kerralla.
–Kun käsittelet kiinteitä aineksia, leikkaa ne pieniksi paloiksi (2-3 cm).
–Nestemäisiä aineksia sekoittaessasi aloita aluksi vähäisellä nestemäärällä. Lisää nestettä vähitellen kannen aukon kautta.
–Kun asetat kätesi käyvän, suljetun tehosekoittimen päälle, voit näin vakauttaa laitteen hyvin.
–Kiinteiden tai erittäin paksujuoksuisten elintarvikkeiden sekoittamisessa voi olla hyödyksi käyttää pulssikäyttöä, jotta leikkuuterän r kiinnijuuttuminen estettäisiin.
Puhdistus
Varo!
Ennen tehosekoittimen ja sen osien puhdistamista:
•Varmista, että laite on otettu pois päältä ja että verkkopistoke on irrotettu.
Moottorilohko ua ei missään tapauksessa saa upottaa veteen tai muihin nesteisiin. Näin voi sähköisku aiheuttaa hengenvaaran ja laite saattaa vaurioitua.
•Älä koskaan avaa laitteen koteloa. Muutoin on olemassa sähköiskun aiheuttama hengenvaara.
•Älä koskaan irrota teriä r äläkä myöskään koskaan työnnä kättäsi sekoitinosaan e. Terät ovat äärimmäisen teräviä r!
•Älä käytä muovipintoihin liuotintai hankausaineita, ne saattavat muutoin vaurioitua.
Sekoitinosan puhdistaminen
Puhdista sekoitinosa e ainoastaan pitkävartisella astianpesuharjalla niin, jotta et loukkaa itseäsi teriin r.
Jos lika on itsepintaista, voit myös puhdistaa sekoitinosan e astianpesukoneessa. Pura tätä varten sekoitinosa e aina myöhemmin kuvatulla tavalla.
Puhdista kansi w ja täyttökorkki q astianpesukoneessa tai tiskatessasi.
Kun puhdistat tehosekoittimen heti käytön jälkeen, saavutat useimmissa tapauksissa riittävän hygienisen puhdistuksen seuraavilla vaihtoehdoilla:
Täytä sekoitinosa e vedellä, sulje kansi w ja aseta sekoitinosa e moottorilohkolle u. Työnnä verkkopistoke pistorasiaan ja käytä Ice Crush/Clean -käyttöä muutaman kerran, jotta terät r sekoittaisivat vettä suurimmalla nopeudellaan.
- 13 -
 Loading...