


CV_KH1557_E3476_LB3.qxd 23.04.2008 15:17 Uhr Seite 1
3 


KOMPERNASS GMBH · BURGSTRASSE 21 · D-44867 BOCHUM www.kompernass.com
ID-Nr.: KH1557-02/08-V2
RICE COOKER
KH 1557
RICE COOKER
Operating instructions
RIISINKEITIN
Käyttöohje
RISKOKARE
Bruksanvisning
RISKOGER
Betjeningsvejledning
BPAΣTHPAΣ PYZIOY
Οδηγίες χρήσης
REISKOCHER
Bedienungsanleitung
CV_KH1557_E3476_LB3.qxd 23.04.2008 15:17 Uhr Seite 4
KH 1557
o
i
q
u
 w
w
e r
y
t
s a
IB_KH1557_E3476_LB3 23.04.2008 15:49 Uhr Seite 1
CONTENT |
PAGE |
Safety information |
2 |
Intended use |
2 |
Technical Data |
3 |
Items supplied |
3 |
Appliance Overview |
3 |
Before the First Use |
3 |
Using the Rice Cooker |
3 |
Cooking Rice..................................................................................................................................... |
3 |
Steaming............................................................................................................................................ |
5 |
Troubleshooting |
6 |
Cleaning and care |
6 |
Disposal |
7 |
Warranty and Service |
7 |
Importer |
7 |
Read the operating instructions carefully before using the appliance for the first time and preserve this booklet for later reference. Pass the manual on to whomsoever might acquire the appliance at a later date.
- 1 -
IB_KH1557_E3476_LB3 23.04.2008 15:49 Uhr Seite 2
RICE COOKER KH1557
Safety information
 Danger! Electric shock!
 Risk of personal injury!
•Never leave the appliance unattended during operation.
 WARNING! Hot steam escapes from the
  steam hole and upon opening the cover! Risk of scalding!
•Connect the rice cooker only to correctly installed and earthed mains sockets supplying a voltage that tallies with the details given on the appliance identification plate.
•Always remove the plug from the power socket when you move or fill the device, in event of problems, before cleaning the appliance and when the cooker is not in use!
•Never disconnect the appliance by pulling on the power cable. Always pull on the plug itself.
•Never touch the appliance plug with wet or moist hands.
Never submerse the device in water or other liquids.
•Should the appliance ever fall into liquid, IMMEDIATELY remove the power plug from the socket. Then, do not operate the appliance again until
it has been inspected by an approved service company.
•Never subject the appliance to moisture and do not use it outdoors.
•Do not use the rice cooker while standing on a wet floor or when your hands or the appliance are wet.
•Position the power cable so that it does not come into contact with hot or sharp-edged objects.
•Do not kink or crush the power cable and do not wind it around the appliance.
•Arrange for defective power plugs and/or cables to be replaced at once by qualified technicians or our Customer Service Department.
•This appliance is not intended for use by individuals (including children) with restricted physical, physiological or intellectual abilities or deficiences in experience and/or knowledge unless they are supervised by a person responsible for their safety or receive from this person instruction in how the appliance is to be used.
•Children should be supervised to ensure that they do not play with the appliance..
•Allow the appliance and accessories to cool completely before cleaning and storing them.
Important! Appliance damage!
•When cooking, never cover the appliance lid with handtowels or anything similar.
•Never place the appliance adjacent to sources of heat.
•Never open the housing. If you do, the safety concept of the appliance can no longer be assured and the warranty becomes void.
•Only use the accessory parts provided with the appliance and never use the appliance without first inserting the cooking bowl.
Intended use
Only use the rice cooker for cooking rice and steaming foods, such as vegetables or fish.
This rice cooker is not intended for commercial use; it is intended exclusively for use in private households!
- 2 -
IB_KH1557_E3476_LB3 23.04.2008 15:49 Uhr Seite 3
Technical Data |
|
|
|
Before the First Use |
Rated voltage: |
230 |
V ~50 Hz |
|
Carefully remove the rice cooker from the packaging. |
Power consumption: |
700 |
W |
|
Remove all possibly remaining protective foils and |
|
|
|
|
clean any packaging-dust remnants from all compo- |
Items supplied |
|
|
|
nents that will come into contact with foodstuffs. |
|
|
|
Clean the appliance as described in the chapter |
"Cleaning and Care".
1 Rice cooker,
incl. cooking bowl and steaming attachment 1 Power cable with safety plug
1 Measuring cup
1 Plastic spoon
1 Operating manual
The total capacity of the measuring cup is approximately 180 ml. The measuring cup has 2 different sets of measurement markings to make filling easier:
1/4 = |
approx. 45 ml |
1/2 = |
approx. 90 ml |
3/4 = |
approx. 135 ml |
40 = |
approx. 40 ml |
80 = |
approx. 80 ml |
120 = |
approx. 120 ml |
160 = |
approx. 160 ml |
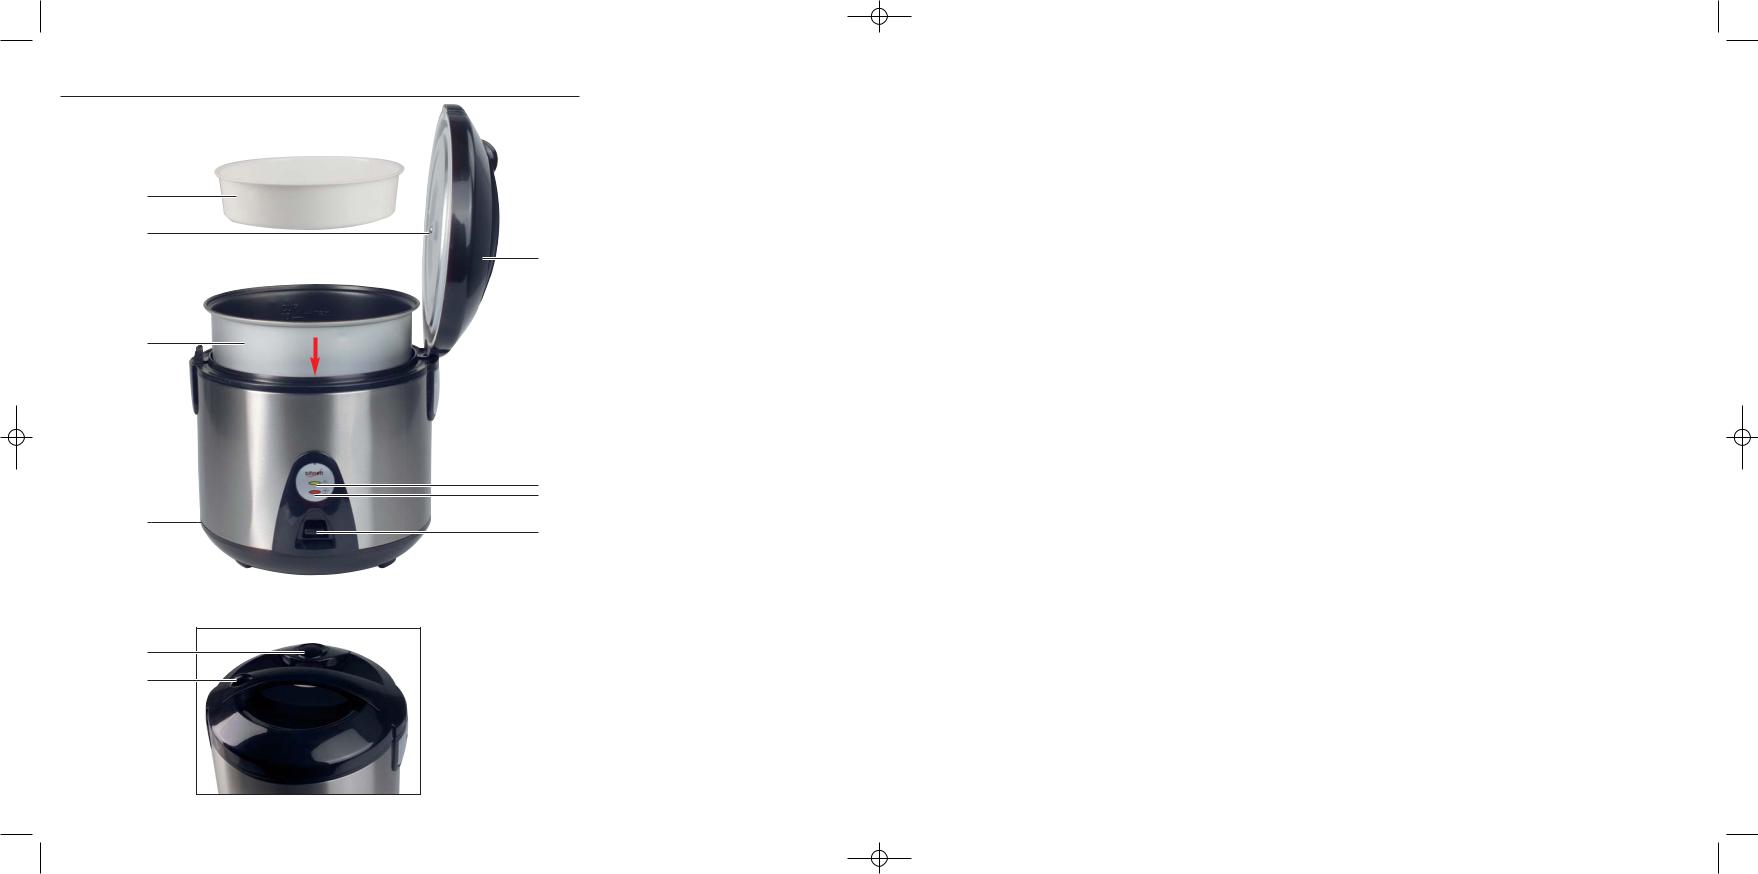
Appliance Overview
1 Lid
2 Catchment container for condensed water 3 Yellow control lamp 

 (Keep-warm)
4 Red control lamp 

 (Cooking)
5 Function selector switch for "Cooking" and "Keep-warm"
6 Connection socket for the power cable
7 Cooking bowl
8 Inner cover
9 Steamer attachment
0 Unlocking button q Steam exit opening
Using the Rice Cooker
With this appliance, it is possible to cook rice as well as to steam other foods at the same time. Experiment with finding the right quantity of water and the right cooking time for the various combinations.
Cooking Rice
 Notice
Coat the inside of the cooking bowl 7 evenly with a little grease or vegetable oil to achieve a better cooking result.
1.Press the unlocking button 0 and open the lid 1.
2.Take out the cooking bowl 7.
3.Measure the desired quantity of rice using the supplied measuring cup.
As a general rule: A level measuring cup - filled with rice - yields a portion for one person. Determine the right quantity of rice and water for you in a few cooking attempts.
4.Thoroughly wash and sieve the rice. If you do not wash the rice, this could lead to poor cooking results and increased foam and steam formation in the cooking bowl 7.
5.After washing it, pour the rice into the cooking bowl 7 and smooth it out.
- 3 -
IB_KH1557_E3476_LB3 23.04.2008 15:49 Uhr Seite 4
Notice
Place at least 2 measuring beakers of rice into the rice cooker! A lesser volume of rice could cause inferior cooking results!
6.Then add water as per the following cup markings:
•2 Measuring beakers of rice = Water up to cup marking “2”
•4 Measuring beakers of rice = Water up to cup marking “4”
•6 Measuring beakers of rice = Water up to cup marking “6”
•8 Measuring beakers of rice = Water up to cup marking “8”
•10 Measuring beakers of rice = Water up to
cup marking “10”
Subject to taste preferences, salt can also be added to the rice.
11.Insert the power plug into a properly installed power socket. The yellow control lamp 

 3 glows.
12.Press the function selector switch 5 down. The yellow control lamp 

 3 extinguishes and the red control lamp

 4 starts to glow. The cooking process begins.
Notice
If the cooking bowl 7 is not correctly positioned, the function selector switch 5 cannot be moved to the setting “Cooking”.
As soon as the rice is cooked, the rice cooker switches itself automatically back to the keep-warm setting. The red control lamp 

 4 extinguishes and the yellow control lamp

 3 starts to glow.
Allow the rice to stand for at least 15 minutes in the cooking bowl 7 - with the lid on 1 on.
Notice
Subject to the type/sort of rice being prepared, it could be that you may have to insert a little more or less water to achieve an optimal cooking result. Vary the amount of water in accordance with your individual experiences and personal preference.
7.When the cooking bowl 7 is full, place it back in the rice cooker housing.
8.Turn the bowl left and right to make certain that it is well seated on the heating plate. To avoid dirtying the cooking area, ensure that there is no moisture or rice located on the outside of the cooking bowl 7. If necessary, wipe the outside with a clean cloth.
9.Close the lid 1, ensuring that it engages.
10.Insert the power cable into the socket 6 on the rear of the appliance.
13.Remove the lid 1 and stir the rice with the supplied plastic spoon to loosen it up. The rice is now ready to eat.
Important
Use only the supplied plastic spoon for stirring or serving the rice. Other spoons may cause damage to the anti-stick coating.
If the rice needs to be kept warm for an extended period, wait until shortly before eating before stirring the rice. Do not remove the lid 1 while the rice is being kept warm and do not leave the rice in the appliance for longer than 2 hours.
Important
When the cooking and keep-warm processes are complete, empty the catchment container for condensed water 2. Take care when doing this: the water is hot!
Risk of scalding!
- 4 -
IB_KH1557_E3476_LB3 23.04.2008 15:49 Uhr Seite 5
Important
Always pull the power plug out of the power socket when no longer using the rice cooker. There is a danger of electric shock!
Steaming
 IMPORTANT:
Do not lift the steaming attachment 9 up during the steaming process - the escaping steam brings with it the real risk of scalding. The steaming attachment 9 becomes hot during the steaming process. When taking hold of the steaming attachment 9, use oven cloths or something similar to lift it from the cooking bowl 7.
1.Pour the desired quantity of water into the cooking bowl 7. The steaming time is dictated by the volume of water poured in. Take note of the examples given in the following table.
•1 filled measuring cup is sufficient for about
15 minutes of steaming.
•2 filled measuring cups are sufficient for about
30 minutes of steaming, etc.
Fish / seafood |
Steaming time |
Weight / |
|
|
in minutes |
quantity |
|
Mussels |
|
|
|
(cook until they |
approx. 10 min |
approx. 450 g |
|
are opened) |
|
|
|
|
|
|
|
Prawns |
|
|
|
(cook until a |
approx. 12 min |
approx. 350 g |
|
pink colour) |
|
|
|
|
|
|
|
Fish (Fillet) |
approx. 15 min |
approx. 350 g |
|
|
|
|
|
Steak |
approx. 20 min |
approx. 450 g |
|
|
|
|
|
Oysters |
approx. 25 min |
approx. 700 g |
|
(in the shell) |
|||
|
|
||
|
|
|
Vegetables |
Steaming time |
Weight / |
|
in minutes |
quantity |
||
|
|||
Mushrooms |
approx. 10 min |
approx. 450 g |
|
(whole) |
|||
|
|
||
|
|
|
|
Peas |
approx. 17 min |
approx. 350 g |
|
(with pods) |
|||
|
|
||
|
|
|
|
Asparagus |
approx. 17 min |
approx. 450 g |
|
|
|
|
|
Carrots |
approx. 20 min |
approx. 450 g |
|
(peeled) |
|||
|
|
||
|
|
|
|
Green beans: |
approx. 20 min |
approx. 450 g |
|
(sliced) |
|||
|
|
||
|
|
|
|
Green beans: |
approx. 25 min |
approx. 450 g |
|
(whole) |
|||
|
|
||
|
|
|
|
Brussels sprouts |
approx. 25 min |
approx. 350 g |
|
|
|
|
|
Corncobs |
approx. 30 min |
2 cobs |
|
|
|
|
2.Place the food to be steamed in the steaming attachment 9.
3.Place the container on the cooking bowl 7.
4.Close the lid 1, ensuring that it engages.
5.Place the power plug in a wall socket. The yellow control lamp 

 3 glows.
6.Press the function selector switch 5 down. The yellow control lamp 

 3 extinguishes
and the red control lamp 

 4 starts to glow. The steaming process begins.
- 5 -
IB_KH1557_E3476_LB3 23.04.2008 15:49 Uhr Seite 6
As soon as the added water has left the cooking bowl 7 by being completely turned to steam, the rice cooker automatically switches back to the "keeping warm" mode.
The red control lamp 

 4 extinguishes and the yellow control lamp

 3 starts to glow again. The food is now completely steamed and is ready to eat.
Troubleshooting
Defect |
Cause |
Solution |
|
|
|
|
|
|
The rice cooker |
Push the power |
|
|
is not plugged |
plug into the |
|
|
in. |
wall socket. |
|
The device |
|
|
|
does not |
|
|
|
|
|
||
function. |
|
|
|
|
The power |
Use a different |
|
|
socket is |
wall power |
|
|
defective. |
socket. |
|
|
|
|
|
The yellow |
|
Slide the |
|
The cooking |
cooking bowl |
||
indicator light |
|||
bowl 7 is not |
lightly to the |
||
3 switches on, |
|||
seated correctly |
right and left so |
||
but the cooking |
|||
process cannot |
in the rice coo- |
as to center the |
|
ker housing. |
bowl 7 on the |
||
be started. |
|||
|
heating plate. |
||
|
|
||
|
|
|
Cleaning and care
 Danger! Electric shock!
•ALWAYS remove the plug from the wall socket before cleaning, and allow the appliance to cool completely before cleaning and storing it!
•Make certain that no liquid comes into contact with the heating plate and the insides of the rice cooker.
•Use a dry cloth to clean the lid 1 and the rice cooker housing incl. the heating plate. Do not use harsh cleaners and abrasive materials. These could damage the upper surfaces.
•Remove the covering of the steam exit opening q to clean it with a dry cloth. After cleaning, replace the cover.
•Clean the steaming attachment 9, the cooking bowl 7, the plastic spoon and the measuring cup in water containing a mild detergent.
•Dry all parts before using the appliance again.
To clean the inside of the lid 8, it must be dismantled:
1.Pull the inner lid 8 off of the stud.
2.Clean the inner lid 8 with a mild soapy solution and rinse it with clear water.
3.Replace the inner lid 8 on the stud. Ensure that the steam exit channel protrudes into the steam exit opening.
- 6 -
IB_KH1557_E3476_LB3 23.04.2008 15:49 Uhr Seite 7
Disposal |
|
DES Ltd |
||||||
|
|
|
|
|
|
Do not dispose of the appliance in your |
|
Units 14-15 |
|
|
|
|
|
|
|
Bilston Industrial Estate |
|
|
|
|
|
|
|
|||
|
|
|
|
|
|
normal domestic waste. This product is |
|
Oxford Street |
|
|
|
|
|
|
subject to the European directive |
|
Bilston |
|
|
|
|
|
|
|||
|
|
|
|
|
|
|||
|
|
|
|
|
|
2002/96/EG. |
|
WV14 7EG |
|
|
|
|
|
|
|
|
Tel.: 0870/787-6177 |
Dispose of the appliance through an approved disposal |
|
Fax: 0870/787-6168 |
||||||
centre or at your community waste facility. |
|
e-mail: support.uk@kompernass.com |
||||||
Observe the currently applicable regulations. |
|
|
||||||
In case of doubt, please contact your waste disposal |
|
Irish Connection |
||||||
centre. |
|
Harbour view |
||||||
|
|
|
|
|
|
|
|
Howth |
|
|
|
|
|
|
Dispose of all packaging materials in an |
|
Co. Dublin |
|
|
|
|
|
|
environmentally friendly manner. |
|
Tel: 00353 (0) 87 99 62 077 |
|
|
|
|
|
|
|
|
Fax: 00353 18398056 |
Warranty and Service |
|
e-mail: support.ie@kompernass.com |
||||||
|
|
|||||||
You receive a 3-year warranty for this device as of |
|
Importer |
||||||
the purchase date. The device has been manufactured |
|
|
||||||
with care and meticulously examined before delivery. |
|
KOMPERNASS GMBH |
||||||
Please retain your receipt as proof of purchase. |
|
BURGSTRASSE 21 |
||||||
In the case of a warranty claim, please make contact |
|
44867 BOCHUM, GERMANY |
||||||
by telephone with our service department. Only in |
|
|
||||||
this way can a post-free despatch for your goods be |
|
www.kompernass.com |
||||||
assured. |
|
|
||||||
The warranty covers only claims for material and |
|
|
||||||
maufacturing defects, not for worn parts or for damage |
|
|
||||||
to fragile components, e.g. buttons or batteries. |
|
|
||||||
This product is for private use only and is not intended |
|
|
||||||
for commercial use. |
|
|
||||||
In the event of misuse and improper handling, use |
|
|
||||||
of force and interference not carried out by our |
|
|
||||||
authorized service branch, the warranty will become |
|
|
||||||
void. Your statutory rights are not restricted in any |
|
|
||||||
way by this warranty. |
|
|
||||||
- 7 -
IB_KH1557_E3476_LB3 23.04.2008 15:49 Uhr Seite 8
- 8 -
IB_KH1557_E3476_LB3 23.04.2008 15:49 Uhr Seite 9
SISÄLLYSLUETTELO |
SIVU |
Turvaohjeet |
10 |
Käyttötarkoitus |
10 |
Tekniset tiedot |
10 |
Toimituslaajuus |
11 |
Laitteen yleiskatsaus |
11 |
Ennen ensimmäistä käyttöä |
11 |
Riisikeittimen käyttö |
11 |
Riisin keittäminen............................................................................................................................. |
11 |
Höyrykypsennys ............................................................................................................................. |
13 |
Vianetsintä |
14 |
Puhdistus ja hoito |
14 |
Hävittäminen |
15 |
Takuu ja huolto |
15 |
Maahantuoja |
15 |
Säilytä käsikirja myöhempää käyttöä varten. Jos myyt laitteen, anna käsikirja uudelle omistajalle!
- 9 -
IB_KH1557_E3476_LB3 23.04.2008 15:49 Uhr Seite 10
RIISINKEITIN KH1557
LOUKKAANTUMISVAARA!
• Älä jätä laitetta käytön aikana ilman valvontaa.
Turvaohjeet
VAARA! Sähköisku!
 VARO! Laitteen höyryn poistoaukosta ja kantta
  avattaessa laitteesta tulee ulos kuumaa höyryä! Palovammavaara!
•Liitä riisikeitin vain määräysten mukaisesti asennettuun ja maadoitettuun pistorasiaan, jonka verkkojännite vastaa laitteen tyyppikilvessä ilmoitettuja arvoja.
•Vedä pistoke aina pistorasiasta, kun siirrät tai täytät laitetta, kun laitteessa ilmenee häiriö, ennen kuin ryhdyt puhdistamaan laitetta tai kun et käytä laitetta!
•Älä koskaan vedä virtajohdosta irrottaaksesi verkkopistokkeen pistorasiasta. Vedä itse pistokkeesta.
•Älä koskaan tartu verkkopistokkeeseen märillä tai kosteilla käsillä.
Älä missään tapauksessa upota laitetta veteen tai muihin nesteisiin.
•Jos laite putoaa nesteeseen, vedä heti pistoke ulos pistorasiasta. Älä sen jälkeen enää ota laitetta uudelleen käyttöön, vaan anna se ensin valtuutetun huoltopisteen tarkistettavaksi.
•Älä altista laitetta kosteudelle äläkä käytä sitä ulkona.
•Älä käytä riisikeitintä, jos olet kostealla lattialla tai jos käsissäsi tai laitteessa on kosteutta.
•Aseta verkkokaapeli niin, että se ei joudu kosketuksiin kuumien eikä teräväreunaisten esineiden kanssa.
•Älä taita, äläkä purista verkkokaapelia äläkä kierrä sitä laitteen ympärille.
•Anna vaurioitunut verkkopistoke tai virtajohto heti valtuutetun ammattihenkilöstön tai huoltopalvelun vaihdettavaksi vaarojen välttämiseksi.
•Tätä laitetta ei ole tarkoitettu sellaisten henkilöiden (mukaan lukien lapset) käyttöön, joiden rajoitetut, fyysiset, aistilliset tai henkiset kyvyt tai kokemuksen ja/tai tiedon puute estävät käytön, lukuun ottamatta tilanteita, joissa heitä valvoo turvallisuudesta vastaava henkilö tai joissa he ovat saaneet tältä ohjeita laitteen käytöstä.
•Lapsia on valvottava ja on varmistettava, etteivät he leiki laitteella.
•Anna laitteen ja sen lisäosien jäähtyä kokonaan, ennen kuin puhdistat laitteen ja panet sen kaappiin.
HUOMIO! Laitevauriot!
•Älä koskaan peitä kantta pyyhkeillä tai vastaavilla.
•Älä koskaan aseta laitetta lämmönlähteiden lähelle.
•Älä koskaan avaa koteloa. Muuten turvallisuutta ei voida taata ja takuu raukeaa.
•Käytä vain laitteen mukana toimitettuja lisäosia, äläkä koskaan käytä laitetta ilman sisään asetettua keittoastiaa.
Käyttötarkoitus
Käytä riisikeitintä vain riisin keittämiseen ja elintarvikkeiden, kuten vihannesten tai kalan, höyrykypsentämiseen.
Tätä riisikeitintä ei ole tarkoitettu ammattikäyttöön, vaan ainoastaan yksityisille kotitalouksille!
Tekniset tiedot
Nimellisjännite: |
230 |
V ~50 Hz |
Tehontarve: |
700 |
W |
- 10 -
IB_KH1557_E3476_LB3 23.04.2008 15:49 Uhr Seite 11
Toimituslaajuus
1 Riisikeitin, keittoastia ja höyrykypsennysosa
1 liitäntäjohto, jossa suojakosketuspistoke
1mitta-astia
1muovilusikka
1käyttöohje
Mitta-astian kokonaisvetoisuus on noin 180 ml. Täyttämisen helpottamiseksi mitta-astiassa on 2 erilaista mitta-asteikkoa:
1/4 = |
noin 45 ml |
1/2 = |
noin 90 ml |
3/4 = |
noin 135 ml |
40 = |
noin 40 ml |
80 = |
noin 80 ml |
120 = |
noin 120 ml |
160 = |
noin 160 ml |
Laitteen yleiskatsaus
1 Kansi
2 Tiivisteveden keruusäiliö
3 Keltainen merkkivalo 

 (lämpimänäpito) 4 Punainen merkkivalo

 (keittäminen) 5 Toiminnan valintakytkin "Keittäminen" tai
"Lämpimänäpito"
6 Virtajohdon liitäntäholkki
7 Keittoastia
8 Sisempi kansi
9 Höyrykypsennysosa
0 Avauspainike
q Höyryn poistoaukko
Ennen ensimmäistä käyttöä
Ota riisikeitin varovasti pakkauksesta. Poista mahdolliset suojamuovit ja puhdista elintarvikkeiden kanssa kosketuksiin tulevat osat pakkauspölystä. Puhdista laite luvussa "Puhdistus ja hoito" kuvatulla tavalla.
Riisikeittimen käyttö
Laitteella on mahdollista sekä keittää riisiä että myös höyrykypsentää samanaikaisesti muita elintarvikkeita. Kokeilemalla itse saat selville tarvittavat vesimäärät ja oikean keittoajan erilaisille yhdistelmille.
Riisin keittäminen
 Ohje
Ohje
Sivele keittoastian 7 sisäpuolelle tasaisesti hieman rasvaa tai kasvisöljyä paremman keittotuloksen saavuttamiseksi.
1.Paina avauspainiketta 0 ja avaa kansi 1.
2.Ota keittoastia 7 ulos.
3.Mittaa haluttu määrä riisiä mukana toimitetun mitta-astian avulla.
Ohjeena voidaan pitää seuraavaa: Tasaisesti täytetty mitta-astia, joka on täynnä riisiä, sisältää yhden henkilön annoksen. Selvitä muutaman kerran kokeilemalla, mikä riisi-vesisuhde on sinulle sopivin.
4.Pese ja siivilöi irtoriisi perusteellisesti. Jollet pese riisiä, keittotulokset voivat huonontua ja keittoastiassa 7 voi muodostua häiritsevän paljon vaahtoa ja höyryä.
5.Aseta puhdistettu riisi pesun jälkeen keittoastiaan 7 ja tasoita riisi.
- 11 -
IB_KH1557_E3476_LB3 23.04.2008 15:49 Uhr Seite 12
Ohje
Aseta riisikeittimeen vähintään 2 mitta-astiallista riisiä! Jos riisiä on vähemmän, keittotuloksesta saattaa tulla huono!
6.Kaada sitten keittimeen vettä vastaavaan CUP-merkintään asti:
•2 mitta-astiallista riisiä = vettä CUP-merkintään “2” saakka
•4 mitta-astiallista riisiä = vettä CUP-merkintään “4” saakka
•6 mitta-astiallista riisiä = vettä CUP-merkintään “6” saakka
•8 mitta-astiallista riisiä = vettä CUP-merkintään “8” saakka
•10 mitta-astiallista riisiä = vettä CUP-merkintään
“10” saakka
Makumieltymysten mukaan voidaan riisiin lisätä myös suolaa.
Ohje
Riisilajista riippuen saattaa olla, että vettä on lisättävä hieman lisää tai hieman vähemmän ihanteellisen keittotuloksen saavuttamiseksi. Vaihtele veden määrää omien kokemustesi ja mieltymyksesi mukaan.
7.Kun keittoastia 7 on täytetty, aseta se riisikeittimen koteloon.
8.Kääntämällä astiaa vasemmalle ja oikealle voit varmistaa, että se on asetettu keittolevylle oikein. Huolehdi siitä, ettei keittoastian 7 ulkopuolelle joudu kosteutta eikä
riisiä. Näin vältetään keittoalueen likaantuminen. Tarvittaessa ulkopuoli on pyyhittävä kuivaksi puhtaalla liinalla.
9.Sulje kansi 1 niin, että se lukittuu paikoilleen.
10.Aseta liitäntäjohto laitteen takapuolella olevaan liitäntäholkkiin 6.
11.Liitä verkkopistoke asianmukaisesti asennettuun pistorasiaan. Keltainen merkkivalo 

 3 syttyy.
12.Paina toiminnan valintakytkintä 5 alas. Keltainen merkkivalo 

 3 sammuu ja punainen merkkivalo

 4 syttyy. Keittäminen alkaa.
Ohje
Jos keittoastiaa 7 ei ole asetettu paikoilleen, toiminnan valintakytkintä 5 ei voida asettaa asentoon "Keittäminen".
Heti, kun riisi on keitetty, riisikeitin kytkeytyy automaattisesti takaisin lämpimänäpitotoimintoon. Punainen merkkivalo 

 4 sammuu, kun taas keltainen merkkivalo

 3 syttyy uudelleen.
Jätä riisi - kansi 1 suljettuna - vielä 15 minuutiksi keittoastiaan 7.
13.Avaa kansi 1 ja sekoita riisi irtonaiseksi mukana tulevalla muovilusikalla. Riisi on nyt valmista syötäväksi.
Huomio
Käytä riisin sekoittamiseen tai ottamiseen ainoastaan mukana tulevaa muovilusikkaa. Muutoin tarttumaton pinnoite saattaa vahingoittua.
Jos riisi on tarkoitus pitää lämpimänä pidemmän aikaa, sekoita se irtonaiseksi vasta vähän ennen ruokailua. Älä avaa kantta 1 lämpimänäpidon aikana, äläkä jätä riisiä lämpimänäpitoon 2 tuntia pidemmäksi aikaa.
Huomio
Tyhjennä keittoja lämpimänäpitotapahtuman jälkeen tiivisteveden keruusäiliö 2. Toimi varovasti: Vesi on kuumaa!
Palovammavaara!
- 12 -
IB_KH1557_E3476_LB3 23.04.2008 15:49 Uhr Seite 13
Huomio
Vedä aina verkkopistoke pistorasiasta, kun et enää käytä riisikeitintä. On olemassa sähköiskun vaara!
Höyrykypsennys
 HUOMIO:
Älä nosta höyrykypsennysosaa 9 kypsentämisen aikana, sillä ulos tuleva höyry voi aiheuttaa palovammoja. Höyrykypsennysosa 9 kuumenee voimakkaasti kypsentämisen aikana. Nosta höyrykypsennysosa 9 keittoastiasta 7 patalappujen tai vastaavien avulla.
1.Kaada keittoastiaan 7 haluamasi määrä vettä. Kypsennysaika riippuu lisätystä vesimäärästä. Huomaa seuraavan taulukon esimerkit.
•1 täysi mitta-astiallinen riittää noin 15 minuutin höyrykypsennykseen.
•2 täyttä mitta-astiallista riittää noin 30 minuutin höyrykypsentämiseen jne.
Kala / |
Höyry- |
Paino / |
|
kypsennysaika |
|||
äyriäiset |
Määrä |
||
minuutteja |
|||
|
|
||
Simpukat (kyp- |
|
|
|
sennys avautumi- |
n. 10 min |
n. 450 g |
|
seen saakka) |
|
|
|
|
|
|
|
Katkaravut |
|
|
|
(kypsennys vaa- |
n. 12 min |
n. 350 g |
|
leanpunaiseksi) |
|
|
|
|
|
|
|
Kala (filee) |
n. 15 min |
n. 350 g |
|
|
|
|
|
Pihvi |
n. 20 min |
n. 450 g |
|
|
|
|
|
Osterit |
n. 25 min |
n. 700 g |
|
(kuorineen) |
|||
|
|
||
|
|
|
|
Höyry- |
Paino / |
|
Vihannekset |
kypsennysaika |
||
Määrä |
|||
|
minuutteja |
||
|
|
||
Sienet |
n. 10 min |
n. 450 g |
|
(kokonaiset) |
|||
|
|
||
|
|
|
|
Herneet |
n. 17 min |
n. 350 g |
|
(kuorineen) |
|||
|
|
||
|
|
|
|
Parsa |
n. 17 min |
n. 450 g |
|
|
|
|
|
Porkkanat |
n. 20 min |
n. 450 g |
|
(kuoritut) |
|||
|
|
||
|
|
|
|
Vihreät pavut |
n. 20 min |
n. 450 g |
|
(leikatut) |
|||
|
|
||
|
|
|
|
Vihreät pavut |
n. 25 min |
n. 450 g |
|
(kokonaiset) |
|||
|
|
||
|
|
|
|
Ruusukaali |
n. 25 min |
n. 350 g |
|
|
|
|
|
Maissintähkät |
n. 30 min |
2 tähkää |
|
|
|
|
2.Lisää kypsennettävä elintarvike höyrykypsennysosaan 9.
3.Aseta astia keittoastialle 7.
4.Sulje kansi 1 niin, että se lukittuu paikoilleen.
5.Liitä verkkopistoke verkkopistorasiaan. Keltainen merkkivalo 

 3 syttyy.
6.Paina toiminnan valintakytkin 5 alas. Keltainen merkkivalo 

 3 sammuu ja punainen merkkivalo

 4 syttyy. Höyrykypsennys alkaa.
- 13 -
 Loading...