


3 


KOMPERNASS GMBH · BURGSTRASSE 21 · D-44867 BOCHUM www.kompernass.com
ID-Nr.: KH401-09/07-V1
 EGG COOKER
KH 401
Egg Cooker
Operating instructions
Munankeitin
Käyttöohje
Äggkokare
Bruksanvisning
Æggekoger
Betjeningsvejledning
Eggekoker
Bruksanvisning
ВсбуфЮсбт бхгюн
ПдзгЯет чсЮузт
Eierkocher
Bedienungsanleitung
KH 401

Egg Cooker |
4 |
Munankeitin |
8 |
Äggkokare |
12 |
Æggekoger |
16 |
Eggekoker |
20 |
ВсбуфЮсбт бхгюн |
24 |
Eierkocher |
28 |
Read these operating instructions carefully before using the appliance for the first time and preserve this manual for later reference. Pass this manual on to whoever might acquire the appliance at a future date.
Lue käyttöohje huolellisesti ennen ensimmäistä käyttöä ja säilytä se myöhempää käyttöä varten. Luovuta ohje laitteen mukana eteenpäin.
Läs igenom bruksanvisningen noga innan du börjar använda apparaten och spara den för senare bruk. Lämna över bruksanvisningen tillsammans med apparaten om du överlåter den till någon annan person.
Læs betjeningsvejledningen omhyggeligt igennem, før du bruger apparatet første gang, og gem den til senere brug. Hvis du giver apparatet videre til andre, skal vejledningen også følge med.
Les bruksanvisningen nøye før apparatet tas i bruk for første gang, og oppbevar den for senere bruk. Dersom apparatet gis videre til en tredje person, må bruksanvisningen også følge med.
ДйбвЬуфе фп егчейсЯдйп чейсйумпэ рсйн брь фзн рсюфз чсЮуз рспуекфйкЬ кбй цхлЬофе фп гйб мйб
меллпнфйкЮ чсЮуз. Рбсбдюуфе фп егчейсЯдйп еЬн з ухукехЮ рбсбдпиеЯ уе Ьллпхт.
Lesen Sie die Bedienungsanleitung vor der ersten Verwendung aufmerksam durch und heben Sie diese für den späteren Gebrauch auf. Händigen Sie bei Weitergabe des Gerätes an Dritte auch die Anleitung aus.

Egg Cooker
1. Intended use
This appliance is intended exclusively for cooking and keeping warm chicken eggs in private households.
It is not intended for use with other foods or other materials. It is also not intended for commercial or industrial use.
2. Technical data
Voltage: |
220-240 V ~50 Hz |
Power consumption: |
400 W |
Capacity: |
Max. 7 eggs |
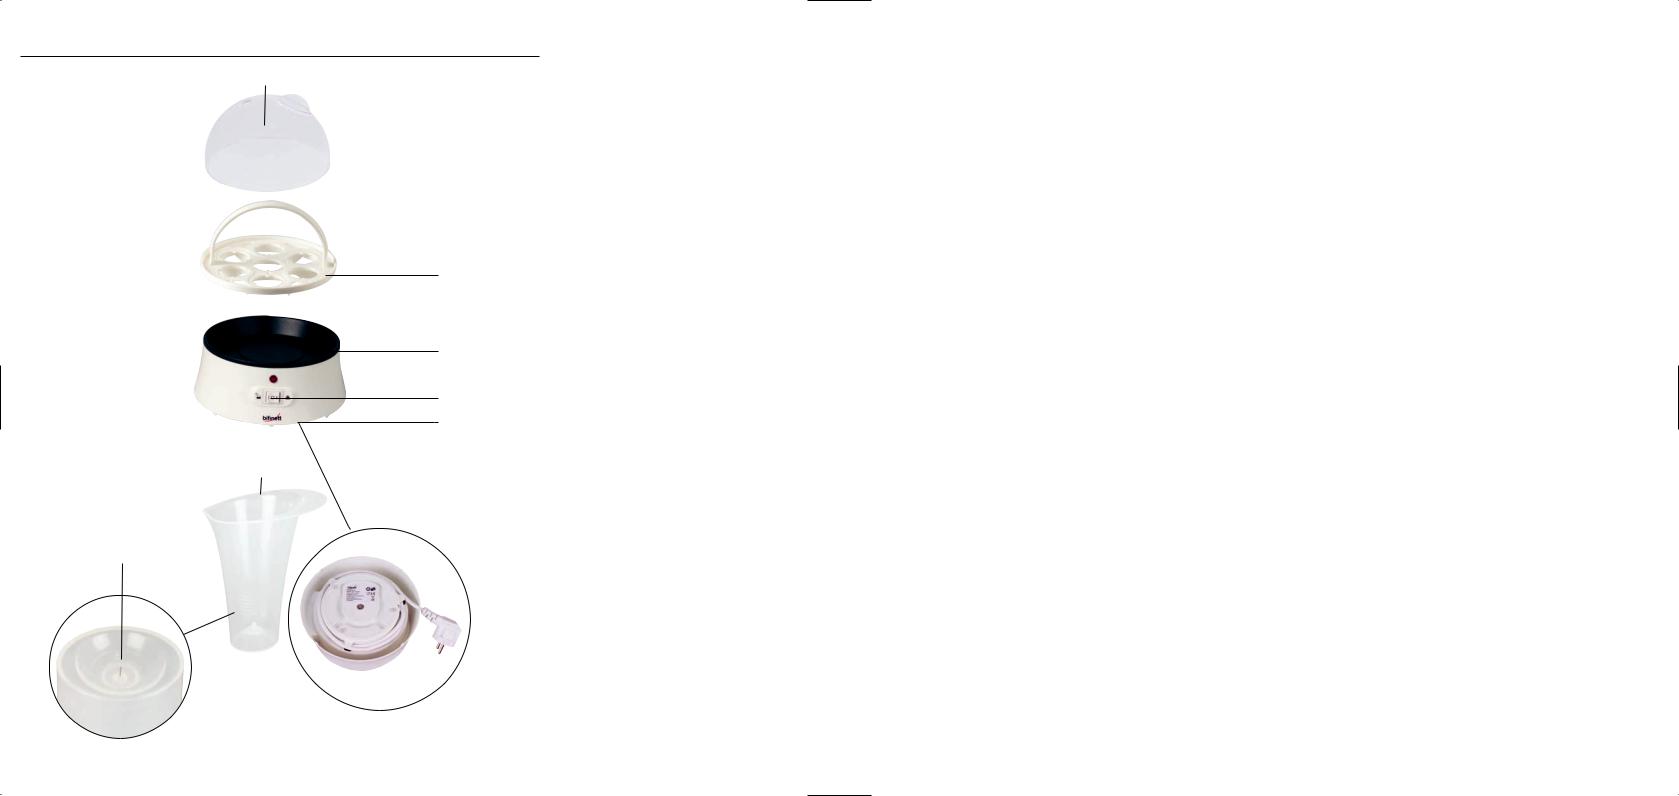
3. Appliance description
q Lid
w Egg holder e Cooking bowl
rOperating switch (position “I“: cook)
(position "O": off)
(position "II": keep warm) 
t Rolled-up cable y Measuring cup u Egg pick
4.Safety instructions
DANGER! Electric shock!
•Only connect the egg cooker to a properly installed and grounded socket with a main voltage of 220 - 240 V ~ 50 Hz.
•Always pull the power plug from the socket when you move or fill the device, in event of problems, before cleaning the appliance and while the cooker is not in use! Never pull on the power cord, only on the power plug. Never touch the appliance plug with wet or moist hands.
•Never submerge the appliance in liquid, never subject it to moisture and never use it outdoors.
•If the appliance does fall into liquid, immediately pull the power plug from the socket. Then refrain from operating the appliance until it has been inspected by an approved service company.
•Do not use the egg cooker if it is located on a wet surface or if your hands or the appliance are wet.
•Position the power cord so that it does not come into contact with hot or sharp-edged objects.
•Do not kink or crush the power cord and do not wind it around the appliance.
•Arrange for defective power plugs and/or cables to be replaced as soon as possible by a qualified technician or by our Customer Service Department to avoid the risk of injury.
- 4 -
Danger of injuries!
•Never leave the appliance unattended during operation.
•Do not allow individuals (including children) to use the appliance whose physical, sensorial or mental abilities or lack of experience and knowledge hinder their safe usage of it if they have not previously been supervised or instructed in its correct usage.
•Tell children about the appliance and its potential dangers so that they do not play with it.
•Be careful with the egg pick u on the bottom of the measuring cup.
•The casing surfaces become very hot during operation. Therefore, only grip the lid q and the egg holder w by the grips provided when removing them.
CAUTION! Hot steam escapes from the steam hole and upon opening the cover!
Danger of scalding!
Always open the lid q by lifting up with the grip and removing it to the side. Avoid letting the escaping steam contact your hand and arm.
Remove the egg holder w only once the steam has completely escaped.
Attention!
•Never use the egg cooker without water.
•Never place the appliance near heat sources.
•Never open the housing. If the housing is opened, the safety of the device is no longer assured and the warranty becomes void.
•Only use the accessories included and never use the appliance without the egg holder w in place.
•Let the appliance and the accessory parts cool down completely before cleaning and storing them.
5. Starting up
Before starting up the appliance, make certain
that ...
-egg cooker, plug and power cable are in good working order and...
-all packaging materials have been removed
from the egg cooker.
First clean the appliance as described under 8.
6. Cooking eggs
Pick a hole in the top or bottom side of the egg with the egg pick u.
Place the eggs on the egg holder w with the picked side up.
Fill the measuring cup y with the required amount of water. The amount of water depends on the number of eggs and the desired degree of hardness.
Explanation of the symbols on the measuring cup:
hard medium soft
Now pour the water into the cooking bowl e.
Place the egg holder w in the cooking bowl e and place the lid q on top.
Press the operating switch r to the left (position “I“)  to turn the appliance on for cooking.
As soon as the eggs are cooked, a signal sounds.
Push the operating switch back to the position “O” to turn the appliance off.
After cooking, peel the eggs under cold, flowing water.
- 5 -

7. Keeping eggs warm
Push the operating switch to the right to activate the keeping warm function (position "II")  after cooking the eggs.
After cooking, peel the eggs under cold, flowing water.
Push the operating switch back to the position "O" to turn the appliance off.
8. Cleaning and care
Life-threatening danger of electrical shock:
•Never open the egg cooker housing. There are no operating elements inside.
•Never immerse the egg cooker components into water or other liquids!
Cleaning the appliance:
Pull the power plug out from the power socket.
Let the appliance cool off.
Then clean the cooking bowl e and the power cord with a slightly damp cloth.
Remove calcified residue with a solution of vinegar and water.
Afterward, operate the appliance only with clear water to remove the vinegar smell.
Always dry the appliance well before using it again.
Cleaning the accessories:
Wash the lid q, the egg holder w and the measuring cup y with soap under flowing water.
Caution: When cleaning the measuring cup, be careful of the egg pick u. Danger of injury!
Note: Never use cleaning agents or solvents. This can cause damage to the appliance.
•The egg holder, lid and measuring cup are dishwasher-safe.
- 6 -
9. Storage
Let the egg cooker cool off completely before storing it.
Wind the power cord around the cord winder t on the bottom of the appliance.
Store the appliance in a dry place.
10. Disposal
Do not dispose of the appliance in your normal domestic waste.
Dispose of the appliance through an approved disposal centre or at your community waste facility. Observe the currently applicable regulations.
In case of doubt, please contact your waste disposal centre.
 Dispose of all packaging materials in an
  environmentally friendly manner.
11. Warranty & Service
The warranty for this appliance is for 3 years from the date of purchase. The appliance has been manu-factured with care and meticulously examined before delivery. Please retain your receipt as proof of purchase. In the case of a warranty claim, please make contact by telephone with our service department. Only in this way can a post-free
despatch for your goods be assured.
The warranty covers only claims for material and maufacturing defects, not for wearing parts or for damage to fragile components. This product is for private use only and is not intended for commercial use.
The warranty is void in the case of abusive and improper handling, use of force and internal tampering not carried out by our authorized service branch. Your statutory rights are not restricted in any way by this warranty.
 DES Ltd
Units 14-15
Bilston Industrial Estate Oxford Street
Bilston WV14 7EG
Tel.: 0870/787-6177
Fax: 0870/787-6168
e-mail: support.uk@kompernass.com
 Kompernass Service Ireland c/o Irish Connection
41 Harbour view Howth Co. Dublin Tel: 087-99 62 077 Fax: 18398056
e-mail: support.ie@kompernass.com
12. Importer
KOMPERNASS GMBH
BURGSTRASSE 21
D-44867 BOCHUM
www.kompernass.com
- 7 -

Munankeitin
1. Käyttötarkoitus
Tämä laite on tarkoitettu vain kananmunien keittämiseen ja lämpimänäpitoon yksityisissä kotitalouksissa.
Sitä ei saa käyttää muiden elintarvikkeiden tai materiaalien kanssa. Laitetta ei ole myöskään tarkoitettu kaupalliseen tai teolliseen käyttöön.
2. Tekniset tiedot
Jännite: |
220-240 V ~50 Hz |
Tehontarve: |
400 W |
Tilavuus: |
enint. 7 munaa |
3. Laitteen kuvaus
q Kansi
w Munanpidike
e Keittokulho
rKäyttökytkin
(asento “I“: Keittäminen)  (Asento “O“: Virta pois)
(Asento “II“: Lämpimänäpito) 
t Johdon kela y Mittakulho u Munapiikki
4.Turvaohjeet
VAARA! Sähköisku!
•Kytke munankeitin vain määräysten mukaisesti asennettuun ja maadoitettuun pistorasiaan, jonka verkkojännite on 220 - 240 V ~ 50 Hz .
•Kun siirrät tai täytät laitetta, kun laitteessa ilmenee häiriö, ennen kuin ryhdyt puhdistamaan laitetta tai kun et tarvitse sitä, vedä aina pistoke ulos pistorasiasta! Älä koskaan vedä verkkokaapelista, vaan tartu aina suoraan verkkopistokkeeseen. Älä koskaan tartu verkkopistokkeeseen märillä käsillä.
•Laitetta ei saa upottaa nesteeseen eikä saattaa alttiiksi nesteiden vaikutukselle. Laitetta ei saa käyttää ulkotiloissa.
•Jos laite putoaa nesteeseen, vedä heti pistoke ulos pistorasiasta. Älä sen jälkeen enää ota laitetta uudelleen käyttöön, vaan anna se ensin valtuutetun huoltopisteen tarkistettavaksi.
•Älä käytä munankeitintä kostealla pinnalla tai kun kätesi tai laite ovat märät.
•Aseta verkkokaapeli niin, että se ei joudu kosketuksiin kuumien eikä teräväreunaisten esineiden kanssa.
•Älä taita äläkä purista verkkokaapelia äläkä kierrä sitä laitteen ympärille.
•Anna valtuutetun ammattihenkilöstön vaihtaa vaurioitunut verkkojohto tai verkkopistoke välittömästi uuteen vaarojen välttämiseksi.
- 8 -

Loukkaantumisvaara!
•Älä jätä laitetta käytön aikana ilman huolenpitoa.
•Älä anna laitetta sellaisten henkilöiden (mukaan lukien lapset) käyttöön, joiden fyysiset, aistilliset tai henkiset kyvyt tai kokemuksen ja tiedon puute estävät heitä käyttämästä laitetta turvallisesti, jollei heitä ole aikaisemmin valvottu tai opastettu laitteen käytössä.
•Selvitä lapsille laite ja sen vaarat, jotta he eivät leikkisi laitteella.
•Varo mitta-astian pohjassa olevaa munapiikkiä u.
•Laitteen kotelon pinnat tulevat hyvin kuumiksi, kun laitetta käytetään. Koske sen takia vain laitteen kanteen q ja munanpidikkeeseen w tarkoitukseen suunnitellusta kahvasta, kun tahdot poistaa ne.
VARO! Laitteesta tulee kuumaa höyryä kantta avattaessa, sekä käytön aikana höyryaukosta! Palamisvaara
Avaa kansi q nostamalla sitä kahvas-ta ja poistamalla se sivusuuntaan. Vältä saattamasta kättä ja käsivartta kosketuksiin laitteesta tulevan höyryn kanssa.
Poista munanpidike w vasta, kun höyryntulo on kokonaan lakannut.
Huomaa!
•Älä koskaan käytä munankeitintä ilman vettä.
•Älä koskaan aseta laitetta lämmönlähteiden lähelle.
•Älä koskaan avaa koteloa. Muuten turvallisuutta ei voida taata ja takuu lakkaa olemasta voimassa.
•Käytä vain toimituksen mukana tulleita lisäosia äläkä koskaan käytä laitetta ilman munanpidikettä w.
•Anna laitteen ja lisäosien jäähtyä kokonaan, ennen kuin puhdistat laitteen ja laitat sen pois.
5. Käyttöönotto
Varmista ennen laitteen käyttöönottoa seuraavat asiat:
-laite, pistoke ja verkkojohto ovat moitteettomassa kunnossa
-laite on poistettu pakkauksesta ja kaikki
pakkausmateriaalit on poistettu laitteesta.
Í Puhdista laite ensin kohdassa 8 kuvatulla tavalla.
6. Munien keittäminen
Pistä munapiikillä u reikä munien alatai yläreunaan.
Aseta munat munanpidikkeeseen w reikäpuoli ylöspäin.
Täytä mitta-astia y tarvittavalla määrällä vettä. Vesimäärä riippuu munien lukumäärästä ja haluamastasi kovuus asteesta.
Mitta-astian merkkien selitykset:
kova normaali pehmeä
Kaada vesi keittokulhoon e.
Aseta munanpidike w keittokulhoon e ja aseta kansi q paikoilleen.
Paina käyttökytkin r vasemmalle (asento “I“)
 , jotta laite kytkeytyy toimintaan.
Kun munat ovat kypsiä, kuuluu merkkiääni.
Paina käyttökytkin takaisin asentoon “O”, jotta laitteesta kytkeytyy virta pois.
Huuhtele keitetyt munat kylmällä, juoksevalla vedellä.
- 9 -

7.Munien pitäminen lämpimänä
Paina käyttökatkaisija oikealle, kun haluat aktivoida lämpimänäpitotoiminnon (asento ”II”) munien keittämisen jälkeen  .
.
Huuhtele keitetyt munat kylmällä, juoksevalla vedellä.
Paina käyttökytkin takaisin asentoon “O”, jotta laitteesta kytkeytyy virta pois.
8. Puhdistus ja hoito
Hengenvaarallisen sähköiskun vaara:
•Älä koskaan avaa laitteen koteloa. Sisällä ei ole minkäänlaisia hallintalaitteita.
•Älä koskaan yritä puhdistaa laitteen osia upottamalla niitä veteen tai muihin nesteisiin.
Laitteen puhdistaminen:
Vedä pistoke irti seinästä.
Anna laitteen jäähtyä.
Puhdista sitten keittokulho e ja verkkojohto kevyesti kostutetulla liinalla.
Poista kalkkijäämät vedestä ja pienes tä määrästä etikkaa tehdyllä liuoksella.
Käytä laitetta sen jälkeen niin, että siinä on vain puhdasta vettä, jotta etikantuoksu katoaa.
Kuivaa laite hyvin, ennen kuin käytät sitä uudestaan.
Lisäosien puhdistaminen:
Pese kansi q, munanpidike w ja mittaastia y pesuaineella juoksevan veden alla.
Vaara: Varo munapiikkiä puhdistaessasi mittaastiaa u. Loukkaantumisvaara!
Ohje: Älä käytä puhdistusaineita äläkä liuottimia. Ne saattavat vaurioittaa laitetta.
•Munapidike, kansi ja mitta-astia kestävät konepesua.
- 10 -
 Loading...