


MiraScan 5.0
Table of contents
 Loading...
Electronic
User’s Manual

2
2
Table of contents
Welcome to MiraScan 5.0! 7
Before you start, check the following items: 7
Preparing your original for scanning 8
If you want to scan a photograph 8
If you want to scan a picture in a book or magazine 8
Opening MiraScan 5.0 9
Scan to File 10
Scan to E-mail 11
Scan to Printer 13
Scan to Fax 14
Scan to OCR 16
Scan to PDA 18
Scan to Web 20
Scan to Application Programs 22
Scan to Wallpaper 24
Closing MiraScan 5.0 25
Additional Operations 26

3
3
Overview 27
Introduction to MiraScan 5.0 27
What is new in MiraScan 5.0? 27
The general structure of MiraScan 5.0 29
MiraScan 5.0 user interfaces 30
The Button Mode 30
The Console Mode 33
Control Window 34
Preview Window 36
Job List Window 39
Quick Start 41
Making a scan in the Button Mode 41
Making a scan in the Console Mode 45
Making a scan in the TWAIN Mode 46
More about MiraScan 5.0 47
The Button Mode 47
Function Buttons 48
Scanning Class Buttons 49
Office Assistance (OA) Class 49
Scan to File 49
Scan to Fax 49
Scan to E-mail 50
Scan to Printer 50

4
4
Document Class 50
Web & Remote Class 50
Scan to ClubPhoto/iMira 51
Scan to PDA 51
Scan to Web Navigator/Editor 51
Image Application Class 52
Image Fun Class 52
Some cursor operations in the panel 52
Making Button Mode settings 54
General Tab 54
OA Tab 55
Document Tab 58
Image Application Tab 59
Web & Remote Tab 60
Image Fun Tab 63
Push Button Event Tab (only shown when scanner is
equipped with push buttons) 64
Getting Help 65
The Console Mode 66
The Control Window 67
The Scan Setting Macro 69
Macros for Reflective type 69
Macros for Transparency type 70
Macro for Negative film 70
Advanced Settings in the Console Mode 71
The Macro Tab 71
The Advanced Tab 73

5
5
The Preview Window 75
Rulers’ Operation 76
Frame Tools 76
The Image Adjustment Window 79
Color Wizard Mode 80
Density Tab 81
Exposure Tab 82
Contrast Tab 83
Sharpness Tab 84
Saturation Tab 85
Film wizard Tab 86
Color Matching Mode 87
Standard Mode 90
Combo Tab 91
Brightness and Contrast Tab 93
Hue and Saturation Tab 94
Color Balance Tab 96
Curve Tab 98
Level Tab 101
Threshold Tab 104
The Jobs List Window 106
The TWAIN Mode 111
Shortcuts 111

6
6
Problems and Solutions 112
Installation and uninstallation problems 112
Installation Problems 112
Uninstallation Problems 114
Problems starting MiraScan 5.0 115
Operation problems 117
Additional tips on improving image quality 119
Service Information 121
Technical support 121
Re-packing directions 121
Appendix 122
Copyright 122
Disclaimer 122
IMPORTANT SAFETY INSTRUCTIONS ON USING YOUR
SCANNER 122
FCC INFORMATION 124
7
7
Welcome to MiraScan 5.0!
In the “Prepare your original for scanning” section, we will walk you through your first
scan. You don’t need to know much about scanners and digital imaging. Just follow the
steps in this section and you’ll be able to scan images and save them as files, send them
via a fax application software or e-mail, or put them on a web page..., etc.
Before you start, check the following items:
• Check if the scanner is correctly installed and connected to your computer. For details,
please see the scanner installation guide poster in the package.
• If you want to use the “Scan to Fax”, “Scan to E-mail”, “Scan to OCR” and “Scan to
PDA” functions, make sure the relevant software programs are installed.
• Check if the printer is correctly installed and turned on before using the “Scan to
Printer” function.
Click the button to jump to the next page, the button to the
previous page.
Click the button to jump to the table of contents.
8
8
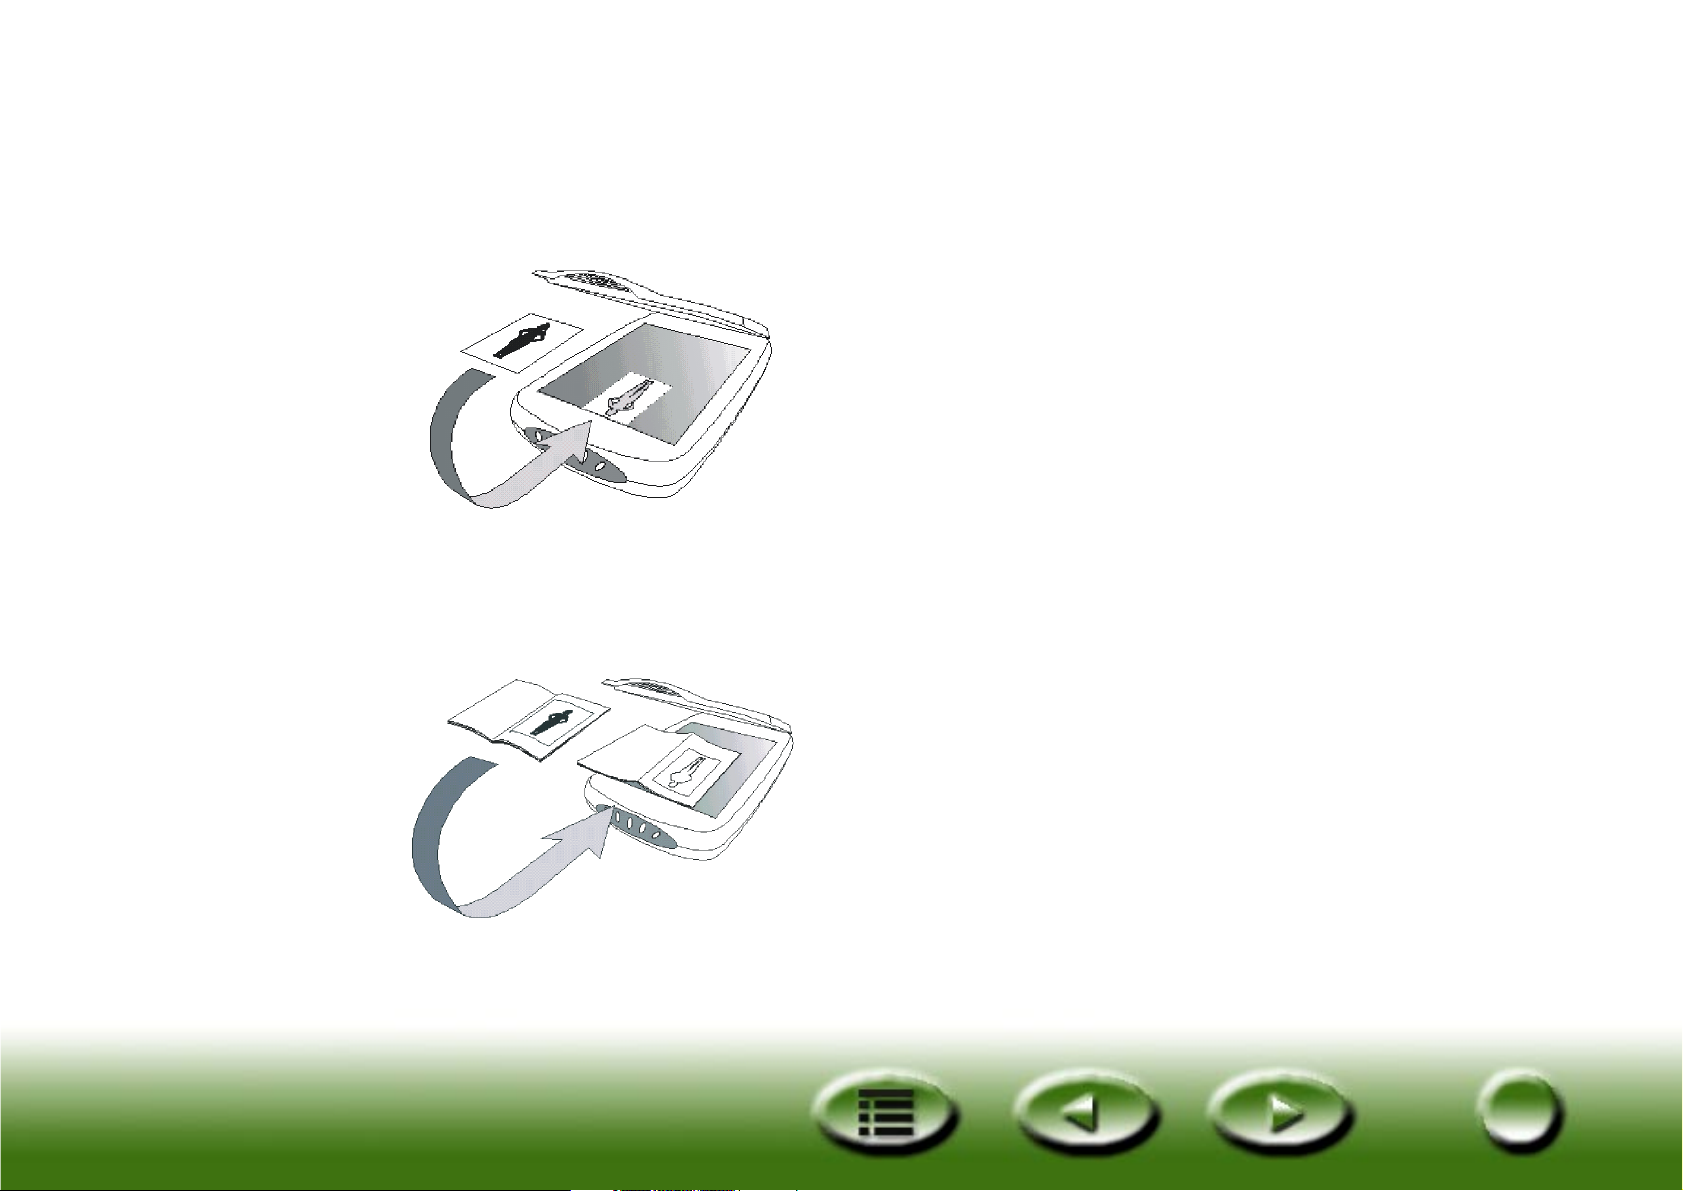
Preparing your original for scanning
If you want to scan a photograph
If you want to scan a picture in a book or magazine
Place the photograph with the side to be scanned
facing down on the scanner glass plate and align it
against the edge of the scanner. Note the direction
of the photograph so that you will not scan the
photograph in the wrong direction.
Close the scanner cover.
Open the book to the page that contains the pic-
ture you want to scan and put it on the scanner
with the picture against the glass plate. Note the
direction of the picture so that you will not scan
the picture in the wrong direction.
Close the scanner cover.
9
9
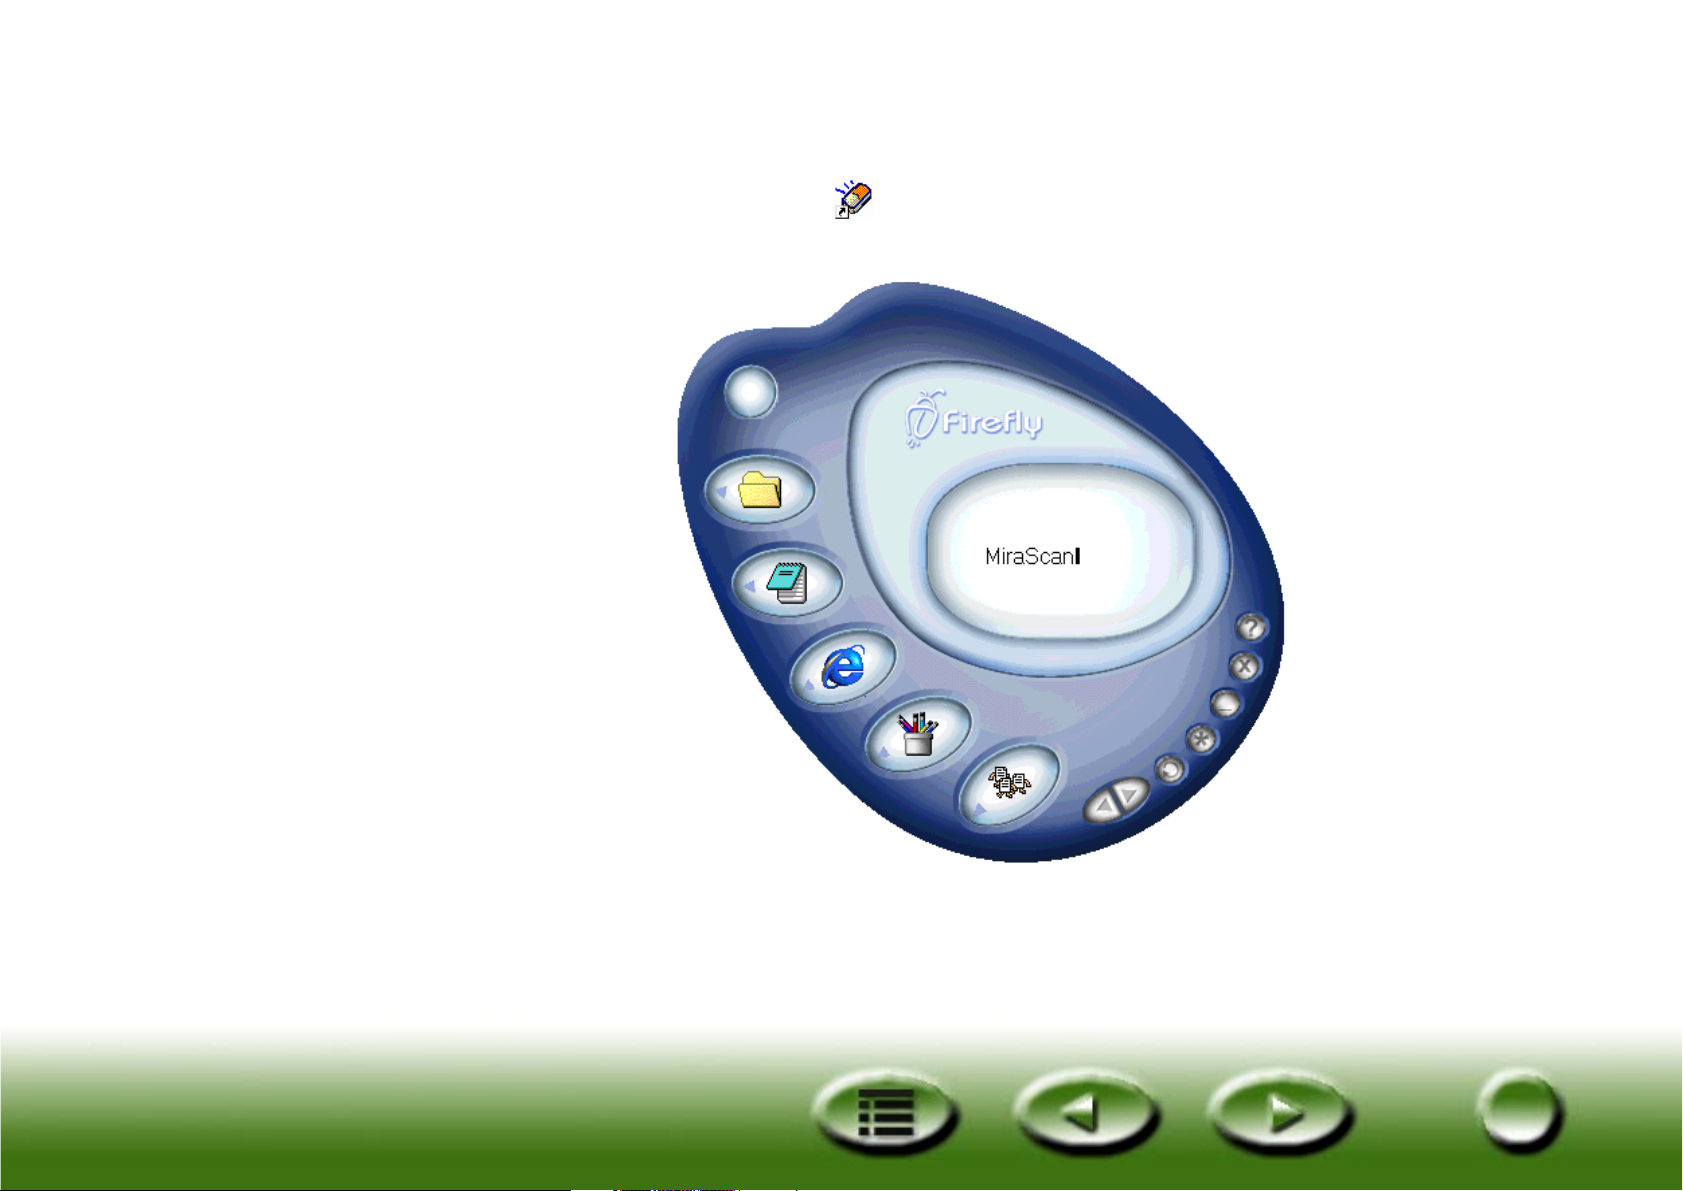
Opening MiraScan 5.0
Double-click the MiraScan icon on your desktop. The MiraScan 5.0 user inter-
face will appear.
Now you are ready to use the “Scan to” functions. Click a quick index button on the
left of this page, and you will jump to the page that describes how to use that
function.
File
E-mail
Printer
Fax
OCR
PDA
Web
Applications
Wallpaper
Quick Index
10
10
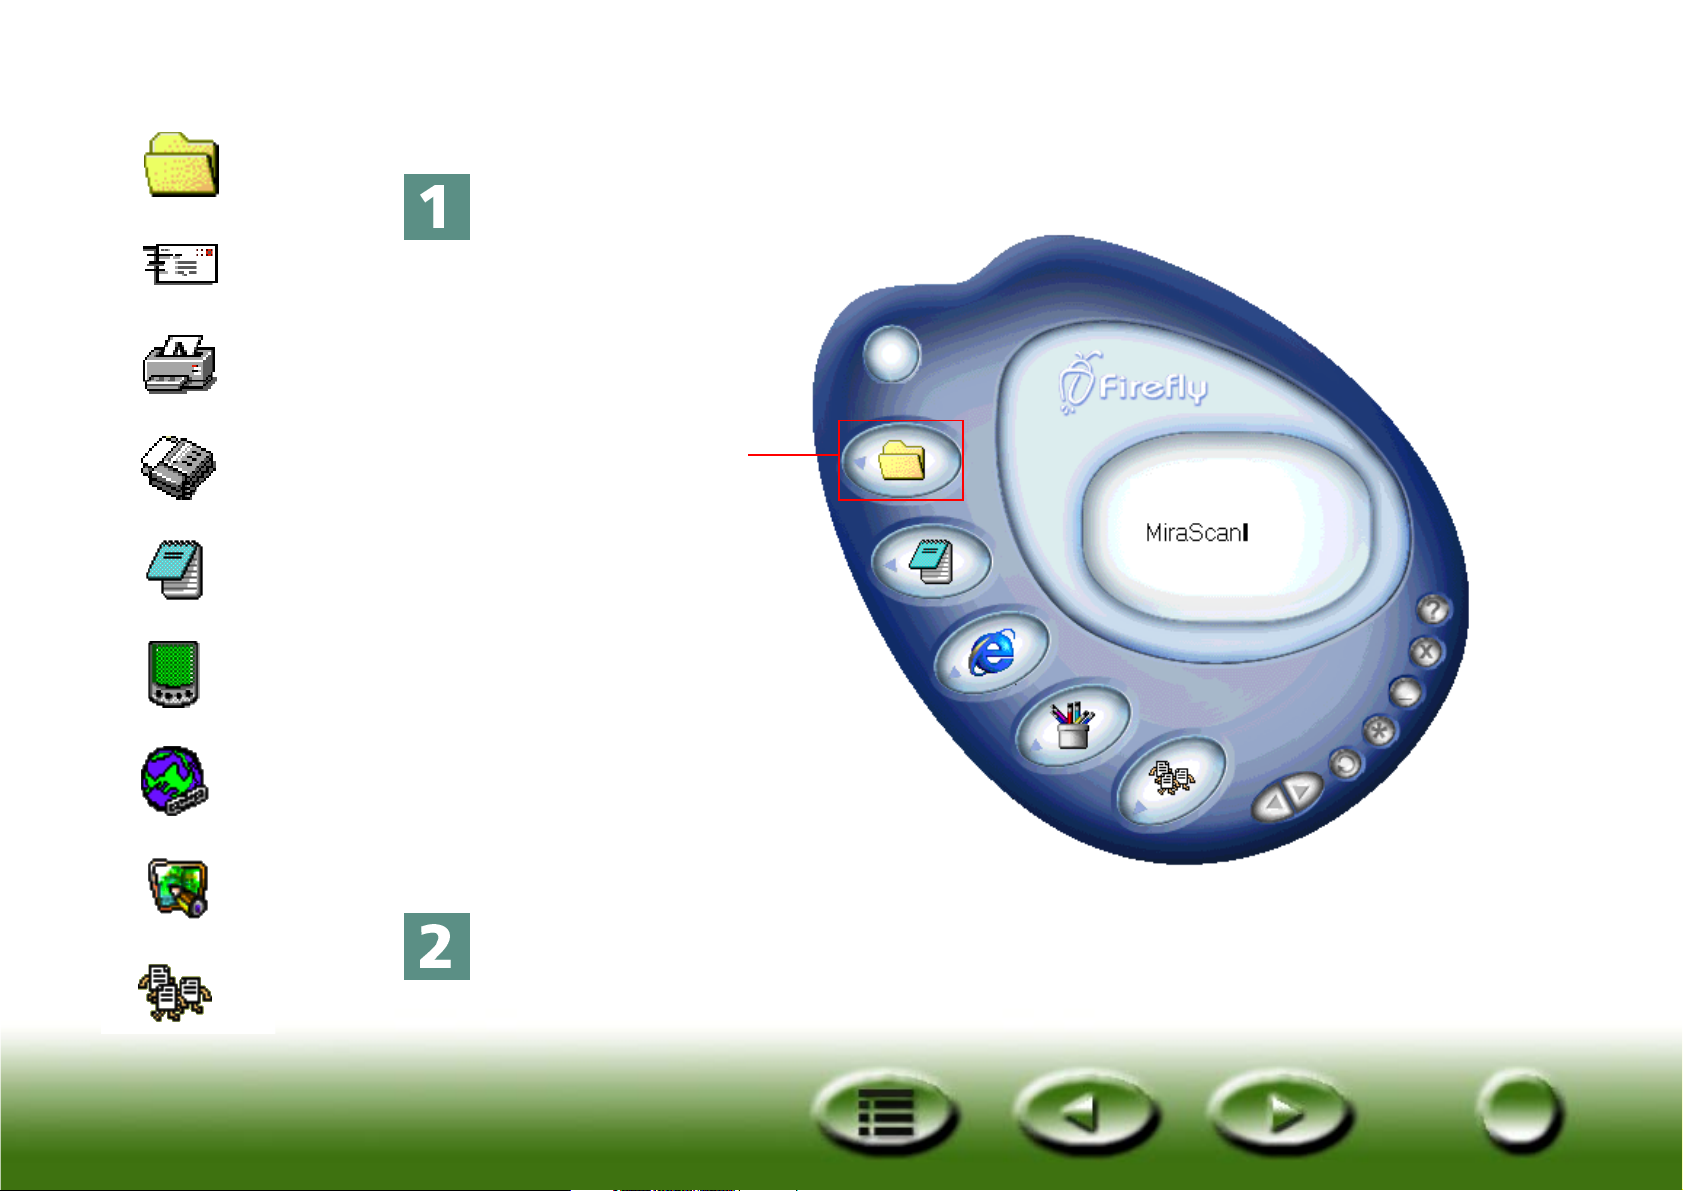
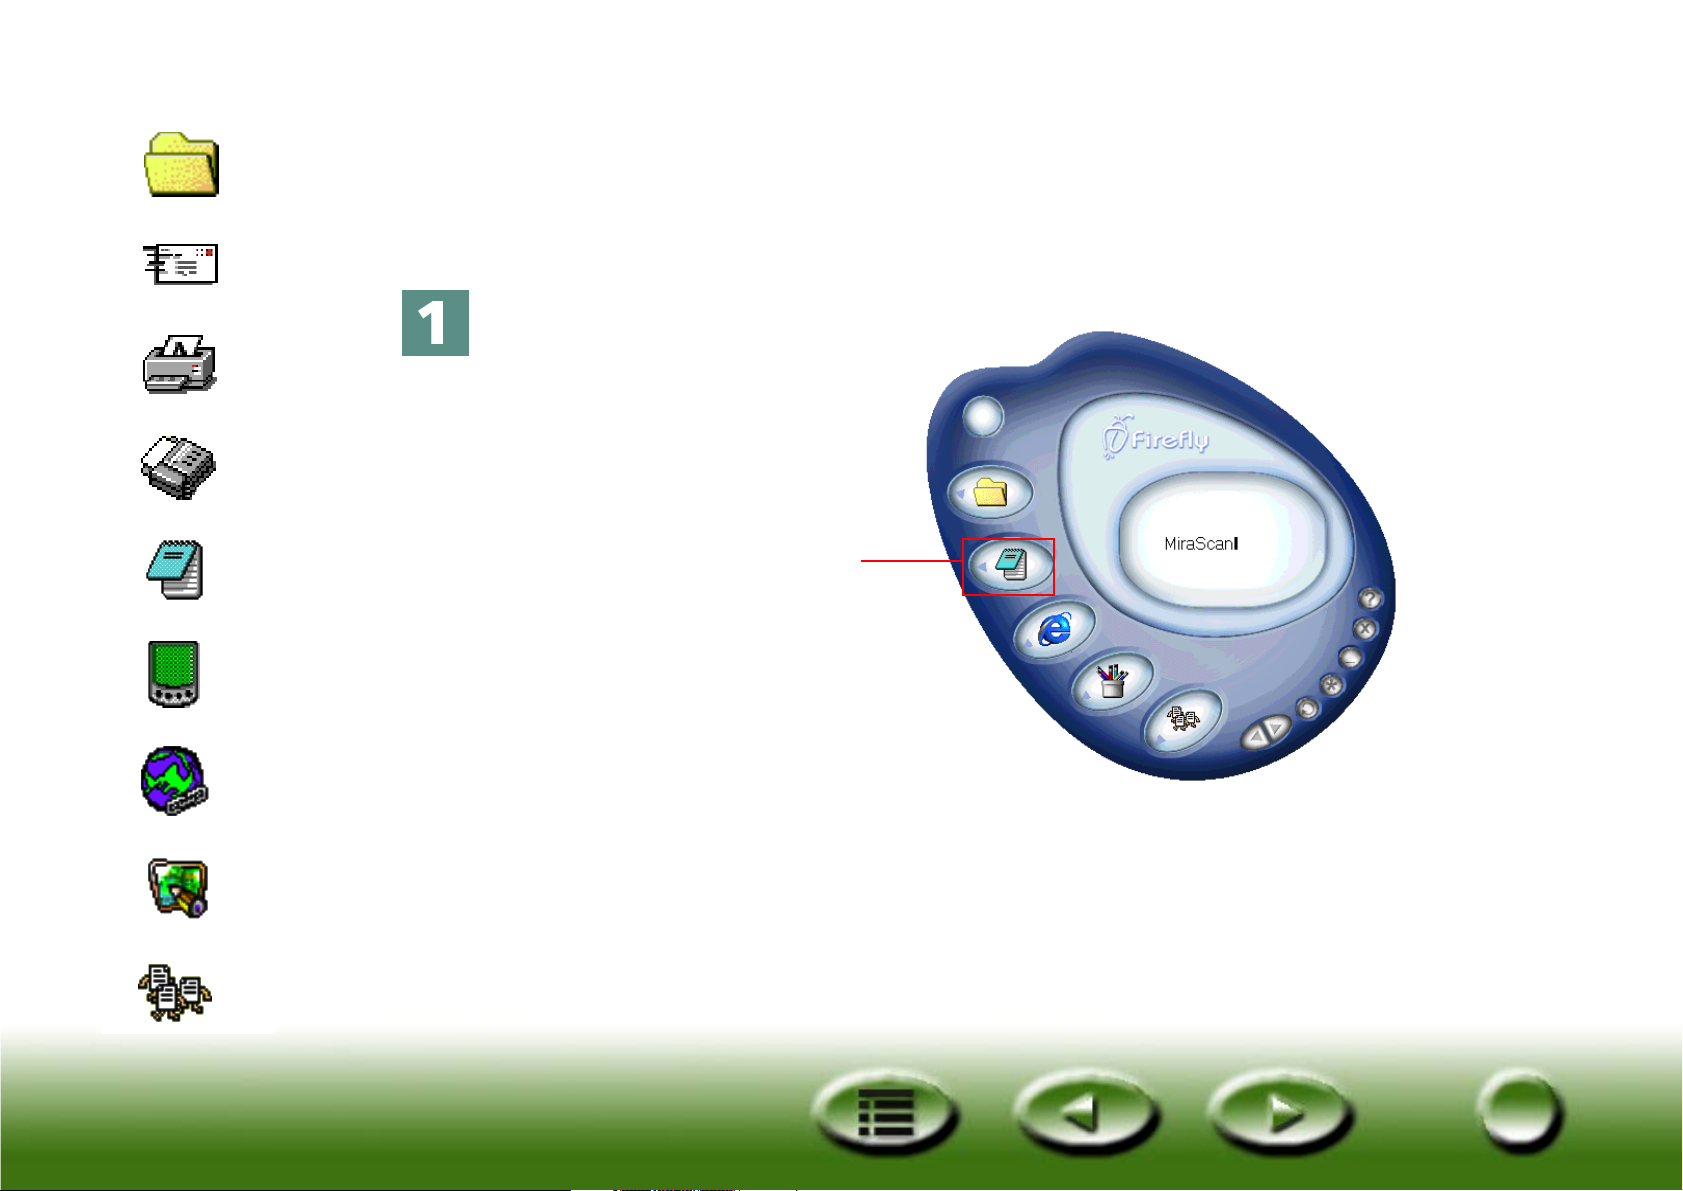
Scan to File
Click the button indicated below.
The scanner will start scanning the original. When finished, the scanned
image file will be saved to your “My Documents” (Windows 98/Me/NT) or
“Personal” (Windows 2000) folder.
Click this button
File
E-mail
Printer
Fax
OCR
PDA
Web
Applications
Wallpaper
Quick Index
11
11
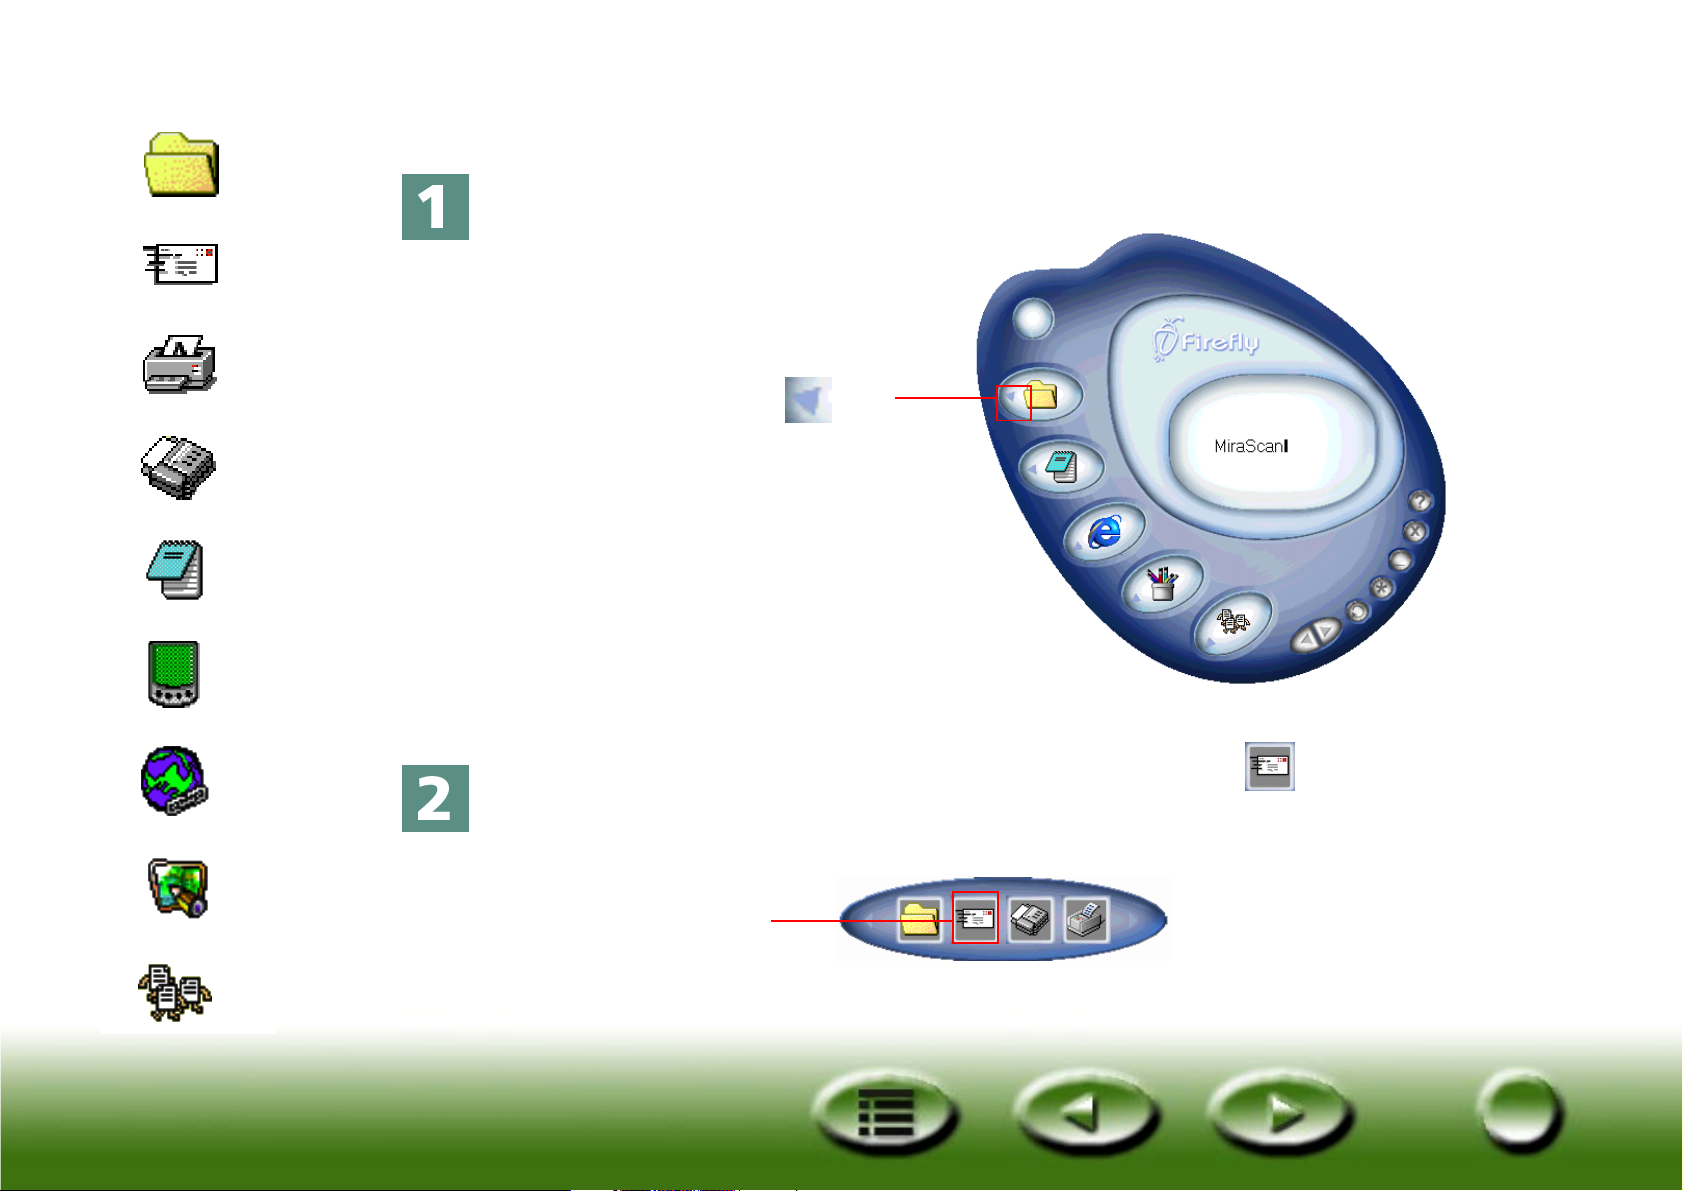
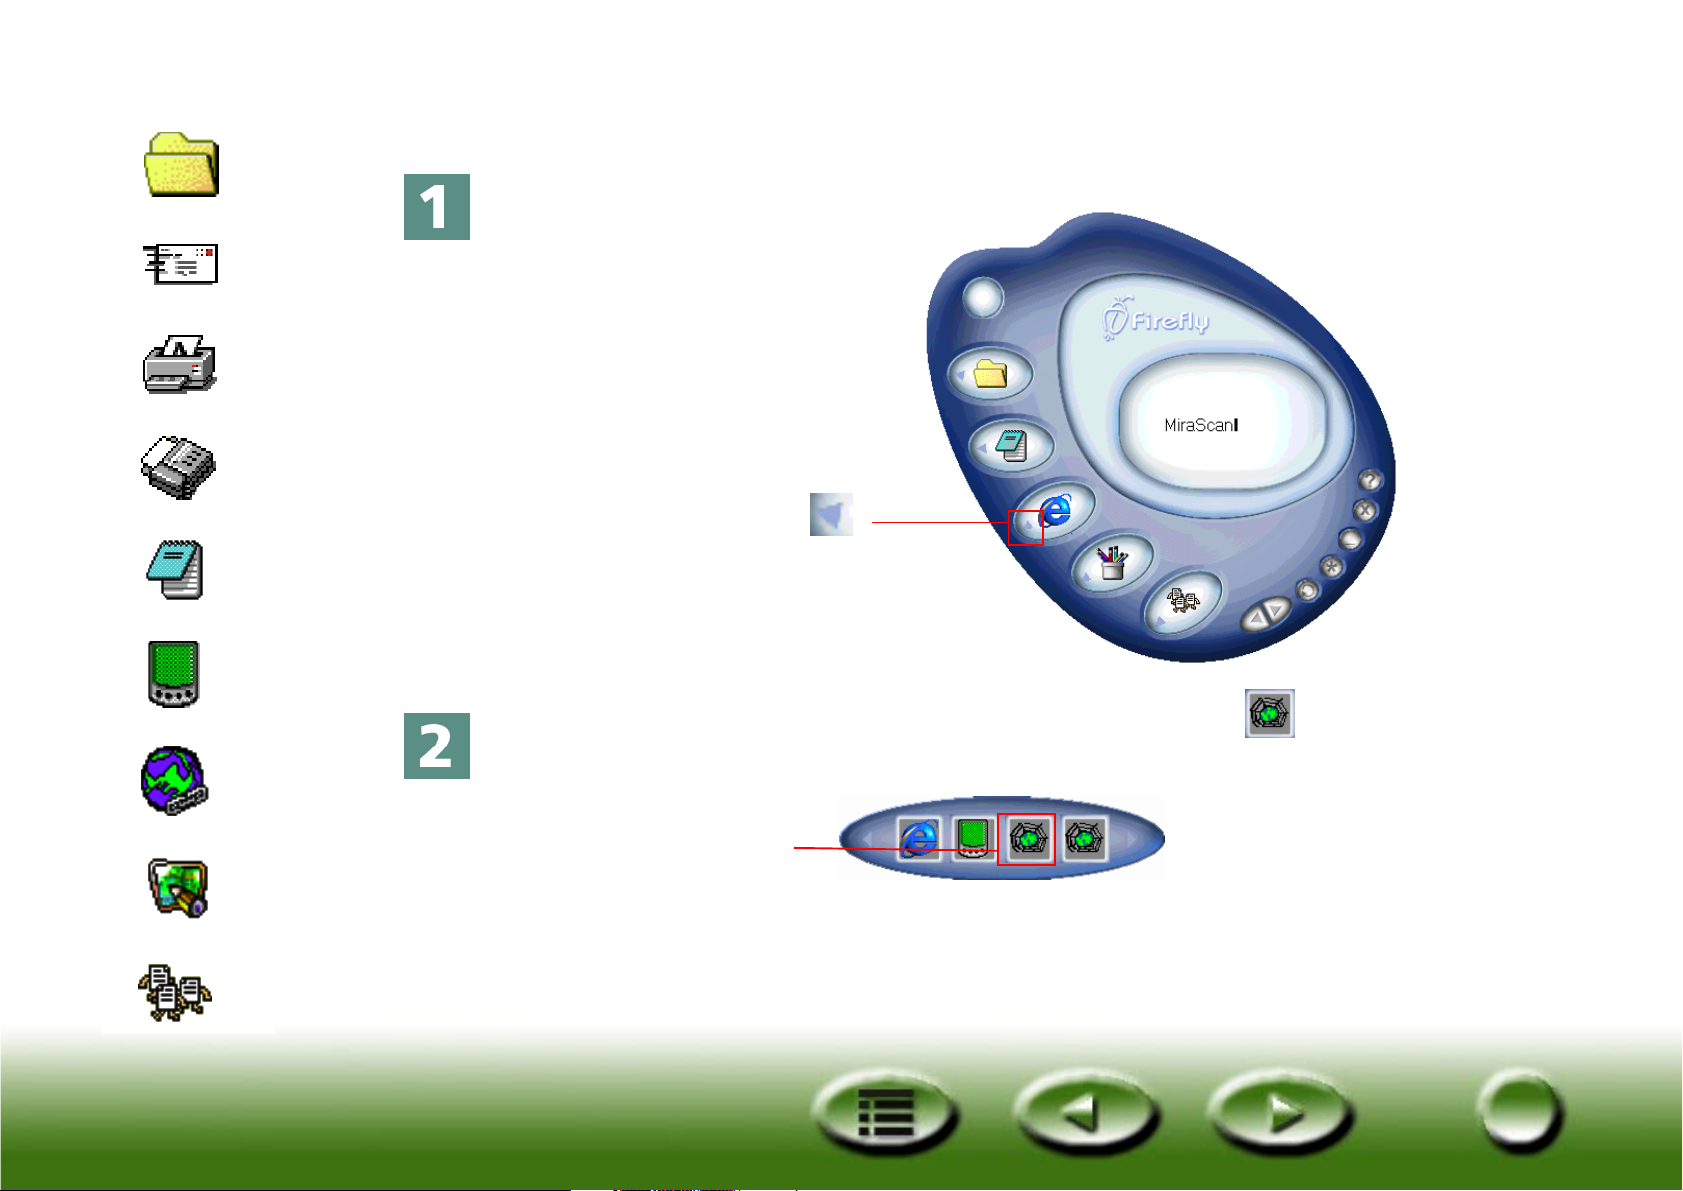
Scan to E-mail
Click the button indicated below.
A button bar will appear on the left. Click the button on the button
bar.
Click the triangle on
this button
Click this button
File
E-mail
Printer
Fax
OCR
PDA
Web
Applications
Wallpaper
Quick Index
12
12
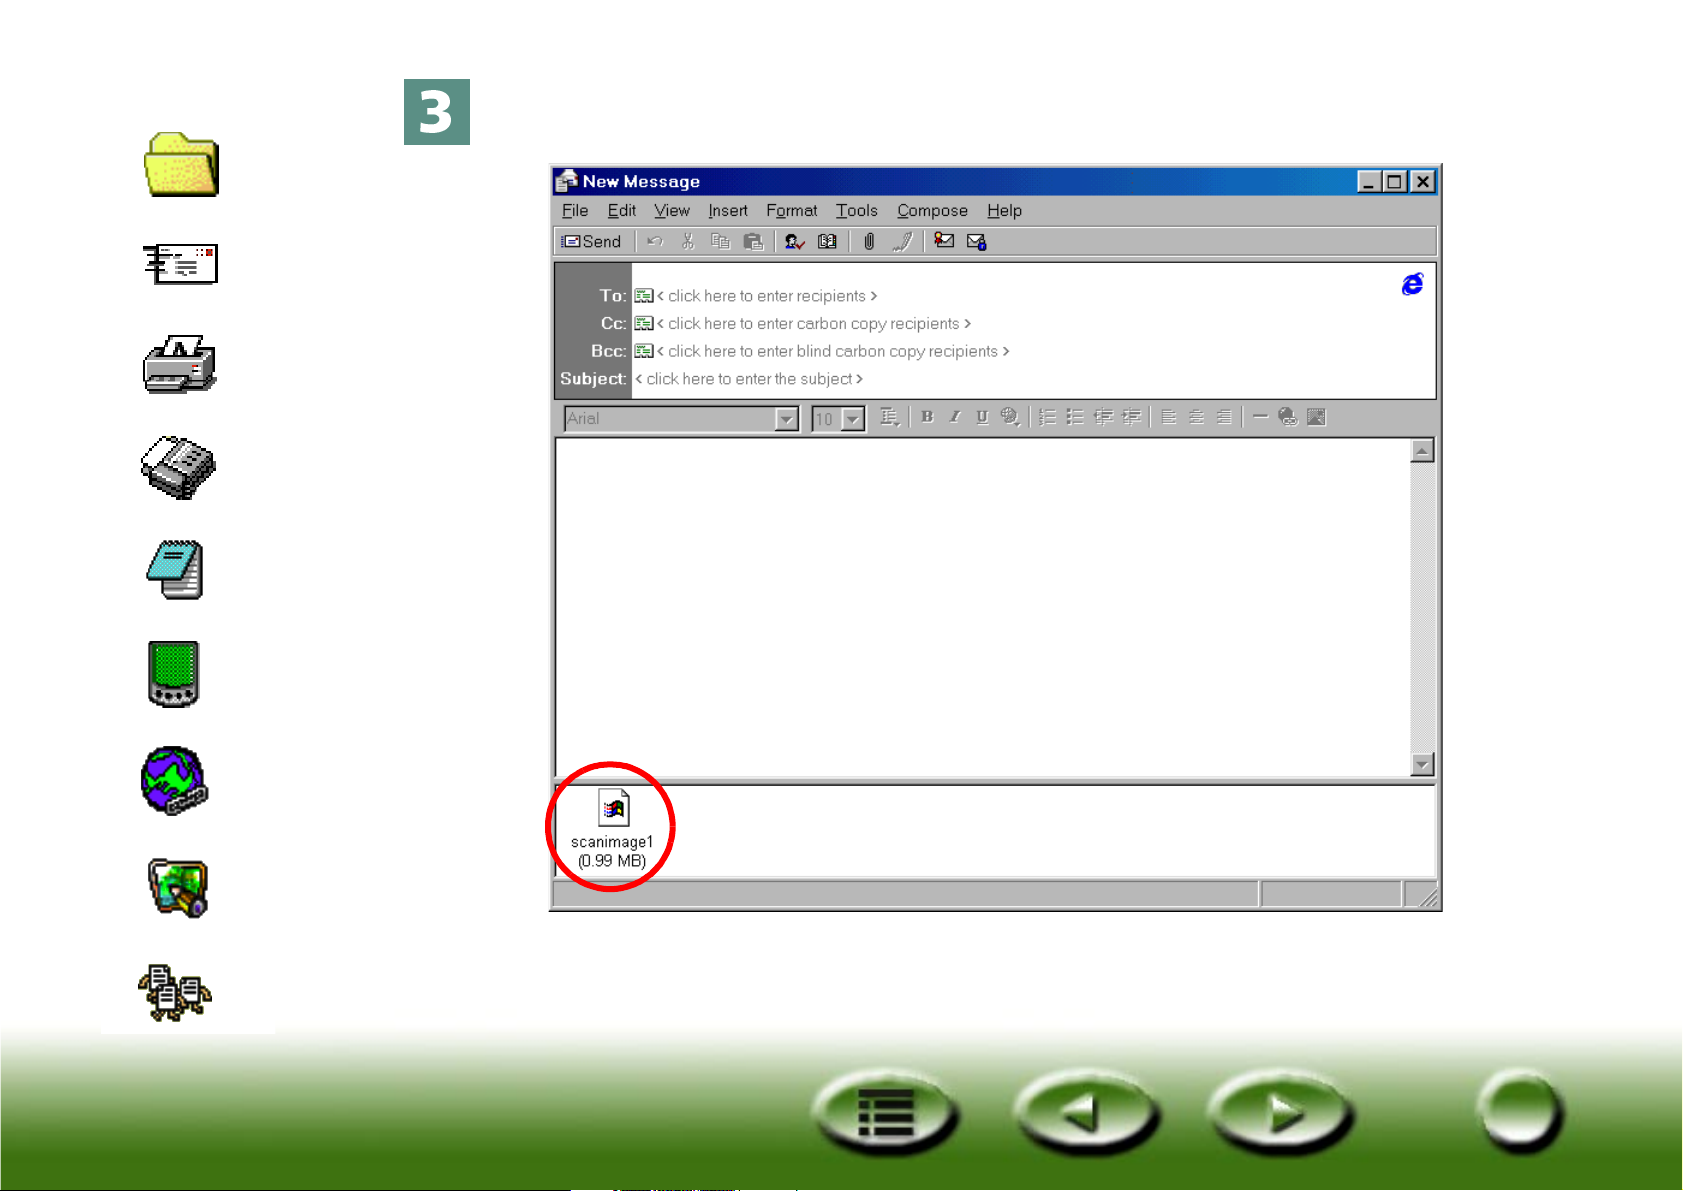
MiraScan 5.0 will scan the original and transfer the scanned image to a
new e-mail as an attachment.

File
E-mail
Printer
Fax
OCR
PDA
Web
Applications
Wallpaper
Quick Index
13
13
Scan to Printer
Click the button indicated below.
A button bar will appear on the left. Click the button on the button
bar.
MiraScan 5.0 will start scanning the original. When finished, the image
will be printed by your printer.
Click the triangle on
this button
Click this button
File
E-mail
Printer
Fax
OCR
PDA
Web
Applications
Wallpaper
Quick Index
14
14
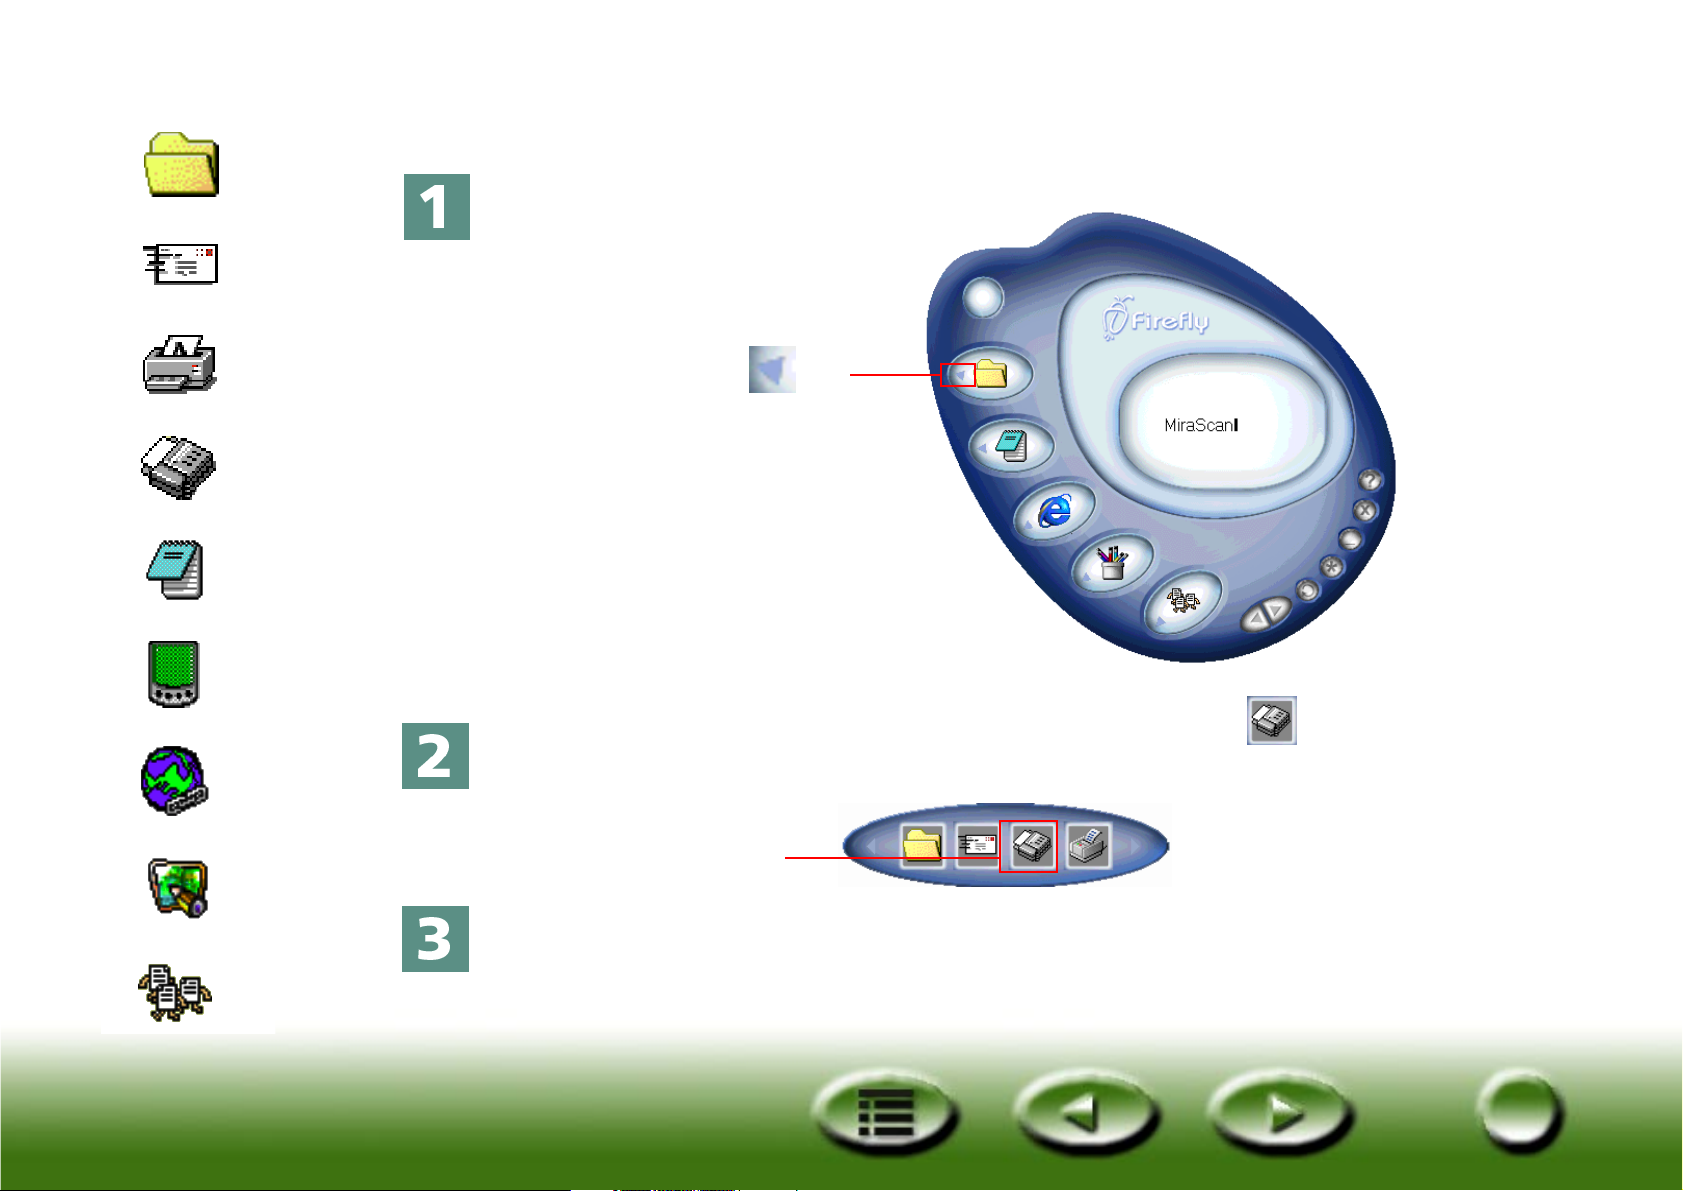
Scan to Fax
Click the button indicated below.
A button bar will appear on the left. Click the button on the button
bar.
MiraScan 5.0 will start scanning the original. When finished, the scanned
image will be sent to the compatible fax software installed in your
computer.
Click the triangle on
this button
Click this button
File
E-mail
Printer
Fax
OCR
PDA
Web
Applications
Wallpaper
Quick Index
15
15
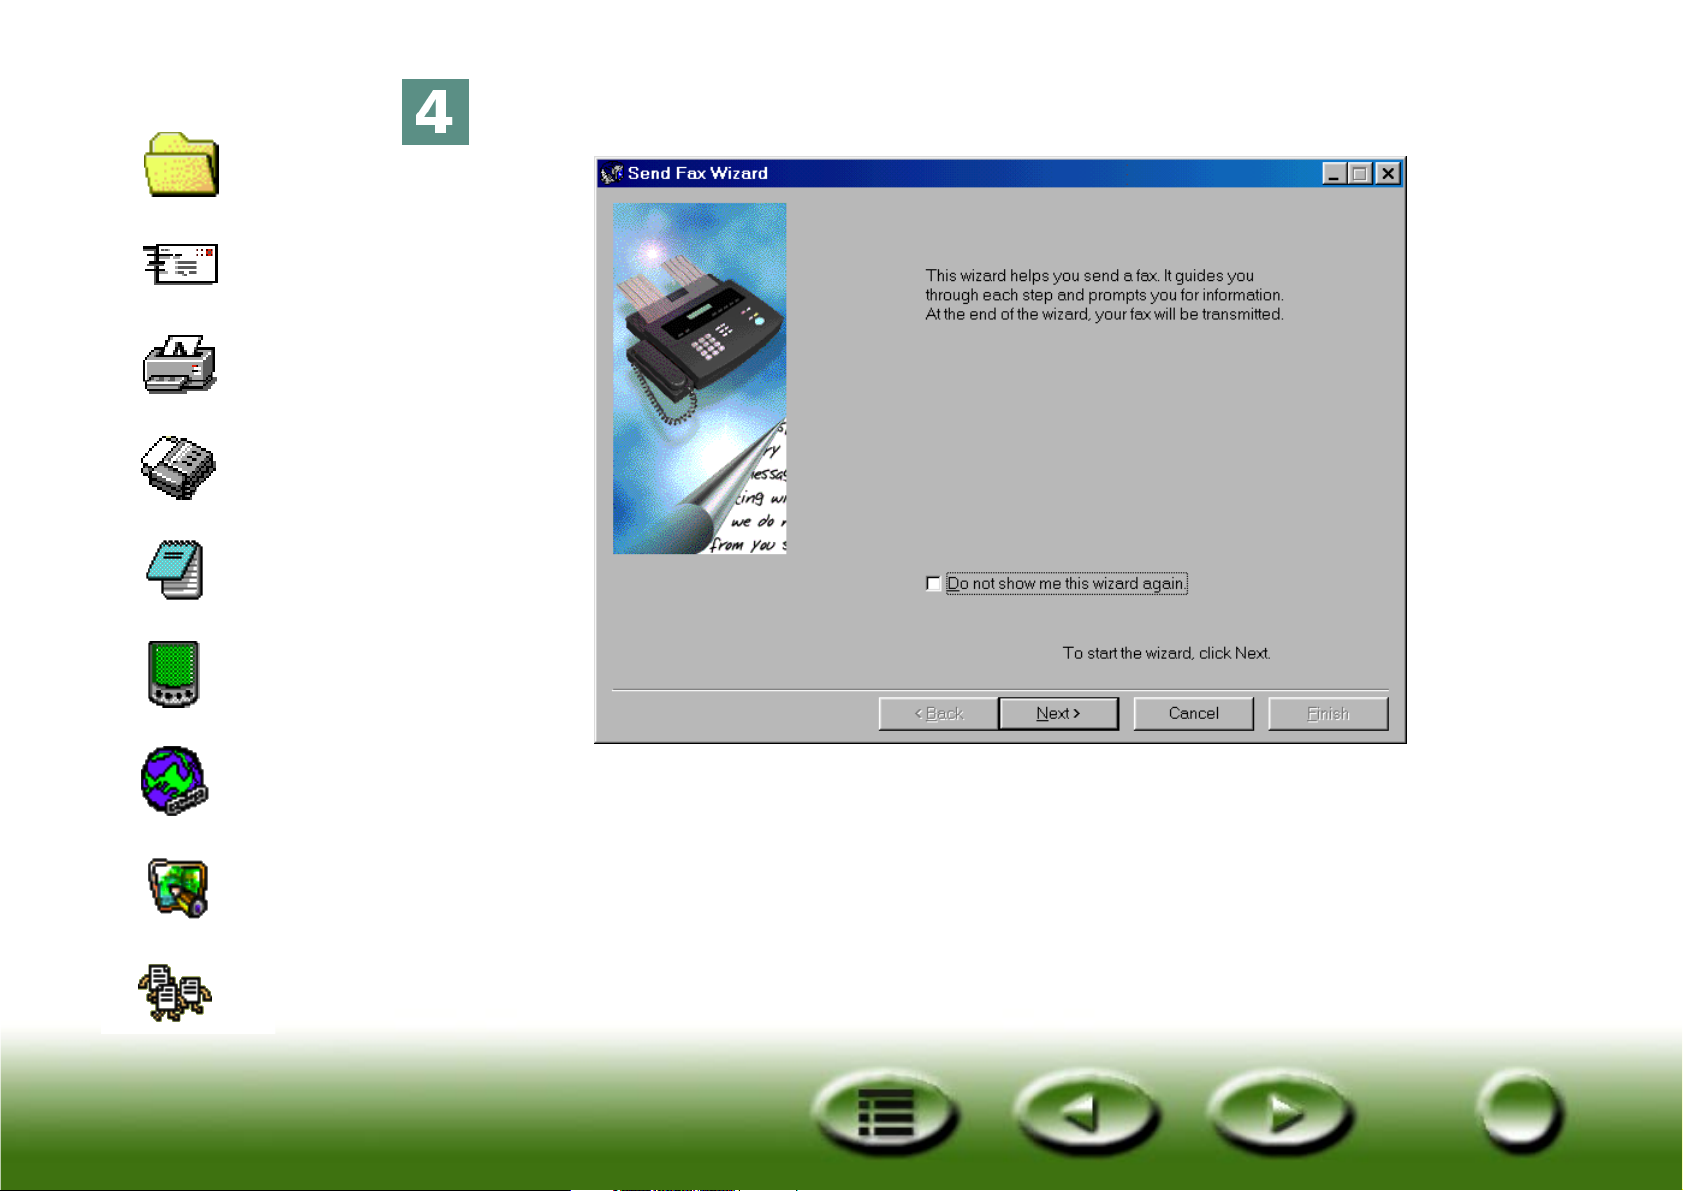
The Send Fax Wizard (taking WinFax for example) will appear. Follow the
instructions and you will be able to send the scanned image by fax.
File
E-mail
Printer
Fax
OCR
PDA
Web
Applications
Wallpaper
Quick Index
16
16
Scan to OCR
The “Scan to OCR” function allows you to scan documents and turn the
scanned document image into editable text files. This will save you a lot of
time re-typing the text.
Click the button indicated below.
Click this button
File
E-mail
Printer
Fax
OCR
PDA
Web
Applications
Wallpaper
Quick Index
17
17
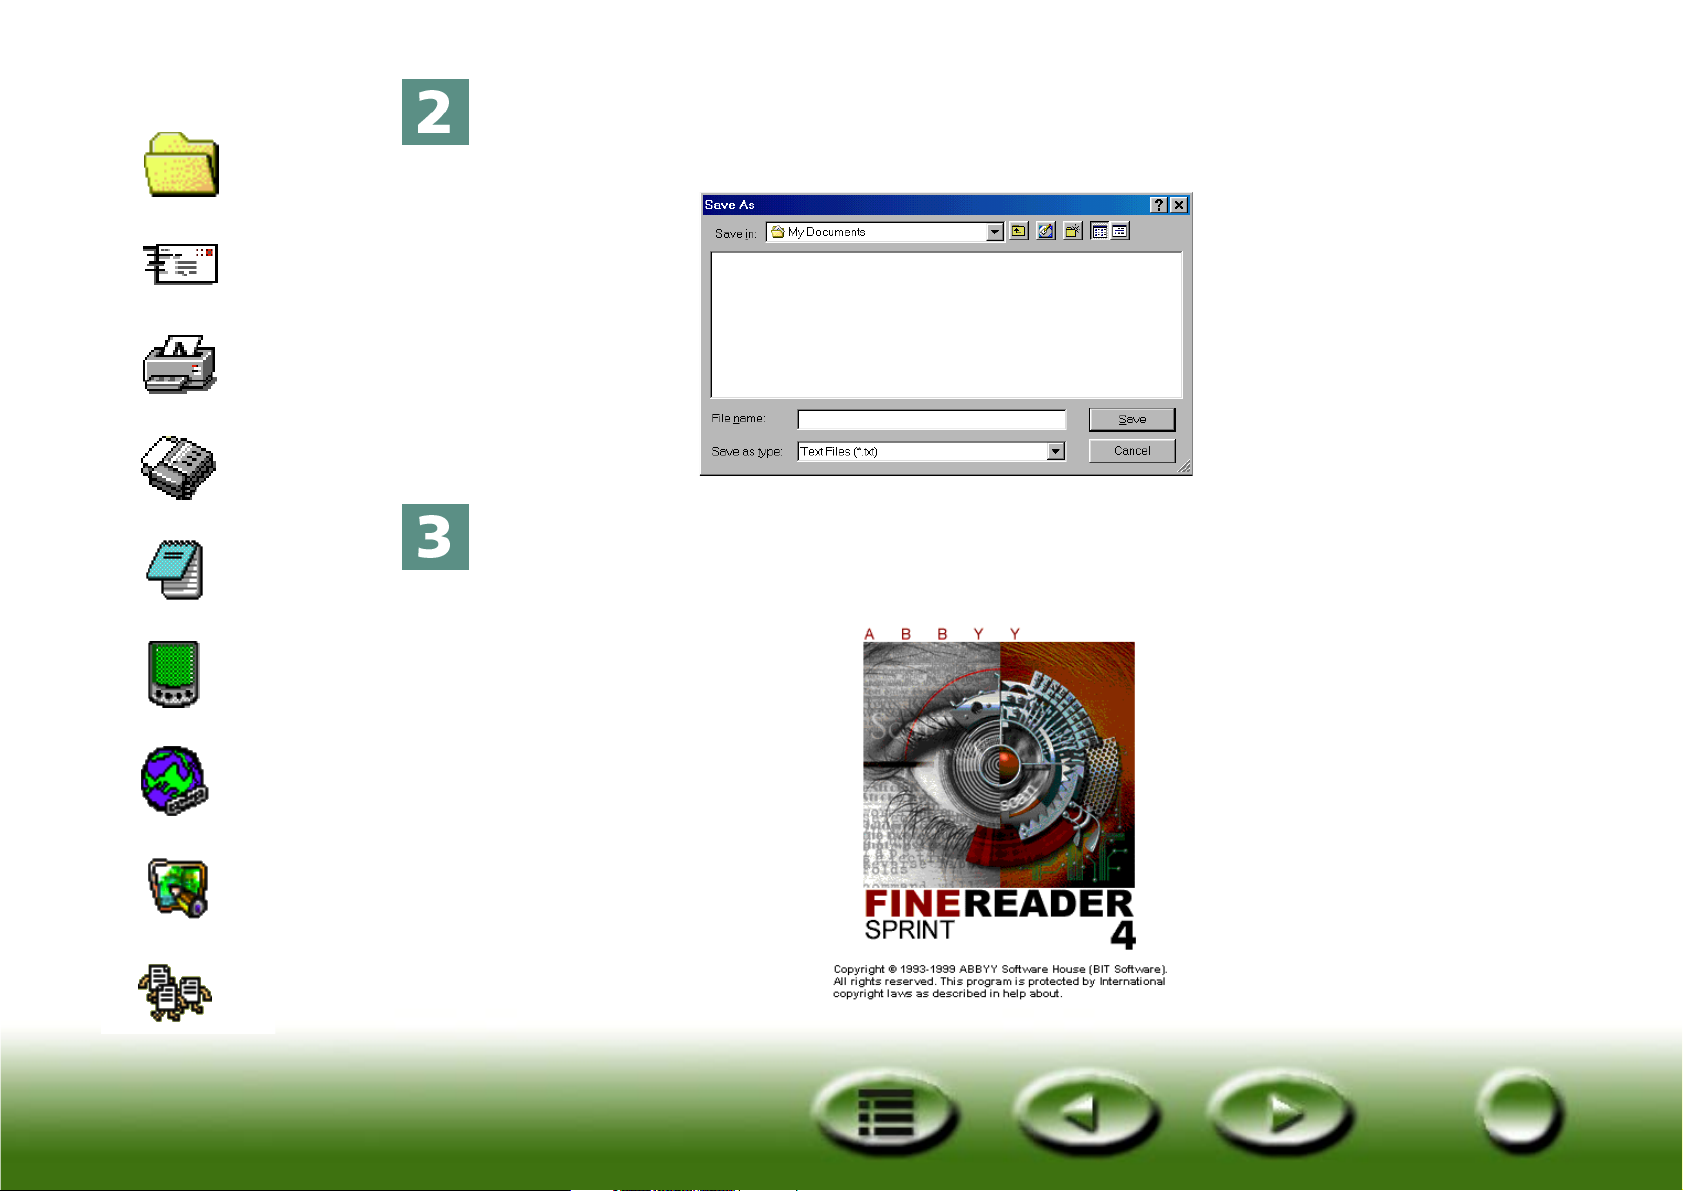
MiraScan 5.0 will start scanning the image. A “Save As” dialogue box will
then appear. Specify the file name and location you want to save the out-
put text file and click “Save”.
The OCR software (taking FineReader 4.0 Sprint for example) will recog-
nize the scanned image and save the result with the name and to the loca-
tion you specified in step 2.
File
E-mail
Printer
Fax
OCR
PDA
Web
Applications
Wallpaper
Quick Index
18
18
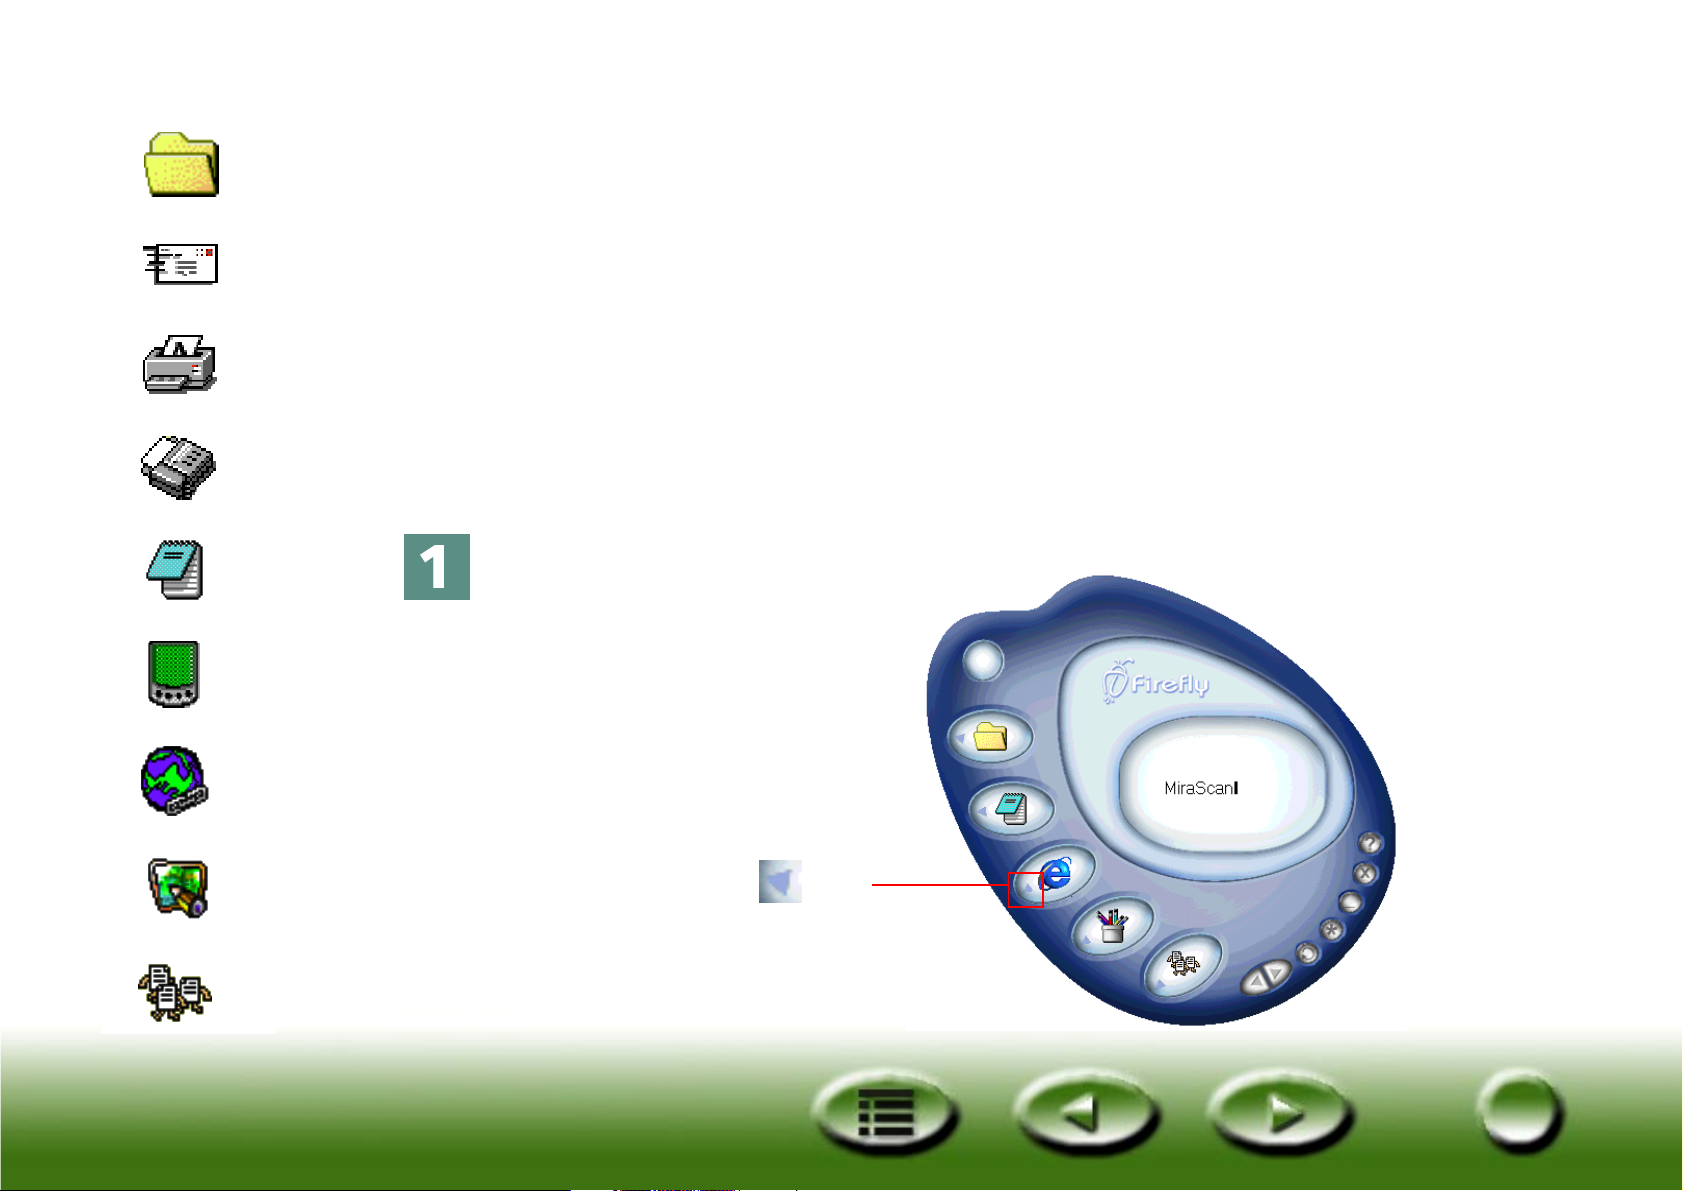
Scan to PDA
This function allows you to scan your favorite photos to Palm compatible
PDAs (Personal Digital Assistant).
Before you start, check the following:
• The utility software that comes with your PDA (such as Palm Desktop) is
installed.
• The software “Album ToGo” (available in the “AlbumToGo” folder in
the scanner software CD-ROM) is installed.
• The PDA is placed on its cradle and connected to your computer
correctly.
Click the button indicated below.
Click the triangle on
this button
File
E-mail
Printer
Fax
OCR
PDA
Web
Applications
Wallpaper
Quick Index
19
19
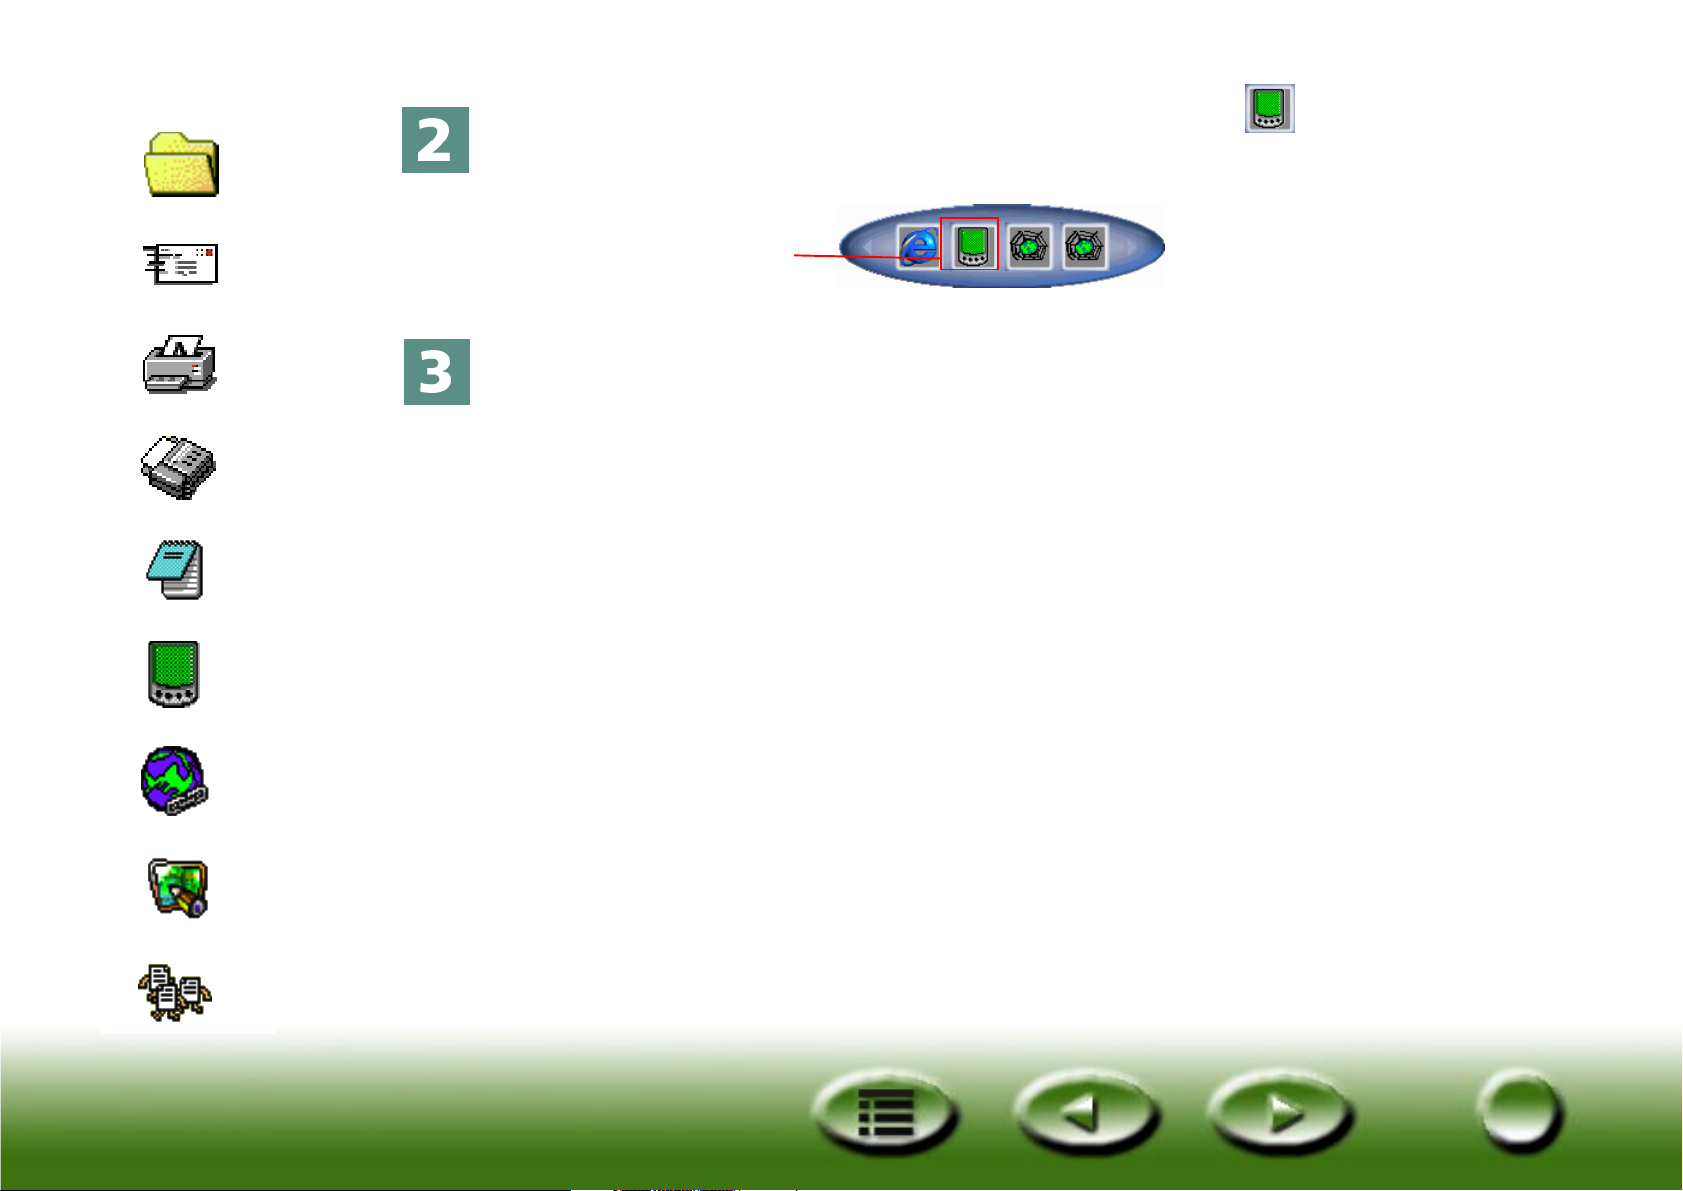
A button bar will appear on the left. Click the button on the button
bar.
MiraScan 5.0 will start scanning the original. When finished, press the Sync
button on the cradle to transfer the scanned image to your PDA.
Click this button
File
E-mail
Printer
Fax
OCR
PDA
Web
Applications
Wallpaper
Quick Index
20
20
Scan to Web
Click the button indicated below.
A button bar will appear on the left. Click the button on the button
bar.
Click the triangle
on this button
Click this button
File
E-mail
Printer
Fax
OCR
PDA
Web
Applications
Wallpaper
Quick Index
21
21
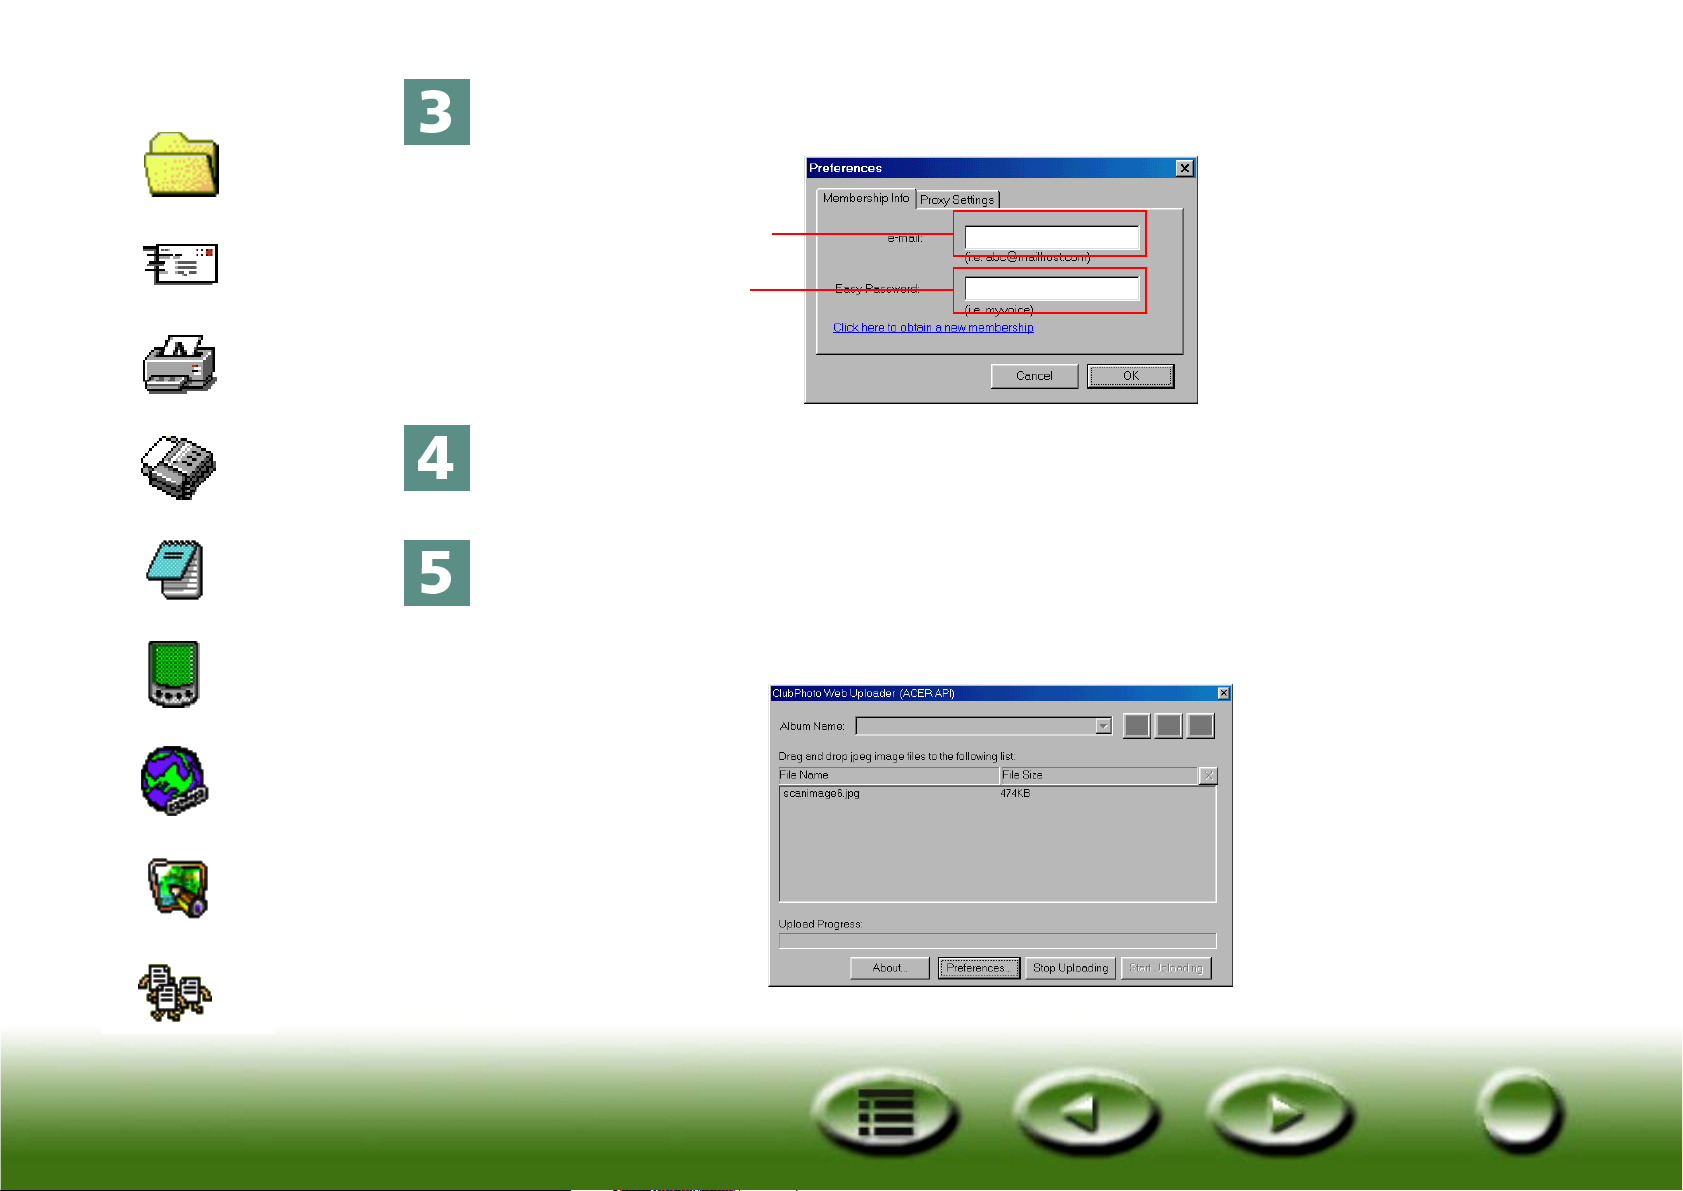
MiraScan 5.0 will start scanning the original. When finished, the following
dialog box will appear.
Now you need to register to the photo sharing web site and get your own
album page. Connect to the Internet. Enter your e-mail address and spec-
ify your personal password in the dialog box. Click “OK” when finished.
The following dialog box will pop up, showing the upload progress. When
the upload is completed, your Internet browser (such as Microsoft Internet
Explorer) will open and the scanned image will appear on your album page.
If the image does not appear, click the “Refresh” button of your browser.
Enter your
e-mail address
Specify your
personal
password
File
E-mail
Printer
Fax
OCR
PDA
Web
Applications
Wallpaper
Quick Index
22
22
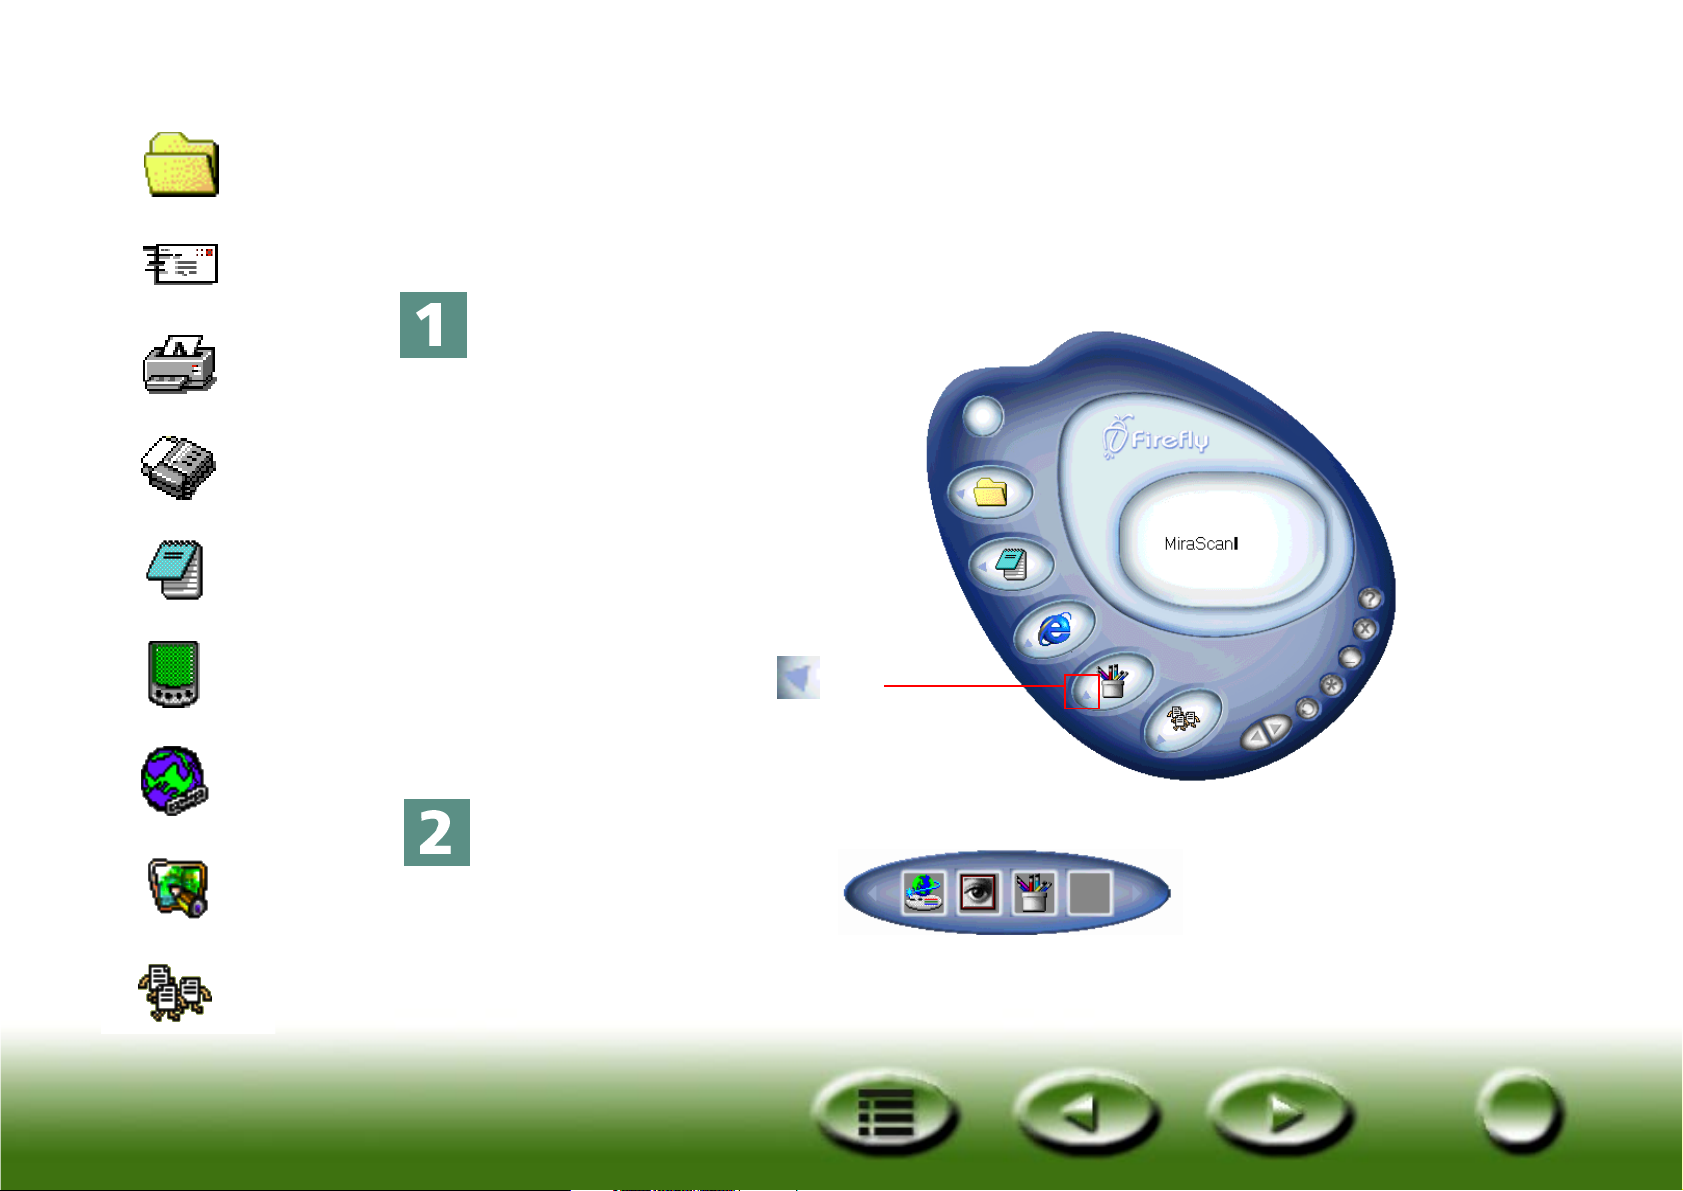
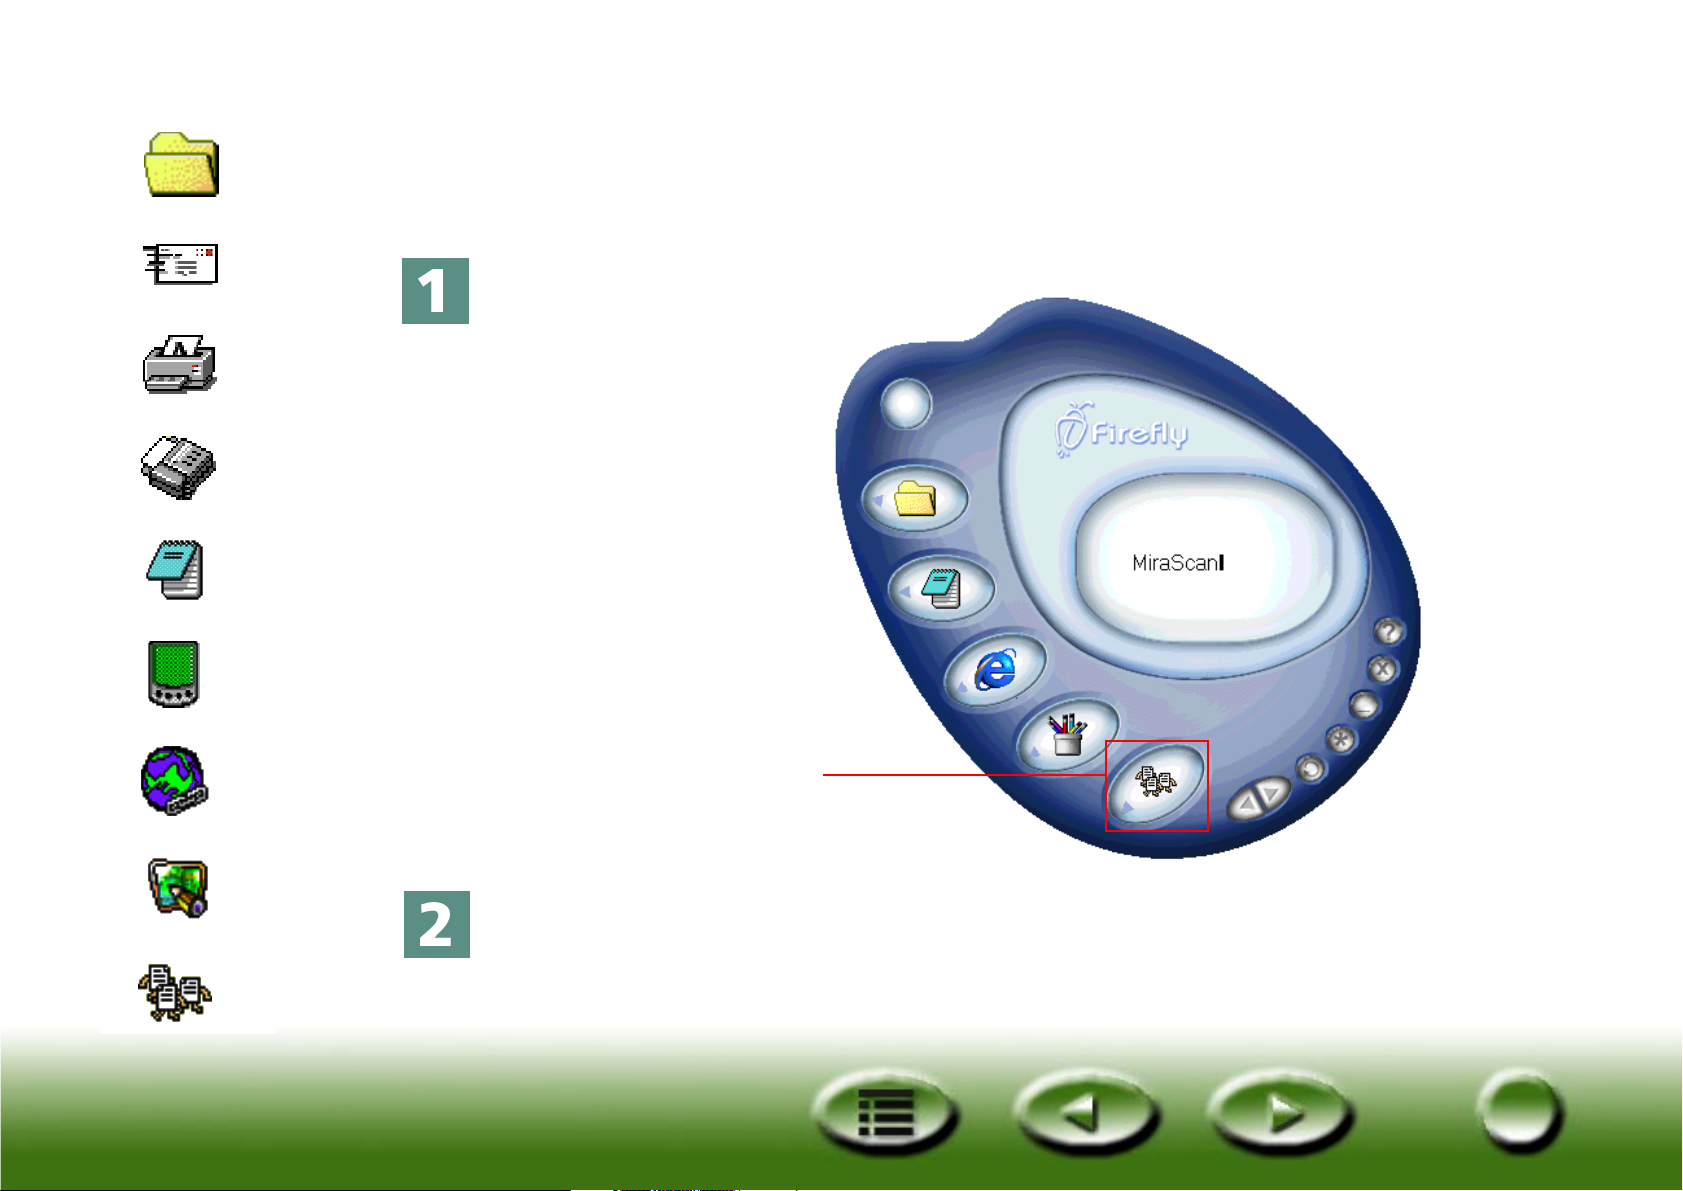
Scan to Application Programs
If you have installed application programs that MiraScan 5.0 can recognize
and work with, you can use this function to scan and transfer the scanned
images to those application programs.
Click the button indicated below.
A button bar that contains several application programs’ icons will appear.
Click the triangle on
this button
File
E-mail
Printer
Fax
OCR
PDA
Web
Applications
Wallpaper
Quick Index
23
23
Click an icon on the button bar. MiraScan 5.0 will start scanning the origi-
nal and transfer the scanned image to the application program of your
choice.
File
E-mail
Printer
Fax
OCR
PDA
Web
Applications
Wallpaper
Quick Index
24
24
Scan to Wallpaper
This function enables you to scan images and replace your current
Windows wallpaper with the new scanned image.
Click the button indicated below.
MiraScan 5.0 will start scanning the original and when finished, your wall-
paper will be replaced by the scanned image.
Click this button
25
25
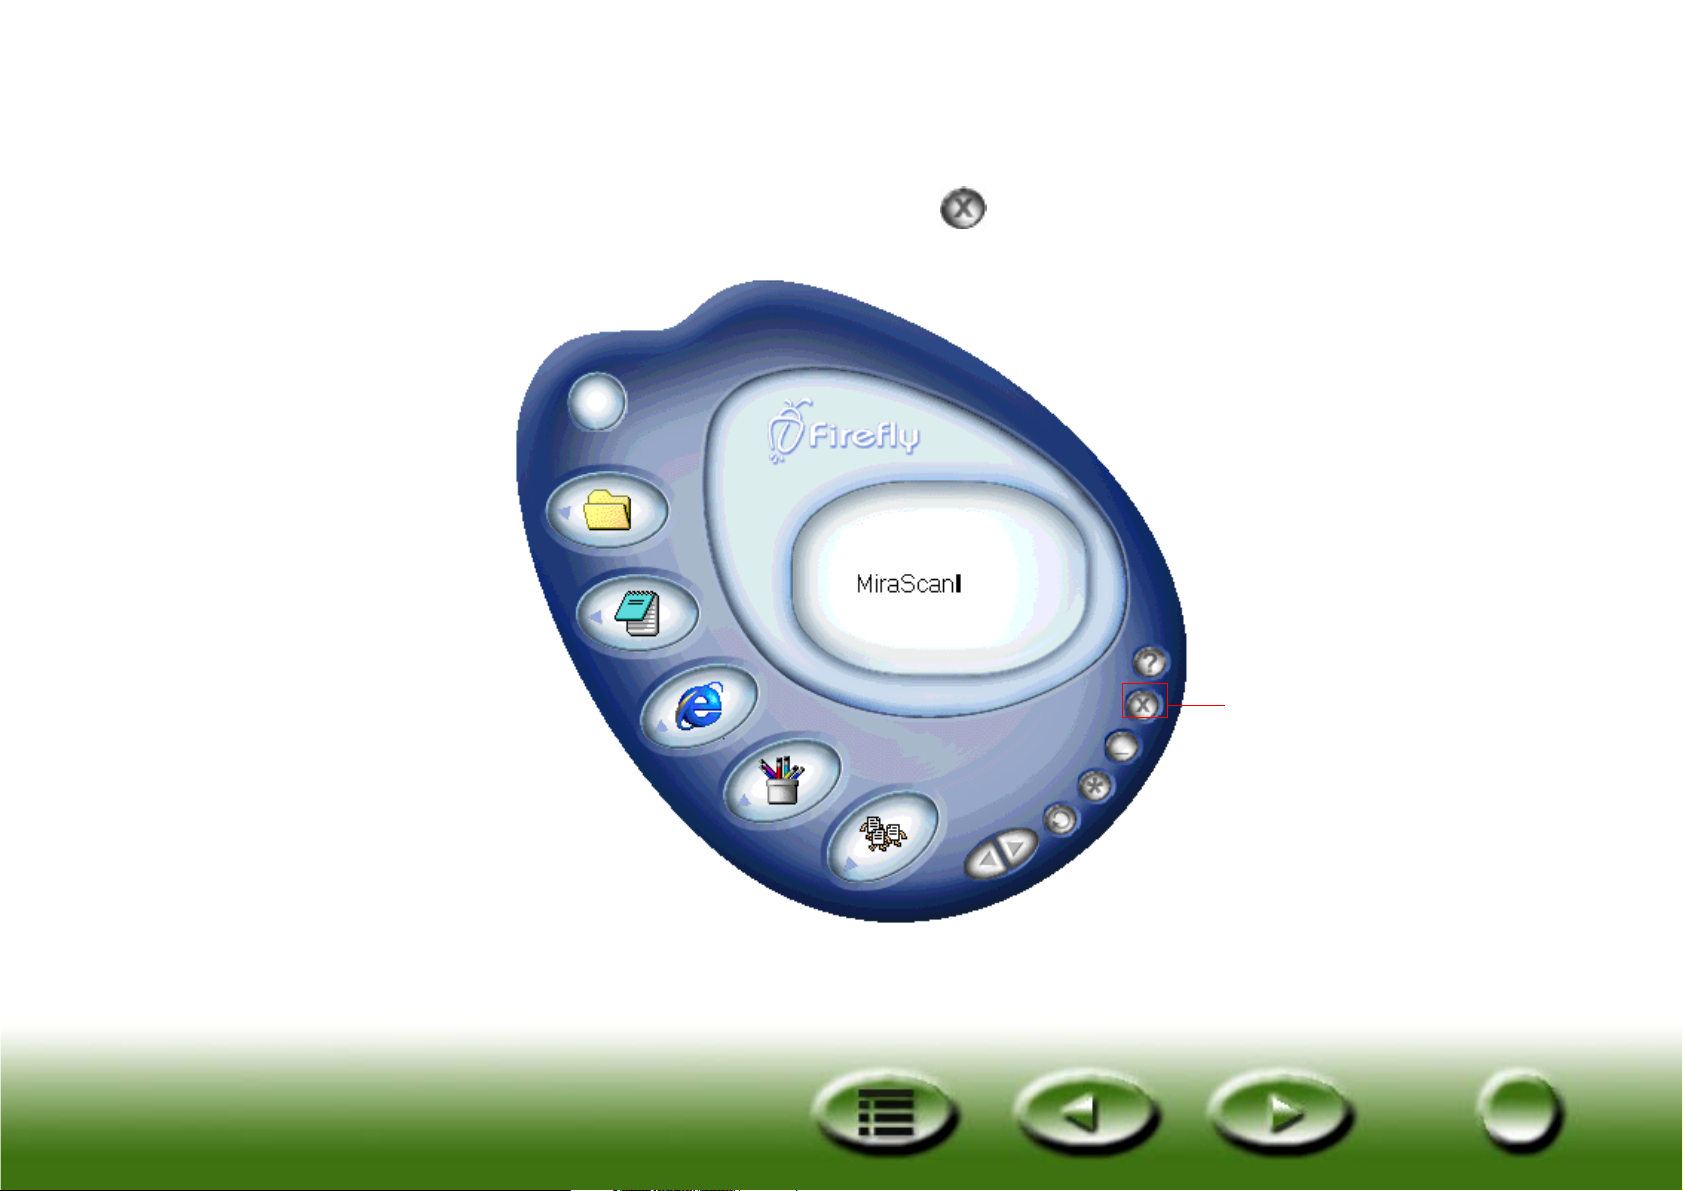
Closing MiraScan 5.0
To close MiraScan 5.0, click the button .
Click this button
26
26
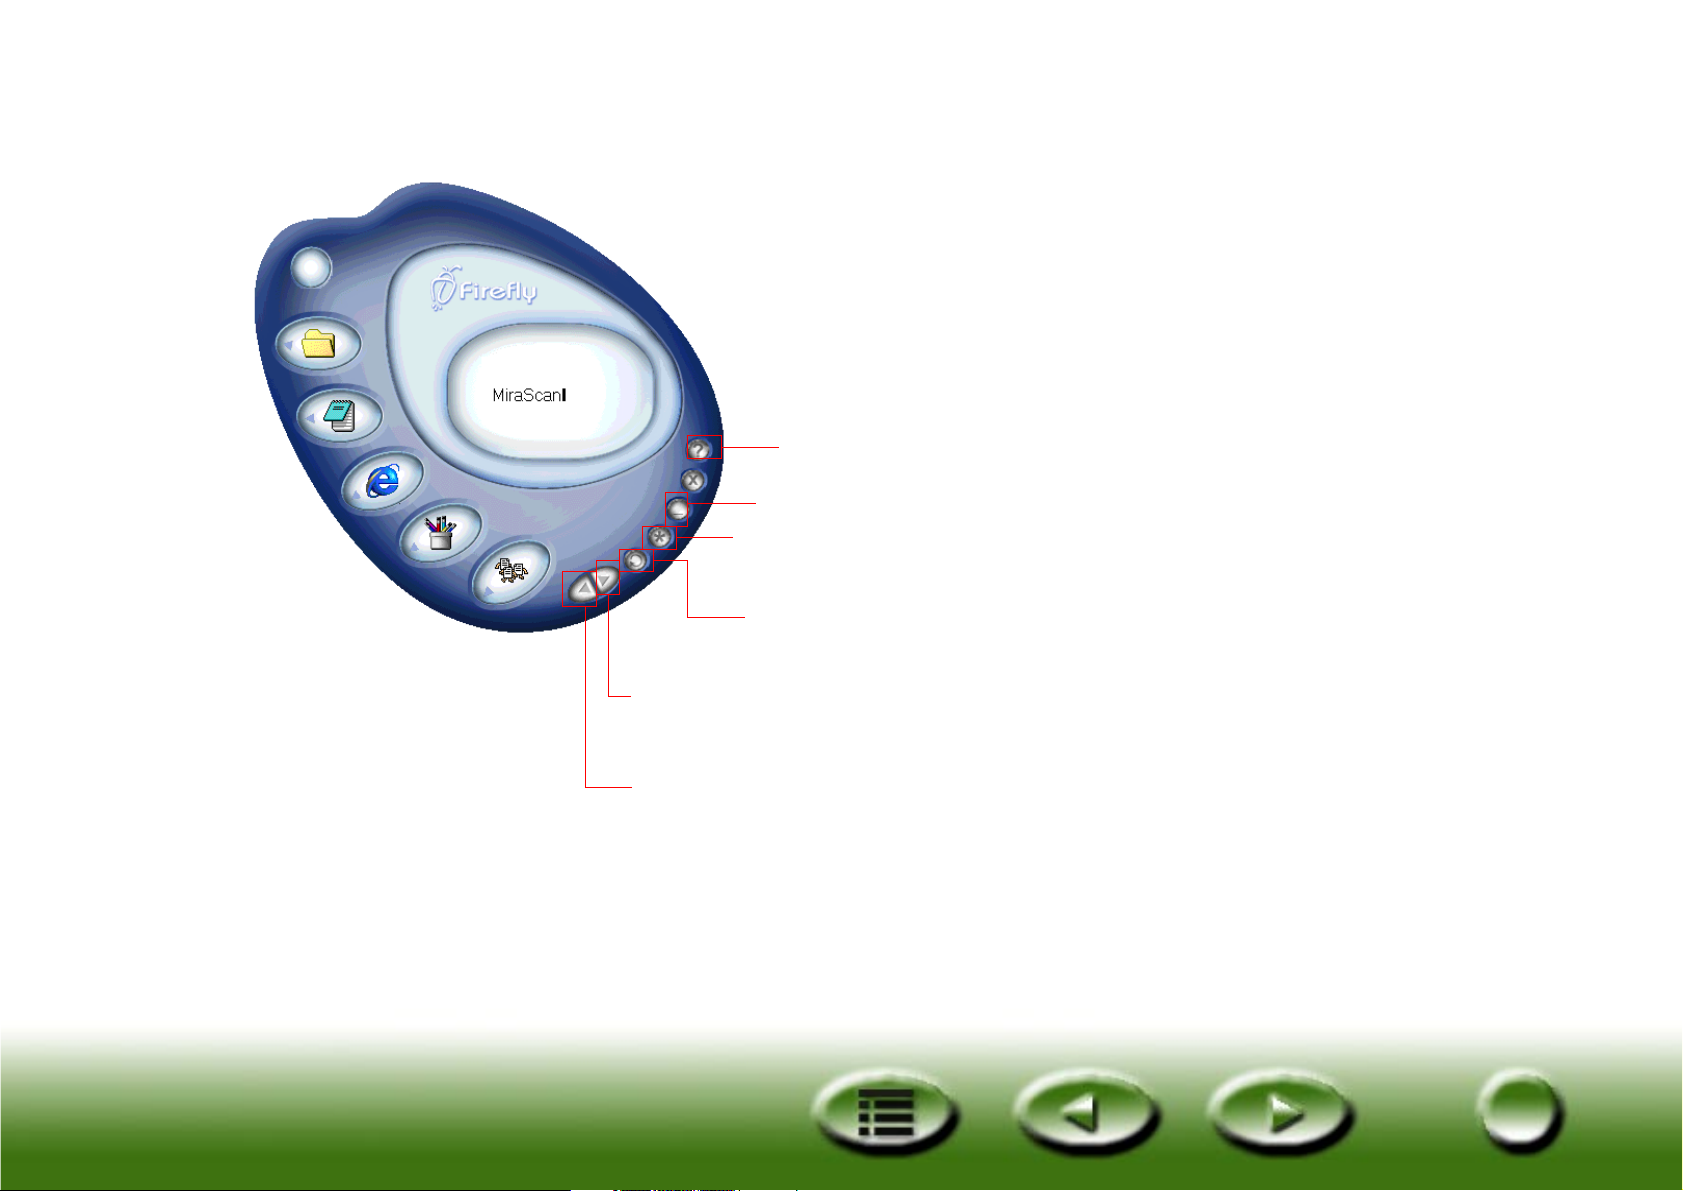
Additional Operations
Click this button to get on-line help
Click this button to minimize MiraScan 5.0
Click this button to access advanced setting options
Click this button to switch to the Console Mode
Click this button to hide all button bars
Click this button to display all button bars

27
27
Overview
Introduction to MiraScan 5.0
As a radically new application program, MiraScan 5.0 provides a more convenient and friendly user inter-
face and functions thanks to a more advanced design and development. MiraScan 5.0 offers an ultimately
novel operative way for users.
What is new in MiraScan 5.0?
For optimum personalization, this version offers the following advanced features:
Button Mode --- Whether it is the first time you use MiraScan 5.0 or whether you are a seasoned user, in
either case you will want to start using the many advantages it offers as quickly as possible. Its user inter-
face is friendly and has a very nice look. For easy operation MiraScan 5.0 provides Button Mode in the
form of easily recognizable buttons. This allows you to swiftly locate the button linked to a certain sub-
task and will help you better understand the relationship between the operations MiraScan 5.0 supports.
Don't worry about not having any experience with scanning or image formats. This application program
allows you to scan to diverse destinations with the click of a button. We have roughly divided all opera-
tions into five classes. They are: Scan to Office Assistance (OA), Scan to Document, Scan to Web & Remote,
Scan to Image Application and Scan to Image Fun. You can click to expand each class for further selection.
In each class, some default application programs are provided. You can add a new application program
using the drag-drop function or through the Settings dialog box. To increase the intuitive character of
the application program, all prompts are shown in a message window. Nearly all settings and macros can
be changed in the settings tabs. All you need to do is click a button. It doesn't get much easier than this,
does it?
Console Mode --- If you are not satisfied with the result in Button Mode or want to carry out more
expert operations, you can switch to Console Mode. This mode offers you a complete and efficient con-
trol over all operations. You can undertake all relevant operations in separate windows and shift
between various active windows. In the Console mode, you can readily apply your advanced user's skills.
We have provided user-friendly settings, parameters, macros and operations. As in other popular image

28
28
processing software, movable and controllable sub-windows are featured beside main windows for easy
operation. The great functions of this application program guarantee professional output. But you
needn't worry about maybe not having the right skills. With the aid of the documentation, you will even-
tually become an imaging expert.
Shift between Button Mode and Console Mode --- Once you've familiarized yourself with the
Modes, you will want to start using them to achieve the output you require. You can shift between two
modes. The system will save the last settings for the Console Mode.
Scan Jobs window --- You can specify a scanning job sequence in the novel Scan Jobs window. The Job
List offers you an overview of your workflow. All information on browsing, scanning, variables and oper-
ation, etc. is available in this window. You can define properties for various items to best suit your needs.
TWAIN Mode --- In addition to the two operation modes, TWAIN Mode is also available as an image
input source. Similar to Console Mode, it allows you to preview scanned material and adjust its proper-
ties. After adjusting, the scanned image is automatically sent to an application of your choice for further
specialized processing. Preparation, as you can see, is optimal.

29
29
The general structure of MiraScan 5.0
Please refer to the illustration below to familiarize yourself with the general structure and working
modes of MiraScan 5.0:
The button Mode
The TWAIN Mode
MiraScan 5.0
The Console Mode
30
30
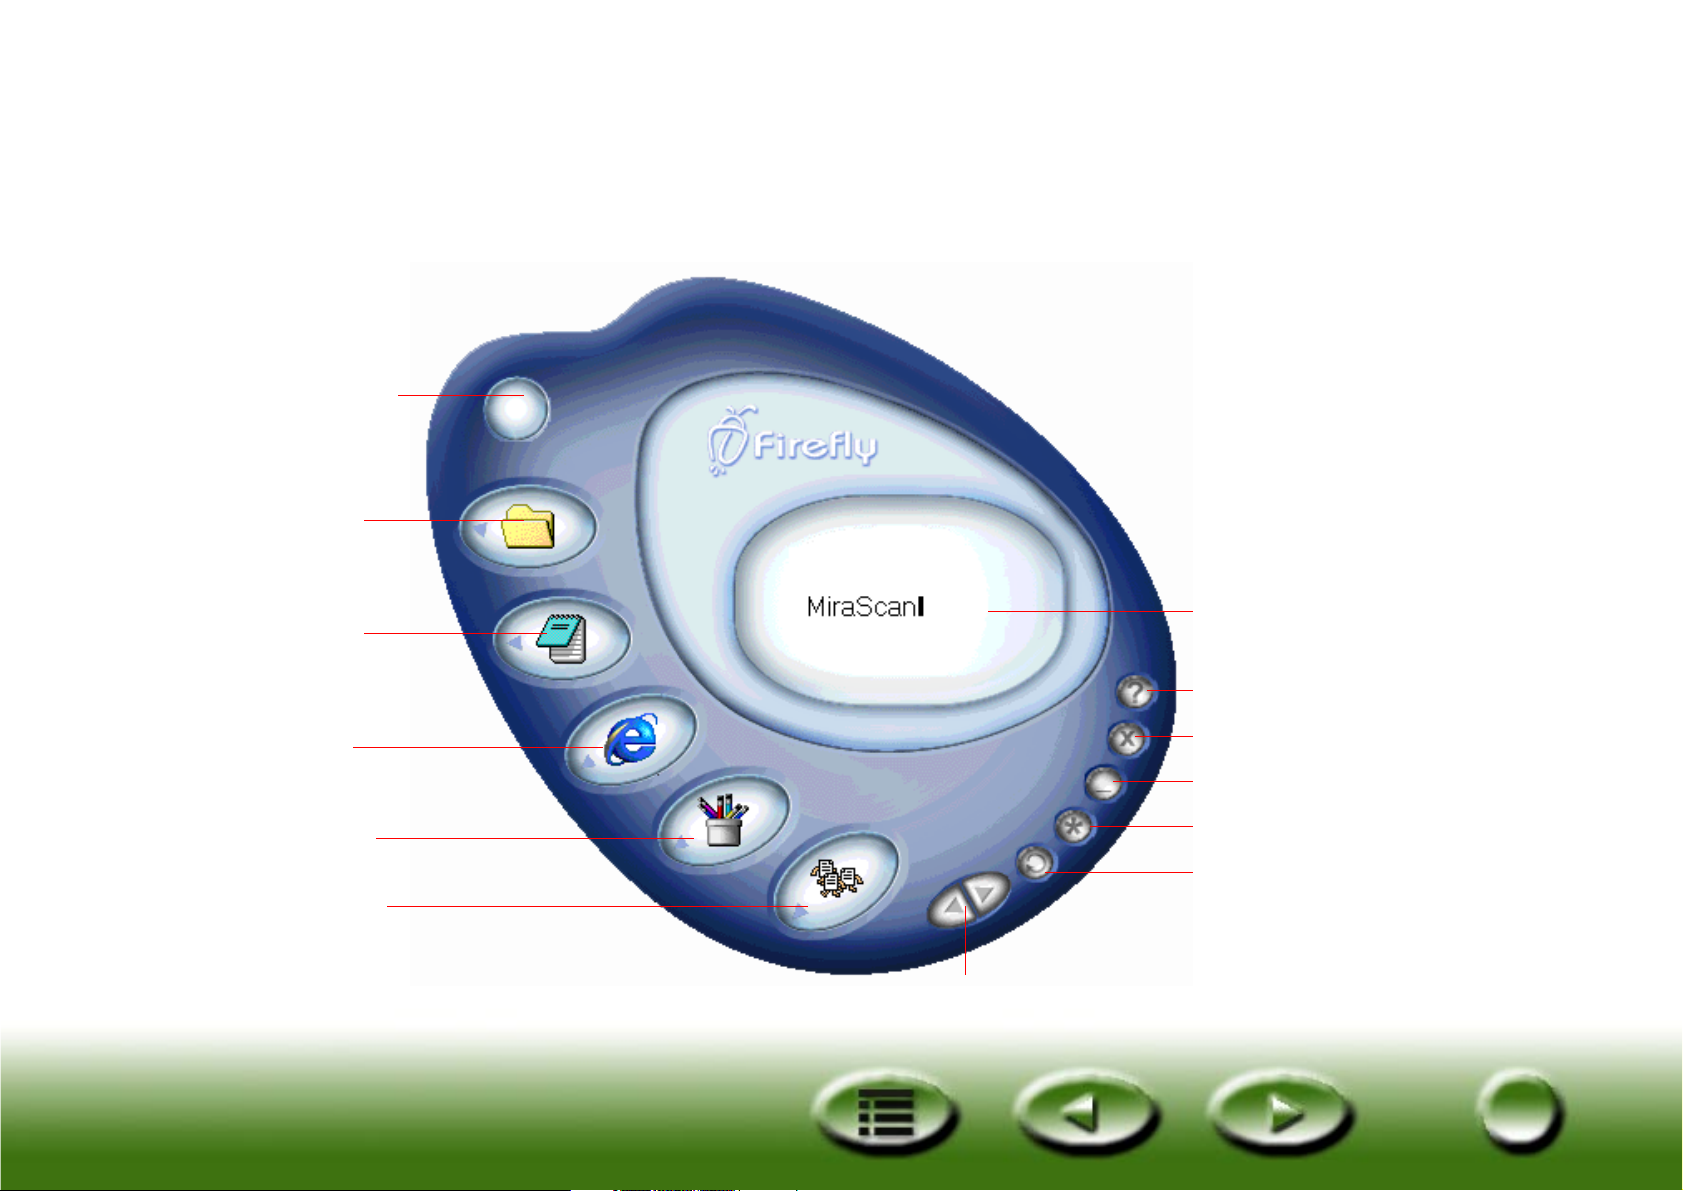
MiraScan 5.0 user interfaces
The Button Mode
Original Type
OA Class
Document Class
Web & Remote
Class
Image Apps Class
Image Fun Class
Shift
Settings
Minimize
Close
Help
Message panel
Expand/Close
Loading...