


Joybee GP3
Mini Projector
User Ma ual
Table of contents |
|
Important safety |
|
instructions ................... |
3 |
Introduction.................. |
7 |
Projector features..................................... |
7 |
Shipping contents ...................................... |
8 |
Projector exterior view......................... |
10 |
Controls and functions .......................... |
11 |
Positioning your |
|
projector ..................... |
18 |
Obtaining a preferred projected image |
|
size.............................................................. |
18 |
Connection ................. |
20 |
Connecting the power........................... |
20 |
Connecting a computer......................... |
25 |
Connecting Video source devices....... |
27 |
Connecting an HDMI source device |
..28 |
Connecting a Component Video source |
|
device......................................................... |
29 |
Connecting a Composite Video source |
|
device......................................................... |
30 |
Connecting an iPhone/iPod device...... |
31 |
Connecting an external speaker.......... |
32 |
Connecting a wireless dongle .............. |
32 |
Connecting to an external memory |
|
device......................................................... |
33 |
Playing sound through the projector..35 |
|
Operation ................... |
36 |
Starting up the projector ...................... |
36 |
Switching input signal ............................. |
36 |
Adjusting the projected image ............. |
37 |
Hiding the image...................................... |
39 |
Securing the projector........................... |
39 |
Selecting the aspect ratio ...................... |
41 |
Optimizing the image............................. |
41 |
Operating in a high altitude |
|
environment............................................. |
44 |
Adjusting the sound ............................... |
44 |
Firmware upgrade .................................. |
46 |
Personalizing the projector menu |
|
display........................................................ |
46 |
Playing files with iPhone/iPod............... |
47 |
Using iPhone/iPod pop-up menus....... |
55 |
Displaying images with PC and Video |
|
source devices......................................... |
58 |
Using PC/ Video pop-up menus .......... |
59 |
Displaying files with internal memory, |
|
USB Drive and SD card......................... |
62 |
Using USB Streaming ............................. |
71 |
Using Wireless Streaming..................... |
73 |
Settings menu .......................................... |
82 |
Shutting down the projector ............... |
90 |
Maintenance ............... |
91 |
Care of the projector............................ |
91 |
Troubleshooting......... |
93 |
Specifications.............. |
94 |
Projector specifications......................... |
94 |
Dimensions .............................................. |
96 |
Timing chart............................................. |
96 |
Supported timing for HDMI input ...... |
97 |
Warranty and Copyright |
|
information................. |
99 |
2 Table of contents
Important safety instructions
Your projector is designed and tested to meet the latest standards for safety of information technology equipment. However, to ensure safe use of this product, it is important that you follow the instructions mentioned in this manual and marked on the product.
Safety Instructions
1. |
Please read this manual before |
4. |
In some countries, the line voltage is |
|
you operate your projector. Save |
|
NOT stable. This projector is |
|
it for future reference. |
|
designed to operate safely within a |
|
|
|
mains voltage of 19 volts DC, but |
|
|
|
could fail if power cuts or surges of |
±10 volts occur. In areas where the
mains voltage may fluctuate or cut out, it is recommended that
you connect your projector
through a power stabilizer, surge
 protector or uninterruptible 2. Do not look straight at the power supply (UPS).
projector lens during operation.
The intense light beam may damage your eyes.
5. Do not block the projection lens with any objects when the projector is under operation as this could cause the objects to become heated and deformed or even cause a fire.
3.Refer servicing to qualified service personnel.
Important safety instructions |
3 |

Safety Instructions (Continued)
6.Never replace any electronic components unless the projector is unplugged.
7.Do not place this product on an unstable cart, stand, or table. The product may fall, sustaining serious damage.
8.Do not attempt to disassemble this projector. There are dangerous high voltages inside which may cause death if you should come into contact with live parts. Refer servicing only to suitably qualified professional service personnel.
9.When the projector is under operation, you may sense some heated air and odor from its ventilation grill. It is a normal phenomenon and not a product defect.
10.Do not place this projector in any of the following environments.
-Space that is poorly ventilated or confined. Allow at least 50 cm clearance from walls and free flow of air around the projector.
-Locations where temperatures may become excessively high, such as the inside of a car with all windows rolled up.
-Locations where excessive humidity, dust, or cigarette smoke may contaminate optical components, shortening the projector's life span and darkening the image.
4 Important safety instructions
Safety Instructions (Continued)
-Locations near fire alarms
-Locations with an ambient temperature above 40°C / 104°F
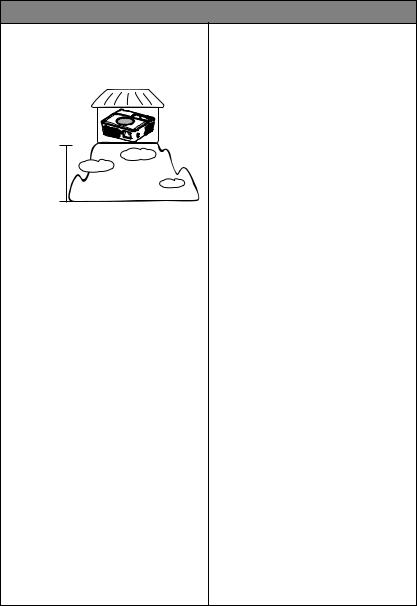
-Locations where the altitudes are higher than 3000 m (10000 feet).
3000 m
(10000 feet)
0 m (0 feet)
11.Do not block the ventilation holes.
-Do not place this projector on a blanket, bedding or any other soft surface.
-Do not cover this projector with a cloth or any other item.
-Do not place inflammables near the projector.
If the ventilation holes are seriously obstructed, overheating inside the projector may result in a fire.
12.Always place the projector on a level, horizontal surface during operation.
13.Do not stand the projector on end vertically. Doing so may cause the projector to fall over, causing injury or resulting in damage to the projector.
14.Do not step on the projector or place any objects upon it. Besides probable physical damage to the projector, doing so may result in accidents and possible injury.
15.Do not place liquids near or on the projector. Liquids spilled into the projector may cause it to fail. If the projector does become wet, disconnect it from the power supply's wall socket and call BenQ to have the projector serviced.
Important safety instructions |
5 |

Safety Instructions (Continued)
16.Precautions for handing the battery.
-Do not use an unapproved battery. It may explode. Only battery approved by BenQ can be applied to this product.
-Do not apply a strong force to the battery or attempt to make a hole in the battery.
-Neither heat the battery nor store it in a place with a high temperature, such as a car interior in the summer.
-Do not leave battery directly under sunshiner.
-Do not let the battery get wet.
-Do not let your chlid or pet suck or hold the battery in his mouth.
-Do not let the charging terminal of the battery contact any metal object.
6 Important safety instructions

Introduction
Projector features
The projector integrates high-performance optical engine projection and a user-friendly design to deliver high reliability and ease of use.
The projector offers the following features.
•Advanced LED light source
Long lasting LEDs provides a longer life span than traditional lamps.
•Optical engine with DLP technologies
WXGA resolution and a bright picture.
•Various useful features
Supports iPhone/iPod player, multimedia player, document viewer, internal memory, SD card, USB flash drive, USB display, an optional removable and rechargeable battery, PC Display, and Stream to me.
•Easy to carry
The projector is small and light, making it useful for business trips and leisure activities. You can view documents, videos and photos anywhere.
•Multiple input ports
Multiple input ports, including PC, AV, HDMI, USB, and SD card provide flexible connectivity with peripheral devices.
•Audio input & output
Equipped with 2W x 2 speakers with RCA & mini-jack input ports and phone jack output port
•Convenient menu items
Friendly menu is used for all types of inputs, making the projector easy to use.
•The apparent brightness of the projected image will vary depending on the ambient lighting
conditions, selected input signal contrast/brightness settings, and is proportional to projection distance.
•The lamp brightness will decline over time and may vary within the lamp manufacturers specifications. This is normal and expected behavior.
Introduction 7
Shipping contents
Carefully unpack and verify that you have all of the items shown below. If any of these items are missing, please contact your place of purchase.
Standard accessories
 The supplied accessories will be suitable for your region, and may differ from those illustrated.
*The warranty card is only supplied in some specific regions. Please consult your dealer for detailed information.
Projector & dock |
Power cord |
Multi-input cable |
AC adapter |
||
|
cover |
|
|
|
|
|
|
|
|
|
|
|
|
|
|
|
|
|
|
|
|
|
|
Safety manual |
Quick start guide |
User manual CD |
Warranty card* |
Pull the tab before using the remote control.
Projector carrying |
Remote control |
|
bag |
with battery |
|
|
|
|
mini HDMI adapter Wireless dongle
8 Introduction

Optional accessories
Battery
Introduction 9

Projector exterior view
Front/upper side
1 |
|
|
|
|
|
|
|
|
|
|
|
|
|
|
|
|
|
|
|
|
|
2 |
|
|
|
|
|
|
|
|
|
|
|
|
|
|
|
|
|
|
|
|
|
4 |
|
|
|
|
|
|
|
|
|
|
|
|
|
|
|
|
3 |
|
|
||
|
||||||||||
|
|
|
|
|
|
|
|
|||
|
|
|
|
|
6 |
|||||
|
|
|||||||||
|
|
|
|
|
|
|
|
|
|
|
7
5
Rear/lower side
8 |
9 10 |
11 |
12 |
13 |
14 |
15 16 17 18 |
1.iPhone/iPod docking station
2.External control panel
(See "Projector" on page 11 for details.)
3.Vent (heated air exhaust)
4.Front IR remote sensor
5.Internal Speakers
6.Focus ring
7.Projection lens
8.SD card slot
9.Type A USB jack (for USB drive/ Wi-Fi dongle)
10.Mini-B USB jack
11.Multi-input socket
RGB (PC)/Component video (YPbPr/ YCbCr) /Composite video/ Audio input (L/R)
12.Mini HDMI input jack
13.Tripod socket
14.Adjuster foot
15.Audio input jack
16.Audio output jack (for iPod dock / internal memory / SD card / USB Drive / multi-input cable RCA audio in)
17.AC adapter inlet
18.Battery latch
 Do not block the ventilation openings. Blocking the ventilation openings can cause your projector to overheat and may cause it to fail.
10 Introduction
Controls and functions
Projector
|
6 |
|
7 |
1 |
|
2 |
8 |
3 |
|
4 |
9 |
5 |
|
1. II Power
Toggles the projector between standby mode and on.
See "Starting up the projector" on page 36 and "Shutting down the projector" on page 90 for details.
2.Left key
When the On-Screen Display (OSD) menu is on:
-Navigate left to select the desired menu items.
-Make adjustments. (e.g. brightness, contrast...)
When the On-Screen Display (OSD) menu is off: (Only applied to SD card, internal memory and USB Drive)
-Play previous video and audio file.
-Press and hold to rewind video and audio file.
3.OK/Blank
Short press:
-Confirms a selected function when a menu is displayed.
-Plays or pauses a video, music, photo slideshow. (Only applied to SD card, internal memory and USB Drive)
Long press (3 seconds):
Toggles the Blank.
4.Menu
Turns on the Pop-up setting menu.
5.Down/Volume down key
When the On-Screen Display (OSD) menu is on:
-Navigate to down to select the desired menu items.
-Make adjustments. (e.g. manual keystone...)
When the On-Screen Display (OSD) menu is off: (Only applied to SD card, internal memory and USB Drive)
-Reduces the volume level.
6.Up/Volume up key
When the On-Screen Display (OSD) menu is on:
-Navigate up to select the desired menu items.
-Make adjustments. (e.g. manual keystone...)
When the On-Screen Display (OSD) menu is off: (Only applied to SD card, internal memory and USB Drive)
- Magnifies the volume level.
Introduction 11
7.Home
Directly returns to home screen from lower level of OSD.
Exits application/pop-up message and back to home screen directly.
8.Right key
When the On-Screen Display (OSD) menu is on:
-Navigate right to select the desired menu items.
-Make adjustments. (e.g. brightness, contrast...)
When the On-Screen Display (OSD) menu is off: (Only applied to SD card, internal memory and USB Drive)
-Play next video and audio file.
-Press and hold to fast forward video and audio file.
9.Back
Goes back to previous OSD menu, exits and saves menu settings.
12 Introduction
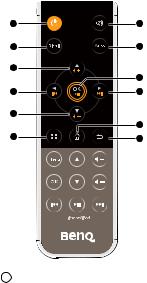
Remote control
1 |
7 |
2 |
8 |
3 |
|
|
9 |
4 |
10 |
5 |
|
|
11 |
6 |
12 |
1. II POWER
Toggles the projector between standby mode and on. See "Starting up the projector" on page 36 and "Shutting down the projector" on page 90 for details.
2.Blank
Toggles Blank on and off. See "Hiding the image" on page 39 for details.
3.Up/Volume up key
When the On-Screen Display (OSD) menu is on:
-Navigate up to select the desired menu items.
-Make adjustments. (e.g. manual keystone...) See "Correcting keystone" on page 38 for details.
When the On-Screen Display (OSD) menu is off: (Only applied to SD card, internal memory and USB Drive)
- Magnifies the volume level.
4.Left key
When the On-Screen Display (OSD) menu is on:
-Navigate left to select the desired menu items.
-Make adjustments. (e.g. brightness, contrast...)
When the On-Screen Display (OSD) menu is off: (Only applied to SD card, internal memory and USB Drive)
-Play previous video and audio file.
-Press and hold to rewind video and audio file.
5.Down/Voume down key
When the On-Screen Display (OSD) menu is on:
-Navigate to down to select the desired menu items.
-Make adjustments. (e.g. manual keystone...)
When the On-Screen Display (OSD) menu is off: (Only applied to SD card, internal memory and USB Drive)
- Reduces the volume level.
6.Menu
Turns on the Pop-up setting menu.
7.Mute/unmute
Turns on/off volume during video or music playback. (Only applied to SD card, USB Drive, internal memory, iPhone and iPod)
8.Auto
Automatically determines the best picture timings for the displayed computer image. See "Auto-adjusting the image" on page 37 for details.
Introduction 13
9.OK
Confirms a selected function when a menu is displayed.
Plays or pauses a video, music, photo slideshow. (Only applied to SD card, internal memory and USB Drive)
10.Right key
When the On-Screen Display (OSD) menu is on:
-Navigate right to select the desired menu items.
-Make adjustments. (e.g. brightness, contrast...)
When the On-Screen Display (OSD) menu is off: (Only applied to SD card, internal memory and USB Drive)
-Play next video and audio file.
-Press and hold to fast forward video and audio file.
11. .Home
Directly returns to home screen from lower level of OSD.
Exits application/pop-up message and back to home screen directly.
12.Back
Returns to upper level of OSD. Closes pop-up setting menu of OSD. Leave current application of OSD.
14 Introduction

 5 1
5 1 


6
2
3
4
4 
7
iPhone/iPod
Remote control over iPhone or iPod is not only workable in power-on mode but also standby mode in which GP3 acts as a docking speaker.
1.Menu/Back key
<Projector in turn-on mode>
Get back to upper level of file videos or music browser.
<Projector in standby mode> PRJ act as a docking speaker:
i.Switch between sub-menu within “Music” or “Videos” menu in iPhone/ iPod home screen.
ii.Get back to upper level of any submenu in “Music” or “Videos” menu in iPhone/iPod home screen.
2.OK key
<Projector in turn-on mode>
Press to confirm and start to playback a desired video or music.
<Projector in standby mode>
Press to confirm and start to playback a desired video or music in file list of “Music” or “Videos" menu in iPhone/iPod home screen.
3.Down key
<Projector in turn-on mode>
Press to scroll down to select a video or music in file browser.
<Projector in standby mode> PRJ act as a docking speaker:
Press to scroll down to select a video or music within a file list of “Music” or “Videos” menu in iPhone/iPad home screen.
4.Previous/Next keys
<Projector in turn-on mode>
i.During video projection
-Press to skip to the beginning of the current/next video.
-Press and hold to rewind/fastforward the current video.
ii.During music playback within “iPod” menu:
-Press to skip to the beginning of the current/next music.
-Press and hold to rewind/fastforward the current music.
<Projector in standby mode> Projector act as a docking speaker./ During music playback:
i.Press to “Skip to the beginning of the Current/Next” music.
ii.Press and hold to “Rewind/Fastforward the current” music.
During video projection or music playback within “iPod” menu:
i.Press to “Skip to the beginning of the Current/Next” music.
ii.Press and hold to “Rewind/Fastforward the currently playing music”.
Introduction 15
5.Up Key
<Projector in turn-on mode>
Press to scroll up to select a video or music in file browser.
<Projector in standby mode> PRJ act as a docking speaker:
Press to scroll down to select a video or music within a file list of “Music” or “Videos” menu in iPhone/iPad home screen.
6.Volume up/down keys
Press to adjust iPhone/iPod volume.
7.Play/pause key
<Projector in turn-on mode>
i.In iPhone/iPod home screen or during music playback within “Music” menu, press to play/pause music directly.
ii.During video projection, press to play/ pause a “Video”.
<Projector in standby mode> Projector act as a docking speaker: In iPhone/iPod home screen or during
music playback within “Music” menu, press to play/pause music directly.
16 Introduction

Remote control effective range
Infra-Red (IR) remote control sensor is located on the front of the projector. The remote control must be held at an angle within 15 degrees perpendicular to the projector's IR remote control sensor to function correctly. The distance between the remote control and the sensor should not exceed 7 meters (~ 23 feet).
Make sure that there are no obstacles between the remote control and the IR sensor on the projector that might obstruct the infra-red beam.
Approx. 15°
Replacing the remote control battery
1.Pull out the battery holder.
 Please follow the illustrated instructions. Push and hold the locking arm while pulling out the battery holder.
2.Insert the new battery in the holder. Note
the positive polarity should face outward.
3.Push the holder into the remote control.
•Avoid excessive heat and humidity.
•There may be battery damage if the battery is incorrectly replaced.
•Replace only with the same or equivalent type recommended by the battery manufacturer.
•Dispose of the used battery according to the battery manufacturer’s instructions.
•Never throw a battery into a fire. There may be danger of an explosion.
•If the battery is dead or if you will not be using the remote control for a long time, remove the battery to prevent damage to the remote control from possible battery leakage.
Introduction 17

Positioning your projector
Obtaining a preferred projected image size
The distance from the projector lens to the screen, the zoom setting (if available), and the video format each factors in the projected image size.
16:10 is the native aspect ratio of this projector.
|
|
|
|
|
|
|
|
|
|
|
|
|
|
|
|
|
|
4:3 aspect image in a 16:10 |
16:10 aspect image scaled to a 4:3 aspect |
||||
aspect display area |
|
display area |
|||
The projector should always be placed horizontally level (like flat on a table), and positioned directly perpendicular (90° right-angle square) to the horizontal center of the screen. This prevents image distortion caused by angled projections (or projecting onto angled surfaces).
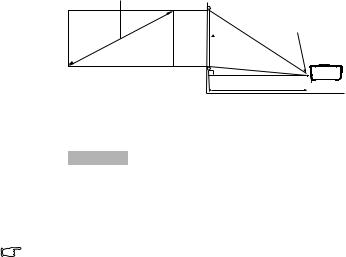
The modern digital projector does not project directly forward (like older style reel-to- reel film projectors did). Instead, digital projectors are designed to project at a slightly upward angle above the horizontal plane of the projector. This is so that they can be readily placed on a table and will project forward and upwards onto a screen positioned so that the bottom edge of the screen is above the level of the table (and everyone in the room can see the screen).
You can see from the diagram on page 19, that this type of projection causes the bottom edge of the projected image to be vertically offset from the horizontal plane of the projector.
If the projector is positioned further away from the screen, the projected image size increases, and the vertical offset also increases proportionately.
When determining the position of the screen and projector, you will need to account for both the projected image size and the vertical offset dimension, which are proportional to the projection distance.
BenQ has provided a table of screen size to assist you in determining the ideal location for your projector. Refer to "Projection dimensions" on page 19 depending on the projector you are using. There are two dimensions to consider, the perpendicular horizontal distance from the center of the screen (projection distance), and the vertical offset height of the projector from the horizontal edge of the screen (offset).
18 Positioning your projector
Projection dimensions
Refer to "Dimensions" on page 96 for the center of lens dimensions of this projector before calculating the appropriate position.
1280:800 screen diagonal
Screen
 Center of lens
|
|
|
Projection distance |
|
|
|
|
|
|
|
|
||
|
|
|
|
|
||
|
|
|
|
|
|
|
1280:800 screen diagonal |
Recommended projection distance from screen |
|||||
in mm |
||||||
|
|
|
||||
Feet |
Inches |
mm |
Average |
|||
2.00 |
24 |
610 |
621 |
|
||
3.33 |
40 |
1016 |
1034 |
|
||
4.67 |
56 |
1422 |
1448 |
|
||
6.00 |
72 |
1829 |
1862 |
|
||
6.66 |
80 |
2032 |
2069 |
|
||
All measurements are approximate and may vary from the actual sizes.BenQ recommends that if you intend to permanently install the projector, you should physically test the projection size and distance using the actual projector in situ before you permanently install it, so as to make allowance for this projector's optical characteristics. This will help you determine the exact mounting position so that it best suits your installation location.
Positioning your projector |
19 |
Connection
 In the connections shown below, some cables may not be included with the projector (see "Shipping contents" on page 8). They are commercially available from electronics stores.
Connecting the power
Using the provided AC adapter or an optional Lithium-ion rechargeable battery.
The projector must be used with the provided AC adapter. Damage caused by the use of an incorrect adapter is not covered under the warranty.
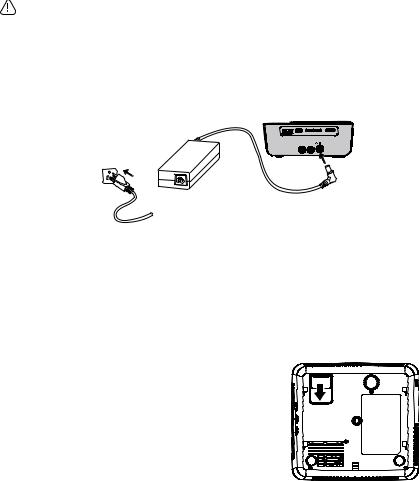
Using the AC adapter
1.Insert the plug from the AC adapter into the DC IN terminal.
2.Insert the appropriate end of the power cord into the AC adapter.
3.Insert the plug on the power cord into a wall outlet. Check that the Power LED indicator on the projector lights orange when using the AC adapter.
1
3
 2
2
Using the optional battery
The projector must be used with specified Lithium-ion rechargeable battery. Charge the battery before using the projector for the first time use. Using the projector for charging the battery. You may also use the projector when charging the battery. Please turn off the projector before attaching the battery.
Charging the battery
When you use the battery, please observe the safety precautions.
1.Move the battery latch to the open side.
CAUTION:
RISK OF EXPLOSION IF BATTERY IS
REPLACED BY AN INCORRECT TYPE.
DISPOSE OF USED BATTERIES
ACCORDING TO THE INSTRUCTIONS.
20 Connection
2.Position the projector on the battery.
When the battery capacity is between 10% and 100 % , the battery LED indicator turns off. When the battery capacity is lower than 10%, the
battery LED indicator blinks red, and the system will shut down.
3.Match the battery carefully until it fits in place.
1
3
 2
2
4.Insert the plug from the AC adapter into the DC IN terminal.
5.Insert the appropriate end of the power cord into the AC adapter.
6.Insert the plug on the power cord into a wall outlet. The battery LED indicator blinks orange when charging is started and turns into solid orange when charging is completed.
Removing the battery
Slide the battery lock switches on the two sides to remove the battery from the projector.
Connection 21

Battery LED indicator behavior
•Battery + Adaptor
Status |
Condition |
LED color |
In charge |
Power on / Standby mode |
Blue blinking |
Charging completed |
Power on / Standby mode |
Blue solid on |
•We recommend that you keep the battery connected to the projector even when the projector is connected to a wall outlet.
•The battery needs to be charged for about 3.5 hours if fully discharged.
•While connecting to battery, LED Mode in Settings will be set to Eco, you can play a video from any sources for about 2.5 hours at 150AL when the battery is fully charged. (If you set LED Mode in Settings to Normal, the battery life will be shortened to about 1 hour at 300AL.)
•ECO mode is suggested for longer time of projection when the unit is operated only with battery.
•The charging time and capacity of the battery differ depending on the battery status, operating condition, and duration of use. The battery consumes power even when the device is not in use. Over time, the maximum operating time gradually shortens.
•The battery can be charged for about 300 times. The battery life differs depending on the personal habit of use.
Instructions and requirement for handling the battery
•Recommending usage
Please read the battery instructions and the label on its surface before use.
Use the battery indoors under normal condition, temperature: (25±3)°C ,absolute humidity: 65±20%
When in use, the battery shall be kept out of heat, high voltage and avoided children's touching. Do not drop the battery.
Use the compatible charger. Do not put the battery into the charger over 24 hours.
Do not contact contactor together. Do not demolish or disassembly the battery by yourself. Do not put the battery in the damp place to avoid danger.
Do not wrap it with conduct material to avoid the damage caused by the direct contact between the metal and battery. Keep the battery in day places.
Well disposed the disused battery. Do not put it into fire or water.
•Hazard warning
•Forbid disassemble batteries
The battery has protective component and circuit internally to avoid danger. Mishandling such as improper disassembly will destroy its protective function and make it heat, smoke, distort or burning.
•Forbid short-circuit batteries
Do not touch the plus and minus contactor with metals. Do not put the battery with metal element together in either storage or movement. If the battery is short-circuit, it carries magnified current, which will cause damage and make the battery heat, smoke, distort or burning.
•Forbid heat and burn the battery
If heating or burning the battery, it will caused the isolated element in the battery dissolved, protection function stopped or the electrode burning, over heated, which will make the battery heat, smoke, distort or burning.
•To avoid use the battery near the heat
Do not use the battery near the fire and stove, or over 60°C, and over heating will cause the battery internal short-circuit and make it heat, smoke, distort or burning.
22 Connection
•Forbid bathing the battery
Do not dampen the battery, or even immerse it in the water, which will cause internal protection circuit and its function lost or abnormal chemical reactions, which will lead to heating, smoking, distortion or burning.
•Avoid charging near fire or in the sunlight
Otherwise, it will cause internal protection circuit and its function lost or abnormal chemical reactions, which will lead to heating, smoking, distortion or burning.
•Danger in using non-indicated chargers in
Charging in abnormal condition, the battery will cause internal protection circuit and its function lost or abnormal chemical reactions, which will lead to heating, smoking, distortion or burning.
•Forbid damage battery
Do not allow damage the battery with the metals gouged, forged or dropped etc. otherwise, it will cause over-heated, distort, smoke or burning, even in danger.
•Forbid directly welding on the battery
Over-heated will cause the isolated element dissolved in the battery and losing protective function its cycle life, even will cause over heated, distort, smoke or burning.
•Forbid directly charging on the power socket or car kit cigarette.
High voltage and amplified current will damage the battery and reduce its cycle life, even will cause overheated, distort, smoke or burning.
•Do not use this battery for other equipment
Impropriate usage will damage the battery and reduce its cycle life, even will cause over-heated, distort, smoke or burning.
•Do not touch the leaking battery
The leaking electrolyte will cause the skin uncomfortable. If it drops into eyes, do not rob the eyes but wash in time, and go to hospital for treatment.
•Warning
•Do not mix with other battery
This battery cannot mix with deposal or twicerecycled batteries in use. Otherwise, for its abnormal charge and discharge, it will cause over-heated, distort, smoke or burning.
Keep the battery out of children's area and prevent them biting or swallowing the battery.
Do not insert the battery onto the charger for a long time If charging beyond the normal time, the battery is still in the charger, please stop charging. The abnormal charging will cause battery over-heated, distort, smoke or burning.
Do not put into microwave stove or any other pressure apparatus Take the battery away from the cellular phone or the charger if it is instant heated or leaking (or odors) and depose it. The bad battery will causes over-heated, smoke or burning.
•Cautions
•Notice
The battery shall be prevented to be exposed in effulgence so as not to cause over-heated, distort, smoke and weaken its performance and cycle life.
•Electro static-free
There is a protective circuit inside the battery to prevent contingency. Do not use the battery in the Electro static circumstances, (above 1000V), for it is easily destroyed the circuit board so that the battery doses not work and causes over-heated, distort, smoke or burning.
•Discharging temperature range
Recommended discharging temperature range is 0-60°C, beyond which it will result in decadence of the battery performance and shortness of its life.
Connection 23
•Read carefully the manual before use or whenever in need.
•Charging method
Use the special chargers in the recommended charging method to charge the battery.
•First usage
When you use the battery for its first time, do not put it into the equipment once you find it in unusual conditions such as unclearness or odors. The battery should be returned to the vendor.
•Children use
When Children use the battery, they should be under their parents' instructions and superintend in use.
•Avoid children's touch
Battery should keep out of the area where children in reach. Prevent children taking the battery out of the charger or the equipment to play.
To avoid the leak-out liquid be exposed to the skin or clothes. If touched, please wash by clean water so as not to cause the skin uncomfortable
•Consultation
When you buy the battery, please note how to contact with the vendors, so that you may get in touch with vendors for consultation whenever in need.
•Safety usage guarantee
If the battery is used on other instruments, please contact with your manufacturer for how to get the best performance, at least consult its maximum current, fast charge and special application.
24 Connection
Connecting a computer
The projector provides a VGA input socket that allows you to connect it to both IBM®
compatibles and Macintosh® computers. A Mac adapter is needed if you are connecting legacy version Macintosh computers.
To connect the projector to a notebook or desktop computer:
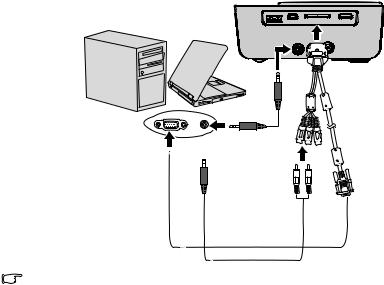
•Using a VGA cable
1.Take the supplied multi-input cable and connect one end to the D-Sub output socket of the computer.
2.Connect the other end of the multi-input cable to the PC/AV socket on the projector.
3.If you wish to make use of the projector speaker, take a suitable audio cable and connect one end of the cable to the audio output socket of the computer, and the other end to the audio input sockets of the multi-input cable.
Notebook or desktop computer
Multi-input cable
 Audio cable
or
Many notebooks do not turn on their external video ports when connected to a projector. Usually a key combo like FN + F3 or CRT/LCD key turns the external display on/off. Locate a function key labeled CRT/LCD or a function key with a monitor symbol on the notebook. Press FN and the labeled function key simultaneously. Refer to your notebook's documentation to find your notebook's key combination.
Connection 25
•Using an HDMI cable
1.Take an HDMI cable and connect one end to the HDMI output jack of the computer.
2.Connect the other end of the HDMI cable to the mini HDMI jack on the projector.
HDMI
HDMI
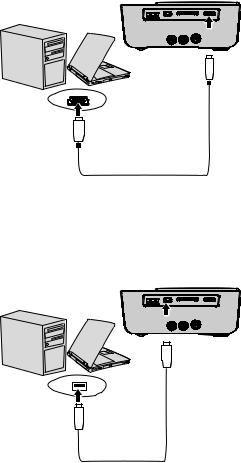
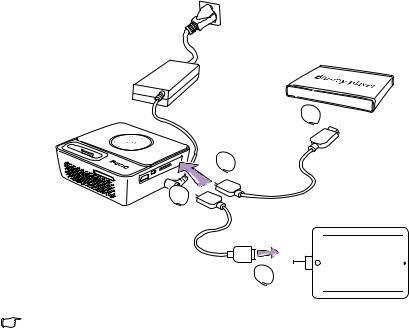
•Using a USB cable
1.Take a USB cable and connect the type A end to the USB output jack of the computer.
2.Connect the mini-B type end of the USB cable to the USB-DISPLAY jack on the projector. When you connect the projector to a computer, you can display computer’s image or transfer files from your computer to the internal memory of the projector.
USB
USB
3.If you select USB Display, follow the on-screen message to install the USB driver in your computer first.
4.If you select USB File Transfer, go to My Computer or Windows Explorer to access the projector's files. The projector appears as a Removable Disk. Transfer the files from your computer to the projector by dragging and dropping or copying and pasting.
26 Connection
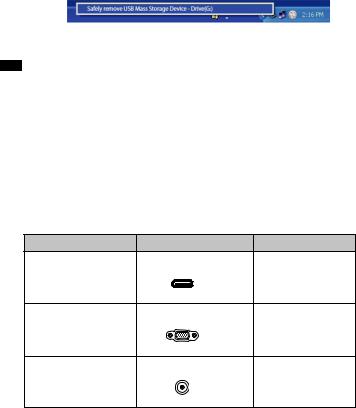
To disconnect the projector from a computer: i. Click  on the Windows Taskbar.
ii.Click the pop-up message.
iii.Disconnect the USB cable only when the message says that it is safe to remove the hardware.
•Do not disconnect the USB cable while the files are being copied, as this could result in loss of data or damage to the projector.
•The connection will not end if you have projector files open on the computer. Close all projector files and try again.
•Other versions of Windows operate similarly. Follow the correct procedure for removing a USB device from your computer safely for your version of Windows.
Connecting Video source devices
You need only connect the projector to a Video source device using just one of the above connecting methods, however each provides a different level of video quality. The method you choose will most likely depend upon the availability of matching terminals on both the projector and the Video source device as described below:
Terminal name |
Terminal appearance |
Picture quality |
Mini HDMI |
Mini HDMI |
Best |
Component Video |
VGA |
Better |
Video |
Video |
Good |
 If the selected video image is not displayed after the projector is turned on and the correct video source has been selected, check that the Video source device is turned on and operating correctly. Also check that the signal cables have been connected correctly.
Connection 27
Connecting an HDMI source device
The projector provides a HDMI input jack that allows you to connect it to an HDMI source device like a Blu-Ray player, a DTV tuner or a display.
HDMI (High-Definition Multimedia Interface) supports uncompressed video data transmission between compatible devices like DTV tuners, Blu-Ray player and displays over a single cable. It provides pure digital viewing and listening experience.
Examine your Video source device to determine if it has a set of unused HDMI output jacks available:
•If so, you can continue with this procedure.
•If not, you will need to reassess which method you can use to connect to the device.
To connect the projector to an HDMI source device:
1.Take an HDMI cable and connect one end to the HDMI output jack of the HDMI source device.
2.Connect the other end of the HDMI cable to the mini HDMI jack on the projector.
2 

 1
1 
 1
1 

2 


•The HDMI cable (shown in this example) for connection your video output device is not supplied as standard.
•The Apple Digital AV Adapter can be purchased from www.apple.com.
28 Connection
Connecting a Component Video source device
Examine your Video source device to determine if it has a set of unused Component Video output sockets available:
•If so, you can continue with this procedure.
•If not, you will need to reassess which method you can use to connect to the device.
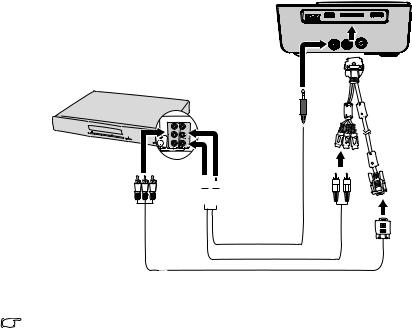
To connect the projector to a Component Video source device:
1.Take a Component Video to VGA (D-Sub) adaptor cable and connect the end with 3 RCA type connectors to the Component Video output sockets of the Video source device. Match the color of the plugs to the color of the sockets; green to green, blue to blue, and red to red.
2.Connect the other end of the Component Video to VGA (D-Sub) adaptor cable (with a D-Sub type connector) to the D-Sub jack of the multi-input cable.
3.Connect the other end of the multi-input cable to the PC/AV socket on the projector.
4.If you wish to make use of the projector speaker, take a suitable audio cable and connect one end of the cable to the audio output sockets of the Video source device, and the other end to the audio input sockets of the multi-input cable.
AV device

 Audio cable
or
Component Video to VGA (D-Sub) adaptor cable
•When audio output jack is connected with the earphone or external speaker, the sound will not come out from the projector speaker.
•No sound will come out from the speaker or audio output jack if video signals are not input. Besides, the sound cannot be adjusted either.
Connection 29

Connecting a Composite Video source device
Examine your Video source device to determine if it has a set of unused composite Video output sockets available:
•If so, you can continue with this procedure.
•If not, you will need to reassess which method you can use to connect to the device.
To connect the projector to a composite Video source device:
1.Take a Video cable and connect one end to the composite Video output socket of the Video source device.
2.Connect the other end of the Video cable to the Video jack of the multi-input cable.
3.Connect the other end of the multi-input cable to the PC/AV socket on the projector.
4.Connect the multi-input cable to the PC/AV socket on the projector.
5.If you wish to make use of the projector speaker, take a suitable audio cable and connect one end of the cable to the audio output sockets of the Video source device, and the other end to the audio input sockets of the multi-input cable.
AV device
Multi-input cable
Audio cable
Video cable
 You need only connect to this device using a composite Video connection if Component Video input is unavailable for use. See "Connecting Video source devices" on page 27 for details.
30 Connection
 Loading...