


 Loading...
Joybook Lite
U102 Series
User Manual

Copyright and trademark
Copyright 2009 by BenQ Corporation. All rights reserved. No part of this publication may be reproduced, transmitted, transcribed, stored in a retrieval system or translated into any language or computer language, in any form or by any means, electronic, mechanical, magnetic, optical, chemical, manual or otherwise, without the prior written permission of this company.
For the latest user manual, visit
http://www.BenQ.com.
All other logos, products, or company names mentioned in this manual may be the registered trademarks or copyrights of their respective companies, and are used for informational purposes only.
Windows, Internet Explorer, and Windows Mail are trademarks of Microsoft Corporation. Others are copyrights of their respective companies or organizations.
This product complies with ENERGY STAR®.
Disclaimer
BenQ Corporation makes no representations or warranties, either expressed or implied, with respect to the contents hereof and specifically disclaims any warranties, merchantability, or fitness for any particular purpose. Further, BenQ Corporation reserves the right to revise this publication and to make changes from time to time in the contents hereof without obligation of this company to notify any person of such revision or changes.
It is the sole responsibility of the user if problems (such as data loss and system failure) occurred due to non-factory installed software, parts, and/or non-original accessories.
Joybook Lite models covered by this manual
This manual contains the information about the following Joybook Lite model:
• Joybook Lite U102 Series (DH1000)
Please note that the actual hardware or software capabilities will vary according to the model you purchased. To determine your Joybook Lite model, refer to the label on the packing box, or the printing on your Joybook Lite.
Ver.: 5/15/2009
Table of Contents |
|
Overview ......................................................................................... |
1 |
About this book........................................................................... |
1 |
Typographics............................................................................... |
2 |
Getting started................................................................................ |
3 |
Package contents ......................................................................... |
3 |
Getting your Joybook Lite ready for use.................................... |
3 |
Expanding the capabilities of your Joybook Lite....................... |
6 |
Touring your Joybook Lite ............................................................ |
8 |
Front view ................................................................................ |
8 |
Left side view ............................................................................. |
10 |
Right side view .......................................................................... |
12 |
Bottom view .............................................................................. |
13 |
Indicators................................................................................... |
14 |
Using your Joybook Lite .............................................................. |
16 |
Using the touchpad................................................................... |
16 |
Using the keyboard ................................................................... |
18 |
Function hotkeys ................................................................ |
18 |
Windows key shortcuts and other keys ............................. |
20 |
Using built-in wireless connectivity (select models only) ...... |
22 |
Connecting to a wireless network...................................... |
22 |
Using Bluetooth (available on select models) ......................... |
24 |
Connecting to a Bluetooth device...................................... |
24 |
Sending a file to a Bluetooth device................................... |
27 |
Using the built-in webcam ....................................................... |
29 |
Activating WebCam Companion 3 ................................... |
29 |
Using WebCam Companion 3........................................... |
30 |
Switching to different modules ................................... |
30 |
Capturing still images or recording videos................. |
30 |
Using the Masque function ......................................... |
31 |
Photo Booth ................................................................. |
31 |
Video chat........................................................................... |
31 |
Using Magic-i Visual Effects.............................................. |
31 |
Adjusting resolution .................................................... |
32 |
Using BIOS setup ......................................................................... |
33 |
When and how to use BIOS setup........................................... |
33 |
Navigating the BIOS setup screen ........................................... |
34 |
Main menu ......................................................................... |
34 |
Advanced menu.................................................................. |
35 |
Security menu..................................................................... |
35 |
Boot menu .......................................................................... |
35 |
Exit menu............................................................................ |
35 |
Recovering your system using QDataTrove............................... |
36 |
Introduction to QDataTrove ................................................... |
36 |
How to launch QDataTrove .................................................... |
37 |
Using QDataTrove in Windows XP ........................................ |
37 |
Backing up your system ..................................................... |
37 |
Backing up your system into a single file.................... |
37 |
Backing up your system into a disc............................. |
38 |
Creating a restore point ............................................... |
38 |
Restoring your system........................................................ |
39 |
Restoring your system to factory default settings....... |
39 |
Restoring your system to your own backup system |
|
Table of Contents |
iii |
image ............................................................................. |
39 |
Restoring your system from a restore point................ |
39 |
Reinstalling bundled applications and drivers ............ |
40 |
Creating recovery discs or Application and Driver DVD .40 |
|
Creating a Factory Recovery CD/DVD........................ |
40 |
Creating a User Recovery CD/DVD ............................ |
41 |
Creating an Application and Driver DVD .................. |
41 |
Creating bootable USB flash disk................................. |
42 |
Protecting your Joybook Lite from viruses and other |
|
security threats .......................................................................... |
43 |
Replacing the memory ................................................................. |
44 |
FAQ and troubleshooting............................................................ |
49 |
Battery and power ..................................................................... |
49 |
Connection ................................................................................ |
50 |
System ........................................................................................ |
51 |
Display ....................................................................................... |
55 |
Cleaning and battery maintenance ............................................. |
57 |
Battery maintenance ................................................................. |
57 |
Cleaning your Joybook Lite ...................................................... |
57 |
Service and support...................................................................... |
58 |
BenQ Joybook Lite Global Online Service............................... |
58 |
Joybook/Joybook Lite Overseas Regional Warranty (ORW) |
|
online registration ..................................................................... |
58 |
Appendix....................................................................................... |
59 |
General safety information ....................................................... |
59 |
Safety information about the battery ....................................... |
59 |
Safety information about the power adapter........................... |
60 |
Disposal of Waste Electrical and Electronic Equipment by |
|
users in private households in the European Union............... |
60 |
Declaration of Conformity ...................................................... |
61 |
Safety instructions for Poland, Romania, Slovenia, Bulgaria, |
|
Latvia, and Croatia.................................................................... |
62 |
iv Table of Contents

Overview
About this book
This book provides you the main information about various components in your Joybook Lite and demonstrates how to use them. The following are the major chapters of this book.
Chapter title |
Description |
|
|
Overview |
Introduction to this book |
|
|
Getting started |
Information about beginning to |
|
use your Joybook Lite |
|
|
Touring your Joybook |
Introduction to the hardware |
Lite |
components of your Joybook |
|
Lite |
|
|
Using your Joybook |
Information about operating |
Lite |
your Joybook Lite |
|
|
Using BIOS setup |
Information about how to use |
|
the BIOS setup utility |
|
|
Recovering your |
Information about using system |
system using |
backup and restore tools |
QDataTrove |
|
|
|
Replacing the |
Information about how to |
memory |
replace RAM memory |
|
|
FAQ and |
Information about frequently |
troubleshooting |
asked questions and |
|
troubleshooting |
|
|
Cleaning and battery |
Information about cleaning and |
maintenance |
battery maintenance |
|
|
Service and support |
Information about Joybook Lite |
|
service and support |
|
|
Appendix |
Important safety information |
|
|
Overview 1
Typographics
The usage of notes, tips, and warnings in this manual is specifically for different purposes, which are described as follows:
Icon/ |
Item |
Meaning |
Symbol |
|
|
|
|
|
|
Warning |
Information mainly to |
|
|
prevent the damage to |
|
|
components, data, or |
|
|
personal injury caused by |
|
|
misuse and improper |
|
|
operation or behavior. |
|
|
|
|
Tip |
Useful information for |
|
|
completing a task. |
|
|
|
|
Note |
Supplementary information. |
|
|
|
< > or [ ] |
Keys on the |
Indicates a key on the |
|
keyboard; User |
keyboard, or the UI on the |
|
Interface (UI) |
screen. Do not actually type |
|
on the screen |
the symbols together with |
|
|
the enclosed letters. |
|
|
|
When you first set up your Joybook Lite, you may want to find more information on setups. Refer to the user manual that is supplied with your operating system, or search from Help and Support in the Start menu in Windows XP.
In this book, the steps needed to reach a menu are shown in condensed form, for example: Start > Help and Support. The
Control Panel options mentioned are organized by the default category view.
2 Overview

Getting started
Depending on the model of your Joybook Lite, the appearance may be different from the illustrations shown in this manual.
Package contents
Before using your Joybook Lite for the first time, please check if you have all the items with you. For details about what should be included in the package, refer to the Product Specification label on the product carton. If any of the items are missing or appear damaged, contact your dealer immediately. Save the packaging in case you need to ship your Joybook Lite for service.
Getting your Joybook Lite ready for use
1. Installing the battery pack
Battery retainer B
Close the lid of your Joybook Lite (if open). Turn your Joybook Lite upside down and place it on a soft clean cloth. With the label side of the battery pack facing down, slide it gently into the battery compartment until it snaps into place (1). Move “Battery retainer B” to the left as shown to lock the battery pack into place (2).
Getting started |
3 |
2. |
Connecting the power |
3. Opening your Joybook Lite |
|
|
|
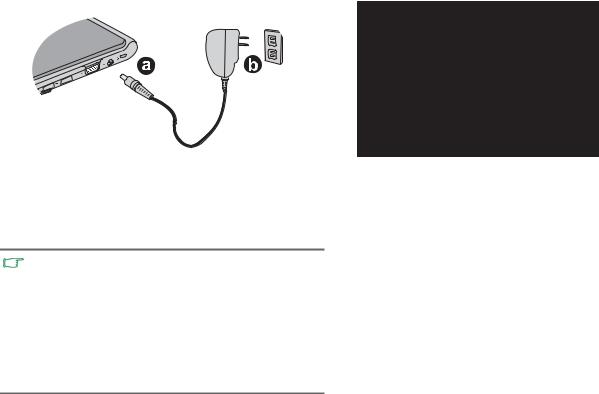
a.Connect the power adapter to the power jack on your Joybook Lite.
b.Connect the other end of the power adapter to a power outlet as illustrated. The Joybook Lite will automatically start charging the battery.
Gently lift up the latchless lid that allows you to open the case easily.
•The battery pack is shipped with low charge from the factory. You can still use your Joybook Lite while the battery is charging.
•Power systems and plug types may vary depending on your country/region.
•When the battery is charging, the battery indicator flashes in blue. When the battery is fully charged, the battery indicator lights up in blue.
•For details about the colors and meanings of the indicators, refer to "Indicators" on page 14.
4 Getting started

4. Performing initial setup
Press the Power button to start up your Joybook Lite, the Power button indicator then lights up in blue. And then follow the onscreen instructions to complete the initial Windows XP setup.
•Your Joybook Lite U102 Series works best with the operating system pre-installed for you. Installing other operating systems that have not been tested is not recommended, and may not only void your warranty but also affect the functionality of your Joybook Lite.
•The actual operating system that comes with your Joybook Lite may vary. For details, refer to the Product Specification label on the product carton
Important:
It is strongly recommended to create Factory Recovery DVD immediately once your Joybook Lite is ready for use. Refer to "Creating a Factory Recovery CD/DVD" on page 40 for details.
Getting started |
5 |

Expanding the capabilities of your Joybook Lite
Pay attention to the plug direction when making the following connections. Incorrect direction may cause damage to the device.
Connect an external display device (such as a monitor or projector) to the 15-pin D-sub video jack of your Joybook Lite with a VGA cable.
To switch to the external display device or simultaneous display, press the <Fn> + <F3> hotkey combination.
Connect USB peripherals to the USB ports of your Joybook Lite.
Insert a Memory Stick, Memory Stick Pro, MMC, and SD memory card following the direction indicated on the card to exchange files.
6 Getting started
Connect an earphone to the audio output jack to output sounds.
Connect a microphone to the microphone input jack to record sounds.
Access local area network (LAN) by connecting a network cable to the LAN port of your Joybook Lite.
Getting started |
7 |

Touring your Joybook Lite
Front view
(1) |
No. |
Front components |
|
|
(1) |
Built-in webcam |
|
|
|
A built-in webcam that allows you to capture still |
|
|
|
images, record videos, and chat online. For |
|
|
|
details, refer to "Using the built-in webcam" on |
|
(2) |
|
page 29. |
|
(2) |
LCD (Liquid Crystal Display) panel |
||
|
|||
|
(3) |
Keyboard |
|
|
(4) |
Built-in microphone |
|
|
(8) |
Receives sounds and voices for recording. |
|
(3) |
(5) |
Indicators |
(4)
(5) |
(6) |
(7) |
Refer to "Indicators" on page 14 for details.
(6)Touchpad indicator
Refer to "Touchpad indicator" on page 15 for details.
(7)Touchpad
Refer to "Using the touchpad" on page 16 for details.
8 Touring your Joybook Lite

(8)Power button
Turns your Joybook Lite on or off.
Touring your Joybook Lite |
9 |

Left side view
|
|
|
|
|
|
|
|
|
|
|
|
|
|
|
|
|
|
|
(1) |
(2) |
|||
|
|
|
|||
No. Left-side components |
|
|
|||
|
|
||||
(1) |
LAN (Local Area Network) port (RJ-45 |
||||
connector)
Allows the Joybook Lite to connect to a 10/ 100Mbps fast Ethernet 100BASE-T network.
 Please be careful to avoid plugging a RJ-11 phone
cable connector in the RJ-45 port. This will damage the LAN port. They look similar, but the RJ-45 connector is wider than the RJ-11 connector, and has more conductors.
(3) |
(4) |
(5) |
(6) |
(2)Vents
Dissipate heat and keep your Joybook Lite at an optimal temperature.
 To prevent overheating, do not obstruct the vents. For
example, do not use the Joybook Lite in bed where a blanket may inadvertently cover the vents and block the airflow.
(3) USB port
Connects peripherals such as mice, digital cameras and MP3 players that use the USB 2.0 interface.
10 Touring your Joybook Lite

(4)Microphone input jack
Connects to a microphone for recording sounds.
 This jack is for 3.5mm analog audio plugs. It accepts both mono and stereo plugs.
(5)Audio output jack
Connects to an earphone/headset or external speaker for playing the Joybook Lite audio.
(6)Four-in-One memory card slot
For a Memory Stick, Memory Stick Pro, SD, or MMC memory card.
Touring your Joybook Lite |
11 |
Right side view
|
|
|
|
|
|
|
|
|
|
|
|
|
|
|
|
|
|
|
|
|
|
|
|
|
|
|
|
|
|
(1) |
(2) |
(3) |
(4) |
(5) |
|||||
No. Right-side components
(1) Wireless switch
Switches wireless network (including Wireless LAN and Bluetooth) on or off. Refer to "Connecting to a wireless network" on page 22 and "Connecting to a Bluetooth device" on page 24 for details.
(2) USB port
Connects peripherals such as mice, digital cameras and MP3 players that use the USB 2.0 interface.
(3) 15-pin D-sub video jack
Connects external display devices, such as monitors and projectors.
(4) Power jack
Connects AC power supply to power the Joybook Lite and charge the battery.
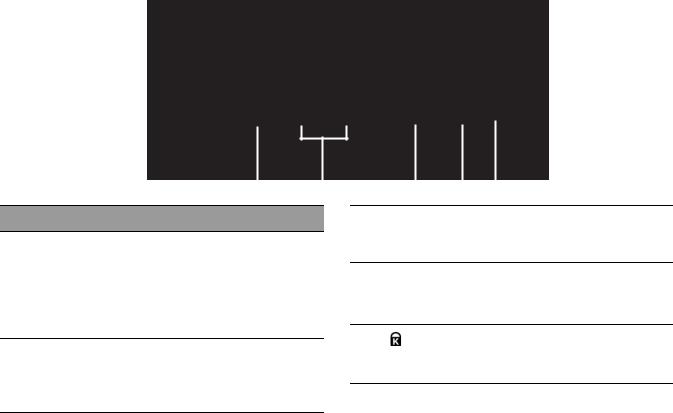
(5) |
Anti-theft Kensington lock slot |
Attaches to an anti-theft Kensington lock and cable to help prevent possible theft.
12 Touring your Joybook Lite

Bottom view
(1)
(2)
(3)
(4)
No. Bottom components
(1)Battery pack
Supplies power to the Joybook Lite when external power is not connected.
(2)Battery retainers
Secure the battery in place.
(3)Back cover
Inside the cover, you can find the memory slot of the Joybook Lite. You can replace the existing memory module of your Joybook Lite from here.
•To remove the cover, a small Phillips head screwdriver is required.
•For more information about replacing the memory module, the limit of maximum memory, or the types of BenQ certified memory modules for your Joybook Lite, refer to "Replacing the memory" on page 44.
(4)Speakers
Touring your Joybook Lite |
13 |
Indicators
(1) (2) (3) (4)
No. Indicators
(1)
Power button indicator
•When the system is on, it lights up in blue.
•When the system is in Sleep mode, it flashes in blue.
•When the system is off or in Hibernation mode, the light goes off.
(2) Battery indicator
•When the battery is charging, it flashes in blue.
•When the battery is fully charged, it lights up in blue.
•When the battery is in use, the light goes off.
•When the battery is running low, it lights up in amber.
•When the battery is not working properly, it flashes in amber.
(3) Hard disk activity indicator
Flashes in blue when the Joybook Lite is accessing data in the hard disk.
(4) Wireless LAN (WLAN)/Bluetooth indicator
•When WLAN and Bluetooth are turned on, it lights up in blue.
•When WLAN and Bluetooth are in use, it flashes in blue.
•When both WLAN and Bluetooth are turned off, the light goes off.
14 Touring your Joybook Lite
(1)
No. Indicator
(1)
 Touchpad indicator
When the touchpad is deactivated, it lights up in amber.
Touring your Joybook Lite |
15 |

Using your Joybook Lite
Using the touchpad
(1)
(2) 


 (3)
(3)
The touchpad with its buttons is a pointing device that functions as an optional external mouse, which can perform navigation, scrolling and selection functions. The components of the touchpad are described as follows.
No. |
Component |
Function |
|
|
|
(1) |
Touchpad |
Moves the pointer, selects or |
|
|
activates items on the screen. |
|
|
|
(2) |
Left touchpad |
Equivalent to the left button of |
|
button |
an optional external mouse. |
|
|
|
(3) |
Right touchpad |
Equivalent to the right button |
|
button |
of an optional external mouse. |
|
|
|
•To use the touchpad as an optional external mouse, press the left and right touchpad buttons, which provide the same click functions as an external mouse does.
•To move the pointer, place your finger with slight pressure on the touchpad and move in the direction as desired.
•Do not use a pen, pencil, or marker on the touchpad. Use only your fingertip.
•To set the touchpad preferences in Windows XP, select
Start > Control Panel > Printers and other Hardware > Mouse.
16 Using your Joybook Lite
Function |
Left |
Right |
Touchpad |
|
|
touchpad |
touchpad |
|
|
|
button |
button |
|
|
|
|
|
|
|
Select |
Click once. |
-- |
Tap once. |
|
|
|
|
|
|
Execute |
Click twice |
-- |
Tap twice |
|
|
quickly. |
|
quickly. |
|
|
|
|
|
|
Drag |
Click once |
-- |
Tap twice |
|
|
and hold the |
|
quickly and |
|
|
item, and |
|
hold the |
|
|
then use |
|
item, and |
|
|
your finger |
|
then move |
|
|
on the |
|
your finger |
|
|
touchpad to |
|
on the |
|
|
drag. |
|
touchpad to |
|
|
|
|
drag. |
|
|
|
|
|
|
Display |
-- |
Click once. |
-- |
|
the |
|
|
|
|
contextual |
|
|
|
|
menu |
|
|
|
|
|
|
|
|
|
|
|
|
|
|
•The touchpad is a pressure sensitive device that requires proper care to avoid damage.
•Do not rest heavy objects on the touchpad or its buttons.
•Do not scratch the touchpad with sharp-pointed objects or your fingernails.
Using your Joybook Lite |
17 |
Loading...