


 Loading...
Joybook R55 Series User Manual
Welcome

 Copyright
Copyright 2006 by BenQ Corporation. All rights reserved. No part of this publication may be reproduced, transmitted, transcribed, stored in a retrieval system or translated into any language or computer language, in any form or by any means, electronic, mechanical, magnetic, optical, chemical, manual or otherwise, without the prior written permission of this company.
 Disclaimer
BenQ Corporation makes no representations or warranties, either expressed or implied, with respect to the contents hereof and specifically disclaims any warranties, merchantability or fitness for any particular purpose. Further, BenQ Corporation reserves the right to revise this publication and to make changes from time to time in the contents hereof without obligation of this company to notify any person of such revision or changes.
Windows, Internet Explorer and Outlook Express are trademarks of Microsoft Corporation. Others are copyrights of their respective companies or organizations.
This product incorporates copyright protection technology that is protected by U.S. patents and other intellectual property rights. Use of this copyright protection technology must be authorized by Macrovision, and is intended for home and other limited viewing uses only unless otherwise authorized by Macrovision. Reverse engineering or disassembly is prohibited.
 Joybook models covered by this manual
This manual contains the information about the following Joybook models:
• Joybook R55 Series
Please note that the actual hardware or software capabilities will vary according to the model you purchased. To determine your Joybook model, please refer to the label on the packing box, or the printing on your Joybook.

Table of contents |
|
Overview............................................................................................... |
1 |
About this book ............................................................................. |
1 |
Typographics.................................................................................. |
1 |
Getting started...................................................................................... |
2 |
Package contents............................................................................ |
2 |
Getting your Joybook ready for use.............................................. |
2 |
Expanding the capabilities of your Joybook................................. |
4 |
Touring your Joybook ......................................................................... |
7 |
Front view ...................................................................................... |
7 |
Left side view.................................................................................. |
8 |
Right side view ............................................................................... |
9 |
Bottom view ................................................................................... |
10 |
Indicators ....................................................................................... |
11 |
Using your Joybook ............................................................................. |
12 |
Using the touchpad........................................................................ |
12 |
Using the keyboard........................................................................ |
13 |
Function hotkeys ..................................................................... |
13 |
Windows keys and lock keys................................................... |
14 |
Port replicator (optional accessory) ............................................. |
15 |
Connecting the port replicator ............................................... |
15 |
Removing the port replicator.................................................. |
15 |
Using the built-in wireless LAN function (optional) .................. |
16 |
Using Bluetooth (optional)........................................................... |
18 |
Bluetooth icons........................................................................ |
19 |
Turning Bluetooth on or off ................................................... |
19 |
Connecting a Bluetooth device............................................... |
19 |
Sending a file to a Bluetooth device........................................ |
19 |
Using BIOS setup ................................................................................. |
21 |
When and how to use BIOS setup ................................................ |
21 |
Navigating the BIOS setup screen................................................. |
22 |
Info menu ................................................................................ |
22 |
Main menu............................................................................... |
22 |
Advanced menu....................................................................... |
22 |
Security menu........................................................................... |
22 |
Boot menu ................................................................................ |
22 |
Exit menu ................................................................................. |
23 |
Boot from LAN............................................................................... |
23 |
Connecting to external display devices ............................................... |
24 |
Connecting to a VGA display device............................................. |
24 |
Before connecting your Joybook to a projector ..................... |
25 |
S-Video output ............................................................................... |
26 |
Installing additional memory .............................................................. |
29 |
FAQ and troubleshooting .................................................................... |
32 |
General............................................................................................ |
32 |
Battery and power .......................................................................... |
32 |
Connection ..................................................................................... |
33 |
System ............................................................................................. |
34 |
Display ............................................................................................ |
36 |
Information on cleaning and battery maintenance............................ |
38 |
Battery maintenance ...................................................................... |
38 |
Cleaning your Joybook .................................................................. |
38 |
Service and support.............................................................................. |
39 |
BenQ Joybook Global Online Service ........................................... |
39 |
Joybook online registration ........................................................... |
39 |
Appendix............................................................................................... |
40 |
General safety information ............................................................ |
40 |
Safety information about the battery ............................................ |
40 |
Caution texts concerning lithium batteries ............................ |
40 |
Safety information about the AC adapter..................................... |
40 |
Safety information about the modem ........................................... |
41 |
Caution ..................................................................................... |
41 |
Disposal of Waste Electrical and Electronic Equipment by users in |
|
private households in the European Union.................................. |
41 |
Declaration of Conformity ............................................................ |
41 |
Table of contents |
iii |
<Memo>
iv Table of contents

 Overview
About this book
This book provides you the main information about various components in your Joybook and demonstrates how to use them. The following are the major chapters of this book.
Chapter |
Title |
Description |
Chapter 1 |
Overview |
Introduction to this book. |
Chapter 2 |
Getting started |
Information about beginning |
|
|
to use your Joybook. |
Chapter 3 |
Touring your |
Introduction to the hardware |
|
Joybook |
components of your Joybook. |
Chapter 4 |
Using your |
Basic and advanced |
|
Joybook |
information about operating |
|
|
your Joybook. |
Chapter 5 |
Using BIOS setup |
Information about how to use |
|
|
the BIOS setup utility. |
Chapter 6 |
Connecting to |
Information about how to |
|
external display |
connect your Joybook to |
|
devices |
external display devices. |
Chapter 7 |
Installing |
Offers information about how |
|
additional memory |
to add the memory. |
Chapter 8 |
FAQ and |
Frequently asked questions |
|
troubleshooting |
and troubleshooting |
|
|
information. |
Chapter 9 |
Information on |
Information about cleaning |
|
cleaning and |
and battery maintenance. |
|
battery |
|
|
maintenance |
|
Chapter 10 |
Service and |
Joybook service and support |
|
support |
information. |
Chapter 11 |
Appendix |
Important safety information. |
Typographics
The usage of notes, tips and warnings is specifically for different purposes, which are described as follows.
Icon/ |
Item |
Meaning |
Symbol |
|
|
|
Warning |
Information mainly to prevent the |
|
|
damage to components, data, or |
|
|
personal injury caused by misuse |
|
|
and improper operation or |
|
|
behavior. |
|
Tip |
Useful information for completing |
|
|
a task. |
|
|
|
|
Note |
Supplementary information. |
|
|
|
< > or [ ] |
Keys on the |
Indicates a key on the keyboard, |
|
keyboard; User |
or the UI on the screen. Do not |
|
Interface (UI) on |
actually type the symbols |
|
the screen |
together with the enclosed letters. |
Overview 1

 Getting started
Depending on the model of your Joybook, the appearance may be different from those shown in this manual.
Package contents
Before using your Joybook for the first time, please check if you have all the items with you. For details about what should be included in the package, refer to the package contents label on the accessory box. If any of the items are missing or appear damaged, contact your dealer immediately. Save the packaging in case you need to ship your Joybook for service.
Getting your Joybook ready for use
1. Installing the battery pack
2. Connecting the power
Connect the power cord to the power adapter.
Connect the power adapter to the power socket on your Joybook.
Turn your Joybook upside down and put it on a soft clean cloth. With the label side of the battery pack facing down, slide it gently into the battery compartment until it snaps into place (1). Move the release latch to the left as shown to lock the battery pack into place (2).
Connect the power cord to a wall outlet and start charging the battery.
Power systems and plug types might vary depending on your country/ region.
2 Getting started

•When the battery is charging, the battery indicator appears in amber. When the charging process is completed, the light goes off.
•For details about the colors and meanings of the indicators, refer to "Indicators" on page 11.
3. Opening your Joybook
To open your Joybook, slide the latch to the right, and then lift the lid up.
4. Performing initial setup
Press the power button to start up your Joybook, and then follow the onscreen instructions to complete the initial Windows XP setup.
•The actual operating system pre-installed with your Joybook might vary. For more information, refer to the Product Specification Label on the product carton.
•Your Joybook R55 Series only works with Microsoft Windows® XP Home and Windows® XP Professional editions.
Getting started |
3 |

Expanding the capabilities of your Joybook
Connect an external display device (such as a monitor or projector) to the VGA port of your Joybook.
Connect a telephone line to the modem port of your Joybook and dial-up to the Internet.
Access local area network (LAN) by connecting a network cable to the LAN port of your Joybook.
Use various PCI Express Cards on the market by inserting one into the PCI Express Card slot of your Joybook.
4 Getting started

Use the optical drive to access data on various kinds of discs or enjoy DVD/VCD movies.
Connect an earphone to the earphone jack to output sounds.
Connects to a Hi-Fi set, radio, synthesizer, walkman, etc.
Connect a microphone to the microphone jack to record sounds.
Getting started |
5 |

Insert a Memory Stick, Memory Stick Pro, SD or MMC memory card to exchange files.
Connect digital camcorders and high-speed storage equipment to this IEEE 1394 (FireWire) Port.
Connect USB peripherals to the USB port of your Joybook.
Output video images on your Joybook to a TV or AV device by connecting it to the S-Video out jack on your Joybook.
6 Getting started
 Touring your Joybook
 Depending on the model of your Joybook, the appearance may be different from those shown in this manual.
Front view
(1)  Built-in microphone
Receives sounds and voices for recording.
(2) Power button and quick access buttons
Power
Turns your Joybook on or off.
 Internet hotkey
Starts up the Internet Explorer Web browser.


 E-mail hotkey
Starts up the Outlook Express e-mail client.
 Wireless LAN launch button
Enables/disables the wireless LAN.
(3)Touchpad
(4)LCD panel
(5)Keyboard
(6) Earphone/SPDIF audio output jack
Can be used to connect to an earphone/headset or external speaker for playing Joybook audio.
(7) 
 Audio input jack
Can be used to connects to a Hi-Fi set, radio, synthesizer, walkman, etc.
(8)  Microphone input jack
Can be used to connect to a microphone for recording sounds.
(9)  IEEE 1394 (FireWire) port
For connecting high-speed peripherals such as digital video cameras and other consumer electronics devices that use the IEEE 1394 (FireWire) interface.
Touring your Joybook |
7 |

Left side view
(1)Power jack
For connecting AC power supply.
(2) Ventilation holes
For dissipating heat and keeping the computer at an optimal temperature.
(3)  Port replicator port (optional)
For connecting to an optional port replicator to add additional ports to your Joyboook, such as PS/2, serial, parallel, USB, etc.
Availability of the port replicator port and the port replicator varies by model. Before using the port replicator, be sure to install the driver in the port replicator driver CD first.
(4) LAN (Ethernet) port (RJ-45 connector)
Allows Joybook to connect to a 10/100/1000Mbps Ethernet network.
Do not plug a phone jack connector in the RJ-45 port. This may damage this device.
(5)  VGA port
For connecting external display devices, such as monitors and projectors.
(6)  S-Video out jack
Allows Joybook to outputs video signals to a television set or VCR that has an S-Video in jack via an S-Video cable.
(7) USB 2.0 port
For connecting peripherals such as mice, digital cameras and MP3 players that use the USB interface.
8 Touring your Joybook
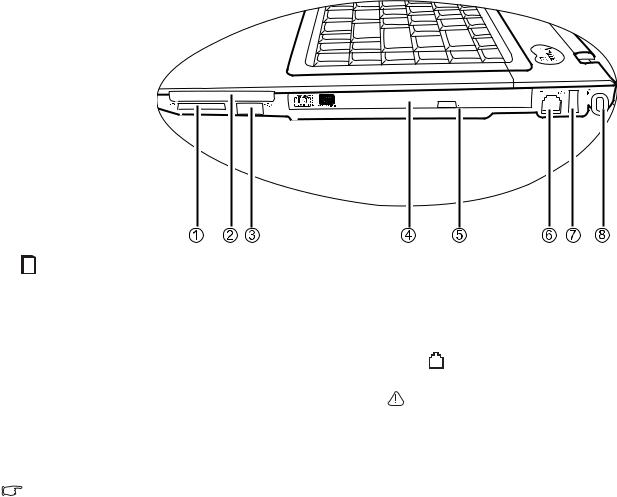
Right side view
(1)  Four-in-One memory card slot
Reads a Memory Stick, Memory Stick Pro, SD or MMC memory card.
(2) PCI Express card slot
This PCI Express Card slot accepts one Type-II PCI Express Card. You can use it and various PCI Express Cards on the market to further expand the capabilities of your Joybook.
Insert a PCI Express Card into the slot following the direction indicated on the card and complete related driver settings.
(3) USB 2.0 port
For connecting peripherals such as mice, digital cameras and MP3 players that use the USB interface.
(4) DVD/CD-RW Combo/DVD-Dual/DVD Super-Multi drive (Optional)
The type of optical drive varies by model, and the support of disc types depends on the optical drive that comes with your Joybook.
Supports multi-functional optical module for reading music CDs, VCDs and DVDs or burning CD-R/CD-RW or DVD+R/DVD-R/DVD+RW/
DVD-RW/DVD-RAM (optional) discs. Discs can be inserted/ejected by pressing the small ejection button on the drive.
(5) Tray ejection hole
If you wish to open the disc tray when your Joybook power is off, or it can't be opened using the ejection button, insert a pointed object into the tray ejection hole next to the ejection button to force open the disc tray.
(6)Modem port (RJ-11 connector)
Accepts an analog telephone line for use with the internal modem.
To reduce the risk of fire, use only No. 26 AWG or larger telecommunications line cord.
(7) USB 2.0 port
For connecting peripherals such as mice, digital cameras and MP3 players that use the USB interface.
(8) Anti-theft lock hole
You can attach a anti-theft lock and cable to this hole to prevent theft.
Touring your Joybook |
9 |

Bottom view
(1) Hard disk drive compartment
Accommodates the hard disk drive of Joybook.
(2) Mini Card slot, Memory expansion slot and CPU compartment
Accommodates the CPU and memory slot of Joybook. There is also a Mini Card slot for using an optional Mini Card.
Depending on your model, a Mini Card wireless network card may have been pre-installed.
(3) Battery retainer A
Secures the battery in place.
(4) Battery pack
Supplies power to Joybook when external power is not connected.
(5) Battery retainer B
Secures the battery in place.
10 Touring your Joybook
Loading...