


22” LCD Color Monitor |
BenQ G2200W |
|
|
Content Index |
|
1. About This Manual.................................................................................................................................................. |
2 |
|
2. Introduction............................................................................................................................................................. |
3 |
|
2.1 |
RoHS requirement.............................................................................................................................................. |
3 |
2.2 |
Safety Notice ...................................................................................................................................................... |
3 |
2.3 |
General Description............................................................................................................................................ |
4 |
2.4 |
Related service information................................................................................................................................ |
4 |
3. Product Overview ................................................................................................................................................... |
6 |
|
3.1 |
Monitor Specifications ........................................................................................................................................ |
6 |
3.2 |
Input Signal Connector....................................................................................................................................... |
7 |
3.3 |
Factory Preset Display Modes ........................................................................................................................... |
8 |
3.4 |
Panel Specification............................................................................................................................................. |
9 |
4 Disassembly /Assembly........................................................................................................................................ |
11 |
|
4.1 Three angles’ view............................................................................................................................................ |
11 |
|
4.2 |
Exploded View.................................................................................................................................................. |
12 |
4.3 |
Disassembly ..................................................................................................................................................... |
13 |
5. Cosmetic / Appearance / Alignment Service...................................................................................................... |
17 |
|
5.1 |
Software/Firmware Upgrade Process .............................................................................................................. |
17 |
5.2 Adjustment / Alignment Procedure................................................................................................................... |
19 |
|
5.3 |
White-Balance, Luminance Adjustment ........................................................................................................... |
28 |
6 Circuit Board and Standard Parts Replacement................................................................................................. |
30 |
|
6.1 |
Electrical Block Diagram .................................................................................................................................. |
30 |
6.2 Troubleshooting Guide ..................................................................................................................................... |
32 |
|
6.3 |
Circuit operation theory .................................................................................................................................... |
39 |
6.4 |
BOM List........................................................................................................................................................... |
41 |
1

22” LCD Color Monitor |
BenQ G2200W |
1. About This Manual
This Service Manual is issued by engineer of TPV customer service according to the structure and capability of various models. The purpose of Service Manual is to provide a guide line to engineers to repair different models. The appearance and capability is introduced in this Service Manual. It is better for repair engineer to have a rough idea of this model through reading the Service Manual. Please do pay attention to the item part of THE DISASSEMBLY when repair the machine and also do the protection of Panel any time. When repairing the circuit board, please follow the requirement of RoHS and refer to the circuit diagram and repairing process that attached in the Service Manual. The method of firmware updated, the way of using the menu and some information that may be used when repairing are also attached in the Service Manual that provide repair engineer various choice.
If you have any questions, please contact with the engineers of TPV customer service.
COLOR MONITOR
MODEL ID G2200W (China)
1st Edition
Feb. 2008
2
22” LCD Color Monitor |
BenQ G2200W |
2. Introduction
2.1 RoHS requirement
Overview
-Restriction of the Use of Certain Hazardous Substances in Electrical and Electronic Equipment (RoHS) Directive 2002/95/EC is published in the Official Journal 13 February 2003 (OJ L37, 13.2.2003, p.19).
-Purpose: Reduction of the environmental and health risks posed by hazardous materials in EEE.
-It is complementary to & running in parallel with the WEEE Directive.
-Transposed into national law by 13 August 2004. And comes into effect 1 July 2006.It is similar to the WEEE Directive, except:
Applies to new EEE placed on the market after 1 July 2006.
Includes household filament light bulbs & luminaries.
Excludes: Medical devices or monitoring & control equipment (WEEE categories 8 & 9);Spare parts for the repair of EEE placed on the market before 1 July 2006; Re-used EEE originally placed on the market before 1 July 2006.
2.2 Safety Notice
FCC Notice
FCC Class B Radio Frequency Interference Statement WARNING: (FOR FCC CERTIFIED MODELS)
NOTE: This equipment has been tested and found to comply with the limits for a Class B digital device, pursuant to Part 15 of the FCC Rules. These limits are designed to provide reasonable protection against harmful interference in a residential installation. This equipment generates, uses and can radiate radio frequency energy, and if not installed and used in accordance with the instructions, may cause harmful interference to radio communications. However, there is no guarantee that interference will not occur in a particular installation. If this equipment does cause harmful interference to radio or television reception, which can be determined by turning the equipment off and on, the user is encouraged to try to correct the interference by one or more of the following measures:
1.Reorient or relocate the receiving antenna.
2.Increase the separation between the equipment and receiver.
3.Connect the equipment into an outlet on a circuit different from that to which the receiver is connected.
4.Consult the dealer or an experienced radio/TV technician for help.
NOTICE :
1.The changes or modifications not expressly approved by the party responsible for compliance could void the user's authority to operate the equipment.
2.Shielded interface cables and AC power cord, if any, must be used in order to comply with the emission limits.
3.The manufacturer is not responsible for any radio or TV interference caused by unauthorized modification to this equipment. It is the responsibilities of the user to correct such interference.
3
22” LCD Color Monitor |
BenQ G2200W |
Power Safety
1.The AC plug isolates this equipment from the AC supply.
2.The power supply cord serves as a power disconnect device for pluggable equipment. The socket outlet should be installed near the equipment and be easily accessible.
3.This product should be operated from the type of power indicated on the marked label. If you are not sure of the type of power available, consult your dealer or local power company.
2.3 General Description
This new LCD (Liquid Crystal Display) monitor BenQ G2200W offers numerous features and functions, for example:
●TFT display (Thin Film Transistor; active matrix)
●minimal space requirements thanks to slim casing
●optimum ergonomic characteristics (totally distortion-free, excellent picture definition and colour purity right into the corners)
●high degree of brightness and good contrast
●high resolution (1680x1050)
●presentation of up to 16.7 million colours (in conjunction with an appropriate graphics card)
●automatic scanning of horizontal frequencies from 31 to 83 kHz and refresh rates (vertical frequencies) from 55 to 76 Hz (absolutely flicker-free)
●digital screen controller with microprocessor for storing 22 different display modes
●freely adjustable colour alignment for matching the screen colours to the colours of various input and output devices
●convenient operation via integrated OSD (On-Screen-display) menu
●VESA-DDC compatibility
●plug&play capability
●power management for reducing power consumption when the computer is not in use
●compliance with the recommendations in accordance with TCO’03
This operating manual contains important information you require to start up and run your LCD monitor.
A graphics card (screen controller) with VGA interface or a digital graphics card with DVI interface is required to control the BenQ G2200W LCD monitor. The monitor processes the data supplied to it by the screen controller. The screen controller or the associated driver software is responsible for setting the modes (resolution and refresh rate).
Additional information
Due to the nature of liquid crystal display (LCD) technology, the picture resolution is always fixed. For the best display performance, please set the display resolution to 1680x1050 pixels with an aspect ratio of 16:10. This is called “Native Resolution” or maximal resolution – that is, the clearest picture. Lower resolutions are displayed on a full screen through an interpolation circuit. Image blurring across pixel boundaries can occur with the interpolated resolution depending upon the image type and its initial resolution.
2.4Related service information
•Do not use the monitor near water, e.g. near a bathtub, washbowl, kitchen sink, laundry tub, swimming pool or in a wet basement.
•Do not place the monitor on an unstable cart, stand, or table. If the monitor falls, it can injure a person and cause serious damage to the appliance. Use only a cart or stand recommended by the manufacturer or sold
4
22” LCD Color Monitor |
BenQ G2200W |
with the monitor. If you mount the monitor on a wall or shelf, use a mounting kit approved by the manufacturer and follow the kit instructions.
•Slots and openings in the back and bottom of the cabinet are provided for ventilation. To ensure reliable operation of the monitor and to protect it from overheating, be sure these openings are not blocked or covered. Do not place the monitor on a bed, sofa, rug, or similar surface. Do not place the monitor near or over a radiator or heat register. Do not place the monitor in a bookcase or cabinet unless proper ventilation is provided.
•The monitor should be operated only from the type of power source indicated on the label. If you are not sure of the type of power supplied to your home, consult your dealer or local power company.
•The monitor is equipped with a three-pronged grounded plug, a plug with a third (grounding) pin. This plug will fit only into a grounded power outlet as a safety feature. If your outlet does not accommodate the three-wire plug, have an electrician install the correct outlet, or use an adapter to ground the appliance safely. Do not defeat the safety purpose of the grounded plug.
•Unplug the unit during a lightning storm or when it will not be used for long periods of time. This will protect the monitor from damage due to power surges.
•Do not overload power strips and extension cords. Overloading can result in fire or electric shock.
•Never push any object into the slot on the monitor cabinet. It could short circuit parts causing a fire or electric shock. Never spill liquids on the monitor.
•Do not attempt to service the monitor yourself; opening or removing covers can expose you to dangerous voltages and other hazards. Please refer all servicing to qualified service personnel.
•To ensure satisfactory operation, use the monitor only with UL listed computers which have appropriate configured receptacles marked between 100 - 240V AC, Min. 5A.
•The wall socket shall be installed near the equipment and shall be easily accessible.
•For use only with the attached power adapter (Output 12V DC) which have UL,CSA listed license(Only for monitors with power adapter).
Since the equipment is compatible with RoHS Directive, use components in which the use of specific chemically noxious substances is restricted; use only designated spare parts when it is necessary to replace such parts with new parts.
Use lead-free solder for the equipment compatible with ones with substrates on which lead-free components are mounted. For the details, refer to “Caution for Lead-Free Soldering Work” given in the next page.
It is important to note that this manual contains various CAUTIONS and NOTICES which should be carefully read in order to minimize the risk of personal injury to service personnel. The possibility exists that improper service methods may damage the equipment.
5
22” LCD Color Monitor |
BenQ G2200W |
||||
3. Product Overview |
|
|
|||
3.1 Monitor Specifications |
|
|
|||
|
|
|
|
|
|
|
|
|
Driving system |
TFT Color LCD |
|
|
|
|
|
|
|
|
|
|
Size |
558.68mm(22") |
|
|
|
|
|
|
|
|
|
|
Pixel pitch |
0.282mm(H) × 0.282mm(V) |
|
|
|
|
|
|
|
|
LCD Panel |
|
Display Area |
473.76 x 296.1 |
|
|
|
|
|
|
|
|
|
Viewable angle |
160, 160 (CR>10) |
|
|
|
|
|
|
||
|
|
|
|
|
|
|
|
|
Contrast |
1000:1 |
|
|
|
|
|
|
|
|
|
|
Brightness |
210 cd/m2 |
|
|
|
|
Response time |
5ms(typical) |
|
|
|
|
|
|
|
|
|
|
|
Analog RGB, 0.7 Volts +/-5%, positive polarity at 75 ohm input |
|
|
|
|
|
impedance |
|
|
|
|
Video |
Digital DVT TMDS |
|
|
|
|
|
600mV for each differential line, positive polarity at 50 ohm input |
|
|
Input |
|
|
impedance |
|
|
|
|
|
|
|
|
|
Synchronization |
Separate horizontal and vertical |
|
|
|
|
|
|
||
|
|
|
synchronizations, polarity-free TTL level, SOG |
|
|
|
|
|
|
|
|
|
|
|
|
(Composite SYNC on green) |
|
|
|
|
|
|
|
|
|
|
H-Frequency |
31 - 83 kHz Multifrequency monitor |
|
|
|
|
|
|
|
|
|
|
V-Frequency |
55 - 76 Hz modes within these parameters |
|
|
|
|
|
|
|
|
Display Colors |
|
|
16.7M Colors |
|
|
|
|
|
|
|
|
Max. Resolution |
|
|
1680 x 1050 |
|
|
|
|
|
|
|
|
Plug & Play |
|
|
VESA DPMS, EPA |
|
|
|
|
|
|
|
|
EPA ENERGY |
ON Mode |
≤45W |
|
|
|
STAR® |
saving mode |
< 2 Watt, 240 V |
|
|
|
|
|
|
|
|
|
Input Connector |
|
|
D-sub / DVI-D |
|
|
|
|
|
|
|
|
Power Source |
|
|
100~240V AC,50~60Hz |
|
|
|
|
|
|
|
|
Environmental |
|
|
Operating Temp: 0° to 35°C |
|
|
Considerations |
|
|
Operating Humidity: 10% to 80% |
|
|
Dimension |
|
|
401.6 x 512.2 x 163.4 mm |
|
|
|
|
|
|
|
|
Weight (N. W.) |
|
|
5.3 KG |
|
|
|
|
|
|
|
6

22” LCD Color Monitor |
|
BenQ G2200W |
|
3.2 Input Signal Connector |
|
|
|
Pin No. |
Description |
Pin No. |
Description |
1. |
Red |
9. |
+5V |
2. |
Green |
10. |
Detect Cable |
3. |
Blue |
11. |
Ground |
4. |
Ground |
12. |
DDC-Serial Data |
5. |
VGA_CON |
13. |
H-Sync |
6. |
R-Ground |
14. |
V-Sync |
7. |
G-Ground |
15. |
DDC-Serial Clock |
8. |
B-Ground |
|
|
|
1 |
5 |
|
|
6 |
10 |
|
|
11 |
15 |
|
Pin No. |
Description |
|
Pin No. |
Description |
|
Pin No. |
Description |
|
|
|
|
|
|
|
|
1 |
TX2- |
|
9 |
TX1- |
|
17 |
TX0- |
|
|
|
|
|
|
|
|
2 |
TX2+ |
|
10 |
TX1+ |
|
18 |
TX0+ |
|
|
|
|
|
|
|
|
3 |
Shield (TX2 / TX4) |
|
11 |
Shield (TX1 / TX3) |
|
19 |
Shield (TX0 / TX5) |
|
|
|
|
|
|
|
|
4 |
TX4- |
|
12 |
TX3- |
|
20 |
TX5- |
|
|
|
|
|
|
|
|
5 |
TX4+ |
|
13 |
TX3+ |
|
21 |
TX5+ |
|
|
|
|
|
|
|
|
6 |
DDC-Serial Clock |
|
14 |
+5V power |
|
22 |
Shield (TXC) |
|
|
|
|
|
|
|
|
7 |
DDC-Serial Data |
|
15 |
Ground (H/V sync) |
|
23 |
TXC+ |
|
|
|
|
|
|
|
|
8 |
V-Sync. (Analog) |
|
16 |
Hot plug detect |
|
24 |
TXC- |
|
|
|
|
|
|
|
|
|
|
Pin - Assignment of DVI-D connector: |
|
|
|||
|
|
|
|
|
|
|
|
|
|
|
|
|
|
|
|
7

22” LCD Color Monitor |
BenQ G2200W |
3.3 Factory Preset Display Modes
8

22” LCD Color Monitor |
BenQ G2200W |
3.4 Panel Specification
M220Z1-L03
OVERVIEW
The M220Z1-L03 model is a 22 inch wide TFT-LCD module with a 4-CCFL Backlight Unit and a 30-pin 2ch-LVDS interface. This module supports 1680 x 1050 WSXGA+ (16:10 wide screen) mode and displays up to 16.7 millions colors. The inverter module for the Backlight Unit is not built in.
General Specifications
Mechanical Specifications
Electrical Characteristics
9

22” LCD Color Monitor |
BenQ G2200W |
Optical Characteristics
10
22” LCD Color Monitor |
BenQ G2200W |
4 Disassembly /Assembly
4.1 Three angles’ view
11

22” LCD Color Monitor |
BenQ G2200W |
4.2 Exploded View
12 |

22” LCD Color Monitor |
BenQ G2200W |
4.3 Disassembly
1). Back View as Fig1
Place the monitor face down on a smooth surface as Fig 1. Be careful to avoid scratch and injury during the uninstall.
Fig1
2).Remove the STAND-BASE ASS'Y
Remove the two screws in red to remove the STAND-BASE ASS'Y as Fig2.
Fig2
13

22” LCD Color Monitor |
BenQ G2200W |
3).Remove the Rear Cover and Bezel
The arrows in blue are the hook that we should put attention to when remove the rear cover. Use plastic putty knife to release the 5 hooks on the bottom,8 hooks on the top,4 hooks on the left,4 hooks on the right and remove the only one screw in red as Fig.3 on the rear cover , then you can easily remove the rear cover and bezel.
Fig.3
14
22” LCD Color Monitor |
BenQ G2200W |
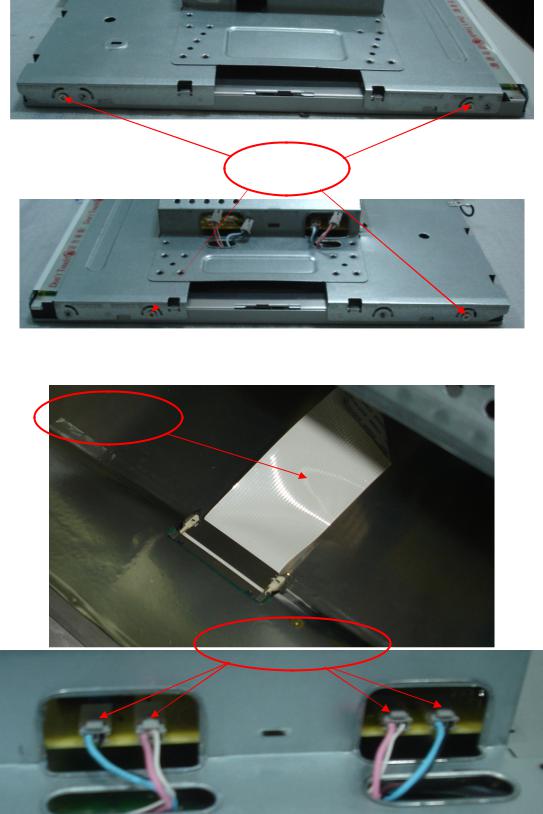
4).Remove the Panel
Remove the 4 screws on the side of main frame first, and then disconnect the Lamp Connections and LVDS Cable connection.
SCREWS
LVDS CABLE
Lamp Connection
15

22” LCD Color Monitor |
BenQ G2200W |
5).Remove the Main Board and Power Board
Remove the screws in red and disconnect the all connections, at last you can get the Main Board and Power Board as follow.
LVDS CABLE
MAIN BOARD
POWER BOARD
16
 Loading...