


Washing Machine |
User’s Manual |
Pesumasin |
Kasutusjuhend |
Veļas mazgājamā mašīna |
Lietošanas rokasgrāmata |
Skalbimo mašina |
Vartotojo vadovas |
Automatická pračka |
Používateľská príručka |
Plně automatická pračka |
Návod k používání |
WRE 7612 XWW |
RO EN EE LV LT CZ SK |
Document Number: 2820670599 |


1 Important instructions for safety and environment
This section contains safety instructions that will help protect from risk of personal injury or property damage. Failure to follow these instructions shall void any warranty.
1.1 General safety
•This product can be used by children at and above 8 years old and by persons whose physical, sensory or mental capabilities were not fully developed or who lack experience and knowledge provided that they are supervised or trained on the safe usage of the product and the risks it brings out. Children must not play with the product. Cleaning and maintenance works should not be performed by children unless they are supervised by someone.
•Children of less than 3 years should be kept away unless continuously supervised.
•Never place the product on a carpet-covered floor. Otherwise, lack of airflow beneath the machine will cause electrical parts to overheat. This will cause problems with your product.
•If the product has a failure, it should not be operated unless it is repaired by the Authorized Service Agent. There is the risk of electric shock!
•This product is designed to resume operating in the event of powering on after a power interruption. If you wish to cancel the programme, see "Cancelling the programme" section.
•Connect the product to a grounded outlet protected by a 16 A fuse. Do not neglect to have the grounding installation made by a qualified electrician. Our company shall not be liable for any damages that will arise when the product is used without grounding in accordance with the local regulations.
•The water supply and draining hoses must be securely fastened and remain undamaged. Otherwise, there is the risk of water leakage.
•Never open the loading door or remove the filter while there is still water in the drum. Otherwise, risk of flooding and injury from hot water will occur.
•Do not force open the locked loading door. The loading door will be ready to open just a few minutes after the washing cycle comes to an end. In case of forcing the loading door to open, the door and the lock mechanism may get damaged.
•Unplug the product when not in use.
•Never wash the product by spreading or pouring water onto it! There is the risk of electric shock!
•Never touch the plug with wet hands! Never unplug by pulling on the cable, always pull out by grabbing the plug.
•Use detergents, softeners and supplements suitable for automatic washing machines only.
•Follow the instructions on the textile tags and on the detergent package.
•The product must be unplugged during installation, maintenance, cleaning and repairing procedures.
•Always have the installation and repairing procedures carried out by the Authorized Service Agent. Manufacturer shall not be held liable for damages that may arise from procedures carried out by unauthorized persons.
•If the power cable is damaged, it must be replaced by the manufacturer, after sales service or a similarly qualified person (preferably an electrician) or someone designated by the importer in order to avoid possible risks.
•Place the product on a rigid, flat and level surface.
•Do not place it on a long-pile rug or similar surfaces.
•Do not place the product on a high platform or near the edge on a cascaded surface.
•Do not place the product on the power cable.
•Never use sponge or scrub materials. These will damage the painted, chrome plated and plastic surfaces.
1.2 Intended use
• This product has been designed for domestic use. It is not suitable for commercial use and it must not be used out of its intended use.
• The product must only be used for washing and rinsing of laundry that are marked accordingly.
• The manufacturer waives any responsibility arisen from incorrect usage or transportation.
1.3 Children's safety
•Packaging materials are dangerous to children. Keep packaging materials in a safe place away from reach of the children.
•Electrical products are dangerous for the children. Keep children away from the product when it is in use. Do not let them to tamper with the product. Use child lock to prevent children from intervening with the product.
3 / EN |
Washing Machine / User’s Manual |
|
|
•Do not forget to close the loading door when leaving the room where the product is located.
•Store all detergents and additives in a safe place away from the reach of the children by closing the cover of the detergent container or sealing the detergent package.
While washing the laundry at high temperatures, the loading door glass becomes hot. Therefore, keep especially the children away from the loading door of the
machine while the washing operation is in progress.
1.4 Package information
• Packaging materials of the product are manufactured from recyclable materials in accordance with our National Environment Regulations. Do not dispose of the packaging materials together with the domestic or other wastes. Take them to the packaging material collection points desig-
nated by the local authorities.
1.5 Disposing of the waste product
• This product has been manufactured with high quality parts and materials which can be reused and are suitable for recycling. Therefore, do not dispose the product with normal domestic waste at the end of its service life. Take it to a collection point for the recycling of electrical and electronic equipment. Please consult your local authorities to learn the nearest collection point. Help protect the environment and natural resources by recycling used products. For children's
safety, cut the power cable and break the locking mechanism of the loading door so that it will be non-functional before disposing of the product.
1.6 Compliance with WEEE Directive
This product complies with EU WEEE Directive (2012/19/EU). This product bears a classification symbol for waste electrical and electronic equipment (WEEE).
This product has been manufactured with high quality parts and materials which can be reused and are suitable for recycling. Do not dispose of the waste product with normal domestic and other wastes at the end of its service life. Take it to the collection center for the recycling of electrical and electronic equipment. Please consult your local authorities to learn about these collection centers.
Compliance with RoHS Directive:
The product you have purchased complies with EU RoHS Directive (2011/65/EU). It does not contain harmful and prohibited materials specified in the Directive.
2 Installation
Refer to the nearest Authorised Service Agent for installation of the product. To make the product ready for use, review the information in the user manual and make sure that the electricity, tap water supply and water drainage systems are appropriate before calling the Authorized Service Agent. If they are not, call a qualified technician and plumber to have any necessary arrangements carried out.
C |
Preparation of the location and electrical, tap water and waste water installations at the place of |
installation is under customer's responsibility. |
|
B |
WARNING: Installation and electrical connections of the product must be carried out by the Authorized |
Service Agent. Manufacturer shall not be held liable for damages that may arise from procedures carried |
|
A |
out by unauthorized persons. |
WARNING: Prior to installation, visually check if the product has any defects on it. If so, do not have it |
|
installed. Damaged products cause risks for your safety. |
|
C |
Make sure that the water inlet and discharge hoses as well as the power cable are not folded, pinched or |
crushed while pushing the product into its place after installation or cleaning procedures. |
2.1 Appropriate installation location
•Place the machine on a rigid floor. Do not place it on a long pile rug or similar surfaces.
•Total weight of the washing machine and the dryer -with full loadwhen they are placed on top of each other reaches to approx. 180 kilograms. Place the product on a solid and flat floor that has sufficient load carrying capacity!
•Do not place the product on the power cable.
•Do not install the product at places where temperature may fall below 0°С.
•Place the product at least 1 cm away from the edges of other furniture.
4 / EN |
Washing Machine / User’s Manual |
|
|
2.2 Removing packaging reinforcement
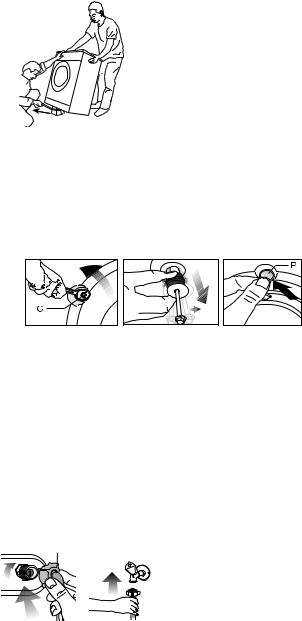
Tilt the machine backwards to remove the packaging reinforcement.
Remove the packaging reinforcement by pulling the ribbon.
2.3 Removing the transportation locks |
|
A |
WARNING: Do not remove the transportation locks before taking out the packaging reinforcement. |
A |
WARNING: Remove the transportation safety bolts before operating the washing machine! Otherwise, |
the product will be damaged. |
|
1.Loosen all the bolts with a suitable spanner until they rotate freely (C).
2.Remove transportation safety bolts by turning them gently.
3.Attach the plastic covers supplied in the User Manual bag into the holes on the rear panel. (P)
C |
Keep the transportation safety bolts in a safe place to reuse when the washing machine needs to be moved |
again in the future. |
|
C |
Never move the product without the transportation safety bolts properly fixed in place! |
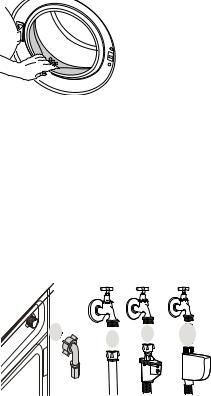
2.4 Connecting water supply
C |
The water supply pressure required to run the product is between 1 to 10 bars (0.1 – 1 MPa). It is necessary |
to have 10 – 80 liters of water flowing from the fully open tap in one minute to have your machine run |
|
C |
smoothly. Attach a pressure reducing valve if water pressure is higher. |
If you are going to use the double water-inlet product as a single (cold) water-inlet unit, you must install the |
|
supplied stopper to the hot water valve before operating the product. (Applies for the products supplied |
|
|
with a blind stopper group.) |
A WARNING: Models with a single water inlet should not be connected to the hot water tap. In such a case the laundry will get damaged or the product will switch to protection mode and will not operate.
A WARNING: Do not use old or used water inlet hoses on the new product. It may cause stains on your laundry.
1. Tighten all hose nuts by hand. Never use a tool when tightening the nuts.
2. Open the taps completely after making the hose connection to
check for water leaks at the connection points. If any leaks occur,
turn off the tap and remove the nut. Retighten the nut carefully after
checking the seal. To prevent water leakages and damages caused
by them, keep the taps closed when the machine is not in use.
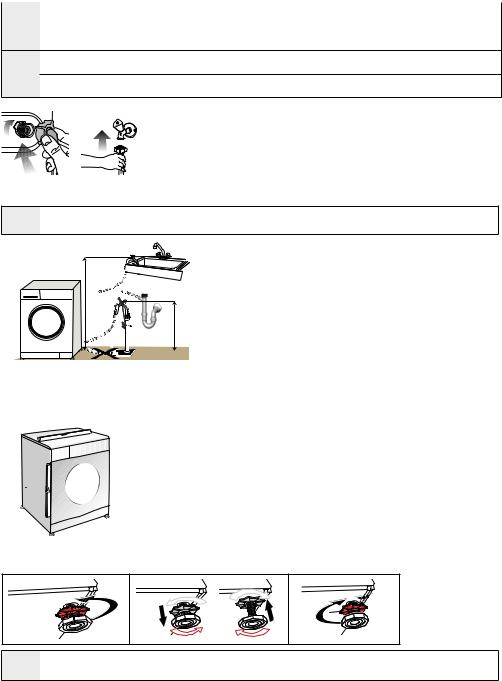
2.5 Connecting to the drain
• The end of the drain hose must be directly connected to the wastewater drain or to the washbasin.
A |
WARNING: Your house will be flooded if the hose comes out of its housing during water discharge. |
|
Moreover, there is risk of scalding due to high washing temperatures! To prevent such situations and to |
||
|
ensure smooth water intake and discharge of the machine, fix the end of the discharge hose tightly so that |
|
|
it cannot come out. |
|
|
|
|
5 / EN |
|
Washing Machine / User’s Manual |
|
|
|
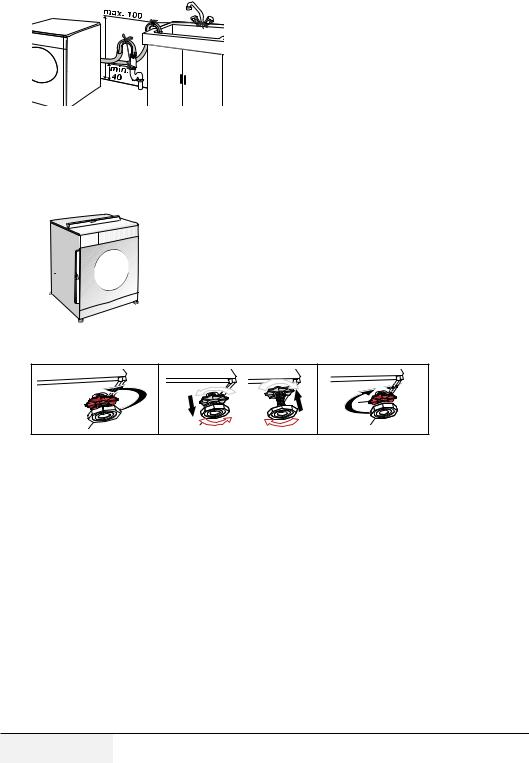
• The hose should be attached to a height of at least 40 cm,
and 100 cm at most.
 • In case the hose is elevated after laying it on the floor level
or close to the ground (less than 40 cm above the ground),
water discharge becomes more difficult and the laundry
may come out excessively wet. Therefore, follow the heights
described in the figure.
• To prevent flowing of dirty water back into the machine and to allow for easy discharge, do not immerse the hose end
into the dirty water or do not drive it in the drain more than 15 cm. If it is too long, cut it short.
• The end of the hose should not be bent, it should not be stepped on and the hose must not be pinched between the drain and the machine.
• If the length of the hose is too short, use it by adding an original extension hose. Length of the hose may not be longer than 3.2 m. To avoid water leak failures, the connection between the extension hose and the drain hose of the product must be fitted well with an appropriate clamp as not to come off and leak.
2.6 Adjusting the feet
A WARNING: In order to ensure that the product operates more silently and vibration-free, it must stand level and balanced on its feet. Balance the machine by adjusting the feet.
Otherwise, the product may move from its place and cause crushing and vibration problems.
1.Loosen the lock nuts on the feet by hand.
2.Adjust the feet until the product stands level and balanced.
3.Tighten all lock nuts again by hand.
A WARNING: Do not use any tools to loosen the lock nuts. Otherwise, they will get damaged. |
2.7 Electrical connection
Connect the product to a grounded outlet protected by a 16 A fuse. Our company shall not be liable for any damages that will arise when the product is used without grounding in accordance with the local regulations.
• Connection must comply with national regulations.
• Power cable plug must be within easy reach after installation.
• If the current value of the fuse or breaker in the house is less than 16 Amps, have a qualified electrician install a 16 Amp fuse.
• The voltage specified in the "Technical specifications" section must be equal to your mains voltage.
• Do not make connections via extension cables or multi-plugs.
B WARNING:
Transportation of the product
1. Unplug the product before transporting it.
2. Remove water drain and water supply connections. 3. Drain all water that has remained in the product.
4. Install transportation safety bolts in the reverse order of removal procedure.
C
A
6 / EN
3 Preparation
3.1 Sorting the laundry
•Sort laundry according to type of fabric, colour, and degree of soiling and allowable water temperature.
•Always obey the instructions given on the garment tags.
3.2 Preparing laundry for washing
• Laundry items with metal attachments such as, underwired bras, belt buckles or metal buttons will damage the machine. Remove the metal pieces or wash the clothes by putting them in a laundry bag or pillow case.
• Take out all substances in the pockets such as coins, pens and paper clips, and turn pockets inside out and brush. Such objects may damage the product or cause noise problem.
• Put small size clothes such as infant's socks and nylon stockings in a laundry bag or pillow case.
• Place curtains in without compressing them. Remove curtain attachment items.
• Fasten zippers, sew loose buttons and mend rips and tears.
• Wash “machine washable”or “hand washable”labeled products only with an appropriate programme.
• Do not wash colours and whites together. New, dark coloured cottons release a lot of dye. Wash them separately.
• Tough stains must be treated properly before washing. If unsure, check with a dry cleaner.
• Use only dyes/colour changers and limescale removers suitable for machine wash. Always follow the instructions on the package.
• Wash trousers and delicate laundry turned inside out.
• Keep laundry items made of Angora wool in the freezer for a few hours before washing. This will reduce pilling.
• Laundry that are subjected to materials such as flour, lime dust, milk powder, etc. intensely must be shaken off before placing into the machine. Such dusts and powders on the laundry may build up on the inner parts of the machine in time and can cause damage.
3.3 Things to be done for energy saving
Following information will help you use the product in an ecological and energy-efficient manner.
• Operate the product in the highest capacity allowed by the programme you have selected, but do not overload; see, "Programme and consumption table".
• Always follow the instructions on the detergent packaging.
• Wash slightly soiled laundry at low temperatures.
• Use faster programmes for small quantities of lightly soiled laundry.
• Do not use prewash and high temperatures for laundry that is not heavily soiled or stained.
• If you plan to dry your laundry in a dryer, select the highest spin speed recommended during washing process.
• Do not use detergent in excess of the amount recommended on the detergent package.
3.4 Initial use
Before starting to use the product, make sure that all preparations are made in accordance with the instructions in sections“Important safety instructions” and “Installation”.
To prepare the product for washing laundry, perform first operation in Drum Cleaning programme. If your product is not equipped with Drum Cleaning programme, perform the Initial Use procedure in accordance with the methods described under “5.2 Cleaning the loading door and the drum” section of the user manual.
C Use an detergents suitable for the washing machines.
Some water might have remained in the product due to the quality control processes in the production. It is not harmful for the product.
3.5 Correct load capacity
The maximum load capacity depends on the type of laundry, the degree of soiling and the washing programme desired.
The machine automatically adjusts the amount of water according to the weight of the loaded laundry.
A warning: Follow the information in the“Programme and consumption table”. When overloaded, machine's washing performance will drop. Moreover, noise and vibration problems may occur.
3.6 Loading the laundry
1.Open the loading door.
2.Place laundry items loosely into the machine.
3.Push the loading door to close until you hear a locking sound. Ensure that no items are caught in the door.
7 / EN |
Washing Machine / User’s Manual |
|
|

C The loading door is locked while a programme is running. The door can only be opened a while after the programme comes to an end.
A warning: In case of misplacing the laundry, noise and vibration problems may occur in the machine.
3.7 Using detergent and softener
C When using detergent, softener, starch, fabric dye, bleach or limescale remover read the manufacturer's instructions on the package carefully and follow the suggested dosage values. Use measuring cup if available.
2  3 1
3 1
Detergent Drawer
The detergent drawer is composed of three compartments:
–(1) for prewash
–(2) for main wash
–(3) for softener
–(*) in addition, there is siphon piece in the softener compartment.
Detergent, softener and other cleaning agents
• Add detergent and softener before starting the washing programme.
• Never leave the detergent drawer open while the washing programme is running!
• When using a programme without prewash, do not put any detergent into the prewash compartment (compartment nr. "1").
• In a programme with prewash, do not put liquid detergent into the prewash compartment (compartment nr. "1").
• Do not select a programme with prewash if you are using a detergent bag or dispensing ball. Place the detergent bag or the dispensing ball directly among the laundry in the machine.
• If you are using liquid detergent, do not forget to place the liquid detergent cup into the main wash compartment (compartment nr. "2").
Choosing the detergent type
The type of detergent to be used depends on the type and colour of the fabric.
•Use different detergents for coloured and white laundry.
•Wash your delicate clothes only with special detergents (liquid detergent, wool shampoo, etc.) used solely for delicate clothes.
•When washing dark coloured clothes and quilts, it is recommended to use liquid detergent.
•Wash woolens with special detergent made specifically for woolens.
A warning: Use only detergents manufactured specifically for washing machines. warning: Do not use soap powder.
Adjusting detergent amount
The amount of washing detergent to be used depends on the amount of laundry, the degree of soiling and water hardness.
•Do not use amounts exceeding the dosage quantities recommended on the detergent package to avoid problems of excessive foam, poor rinsing, financial savings and finally, environmental protection.
•Use lesser detergent for small amounts or lightly soiled clothes.
Using softeners
Pour the softener into the softener compartment of the detergent drawer.
•Do not exceed the (>max<) level marking in the softener compartment.
•If the softener has lost its fluidity, dilute it with water before putting it in the detergent drawer.
8 / EN |
Washing Machine / User’s Manual |
|
|

Using liquid detergents
If the product contains a liquid detergent cup:
•Make sure that you have placed the liquid detergent cup in compartment nr. “2”.
•If the liquid detergent has lost its fluidity, dilute it with water before putting in the detergent cup.
|
|
Light colours and whites |
Colours |
Dark colours |
Delicates/Woollens/ |
|
|
|
Silks |
||||
|
|
|
|
|
||
|
|
(Recommended |
(Recommended |
(Recommended |
(Recommended |
|
|
|
temperature range based |
temperature range |
temperature range |
||
|
|
temperature range based |
||||
|
|
on soiling level: cold |
based on soiling |
based on soiling level: |
||
|
|
on soiling level: 40-90 °C) |
||||
|
|
-40 °C) |
level: cold -40 °C) |
cold -30 °C) |
||
|
|
|
||||
|
|
It may be necessary to |
Powder and |
|
|
|
|
|
pre-treat the stains or |
liquid detergents |
|
|
|
|
|
perform prewash. Powder |
recommended for |
Liquid detergents |
|
|
|
Heavily |
and liquid detergents |
colours can be used at |
Prefer liquid |
||
|
suitable for |
|||||
|
Soiled |
recommended for whites |
dosages recommended |
detergents produced |
||
|
colours and dark |
|||||
|
(difficult |
can be used at dosages |
for heavily soiled clothes. |
for delicate clothes. |
||
|
colours can be |
|||||
|
stains such |
recommended for |
It is recommended to use |
used at dosages |
Woollen and silk |
|
|
as grass, |
heavily soiled clothes. It |
powder detergents to |
recommended |
clothes must be |
|
|
coffee, fruits |
is recommended to use |
clean clay and soil stains |
washed with special |
||
|
for heavily soiled |
|||||
|
and blood.) |
powder detergents to |
and the stains that are |
woollen detergents. |
||
|
clothes. |
|||||
|
|
clean clay and soil stains |
sensitive to bleaches. |
|
||
|
|
|
|
|||
|
|
and the stains that are |
Use detergents without |
|
|
|
Level |
|
sensitive to bleaches. |
bleach. |
|
|
|
Normally |
|
Powder and |
Liquid detergents |
|
||
|
|
|
||||
|
Soiled |
|
Prefer liquid |
|||
Soiling |
|
liquid detergents |
suitable for |
|||
(For |
Powder and liquid |
detergents produced |
||||
recommended for |
colours and dark |
|||||
example, |
detergents recommended |
for delicate clothes. |
||||
|
stains |
for whites can be used at |
colours can be used at |
colours can be |
Woollen and silk |
|
|
dosages recommended |
used at dosages |
||||
|
caused by |
dosages recommended for |
clothes must be |
|||
|
for normally soiled |
recommended for |
||||
|
body on |
normally soiled clothes. |
clothes. Use detergents |
normally soiled |
washed with special |
|
|
collars and |
|
woollen detergents. |
|||
|
|
without bleach. |
clothes. |
|||
|
cuffs) |
|
|
|||
|
|
|
|
|
||
|
|
|
Powder and |
Liquid detergents |
Prefer liquid |
|
|
|
|
liquid detergents |
suitable for |
||
|
|
Powder and liquid |
detergents produced |
|||
|
Lightly |
recommended for |
colours and dark |
|||
|
detergents recommended |
for delicate clothes. |
||||
|
Soiled |
colours can be used at |
colours can be |
|||
|
(No visible |
for whites can be used at |
dosages recommended |
used at dosages |
Woollen and silk |
|
|
dosages recommended for |
clothes must be |
||||
|
stains exist.) |
lightly soiled clothes. |
for lightly soiled clothes. |
recommended |
washed with special |
|
|
|
|
Use detergents without |
for lightly soiled |
woollen detergents. |
|
|
|
|
bleach. |
clothes. |
||
|
|
|
|
If the product does not contain a liquid detergent cup:
•Do not use liquid detergent for the prewash in a programme with prewash.
•Liquid detergent stains your clothes when used with Delayed Start function. If you are going to use the Delayed Start function, do not use liquid detergent.
Using gel and tablet detergent
Apply the following instructions when using tablet, gel and similar detergents.
•If the gel detergent thickness is fluidal and your machine does not contain a special liquid detergent cup, put the gel detergent into the main wash detergent compartment during first water intake.
If your machine contains a liquid detergent cup, fill the detergent into this cup before starting the programme.
9 / EN |
Washing Machine / User’s Manual |
|
|
•If the gel detergent thickness is not fluidal or in the shape of capsule liquid tablet, put it directly into the drum before washing.
•Put tablet detergents into the main wash compartment (compartment nr. "2") or directly into the drum before washing.
C Tablet detergents may leave residues in the detergent compartment. If you encounter such a case, place the tablet detergent between the laundry, close to the lower part of the drum in future washings.
Use the tablet or gel detergent without selecting the prewash function.
Using starch
•Add liquid starch, powder starch or the fabric dye into the softener compartment.
•Do not use softener and starch together in a washing cycle.
•Wipe the inside of the machine with a damp and clean cloth after using starch.
Using bleaches
•Select a programme with prewash and add the bleaching agent at the beginning of the prewash. Do not put detergent in the prewash compartment. As an alternative application, select a programme with extra rinse and add the bleaching agent while the machine is taking water from the detergent compartment during first rinsing step.
•Do not use bleaching agent and detergent by mixing them.
•Use just a little amount (approx. 50 ml) of bleaching agent and rinse the clothes very well as it causes skin irritation. Do not pour the bleaching agent onto the clothes and do not use it for coloured clothes.
•When using oxygen based bleaches, select a programme that washes at a lower temperature.
•Oxygen based bleaches can be used together with detergents; however, if its thickness is not the same with the detergent, put the detergent first into the compartment nr. "2" in the detergent drawer and wait until the detergent flows while the machine is taking in water. Add the bleaching agent from the same compartment while the machine is still taking in water.
10 / EN |
Washing Machine / User’s Manual |
|
|
4 Operating the product
4.1 Control panel
1 - Programme Selection knob (Uppermost position On / Off) 2 - Display
3 - Delayed Start Indicator
4 - Programme Follow-up indicator
5 - Start / Pause button
6 - Auxiliary function button 3
7 - Auxiliary function button 2
8 - Auxiliary function button 1
9 - Spin Speed Adjustment button
10 - Temperature Adjustment button
4.2 Preparing the machine
1.Make sure that the hoses are connected tightly. 2.Plug in your machine.
3.Turn the tap on completely. 4.Place the laundry in the machine. 5.Add detergent and fabric softener.
4.3 Programme selection and tips for efficient washing
1.Select the programme suitable for the type, quantity and soiling degree of the laundry in accordance with the "Programme and consumption table" and the temperature table below.
2.Select the desired programme with the Programme Selection knob.
Indicative values for Synthetics programmes (EN)
|
|
Water Consumption (l) |
Energy Consumption (kWh) |
Programme Duration (min) * |
Remaining Moisture |
Remaining Moisture |
|
Load (kg) |
Content (%) ** |
Content (%) ** |
|||
|
≤ 1000 rpm |
> 1000 rpm |
||||
|
|
|
|
|
|
|
Synthetics 60 |
3 |
65 |
1.20 |
100/120 |
45 |
40 |
Synthetics 40 |
3 |
63 |
0.75 |
90/110 |
45 |
40 |
* You can see the washing time of the programme you have selected on the display of the machine. It is normal that small differences may occur between the time shown on the display and the real washing time.
** Remaining moisture content values may differ according to the selected spin speed.
11 / EN |
Washing Machine / User’s Manual |
|
|

4.4 Programme and consumption table
|
|
|
|
|
|
|
Auxiliary |
|
||
|
|
|
|
|
|
functions |
|
|||
Programme °C |
|
Maximumload (kg) |
Water consumption(l) |
Power consuption (kVt/h) |
speedSpin |
Prewash |
|
WashQuicl |
WaterExtra |
Temperature °C |
|
|
|
|
|
|
|
|
|
||
|
|
|
|
|
|
|
|
|
|
|
Cottons |
90 |
7 |
92 |
2.25 |
1200 |
• |
|
• |
• |
90 |
|
|
|
|
|
|
|
|
|
|
|
Cottons |
60 |
7 |
92 |
1.70 |
1200 |
• |
|
• |
• |
90 |
|
|
|
|
|
|
|
|
|
|
|
Cottons |
40 |
7 |
89 |
1.05 |
1200 |
• |
|
• |
• |
90 |
|
|
|
|
|
|
|
|
|
|
|
Cottons Eco |
60** |
7 |
51.1 |
0.810 |
1200 |
|
|
|
|
60 |
|
|
|
|
|
|
|
|
|
|
|
Cottons Eco |
60** |
3,5 |
40.4 |
0.710 |
1200 |
|
|
|
|
60 |
|
|
|
|
|
|
|
|
|
|
|
Cottons Eco |
40** |
3,5 |
40.4 |
0.750 |
1200 |
|
|
|
|
60 |
|
|
|
|
|
|
|
|
|
|
|
Synthetics |
60 |
3 |
65 |
1.20 |
1200 |
• |
|
• |
• |
60 |
|
|
|
|
|
|
|
|
|
|
|
Synthetics |
40 |
3 |
63 |
0.75 |
1200 |
• |
|
• |
• |
60 |
|
|
|
|
|
|
|
|
|
|
|
Daily Xpress / Xpress Super Short |
90 |
7 |
62 |
2.00 |
1200 |
|
|
• |
|
90 |
|
|
|
|
|
|
|
|
|
|
|
Daily Xpress / Xpress Super Short |
60 |
7 |
62 |
1.10 |
1200 |
|
|
• |
|
90 |
|
|
|
|
|
|
|
|
|
|
|
Daily Xpress / Xpress Super Short |
30 |
7 |
60 |
0.20 |
1200 |
|
|
• |
|
90 |
|
|
|
|
|
|
|
|
|
|
|
Daily Xpress / Xpress Super Short |
30 |
2 |
41 |
0.15 |
1200 |
|
|
• |
|
30 |
+ Fast |
|
|
|
|||||||
|
|
|
|
|
|
|
|
|
|
|
Mix 40 |
40 |
3 |
65 |
0.75 |
800 |
• |
|
• |
|
40 |
|
|
|
|
|
|
|
|
|
|
|
Woollens |
40 |
1.5 |
55 |
0.55 |
1200 |
|
|
|
• |
40 |
|
|
|
|
|
|
|
|
|
|
|
Delicates |
30 |
3 |
51 |
0.65 |
1200 |
|
|
|
|
40 |
|
|
|
|
|
|
|
|
|
|
|
Down Wear |
60 |
1.5 |
70 |
1.25 |
1000 |
|
|
|
• |
60 |
|
|
|
|
|
|
|
|
|
|
|
Sports |
40 |
3 |
44 |
0.45 |
1200 |
• |
|
|
|
40 |
|
|
|
|
|
|
|
|
|
|
|
Dark Wash |
40 |
2.5 |
82 |
0.85 |
1200 |
• |
|
|
|
40 |
|
|
|
|
|
|
|
|
|
|
|
Curtain |
30 |
1 |
65 |
0.30 |
600 |
|
|
|
|
30 |
|
|
|
|
|
|
|
|
|
|
|
Shirts |
60 |
3 |
55 |
1.20 |
800 |
• |
|
• |
|
60 |
|
|
|
|
|
|
|
|
|
|
|
Hygiene |
90 |
7 |
119 |
2.40 |
1200 |
|
|
|
|
20 - 90 |
|
|
|
|
|
|
|
|
|
|
|
Drum Clean |
90 |
- |
73 |
2.10 |
600 |
|
|
|
|
90 |
|
|
|
|
|
|
|
|
|
|
|
• : Selectable
** : Energy Label programme (EN 60456 Ed.3)
** "Cotton Economic 40°C and Cotton Economic 60°C are standard programmes." These programmes are known as '40°C cotton standard programme' and '60°C cotton standard programme' and indicated with the 
 symbols on the panel.
C Water and power consumption may vary subject to the changes in water pressure, water hardness and temperature, ambient temperature, type and amount of laundry, selection of auxiliary functions and spin speed, and changes in electric voltage.
You can see the washing duration on the display of your machine while selecting a programme. Depending on the amount of laundry you have loaded into your machine, there may be a difference of 1-1.5 hours between the duration shown on the display and the actual duration of the wash cycle. Duration will be automatically updated soon after the washing starts.
The auxiliary functions in the table may vary according to the model of your machine.
12 / EN |
Washing Machine / User’s Manual |
|
|

4.5 Main programmes
Depending on the type of fabric, use the following main programmes.
• Cottons
You can wash your durable cotton laundry (sheets, bedlinen, towels, bathrobes, underwear etc.) in this programme. When the quick wash function button is pressed, programme duration becomes notably shorter but effective washing performance is ensured with intense washing movements. If the quick wash function is not selected, superior washing and rinsing performance is ensured for your heavily soiled laundry.
• Synthetics
You can wash your laundry (such as shirts, blouses, synthetic/cotton blended fabrics etc.) in this programme. The programme duration gets notable shorter and washing with high performance is ensured. If the quick wash function is not selected, superior washing and rinsing performance is ensured for your heavily soiled laundry.
• Woollens
Use to wash your woolen/delicate laundry. Select the appropriate temperature complying with the tag of your clothes. Your laundry will be washed with a very gentle washing action in order not to damage the clothes.
“The wool wash cycle of this machine has been approved by The Woolmark Company for the washing of machine washable wool products provided that the products are washed according to the instructions on the garment label and those issued by the manufacturer of this washing machine. M0000.”
“In UK, Eire, Hong Kong and India the Woolmark trade mark is a Certification trade mark.”
4.6 Additional programmes
For special cases, additional programmes are available in the machine.
C Additional programmes may differ according to the model of the machine.
• Cottons Eco
Use to wash your normally soiled, durable cotton and linen laundry. Although it washes longer than all other programmes, it provides high energy and water savings. Actual water temperature may be different from the stated wash temperature. When you load the machine with less laundry (e.g. ½ capacity or less), periods in programme stages may automatically get shorter. In this case, energy and water consumption will decrease more, providing a more economic wash.
• Hygiene
This is a long-duration programme that you can use for your laundry requiring a hygienic washing at high temperatures with intensive and long washing cycle. The high level of hygiene is ensured thanks to long heating duration and additional rinsing step.
• Delicates
You can wash your delicate clothes such as cotton/synthetic blended knitwear or hosiery in this programme. It washes with more delicate washing action. Wash your clothes whose colour you want to preserve either at 20degrees or by selecting the cold wash option.
• Daily Xpress / Xpress Super Short
Use this programme to wash your lightly soiled or unspotted cotton clothes in a short time. The programme duration can be reduced up to 14 minutes when the quick wash function is selected. When the quick wash function is selected, maximum 2 (two) kg of laundry must be washed.
• Dark Wash
Use this programme to protect the colour of your dark-coloured garments or jeans. It performs high performance washing with special drum movement even if the temperature is low. It is recommended to use liquid detergent or woolen shampoo for dark coloured laundry. Do not wash your delicate clothes containing wool or etc.
• Mix 40
Use to wash your cotton and synthetic clothes together without sorting them.
• Shirts
This programme is used to wash the shirts made from cotton, synthetic and synthetic blended fabrics altogether. It reduces wrinkles. When the quick wash function is selected, the Pre-treatment algorithm is executed.
• Apply the pre-treatment chemical on your garments directly or add it together with detergent when the machine starts to take water from the main washing compartment. Thus, you can obtain the same
performance as you obtain with normal washing in a much shorter period of time. Usage life of your shirts increases.
13 / EN |
Washing Machine / User’s Manual |
|
|
• Sports
You can use this programme to wash sports and outdoors garments that contain cotton/synthetics mix and water repellent covers such as gore-tex etc. It makes sure your garments are washed gently thanks to special rotating movements.
• Curtain
You can use this programme to wash your tulles and curtains. As their meshed texture causes excessive foaming, put little amount of detergent into the main wash compartment. Thanks to the special spin profile of the programme, tulles and curtains crease lesser. Do not load your curtains above the specified capacity in order not to damage them.
C It is recommended that you use special detergents produced specifically for curtains in this programme.
• Down Wear
Use this programme to wash your coats, vest, jackets etc. containing feathers with a „machine-washable“ label on them. Thanks to special spinning profiles, it is ensured that the water reaches the air gaps amongst the feathers.
4.7 Special programmes
For specific applications, select any of the following programmes.
• Rinse
Use when you want to rinse or starch separately.
• Spin+Drain
You can use this function to remove the water on the garment of drain the water in the machine.
Before selecting this programme, select the desired spin speed and press Start / Pause button. First, the machine will drain the water inside of it. Then, it will spin the laundry with the set spin speed and drain the water coming out of them.
If you wish to drain only the water without spinning your laundry, select the Pump+Spin programme and then select the No Spin function with the help of Spin Speed Adjustment button. Press Start / Pause button.
C Use a lower spin speed for delicate laundries.
4.8 Temperature selection
Whenever a new programme is selected, the recommended temperature value for the selected programme appears on the temperature indicator.
To decrease the temperature, press the Temperature Adjustment button. Temperature will decrease gradually. Temperature level lights will not turn on when the cold level is selected.
C If the programme has not reached the heating step, you can change the temperature without switching the machine to Pause mode.
4.9 Spin speed selection
Whenever a new programme is selected, the recommended spin speed of the selected programme is displayed on the spin speed indicator.
To decrease the spin speed, press the Spin Speed Adjustment button. Spin speed decreases gradually. Then, depending on the model of the product, „Rinse Hold“ and „No Spin“ options appear on the display. When „No Spin“ is selected, the rinse level indicator lights will not turn on.
C If the programme has not reached the spinning step, you can change the speed without switching the machine to Pause mode.
4.10 Auxiliary function selection
Select the desired auxiliary functions before starting the programme. Furthermore, you may also select or cancel auxiliary functions that are suitable to the running programme without pressing the Start / Pause button when the machine is operating. For this, the machine must be in a step before the auxiliary function you are going to select or cancel.
If the auxiliary function cannot be selected or canceled, light of the relevant auxiliary function will blink 3 times to warn the user.
C If a second auxiliary function conflicting with the first one is selected before starting the machine, the function selected first will be canceled and the second auxiliary function selection will remain active.
An auxiliary function that is not compatible with the programme cannot be selected. (See, "Programme and consumption table")
Auxiliary Function buttons may vary according to the model of the machine.
14 / EN |
Washing Machine / User’s Manual |
|
|
4.10.1 Auxiliary functions
• Prewash
A Prewash is only worthwhile for heavily soiled laundry. Not using the Prewash will save energy, water, detergent and time.
C Prewash without detergent is recommended for tulle and curtains.
• Fast+
When this function is selected, the durations of the relevant programmes get shorter by 50%. Thanks to the optimised washing steps, high mechanic activity and optimum water consumption, high washing performance is achieved in spite of the reduced duration.
C When you select this function, load your machine with half of the maximum laundry specified in the programme table.
• Extra Water
This function enables the product to make another rinsing in addition to the one already made after the main wash. Thus, the risk for sensitive skins (babies, allergic skins, etc.) to be effected by the minimal detergent remnants on the laundry can be reduced.
4.10.2 Functions/Programmes Selected by Pressing the Function Buttons for 3 Seconds
• Drum Clean 3II
Press and hold the auxiliary function button 1 for 3 seconds to select the programme.
Use regularly (once in every 1-2 months) to clean the drum and provide the required hygiene. Operate the programme while the machine is completely empty. To obtain better results, put powder lime-scale remover for washing machines into the detergent compartment no. “2”. When the programme is over, leave the loading door ajar so that the inside of the machine gets dry.
C This is not a washing programme. It is a maintenance programme.
Do not run the programme when there is something in the machine. If you try to do so, the machine detects that there is load inside and aborts the programme.
• Child lock (Ready) I 
Use Child Lock function to prevent children from tampering with the machine. Thus you can avoid any changes in a running programme.
C If the Programme Selection knob is turned when the Child Lock is active, "Con" appears on the display. The Child Lock does not allow any change in the programmes and the selected temperature, speed and auxiliary functions.
Even if another programme is selected with the Programme Selection knob while the Child Lock is active, previously selected programme will continue running.
To activate the Child Lock:
2. Pres and hold the Auxiliary Function button for 3 seconds. C03, C02, C01 will appear on the display respectively while you keep the button pressed for 3 seconds. Then, while the light of the Auxiliary Function button 2 is flashing, „Con“ will appear on the display indicating that the child lock has been activated. If you press any button or turn the Programme Selection knob when the Child Lock is active, same phrase will appear on the display.
To deactivate the Child Lock:
Press and hold the Auxiliary Function button 2 for 3 seconds while a programme is running. C03, C02, C01 will appear on the display respectively while you keep the button pressed for 3 seconds. Then, while the light of the auxiliary function button 2 is flashing, „COF“ will appear on the display indicating that the child lock has been deactivated.
C In addition to the method above, to deactivate the Child Lock, switch the Programme Selection knob to On / Off position when no programme is running, and select another programme.
Child Lock is not deactivated after power failures or when the machine is unplugged.
4.11 Delayed Start
With the Delayed Start function the startup of the programme may be delayed up to 19 hours. Delayed start time can be increased by increments of 1 hour.
C Do not use liquid detergents when you set Delayed Start! There is the risk of staining of the clothes.
1. Open the loading door, place the laundry and put detergent, etc.
15 / EN |
Washing Machine / User’s Manual |
|
|
2.Select the washing programme, temperature, spin speed and, if required, the auxiliary functions.
3.Set the desired time by pressing the Delayed Start button.
4.Press Start / Pause button. The delayed start time you have set is displayed. Delayed start countdown starts. “_” symbol next to the delayed start time moves up and down on the display.
C Additional laundry may be loaded during the delayed start period.
5. At the end of the countdown, duration of the selected programme will be displayed. “_” will disappear and the selected programme will start.
Changing the delayed start period
If you want to change the time during countdown:
1. Press the Delayed Start button. Time will increase by 1 hour each time you press the button.
2. If you want to decrease the delayed start time, press Delayed Start button repeatedly until the desired delayed start time appears on the display.
Canceling the Delayed Start function
If you want to cancel the delayed start countdown and start the programme immediately:
1. Set the Delayed Start period to zero or turn the Programme Selection knob to any programme. Thus, Delayed Start function will be canceled. The End/Cancel light flashes continuously.
2. Then, select the programme you want to run again. 3. Press Start / Pause button to start the programme.
4.12 Starting the programme
1. Press Start / Pause button to start the programme.
2. Programme follow-up light showing the startup of the programme will turn on.
C If no programme is started or no button is pressed within 1 minute during programme selection process, the machine will switch to Pause mode and the illumination level of the temperature, speed and loading door indicator lights will decrease. Other indicator lights and indicators will turn off. Once the Programme Selection knob is rotated or any button is pressed, indicator lights and indicators will turn on again.
4.13 Progress of programme
Progress of a running programme can be followed from the Programme Follow-up indicator. At the beginning of every programme step, the relevant indicator light will turn on and light of the completed step will turn off.
You can change the auxiliary functions, speed and temperature settings without stopping the programme flow while the programme is running. To do this, the change you are going to make must be in a step after the running programme step. If the change is not compatible, relevant lights will flash for 3 times.
C If the machine does not pass to the spinning step, Rinse Hold function might be active or the automatic unbalanced load detection system might be activated due to the unbalanced distribution of the laundry in the machine.
4.14 Loading door lock
There is a locking system on the loading door of the machine that prevents opening of the loading door in cases when the water level is unsuitable.
Loading door light will start flashing when the machine is switched to Pause mode. Machine checks the level of the water inside. If the level is suitable, Loading Door light illuminates steadily within 1-2 minutes and the loading door can be opened.
If the level is unsuitable, Loading Door light turns off and the loading door cannot be opened. If you are obliged to open the Loading Door while the Loading Door light is off, you must cancel the current programme. See. „Cancelling the programme“
4.15 Changing the selections after programme has started
Switching the machine to pause mode
Press the Start / Pause button to switch the machine to pause mode while a programme is running. The light of the step which the machine is in starts flashing in the Programme Follow-up indicator to show that the machine has been switched to the pause mode.
Also, when the loading door is ready to be opened, Loading Door light will also illuminate continuously in addition to the programme step light.
Changing the auxiliary function, speed and temperature
Depending on the step the programme has reached, you can cancel or select the auxiliary functions. See, „Auxiliary function selection“.
16 / EN |
Washing Machine / User’s Manual |
|
|

You can also change the speed and temperature settings. See, „Spin speed selection“ and „Temperature selection“.
C If no change is allowed, the relevant light will flash 3 times.
Adding or taking out laundry
1. Press Start / Pause button to switch the machine to pause mode. The programme follow-up light of the relevant step during which the machine was switched into the pause mode will flash.
2. Wait until the Loading Door can be opened.
3. Open the Loading Door and add or take out the laundry. 4. Close the Loading Door.
5. Make changes in auxiliary functions, temperature and speed settings if necessary. 6. Press Start / Pause button to start the machine.
4.16 Cancelling the programme
To cancel the programme, turn the Programme Selection knob to select another programme. Previous programme will be cancelled. End / Cancel light will flash continuously to notify that the programme has been canceled.
Your machine will end the programme when you turn the Programme Selection knob; however, it does not drain the water inside. When you select and start a new programme, the newly selected programme will start depending on the step the previous programme was canceled in. For example, it may take in additional water or continue to wash with the water inside.
C Depending on the step where the programme was canceled in, you may have to put detergent and softener again for the programme you have selected anew.
4.17 End of programme
“End” appears on the display at the end of the programme. 1. Wait until the loading door light illuminates steadily.
2. Press On / Off button to switch off the machine.
3. Take out your laundry and close the loading door. Your machine is ready for the next washing cycle.
4.18 Your machine features “Standby Mode”.
After you switch on your machine with On-Off button, if no programme is started or no other procedure is performed at the selection step or no action is taken within approx. 2 minutes after the selected programme ends, your machine will switch to energy saving mode automatically. The brightness of the indicator lights will decrease. Also, if your product has a display that shows programme time, this display will be completely turned off. If you turn the Programme Selection knob or touch any button, lights and display will switch back to previous condition. The selections which you make when exiting from the energy efficiency may change. Please check the correctness of your selections before starting the programme. If necessary, please make your settings again. This is not an error.
5 Maintenance and cleaning
Service life of the product extends and frequently faced problems decrease if cleaned at regular intervals.
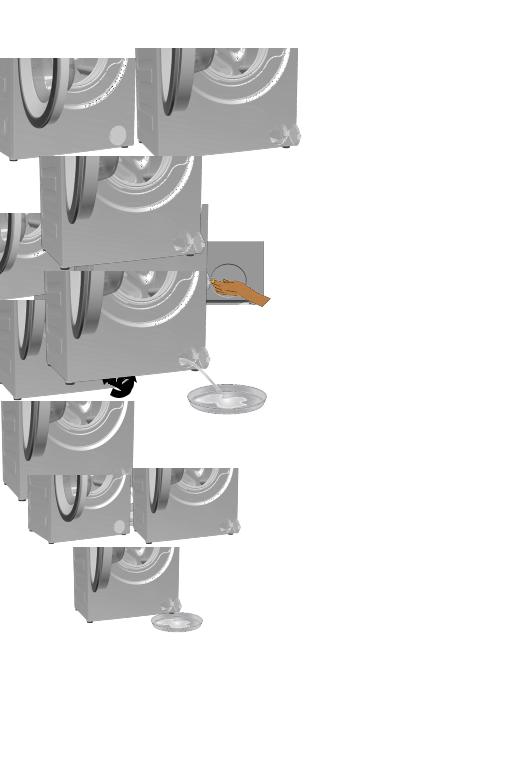
5.1 Cleaning the detergent drawer
Clean the detergent drawer at regular intervals (every 4-5 washing cycles) as shown below in order to prevent accumulation of powder detergent in time.
Lift the rear part of the siphon to remove it as illustrated.
C If more than normal amount of water and softener mixture starts to gather in the softener compartment, clean the siphon.
2Wash the detergent drawer and the siphon with plenty of lukewarm water in a washbasin. Wear protective gloves or use an appropriate brush to avoid touching of the residues in the drawer with your skin when cleaning.
3After cleaning, replace the siphon back to its seating and push its front section downwards to make sure that the locking tab engages.
17 / EN |
Washing Machine / User’s Manual |
|
|
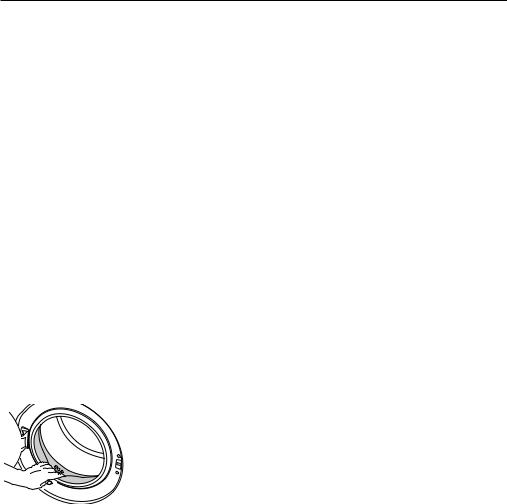
5.2 Cleaning the loading door and the drum
Residues of softener, detergent and dirt may accumulate in your machine in time and may cause unpleasant odours and washing complaints. To avoid this, use the Drum Cleaning programme. If your machine is not featured with Drum Cleaning programme, use Cottons-90 programme and select Additional Water or Extra Rinse auxiliary functions as well. Run the programme without any laundry in the machine. Before starting the programme, put max. 100 g of powder detergents into the main wash detergent compartment(compartment nr. 2). If the detergent is in tablet form, put only one tablet into compartment nr. 2. Dry the inside of the bellow with a clean piece of cloth after the programme has come to an end.
C |
Repeat Drum Cleaning process in every 2 months. |
Use an detergents suitable for the washing machines. |
After every washing check that no foreign substance is left in the drum.
If the holes on the bellow shown in the figure is blocked, open the holes using a toothpick.
C A
Foreign metal substances will cause rust stains in the drum. Clean the stains on the drum surface by using cleaning agents for stainless steel. Never use steel wool or wire wool.
WARNING: Never use sponge or scrub materials. These will damage the painted and plastic surfaces.
5.3 Cleaning the body and control panel
Wipe the body of the machine with soapy water or non-corrosive mild gel detergents as necessary, and dry with a soft cloth.
Use only a soft and damp cloth to clean the control panel.
5.4 Cleaning the water intake filters
There is a filter at the end of each water intake valve at the rear of the machine and also at the end of each water intake hose where they are connected to the tap. These filters prevent foreign substances and dirt in the water to enter the washing machine. Filters should be cleaned as they do get dirty.
1 Close the taps.
2 Remove the nuts of the water intake hoses to access
the filters on the water intake valves. Clean them with
an appropriate brush. If the filters are too dirty, take
them out by means of pliers and clean them.
3 Take out the filters on the flat ends of the water
intake hoses together with the gaskets and clean
thoroughly under running water.
4 Replace the gaskets and filters carefully in their places
and tighten the hose nuts by hand.
5.5 Draining remaining water and cleaning the pump filter
The filter system in your machine prevents solid items such as buttons, coins and fabric fibers clogging the pump impeller during discharge of washing water. Thus, the water will be discharged without any problem and the service life of the pump will extend.
If the machine fails to drain water, the pump filter is clogged. Filter must be cleaned whenever it is clogged or in every 3 months. Water must be drained off first to clean the pump filter.
In addition, prior to transporting the machine (e.g., when moving to another house) and in case of freezing of the water, water may have to be drained completely.
A WARNING: If the product is not in use, turn the tap off, detach the supply hose and drain the water inside the machine against any freezing possibility in the region of installation.
WARNING: After each use close the supply hose tap of the product.
18 / EN |
Washing Machine / User’s Manual |
|
|
In order to clean the dirty filter and discharge the water:
1 Unplug the machine to cut off the supply power.
WARNING: Temperature of the water inside the machine may rise up to 90 ºC. To avoid burning risk, clean |
|
A the filter after the water in the machine cools down. |
|
2 |
Open the filter cap. |
3 |
Some of our products have emergency draining |
|
hose and some does not have. Follow the steps |
|
below to discharge the water. |
Discharging the water when the product has an emergency draining hose:
a Pull the emergency draining hose out from its
seat
b Place a large container at the end of the hose.
Drain the water into the container by pulling out the plug at the end of the hose. When the
container is full, block the inlet of the hose by replacing the plug. After the container is emptied, repeat the above procedure to drain the water in the machine completely.
cWhen draining of water is finished, close the end by the plug again and fix the hose in its place.
dTurn the pump filter to take it out.
Discharging the water when the product does not have an emergency draining hose:
a Place a large container in front of the filter to catch water from the filter.
b Loosen pump filter (anticlockwise) until water starts to flow. Fill the flowing water into the container you have placed in front of the filter. Always keep a piece of cloth handy to absorb any spilled water.
c When the water inside the machine is finished, take out the filter completely by turning it.
4Clean any residues inside the filter as well as fibers, if any, around the pump impeller region.
5Install the filter.
6If the filter cap is composed of two pieces, close the filter cap by pressing on the tab. If it is one piece, seat the tabs in the lower part into their places first, and then press the upper part to close.
19 / EN |
Washing Machine / User’s Manual |
|
|

6 Technical specifications
Complying Commission Delegated Regulation (EU) No 1061/2010
Supplier name or trademark |
Beko |
|
Model name |
WRE 7612 XWW |
|
|
|
|
Rated capacity (kg) |
7 |
|
Energy efficiency class / Scale from A+++ (Highest Efficiency) to D (Lowest Efficiency) |
A+++ |
|
Annual Energy Consumption (kWh) (1) |
173 |
|
Energy consumption of the standard 60°C cotton programme at full load (kWh) |
0.810 |
|
Energy consumption of the standard 60°C cotton programme at partial load (kWh) |
0.710 |
|
Energy consumption of the standard 40°C cotton programme at partial load (kWh) |
0.750 |
|
Power consumption in ‘off-mode’(W) |
0.25 |
|
Power consumption in ‘left-on mode’(W) |
1.0 |
|
Annual Water Consumption (l) (2) |
9899 |
|
Spin-drying efficiency class / Scale from A (Highest Efficiency) to G (Lowest Efficiency) |
B |
|
Maximum spin speed (rpm) |
1200 |
|
Remaining moisture Content (%) |
62 |
|
Standard cotton programme (3) |
Cotton Eco 60°C and 40°C |
|
Programme time of the standard 60°C cotton programme at full load (min) |
215 |
|
Programme time of the standard 60°C cotton programme at partial load (min) |
190 |
|
|
|
|
Programme time of the standard 40°C cotton programme at partial load (min) |
185 |
|
|
|
|
Duration of the left-on mode (min) |
N/A |
|
|
|
|
Airborne acoustical noise emissions washing/spinning (dB) |
63/77 |
|
|
|
|
Built-in |
Non |
|
|
|
|
Rated capacity (kg) |
7 |
|
|
|
|
Height (cm) |
84 |
|
|
|
|
Width (cm) |
60 |
|
|
|
|
Depth (cm) |
45 |
|
|
|
|
Net weight (±4 kg.) |
62 |
|
|
|
|
Single Water inlet / Double Water inlet |
• / - |
|
|
||
• Available |
||
|
||
Electrical input (V/Hz) |
230 V / 50Hz |
|
Total current (A) |
10 |
|
Total power (W) |
2200 |
|
Woolmark № |
M-1520 |
(1)Energy Consumption based on 220 standard washing cycles for cotton programmes at 60°C and 40°C at full and partial load, and the consumption of the low-power modes. Actual energy consumption will depend on how the appliance is used.
(2)Water consumption based on 220 standard washing cycles for cotton programmes at 60°C and 40°C at full and partial load. Actual water consumption will depend on how the appliance is used.
(3)"Standard 60°C cotton programme" and the "standard 40°C cotton programme" are the standard washing programmes to which the information in the label and the fiche relates and these programmes are suitable to clean normally soiled cotton laundry and that they are the most efficient programmes in terms of combined energy and water consumption.
Technical specifications may be changed without prior notice to improve the quality of the product.
20 / EN |
Washing Machine / User’s Manual |
|
|
7 Troubleshooting
Programme cannot be started or selected.
• Washing machine has switched to self protection mode due to a supply problem (line voltage, water pressure, etc.). >>> To cancel the programme, turn the Programme Selection knob to select another programme. Previous programme will be cancelled. (See “Canceling the programme”)
Water in the machine.
• Some water might have remained in the product due to the quality control processes in the production. >>> This is not a failure; water is not harmful to the machine.
Machine vibrates or makes noise.
•Machine might be standing unbalanced. >>> Adjust the feet to level the machine.
•A hard substance might have entered into the pump filter. >>> Clean the pump filter.
•Transportation safety bolts are not removed. >>> Remove the transportation safety bolts.
•Laundry quantity in the machine might be too little. >>> Add more laundry to the machine.
•Machine might be overloaded with laundry. >>> Take out some of the laundry from the machine or distribute the load by hand to balance it homogenously in the machine.
•Machine might be leaning on a rigid item. >>> Make sure that the machine is not leaning on anything.
Machine stopped shortly after the programme started.
• Machine might have stopped temporarily due to low voltage. >>> It will resume running when the voltage restores to the normal level.
Programme time does not countdown. (On models with display)
• Timer may stop during water intake. >>> Timer indicator will not countdown until the machine takes in adequate amount of water. The machine will wait until there is sufficient amount of water to avoid poor washing results due to lack of water. Timer indicator will resume countdown after this.
• Timer may stop during heating step. >>> Timer indicator will not countdown until the machine reaches the selected temperature.
• Timer may stop during spinning step. >>> Automatic unbalanced load detection system might be activated due to the unbalanced distribution of the laundry in the drum.
• Machine does not switch to spinning step when the laundry is not evenly distributed in the drum to prevent any damage to the machine and to its surrounding environment. Laundry should be rearranged and re-spun.
Foam is overflowing from the detergent drawer.
•Too much detergent is used. >>> Mix 1 tablespoonful softener and ½ l water and pour into the main wash compartment of the detergent drawer.
•Put detergent into the machine suitable for the programmes and maximum loads indicated in the “Programme and consumption table”. When you use additional chemicals (stain removers, bleachs and etc), reduce the amount of detergent.
Laundry remains wet at the end of the programme
•Excessive foam might have occurred and automatic foam absorption system might have been activated due to too much detergent usage. >>> Use recommended amount of detergent.
•Machine does not switch to spinning step when the laundry is not evenly distributed in the drum to prevent any damage to the machine and to its surrounding environment. Laundry should be rearranged and re-spun.
Awarning: If you cannot eliminate the problem although you follow the instructions in this section, consult your dealer or the Authorized Service Agent. Never try to repair a nonfunctional product yourself.
21 / EN |
Washing Machine / User’s Manual |
|
|

1 Olulised ohutusja keskkonnakaitsejuhised
Siit leiate ohutusjuhised, mis aitavad vältida kehavigastusi ja varalist kahju. Nende juhiste eiramisel kaotab garantii kehtivuse.
1.1 Üldine ohutus
• Lapsed alates 8. eluaastast ja füüsilise, meelevõi vaimupuudega isikud, samuti puudulike kogemuste ja teadmistega isikud võivad toodet kasutada tingimusel, et nad teevad seda järelevalve all või neile on selgitatud toote kasutamisega seotud ohte ja toote ohutut kasutamist. Lapsed ei tohi tootega mängida. Lastel ei ole lubatud teha seadme puhastusja hooldustöid, välja arvatud kellegi järelevalve all.
• Bērniem, kas ir jaunāki par 3 gadiem, ir jāliedz piekļuve, ja vien viņi netiek pastāvīgi uzraudzīti.
• Ärge paigaldage toodet vaibaga kaetud põrandale. Kui õhk ei saa pesumasina all ringelda, võivad elektridetailid üle kuumeneda. See võib põhjustada probleeme pesumasina töös.
• Kui toode läheb rikki, ei tohi seda kasutada enne, kui volitatud hooldustehnik on rikke kõrvaldanud. Elektrilöögi oht!
• Toode on konstrueeritud nii, et ta jätkab tööd ka pärast voolukatkestuse lõppu. Kui soovite programmi tühistada, vt lõiku "Programmi tühistamine".
• Ühendage toode maandatud seinakontakti, mida kaitseb 16 A kaitse. Maandussüsteemi peab kindlasti paigaldama kvalifitseeritud elektrik. Meie firma ei vastuta kahjude eest, mis võivad tekkida toote kasutamisel maanduseta (isegi kui see on kohalike eeskirjadega lubatud).
• Vee sisseja väljalaskevoolikud peavad alati olema terved ja korralikult kinnitatud. Muidu võib vesi lekkima hakata.
• Ärge kunagi avage pesumasina ust ega eemaldage filtrit, kui trumlis on vett. Muidu võib vesi välja voolata ja tekitada põletushaavu.
• Ärge püüdke lukustatud ust jõuga avada. Pesumasina ust saab avada paar minutit pärast pesutsükli lõppemist. Pesumasina ukse jõuga avamisel võivad uks ja lukustusmehhanism viga saada.
• Kui te toodet ei kasuta, eemaldage toitejuhtme pistik pistikupesast.
• Ärge kunagi peske masinat ohtra või voolava veega! Elektrilöögi oht!
• Ärge kunagi puudutage pistikut märgade kätega! Seadme lahutamiseks vooluvõrgust ärge sikutage juhet, vaid tõmmake pistikust.
• Kasutage ainult automaatpesumasinate jaoks ette nähtud pesuvahendeid, pesupehmendajaid ja lisaaineid.
• Järgige riideesemete etikettidel ja pesuvahendi pakendil olevaid juhiseid.
• Paigaldamise, hoolduse, puhastamise ja remondi ajaks tuleb toode lahutada vooluvõrgust.
• Jätke paigaldus ja remont alati volitatud teeninduse hooleks. Tootja ei vastuta kahju eest, mis on tingitud kvalifitseerimata isikute tehtud protseduuridest.
• Kui toitejuhe on katki, laske see ohtude vältimiseks välja vahetada tootjal, müügijärgses teeninduses, samaväärse kvalifikatsiooniga isikul (soovitatavalt elektrikul) või maaletooja poolt määratud spetsialistil.
1.2 Kasutusotstarve
• Toode on mõeldud kasutamiseks ainult koduses majapidamises. See ei sobi kommertskasutuseks ja seda ei tohi kasutada muuks kui ettenähtud otstarbeks.
• Toodet võib kasutada ainult vastava märgistusega pesu pesemiseks ja loputamiseks.
• Tootja loobub igasugusest vastutusest seoses ebaõige kasutamise ja transpordiga.
1.3 Laste ohutus
• Pakkematerjalid on lastele ohtlikud. Hoidke pakkematerjale kindlas kohas väljaspool laste käeulatust.
• Elektriseadmed on lastele ohtlikud. Jälgige, et lapsed ei oleks töötava seadme läheduses. Ärge laske neil seadmega mängida. Kasutage lapselukku, et lapsed ei saaks seadet kasutada.
• Pesumasina juurest lahkudes sulgege seadme uks.
• Hoidke kõiki pesuvahendeid ja lisaaineid kindlas kohas väljaspool laste käeulatust, suletud mahutis või pakendis.
Kui pesta pesu kõrgel temperatuuril, muutub pesumasina ukseklaas tuliseks.
Seetõttu tuleb eriti lapsi töötava pesumasina uksest eemal hoida.
1.4 Teave pakendi kohta
• Toote pakend on valmistatud taaskasutatavatest materjalidest vastavalt riiklikele keskkonnaeeskirjadele. Ärge visake pakkematerjale tavalise olmeprügi või muude jäätmete hulka. Viige need kohaliku omavalitsuse pakendijäätmete kogumispunkti.
1.5 Toote kasutuselt kõrvaldamine
• Toode on valmistatud kvaliteetsetest osadest ja materjalidest, mis on taaskasutatavad ja sobivad ringlussevõtmiseks. Seepärast ärge visake kasutuks muutunud toodet olmeprügi hulka. Toimetage see vastavasse kogumispunkti, mis tegeleb elektrija elektroonikaseadmete ringlussevõtuga. Lähima kogumispunkti kohta saate teavet kohalikust omavalitsusest. Kasutatud tooteid ringlusse andes aitate
kaitsta keskkonda ja loodusvarasid. Laste ohutuse tagamiseks lõigake enne toote kasutuselt kõrvaldamist ära toitejuhe ja muutke kasutuskõlbmatuks pesumasina ukse lukustusmehhanism.
22 / EЕ |
Pesumasin / Kasutusjuhend |
|
|

1.6 Vastavus WEEE direktiivi
Seade vastab Euroopa Liidu WEEE direktiivile (2012/19/EL). Seadmel on elektrija elektroonikaseadmete jäätmete (WEEE) liigiti kogumise tähis.
Seade on valmistatud kvaliteetsetest osadest ja materjalidest, mis sobivad ringlussevõtmiseks ja taaskasutamiseks. Ärge visake tarbetuks muutunud seadet tavalise olmeprügi ega muude jäätmete hulka. Viige see elektrija elektroonikajäätmete kogumispunkti. Kogumispunktide kohta saate täpsemat teavet kohalikust omavalitsusest.
RoHS-direktiivi täitmine:
Seade vastab Euroopa Liidu RoHS-direktiivile (2011/65/EL). See ei sisalda direktiivis mainitud kahjulikke ja keelatud materjale.
2 Paigaldamine
Toote paigaldamise asjus pöörduge lähimasse volitatud teenindusse. Enne volitatud teenindusest toote paigalduse tellimist tutvuge kasutusjuhendis oleva teabega ja veenduge, et elektri-, veeja kanalisatsioonisüsteem vastab nõuetele. Vastasel juhul tellige vajalikud tööd pädevalt tehnikult ja
sanitaartehnikult.
C
B
A
C
2.1 Sobiv paigalduskoht
• Paigutage seade jäigale põrandale. Ärge asetage seda pikkade narmastega vaibale vms aluspinnale.
• Pesumasina ja kuivati kogukaal (koos pesu ja veega) ja üksteise peale asetatuna võib olla kuni 180 kg. Asetage toode piisava kandevõimega kindlale ja ühetasasele põrandale!
• Ärge jätke toitejuhet seadme alla.
• Ärge paigaldage toodet kohta, kus temperatuur võib langeda alla 0 ºC.
• Asetage toode mööbliesemete servadest vähemalt 1 cm kaugusele.
2.2 Pakkematerjalide eemaldamine
Pakkematerjalide eemaldamiseks kallutage seadet tahapoole.
Eemaldage pakkematerjalid, tõmmates lindist.
2.3 Transpordifiksaatorite eemaldamine
A HOIATUS: Ärge eemaldage transpordifiksaatoreid enne pakendi tugevdusmaterjalide väljavõtmist. HOIATUS: Eemaldage transpordipoldid enne pesumasina kasutamist! Muidu saab toode kahjustada.
1.Keerake kõik poldid sobiva mutrivõtme abil lahti, kuni need vabalt pöörlevad (C).
2.Ettevaatlikult polte keerates eemaldage need masina küljest.
3.Paigaldage tagaküljel paiknevatesse avadesse plastkatted, mille leiate kasutusjuhendi pakendist. (P)
C |
Hoidke transpordipolte kindlas kohas – teil võib neid tulevikus pesumasina transportimisel vaja minna. |
Ärge kunagi transportige toodet ilma korralikult kinnitatud transpordipoltideta! |
23 / EЕ |
Pesumasin / Kasutusjuhend |
2.4 Seadme ühendamine veetorustikuga
C |
Toote tööks vajalik veesurve on 1–10 baari (0,1–1 MPa). Et masin töötaks tõrgeteta, peab täiesti avatud kraanist |
ühe minuti jooksul välja voolama 10–80 liitrit vett. Kui veesurve on suurem, paigaldage reduktsioonklapp. |
|
|
Kui kavatsete kasutada kahe sisselaskeavaga seadmel vaid ühte (külma) vee sisselaskeava, peate enne seadme |
|
kasutamist paigaldama kuuma vee sisselaskeklapile sulguri, mis tarniti koos seadmega. (Kehtib toodete puhul, |
|
mis tarnitakse sulguriga.) |
A HOIATUS: Ühe sisselaskeavaga mudeleid ei tohi ühendada kuumaveetoruga. Sellisel juhul võib pesu kahjustada saada või seade töö katkestada ja kaitserežiimile lülituda.
HOIATUS: Ärge kasutage uut seadet vanade või kasutatud sisselaskevoolikutega. Need võivad põhjustada pesu määrdumist.
1. Kinnitage kõik voolikumutrid käega. Ärge kunagi kasutage mutrite kinnikeeramiseks mutrivõtit.
2. Pärast voolikute ühendamist avage kraanid ja kontrollige ühenduskohtade
lekkekindlust. Lekete korral keerake kraan kinni ja eemaldage mutter. Pärast
tihendi kontrollimist keerake mutter korralikult kinni. Et vältida veelekkeid ja
nendest põhjustatud kahju, hoidke kraanid kinni, kui te masinat ei kasuta.
2.5 Pesumasina ühendamine kanalisatsiooniga
• Tühjendusvooliku ots tuleb ühendada otse äravoolutoru või valamuga.
A HOIATUS: Kui voolik vee väljalaskmise ajal lahti tuleb, tekib korteris uputus. Kuuma pesuveega kõrvetada saamise oht! Et vältida selliseid olukordi ja tagada vee ühtlane sisseja väljavool masinast, kinnitage väljalaskevooliku ots kindlalt, et see ei saaks lahti tulla.
100cm
40cm
•Voolik tuleb kinnitada vähemalt 40 cm kõrgusele, aga mitte kõrgemale kui 100 cm.
•Kui voolik paigaldada põrandale või põranda lähedale (kõrgus põrandast alla 40 cm) järsu tõusunurgaga, siis on vee äravool raskendatud ja pesu võib jääda liiga märjaks. Sestap järgige joonisel näidatud kõrgusi.
•Et vältida musta pesuvee voolamist tagasi masinasse ja hõlbustada vee äravoolu, ärge pange vooliku otsa väljavoolanud vee sisse ega suruge seda kanalisatsiooniavas rohkem kui 15 cm sügavusele. Kui voolik on liiga pikk, lõigake see lühemaks.
•Vooliku peal ei tohi tallata ja vooliku otsa ei tohi painutada ega muljuda äravoolutoru ja masina vahele.
•Kui voolik on liiga lühike, kasutage selle pikendamiseks pikendusvoolikut (originaal). Voolik ei tohi olla pikem kui 3,2 m. Veeleketest tingitud kahju vältimiseks tuleb väljalaskevooliku ja pikendusvooliku ühendus sobiva fiksaatoriga kinnitada, et see lahti ei tuleks ja lekkima ei hakkaks.
2.6 Seadme jalgade reguleerimine
A HOIATUS: Et toote töömüra ja vibratsioon oleksid minimaalsed, peab see olema loodis ja toetuma kindlalt jalgadele. Masina loodimiseks reguleerige selle jalgu. Muidu võib toode kohalt nihkuda ning ümberkaudseid objekte muljuda või vibreerima hakata.
1.Avage pesumasina jalgade lukustusmutrid käsitsi.
2.Reguleerige jalgu nii, et seade oleks loodis ja ei kõiguks.
3.Keerake kõik lukustusmutrid uuesti käega kinni.
A HOIATUS: Ärge kasutage lukustusmutrite avamiseks tööriistu. Muidu võite neid vigastada. |
2.7 Vooluvõrku ühendamine
Ühendage toode maandatud seinakontakti, mida kaitseb 16 A kaitse. Meie firma ei vastuta kahjude eest, mis võivad tekkida toote kasutamisel maanduseta (isegi kui see on kohalike eeskirjadega lubatud).
24 / EЕ |
Pesumasin / Kasutusjuhend |
|
|
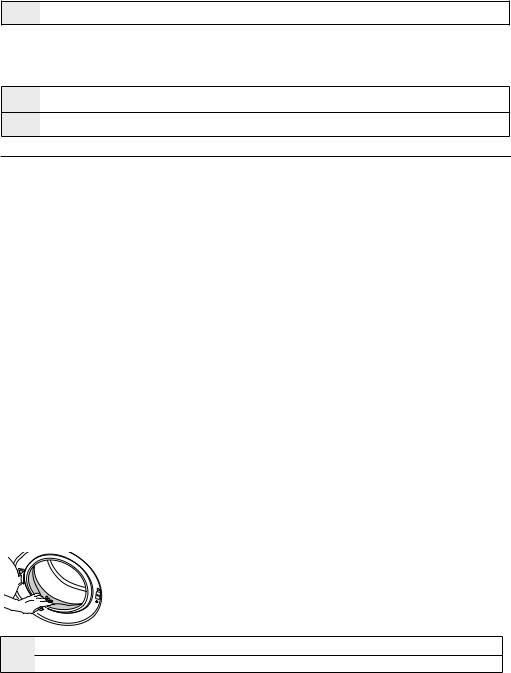
• Ühendamisel tuleb järgida riigis kehtivaid eeskirju.
• Toitejuhtme pistik peab olema pärast seadme paigaldamist kergesti ligipääsetav.
• Kui teie elektrisüsteemi kaitsme või võimsuslüliti nimivoolutugevus on alla 16 ampri, siis laske kvalifitseeritud elektrikul paigaldada 16-amprine kaitse.
• Võrgupinge peab vastama lõigus "Tehnilised näitajad" toodud pingele.
• Ärge kasutage seadme ühendamiseks pikendusjuhtmeid ega harupesasid.
B HOIATUS:
Toote transport
1. Enne toote transportimist eemaldage toitejuhtme pistik pistikupesast.
2. Võtke lahti vee sisseja väljalaskevoolikud.
3. Eemaldage tootest kogu sinna jäänud vesi.
4. Paigaldage transpordipoldid nende eemaldamisele vastupidises järjekorras.
C
A HOIATUS: Pakkematerjalid on lastele ohtlikud. Hoidke pakkematerjale kindlas kohas väljaspool laste käeulatust.
3 Ettevalmistused
3.1 Pesu sorteerimine
• Sorteerige pesu vastavalt kangatüübile, värvile, määrdumisastmele ja lubatud veetemperatuurile.
• Järgige alati riiete etikettidel olevaid juhiseid.
3.2 Pesu ettevalmistamine pesemiseks
• Metalldetailidega (nt rinnahoidjate tugikaared, rihmapandlad, metallnööbid) esemed võivad pesumasinat kahjustada. Eemaldage metalldetailid või asetage metalldetailidega esemed pesukoti, padjapüüri vms sisse.
• Eemaldage taskutest kõik esemed (nt mündid, pastakad ja kirjaklambrid), keerake taskud pahupidi ja pühkige harjaga üle. Taskutesse jäänud esemed võivad tekitada müra või masinat kahjustada.
• Pisiesemed (nt laste sokid, nailonsukad jms) asetage pesukoti, padjapüüri vms sisse.
• Kardinaid masinasse asetades ärge suruge neid kokku. Eemaldage kardinate riputusklambrid.
• Tõmmaku lukud kinni, õmmelge lahtised nööbid kindlalt ette ja parandage lõhkikärisenud kohad.
• Peske pesu etikettidega "Masinpesu" või "Käsipesu" ainult vastavaid programme kasutades.
• Ärge peske koos värvilisi ja valgeid esemeid. Uued tumedat värvi puuvillased esemed võivad väga tugevalt värvi anda. Peske neid eraldi.
• Tõrksaid plekke tuleb enne pesemist korralikult töödelda. Kahtluste korral küsige nõu keemilisest puhastusest.
• Kasutage ainult värve, värvieemaldajaid ja katlakivieemaldajaid, mis sobivad pesumasinas kasutamiseks. Järgige alati pakendil olevaid juhiseid.
• Püksid ja õrnad pesuesemed pöörake enne pesemist pahupidi.
• Angooravillast esemeid hoidke enne pesemist paar tundi sügavkülmikus. See aitab vähendada villakiudude lahtitulemist.
• Pesu, millele on ladestunud selliseid aineid nagu jahu, lubjatolm, piimapulber vms, tuleb enne masinasse asetamist raputada. Aja jooksul võivad pesule ladestunud tolm ja pulberjad ained koguneda masina sisedetailidele ja masinat kahjustada.
3.3 Elektrikokkuhoid
Alljärgnev teave aitab teil toodet kasutades keskkonda ja elektrienergiat säästa.
• Kasutage toodet valitud programmis lubatud kõrgeimal võimsusel, kuid vältige ülekoormust; vt "Programmide ja kulu tabel".
• Järgige alati pesuvahendi pakendil olevaid juhiseid.
• Vähemäärdunud pesu peske madalal temperatuuril.
• Kui pesu on vähe ja see ei ole tugevalt määrdunud, kasutage lühemaid programme.
• Kui riided ei ole tugevalt määrdunud ja neil ei ole plekke, ärge kasutage eelpesu ja kõrget temperatuuri.
• Kui kavatsete kuivatada pesu kuivatis, valige pesemise käigus suurim soovitatud tsentrifuugimiskiirus.
• Ärge kasutage pesuvahendit pakendil soovitatud kogusest rohkem.
3.4 Esimene kasutuskord
Enne, kui asute toodet kasutama, veenduge, et kõik lõikudes "Olulised ohutusja keskkonnakaitsejuhised" ja "Paigaldamine" kirjeldatud
ettevalmistused on tehtud.
Et valmistada toode ette pesupesemiseks, tehke esimene pesu trumli
puhastamise programmiga. Kui masinal seda programmi pole, kasutage punktis 6.2 kirjeldatud meetodit.
C Kasutage pesumasina jaoks sobivat katlakivieemaldusvahendit.
Seoses tootmise käigus tehtud kvaliteedikontrolliga võib seadmesse olla jäänud veidi vett. See ei kahjusta toodet.
25 / EЕ |
Pesumasin / Kasutusjuhend |
|
|
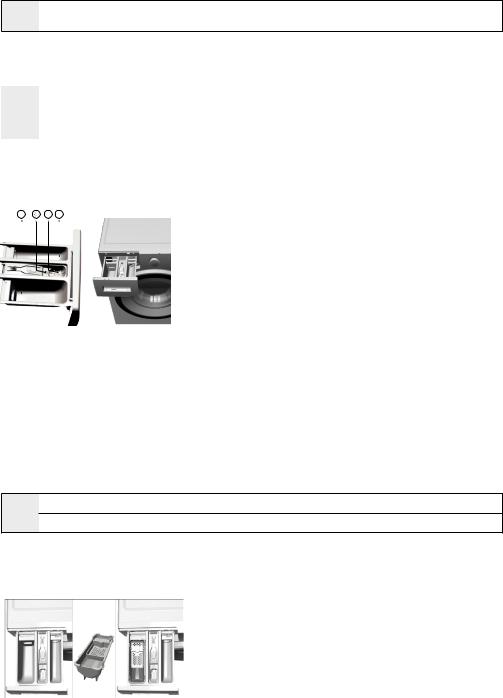
3.5 Õiged pesukogused
Maksimaalne pesukogus sõltub pesu tüübist, määrdumisastmest ja soovitud pesuprogrammist. Masin reguleerib veekogust automaatselt vastavalt pesu kaalule.
A HOIATUS: Järgige "Programmide ja kulu tabelis" toodud juhiseid. Kui masinas on liiga palju pesu, võib tulemus soovida jätta. Samuti võib tekkida müra ja vibratsioon.
3.6 Pesu asetamine masinasse
1 Avage pesumasina uks.
2 Asetage pesu masinasse (mitte liiga tihkelt).
3 Suruge pesumasina uks kinni, kuni kuulete klõpsatust. Veenduge, et üksi ese pole ukse vahele jäänud.
|
|
Programmi töötamise ajal on pesumasina uks lukustatud. Ust saab avada alles veidi aega pärast programmi |
||
C lõppemist. |
||||
A HOIATUS: Kui pesu on halvasti paigutatud, võib masin hakata vibreerima ja tugevalt mürisema. |
||||
3.7 Pesuvahendi ja pesupehmendaja kasutamine |
||||
|
|
|
|
|
C |
Kui kasutate pesuvahendit, pesupehmendajat, tärgeldusainet, riidevärvi, pesuvalgendit või katlakivieemaldajat, |
|||
lugege pakendilt hoolikalt tootja juhiseid ja järgige koguste kohta antud soovitusi. Kasutage mõõtetopsi, kui see |
||||
|
|
on olemas. |
||
2 |
3 |
1 |
||
|
|
|
|
Pesuvahendi sahtel |
|
|
|
|
Pesuvahendi sahtel koosneb kolmest lahtrist: |
|
|
|
|
– (1) eelpesu; |
|
|
|
|
|
|
|
|
|
– (2) põhipesu; |
|
|
|
|
– (3) pesupehmendaja; |
|
|
|
|
– (*) pesupehmendaja lahtris on veel ka sifoon. |
Pesuvahend, pesupehmendaja jm puhastusvahendid
• Lisage pesuvahend ja pesupehmendaja enne pesuprogrammi käivitamist.
• Ärge kunagi jätke pesuvahendisahtlit lahti, kui pesuprogramm on pooleli!
• Kui programm ei sisalda eelpesu, siis ärge pange pesuvahendit eelpesu lahtrisse (lahter nr 1).
• Kui programm sisaldab eelpesu, ärge pange eelpesu lahtrisse (lahter nr 1) vedelat pesuvahendit.
• Kui kasutate pesuvahendikotti või doseerimispalli, ärge valige eelpesu sisaldavat programmi. Asetage pesuvahendikott või doseerimispall pesuga koos otse masinasse.
• Kui kasutate vedelat pesuvahendit, ärge unustage asetamast vedela pesuvahendi topsi põhipesu lahtrisse (lahter nr 2).
Pesuvahendi tüübi valimine
Pesuvahendi tüüp sõltub pestavate esemete tüübist ja värvusest.
• Värvilist ja valget pesu peske erinevate pesuvahenditega.
• Õrnast materjalist riideid peske ainult õrnale pesule sobiva spetsiaalse pesuvahendiga (vedel pesuvahend, villašampoon vms).
• Tumedat värvi riiete ja vatitekkide pesemiseks on soovitatav kasutada vedelat pesuvahendit.
• Villast pesu peske villapesuvahendiga.
A HOIATUS: Kasutage ainult pesumasinate jaoks ette nähtud pesuvahendeid. HOIATUS: Ärge kasutage seebipulbrit.
Pesuvahendi koguse määramine
Pesuvahendi kogus sõltub pesu kogusest, määrdumisastmest ja vee karedusest.
• Ärge kasutage pesuvahendit pakendil soovitatud kogusest rohkem, et vältida liigse vahu teket, ebapiisavat loputamist, raha raiskamist ja muidugi ka keskkonna reostamist.
• Kui pesu on vähe ja see ei ole tugevalt määrdunud, kasutage vähem pesuvahendit.
Pesupehmendaja kasutamine
Kallake pesupehmendaja pesuvahendisahtli pesupehmendaja lahtrisse.
• Ärge kasutage pesupehmendajat lubatud piirist rohkem (tähis >max<).
• Kui pesupehmendaja on liiga paks, lahjendage seda enne pesuvahendisahtlisse kallamist veega.
Vedela pesuvahendi kasutamine
Kui tootega on kaasas vedela pesuvahendi tops:
• Asetage vedela pesuvahendi tops lahtrisse nr 2.
26 / EЕ |
Pesumasin / Kasutusjuhend |
|
|

• Kui vedel pesuvahend on liiga paks, lahjendage seda enne pesuvahendisahtlisse kallamist veega.
Kui tootega ei ole kaasas vedela pesuvahendi topsi:
• Eelpesu sisaldava programmi puhul ärge kasutage vedelat pesuvahendit.
• Viitstardi kasutamisel määrib vedel pesuvahend riideid. Kui kavatsete kasutada viitstarti, ärge kasutage vedelat pesuvahendit.
Pesugeeli või -tablettide kasutamine
• Kui kasutate vedelat pesugeeli ja teie masinal ei ole spetsiaalset vedela pesuvahendi topsi, pange pesugeel esimese vee sissevõtu ajal põhipesu lahtrisse. Kui teie masinal on vedela pesuvahendi tops, täitke see enne pesuprogrammi käivitamist pesuvahendiga.
• Kui kasutate paksu konsistentsiga pesugeeli või kapseldatud vedelat pesuvahendit, pange see enne pesuprogrammi käivitamist otse trumlisse.
• Asetage pesutablett põhipesu lahtrisse (lahter nr 2) või enne pesuprogrammi käivitamist otse trumlisse.
C Pesutableti kasutamisel võivad selle riismed pesuvahendisahtlisse jääda. Sellisel juhul asetage pesutablett edaspidi trumli põhja lähedusse pesu vahele.
Pesutableti või -geeli kasutamisel ärge valige eelpesu funktsiooni.
Tärgeldusvahendi kasutamine
• Nii vedel kui ka pulbriline tärgeldusaine ja riidevärv pannakse pesupehmendaja lahtrisse.
• Ärge kasutage ühe ja sama pesutsükli ajal korraga nii pesupehmendajat kui ka tärgeldusvahendit.
• Pärast tärgeldusvahendi kasutamist pühkige pesumasina sisepindu puhta niiske lapiga. Pesuvalgendi kasutamine
• Valige eelpesu sisaldav programm ja lisage pesuvalgendi eelpesu alguses. Ärge pange pesuvahendit kunagi eelpesu lahtrisse. Teine võimalus on valida lisaloputusega programm ja lisada pesuvalgendi pesuvahendisahtli kaudu sel ajal, kui masin võtab sisse esimest loputusvett.
• Pesuvalgendit ja pesuvahendit ei tohi kokku segada.
• Lisage pesuvalgendit väga vähe (umbes 50 ml) ja loputage riideid põhjalikult, sest valgendi põhjustab nahaärritust. Ärge valage pesuvalgendit otse riietele ja ärge kasutage, kui tegu on värviliste riietega.
• Kui kasutate hapnikupõhist pesuvalgendit, valige madalama temperatuuriga pesuprogramm.
• Hapnikupõhiseid pesuvalgendeid võib kasutada koos pesuvahenditega; kui aga pesuvalgendi ja pesuvahend on erineva konsistentsiga, pange pesuvahend esimesena pesuvahendisahtli lahtrisse nr 2 ja oodake, kuni see
vee sissevõtu ajal välja voolab. Pesuvalgendi lisage sama lahtri kaudu enne, kui masin vee sissevõtu lõpetab. Katlakivieemaldaja kasutamine
• Vajadusel kasutage pesumasina jaoks ette nähtud katlakivieemaldajat.
Määrdumisaste
|
|
Rõivad |
|
|
|
|
Heledates toonides ja valged |
Värviline pesu |
Tumedad toonid |
Õrn materjal, villane, |
|
|
siid |
||||
|
|
|
|
||
|
(Soovituslik |
(Soovituslik |
(Soovituslik |
(Soovituslik |
|
|
temperatuurivahemik |
temperatuurivahemik |
|||
|
temperatuurivahemik |
temperatuurivahemik |
|||
|
vastavalt |
vastavalt |
|||
|
vastavalt määrdumisastmele: |
vastavalt määrdumisastmele: |
|||
|
määrdumisastmele: |
määrdumisastmele: |
|||
|
40–90 °C) |
külm 40 °C) |
|||
|
külm 40 °C) |
külm 30 °C) |
|||
|
|
|
|||
|
Võimalik, et plekke tuleb |
|
|
|
|
|
enne pesu töödelda või |
Värvilisele pesule mõeldud |
|
|
|
|
kasutada eelpesu. Valgele |
pulbrilisi ja vedelaid |
|
|
|
Tugevalt |
pesule mõeldud pulbrilisi |
pesuvahendeid võib kasutada |
Värvilisele ja |
Eelistage õrna |
|
määrdunud |
ja vedelaid pesuvahendeid |
tugevalt määrdunud pesu |
|||
tumedat värvi pesule |
pesu jaoks |
||||
|
võib kasutada tugevalt |
puhul soovitatavas koguses. |
|||
|
sobivaid vedelaid |
toodetud vedelaid |
|||
(raskesti |
määrdunud pesu puhul |
Savija mullaplekkide |
|||
pesuvahendeid võib |
pesuvahendeid. |
||||
eemaldatavad |
soovitatavas koguses. |
ning pleegitusainete |
|||
kasutada tugevalt |
Villaseid ja siidist riideid |
||||
plekid: nt rohu-, |
Savija mullaplekkide |
suhtes tundlike plekkide |
|||
määrdunud pesu puhul |
tuleb pesta spetsiaalse |
||||
kohvi-, puuvilja- |
ning pleegitusainete |
eemaldamiseks on |
|||
soovitatavas koguses. |
villapesuvahendiga. |
||||
ja vereplekid) |
suhtes tundlike plekkide |
soovitatav kasutada pulbrilisi |
|||
|
|
||||
|
eemaldamiseks on |
pesuvahendeid. Kasutage ilma |
|
|
|
|
soovitatav kasutada pulbrilisi |
valgendita pesuvahendeid. |
|
|
|
|
pesuvahendeid. |
|
|
|
|
Mõõdukalt |
Valgele pesule mõeldud |
Värvilisele pesule mõeldud |
Värvilisele ja |
Eelistage õrna |
|
pulbrilisi ja vedelaid |
tumedat värvi pesule |
pesu jaoks |
|||
määrdunud |
pulbrilisi ja vedelaid |
||||
pesuvahendeid võib kasutada |
sobivaid vedelaid |
toodetud vedelaid |
|||
|
pesuvahendeid võib |
||||
|
mõõdukalt määrdunud pesu |
pesuvahendeid võib |
pesuvahendeid. |
||
(näiteks kraele |
kasutada mõõdukalt |
||||
puhul soovitatavas koguses. |
kasutada mõõdukalt |
Villaseid ja siidist riideid |
|||
ja mansettidele |
määrdunud pesu puhul |
||||
Kasutage ilma valgendita |
määrdunud pesu puhul |
tuleb pesta spetsiaalse |
|||
jäänud plekid) |
soovitatavas koguses. |
||||
pesuvahendeid. |
soovitatavas koguses. |
villapesuvahendiga. |
|||
|
|
||||
Kergelt |
Valgele pesule mõeldud |
Värvilisele pesule mõeldud |
Värvilisele ja |
Eelistage õrna |
|
pulbrilisi ja vedelaid |
tumedat värvi pesule |
pesu jaoks |
|||
määrdunud |
pulbrilisi ja vedelaid |
||||
pesuvahendeid võib kasutada |
sobivaid vedelaid |
toodetud vedelaid |
|||
|
pesuvahendeid võib |
||||
|
kergelt määrdunud pesu |
pesuvahendeid võib |
pesuvahendeid. |
||
(silmaga |
kasutada kergelt määrdunud |
||||
puhul soovitatavas koguses. |
kasutada kergelt |
Villaseid ja siidist riideid |
|||
nähtavaid |
pesu puhul soovitatavas |
Kasutage ilma valgendita |
määrdunud pesu puhul |
tuleb pesta spetsiaalse |
|
plekke pole) |
koguses. |
||||
pesuvahendeid. |
soovitatavas koguses. |
villapesuvahendiga. |
|||
|
|
||||
|
|
|
|
|
27 / EЕ |
Pesumasin / Kasutusjuhend |
|
|

4.3 Toote kasutamine
4.3.1 Juhtpaneel
1 – Programmi valimise lüliti (ülemises asendis sisse/välja lülitus)
2 – Ekraan
3 – Viitstardi näidik
4 – Programminäidik
5 – Käivitus-/seiskamisnupp
6 – Lisafunktsiooni nupp 3
7 – Lisafunktsiooni nupp 2
8 – Lisafunktsiooni nupp 1
9 – Tsentrifuugimiskiiruse reguleerimise nupp
10 – Temperatuuri reguleerimise nupp
4.3.2Masina ettevalmistamine
1.Veenduge, et voolikud on korralikult ühendatud.
2.Ühendage pesumasin vooluvõrku.
3.Keerake kraan lõpuni lahti.
4.Asetage pesu masinasse.
5.Lisage pesuvahend ja pesupehmendaja.
4.3.3Programmi valimine ja näpunäited pesu pesemiseks
1.Valige pesu tüüpi, kogust ja määrdumisastet arvestades sobiv programm, juhindudes allpool olevast "Programmide ja kulu tabelist" ja temperatuuritabelist.
2.Valige programmilüliti abil soovitud programm.
Indicative values for Synthetics programmes
|
|
Water Consumption (l) |
Energy Consumption (kWh) |
Programme Duration (min) * |
Remaining Moisture |
Remaining Moisture |
|
Load (kg) |
Content (%) ** |
Content (%) ** |
|||
|
≤ 1000 rpm |
> 1000 rpm |
||||
|
|
|
|
|
|
|
Synthetics 60 |
3 |
65 |
1.20 |
100/120 |
45 |
40 |
Synthetics 40 |
3 |
63 |
0.75 |
90/110 |
45 |
40 |
* You can see the washing time of the programme you have selected on the display of the machine. It is normal that small differences may occur between the time shown on the display and the real washing time.
** Remaining moisture content values may differ according to the selected spin speed.
28 / EЕ |
Pesumasin / Kasutusjuhend |
|
|

4.3.4 Programmide ja kulu tabel
|
|
|
|
|
|
Lisafunktsioonid |
|
||
Programm °C |
|
Maksimumkogus )kg( |
Veekulu )I( |
Energiakulu )kWh( |
Maksimumkiirus |
Eelpesu |
Kiirpesu |
Lisaloputus |
Temperatuur °C |
|
|
|
|
|
|
|
|
||
|
|
|
|
|
|
|
|
|
|
Puuvill |
90 |
7 |
92 |
2.25 |
1200 |
• |
• |
• |
90 |
|
|
|
|
|
|
|
|
|
|
Puuvill |
60 |
7 |
92 |
1.70 |
1200 |
• |
• |
• |
90 |
|
|
|
|
|
|
|
|
|
|
Puuvill |
40 |
7 |
89 |
1.05 |
1200 |
• |
• |
• |
90 |
|
|
|
|
|
|
|
|
|
|
Puuvill Eco |
60** |
7 |
51.1 |
0.810 |
1200 |
|
|
|
60 |
|
|
|
|
|
|
|
|
|
|
Puuvill Eco |
60** |
3,5 |
40.4 |
0.710 |
1200 |
|
|
|
60 |
|
|
|
|
|
|
|
|
|
|
Puuvill Eco |
40** |
3,5 |
40.4 |
0.750 |
1200 |
|
|
|
60 |
|
|
|
|
|
|
|
|
|
|
Sünteetika |
60 |
3 |
65 |
1.20 |
1200 |
• |
• |
• |
60 |
|
|
|
|
|
|
|
|
|
|
Sünteetika |
40 |
3 |
63 |
0.75 |
1200 |
• |
• |
• |
60 |
|
|
|
|
|
|
|
|
|
|
Kiirpesu / Kiirpesu 14I |
90 |
7 |
62 |
2.00 |
1200 |
|
• |
|
90 |
Kiirpesu / Kiirpesu 14I |
60 |
7 |
62 |
1.10 |
1200 |
|
• |
|
90 |
Kiirpesu / Kiirpesu 14I |
30 |
7 |
60 |
0.20 |
1200 |
|
• |
|
90 |
Kiirpesu / Kiirpesu 14I + Kiirpesu |
30 |
2 |
41 |
0.15 |
1200 |
|
• |
|
30 |
Segapesu 40 |
40 |
3 |
65 |
0.75 |
800 |
• |
• |
|
40 |
|
|
|
|
|
|
|
|
|
|
Villaja käsipesu |
40 |
1.5 |
55 |
0.55 |
1200 |
|
|
• |
40 |
|
|
|
|
|
|
|
|
|
|
Õrnpesu |
30 |
3 |
51 |
0.65 |
1200 |
|
|
|
40 |
|
|
|
|
|
|
|
|
|
|
Suled |
60 |
1.5 |
70 |
1.25 |
1000 |
|
|
• |
60 |
|
|
|
|
|
|
|
|
|
|
Spordiriided |
40 |
3 |
44 |
0.45 |
1200 |
• |
|
|
40 |
Tumedad riided |
40 |
2.5 |
82 |
0.85 |
1200 |
• |
|
|
40 |
Kardinad |
30 |
1 |
65 |
0.30 |
600 |
|
|
|
30 |
Särgid |
60 |
3 |
55 |
1.20 |
800 |
• |
• |
|
60 |
Hügieen |
90 |
7 |
119 |
2.40 |
1200 |
|
|
|
20 - 90 |
Trumli puhastus |
90 |
- |
73 |
2.10 |
600 |
|
|
|
90 |
• : Valitav
** : Energiamärgise programm (EN 60456 Ed.3).
** "Puuvill, ökonoomne 40 ºC ja Puuvill, ökonoomne 60 ºC on standardprogrammid." Need programmid kannavad nimesid 40 °C puuvilla standardprogramm ja 60 °C puuvilla standardprogramm ning on tähistatud juhtpaneelil vastavate
sümbolitega

 .
.
C Veeja elektrikulu võib varieeruda olenevalt veesurvest, vee karedusest ja temperatuurist, ümbritseva keskkonna temperatuurist, pesu kogusest ja tüübist, lisafunktsioonide kasutamisest, tsentrifuugimiskiirusest ja pingekõikumistest.
Valitud programmi pesemiskestust näete pesumasina ekraanil. Olenevalt masinasse pandud pesu hulgast võib reaalse pesutsükli kestus erineda ekraanil kujutatud ajast 1-1,5 tunni võrra. Pesutsükli kestust värskendatakse pesemise alguses.
Olenevalt pesumasina mudelist võivad tabelis kirjeldatud lisafunktsioonid erineda.
4.3.5 Põhiprogrammid
Olenevalt kanga tüübist saab kasutada järgmisi põhiprogramme:
• Puuvill
Selle programmiga saate pesta vastupidavat puuvillasest materjalist pesu (linad, voodipesu, käterätikud, hommikumantlid, aluspesu jne). Kui vajutate kiirpesufunktsiooni nuppu, on programmi kestus märgatavalt
29 / EЕ |
Pesumasin / Kasutusjuhend |
|
|

väiksem, aga tõhus pesemistulemus tagatakse intensiivsete pesemisliigutustega. Kui te ei vajuta kiirpesufunktsiooni nuppu, tagatakse väga hea pesemisja loputustulemus teie tugevalt määrdunud pesu jaoks.
• Sünteetika
Selle programmiga saate pesta näiteks särke, pluuse, sünteetika ja puuvilla segust kangaid jne. Programmi kestus lüheneb märkimisväärselt ja korralik pesemistulemus on tagatud. Kui te ei vajuta kiirpesufunktsiooni nuppu, tagatakse väga hea pesemisja loputustulemus teie tugevalt määrdunud pesu jaoks.
• Villaja käsipesu
Seda programmi saate kasutada villaste riiete õrnade pesuesemete pesemiseks. Valige riietel olevate etikettide järgi õige temperatuur. Selles programmis kasutatakse ettevaatlikke pesemisliigutusi, et vältida pesu kahjustamist.
“Selle pesumasina villaprogramm on pälvinud The Woolmark Company heakskiidu masinpesuks mõeldud villaste esemete pesemiseks, tingimusel, et seejuures järgitakse riideeseme sildil ja selle pesumasina tootja poolt esitatud juhiseid. M0000.”
“Suurbritannias, Iirimaal, Hongkongis ja Indias on Woolmarki kaubamärk kasutusel sertifitseeritud kaubamärgina.”
4.3.6 Lisaprogrammid
Erijuhtudeks on masinas saadaval lisaprogrammid.
C Lisaprogrammide valik oleneb pesumasina mudelist.
• Puuvill Eco
Selle programmiga saate pesta mõõdukalt määrdunud vastupidavat puuvillasest ja linasest materjalist pesu. Kuigi pesemiseks kulub rohkem aega kui kõigi teiste programmide puhul, võimaldab see suurt elektrija veekokkuhoidu. Tegelik veetemperatuur võib esitatud pesutemperatuurist erineda. Kui panete masinasse vähem pesu (nt pool kogust või vähem), võib programmietappidele kuluv aeg automaatselt lüheneda. Sel juhul väheneb energiaja veekulu veelgi, muutes pesupesemise ökonoomsemaks.
• Hügieen
See on pika kestusega programm, mida saate kasutada hügieenilist töötlust vajava pesu pesemiseks kõrgel temperatuuril intensiivse ja pika pesutsükliga. Väga hea hügieenilisus tagatakse pika kuumutamise ajaga ning täiendava loputusetapiga.
• Õrnpesu
Selle programmiga saate pesta õrna pesu, näiteks puuvillast / sünteetika segust kudumeid või sukktooteid. Programmil on õrnem pesutoime. Rõivaid, mille värvi soovite säilitada, peske kas 20 kraadi juures või valige nende pesemiseks külmpesu.
• Kiirpesu / Kiirpesu 14I
Selle programmiga saate lühikese ajaga pesta vähemäärdunud või plekkideta puuvillast riideid. Kui valitud on kiirpesu funktsioon, saab programmi kestust vähendada kuni 14 minuti võrra. Kui valitud on kiirpesu funktsioon, on pestava pesu maksimaalne kaal 2 (kaks) kg.
• Tumedad riided / teksad
Selle programmiga saate kaitsta tumedavärvilise pesu või teksade värvi. Tõhus pesemistulemus saavutatakse trumli spetsiaalse liikumisega isegi madala temperatuuri juures. Tumedavärvilise pesu pesemiseks on soovitatav kasutada vedelat pesuvahendit või villašampooni. Ärge peske villa sisaldavat õrna pesu jms.
• Segapesu 40
Seda programmi saate kasutada sorteerimata puuvillasest ja sünteetilisest materjalist pesu pesemiseks.
• Särgid
Selle programmiga saab koos pesta puuvillasest, sünteetilisest ja segamaterjalist särke. See vähendab kortse. Kui kiirpesu funktsioon on valitud, rakendatakse eeltöötluse algoritmi.
• Pange eeltöötlusainet otse riietele või lisage seda koos pesuainega koos pesuainega vee sissevõtmise ajaks põhipesu lahtrist. Sellega saate kasutada sama tõhusust, mida tavapärase pesu puhulgi, kuid seda märksa lühema aja jooksul. Teie särkide kasutusiga pikeneb.
• Spordiriided
Seda programmi saate kasutada spordija väliriiete pesemiseks, mis sisaldavad puuvilla ja sünteetika segu ning vett hülgavaid katteid (nt gore-tex, jne). Tänu spetsiaalsetele pöörlevatele liigutustele tagab programm nende õrna pesemise.
• Kardinad
Seda programmi saate kasutada tülli ja kardinate pesemiseks. Kuna nende võrkstruktuur tekitab liiga palju vahtu, pange põhipesu lahtrisse vaid väike kogus pesuvahendit. Tänu programmi spetsiaalsele tsentrifuugimisprofiilile kortsuvad kardinad ja tüll vähem. Ärge peske korraga rohkem kardinaid, kui lubatud piirmäärana ette nähtud, et neid mitte kahjustada.
C Selles programmis on soovitatav kasutada spetsiaalseid kardinate pesuks mõeldud pesuvahendeid.
30 / EЕ |
Pesumasin / Kasutusjuhend |
|
|
 Loading...