


Perfusor® compact
Instructions for use
0123
Software AA
1

Patient Safety
Attention: take note of accompanying documents! ▲!
 First read the Instructions for Use. Use of the equipment presupposes regular checking by specially-trained staff.
Operation
 Make sure that the unit has been positioned safely and is stable and secure.
 Prior to use: always ensure the functioning of the audible and visual alarms during the automatic check (see page 6). Also check the staff call and syringe setting features for possible damage.
 Connection to patient is only permissible when the device is switched on. Interrupt the connection to change syringes. There is otherwise a danger of incorrect dosage.
 Select syringe/catheter suitable for use with the connection system and medical application.
 Make the connection ensuring that the infusion line is free of kinks so that a flow is possible.
Replace disposable articles after 24 hours.
 It is presupposed that installation in rooms used for medical purposes will comply with the appropriate regulations (e.g. VDE 0100, VDE 0107 or IEC publications). Care must also be taken to observe regional specifications and national variations.
 Do not use in an area endangered by risk of explosion.
 Compare displayed and input values. Use only when these match.
Other Components
 Work in the area of the pressure shut-down facility, or variations in pressure (e.g. as caused by change in level), can affect the accuracy of the device.
 Where several infusion lines are connected, the possibility of their exerting a mutual influence on each other cannot be excluded. Cases of possible incompatibility can be found in the directions on use of the medicament or appliances in question.
See also VDE 0753, Part 5, "Application Rules for Parallel Infusion - Possible Application Methods", or the BBM application directives for parallel infusion (38910004).
 Only combinations of equipment, accessories, working parts and disposable parts that have been shown to be compatible shall be used.
 The use of disposable parts that have not been tested or approved might well exert an influence on the technical data.
 Connected analogue and digital components must verifiably satisfy the EN specifications (e.g. EN60950 on data processing devices and EN60601 on medical electrical devices). Anyone who additionally connects devices to the signal input or output part is a system configurator and is thereby responsible for compliance with the systems standard EN60601-1-1.
Safety Standards
Perfusor compact satisfies all safety standards for medical electrical devices in terms of the IEC 601-1 and IEC 601-2 (-24) publications. Note: IEC 601-1 corresponds to the European Standard EN60601.
2

Perfusor compact
Contents
Perfusor compact / Overview |
Page |
4 |
Operation |
Page |
6 |
|
|
|
Technical Data |
Page 10 |
|
Start-up and Trumpet Curves |
Page 12 |
|
Warranty |
Page 13 |
|
Ordering |
Page 14 |
|
The Perfusor compact is a transportable infusion syringe pump in accordance with EN60601-2-24 (draft), Points 2.2.18 and 2.2.23 that is suitable for dispensing liquids in nutritional and infusion therapy. The medical specialist must decide on suitability for application on the basis of the warranted properties and the technical data.
For further details please refer to these Instructions for Use.
3

Overview
Handle |
|
|
|
Operation |
|
|||||||||||||||||||
|
|
|
|
|||||||||||||||||||||
Always use the handle when carrying |
|
|
For special functions first press the F button. |
|
||||||||||||||||||||
|
|
|
|
|
|
|
|
|
|
|
|
|
|
|
|
|
|
|
|
|
|
|
|
|
|
|
|
|
|
|
|
|
|
|
|
|
|
|
|
|
|
|
|
|
|
|
|
|
|
|
|
|
|
|
|
|
|
|
|
|
|
|
|
|
|
|
|
|
|
|
|
|
|
|
|
|
|
|
|
|
|
|
|
|
|
|
|
|
|
|
|
|
|
|
|
|
|
|
|
|
|
|
|
|
|
|
|
|
|
|
|
|
|
|
|
|
|
|
|
|
|
|
|
|
|
|
|
|
|
|
|
|
|
|
|
|
|
|
|
|
|
|
|
|
|
|
|
|
|
|
|
|
|
|
|
|
|
|
|
|
|
|
|
|
|
|
|
|
|
|
|
|
|
|
|
|
|
|
|
|
|
|
|
|
|
|
|
|
|
|
|
|
|
|
|
|
|
|
|
|
|
|
|
|
|
|
|
|
|
|
|
|
|
|
|
|
|
|
|
|
|
|
|
|
|
|
|
|
|
|
|
|
|
|
|
|
|
|
|
|
|
|
|
|
|
|
|
|
|
|
|
|
|
|
|
|
|
|
|
|
|
|
|
|
|
|
|
|
|
|
|
|
|
|
|
|
|
|
|
|
|
|
|
|
|
|
|
|
|
|
|
|
|
|
|
|
|
|
|
|
|
|
|
|
|
|
|
|
|
|
|
|
|
|
|
|
|
|
|
|
|
|
|
|
|
|
|
|
|
|
|
|
|
|
|
|
|
|
|
|
|
|
|
|
|
|
|
|
|
|
|
|
|
|
|
|
|
|
|
|
|
|
|
|
|
|
|
|
|
|
|
|
|
|
|
|
|
|
|
|
|
|
|
|
|
|
|
|
|
|
|
|
|
|
|
|
|
|
|
|
|
|
|
|
|
|
|
|
|
|
|
|
|
|
|
|
|
|
|
|
|
|
|
|
|
|
|
|
|
|
|
|
|
|
|
|
|
|
|
|
|
|
|
|
|
|
|
|
|
|
|
|
|
|
|
|
|
|
|
|
|
|
|
|
|
|
|
|
|
|
|
|
|
|
|
|
|
|
|
|
|
|
|
|
|
|
|
|
|
|
|
|
|
|
|
|
|
|
|
|
|
|
|
|
|
|
|
|
|
|
|
|
|
|
|
|
|
|
|
|
|
|
|
|
|
|
|
|
|
|
|
|
|
|
|
|
|
|
|
|
|
|
|
|
|
|
|
|
|
|
|
|
|
|
|
|
|
|
|
|
|
|
|
|
|
|
|
|
|
|
|
|
|
|
|
|
|
|
|
|
|
|
|
|
|
|
|
|
|
|
|
|
|
|
|
|
|
|
|
|
|
|
|
|
|
|
|
|
|
|
|
|
|
|
|
|
|
|
|
|
|
|
|
|
|
|
|
|
|
|
|
|
|
|
|
|
|
|
|
|
|
|
|
|
|
|
|
|
|
|
|
|
|
|
|
|
|
|
|
|
|
|
|
|
|
|
|
|
|
|
|
|
|
|
|
|
|
|
|
|
|
|
|
|
|
|
|
|
|
|
|
|
|
|
|
|
|
|
|
|
|
|
|
|
|
|
|
|
|
|
|
|
|
|
|
|
|
|
|
|
|
|
|
|
|
|
|
|
|
|
|
|
|
|
|
|
|
|
|
|
|
|
|
|
|
|
|
|
|
Display
Shows all important features at a glance: rate, type of syringe, mains or rechargeable battery, carriage control 

 and alarm symbol (see "Alarms" on page 9).
Battery
Press here to change the battery. Interrupt the connection to the patient during changing of the battery. Switch off the device and pull the cover downwards. Always renew all batteries, takingcaretoobservewastedisposalregulations.
Syringe holder
Locks in the syringe. To remove, pull and swing to the left.
The drive unit can be moved by hand after the locking lever has been opened.
Short instructions for use and Syringe Table
See the underside of the device.
Multi-Function Connector (MFC)
Connection for staff call; ambulance cars (12V) and interface.
Mains Connection
Connection for the mains supply. In the event of power failure, automatic switch-over to battery.
4
Input Correction |
Interrupt alarm signal for 2 min. |
|
On/Off. Press for 2 sec to switch off. |
|
Start/Stop Infusion |
|
For special functions (green) first press F. |
Decimal Point |
|
|
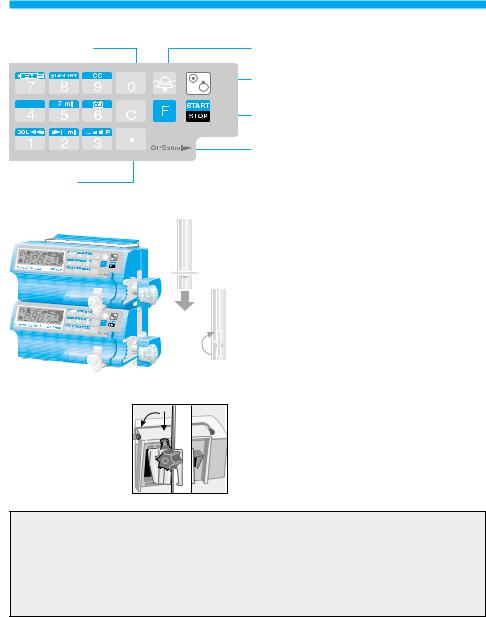
Transport/Carriage |
|
A maximum of three devices can be connected |
|
together. Special care is required here if a |
|
patient is already connected. Avoid external |
|
mechanical influence! |
|
Locking Devices Together |
|
Place one device on top of the other. Push down |
|
the connecting part until clicks into place. Lock |
|
by turning the vane until it is vertical. |
|
To disconnect, turn until horizontal and then |
|
push upwards. |
|
Stand Clamp/Attachment on Stand |
|
Attach the Perfusor compact from above, |
|
clicking it into place. To release, press the black |
|
button. For safety purposes attach each device |
|
separately to the stand. |
Inspection on Delivery
Despite careful packaging the risk of transport damage cannot be entirely excluded. Upon delivery please check that nothing is missing. Do not make use of a damaged device! Contact the service department.
Packaging: Reusable, therefore environmentally acceptable (returns will be accepted).
Extent of Delivery: Perfusor compact, power lead, pole clamp, instructions for use,
4 batteries.
5
 Loading...