

Page 1
BeoSound5Encore
Page 2

Page 3

Dear Customer
This Getting Started contains information about the daily use of your
Bang& Olufsen product. We expect your retailer to deliver, install and set
up your product.
In order to use your BeoSound5Encore as a navigation panel for your
digital music collection and more than 10,000 radio stations world-wide,
the music system must be connected to the internet and to a digital
music library source of your choice.
You can nd information about how to make your digital music available
in the product’s on-line Guide on www.bang-olufsen.com/guides. This
Guide describes additional features and functions such as language and
pincode settings and how to operate your product with a Bang& Olufsen
remote control.
On www.bang-olufsen.com you can also nd further information and
relevant FAQs about your product.
Your Bang& Olufsen retailer is your rst stop for all your queries.
To nd your nearest retailer, visit our website…
www.bang-olufsen.com
Technical specications, features and the use
thereof are subject to change without notice.
3510810 Version 1.1 1102
Page 4
WARNING: To reduce the risk of fire
or electric shock, do not expose this
appliance to rain or moisture. Do not
expose this equip ment to dripping or
splashing and ensure that no objects
filled with liquids, such as vases, are
placed on the equipment.
To completely disconnect this equipment
from the AC Mains, disconnect the mains
plug from the wall socket. The disconnect
device shall remain readily operable.
The lightning flash with arrowhead
symbol within an equilateral triangle,
is intended to alert the user to the
presence of un insulated “dangerous
voltage” within the product’s enclosure that may be of sufficient
magnitude to constitute a risk of
electric shock to persons.
The exclamation point within an
equi lateral triangle is intended to alert
the user to the presence of important
operating and main tenance (servicing)
instructions in the literature
accompanying the product.
Important!
– Avoid placing the product in direct sunlight or
direct articial light, such as a spotlight.
– Make sure that the product is set up, placed and
connected in accordance with the instructions.
– Place your product on a rm surface or stand
where you want it placed permanently. Use
Bang & Olufsen approved stands and wall
brackets only!
– Do not place any items on top of your product.
– No naked ame sources, such as lighted candles
should be placed on the apparatus.
– Do not subject the product to high humidity,
rain or sources of heat.
– The product is intended for indoor use in dry,
domestic environments only. Use within a
temperature range of 10–40°C (50 –105°F).
– If the product has been exposed to temperatures
below 5°C (40°F), leave it at room temperature
and wait until the product has regained normal
room temperature before it is connected to the
mains and switched on.
– Leave enough space around the product for
adequate ventilation.
– Do not connect any of the products in your
system to the mains, until you have connected
all the cables.
– Do not attempt to open the product. Leave such
operations to qualied service personnel.
– The product can only be switched off completely
by disconnecting it from the wall socket.
Page 5

Contents
6 How to use your music system
7 The display
8 Listen to your music
10 MOTS, play queues and favourites
12 Listen to internet radio
14 Set up your music system
15 Cleaning
16 Connections
18 What to do if ...
Page 6
6
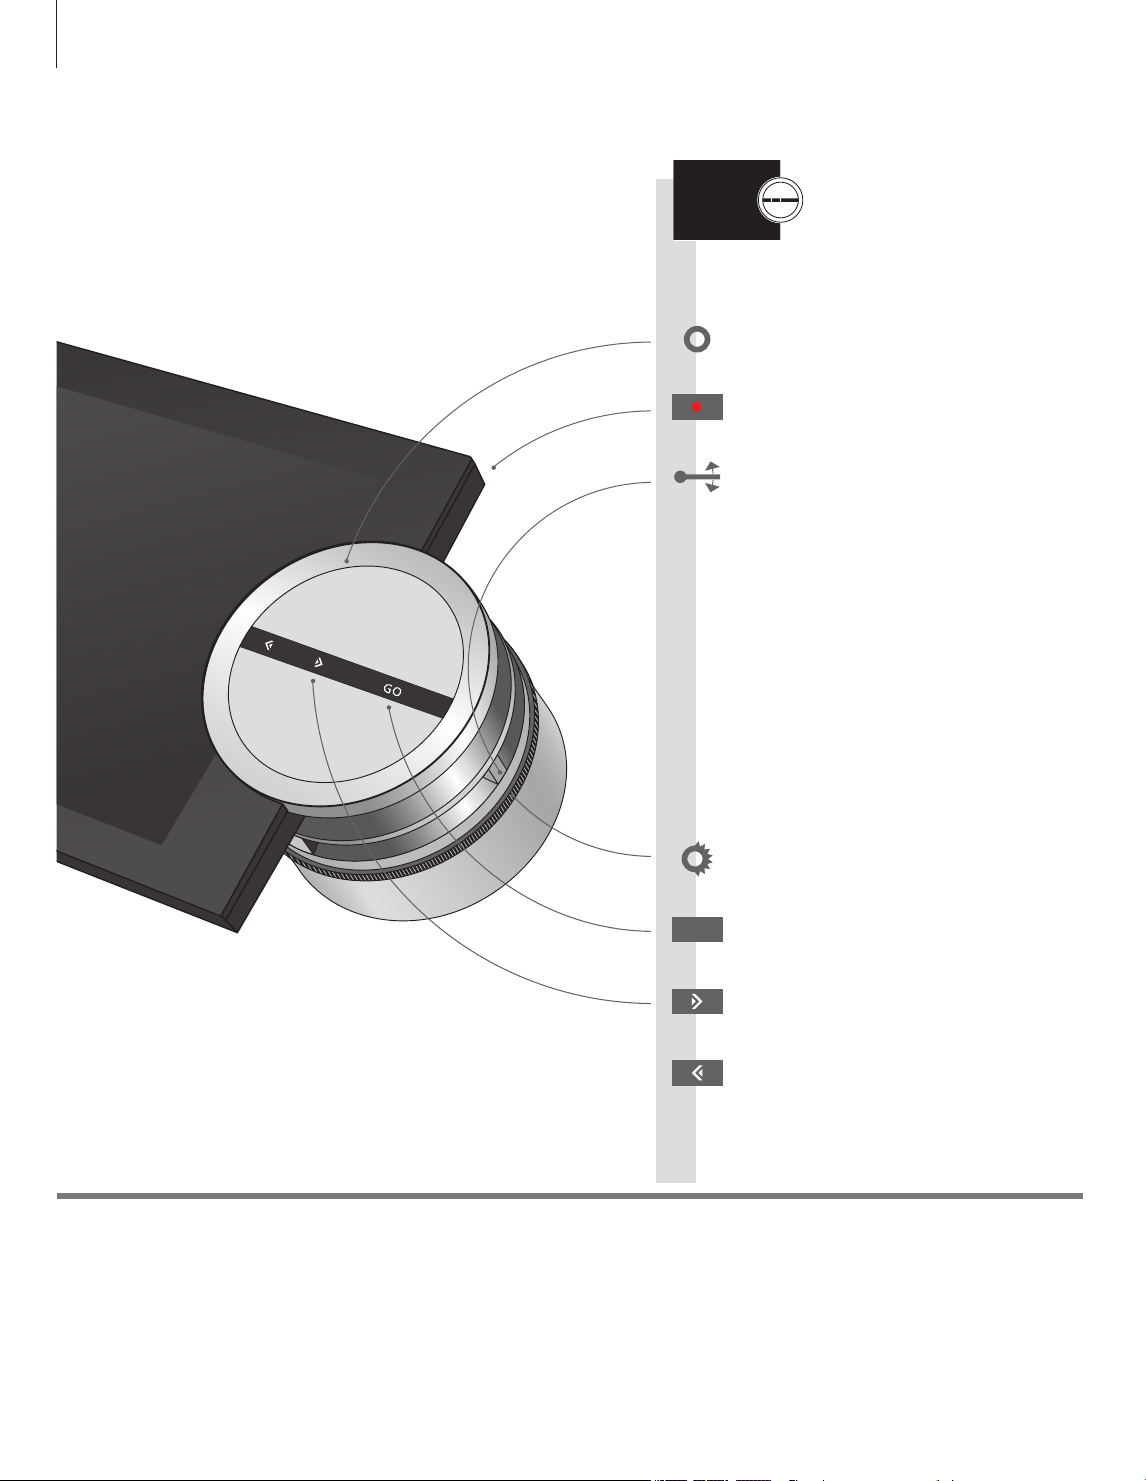
How to use your music system
The music system is designed for close-up operation.
You use the pointer, the wheel and the buttons to
operate.
The wheel: Scroll lists of content or browse in
menus.
Standby.
The pointer: Move the ‘laser-beam’ between
views and menus along the ‘Arc’ to the lef t.
Important
Symbols
Remote control
Turn to adjust volume.
Activate display. Conrm selection. Play or
GO
pause track or bring up sub-menus.
Close sub-menu or go to next track or station
in Player mode. Leave SETTINGS menus
without storing.
Open sub -menu or select item. Go to previous
track or station in Player mode.
The symbols shown above are used in this Getting Started to explain how to operate the music system.
The product can also be operated by remote control. This and more is explained in the Guide found on
www.bang-olufsen.com/guides.
Page 7
Spring
Various Artists / Greatest Hits
MODE
ARTISTS
ALBUMS
TITLES
FAVOURITES
QUEUE
Winter
Spring
Moonlight
Sunshine
Shooting Stars
Hearts in Love
Summer
Butterfly
Fall
Greatest Hits
Various Artists
COVERS
The ‘Arc’ – select items along
the Arc with the pointer
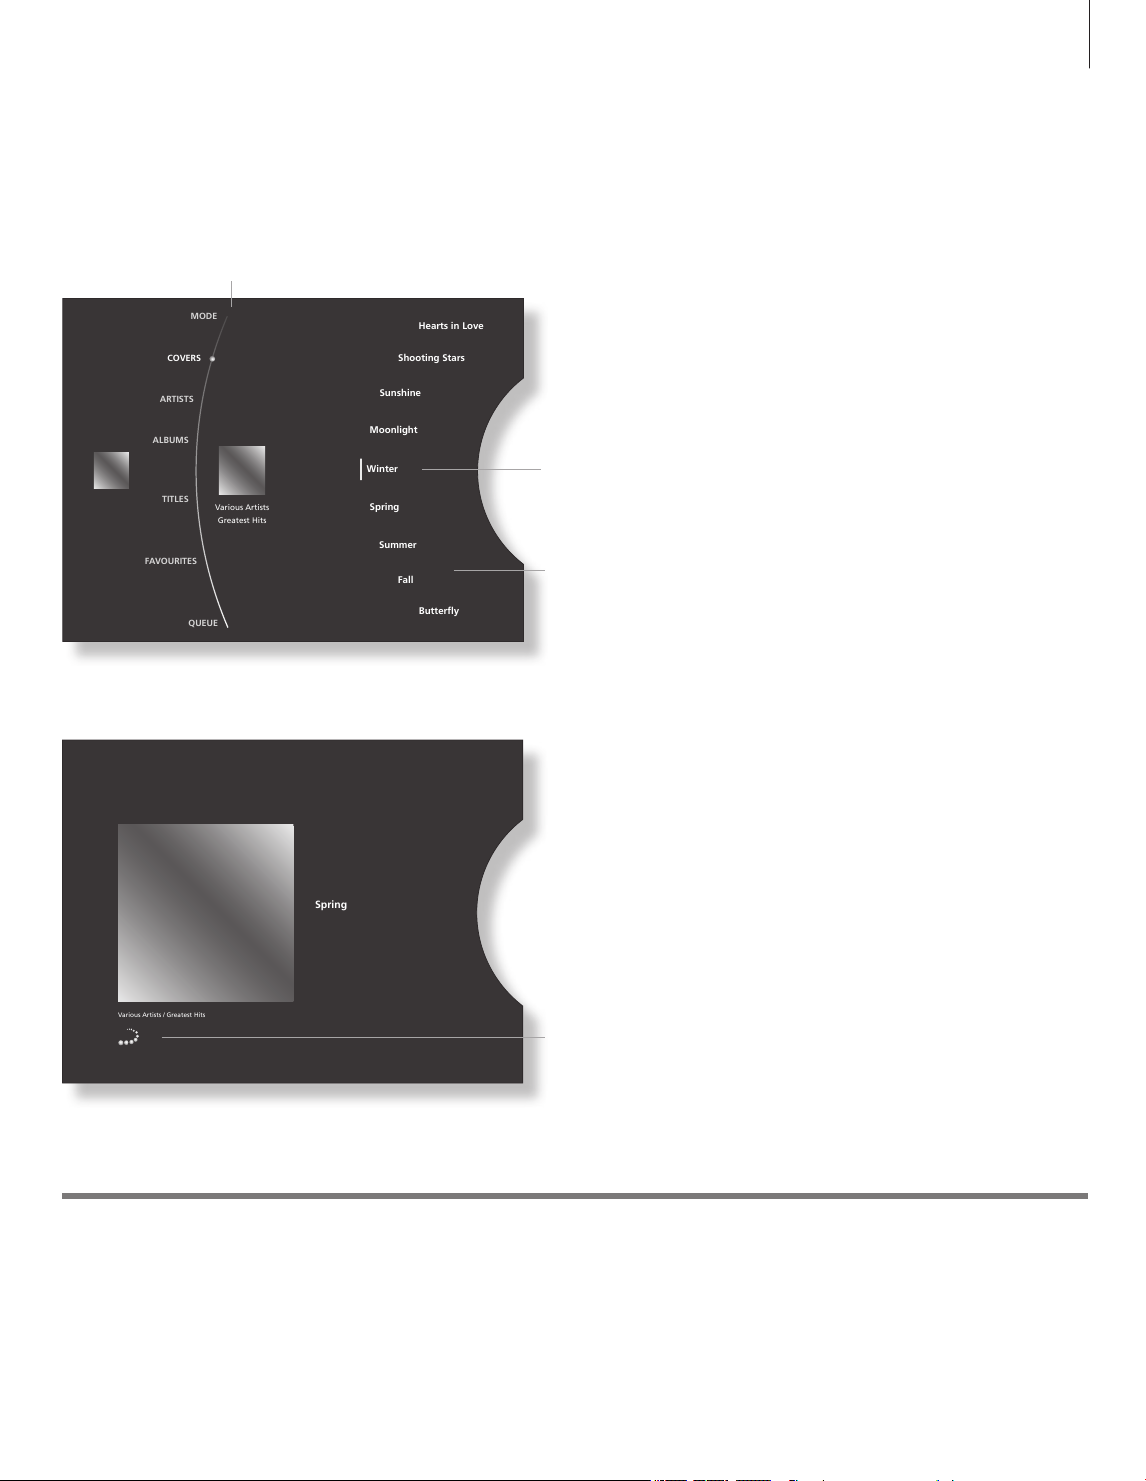
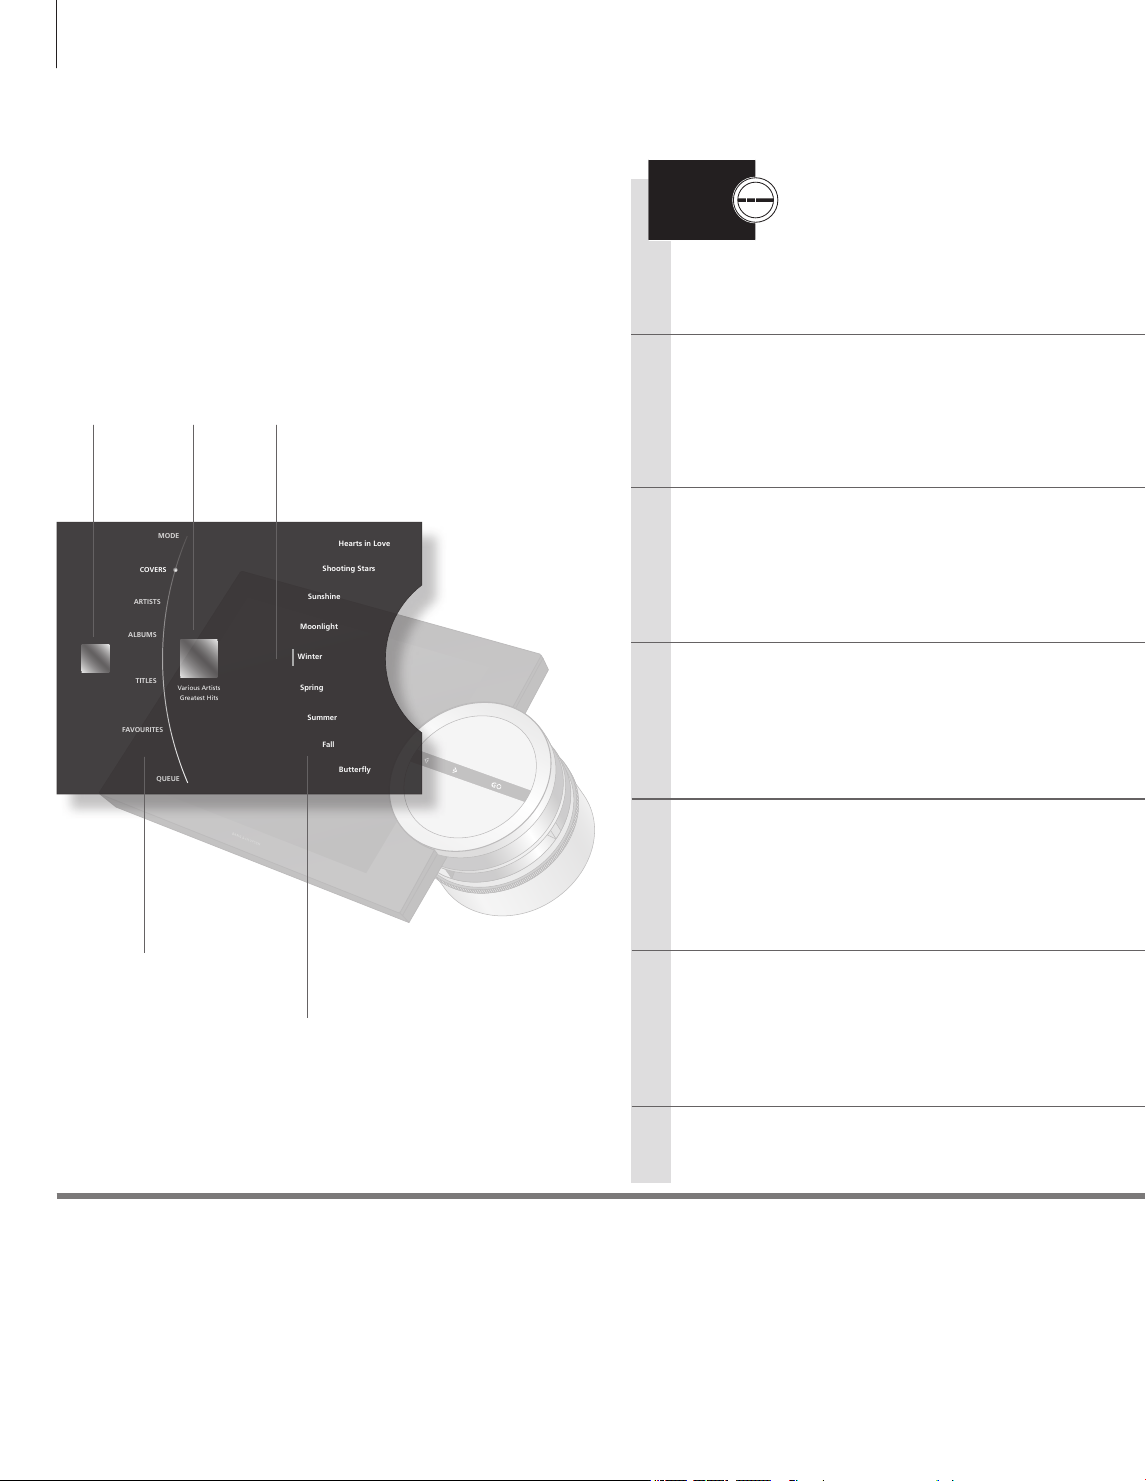
The display
The display has two different modes: Browser mode and Player mode. You can
do different things when in Player and Browser mode.
Browser mode
In Browser mode, you can look through the content on your music system without
interrupting playback. You can add music to make your own play queues or
‘plant a seed’ to auto -generate a MOTS play queue.
The ‘Wheel focus’ – shows the current selection and focus of operation.
A vertical line in front of an item shows that something new starts, for
example; a new album.
The ‘Wheel list’ – shows lists of content.
7
You enter Browser mode by pressing the GO button.
The display enters Player mode automatically 3 minutes af ter
the last operation. To activate Player mode faster, just move
the pointer to the top or bottom of the display.
Start-up time The start-up time of your music system depends on the POWER SAVING setting. See the Guide for more
information.
Player mode
In Player mode, you can see what is playing. Use the buttons to pause playback
or step to the next/previous track or radio station, and turn the volume wheel to
adjust volume.
You can also use a Bang& Olufsen remote control to perform these operations.
MOTS icon – shows that the music playing is generated by MOTS.
Page 8
MODE
ARTISTS
ALBUMS
TITLES
FAVOURITES
QUEUE
Winter
Spring
Moonlight
Sunshine
Shooting Stars
Hearts in Love
Summer
Butterfly
Fall
Greatest Hits
Various Artists
COVERS
8
Listen to your music
To activate the display from standby, just press the GO button.
You can now browse your music collection to nd the music
you want to listen to.
Cover of
playing
album
Cover of
album in
focus
Wheel focus –
shows focus of user
operation
BeoSound 5 Encore Operation
Start N.MUSIC
The music system starts from the beginning of the last
played track.
Browse music
Browse your music without interfering with the current track.
Pause or resume
In Player mode, you can pause or resume playback of the
current track.
View
music by
Covers
Artists
Albums
Titles
Important information
Play specic track
Select a specic track by artist, album or cover.
Next or previous
The wheel list
Shows content in
selected view
In Player mode, you can step to the next or previous track.
Switch off
Music To listen to N.MUSIC, your music system must be connected to a digital music source, for example a
hard disc, a DLNA server (NAS), a computer, USB stick or handheld device.
For information about how to connect your preferred sources, refer to page16 in this Getting Started
and to the Guide.
Page 9

GO
9
Highlight
MODE
Highlight a
view
GO
Press once to pause and again
to resume
Highlight a
view
Select
N.MUSIC*
1
Conrm
Open Browse
Open Browse
Browse
Browse
GO
Conrm
Previous or next track
Press
Remote control
Views
1*
N.MUSIC
Remote control operation is explained in the Guide found on www.bang-olufsen.com/guides.
Available views in N.MUSIC are COVERS, ARTISTS, ALBUMS and TITLES. Albums without a cover are
shown with a default cover.
Select the ‘name’ of the music source you want to use (A.MEM, CD or N.MUSIC).
Page 10

MODE
COVERS
ARTISTS
ALBUMS
FAVOURITES
QUEUE
ADD TO QUEUE
01
BLUE
YELLOW
GREEN
RED
02
04
03
Spring
TITLES
10
MOTS, play queues and favourites
You can decide the playback order of your music, or let the music
system generate a MOTS play queue for you. The last track you
add to your play queue always serves as a MOTS ‘seed’.
Track title Coloured lists
BeoSound 5 Encore Operation
Start N.MUSIC
The music system starts from the beginning of the last
played track.
Seed MOTS
Use a track as seed to auto-generate an endless
sequence of similar tracks.*
1
Make a play queue
Add track, album or artist to the play queue.
MOTS
status for
selected
source
Information
Numbered
favourites
1
* MOTS
Play queue
Play from the play queue.*
2
Remove from queue
Remove track, album or artist from the play queue.
Play favourites
Browse in four coloured lists and 99 numbered
favourites.*
The idea of MOTS is that you ‘plant a seed’ by selecting a track, and this seed will then grow into a list
of similar music. Once you start playing a track, it will continue to play similar music.
To generate a MOTS play queue, the music system always uses the last added track in the play queue.
3
Page 11

GO
11
Highlight
MODE
Select track
Select track,
album or artist
Highlight
QUEUE
N.MUSIC
Activate
Player mode
GO
Press and
hold
Conrm Select
GO
Press and
hold
Select ‘ADD TO
QUEUE’
GO
Conrm Select track
GO
Conrm
Highlight
QUEUE
Highlight
FAVOURITES
2
* Play queue
3
* Favourites
Select item
to remove
list
GO
Press and hold
to reveal options
GO
Conrm Select coloured
REMOVE
or
Select
numbered
favourite
GO
Conrm Select
GO
Conrm
The play queue shows the list of music items (tracks, albums, etc.) you have selected for playback.
You can place your favourite music in coloured lists and numbered favourites to be able to select it quickly with the remote
control. For further information, see the Guide on www.bang-olufsen.com/guides
Page 12

MODE
LANGUAGES
COUNTRIES
NAMES
FAVOURITES
Country
Dance
Comedy
College
Classical
Classic Rock
Electronica
Gospel
Folk
Always Country
GENRES
12
Listen to internet radio
With internet radio you have easy access to radio stations
worldwide.
Radio station
playing
Wheel focus
Shows focus of
user operation
BeoSound 5 Encore Operation
Start RADIO
The music system starts automatically on the last played
station.
Find station by view
Select station by GENRES, LANGUAGES, COUNTRIES or
NAMES.
Next or previous
In Player mode, play the next or previous radio station.
Information
View
stations by
Genres
Languages
Countries
Names
Add a station as favourite
Make a radio station a numbered favourite.
The wheel list
Shows content in
selected view
Play a favourite
Browse in four coloured lists and 99 numbered favourites.
Internet connection To listen to internet radio, your music system must be connected to the internet.
Page 13

GO
13
Highlight MODE Conrm
Highlight a view Browse
Move to top or
bottom for Player
mode
Select radio
station
Select RADIO
Open Browse
Previous or next
station in Player mode
GO GO
Press and
hold
Select ‘ADD TO’
an available
number
GO
Select
Conrm
Highlight
FAVOURITES
GO
Select list or
numbered favourite
Play
Favourites If you own a Bang& Olufsen remote control, you can use it to play a
numbered station immediately, simply press the digit corresponding to
the numbered station. To play a specic station in a coloured list, press
the coloured button followed by the digit.
NOTE! The radio stations are auto matically
updated on a regular basis to reect only the
stations currently available.
Page 14

14
Place the wall bracket
Find the correct place for the music system.
Use the enclosed wall bracket and spacer as a
template to mark up where to drill the holes.
To make sure the wall bracket is level, place a spirit
level on top of the two designated supports (A).
Set up your music system
The music system must be placed on a wall, or on one of the optional accessories.
Follow the instructions below to place the music system on a wall – using the
standard wall bracket.
80 mm
3.15"
140 mm
5.5"
260 mm – 10. 24"
A
Fasten the wall bracket
Use the appropriate size and type of screws and
wall plugs – taking into account the construction
and condition of the wall. Use three screws/
fasteners with a minimum load rating of 3.5 kg
(8 lbs.).
Before you fasten the music system on the wall
bracket, insert the cables into the corresponding
sockets of the cylinder on the back of the music
system (B). For information about sockets, refer to
page16.
Information
Light par tition walls If you intend to hang the music system on a gypsum wall (also known as dry wall or wall board), the wall
B
bracket must be fastened to a vertical stud. Use one lag screw (5 mm – 0.2"), which penetrates the
gypsum, and is screwed a minimum of 25 mm (1") into a vertical stud. For stability, use two additional
screws of a type intended for gypsum walls. Mounting was evaluated for use on a drywall surface.
Page 15

Fasten the music system
3
4
click
Turn the cylinder clockwise as far as it goes. Insert
a pencil or similar into the small hole on the outer
side of the cylinder to gently unlock the locking
mechanism, as shown (1).
Then turn the cylinder clockwise as far as it will
go. One of the ‘cut-outs’ in the cylinder must be
in a 12 o’ clock position, as shown (2).
Now t the music system onto the wall bracket
(3) and turn the cylinder clockwise to tighten
until the music system is fastened securely on the
wall (4).
15
2
3
4
click
1
Dismount the music system
Face the music system from the front:
Turn the cylinder counter-clockwise as far as it
goes. Insert a pencil or similar into the small hole
on the outer side of the cylinder and gently
unlock the locking mechanism, as shown (1).
Then turn the cylinder counter-clockwise as far as
it will go (2).
Disconnect the cables from the socket panel.
NOTE! The product is heavy and must be handled
with care.
Cleaning
Display
Cabinet and controls
Use a soft, dry cloth to wipe dust off the music system. Do not use
liquid cleaners or aerosol cleaners.
Wipe dust off the surfaces using a dry, soft cloth. To remove stains or
dirt, use a soft, damp cloth and a solution of water and mild detergent,
such as washing-up liquid.
1
2
NOTE! Regular maintenance, such as cleaning,
is the responsibility of the user.
Page 16

16
Connections
The permanent sockets are placed on the back
side of the music system, whereas sockets for
temporary use are easily accessible below the
display.
Connections
To use BeoSound 5 Encore as a navigation panel for your music collection, one or
several digital music sources must be connected.
POWER
LINK
5 V
0.5 A
POWER
DC
ETHERNET CONNEC TION*
POWER LINK
Power Link socket for loudspeaker
connection
Loudspeaker connections – Power Link
Connect your active speakers to the socket
marked Power Link and loop the signal
through from speaker to speaker. Refer to
the Guides for the BeoLab loudspeakers.
USB
USB connection – for permanent music
storage on external hard disc drive.
POWER
Connect the music system to the mains
using the supplied power supply.*
1
2
LINE IN
Line-in connection – for connection of
an MP3 player such as an iPod.
Headphone connec tion
When headphones are plugged in, the
speakers, connected to your music
system, are muted.
NOTE! Prolonged listening at a high
volume level may cause hearing
damages!
USB
USB connection – for temporar y music
storage on a USB stick.
Important information
Connections
2
* Power supply
For more information about connections, see the Guide on
www.bang-olufsen.com/guides.
For information about how to connect the music system to the mains using
the supplied power supply, please refer to its own Guide.
1*
For access to internet radio, DLNA server (NAS),
3rd party server, BeoSound 5/BeoMaster 5 setup, etc.
NOTE! Only connect to a local area network (L AN)
that does not exit your house or building.
Page 17

17
Page 18

18
What to do if…
If you want to… Then…
Enter pincode on start-up…
Switch between sources… Use the pointer to select MODE. Then turn the wheel to choose between available sources, and press
Find out why a source is not available… If the source you want to select does not appear in the MODE menu, it is most likely because it is not
Add a track to the play queue…
See the play queue… Move the pointer to select QUEUE and the play queue appears in the wheel list to the right.
Clear the play queue… Use the pointer to select QUEUE, then turn the wheel to select a random track. Now press and hold
Remove a track from the play queue… Use the pointer to select QUEUE, then turn the wheel to nd the track you wish to remove. Now press
Use a track as MOTS seed… The last track in the play queue always serves as MOTS seed, also when you play a coloured list or a
Make a coloured list… Turn the wheel to nd the item (track, album, artist or radio station), you wish to add to a coloured list.
Use the wheel to enter the digits in your pincode. Use the arrow button left or GO to add a digit. Use the
arrow button right
and select STORE, then press GO. For further information about pincode, see the Guide.
GO to conrm.
connected. Make connections and try again.
Use the pointer to select a view, e.g. Albums. Then turn the wheel to browse in the selected view (use the
left arrow
add to the play queue. When the track is selected, press and hold GO, then scroll the wheel to select
ADD TO QUEUE and press GO.
GO, turn the wheel to select CLEAR QUEUE and press GO.
and hold GO, scroll the wheel to select REMOVE and press GO.
numbered favourite. See page10.
Then press and hold GO, turn the wheel to select a colour and press GO to conrm.
Note that you cannot add music from two different music sources to a coloured list, each music source
has its own favourite lists.
to remove previously entered digits. To store the entered pincode, turn the wheel
to unfold the view, if necessary) and turn the wheel again to nd the track you want to
Play a coloured list… Activate N.MUSIC. Turn the wheel to select FAVOURITES and press GO, turn the wheel to select the
coloured list you want and press GO.
Change the display language… Use the pointer to select MODE, then turn the wheel to select SETTINGS and use the pointer again to
highlight SYSTEM SETTINGS. Now turn the wheel to select L ANGUAGE and press GO, then turn the
wheel to select language and press GO.
Important information
Guide
To learn more about your music system, look up the Guide on www.bang-olufsen.com/guides or see the
FAQ section on our website.
Page 19

19
Page 20

20
This product is in
conformity with the
provisions of the Directive
1999/5/EC (R&TTE).
AT, BE, BG, CH, CY, CZ, DE, DK, EE, ES, FI, FR, GB,
GR, HU, IE, IS, IT, LI, LT, LU, LV, MT, NL, NO, PL, PT,
RO, SE, SI, SK, TR.
Hereby, Bang & Olufsen declares that this Audio
System with WLAN is in compliance with the
essential requirements and other relevant
provisions of Directive 1999/5/EC.
The Declaration of Conformity may be consulted
at www.bang-olufsen.com/guides.
This product incorporates copyright protection
technology that is protected by U.S. patents and
other intellectual property rights. Use of this
copy right protection technology must be
authorized by Rovi, and is intended for home and
other limited viewing uses only unless otherwise
authorized by Rovi. Reverse engineering or
disassembly is prohibited.
HDMI, the HDMI logo and High-Denition
Multi media Interface are trademarks or registered
trade marks of HDMI Licensing LLC.
The distance from the human hand to the
transmitter antenna during normal use of this
product will be at least 6 cm, which is more than
the RF exposure safety distance of 4 cm.
Bang & Olufsen cannot vouch for the quality of
net radio stations available from programme
providers.
For the US -market only!
Changes or modications not expressly approved
by the party responsible for compliance could void
the user’s authority to operate the equipment.
This device complies with par t 15 of the FCC Rules.
Operation is subject to the following two
conditions: (1) this device may not cause harmful
interference, and (2) this device must accept any
interference received, including interference that
may cause undesired operation.
NOTE: This equipment has been tested and found
to comply with the limits for a class B digital
device, pursuant to part 15 of the FCC Rules.
These limits are designed to provide reasonable
protection against harm ful inter ference in a
residential installation. This equipment generates,
uses and can radiate radio frequency energy and,
if not installed and used in accordance with the
instructions, may cause harmful interference to
radio communications. However, there is no
guarantee that inter ference will not occur in a
particular installation. If this equipment does
cause harmful interference to radio or tele vision
reception, which can be determined by turning
the equip ment off and on, the user is encouraged
to try to correct the interference by one or more
of the following measures:
– Reorient or relocate the receiving antenna.
– Increase the separation between the equipment
and receiver.
– Connect the equipment into an outlet on a
circuit different from that to which the receiver
is connected.
– Consult the retailer or an experienced radio/TV
technician for help.
For the Canadian market only!
This class B digital apparatus meets all requirements
of the Canadian Interference- Causing Equipment
Regulations.
This device complies with Industry Canada
licenceexempt RSS standard(s). Operation is
subject to the following two conditions: (1) this
device may not cause interference, and (2) this
device must accept any interference, including
interference that may cause undesired operation
of the device.
Under Industry Canada regulations, this radio
transmitter may only operate using an antenna of
a type and maximum (or lesser) gain approved for
the transmitter by Industry Canada. To reduce
potential radio interference to other users, the
antenna type and its gain should be so chosen
that the equivalent isotropically radiated power
(e.i.r.p.) is not more than that necessary for
successful communication.
This radio transmitter (3775A-SMALLENGINE) has
been approved by Industry Canada to operate
with the antenna types listed below with the
maximum permissible gain and required antenna
impedance for each antenna type indicated. Antenna
types not included in this list, having a gain greater
than the maximum gain indicated for that type,
are strictly prohibited for use with this device:
Tyco Electronics Antenna 1551359-1, Gain 5dBi,
Impedance 50 Ohm.
This equipment complies with IC RSS-102 radiation
exposure limits set forth for an uncontrolled
environment. This equipment should be installed
and operated with a minimum distance 20 cm
between the radiator and your body.
Please note that high-power radars are allocated
as primary users (i.e. priority users) of the bands
5250-5350 MHz and 5650-5850 MHz and these
radars can cause interference and/or damage to LELAN (License-exempt Local Area Network) devices.
Page 21

21
Waste Electrical and Electronic Equipment
(WEEE) – Environmental protection
Electrical and electronic equipment, parts and
batteries marked with this symbol must not be
disposed of with normal household wastage; all
electrical and electronic equipment, parts and
batteries must be collected and disposed of
separately.
When disposing of electrical and electronic
equipment and batteries by use of the collection
systems available in your country, you protect the
environment, human health and contribute to the
prudent and rational use of natural resources.
Collecting electrical and electronic equipment,
batteries and waste prevents the potential
All Bang & Olufsen products comply with applicable
environmental legislation throughout the world.
contamination of nature with the hazardous
substances which may be present in electrical
and electronic products and equipment.
Your Bang & Olufsen retailer will advise you of the
correct way of disposal in your country.
If a product is too small to be marked with the
symbol, it will appear in the User guide, on the
Guarantee certicate, or on the packaging.
Page 22

22
Page 23

Page 24

 Loading...