


 Loading...
ROG STRIX Z490-G GAMING Series
BIOS Manual
<![endif]>Motherboard

E16801
First Edition
May 2020
Copyright© 2020 ASUSTeK COMPUTER INC. All Rights Reserved.
No part of this manual, including the products and software described in it, may be reproduced, transmitted, transcribed, stored in a retrieval system, or translated into any language in any form or by any means, except documentation kept by the purchaser for backup purposes, without the express written permission of ASUSTeK COMPUTER INC. (“ASUS”).
Product warranty or service will not be extended if: (1) the product is repaired, modified or altered, unless such repair, modification of alteration is authorized in writing by ASUS; or (2) the serial number of the product is defaced or missing.
ASUS PROVIDES THIS MANUAL “AS IS” WITHOUT WARRANTY OF ANY KIND, EITHER EXPRESS OR IMPLIED, INCLUDING BUT NOT LIMITED TO THE IMPLIED WARRANTIES OR CONDITIONS OF MERCHANTABILITY OR FITNESS FOR A PARTICULAR PURPOSE. IN NO EVENT SHALL ASUS, ITS DIRECTORS, OFFICERS, EMPLOYEES OR AGENTS BE LIABLE FOR ANY INDIRECT, SPECIAL, INCIDENTAL, OR CONSEQUENTIAL DAMAGES (INCLUDING DAMAGES FOR LOSS OF PROFITS, LOSS OF BUSINESS, LOSS OF USE OR DATA, INTERRUPTION OF BUSINESS AND THE LIKE), EVEN IF ASUS HAS BEEN ADVISED OF THE POSSIBILITY OF SUCH DAMAGES ARISING FROM ANY DEFECT OR ERROR IN THIS MANUAL OR PRODUCT.
SPECIFICATIONS AND INFORMATION CONTAINED IN THIS MANUAL ARE FURNISHED FOR INFORMATIONAL USE ONLY, AND ARE SUBJECT TO CHANGE AT ANY TIME WITHOUT NOTICE, AND SHOULD NOT BE CONSTRUED AS A COMMITMENT BY ASUS. ASUS ASSUMES NO RESPONSIBILITY OR LIABILITY FOR ANY ERRORS OR INACCURACIES THAT MAY APPEAR IN THIS MANUAL, INCLUDING THE PRODUCTS AND SOFTWARE DESCRIBED IN IT.
Products and corporate names appearing in this manual may or may not be registered trademarks or copyrights of their respective companies, and are used only for identification or explanation and to the owners’ benefit, without intent to infringe.
Offer to Provide Source Code of Certain Software
This product contains copyrighted software that is licensed under the General Public License (“GPL”), under the Lesser General Public License Version (“LGPL”) and/or other Free Open Source Software Licenses. Such software in this product is distributed without any warranty to the extent permitted by the applicable law. Copies of these licenses are included in this product.
Where the applicable license entitles you to the source code of such software and/or other additional data, you may obtain it for a period of three years after our last shipment of the product, either
(1)for free by downloading it from https://www.asus.com/support/
or
(2)for the cost of reproduction and shipment, which is dependent on the preferred carrier and the location where you want to have it shipped to, by sending a request to:
ASUSTeK Computer Inc.
Legal Compliance Dept.
1F., No. 15, Lide Rd.,
Beitou Dist., Taipei City 112,
Taiwan
In your request please provide the name, model number and version, as stated in the About Box of the product for which you wish to obtain the corresponding source code and your contact details so that we can coordinate the terms and cost of shipment with you.
The source code will be distributed WITHOUT ANY WARRANTY and licensed under the same license as the corresponding binary/object code.
This offer is valid to anyone in receipt of this information.
ASUSTeK is eager to duly provide complete source code as required under various Free Open Source Software licenses. If however you encounter any problems in obtaining the full corresponding source code we would be much obliged if you give us a notification to the email address gpl@asus.com, stating the product and describing the problem (please DO NOT send large attachments such as source code archives, etc. to this email address).
2 |
ROG STRIX Z490-G GAMING Series BIOS Manual |

Contents
1.1 |
Knowing BIOS................................................................................................ |
4 |
|
1.2 |
BIOS setup program...................................................................................... |
5 |
|
|
1.2.1 |
Advanced Mode.............................................................................. |
6 |
|
1.2.2 |
EZ Mode......................................................................................... |
9 |
|
1.2.3 |
QFan Control................................................................................ |
10 |
1.3 |
My Favorites................................................................................................. |
12 |
|
1.4 |
Main menu.................................................................................................... |
14 |
|
1.5 |
Ai Tweaker menu......................................................................................... |
16 |
|
1.6 |
Advanced menu........................................................................................... |
35 |
|
|
1.6.1 |
Platform Misc Configuration.......................................................... |
36 |
|
1.6.2 |
CPU Configuration........................................................................ |
37 |
|
1.6.3 |
System Agent (SA) Configuration................................................. |
40 |
|
1.6.4 |
PCH Configuration........................................................................ |
41 |
|
1.6.5 |
PCH Storage Configuration.......................................................... |
42 |
|
1.6.6 |
PCH-FW Configuration................................................................. |
43 |
|
1.6.7 |
PCI Subsystem Settings............................................................... |
43 |
|
1.6.8 |
USB Configuration........................................................................ |
44 |
|
1.6.9 |
Network Stack Configuration........................................................ |
45 |
|
1.6.10 |
NVMe Configuration..................................................................... |
45 |
|
1.6.11 |
Onboard Devices Configuration.................................................... |
46 |
|
1.6.12 |
APM Configuration........................................................................ |
48 |
|
1.6.13 |
HDD/SSD SMART Information..................................................... |
49 |
1.7 |
Monitor menu............................................................................................... |
49 |
|
1.8 |
Boot menu.................................................................................................... |
54 |
|
1.9 |
Tool menu..................................................................................................... |
59 |
|
|
1.9.1 |
ASUS EZ Flash 3 Utility................................................................ |
60 |
|
1.9.2 |
Secure Erase................................................................................ |
60 |
|
1.9.3 |
ASUS User Profile........................................................................ |
61 |
|
1.9.4 |
ASUS SPD Information................................................................. |
62 |
|
1.9.5 |
ASUS Armoury Crate.................................................................... |
62 |
1.10 |
Exit menu...................................................................................................... |
63 |
|
1.11 |
Updating BIOS............................................................................................. |
64 |
|
|
1.11.1 |
EZ Update..................................................................................... |
64 |
|
1.11.2 |
ASUS EZ Flash 3.......................................................................... |
65 |
|
1.11.3 |
ASUS CrashFree BIOS 3............................................................. |
66 |
ROG STRIX Z490-G GAMING Series BIOS Manual |
3 |

BIOS Setup
1.1Knowing BIOS
The new ASUS UEFI BIOS is a Unified Extensible Interface that complies with UEFI architecture, offering a user-friendly interface that goes beyond the traditional keyboardonly BIOS controls to enable a more flexible and convenient mouse input. You can easily navigate the new UEFI BIOS with the same smoothness as your operating system. The term “BIOS” in this user manual refers to “UEFI BIOS” unless otherwise specified.
BIOS (Basic Input and Output System) stores system hardware settings such as storage device configuration, overclocking settings, advanced power management, and boot device configuration that are needed for system startup in the motherboard CMOS. In normal circumstances, the default BIOS settings apply to most conditions to ensure optimal performance. DO NOT change the default BIOS settings except in the following circumstances:
•An error message appears on the screen during the system bootup and requests you to run the BIOS Setup.
•You have installed a new system component that requires further BIOS settings or update.
Inappropriate BIOS settings may result to instability or boot failure. We strongly recommend that you change the BIOS settings only with the help of a trained service personnel.
•When downloading or updating the BIOS file for your motherboard, rename it as XXXXX.CAP. The name of the CAP file varies depending on models. Refer to the
user manual that came with your motherboard for the name.
•The screenshots in this manual are for reference only, please refer to the latest BIOS version for settings and options.
•BIOS settings and options may vary due to different BIOS release versions. Please refer to the latest BIOS version for settings and options.
4 |
ROG STRIX Z490-G GAMING Series BIOS Manual |

1.2BIOS setup program
Use the BIOS Setup to update the BIOS or configure its parameters. The BIOS screen include navigation keys and brief onscreen help to guide you in using the BIOS Setup program.
Entering BIOS at startup
To enter BIOS Setup at startup, press <Delete> or <F2> during the Power-On Self Test (POST). If you do not press <Delete> or <F2>, POST continues with its routines.
Entering BIOS Setup after POST
To enter BIOS Setup after POST:
•Press <Ctrl>+<Alt>+<Delete> simultaneously.
•Press the reset button on the system chassis.
•Press the power button to turn the system off then back on. Do this option only if you failed to enter BIOS Setup using the first two options.
After doing either of the three options, press <Delete> key to enter BIOS.
•The BIOS setup screens shown in this section are for reference purposes only, and
may not exactly match what you see on your screen.
•Ensure that a USB mouse is connected to your motherboard if you want to use the mouse to control the BIOS setup program.
•If the system becomes unstable after changing any BIOS setting, load the default settings to ensure system compatibility and stability. Select the Load Optimized Defaults item under the Exit menu or press hotkey <F5>. See section Exit menu for details.
•If the system fails to boot after changing any BIOS setting, try to clear the CMOS and reset the motherboard to the default value. See your motherboard manual for information on how to erase the RTC RAM.
•The BIOS setup program does not support Bluetooth devices.
BIOS menu screen
The BIOS Setup program can be used under two modes: EZ Mode and Advanced Mode. You can change modes from Setup Mode in Boot menu or by pressing the <F7> hotkey.
The BIOS settings and options for each motherboard may differ slightly with the options in this manual. Please refer to the BIOS of your motherboard for the settings and options.
ROG STRIX Z490-G GAMING Series BIOS Manual |
5 |
1.2.1Advanced Mode
The Advanced Mode provides advanced options for experienced end-users to configure the BIOS settings. The figure below shows an example of the Advanced Mode. Refer to the following sections for the detailed configurations.
The default screen for entering the BIOS setup program can be changed. Refer to the Setup Mode item in section Boot menu for details.
|
|
Configuration fields |
|
|
|
|
|
|
|
|
|
|
|
|||
|
|
Pop-up Menu |
|
|
|
|
|
|
|
|
|
|
|
Scroll bar |
||
|
|
Menu bar |
|
|
|
|
|
|
|
|
|
|
|
|||
|
|
Language |
MyFavorite(F3) Qfan Control(F6) Search(F9) |
AURA ON/OFF |
|
|||||||||||
|
|
|
|
|
||||||||||||
|
|
|
|
|
|
|
|
|
|
|
|
|
|
|
|
|
|
|
|
|
|
|
|
|
|
|
|
|
|
|
|
|
|
|
|
|
|
|
|
|
|
|
|
|
|
|
|
|
|
|
|
|
|
|
|
|
|
|
|
|
|
|
|
|
|
|
|
|
|
|
|
|
|
|
|
|
|
|
|
|
|
|
|
|
|
|
|
|
|
|
|
|
|
|
|
|
|
|
|
|
|
|
|
|
|
|
|
|
|
|
|
|
|
|
|
|
|
|
|
|
|
|
|
|
|
|
|
|
|
|
|
|
|
|
|
|
|
|
|
|
|
|
|
|
|
|
|
|
|
|
|
|
|
|
|
|
|
|
|
|
|
|
|
|
|
|
|
|
|
|
|
|
|
|
|
|
|
|
|
|
|
|
|
|
|
|
|
|
|
|
|
|
|
|
|
|
|
|
|
|
General |
|
help |
|
|
|
to EZ Mode |
|
|
|
|
|
|
|
|
|
|
|
|||
|
|
|
Submenu items |
|
Last modified settings Go back |
|
||||||
|
|
|
|
|
|
|
|
|
|
|
||
|
|
|
|
|
|
|
|
|
|
|
Hot keys |
|
|
|
|
|
Menu items |
|
|
|
|
Displays a quick overview |
|||
|
|
|
|
|
|
|
|
|||||
|
|
|
|
|
|
|
|
|
||||
|
|
|
|
|
|
|
|
|
|
of the system status |
||
6 |
ROG STRIX Z490-G GAMING Series BIOS Manual |

Menu bar
The menu bar on top of the screen has the following main items:
My Favorites
Main
Ai Tweaker
Advanced
Monitor
Boot
Tool
Exit
For saving the frequently-used system settings and configuration.
For changing the basic system configuration
For changing the overclocking settings
For changing the advanced system settings
For displaying the system temperature, power status, and changing the fan settings.
For changing the system boot configuration
For configuring options for special functions
For selecting the exit options and loading default settings
Menu items
The highlighted item on the menu bar displays the specific items for that menu. For example, selecting Main shows the Main menu items.
The other items (My Favorites, Ai Tweaker, Advanced, Monitor, Boot, Tool, and Exit) on the menu bar have their respective menu items.
Submenu items
An arrow sign (>) before each item on any menu screen means that the item has a submenu. To display the submenu, select the item and press <Enter>.
Language
This button above the menu bar contains the languages that you can select for your BIOS. Click this button to select the language that you want to display in your BIOS screen.
My Favorite (F3)
This button above the menu bar shows all BIOS items in a Tree Map setup. Select frequently-used BIOS settings and save it to My Favorites menu.
Refer to section My Favorites for more information.
QFan Control (F6)
This button above the menu bar displays the current settings of your fans. Use this button to manually tweak the fans to your desired settings.
Refer to section QFan Control for more information.
Search (F9)
This button allows you to search for BIOS items by entering its name, enter the item name to find the related item listing.
ROG STRIX Z490-G GAMING Series BIOS Manual |
7 |

AURA ON/OFF(F4)
This button allows you to turn the RGB LED lighting or functional LED on or off.
[All On]: |
All LEDs (Aura or Functional) will be enabled. |
[Aura Only]: |
Aura LEDs will be enabled and functional LEDs will be disabled. |
[Aura Off]: |
Aura LEDs will be disabled, however functional LEDs will still be enabled. |
[Stealth Mode]: |
All LEDs (Aura and Functional) will be disabled. |
Hot keys
This button above the menu bar contains the navigation keys for the BIOS setup program. Use the navigation keys to select items in the menu and change the settings.
Scroll bar
A scroll bar appears on the right side of a menu screen when there are items that do not fit on the screen. Press the Up/Down arrow keys or <Page Up> / <Page Down> keys to display the other items on the screen.
General help
At the bottom of the menu screen is a brief description of the selected item. Use <F12> key to capture the BIOS screen and save it to the removable storage device.
Configuration fields
These fields show the values for the menu items. If an item is user-configurable, you can change the value of the field opposite the item. You cannot select an item that is not userconfigurable.
A configurable field is highlighted when selected. To change the value of a field, select it and press <Enter> to display a list of options.
Last Modified button
This button shows the items that you last modified and saved in BIOS Setup.
8 |
ROG STRIX Z490-G GAMING Series BIOS Manual |

1.2.2EZ Mode
The EZ Mode provides you an overview of the basic system information, and allows you to select the display language, system performance, mode and boot device priority. To access the Advanced Mode, select Advanced Mode or press the <F7> hotkey for the advanced BIOS settings.
To switch from Advanced Mode to EZ Mode, click EZ Mode(F7) or press the <F7> hotkey.
Displays a quick overview of the system status
Selects the display language of the BIOS setup program
Displays the system properties of the selected mode. Click < or > to switch modes
AURA ON/OFF(F4)
Search(F9)
Enables or disables the SATA RAID mode for Intel Rapid Storage Technology
Displays the CPU Fan’s speed. Click the button to manually tune the fans
Loads optimized
default settings Saves the changes and resets the system
Click to go to Advanced mode
Click to display boot devices
Selects the boot device priority
The boot device options vary depending on the devices you installed to the system.
ROG STRIX Z490-G GAMING Series BIOS Manual |
9 |
1.2.3QFan Control
The QFan Control allows you to set a fan profile or manually configure the operating speed of your CPU and chassis fans.
|
|
Click to select a fan to be |
Click to activate |
|
|
|
Click to activate DC Mode |
||||
|
|
configured |
PWM Mode |
|
|
|
|||||
|
|
|
|
|
|
|
|
|
|
|
|
|
|
|
|
|
|
|
|
|
|
|
|
|
|
|
|
|
|
|
|
|
|
|
|
|
|
|
|
|
|
|
|
|
|
|
|
|
|
|
|
|
|
|
|
|
|
|
|
|
|
|
|
|
|
|
|
|
|
|
|
|
|
|
|
|
|
|
|
|
|
|
|
Select a profile to |
|
Click to apply the fan setting |
|
|
|
|
|
apply to your fans |
|
|
|
|
|
||
|
Click to undo the |
Click to go back to main menu |
|
|
|||
|
|
|
|
||||
|
|
changes |
|
|
Select to manually configure |
||
|
|
|
|
|
|||
|
|
|
|
|
your fans |
||
10 |
ROG STRIX Z490-G GAMING Series BIOS Manual |
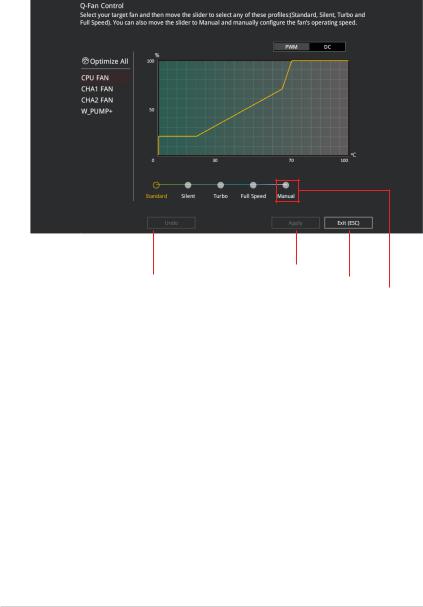
Configuring fans manually
Select Manual from the list of profiles to manually configure your fans’ operating speed.
|
|
|
|
|
|
|
|
|
|
|
|
|
|
|
|
|
|
|
|
|
|
|
|
|
|
|
|
Speed points |
Select to manually |
|||||
|
|
|
configure your fans |
|||
To configure your fans:
1.Select the fan that you want to configure and to view its current status.
2.Click and drag the speed points to adjust the fans’ operating speed.
3.Click Apply to save the changes then click Exit (ESC).
ROG STRIX Z490-G GAMING Series BIOS Manual |
11 |

1.3My Favorites
My Favorites is your personal space where you can easily save and access your favorite BIOS items. You can personalize this screen by adding or removing items.
12 |
ROG STRIX Z490-G GAMING Series BIOS Manual |
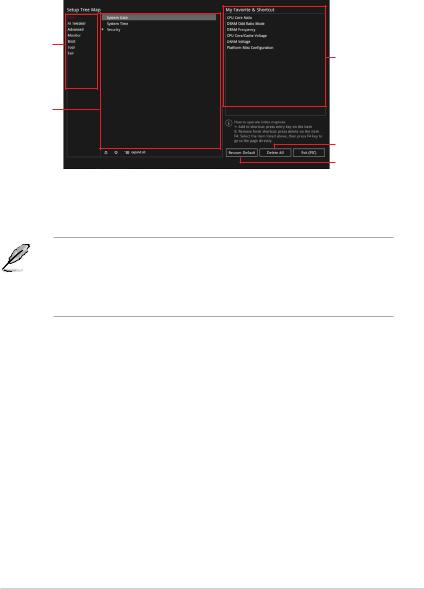
Adding items to My Favorites
To add BIOS items:
1.Press <F3> on your keyboard or click MyFavorite(F3) from the BIOS screen to open Setup Tree Map screen.
2.On the Setup Tree Map screen, select the BIOS items that you want to save in My Favorites screen.
Main menu panel
Selected shortcut items
Submenu panel
Delete all favorite items
Recover to default favorite items
3.Select an item from main menu panel, then click the submenu that you want to save as favorite from the submenu panel and click  or press <Enter> on your keyboard.
You cannot add the following items to My Favorite items:
• Items with submenu options.
•User-managed items such as language and boot order.
•Configuration items such as Memory SPD Information, system time and date.
4.Click Exit (ESC) or press <Esc> key to close Setup Tree Map screen.
5.Go to My Favorites menu to view the saved BIOS items.
ROG STRIX Z490-G GAMING Series BIOS Manual |
13 |

1.4Main menu
The Main menu screen appears when you enter the Advanced Mode of the BIOS Setup program. The Main menu provides you an overview of the basic system information, and allows you to set the system date, time, language, and security settings.
Security
The Security menu items allow you to change the system security settings.
14 |
ROG STRIX Z490-G GAMING Series BIOS Manual |

• If you have forgotten your BIOS password, erase the CMOS Real Time Clock (RTC) RAM to clear the BIOS password. See the motherboard for information on how to erase the RTC RAM via the Clear CMOS header.
•The Administrator or User Password items on top of the screen show the default [Not Installed]. After you set a password, these items show [Installed].
Administrator Password
If you have set an administrator password, we recommend that you enter the administrator password for accessing the system. Otherwise, you might be able to see or change only selected fields in the BIOS setup program.
To set an administrator password:
1.Select the Administrator Password item and press <Enter>.
2.From the Create New Password box, key in a password, then press <Enter>.
3.Re-type to confirm the password then select OK.
To change an administrator password:
1.Select the Administrator Password item and press <Enter>.
2.From the Enter Current Password box, key in the current password, then press <Enter>.
3.From the Create New Password box, key in a new password, then press <Enter>.
4.Re-type to confirm the password then select OK.
To clear the administrator password, follow the same steps as in changing an administrator password, but leave other fields blank then select OK to continue. After you clear the password, the Administrator Password item on top of the screen shows [Not Installed].
User Password
If you have set a user password, you must enter the user password for accessing the system. The User Password item on top of the screen shows the default [Not Installed]. After you set a password, this item shows [Installed].
To set a user password:
1.Select the User Password item and press <Enter>.
2.From the Create New Password box, key in a password, then press <Enter>.
3.Re-type to confirm the password then select OK.
To change a user password:
1.Select the User Password item and press <Enter>.
2.From the Enter Current Password box, key in the current password, then press <Enter>.
3.From the Create New Password box, key in a new password, then press <Enter>.
4.Re-type to confirm the password then select OK.
To clear the user password, follow the same steps as in changing a user password, but leave other fields blank then select OK to continue. After you clear the password, the User Password item on top of the screen shows [Not Installed].
ROG STRIX Z490-G GAMING Series BIOS Manual |
15 |
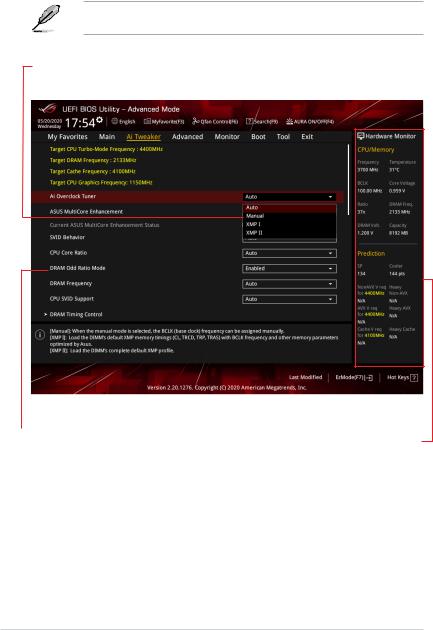
1.5Ai Tweaker menu
The Ai Tweaker menu items allow you to configure overclocking-related items.
Be cautious when changing the settings of the Ai Tweaker menu items. Incorrect field values can cause the system to malfunction.
The configuration options for this section vary depending on the CPU and DIMM model you installed on the motherboard.
Scroll down to display other BIOS items.
16 |
ROG STRIX Z490-G GAMING Series BIOS Manual |

Ai Overclock Tuner
This item allows you to select the CPU overclocking options to achieve the desired CPU internal frequency. Select any of these preset overclocking configuration options:
[Auto] |
Loads the optimal settings for the system. |
[Manual] |
When the manual mode is selected, the BCLK (base clock) frequency can |
|
be assigned manually. |
[XMP I] |
If you install memory modules supporting the eXtreme Memory Profile |
|
(XMP) Technology, choose this item to load the DIMM’s default XMP |
|
memory timings (CL, TRCD, TRP, TRAS) with BCLK frequency and other |
|
memory parameters optimized by ASUS. |
[XMP II] |
If you install memory modules supporting the eXtreme Memory Profile |
|
(XMP) Technology, choose this item to load the DIMM’s default XMP |
|
profile. |
|
|
|
The [X.M.P.] configuration option appears only when you install memory modules |
|
supporting the eXtreme Memory Profile(X.M.P.) Technology. |
|
|
The following item appears only when Ai Overclock Tuner is set to [XMP I] or [XMP II].
XMP
This item allows you to select your eXtreme Memory Profile (XMP). Each profile has its own DRAM frequency, timing and voltage.
The following items appear only when Ai Overclock Tuner is set to [XMP I], [XMP II], or
[Manual].
BCLK Frequency
This item allows you to set the BCLK (base clock) frequency to enhance the system performance. Use the <+> or <-> to adjust the value.
We recommend you to set the value based on the CPU specification, as high BCLK frequencies may damage the CPU permanently.
BCLK Spread Spectrum
This item allows you to enable or disable the BCLK Spread Spectrum. When set to [Enabled] the peak value of EMI emissions is reduced. Set to [Disabled] for a more accurate Base Clock.
Configuration options: [Auto] [Disabled] [Enabled]
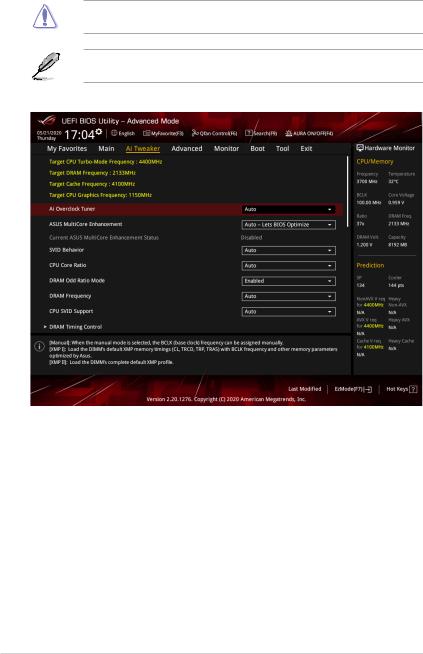
ASUS MultiCore Enhancement
[Auto - Lets BIOS Optimize] |
This item allows you to use ASUS optimized core ratio |
|
Turbo settings at default processor speeds. |
[Disabled - Enforce All limits] |
This item allows you to use Intel default Turbo core ratio |
|
settings. |
[Enabled - Remove All limits] |
This item allows you to use optimized power and current |
|
thresholds for maintaining maximum performance. |
ROG STRIX Z490-G GAMING Series BIOS Manual |
17 |

SVID Behavior
This item allows you to program the CPU’s SVID behavior based on the CPU’s quality. The default option is based on [Typical Scenario], but the more optimistic the mode selected, the lower the temperature of the CPU. [Intel’s Fail Safe] is the default behavior of the processor oblivious to the actual Motherboard design. [Trained] optimizes SVID behavior to match input parameters such as VRM Loadline and Target Frequencies.
Configuration options: [Auto] [Best-Case Scenario] [Typical Scenario] [Worst-Case Scenario] [Intel’s Fail Safe] [Trained]
CPU Core Ratio
This item allows you to set the CPU core ratios.
Configuration options: [Auto] [Sync All Cores] [By Core Usage] [AI Optimized]
The [AI Optimized] item appears only when you use an unlocked CPU.
The following item appears only when CPU Core Ratio is set to [Sync All Cores].
ALL-Core Ratio Limit
Enter [Auto] to apply the CPU default Turbo Ratio setting or manually assign a Core ratio limit to synchronize all cores.
The following item appears only when CPU Core Ratio is set to [By Core Usage].
1-Core Ratio Limit
Enter [Auto] to apply the CPU default Turbo Ratio setting or manually assign a 1-Core Limit value that must be higher than or equal to the 2-Core Ratio Limit.
2-Core Ratio Limit
Enter [Auto] to apply the CPU default Turbo Ratio setting or manually assign a 2-core ratio limit that must be higher than or equal to the 3-core ratio limit.
If you assign a value for 2-Core Ratio Limit, do not set the 1-Core Ratio Limit to [Auto].
3-Core Ratio Limit
Enter [Auto] to apply the CPU default Turbo Ratio setting or manually assign a 3-core ratio limit that must be higher than or equal to the 4-core ratio limit.
If you assign a value for 3-Core Ratio Limit, do not set the 1-Core Ratio Limit and 2-Core Ratio Limit to [Auto].
4-Core Ratio Limit
Enter [Auto] to apply the CPU default Turbo Ratio setting or manually assign a 4-core ratio limit that must be higher than or equal to the 5-core ratio limit.
If you assign a value for 4-Core Ratio Limit, do not set the 1-Core Ratio Limit, 2-Core Ratio Limit, and 3-Core Ratio Limit to [Auto].
18 |
ROG STRIX Z490-G GAMING Series BIOS Manual |

DRAM Odd Ratio Mode
This item allows you to enable or disable availability of odd DRAM ratios for improved granularity.
Configuration options: [Enabled] [Disabled]
DRAM Frequency
This item allows you to set the memory operating frequency. The configurable options vary with the BCLK (base clock) frequency setting. Select the auto mode to apply the optimized setting.
Configuration options: [Auto] [DDR4-800MHz] - [DDR4-8533MHz]
CPU SVID Support
Disable this item to stop the CPU from communicating with the external voltage regulator. We recommend setting this item to [Disabled] for overclocking.
Configuration options: [Auto] [Disabled] [Enabled]
DRAM Timing Control
The sub-items in this menu allow you to set the DRAM timing control features. Use the <+> and <-> keys to adjust the value. To restore the default setting, type [Auto] using the keyboard and press the <Enter> key.
Changing the values in this menu may cause the system to become unstable! If this happens, revert to the default settings.
Primary Timings
DRAM CAS# Latency
Configuration options: [Auto] [1] - [31]
DRAM RAS# to CAS# Delay
Configuration options: [Auto] [1] - [63]
DRAM RAS# ACT Time
Configuration options: [Auto] [1] - [63]
DRAM Command Rate
Configuration options: [Auto] [1N] [2N] [3N] [N:1]
The following item appears only when DRAM Command Rate is set to [N:1].
N to 1 ratio
Number of bubbles between wach valid command cycle.
Configurations: [4] - [7]
Secondary Timings
DRAM RAS# to RAS# Delay L
Configuration options: [Auto] [1] - [15]
DRAM RAS# to RAS# Delay S
Configuration options: [Auto] [1] - [15]
DRAM REF Cycle Time
Configuration options: [Auto] [1] - [1023]
ROG STRIX Z490-G GAMING Series BIOS Manual |
19 |

DRAM REF Cycle Time 2
Configuration options: [Auto] [1] - [1023]
DRAM REF Cycle Time 4
Configuration options: [Auto] [1] - [1023]
DRAM Refresh Interval
Configuration options: [Auto] [1] - [65535]
DRAM WRITE Recovery Time
Configuration options: [Auto] [1] - [31]
DRAM READ to PRE Time
Configuration options: [Auto] [1] - [15]
DRAM FOUR ACT WIN Time
Configuration options: [Auto] [1] - [63]
DRAM WRITE to READ Delay
Configuration options: [Auto] [1] - [15]
DRAM WRITE to READ Delay L
Configuration options: [Auto] [1] - [15]
DRAM WRITE to READ Delay S
Configuration options: [Auto] [1] - [15]
DRAM CKE Minimum Pulse Width
Configuration options: [Auto] [0] - [15]
DRAM Write Latency
Configuration options: [Auto] [1] - [31]
Skew Control
ODT RTT WR (CHA)
Configuration options: [Auto] [0 DRAM CLOCK] [80 DRAM CLOCK] [120 DRAM CLOCK] [240 DRAM CLOCK] [255 DRAM CLOCK]
ODT RTT PARK (CHA)
Configuration options: [Auto] [0 DRAM CLOCK] [34 DRAM CLOCK] [40 DRAM CLOCK] [48 DRAM CLOCK] [60 DRAM CLOCK] [80 DRAM CLOCK] [120 DRAM CLOCK] [240 DRAM CLOCK]
ODT RTT NOM (CHA)
Configuration options: [Auto] [0 DRAM CLOCK] [34 DRAM CLOCK] [40 DRAM CLOCK] [48 DRAM CLOCK] [60 DRAM CLOCK] [80 DRAM CLOCK] [120 DRAM CLOCK] [240 DRAM CLOCK]
ODT RTT WR (CHB)
Configuration options: [Auto] [0 DRAM CLOCK] [80 DRAM CLOCK] [120 DRAM CLOCK] [240 DRAM CLOCK] [255 DRAM CLOCK]
ODT RTT PARK (CHB)
Configuration options: [Auto] [0 DRAM CLOCK] [34 DRAM CLOCK] [40 DRAM CLOCK] [48 DRAM CLOCK] [60 DRAM CLOCK] [80 DRAM CLOCK] [120 DRAM CLOCK] [240 DRAM CLOCK]
20 |
ROG STRIX Z490-G GAMING Series BIOS Manual |
Loading...