


Quick Start Guide
For online help and support, visit support.google.com/nexus
Copyright
Copyright © 2012 ASUSTek COMPUTER INC.
All rights reserved.
No part of this guide, including the products and software described in it, may be reproduced, transmitted, transcribed, stored in a retrieval system, or translated into any language in any form or by any means, except documentation kept by the purchaser for backup purposes, without the express written permission of ASUSTek COMPUTER INC. ("ASUS"). This clause does not apply to such software which is licensed under the General Public License ("GPL" ) or other Free Open Source Licenses. Copies of the respective license terms, and where required an offer to provide the respective source code, are included in the product.
Google, Android, Gmail, Google Maps, Nexus 7, Google Play, YouTube, Google+, and other trademarks are property of Google Inc. ASUS and the ASUS logo are trademarks of ASUSTek Computer Inc. All other marks and trademarks are properties of their respective owners.
The content of this guide may differ in some details from the product or its software. All information in this document is subject to change without notice.
The Nexus 7 tablet is certified by ASUS under the name
ASUS Pad ME370TG.
For online help and support, visit support.google.com/nexus

What’s in the box
micro usb cable
Nexus 7 |
usb charging unit |
|
Warranty |
quick start guide |
warranty |
•A SIM card ejection tool is also included.
•If any item is damaged or missing, contact your point of purchase for assistance
•The bundled USB charging unit varies by country or region.
Nexus 7 |
3 |
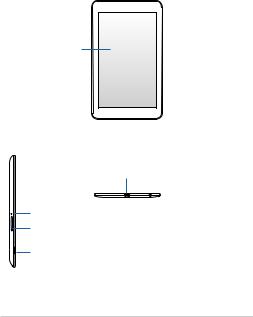
Your Nexus 7
 Front-facing
camera
Touch screen
Micro USB port
Microphone |
|
|
|
|
3.5m headset jack |
||||
SIM card tray |
||||
|
|
|||
4-pin connector |
|
|
||
4 |
Nexus 7 |
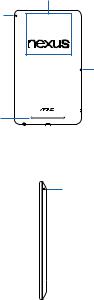
NFC area
Microphone
Power/lock key 

Volume key 

Microphone

 SIM card tray

 4-pin connector
Speaker
3.5mm headset jack |
|
|
|
Micro USB port |
|
|
Microphone
 Power/lock key
 Volume key
Nexus 7 |
5 |

Charge the battery
Your battery may not be fully charged when you first unpack your Nexus 7. It’s a good idea to fully charge the battery as soon as you get a chance.
Connect the micro USB cable to Nexus 7 and to the charging unit, as shown in the illustration. Then connect the charging unit to a power outlet.
a
DO NOT throw the battery in municipal waste. The symbol of the crossed out wheeled bin indicates that the battery should not be placed in municipal waste.
6 |
Nexus 7 |

•The USB charging unit varies by country or region.
•Use only the USB charging unit that comes with your Nexus 7. Using a different charging unit may damage your tablet.
•To avoid risk of injury or damaging your device, unit and USB cable before charging the battery.
•The input voltage range between the wall outlet and this charging unit is AC 100V–240V, and the charging unit’s output voltage is DC 5V, 2A.
•Your Nexus 7 can be charged via the USB port on a computer only when Nexus 7 is in sleep mode (screen off) or turned off. Charging through the USB port will take longer than charging with the USB charging unit.
•The socket-outlet shall be installed near the equipment(Pad) and shall be easily accessible.
DO NOT throw Nexus 7 in municipal waste. This product has been designed to enable proper reuse of parts and recycling. The symbol of
the crossed out wheeled bin indicates that the product (electrical, electronic equipment and mercury-containing button cell battery) should not be placed in municipal waste. Check local regulations for disposal of electronic products.
Nexus 7 |
7 |

Insert SIM card
To use your tablet with 3G data networks, you must first insert a micro SIM card provided by your carrier. If no card is installed, the message “No SIM card” appears on the tablet’s lock screen.
When the tablet is face down, the SIM card tray is located on the right side.The eject button is a small round aperture on the left side of the tray door.
8 |
Nexus 7 |
 Loading...