


User Manual
Copyright 2006-2009 by reFX Audio Software Inc.
All rights reserved. No part of this publication may be reproduced or transmitted in any form, including photocopying or recording, without the written permission of the copyright holder, application for which should be made to the publisher at the above address. Such written permission must also be obtained before any part of this publication is stored in an information retrieval system of any kind.
The information in this document is subject to change without notice and does not represent a commitment on the part of reFX Audio Software Inc. The software described by this document is subject to a License Agreement and may not be copied to any other media unless specifically allowed in the License Agreement.

INTRODUCTION
NEXUS2 User Manual 3

Introduction
Welcome and thank your for purchasing NEXUS2. You are now the owner of a highquality product that includes a professional and comprehensive sound library and an easy-to-use but powerful patch management system. The demands placed on your
computer’s CPU are surprisingly low.
NEXUS2 is a sample-ROM based synthesizer (often called a “rompler”). This means that NEXUS2 accesses sampled waveforms from your hard disk to generate its sounds. Apart from the low demands on your CPU mentioned above, this method also has other benefits: It allowed us to sample several prohibitively expensive analog hardware devices and make these quality sounds available to you, the NEXUS2 user. Furthermore, the complex sound architecture in NEXUS2 gives you extensive control over the most important parameters to customize the sounds to suit your personal tastes.
The internal architecture lets you generate highly complex soundscapes, stacked sequences and/ or extreme modulations – all with a depth and clarity you’ve never heard before.
Dive into the world of NEXUS2 and experience a totally new dimension of sound.
Specifications and features:
Over 4 gigabyte library of high quality multisamplesEight alias-free classic waveforms
Over 890 factory presets covering all popular genresFour different filter types with flexible envelopes
Two freely editable master effects
Freely programmable 32-step arpeggiator with note transposeFreely programmable 32-step stereo trance gate
Flexible delay with adjustable modulation
Production-quality reverb (licensed from ArtsAcoustic)
Can be upgraded via separately available expansions (27 already available)
4 NEXUS2 User Manual

INSTALLATION
NEXUS2 User Manual 5

INSTALLING NEXUS2 ON A WINDOWS PC
To install NEXUS2 on your Windows PC, please follow these simple steps:
1.Insert the NEXUS2 DVD into your DVD drive.
2.Double click the file “NEXUS2 Setup.exe” from within the “Windows Setup” folder on the DVD and follow the on screen instructions.
3.Continue with “DOWNLOADING THE LICENSE” on page 8
MINIMUM PC SYSTEM REQUIREMENTS
Pentium III @ 800MHz or better (or AMD equivalent)Minimum of 512Mb RAM (1Gb recommended)
Hard drive space required: 4Gb
Operation system: Windows XP/Vista
Graphics (minimum resolution): 16-bit 800x600
Host: Any application supporting the VSTi standard (e.g. Cubase, FL Studio, Sonar etc.) or Pro Tools 7.3 or better
6 NEXUS2 User Manual

INSTALLING NEXUS2 ON A Mac
To install NEXUS2 on your Mac, please follow these simple steps:
1.Insert the NEXUS2 DVD into your DVD drive.
2.Double click the file“NEXUS2 Setup.dmg”from within the“OSX Setup”folder on the DVD and follow the on screen instructions.
3.Copy the folder “Nexus Content” from the DVD to any location on one of your hard drives, but make sure that the hard drive has enough space to fit the entire factory content (4 Gb) and please also make sure there is enough space left for expansions you might want to import in the future.
4.Continue with “DOWNLOADING THE LICENSE” on page 8.
Minimal Mac system requirements
Mac G4 800MHz or better / Mac Intel 1.4 GHz or betterMinimum of 512Mb RAM (1Gb recommended)
Hard drive space required: 4Gb
Operating system: OSX 10.4 / 10.5
Graphics (minimum resolution): 16-bit 800x600
Host: Any application with VSTi support (e.g. Cubase, Nuendo, Live), AU (AudioUnit) support (e.g. Logic, Garageband, Live) or RTAS support (Pro Tools 7.x & DP 5.x)
NEXUS2 User Manual 7

Downloading the license
NEXUS2 requires a valid license to be present on the USB eLicenser in order to run. You have to download this license from the internet using the activation code you received via email when you ordered NEXUS2.
To download your license to a connected USB eLicenser, please follow these simple steps:
1.Download the “License Control Center” from http://www.elicenser.net/
2.Install the “License Control Center”.
3.In the “Wizards” menu, choose the option “License Download”.
4.Follow the on-screen instructions.
5.That’s it. The license has been stored on your USB eLicenser and the activation code has become invalid.
Please note that you do NOT need to download the license on the same computer you plan to use NEXUS2 on.
You can use ANY Windows or Mac compatible computer to download the license.
In case your music-computer isn’t connect to the internet, simply use another one to download the license to the USB eLicenser.
The computer that downloads the license needs the “License Control Center” installed.
You can download the latest version of the “License Control Center” from http://www.elicsense.net/
8 NEXUS2 User Manual

Manual installation of the content
To install the NEXUS2 content manually, please follow these simple steps:
1.Insert the NEXUS2 DVD into your DVD drive.
2.Copy the folder “Nexus Content” from the DVD to any location on one of your hard drives, but make sure that the hard drive has enough space to fit the entire factory content (4 Gb) and please also make sure there is enough space left for expansions you might want to import in the future.
NEXUS2 User Manual 9
10 NEXUS2 User Manual
QUICK START
NEXUS2 User Manual 11
Quick start
Within this section we will describe, step-by-step, how to load NEXUS2 into your host application and how to open it within a Cubase or Logic project. If you use neither Cubase nor Logic, or if you have other host-related questions, please consult the
manual that came with your specific host application.
Please make sure that NEXUS2 has been installed correctly before starting your host application (see previous chapter).
using NEXUS2 in Steinberg Cubase or Nuendo
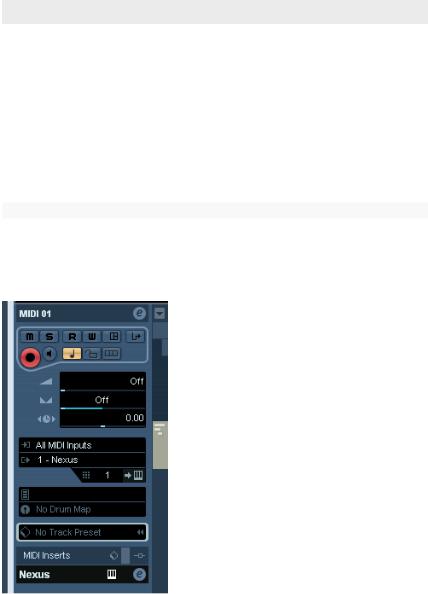
Cubase and Nuendo have so-called Instrument Slots. Open your VST instrument rack (in Cubase, the default shortcut for this is F11). Click on an empty slot and a list of all your VST instruments should appear. Select “NEXUS” from this list. An instance of NEXUS2 will be loaded and its name will appear in the selected instrument slot.
Now, create a MIDI track and route this track’s MIDI output to the instance of NEXUS2 you loaded earlier.
If your system has been configured correctly, you should now be able to hear a sound when playing a key on your MIDI keyboard (the patch “Saw Init” is loaded by default).
To select a different preset, open NEXUS2 (click on the “e” button within the instrument rack). You’ll now be able to see the NEXUS2 preset browser (Library). Double-clicking a preset name in the column to the right will load that particular preset.
Alternatively, you can use the cursor keys to select a preset. The up/down keys scroll through the presets in the currently selected category. Use the right cursor key to load the currently highlighted preset.
12 NEXUS2 User Manual
quick start
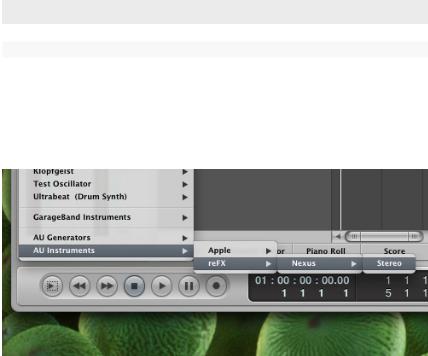
using NEXUS in Apple Logic 8
Create a new song and then create a“Software Instrument”track. When the newly created track is selected, you will see the track inspector on the left hand side.
Click on the gray button under the letters “I/O” but above the button labeled “Out 1-2”. A big list of instruments and plug-ins will appear. In this list, select “AU Instruments -> reFX -> Nexus -> Stereo”.
To select a different preset, open NEXUS2 (click once on the same button you used to load NEXUS2 in the inspector). You’ll now be able to see the NEXUS2 preset browser (Library). Double-clicking a preset name in the column to the right will load that particular preset.
NEXUS2 User Manual 13

Quick start
general information
Because NEXUS2 receives on all 16 MIDI channels simultaneously, there is no need to set its MIDI input channel manually. If you’d like to add a second NEXUS2 sound (or more), simply load another instance of NEXUS2 in your host and select another preset.
NEXUS2 is delivered with over 800 factory presets from all musical genres. We recommend that you audition them first to gain an impression of the power and versatility that NEXUS2 has to offer.
expansions
Your NEXUS2 sound library can be expanded with additional presets (and their referenced samples). Each expansion holds a minimum of 128 new presets.
To learn how to import these expansions into NEXUS2, please read the section “importing data” on page 44.
special features
NEXUS2 parameters can be automated via MIDI continuous controller data. You’ll find a list of the supported continuous controllers and their assignments in appendix A (at the end of this document).
NEXUS2 is also able to interpret automation data sent from your sequencer. For further information about instrument automation, please refer to the manual that came with your host application.
14 NEXUS2 User Manual
NEXUS Reference
NEXUS2 User Manual 15

Basic functions
When NEXUS2 is started for the very first time, it will appear with its white skin (see“guiskin” on page 42). The central dot-matrix area displays the NEXUS2 preset browser (“library”) by default.
The individual sections are (from top left to bottom right):
filter modifier
Provides simultaneous control over basic filter parameters for all four layers.
central display
Various functions (see “Central Display” on page 18).
amp modifier
Provides simultaneous control over volume and pan parameters for all four layers.
master filter
An extra filter applied to NEXUS2’s main output.
delay
Master delay settings. Please refer to page 23 for more information.
reverb
Master reverb settings. Please refer to page 24 for more information.
output
Volume control and metering for NEXUS2 main output.
16 NEXUS2 User Manual
the Vengeance / reFX logos
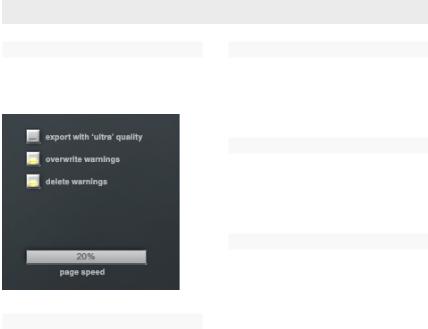
If you click on these logos, the NEXUS2 “rear panel” will appear, giving you access to several global settings and functions:
export with “ultra” quality
If this option is selected, NEXUS2 will always use the best possible audio quality while exporting. The default setting for this option is “off”. Currently only the Steinberg hosts such as Cubase & Nuendo support this feature.
Basic functions
overwrite warnings
This option allows you to deactivate the warnings usually seen when attempting to overwrite data. The default setting for this option is “on”.
delete warnings
This option deactivates warnings when attempting to delete categories, presets or patterns. The default setting for this option is “on”.
page speed
Allows you to change the speed with which the mouse-wheel scrolls through lists.
Please note that not all hosts have mousewheel support for their plug-in windows. We’re working with these vendors to add this functionality in future releases of their host software.
NEXUS2 User Manual 17
Central display
The NEXUS2 display has several distinct functions. These are selected using the eight buttons you’ll find to either side of the display:
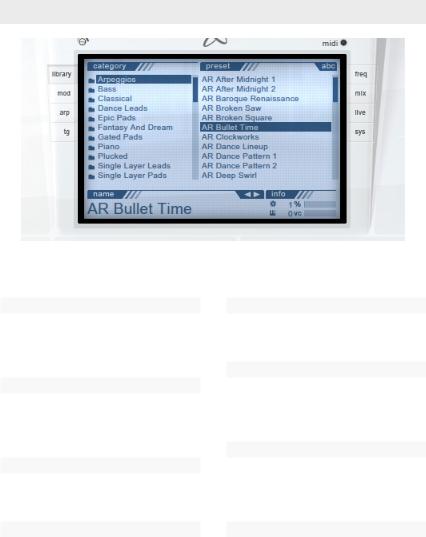
library
Click on this button to show the preset browser. This is used for loading, saving, renaming, deleting and managing your presets.
mod
Click on this button to access the modulation matrix, LFOs and their associated parameters.
arp
Click on this button to access the freely editable arpeggiator.
tg
Click on this button to access the NEXUS2 “Trance Gate”.
freq
Click on this button to display the scope / FFT frequency analyzer.
mix
Click on this button to access the Master Effects, Feature Matrix, Oscillator mixer and Master EQ.
live
News, updates, expansions, skins and more - the whole world of NEXUS2 is just one click away!
sys
System settings for this particular instance of NEXUS2. These settings are stored with the current song/project i.e. they are not saved along with a preset itself.
18 NEXUS2 User Manual
 Loading...