Asus EA-N66 User Manual [en, es, fr]


 ®
®
EA
 -N66
-N66
Dual-band Wireless-N
Ethernet Adapter
Quick Start Guide
English.............................................. |
4 |
Français............................................ |
11 |
Español............................................ |
18 |
Português do Brasil..................... |
25 |
Português....................................... |
32 |
Q7020 / First Edition / January 2012

English
A quick look
3 |
4 |
|
5 |
||
|
1 2 


 7 6
7 6
1)Ethernet port
2)DC In port
3)LED indicator
OFF: No power or physical connection Solid light: Excellent connection Blinking fast: Active connection
Blinking slow: connection
4)Air vent
5)Mounting hole
6)WPS button
7)Reset button

Package contents
EA-N66 |
Power adapter |
 Network cable
  Quick Start Guide
NOTE: If any of the items is damaged or missing, contact your retailer.
Mounting options
Out of the box, the ASUS EA-N66 is designed to sit on a raised flat surface like a file cabinet or book shelf. The unit may also be converted for mounting to a wall or ceiling.
1.Look on the 
 underside for the

 mounting hook.


2.Mark an upper 


 hole in a flat


 surface.


3.Tighten one screw
until only 1/4’’ is showing.
4.Latch the hook of your EA-N66 onto the screw.
NOTES:
•Re-adjust the screw if you cannot latch EA-N66 onto the screw or if it is too loose.
•The screw is not included in the EA-N66 package contents.
English

English |
Getting started |
A. Connecting via the WPS button |
|
|
1. Connect to a wireless network. |
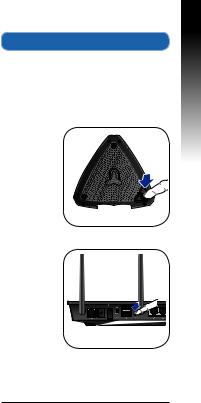
The WPS (Wi-Fi Protected Setup) button allows you to connect to a secured and protected network.
1.Press the WPS button on EA-N66.
2.Press WPS button on the router.

B. Connecting via a network cable
EA-N66
Wall Power Outlet
a
Power
LAN b
a:Insert your EA-N66’s AC adapter to the DC-In port and plug it to a power outlet.
b:Using the bundled network cable, connect your computer to your EA-N66’s LAN port.
2.Log into the EA-N66's web graphics user interface (web GUI).
a:Ensure that the wireless LED is blinking.

 Wireless LED
b:In your web browser, key in www. asusrouter.com. Key in admin as the default username and password.
c:From the web GUI, select the operation mode and configure its settings for your wireless network setup.
English

English
NOTE: If the web GUI does not launch, refer to the Frequently Asked Questions section.
Operation modes
ASUS EA-N66 provides three operation modes: Ethernet Adapter, Access Point (AP), and Repeater.
NOTE: Please follow the GUI Setup Wizard for these modes.
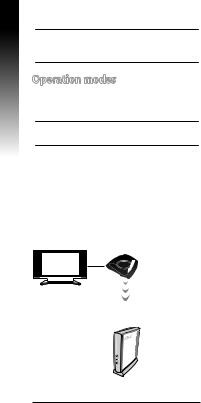
Ethernet Adapter mode
By default, EA-N66 is set to the Ethernet Adapter mode. In this mode, you can connect any Ethernet-enabled device to your wireless home network via the wireless router. This mode is perfect for home theater devices such as the Internet TV, TiVo, and Blu-ray player.
Internet TV
ADSL/
Cable modem

Frequently Asked Questions
Q1: I cannot access the web GUI to configure the EA-N66 settings.
•Close all running web browsers and launch again.
•Follow the steps below to configure your computer settings based on its operating system.
Windows 7
A. Disable the proxy server, if enabled.
1.Click Start > Internet Explorer to launch the web browser.
2.Click Tools > Internet options > Connections tab > LAN settings.
3.From the Local Area Network (LAN) Settings screen, untick Use a proxy server for your LAN.
4.Click OK when done.
B.Set the TCP/IP settings to automatically obtain an IP address.
1.Click Start > Control Panel > Network and Internet > Network and Sharing Center > Manage network connections.
2.Select Internet Protocol Version 4 (TCP/IPv4), then click Properties.
3.Tick Obtain an IP address automatically.
4.Click OK when done.
English

English
Mac 10.5.8
A. Disable the proxy server, if enabled.
1.From the menu bar, click Safari >
Preferences... > Advanced tab.
2.Click Change Settings... in the Proxies field.
3.From the list of protocols, deselect FTP Proxy and Web Proxy (HTTP).
4.Click OK when done.
B.Set the TCP/IP settings to automatically obtain an IP address.
1. Click the Apple icon > System Preferences > Network.
2.Select Ethernet and select Using DHCP in the Configure field.
3.Click Apply when done.
10

Aperçu rapide
3 |
4 |
|
5 |
||
|
1 2 


 7 6
7 6
1)Port Ethernet
2)Prise d’alimentation (CC)
3)Voyant lumineux
Éteint : aucune alimentation ou connexion physique
Allumé : excellente connexion
Clignotement rapide : connexion active
Clignotement lent : connexion
4)Fentes de ventilation
5)Ouverture pour fixation murale
6)Bouton WPS
7)Bouton de réinitialisation
Français
11

Français
Contenu de la boîte
EA-N66 |
Adaptateur secteur |
 Câble réseau
 Guide de démarrage rapide
REMARQUE : Contactez votre revendeur si l’un des éléments est manquant ou endommagé.
Options de montage
L’ASUS EA-N66 a été conçu pour être placé sur une surface plane comme un bureau ou un classeur. Toutefois, l’appareil peut être fixé sur un mur ou un plafond.
1.Localisez l’ouverture de fixation murale située sous 
 l’appareil.


2.Percez un trou 


 sur un mur ou au


 plafond.


3.Placez-y une vis et 


 serrez-la jusqu’à ce
qu’un quart de la vis dépasse du trou.
4.Placez l’ouverture de fixation du EAN66 sur la vis.
REMARQUES :
•Ajustez la position de la vis si la fixation de l'EA-N66 n'est pas stable.
•La vis n'est pas incluse dans la boîte de votre EA-N66.
12

Mise en route
1.Connexion à un réseau sans fil
A. Connexion via le bouton WPS
Le bouton WPS (Wi-Fi Protected Setup) vous permet d’établir une connexion sans fil sécurisée.
1. Appuyez sur le bouton WPS de votre EA-N66.
2.Appuyez sur le bouton WPS de votre routeur.
Français
13

Français
B. Connexion filaire
EA-N66
Wall Power Outlet
a
Power
LAN b
a:Reliez une extrémité de l’adaptateur secteur de à la prise d’alimentation de votre EA-N66 et l’autre extrémité à une prise électrique.
b:Utilisez le câble réseau fourni pour relier votre EA-N66 à un ordinateur.
2.Accès à l’interface graphique de gestion du EA-N66
a:Vérifiez que le voyant lumineux de connexion sans fil clignote.
Voyant |
lumineux |
b:Dans la barre d’adresse de votre navigateur Internet, entrez www.asusrouter.com. Utilisez admin comme nom d’utilisateur et mot de passe.
c:Sélectionnez le mode d’opération de l’appareil et configurez ses paramètres de connexion sans fil.
14
 Loading...