


 ®
®
EA
 -N66R
-N66R
Ethernet Adapter
Quick Start Guide
English.............................................. |
4 |
Français............................................ |
12 |
Español............................................ |
20 |
Português do Brasil..................... |
28 |
Q7020 / July 2012

English
A quick look
3 |
4 |
||
5 |
|||
|
|
||
|
|
|
|
|
|
|
|
1 2 


 6 7
6 7
1)Ethernet port
2)DC In port
3)LED indicator
OFF: No power or physical connection Solid light: Excellent connection Blinking fast: Active connection
Blinking slow: connection
4)Air vent
5)Mounting hole
6)WPS button
7)Reset button
Package contents
EA-N66R |
Power adapter |
 Network cable
  Quick Start Guide
NOTE: If any of the items is damaged or missing, contact your retailer.
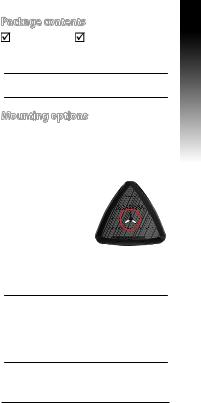
Mounting options
Out of the box, the ASUS EA-N66R is designed to sit on a raised flat surface like a file cabinet or book shelf. The unit may also be converted for mounting to a wall or ceiling.
1.Look on the  underside for the

 mounting hook.


2.Mark an upper 


 hole in a flat


 surface.


3.Tighten one screw
until only 1/4’’ is showing.
4.Latch the hook of your EA-N66R onto the screw.
NOTES:
•Re-adjust the screw if you cannot latch EA-N66R onto the screw or if it is too loose.
•The screw is not included in the EA-N66R package contents.
English

English |
Getting started |
A. Connecting via the WPS button |
|
|
1. Connect to a wireless network. |
The WPS (Wi-Fi Protected Setup) button allows you to connect to a secured and protected network.
1.Press the WPS button on EA-N66R.
2.Press WPS button on the router.

B. Connecting via a network cable
EA-N66R
Wall Power Outlet
a
Power
LAN b
a:Insert your EA-N66R’s AC adapter to the DC-In port and plug it to a power outlet.
b:Using the bundled network cable, connect your computer to your EA-N66R’s LAN port.
2.Log into the EA-N66R's web graphics user interface (web GUI).
a:Ensure that the wireless LED is blinking.

 Wireless LED
b:In your web browser, key in www. asusrouter.com. Key in admin as the default username and password.
c:From the web GUI, select the operation mode and configure its settings for your wireless network setup.
English

English
NOTE: If the web GUI does not launch, refer to the Frequently Asked Questions section.
IMPORTANT:
•For the best wireless performance, place EA-N66 at a distance of more than 1.5 meters away from the parent Access Point (AP).
•You can adjust the transmission power of EA-N66R from its web interface.

Operation modes
ASUS EA-N66R provides three operation modes: Ethernet Adapter, Access Point (AP), and Repeater.
NOTE: Please follow the GUI Setup Wizard for these modes.
Ethernet Adapter mode
By default, EA-N66R is set to the Ethernet Adapter mode. In this mode, you can connect any Ethernet-enabled device to your wireless home network via the wireless router. This mode is perfect for home theater devices such as the Internet TV, TiVo, and Blu-ray player.
Internet TV
ADSL/
Cable modem
English

English
Frequently Asked Questions
Q1: I cannot access the web GUI to configure the EA-N66R settings.
•Close all running web browsers and launch again.
•Follow the steps below to configure your computer settings based on its operating system.
Windows 7
A. Disable the proxy server, if enabled.
1.Click Start > Internet Explorer to launch the web browser.
2.Click Tools > Internet options > Connections tab > LAN settings.
3.From the Local Area Network (LAN) Settings screen, untick Use a proxy server for your LAN.
4.Click OK when done.
B.Set the TCP/IP settings to automatically obtain an IP address.
1.Click Start > Control Panel > Network and Internet > Network and Sharing Center > Manage network connections.
2.Select Internet Protocol Version 4 (TCP/IPv4), then click Properties.
3.Tick Obtain an IP address automatically.
4.Click OK when done.
10
Mac 10.5.8
A. Disable the proxy server, if enabled.
1.From the menu bar, click Safari >
Preferences... > Advanced tab.
2.Click Change Settings... in the Proxies field.
3.From the list of protocols, deselect FTP Proxy and Web Proxy (HTTP).
4.Click OK when done.
B.Set the TCP/IP settings to automatically obtain an IP address.
1. Click the Apple icon > System Preferences > Network.
2.Select Ethernet and select Using DHCP in the Configure field.
3.Click Apply when done.
English
11

Français
Aperçu rapide
3 |
4 |
||
5 |
|||
|
|
||
|
|
|
|
|
|
|
|
1 2 


 6 7
6 7
1)Port Ethernet
2)Prise d’alimentation (CC)
3)Voyant lumineux
Éteint : aucune alimentation ou connexion physique
Allumé : excellente connexion
Clignotement rapide : connexion active
Clignotement lent : connexion
4)Fentes de ventilation
5)Ouverture pour fixation murale
6)Bouton WPS
7)Bouton de réinitialisation
12
Contenu de la boîte
EA-N66R |
Adaptateur secteur |
 Câble réseau
 Guide de démarrage rapide
REMARQUE : Contactez votre revendeur si l’un des éléments est manquant ou endommagé.
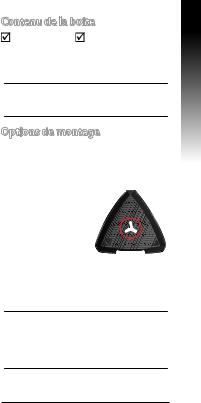
Options de montage
L’ASUS EA-N66R a été conçu pour être placé sur une surface plane comme un bureau ou un classeur. Toutefois, l’appareil peut être fixé sur un mur ou un plafond.
1.Localisez l’ouver-
ture de fixation  murale située sous


 l’appareil.


2.Percez un trou 


 sur un mur ou au


 plafond.


3.Placez-y une vis et serrez-la jusqu’à ce qu’un quart de la vis dépasse du trou.
4.Placez l’ouverture de fixation du EAN66R sur la vis.
REMARQUES :
•Ajustez la position de la vis si la fixation de l'EA-N66R n'est pas stable.
•La vis n'est pas incluse dans la boîte de votre EA-N66R.
Français
13
 Loading...