


 Loading...
Asus EB1036, BP1AE, D510MT, EB1037, D810MT User’s Manual
...Desktop PC
ASWM Enterprise
Web-based Management
User Guide

E10321
First Edition
April 2015
Copyright © 2015 ASUSTeK Client Inc. All Rights Reserved.
No part of this manual, including the products and software described in it, may be reproduced, transmitted, transcribed, stored in a retrieval system, or translated into any language in any form or by any means, except documentation kept by the purchaser for backup purposes, without the express written permission of ASUSTeK Client Inc. (“ASUS”).
Product warranty or service will not be extended if: (1) the product is repaired, modified or altered, unless such repair, modification of alteration is authorized in writing by ASUS; or (2) the serial number of the product is defaced or missing.
ASUS PROVIDES THIS MANUAL “AS IS”WITHOUT WARRANTY OF ANY KIND, EITHER EXPRESS OR IMPLIED, INCLUDING BUT NOT LIMITED TO THE IMPLIED WARRANTIES OR CONDITIONS OF MERCHANTABILITY OR FITNESS FOR A PARTICULAR PURPOSE. IN NO EVENT SHALL ASUS, ITS DIRECTORS, OFFICERS, EMPLOYEES OR AGENTS BE LIABLE FOR ANY INDIRECT, SPECIAL, INCIDENTAL, OR CONSEQUENTIAL DAMAGES (INCLUDING DAMAGES FOR LOSS OF PROFITS, LOSS OF BUSINESS, LOSS OF USE OR DATA, INTERRUPTION OF BUSINESS AND THE LIKE), EVEN IF ASUS HAS BEEN ADVISED OF THE POSSIBILITY OF SUCH DAMAGES ARISING FROM ANY DEFECT OR ERROR IN THIS MANUAL OR PRODUCT.
SPECIFICATIONS AND INFORMATION CONTAINED IN THIS MANUAL ARE FURNISHED FOR INFORMATIONAL USE ONLY, AND ARE SUBJECT TO CHANGE AT ANY TIME WITHOUT NOTICE, AND SHOULD NOT BE CONSTRUED AS A COMMITMENT BY ASUS. ASUS ASSUMES NO RESPONSIBILITY OR LIABILITY FOR ANY ERRORS OR INACCURACIES THAT MAY APPEAR IN THIS MANUAL, INCLUDING THE PRODUCTS AND SOFTWARE DESCRIBED IN IT.
Products and corporate names appearing in this manual may or may not be registered trademarks or copyrights of their respective companies, and are used only for identification or explanation and to the owners’ benefit, without intent to infringe.
2

Contents |
|
|
Chapter 1: |
Getting started |
|
Overview.............................................................................................................................................. |
|
5 |
Installing ASWM Enterprise........................................................................................................... |
7 |
|
Uninstalling ASWM Enterprise..................................................................................................... |
9 |
|
Logging into ASWM Enterprise................................................................................................. |
10 |
|
ASWM Home screen...................................................................................................................... |
12 |
|
Chapter 2: |
Deploying ASWM |
|
Deploying new ASWM Enterprise agent................................................................................ |
13 |
|
Removing ASWM Enterprise agents........................................................................................ |
23 |
|
Chapter 3: |
Server PC functions |
|
Monitor .............................................................................................................................................. |
|
29 |
Account Management.................................................................................................................. |
32 |
|
Deployment Management.......................................................................................................... |
35 |
|
Centralized Management............................................................................................................ |
35 |
|
Report Management..................................................................................................................... |
42 |
|
Server Configuration..................................................................................................................... |
45 |
|
Chapter 4: |
Monitoring clients |
|
Monitor Overview........................................................................................................................... |
|
51 |
HW Sensor......................................................................................................................................... |
|
53 |
Inventory............................................................................................................................................ |
|
58 |
Event Log........................................................................................................................................... |
|
61 |
Utilization.......................................................................................................................................... |
|
64 |
Software............................................................................................................................................. |
|
66 |
Security .............................................................................................................................................. |
|
71 |
BMC .............................................................................................................................................. |
|
74 |
BIOS Flash.......................................................................................................................................... |
|
75 |
Configuration................................................................................................................................... |
|
76 |
Remote Control............................................................................................................................... |
|
79 |
ThinClient features......................................................................................................................... |
|
80 |
3

4

Chapter 1
Getting started
Overview
ASUS System Web-based Management (ASWM) Enterprise is an ASUS-exclusive web-based app that allows you to set up a management system environment for tracking, monitoring, and controlling your network clients from one server PC running on Windows® 7/8/8.1 Pro. You must
have an administrator privilege to track, manage, and control these clients either locally (from the server PC) or remotely (via a web browser).
NOTE: For optimal ASWM performance, we recommend that your server PC has high hardware specifications.
How ASWM Enterprise works
ASWM Enterprise is composed of an agent that generally acts as a data collector, and a set of HTTP web pages that serve as the user interface (UI). The ASWM agent collects the data that are essential to the continuous ASWM monitoring operations. These collected data are displayed in the UI.
The agent does the following tasks:
•In the monitoring process, the agent basically keeps track of the hardware and software status of the system. The agent has sensors that monitor fan rotation speeds (in RPM), working voltages, motherboard and CPU temperatures, and the backplane (if present).
•The agent monitors hard disk drives health status through the SMART (Self-Monitoring,
Analysis, and Reporting Technology) feature, space utilization of a file system, CPU or system memory loading, and even the traffic status of a network device.
•The agent records the history of the detected status of all monitored hardware items.The status record includes the time of alert events (fan, voltage, or temperature), and the type of alert event (critical, warning, or normal).
You can also configure ASWM Enterprise to react to exceptional situations. For example, the administrator can be automatically notified by e-mail when a hard drive starts to malfunction or when a chassis intrusion is detected. In this way, ASWM Enterprise acts as an active guardian of the system’s key components.
ASUS ASWM Enterprise |
5 |

<![endif]>ENGLISH
Supported platforms
Server PC OS support |
Windows® 7 Pro 32/64 bit |
|
Windows® 8 Pro 32/64 bit |
|
Windows® 8.1 Pro 32/64 bit |
Agent PC OS support |
Windows® 7 32/64 bit |
|
Windows® 8 32/64 bit |
|
Windows® 8.1 32/64 bit |
|
Windows® 7 Pro 32/64 bit |
|
Windows® 8 Pro 32/64 bit |
|
Windows® 8.1 Pro 32/64 bit |
Web browser support |
|
Internet Explorer |
|
|
Google Chrome |
|
Safari |
Server PC system requirements
Windows® 7/8/8.1 Pro
•Web Server IIS 6.0 or later (Internet Information Services)
•General HTTP Activation (Tick all its sub-items)
•IIS 6 management compatibility (Tick all its sub-items)
•Application Development
•ASP
•ASP.NET
•ISAPI Extensions
•ISAPI Filters
•.NET Framework 3.5.1
•Firewall Settings
•File and Printer Share
•Windows Management Instrumentation (WMI)
•WorldWideWeb Services (HTTP)
•ICMP Packet Response
IMPORTANT! The server PC and the clients must be configured to the same time zone settings.
6 |
Chapter 1: Installing ASWM |
Installing ASWM Enterprise
IMPORTANT! Before installing ASWM Enterprise, ensure the following:
•SQL Server Express 2005 (or later) is installed in the server PC.
•Ensure that your server PC meets the system requirements for ASWM installation. For details, refer to the section Server PC system requirements.
•You are logged in as administrator in the server PC.
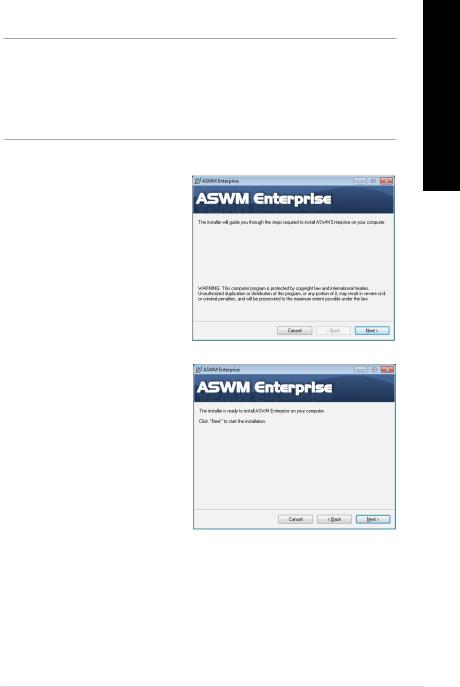
To install ASWM Enterprise:
1.Download the latest version of ASWM Enterprise from http://www.asus.com/ supportonly/ASWM%20Enterprise/ HelpDesk_Download
2.Click ASWM Enterprise item to launch the ASWM Enterprise setup wizard, then click Next to continue.
3.Click Next to start the installation.
<![endif]>ENGLISH
ASUS ASWM Enterprise |
7 |
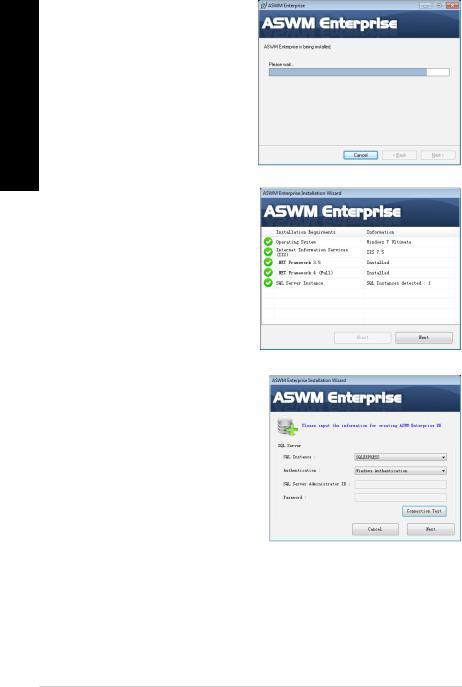
4.Wait for a few minutes while ASWM Enterprise is installing on your server PC.
<![if ! IE]><![endif]>ENGLISH
5.ASWM Enterprise automatically checks the installed system requirements on your server PC. Click Next to continue.
6.Select an Authentication type and click
Connection Test to proceed.
8 |
Chapter 1: Installing ASWM |
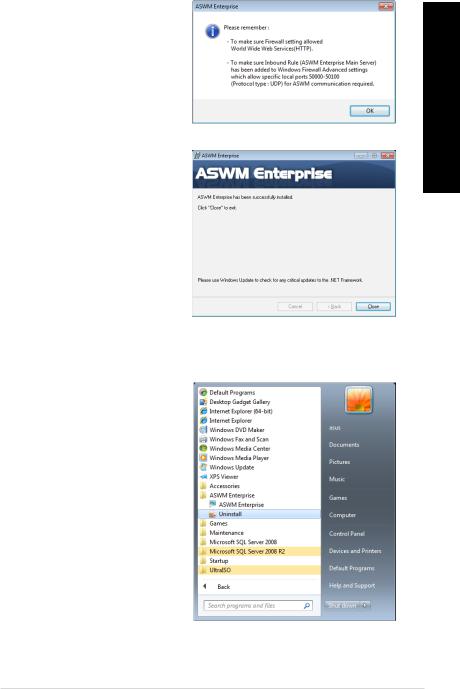
7.Ensure that your system has meet the requirements stated in the reminder notice, then click OK.
<![if ! IE]><![endif]>ENGLISH
8.After ASWM Enterprise is successfully installed on your server PC, click Close to exit the ASWM setup wizard.
Uninstalling ASWM Enterprise
To uninstall ASWM Enterprise:
1.Click Start > All Programs > ASWM Enterprise > Uninstall.
ASUS ASWM Enterprise |
9 |
<![endif]>ENGLISH
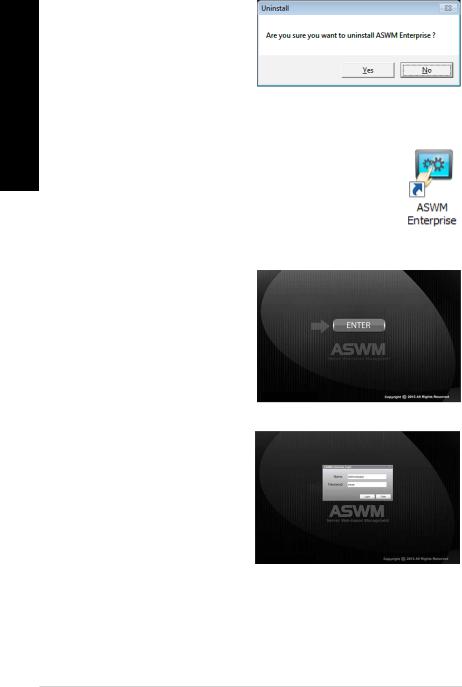
2.Click Yes on the confirmation message. Wait until the uninstallation process is completed.
Logging into ASWM Enterprise
To log into ASWM Enterprise:
1.To log in locally (from the server PC), click the ASWM Enterprise icon on the Windows desktop.
To log in remotely (via a web browser), enter this ASWM Enterprise web address: http://hostnma(IP)/aswment
2.Click Enter.
3.When logging in for the first time, enter the following default case-sensitive login name and password:
• As administrator:
Name: Administrator / Password: aswm
• As user:
Name: User / Password: user
10 Chapter 1: Installing ASWM
IMPORTANT! To change the login name and password, refer to the section Account Management.
NOTE: When logging in as User, there are limitations/restrictions as listed below:
•Only limited functions, including Monitor and Account Management are available.
•HW Sensor is read-only. You cannot customize the threshold.
•You cannot delete the EventLog, but you are allowed to use the Advanced Search function.
•Utilization is read-only. You cannot customize the threshold.
•You can check the information of the installed software, but Service of starting, restarting or stopping the selected service is unavailable. Ending process is also unavailable.
•Remote Control is dimmed and unavailable.
•Deleting SEL information on BMC is not allowed.
•BIOS Flash is read-only. You cannot flash the BIOS.
•Configuration in Monitor is not available.
<![endif]>ENGLISH
ASUS ASWM Enterprise |
11 |
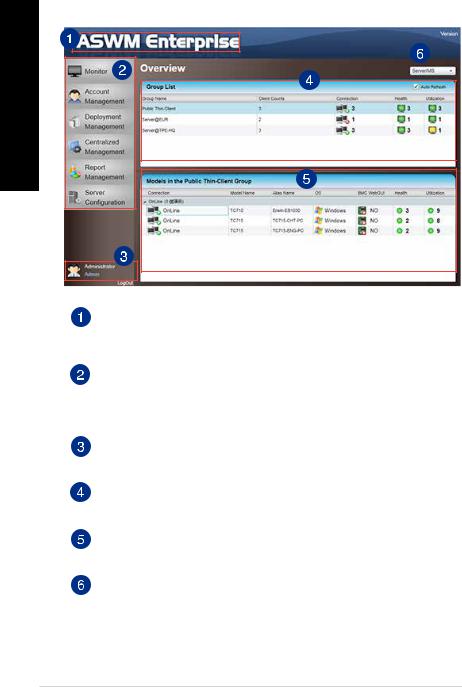
ASWM Home screen
<![if ! IE]><![endif]>ENGLISH
Full screen view
Click this banner to switch to the full screen view and press <Esc> to return to the normal window view. You cannot enter text in the full screen view.
Navigation menu
Click any of the items in this menu to access the ASWM functions such as health monitoring, account management, deployment management, centralized management, and server configuration. Refer to the next chapters for more details about these functions.
Login information
This area displays the login information. Different login users have different level of controlling ASWM Enterprise. Click LogOut to exit ASWM Enterprise.
Group List
The Group List shows the existing groups. It is more convenient for the administrator to manage a large number of clients through groups.
Models in the group
This area shows the clients and their general information in your selected group group list.
Switch Monitor View
This area allows you to switch the monitor view between Server/MB and Storage.
12 Chapter 1: Installing ASWM

Chapter 2
Deploying ASWM
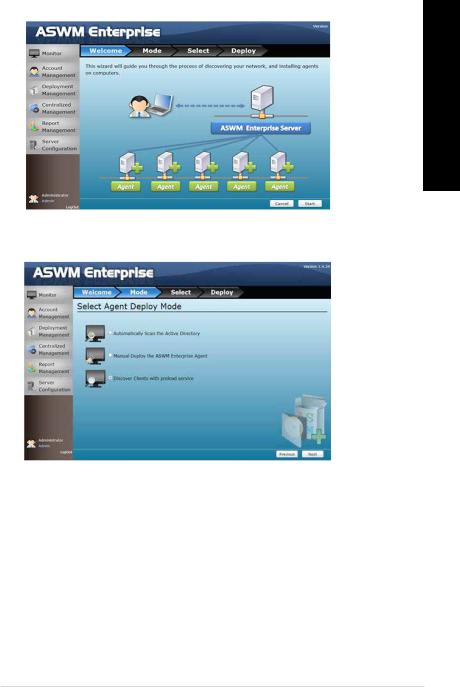
Deploying new ASWM Enterprise agent
Install or deploy ASWM Enterpise agents on your network clients and add them the ASWM Enterprise server PC for convenient management, monitor, and control.
ASWM Enterprise client agent system requirement
•.NET Framework 3.5
•Requires ASUS Management IPMI Driver for all models with BMC device onWindows® 7
32/64bit
•Firewall Setting
•AllowWindows® Management Instrumentation (WMI)
•Allow File And Printer Share
•Allow ICMP Packet Response
Automatically deploy ASWM agents
To automatically deploy ASM agents:
1.On the navigation menu, click Deployment Management.
<![endif]>ENGLISH
ASUS ASWM Enterprise |
13 |
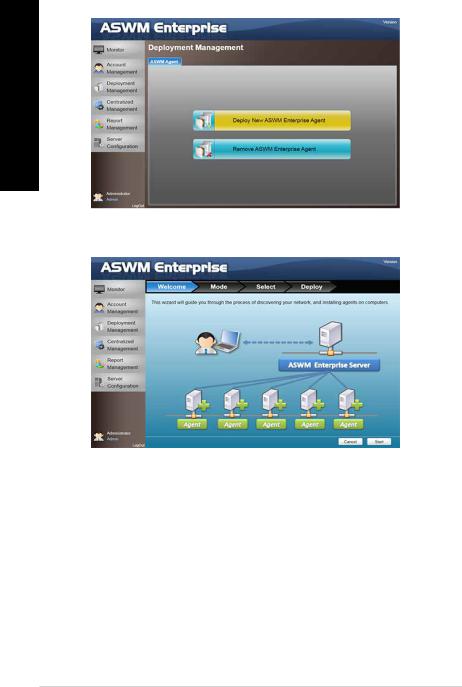
2.Click Deploy New ASWM Enterprise Agent.
<![if ! IE]><![endif]>ENGLISH
3.The wizard guides you through the deployment process. Click Start to continue.
14 Chapter 2: Deploying ASWM

4.Select Automatically Scan the Active Directory and click Next to continue. The system automatically scans the directory for agents.
<![if ! IE]><![endif]>ENGLISH
5.Select the Domain and click Scan.
Click Enable Group and select a group to downsize the scanning range. Doing this shortens the time for agent deployment.
ASUS ASWM Enterprise |
15 |
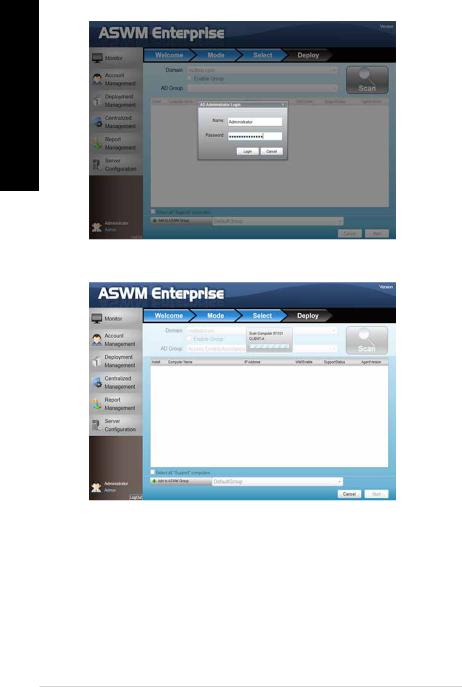
6.Log in as administrator.
<![if ! IE]><![endif]>ENGLISH
7.Wait for a while until the scanning process is finished.
16 Chapter 2: Deploying ASWM
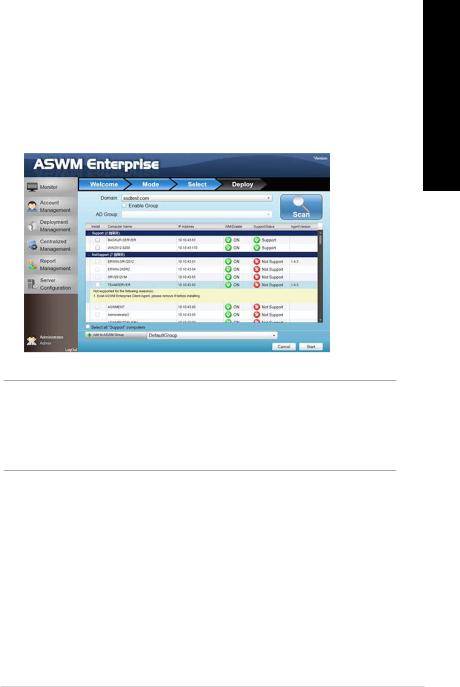
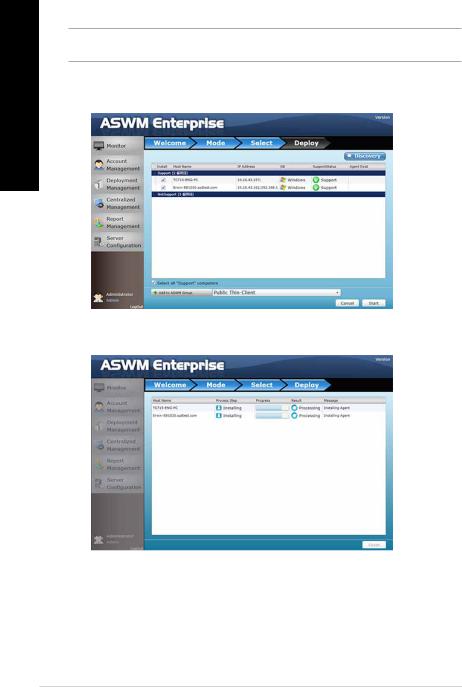
8. Select the clients to which you want to deploy agents, and click Start. Your selected clients must have the Support status in the SupportStatus field. Click the clients with the Not Support status to display the details for the status.
If a selected client have the Not Support status, check the following: |
<![if ! IE]> <![endif]>ENGLISH |
||
• |
The client (agent PC) runs on a supportedWindows® operating system. For details on |
||
|
|||
|
Agent PC OS Support, refer to the section Supported platforms. |
|
|
• |
.NET 3.5 is installed in the client. |
|
|
• |
ASWM Enterprise Agent is installed in the client. |
|
|
• |
If an older ASWM version exists in the client. |
|
|
NOTES:
•Tick Select all Support clients to deploy agents on all supported clients.
•Click Add to ASWM Group to categorize the selected clients to different groups.
•The SupportStatus shows Unknown when WMI is disabled.
ASUS ASWM Enterprise |
17 |

9.Wait until the agent deployment process is finished. Click Finish to close the screen.
<![if ! IE]><![endif]>ENGLISH
Manually deploy the ASWM Enterprise agents
To manually deploy the ASWM Enterprise agents:
1.On the navigation menu, click Deployment Management.
2.Click Deploy New ASWM Enterprise Agent.
18 Chapter 2: Deploying ASWM
3.The wizard guides you through the deployment process. Click Start to continue.
<![if ! IE]><![endif]>ENGLISH
4.Select Manual Deploy the ASWM Enterprise Agent and click Next to continue.
ASUS ASWM Enterprise |
19 |

<![endif]>ENGLISH
5.Click Add Target PC and do the following:
a)Select the target PC type as either IP Address or Host Name.
b)Select the account type as either Local Account or Domain Account.
c)Log in as administrator.
d)Click Save.
6.Click Scan and wait until the scanning process is finished.
NOTE: You can also click the Import button to import a deploy table manually.
6.From the scanning result, select the clients to which you want to deploy agents, and click
Start.
6.Wait until the installation/deployment process is finished. Click Finish to close the screen.
20 Chapter 2: Deploying ASWM
Discovering clients with preload service (ThinClient mode)
The ThinClient mode allows you to search for Thin Clients (such as TC-710) in the same network for multiple client deployment via the ASWM Enterprise.
NOTE: Ensure that the ThinClient is turned on and is connected to the same network as the server PC.
To discover clients with preload service:
1.Select Discover Clients with preload service and click Next to search for the ThinClient in the network.
2.The clients are classified into Support and Not Support in the SupportStatus field.
•Support: The ThinClient supports ASUS ASWM Enterprise agent.
•Not Support: An older version of ASUS ASWM Enterprise agent may already be installed in the ThinClient. Uninstall the older version of ASWM agent in the ThinClient.
<![endif]>ENGLISH
ASUS ASWM Enterprise |
21 |
<![endif]>ENGLISH
3.Click Discovery to search again.
NOTE: Set the firewall in the server PC properly since the Discovery function sends broadcast packet through the server PC.
4.Under the Install column, select the Thin Client, and click Start to install the agent.
5.Wait until the installation/deployment process is completed.
22 Chapter 2: Deploying ASWM
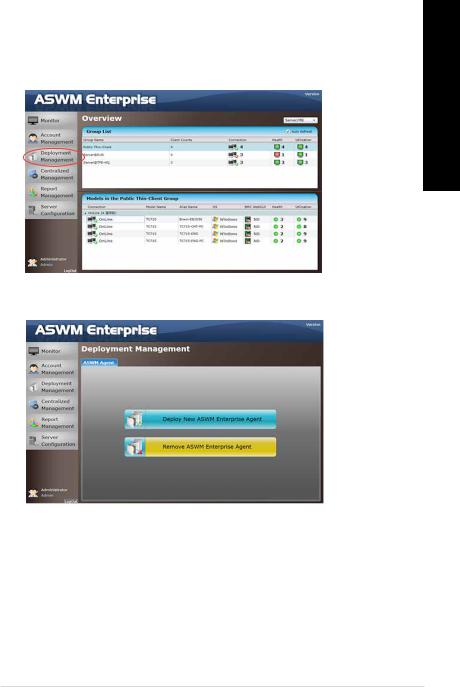
Removing ASWM Enterprise agents
You are allowed to remove the ASWM Enterprise agents from the server PC or in Active Directory.
Removing the ASWM agents from the server PC
To remove the agents from the server PC:
1.On the navigation menu, click Deployment Management.
2.Click Remove ASWM Enterprise Agent.
<![endif]>ENGLISH
ASUS ASWM Enterprise |
23 |
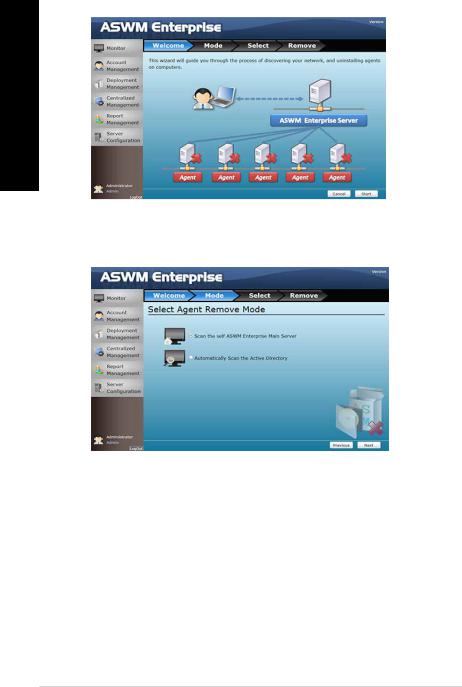
3.The wizard guides you through the uninstallation process. Click Start to continue.
<![if ! IE]><![endif]>ENGLISH
4.Click Scan the self ASWM Enterprise Main Server and click Next to continue. The system scans the server PC.
24 Chapter 2: Deploying ASWM
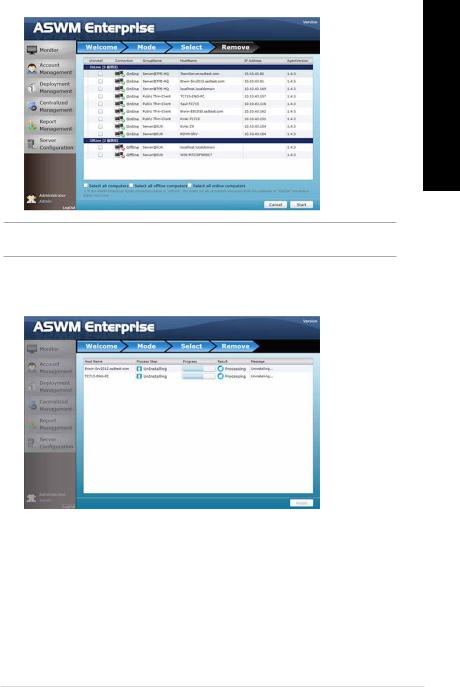
5.Select the clients whose ASWM agents you want to uninstall and click Start.
<![if ! IE]><![endif]>ENGLISH
NOTE: To narrow down your selection, tick any of these options: Select all clients, Select all offline clients, or
Select all online clients.
6.The server automatically removes the agents on the selected clients. When done, the status is displayed as Success. Click Finish to close the screen.
ASUS ASWM Enterprise |
25 |
Loading...