


 Loading...
E4847
15G06Q161100

Table of Contents
About This User’s Manual........................................................................................................ |
v |
Notes for This Manual............................................................................................................... |
v |
Safety Precautions.................................................................................................................... |
vi |
Transportation Precautions.................................................................................. |
viii |
Charging Your Batteries......................................................................................... |
viii |
Airplane Precautions............................................................................................... |
viii |
Chapter 1: |
Knowing the Parts |
|
Top Side..................................................................................................................................... |
|
1-2 |
Bottom Side............................................................................................................................. |
|
1-5 |
Right Side.................................................................................................................................. |
|
1-7 |
Left Side..................................................................................................................................... |
|
1-8 |
Front Side.................................................................................................................................. |
|
1-9 |
Keyboard Usage................................................................................................................... |
|
1-10 |
Special Function Keys.......................................................................................... |
1-10 |
|
Chapter 2: |
Getting Started |
|
Powering on your Disney Netpal..................................................................................... |
2-2 |
|
First-time Startup................................................................................................................... |
|
2-3 |
Desktop..................................................................................................................................... |
|
2-4 |
Parental Control...................................................................................................................... |
|
2-5 |
Setting the master password andcreating an account............................. |
2-5 |
|
Disney Desktop..................................................................................................................... |
|
2-10 |
ASUS EeePC Tray Utility...................................................................................................... |
2-13 |
|
Enabling and Disabling Devices...................................................................... |
2-13 |
|
Adjusting the display resolution..................................................................... |
2-14 |
|
Network Connection.......................................................................................................... |
|
2-15 |
Configuring a wireless network connection............................................... |
2-15 |
|
Local Area Network.............................................................................................. |
2-16 |
|
Browsing web pages............................................................................................ |
2-18 |
|
ii |
Table of Contents |
Chapter 3: |
Using the Disney Netpal |
|
ASUS Update........................................................................................................................... |
|
3-2 |
Updating the BIOS through the Internet........................................................ |
3-2 |
|
Updating the BIOS through a BIOS file........................................................... |
3-3 |
|
Super Hybrid Engine............................................................................................................. |
|
3-4 |
Super Hybrid Engine Modes............................................................................... |
3-4 |
|
Microsoft® Office Trial............................................................................................................ |
|
3-5 |
Disney Mix Central................................................................................................................. |
|
3-6 |
Listening to music................................................................................................... |
3-6 |
|
Viewing images....................................................................................................... |
3-7 |
|
Watching videos...................................................................................................... |
3-7 |
|
Shopping online...................................................................................................... |
3-7 |
|
Disney Pix.................................................................................................................................. |
|
3-8 |
Drawing and editing pictures............................................................................. |
3-8 |
|
Browsing albums..................................................................................................... |
3-9 |
|
Creating Bobble Head videos and postcards............................................... |
3-9 |
|
Disney Theme........................................................................................................................ |
|
3-10 |
Applying Hypersuite............................................................................................ |
3-10 |
|
Radio Disney.......................................................................................................................... |
|
3-11 |
Listening to Radio Disney.................................................................................. |
3-11 |
|
Last 10 Songs.......................................................................................................... |
|
3-12 |
Lyrics.......................................................................................................................... |
|
3-12 |
Skins........................................................................................................................... |
|
3-12 |
Chapter 4: |
Support DVD & System Recovery |
|
Support DVD information................................................................................................... |
4-2 |
|
Running the support DVD................................................................................... |
4-2 |
|
Drivers menu. |
........................................................................................................... |
4-3 |
Utilities menu........................................................................................................... |
|
4-3 |
Contact....................................................................................................................... |
|
4-3 |
Other information................................................................................................... |
4-3 |
|
System Recovery.................................................................................................................... |
|
4-4 |
Using the Support ........................................................................................DVD |
4-4 |
|
Using Recovery ...........................................Partition (on selected models) |
4-5 |
|
Boot Booster............................................................................................................................ |
|
4-6 |
|
|
|
Disney Netpal |
|
iii |

Appendix
Declarations and Safety Statements............................................................................... |
A-2 |
Federal Communications Commission Statement..................................... |
A-2 |
FCC Radio Frequency (RF) Exposure Caution Statement......................... |
A-3 |
Declaration of Conformity(R&TTE directive 1999/5/EC)........................... |
A-4 |
CE Mark Warning..................................................................................................... |
A-4 |
IC Radiation Exposure Statement for Canada............................................... |
A-4 |
Wireless Operation Channel for Different Domains................................... |
A-6 |
France Restricted Wireless Frequency Bands................................................ |
A-6 |
UL Safety Notices.................................................................................................... |
A-7 |
REACH......................................................................................................................... |
A-8 |
Power Safety Requirement.................................................................................. |
A-8 |
Nordic Lithium Cautions (for lithium-ion batteries)................................... |
A-9 |
Copyright Information...................................................................................................... |
A-11 |
Limitation of Liability......................................................................................................... |
A-12 |
Service and Support.......................................................................................................... |
A-12 |
iv |
Table of Contents |
About This User’s Manual
You are reading the Disney Netpal User’s Manual.This User’s Manual provides information regarding the various components in the Disney Netpal and how to use them.The following are major sections of this User’ s Manual:
1.Knowing the Parts
Provides information on the Disney Netpal’s components.
2.Getting Started
Provides information on getting started with the Disney Netpal.
3.Using the Disney Netpal
Provides information on using the Disney Netpal’s utilities.
4.Support DVD and System Recovery
Gives you information on support DVD contents and system recovery.
5.Appendix
Gives you safety statements.
The actual bundled applications differ by models and territories. There may be differences between your Disney Netpal and the pictures shown in this manual. Please accept your Disney Netpal as being correct.
Notes for This Manual
A few notes and warnings are used throughout this guide, allowing you to complete certain tasks safely and effectively.These notes have different degrees of importance as follows:
WARNING! Important information that must be followed for safe operation.
IMPORTANT! Vital information that must be followed to prevent damage to data, components, or persons.
TIP: Tips for completing tasks.
NOTE: Information for special situations.
Disney Netpal

Safety Precautions
The following safety precautions will increase the life of the Disney Netpal. Follow all precautions and instructions. Except as described in this manual, refer all servicing to qualified personnel.
Disconnect the AC power before cleaning.Wipe the Disney Netpal using a clean cellulose sponge or chamois cloth dampened with a solution of nonabrasive detergent and a few drops of warm water and remove any extra moisture with a dry cloth.
DO NOT place on uneven  or unstable work surfaces.
 Seek servicing if the casing
has been damaged.
DO NOT expose to dirty or dusty environments. DO NOT operate during a gas leak.
DO NOT place or drop objects on top and do not shove
any foreign objects into the Disney Netpal.
DO NOT expose to strong magnetic or electrical fields.
DO NOT press or touch the  display panel. Do not place
 together with small items
that may scratch or enter the Disney Netpal.
DO NOT leave the Disney Netpal on your lap or any part of the body to prevent discomfort or injury from heat exposure.
When replacing or upgrading the battery, hard drive, and memory, always visit an authorized service center or retailer for this Disney Netpal.
DO NOT expose to or use near liquids, rain, or moisture. DO NOT use the modem during electrical storms.
Battery safety warning: DO NOT throw the battery in fire. DO NOT short circuit the
contacts. DO NOT disassemble the battery.
Risk of explosion if battery is replaced by an incorrect type. Dispose of used batteries according to the instructions.
vi |
Table of Contents |


 SAFE TEMP:This Disney
 Netpal should only be used in environments with ambient temperatures between 5°C (41°F) and 35°C (95°F)
DO NOT carry or cover a Disney Netpal that is powered ON with any
materials that will reduce air circulation such as a carrying bag.
DO NOT use damaged power cords, accessories, or other peripherals.
INPUT RATING: Refer to the rating label on the bottom of the Disney Netpal and be sure that your power adapter complies with the rating.
DO NOT use strong solvents such as thinners, benzene, or other chemicals on or near the surface.
Incorrect installation of battery may cause explosion and damage the Disney Netpal.
DO NOT throw the Disney Netpal in municipal waste.This product has been designed to enable proper reuse of parts and recycling. The symbol of the crossed out wheeled bin indicates that the product (electrical, electronic equipment and mercury-containing button cell battery) should not be placed in municipal waste. Check local regulations for disposal of electronic products.
DO NOT throw the battery in municipal waste.The symbol of the crossed out wheeled bin indicates that the battery should not be placed in municipal waste.
CAUTION! ELECTRICALLY OPERATED PRODUCT.THIS IS NOT A TOY. TO AVOID RISK OF ELECTRIC SHOCK OR FIRE, IT SHOULD NOT BE PLAYED WITHOUT ADULT SUPERVISION OR PLACED WHERE SMALL CHILDREN CAN REACH.
Disney Netpal |
vii |
Transportation Precautions
To prepare the Disney Netpal for transport, you should close the display panel to protect the keyboard and display panel.
For the model that comes with a hard disk drive, you should turn it OFF and disconnect all external peripherals to prevent damage to the connectors when you prepare for transport.The hard disk drive’s head retracts when the power is turned OFF to prevent scratching of the hard disk surface during transport. Never transport it while the power is still ON.
The Disney Netpal’s surface is easily dulled if not properly cared for. Be careful not to rub or scrape surfaces when transporting your Disney Netpal.You can put your Disney Netpal in a carrying case for protection from dirt, water, shock, and scratches.
Charging Your Batteries
If you intend to use battery power, be sure to fully charge your battery pack before going on long trips. Remember that the power adapter charges the battery pack as long as it is plugged into the computer and an AC power source. Be aware that it takes much longer to charge the battery pack when the Disney Netpal is in use.
Remember to fully charge the battery (8 hours or more) before first use and whenever it is depleted to prolong battery life.The battery reaches its maximmum capacity after a few full charging and discharging cycles.
Airplane Precautions
Contact your airline if you want to use the Disney Netpal on the airplane. Most airlines have restrictions for using electronic devices. Most airlines allow electronic use only between and not during takeoffs and landings.
There are three main types of airport security devices: X-ray machines (used on items placed on conveyor belts), magnetic detectors (used on people walking through security checks), and magnetic wands (hand-held devices used on people or individual items).You can send your Disney Netpal and diskettes through airport X-ray machines. However, it is recommended that you do not send your Disney Netpal or diskettes through airport magnetic detectors or expose them to magnetic wands.
viii |
Table of Contents |
Top Side
Bottom Side
Right Side
Left Side
Rear Side
Keyboard Usage
Touchpad Usage
Knowing the Parts1

Top Side
Refer to the diagram below to identify the components on this side of the Disney Netpal.
The top side may vary in appearance depending on model.
1
2
3
4
5
6
7
The keyboard differs for each territory.
1-2 |
Chapter 1: Knowing the Parts |
1
2
3
4
Microphone (Built-in)
The built-in mono microphone can be used for skype, voice narrations, or simple audio recordings.
Built-in Camera
Display Panel
Power Indicator
The power indicator lights when the Disney Netpal is turned ON and blinks slowly when the Disney Netpal is in the Save-to-RAM (Suspend) mode.This indicator is OFF when the Disney Netpal is turned OFF.
Status Indicators
Battery Charge Indicator
The battery charge indicator (LED) shows the battery charging status as follows:
Powered ON
High battery power (95%–100%)
Medium battery power (11%–94%)
Low battery power (0%–10%)
With Adapter |
Without Adapter |
Green ON |
Off |
|
|
Orange ON |
Off |
|
|
Orange Blinking |
Orange Blinking |
|
|
Powered OFF/ Standby mode
High battery power (95%–100%)
Medium battery power (11%–94%)
Low battery power
(0%–10%)
With Adapter |
Without Adapter |
Green ON |
Off |
|
|
Orange ON |
Off |
|
|
Orange Blinking |
Off |
|
|
Storage Device Indicator
The storage device indicator blinks when data is written to or read from the disk drive.
Capital Lock Indicator
Indicates that capital lock [Caps Lock] is activated when lighted.
Disney Netpal |
1-3 |
Wireless/Bluetooth Indicator
This is only applicable on models with built-in wireless LAN/Bluetooth.When the built-in wireless LAN/Bluetooth is enabled, this indicator lights.
5  Power Switch
The power switch allows powering ON and OFF the Disney Netpal and recovering from Save-to-RAM (Suspend) mode. Press the switch once to turn ON and hold it to turn OFF the Disney Netpal.The power switch only works when the display panel is opened.
6 
 Keyboard
The keyboard provides keys with comfortable travel (depth at which the keys can be depressed) and palm rest for both hands.
The keyboard differs depending on model.
7 
 Touchpad and Buttons
The touchpad and its buttons comprises a pointing device that provides the same functions as a desktop mouse.
1-4 |
Chapter 1: Knowing the Parts |

Bottom Side
Refer to the diagram below to identify the components on this side of the Disney Netpal.
The bottom side may vary in appearance depending on model.
1
2 |
3 |
The bottom of the Disney Netpal can get very hot. Be careful when handling the Disney Netpal while it is in operation or recently been in operation. High temperatures are normal during charging or operation. DO NOT use on soft surfaces such as beds or sofas, which may block the vents. DO NOT PUT THE Disney Netpal ON YOUR
LAP OR OTHER PARTS OF THE BODY TO AVOID INJURY FROM THE HEAT.
Disney Netpal |
1-5 |

1  Memory (RAM) Compartment
The memory compartment provides expansion capabilities for additional memory. Additional memory will increase application performance by decreasing disk drive access.The
BIOS automatically detects the amount of memory in the system and configures accordingly.There is no hardware or software (including BIOS) setup required after the memory is installed. Visit an authorized service center or retailer for information
on memory upgrades for your Disney Netpal. Only purchase expansion modules from authorized retailers of this Disney Netpal to ensure maximum compatibility and reliability.
2 
 Reset Button (Emergency)
In case your operating system cannot properly turn OFF, the reset button can be depressed with a pin or a straightened paper clip to shut down the Disney Netpal.
3Air Vents
The air vents allow cool air to enter and warm air to exit the Disney Netpal.
1-6 |
Chapter 1: Knowing the Parts |
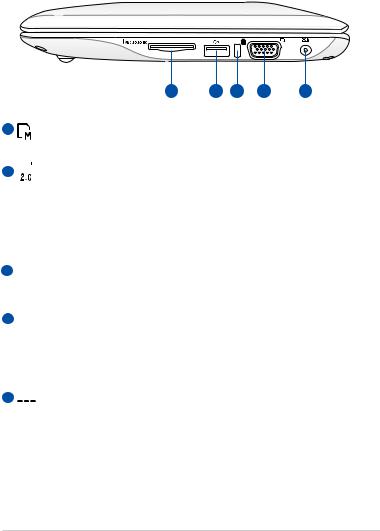
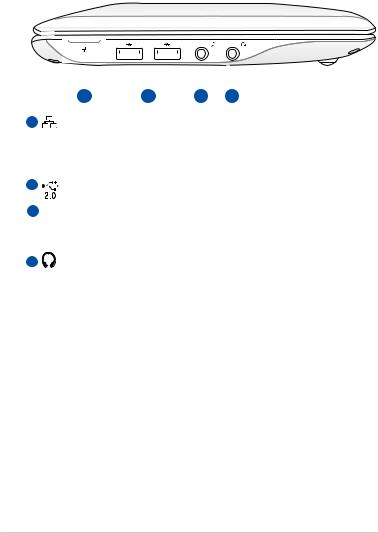
Right Side
Refer to the diagram below to identify the components on this side of the Disney Netpal.
1 |
2 |
3 |
4 |
5 |
1 |
Memory Card Slot |
The built-in memory card reader can read MMC/SD cards.
2  USB Port (2.0/1.1)
The USB (Universal Serial Bus) port is compatible with USB 2.0 or USB 1.1 devices such as keyboards, pointing devices, cameras, and storage devices, connected in a series up to 12Mbits/sec (USB 1.1) and 480Mbits/sec (USB 2.0). Also, the USB supports hot-swapping function.
3  Kensington® Lock Port
The Kensington® lock port allows the Disney Netpal to be secured using Kensington® compatible security products.
4  Display (Monitor) Output
The 15-pin D-sub monitor port supports a standard VGAcompatible device such as a monitor or projector to allow viewing on a larger external display.
5  Power (DC) Input
The supplied power adapter converts AC power to DC power for use with this jack. Power supplied through this jack supplies
power to the Disney Netpal and charges the internal battery pack. To prevent damage to the Disney Netpal and battery pack, always use the supplied power adapter. CAUTION: MAY BECOME WARM TO HOT WHEN IN USE. BE SURE NOT TO COVER THE ADAPTER AND KEEP IT AWAY FROM YOUR BODY.
Disney Netpal |
1-7 |
Left Side
Refer to the diagram below to identify the components on this side of the Disney Netpal.
|
|
|
|
|
|
|
|
|
|
|
|
|
|
|
|
|
|
|
|
|
|
|
|
|
|
|
|
|
|
|
|
|
|
|
|
|
|
|
|
|
|
|
|
|
|
|
|
|
|
|
|
|
|
|
|
|
|
|
|
|
|
|
|
|
|
|
|
|
|
|
|
|
|
|
|
|
|
|
|
|
|
|
|
|
1 |
|
|
2 |
|
3 |
4 |
||||||
1 |
LAN Port |
|
|
|
|
|
|
|
|
|
|||
2
3 
4
The eight-pin RJ-45 LAN port (10/100M bit) supports a standard Ethernet cable for connection to a local network.The built-in connector allows convenient use without additional adapters.
USB Port (2.0/1.1)
Microphone Jack
The microphone jack is designed to connect the microphone used for Skype, voice narrations, or simple audio recordings.
Headphone Output Jack
The 1/8”stereo headphone jack (3.5mm) connects the Disney Netpal’s audio out signal to amplified speakers or headphones. Using this jack automatically disables the built-in speakers.
1-8 |
Chapter 1: Knowing the Parts |

Front Side
Refer to the diagram below to identify the components on this side of the Disney Netpal.
1 |
2 |
3 |
1  Power Indicator
The power indicator lights when the Disney Netpal is turned ON and blinks slowly when the Disney Netpal is in the Save-to-RAM (Suspend) mode.This indicator is OFF when the Disney Netpal is turned OFF.
2 |
Battery Charge Indicator |
The battery charge indicator (LED) shows the status of the battery’s power.
3Air Vents
The air vents allow cool air to enter and warm air to exit the Disney Netpal.
Disney Netpal |
1-9 |
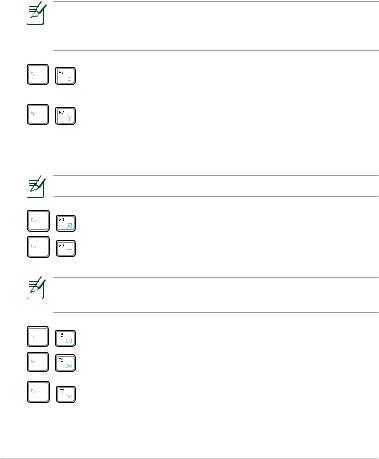
Keyboard Usage
Special Function Keys
The following defines the colored hot keys on the Disney Netpal’s keyboard.The colored commands can only be accessed by first pressing and holding the function key while pressing a key with a colored command. Some function icons appear in the Notification area after activation.
The Hot Key locations on the function keys may vary depending on model but the functions should remain the same. Follow the icons whenever your hot key locations do not match the manual.
ZZ Icon (F1): Places the Disney Netpal in suspend mode (Save-to-RAM).
Radio Tower (F2): Wireless Models Only:Toggles the
internal wireless LAN or Bluetooth (on selected models) ON or OFF with an on-screen-display.When enabled, the corresponding wireless indicator will light.
The default setting is WLAN ON / Bluetooth OFF.
Touchpad (F3):Toggles the touchpad ON/OFF.
Resolution Selection (F4): Press to adjust the display resolution.
The Touchpad (<Fn> + <F3>) and Resolution Selection (<Fn> + <F4>) functions are available on selected models.
Sun Down Icon (F5): Decreases the display brightness.
Sun Up Icon (F6): Increases the display brightness.
Crossed Screen Icon (F7):Turns off the display backlight.
1-10 |
Chapter 1: Knowing the Parts |
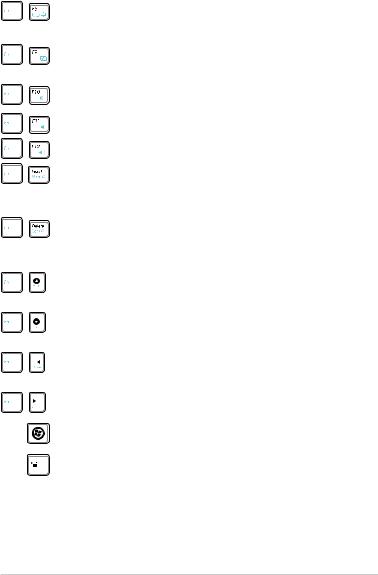
LCD/Monitor Icons (F8):Toggles between the Disney
Netpal’s LCD display and an external monitor.
Task Manager Icon (F9): Initiates the Task Manager to view the application process or terminates applications.
Crossed Speaker Icon (F10): Mutes the speaker.
Volume Down Icon (F11): Decreases speaker volume.
Volume Up Icon (F12): Increases the speaker volume.
Num Lk (Insert):Toggles the numeric keypad (number
lock) ON and OFF. Allows use of a larger portion of the keyboard for number entering.
Scr Lk (Delete): Toggles the “Scroll Lock” ON and OFF.
Allows you to use a larger portion of the keyboard for cell navigation.
Pg Up (↑): Press to scroll up in documents or the web browser.
Pg Dn (↓): Press to scroll down in documents or the web browser.
Home (←): Press to move the pointer to the beginning of the line.
End (→): Press to move the pointer to the end of the line.
Windows icon: Displays the start menu.
Menu with pointer icon : Activates the properties menu
and is equivalent to right-clicking the touchpad/mouse on an object.
Disney Netpal |
1-11 |

1-12 |
Chapter 1: Knowing the Parts |
Powering on your Disney Netpal First-time Startup
Desktop
ASUS EeePC Tray Utility Network Connection
Getting Started2
Loading...