


Turbo Drive
External 16X Blu-ray Writer
BW-16D1X-U
External Blu-ray Writer
Quick Installation Guide In 35 Languages
English |
Ελληνικά |
Italiano |
Norsk |
Svenska |
|
Español |
|
Polski |
|
|
Eesti |
Қазақ |
Português |
Türkçe |
български |
Suomi |
Lietuvių |
Română |
(Kurulum Kılavuzu) |
Tiếng Việt |
||||
Česky |
Français |
Latviski |
Русский |
Українська |
Dansk |
Magyar |
Bahasa Malaysia |
Slovensky |
يبرع |
Deutsch |
Bahasa Indonesia |
Nederlands |
Slovenščina |
یسراف |
Model / нормативная модель : BW-16D1X-U
V 1.5 Published August 2018
Copyright © 2018 ASUSTeK Computer Inc. All Rights Reserved. 15060-34450500

Safety Information
•Do not place damaged discs inside the device. A damaged disc may break while in use and damage the device.
•Use of any controls, adjustments, or procedures other than those specified in this manual may result to hazardous radiation exposure.
•Do not attempt to disassemble the drive.
•Do not move the device from a cold to a warm or hot environment. Drastic change in temperature is harmful to the device.
•Before moving or uninstalling the drive, remove any disc in it.
•Prevent liquids or any metal from getting into the device, If this situation occurs, contact your retailer for help.
•Do not use any evaporating solvents to clean the device. If you accidentally sprayed any solvent on the device, use a clean cloth to wipe it. You may also use a neutral cleaner to dilute the solvent to easily wipe it from the device.
•Do not turn off the computer while the device is in reading or writing mode.
•Do not place discs into the device immediately if they came from a cold environment, especially during cold seasons. Wait until the discs have reached room temperature.
CD-ROM Drive Safety Warning
CLASS 1 LASER PRODUCT
Sicherheitsinformationen
Gerät nutzen
•Legen Sie keine beschädigten Medien in das Gerät ein. Ein defektes Medium kann bei der Benutzung brechen und das Gerät beschädigen.
•Die Nutzung von Reglern, Einstellungen und Verfahren, die nicht in dieser Anleitung angegeben sind, kann zu gefährlicher Strahlenbelastung führen.
•Versuchen Sie nicht, das Laufwerk zu demontieren.
•Bringen Sie das Gerät nicht von einem kalten an einen warmen oder heißen Ort. Drastische Temperaturunterschiede sind schädlich für das Gerät.
•Entnehmen Sie jegliche Medien, bevor Sie das Laufwerk transportieren oder ausbauen.
•Achten Sie darauf, dass keine Flüssigkeiten oder Metallteile in das Gerät gelangen; falls dies dennoch passiert, wenden Sie sich an Ihren Händler.
•Verwenden Sie zur Reinigung des Gerätes keine verdunstenden Lösungsmittel. Falls Sie versehentlich Lösungsmittel auf das Gerät sprühen, wischen Sie es mit einem sauberen Tuch ab. Sie können das Lösungsmittel auch mit einem neutralen Reiniger verdünnen und so leichter vom Gerät entfernen.
•Schalten Sie den Computer nicht ab, während sich das Gerät im Leseoder Schreibmodus befindet.
•Legen Sie Medien nicht sofort ein, wenn sie aus einer kalten Umgebung kommen, insbesondere während der kalten Jahreszeit. Warten Sie, bis das Medium Zimmertemperatur erreicht hat.
CD-ROM-Laufwerk – Sicherheitswarnung
Laserprodukt der Klasse 1
Australia Statement Notice
From 1 January 2012 updated warranties apply to all ASUS products, consistent with the Australian Consumer Law. For the latest product warranty details please visit http://support.asus.com. Our goods come with guarantees that cannot be excluded under the Australian Consumer Law. You are entitled to a replacement or refund for a major failure and compensation for any other reasonably foreseeable loss or damage. You are also entitled to have the goods repaired or replaced if the goods fail to be of acceptable quality and the failure does not amount to a major failure.
If you require assistance please call ASUS Customer Service 1300 2787 88 or visit us at http://support.asus.com.
India RoHS
This product complies with the "India E-Waste (Management) Rules, 2016” and prohibits use of lead, mercury, hexavalent chromium, polybrominated biphenyls (PBBs) and polybrominated diphenyl ethers (PBDEs) in concentrations exceeding 0.1% by weight in homogenous materials and 0.01% by weight in homogenous materials for cadmium, except for the exemptions listed in Schedule II of the Rule.
REACH
Complying with the REACH (Registration, Evaluation, Authorisation, and Restriction of Chemicals) regulatory framework, we published the chemical substances in our products at ASUS REACH website at http://csr.asus.com/english/REACH.htm.
Die rechtliche Rahmenbedingungen für REACH (Registration, Evaluation, Authorisation, and Restriction of Chemicals) erfüllend, veröffentlichen wir die chemischen Substanzen in unseren Produkten auf unserer ASUS REACH-Webseite unter http://csr.asus.com/english/REACH.htm.
ASUSTeK Computer Inc. |
ASUS TECHNOLOGY HOLLAND B.V. |
4F, No.150, LI-TE RD., PEITOU, |
FULTONBAAN 12, 3439 NE,NIEUWEGEIN, |
TAIPEI, TAIWAN |
THE NETHERLANDS |
•0°C ~ 40°C
•BW-16D1X-U
•12V, 3.0A
•1
3
|
|
|
|
|
||
|
(Pb) |
(Hg) |
(Cd) |
|
|
|
|
|
|
|
(Cr+6) |
(PBB) |
(PBDE) |
|
|
○ |
○ |
○ |
○ |
○ |
|
○ |
○ |
○ |
○ |
○ |
○ |
|
|
○ |
○ |
○ |
○ |
○ |
|
|
○ |
○ |
○ |
○ |
○ |
|
|
○ |
○ |
○ |
○ |
○ |
1. “○”2. “ ”
限。仅指电子电器产品中含有的有害物质不致发生外泄或突变从而对环境造 成污染或对人身、财产造成严重损害的期限。
|
|
|
|
|
|
|
|
|
(Pb) |
(Hg) |
(Cd) |
|
|
|
|
|
|
|
|
|
(Cr(VI)) |
(PBB) |
(PDBE) |
|
|
|
|
|
|
|
|
|
× |
○ |
○ |
|
○ |
○ |
○ |
|
○ |
○ |
○ |
|
○ |
○ |
○ |
|
× |
○ |
○ |
|
○ |
○ |
○ |
SJ/T 11364
○ GB/T 26572 × GB/T 26572
2011/65/EU
Compliance Statement of Innovation, Science and Economic
Development Canada (ISED)
This device complies withInnovation, Science, and Economic Development Canada licence exempt RSS standard(s). Operation is subject to the following two conditions: (1) this device may not cause interference, and (2) this device must accept any interference, including interference that may cause undesired operation of the device.
CAN ICES-3(B)/NMB-3(B)
Déclaration de conformité de Innovation, Sciences et Développement économique Canada (ISED)
Le présent appareil est conforme aux CNR d’Innovation, Sciences et Développement économique Canada applicables aux appareils radio exempts de licence. L’exploitation est autorisée aux deux conditions suivantes : (1) l’appareil ne doit pas produire de brouillage, et (2) l’utilisateur de l’appareil doit accepter tout brouillage radioélectrique subi, même si le brouillage est susceptible d’en compromettre le fonctionnement.
CAN ICES-3(B)/NMB-3(B)
ASUS Recycling / Takeback Services
ASUS recycling and takeback programs come from our commitment to the highest standards for protecting our environment. We believe in providing solutions for our customers to be able to responsibly recycle our products, batteries and other components as well as the packaging materials. Please go to http://csr.asus.com/english/Takeback.htm for detail recycling information in different region.
AEEE Yönetmeliğine Uygundur.
4 |
5 |

Package Contents
Optical Drive x1 |
Quick Install Guide x1 |
USB 3.0 Cable x1 |
x1 |
x1 |
USB 3.0 x1 |
Power Adapter x1 |
Power Cord x1 |
Software x1 |
x1 |
x1 |
x1 |
NOTE Different countries or regions use different power cord models. You may find two models in the package. Please use the one fit in your country or region.
System Requirements for Playing Blu-ray Discs (for Blu-ray Drive Only)
Operating system:
Processor:
Memory:
Graphics Card:
Windows® 10 / 8 / 7 / Vista / XP with Service Pack 3 installed Mac OS® X 10.6 and above
Intel® Pentium® D 945 (3.4 GHz) or higher 1 GB or more is recommended
NVIDIA® GeForce 7600 GT, ATI X1600 series and above, or Intel® Graphics G965, HD3000 or HD4000 series graphics software decoder (Intel® Core™ 2 Duo E6700 (2.66 GHz) and above is recommended)
• Use HDCP compatible display and VGA card to get High Definition digital output.
NOTES • Refer to CyberLink website http://www.cyberlink.com for more details.
• Specifications are subject to change without notice.
Connect to Your Mac
01 Connecting the optical drive to your Mac
Connect the Type A USB connector of the bundled USB 3.0 cable to your Mac, and the Type B connector to the optical drive.
Type B
Type A 
02 Checking if your Mac has detected the ODD
1. Click |
on your desktop. |
2.Click “Applications”,
then choose “Disk Utility” and you can find the optical drive in the list.
ASUS BW-16D1X-U
6 |
7 |

03 Inserting a disc that contains files
•A disc icon appears on the desktop when you insert a disc.
•To eject the disc, right-click the disc icon, then select Eject [Disc Name]. The Eject button does not work on Mac OS.
04Burning files
1.A menu will pop-up when you insert a blank disc.
Select an action and click OK.
2.A disc icon will be created on your desktop.
3.Click on the disc icon to open the disc burning application.
4.Drag the files that you wish to burn into the application.
5.Click Burn.
NOTES •Mac OS supports DVD burning and playback.
•Mac OS supports burning to a Blu-ray disc. You need to purchase third-party software if you want to play movies from Blu-ray discs.
•Does not support BOOTCAMP INSTALL Windows® OS.
Connect the optical drive to your computer
Step 1
8 |
9 |
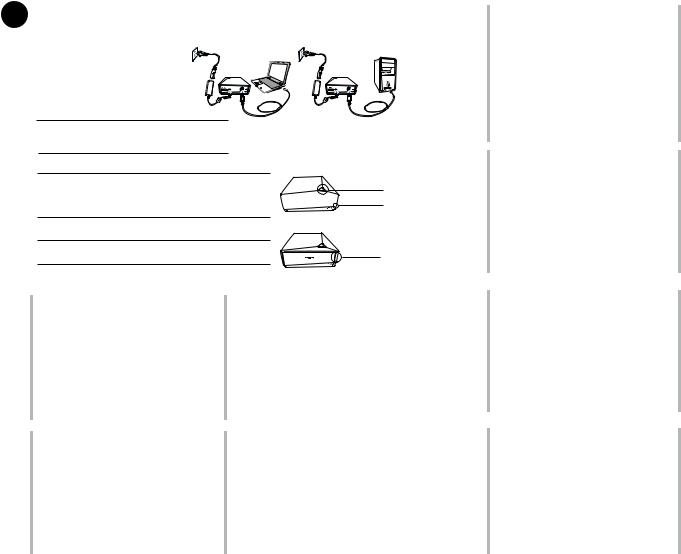
01 Connect the optical drive to your computer.
1. Connect one end of the bundled Notebook |
Desktop |
USB 3.0 cable to your computer. |
|
2. Connect the other end of the |
|
bundled USB 3.0 cable to the |
|
optical drive. |
|
NOTE Please use USB 3.0 cable to reach the maximum data transfer rate. USB 2.0 cable is compatible.
NOTES • The power LED lights up when the optical drive is switched on.
• The activity LED blinks when the optical drive is reading or writing BD, DVD, or CD.
Power LED
 Activity LED
NOTE Press the eject button to open or close the |
Eject Button |
optical drive tray. |
|
<![endif]>Français
<![if ! IE]><![endif]>Italiano
Connectez le lecteur optique à votre ordinateur:
1.Connectez une exrémité du câble USB 3.0 à l’un des ports USB de votre ordinateur.
2.Connectez l’autre extrémité du câble au lecteur optique.
REMARQUE: Veuillez utiliser le câble USB 3.0 pour obtenir un meilleur débit. Les câbles USB 2.0 sont toutefois compatibles.
REMARQUES:
•Le voyant d’alimentation s’allume lorsque le lecteur optique est sous tension.
•Le voyant d’activité clignote lorsque le lecteur optique est en cours de lecture ou d’écriture d’un disque BD-ROM, DVD-ROM ou CD-ROM.
REMARQUE: Appuyez sur le bouton d’éjection pour ouvrir ou fermer le plateau du lecteur optique.
Collegamento dell’unità ottica al computer.
1.Collegare al computer un’estremità del cavo USB 3.0 in dotazione.
2.Collegare l’altra estremità del cavo USB 3.0 all’unità ottica.
NOTA: utilizzare il cavo USB 3.0 per raggiungere la massima velocità di trasferimento dati. Il dispositivo mantiene la compatibilità con il cavo USB 2.0.
NOTE:
•Quando l’unità ottica è accesa, la spia LED dell’alimentazione si illumina.
•In fase di lettura o scrittura di BD, DVD o CD, la spia LED lampeggia.
NOTA: per aprire o chiudere il vassoio dell’unità ottica, premere il pulsante di espulsione.
<![endif]>Deutsch
<![if ! IE]><![endif]>Español
Verbinden des optischen Laufwerks mit Ihren Computer.
1.Connectez une exrémité du câble USB 3.0 à l’un des ports USB de votre ordinateur.
2.Connectez l’autre extrémité du câble au lecteur optique.
HINWEIS: Benutzen Sie bitte das USB 3.0-Kabel, um die maximale Datenübertragungsrate zu erreichen, ein USB 2.0-Kabel ist aber ebenfalls kompatibel.
HINWEISE:
•Die Strom-LED leuchtet auf, wenn das optische Laufwerk eingeschaltet ist.
•Die Aktivitäts-LED blinkt beim Lesen und Schreiben von BDs, DVDs oder CDs.
HINWEIS: Drücken Sie die Auswurftaste, um den Disk-Schlitten zu öffnen oder zu schließen.
Conecte la unidad óptica a su equipo.
1.Conecte un extremo del cable USB incluido al equipo.
2.Conecte el otro extremo del cable USB 3.0 incluido a la unidad óptica.
NOTA: utilice el cable USB 3.0 para conseguir la tasa de transferencia de datos máxima. El cable USB 2.0 es compatible.
NOTAS:
•El LED de alimentación se ilumina cuando la unidad óptica está encendida.
•El LED de actividad parpadea cuando la unidad óptica está realizando operaciones de lectura o escritura en BD, DVD o CD.
NOTA: Presione botón de expulsión para abrir o cerrar la bandeja de la unidad de disco óptica.
<![endif]>Русский
<![if ! IE]><![endif]>Česky
<![if ! IE]><![endif]>Nederlands
<![if ! IE]><![endif]>Suomi
Подключение оптического привода к компьютеру.
1.Подключите один конец поставляемого в комплекте кабеля USB 3.0 к компьютеру.
2.Подключите другой конец поставляемого в комплекте кабеля USB 3.0 к оптическому приводу.
‘ПРИМЕЧАНИЕ: Для достижения максимальной скорости передачи данных, используйте кабель USB 3.0. Кабель USB 2.0 совместим.
Примечания:
•‘Индикатор питания горит когда оптический привод включен.
•‘Индикатор активности мигает при чтении или записи BD, DVD или CD.
‘ПРИМЕЧАНИЕ: Нажмите кнопку извлечения для открытия или закрытия лотка оптического привода.
Připojte optickou jednotku k počítači.
1.Připojte jeden konec dodaného kabelu USB 3.0 k počítači.
2.Připojte druhý konec dodaného kabelu USB 3.0 k optické jednotce.
POZNÁMKA: Pro dosažení maximální rychlosti přenosu dat použijte kabel USB 3.0. Kabel USB 2.0 je kompatibilní.
POZNÁMKY:
•Indikátor LED napájení svítí, když je optická jednotka zapnutá.
•Indikátor LED činnosti bliká, když optická jednotka
načítá nebo zapisuje na disk BD, DVD nebo CD. POZNÁMKA: Stisknutím vysouvacího tlačítka otevřete a zavřete přihrádku optické jednotky.
Sluit het optische station aan op uw computer.
1.Sluit een stekker van de meegeleverde usb 3.0-kabel aan op de computer.
2.Sluit de andere stekker van de meegeleverde usb 3.0-kabel aan op het optische station.
OPMERKING: Gebruik een usb 3.0-kabel voor de maximale overdrachtsnelheid van gegevens. Een usb 2.0-kabel is compatibel.
OPMERKINGEN:
•De powerled gaat branden als het optische station ingeschakeld is.
•De activiteitled knippert als het optische station een bd, dvd of cd leest of beschrijft.
OPMERKING: Druk op de uitwerpknop om de lade van het optische station te openen en te sluiten.
Liitä optinen asema tietokoneeseesi.
1.Liitä niputetun USB 3.0 –kaapelin toinen pää tietokoneeseesi.
2.Liitä niputetun USB 3.0 –kaapelin toinen pää optiseen asemaan.
HUOMAA: Käytä USB 3.0 –kaapelia saavuttaaksesi maksimaalisen tiedonsiirtonopeuden. USB 2.0 – kaapeli on yhteensopiva.
HUOMAUTUKSIA:
•Virta-LED syttyy, kun optinen asema on kytketty päälle.
•Aktiviteetti-LED vilkkuu, kun optinen asema on lukemassa tai kirjoittamassa BD-, DVD-, tai CDlevylle.
HUOMAA: Paina ulostyöntö-painiketta avataksesi tai sulkeaksesi optisen aseman tarjottimen.
<![endif]>български
<![if ! IE]><![endif]>Dansk
<![if ! IE]><![endif]>Eesti
<![if ! IE]><![endif]>Ελληνικά
Свържете оптичното устройство с компютъра.
1.Свържете единия край на включения в комплекта USB 3.0 кабел с Вашия компютър.
2.Свържете другия край на USB 3.0 кабела с оптичното устройство.
‘ЗАБЕЛЕЖКА: Използвайте USB 3.0 кабел ако искате да постигнете максимална скорост за пренос на данни. USB 2.0 кабелът също е съвместим.
ЗАБЕЛЕЖКИ:
•Индикаторът на захранването светва, когато оптичното устройство е включено.
•Индикаторът за активност мига, когато оптичното устройство чете или записва BD, DVD или CD диск.
‘ЗАБЕЛЕЖКА: Натиснете бутона за изваждане, за да отворите и затворите тавата на оптичното устройство.
Forbind det optiske drev til computeren.
1.Tilslut den ene ende af det medfølgende USB 3.0-kabel til computer.
2.Tilslut den anden af USB 3.0-kablet til det optiske drev.
BEMÆRK: Anvend USB 3.0-kablet for at opnå den maksimale overførselshastighed. Et USB 2.0-kabel er kompatibelt.
BEMÆRKINGER:
•Strømlampen tændes, når den optimale drev tændes.
•Aktivitetslampen blinker, når det optiske drev læser
fra eller skriver på en BD, dvd eller cd.
BEMÆRK: Tryk på knappen Skub ud for at åbne eller lukke den optiske diskskuffe.
Ühendage optiline seade arvutiga.
1.Ühendage seadmega kaasnenud USB 3.0 kaabli üks ots arvutiga.
2.Ühendage komplekti kuuluva USB 3.0 kaabli teine ots optilise seadmega.
MÄRKUS: Kasutage USB 3.0 kaablit, et saavutada maksimaalset andmeedastuskiirust. USB 2.0 ei ole sobiv.
MÄRKUSED:
•Toite LED indikaatorid süttivad, kui optiline seade on sisse lülitatud.
•Oleku LED indikaator vilgub, kui optiline seade loeb andmeid BD-lt, DVD-lt või CD-lt või kirjutab nendele.
MÄRKUS: Vajutage väljastusnuppu optilise kettaseadme avamiseks või sulgemiseks.
Συνδέστε την οπτική μονάδα στον υπολογιστή σας.
1.Συνδέστε το ένα άκρο του συνημμένου καλωδίου USB 3.0 με τον υπολογιστή σας.
2.Συνδέστε το άλλο άκρο του συνημμένου καλωδίου USB 3.0 με την οπτική μονάδα.
ΣΗΜΕΙΩΣΗ: Χρησιμοποιήστε το καλώδιο USB 3.0 για να επιτευχθεί ο μέγιστος ρυθμός μεταφοράς δεδομένων. Το καλώδιο USB 2.0 είναι συμβατό.
ΣΗΜΕΙΩΣΕΙΣ:
•Το LED ισχύος φωτίζεται, όταν ενεργοποιηθεί η οπτική μονάδα.
•Το LED δραστηριότητας αναβοσβήνει όταν η οπτική μονάδα διαβάζει ή γράφει BD, DVD, ή CD.
ΣΗΜΕΙΩΣΗ: Πατήστε το κουμπί εξαγωγής για να ανοίξει και να κλείσει η μονάδα του οπτικού δίσκου.
10 |
11 |
 Loading...