


User Instruction Book
for
ARISTON
DISHWASHER
Model
LSI 61UK
D ISHWASHER
Quick guide to your dishwasher
This manual explains pleasantly all your new electric household appliance has to offer. In addition, you will discover a world of useful hints and handy tips to help you get a better wash from your dishwasher and to make it last longer.
1. Installation and moving (p. 7)
Installation,afterdeliveryoryourmovinghouse,isthemostimportant procedureforthecorrectoperationofyourdishwasher.Alwayscheck: 1.Thattheelectricitysystemisinaccordancewithnorms;
2.Thatthewaterinletandoutlethosesareconnectedcorrectly;
3.Thatthedishwasherislevelontheground.Itisworthit:forthelonger lifespanandthecorrectoperationofyourdishwasher.
2. Control panel at your orders (p. 2)
Learntogettoknowthepartswhichmakeupyourdishwasher,youwill use it better for it. This is where you will find the description of the controlsandtheinternalparts.
3. How to load your dishes (p. 3)
Thispageincludesusefultipstohelpyouloadyourdishwashercorrectly andmakethemostofalltheavailablespace.
4. How to start your dishwasher (p. 4)
Afterloadingthedishes,youneedtoselecttherightwashcycleand measureoutthecorrectdoseofdetergentandrinseaid.Readingthese pageswillhelpyouthroughallthewashphases.
5. Salt: an important ally (p. 6)
Usingtherightsaltandintherightquantitywillhelpyoumaintainyour dishwasherintopcondition,towashbetterandtoavoidpossibledamage causedbylimescale.
6. Advice and suggestions to help you make savings
as well (p. 6)
Thisiswhereyouwillfindsmalltipsonhowtowashyourdishesbetter andtohelpmakesavingsbyselectingawashcyclewhichbestsuitsthe typeofload.
7. Troubleshooting (p. 9)
Beforecallingthetechnician,havealookhere:alotofproblemscan haveanimmediatesolution.Ifyoucan'tmanagetosolveityourself,then calltheAristonhelplineandanyproblemwillbesolvedasquicklyas possible.
8. Safety for you and your family (p.9)
Readthischaptercarefully,asitwillprovideyouwithusefulinformation oninstallation,useandmaintenancesafety.Toavoidnastysurprises.
9. Special care and maintenance (p.10)
Onceinawhile,onceamonth,spendalittletimeonthefilterassembly andthesprayerarms.Thisiswhereyoucanlearnhow.
10. Keeping your dishwasher in shape (p.10)
Respectthefewrulesyouwillfindhere,andtheresultwillbeanenduring top-shapedishwasher.
11. Technical characteristics (p. 2)
All your appliance's technical data, in accordance with norms and regulationsasalways.
12. Ariston is still with you after purchase (p.11)
Ariston supports its products by means of after-sales services and assistance,offeringyouspecialguarantees,professionalassistanceas wellasqualitysparepartsandaccessories.Tofindoutmore,callthe AristonFreefoneNumber.
LAVASTOVIGLIE ARISTON - Istruzioni per l’installazione e l’uso 1
D ISHWASHER
Let's open up your dishwasher together
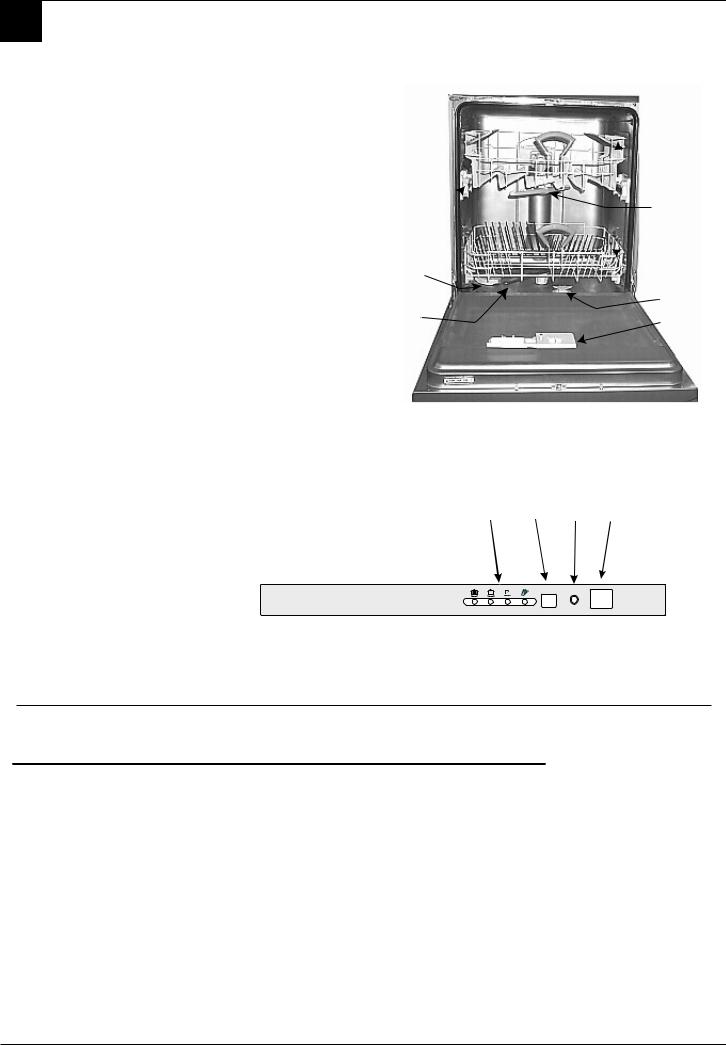
How is it made?
Learn to get to know the parts which make up your dishwasher, you will use it better for it.
E
E. Upper rack |
I. Bottom sprayer arm |
|
F. Top sprayer arm |
J. Salt container cap |
F |
G. Rack height adjuster |
K . Washing filter |
|
|
G |
|
H . Lower rack |
L. Detergent and rinse |
|
|
aid dispenser |
H |
|
J |
|
|
|
K |
|
I |
L |
|
|
Control panel at your orders
A.ON-OFF Button
Press this button to switch the appliance on.
B.ON-OFF Indicator light
This light informs you
that the dishwasher is on.
P.Cycle select button
Each time this button is pressed, one of the cycle
indicator lights M will
come on in sequence.
M.Cycle indicator light
This light informs you which cycle you have selected or the one in progress.
M P B A
Technical Characteristics
Technical characteristics
|
|
This dishwasher |
||
|
|
|||
Width |
cm. 59,5 |
conforms to the |
||
|
|
following European |
||
|
|
|||
Depth |
cm. 57 |
Community Directives: |
||
|
|
• |
73/23/EEC of 19/ |
|
Height |
cm. 82 |
|||
|
|
|
02/73 (Low Voltage) |
|
Capacity |
12 standard place settings |
|
and subsequent |
|
|
modifications; |
|||
|
|
|
||
|
|
• |
89/336/EEC of 03/ |
|
Mains water pressure |
20 KPa÷ 1MPa (0,2 ÷10 bar) |
|||
|
05/89 |
|||
|
|
|
(Electromagnetic |
|
Power voltage |
See data plate |
|
||
|
Compatibility) and |
|||
|
|
|
subsequent |
|
Total absorber power |
See data plate |
|
||
|
modifications; |
|||
|
|
|
|
|
Fuse |
See data plate |
|
|
|
|
|
|
|
|
2 ARISTON DISHWASHER - Instructions for installation and use

|
|
|
How to load your dishes |
D |
ISHWASHER |
|
|
Before washing, a few small steps can help you get a better wash and keep your dishwasher for longer. Remove the largest scraps of food left over on your plates, soak saucepans and frying pans with tough incrustations. After loading your dishes, make sure the blades on the sprayer arm turn well.
Do not place glasses and cups on top of one another, and make sure the dishes are not touching.
First of all. |
What goes into the |
Before placing the dishes in the |
upper rack? |
racks,removethelargestscraps |
Place delicate and lightweight |
offoodleftoveronyourplates,you |
dishesintheupperrack:glasses, |
willthusavoidblockingthefilter, |
teacupsandcoffeecups,saucers- |
whichwouldreducetheefficacy |
butplatestoo-shallowsaladbowls, |
ofthewash. |
slightly dirty frying pans and |
Ifthesaucepansandfryingpans |
shallowpans. |
areverydirty,allowthemtosoak |
Positionlightweightdishesinsuch |
beforebeingwashed.Tomakeit |
as way as to avoid their being |
easiertoloadyourdishes,pullthe |
movedbythesprayofwater. |
racksout. |
|
What goes into the lower rack?
Werecommendyouplacethemost difficult dishes to wash into the lowerrack:saucepans,lids,soup dishesandplates(aloadexample isshowninthephoto).
•Serving dishes and large lids: place them on the sides oftherack.
•Saucepans, salad bowls: mustalwaysbeplacedupside down
•Very deep dishes: place themobliquely,thusallowing water to run down them and cleaningthembetter
|
1 |
2 |
|
|
|
Fig.F |
|
3 |
|
4 |
|
|
|
Placethecutlerywiththehandles atthebottom;ifthebasketisthe onewithsideinserts,theninsert theteaspoonsonebyoneintothe slots(seefig.A)
A
Itisbestifyouplacelongerutensils horizontallyatthefrontoftheupper rack.
Afterloadingthedishes,remember to check that the blades on the sprayer arms can turn freely withouthittingagainstanydishes.
Open the rail stop flaps and pull the rack out completely. Now place it in high or low position, then slide it along the guide rails until the front wheels also go in. Now close the rail stop flaps. Follow the sequence of actions illustrated in figure "F".
12 standard place- |
Daily load |
settings load |
|
upperrack |
upperrack |
lowerrack |
lowerrack |
ARISTON DISHWASHER - Instructions for installation and use 3
 Loading...