


Istruzioni per luso
IT
Italiano, 1Italiano, 1
Italiano, 1
Italiano, 1Italiano, 1
DE
EN
English,13
NL
FR
Français, 25
ES
LAVASTOVIGLIE
Sommario
Installazione, 2-3
Posizionamento e livellamento
Collegamenti idraulici ed elettrici
Dati tecnici
Deutsch, 37
Dutch, 49
PT
Portuges, 73
LZ 705 EXTRA
Espanol, 61
Descrizione dellapparecchio, 4
Vista d’insieme
Pannello di controllo
Caricare i cestelli, 5
Cestello inferiore
Cestello delle posate
Cestello superiore
Avvio e utilizzo, 6
Avviare la lavastoviglie
Caricare il detersivo
Opzioni di lavaggio
Programmi, 7
Tabella dei programmi
Brillantante e sale rigenerante, 8
Caricare il brillantante
Caricare il sale rigenerante
Manutenzione e cura, 9
Escludere acqua e corrente elettrica
Pulire la lavastoviglie
Evitare i cattivi odori
Pulire gli irroratori
Pulire i filtri
Se ci si assenta per lunghi periodi
Precauzioni e consigli, 10
Sicurezza generale
Smaltimento
Risparmiare e rispettare l’ambiente
Anomalie e rimedi, 11
Assistenza, 12
Assistenza Attiva 7 giorni su 7
Installazione
IT
È importante conservare questo libretto per
poterlo consultare in ogni momento. In caso di
vendita, di cessione o di trasloco, assicurarsi che
resti insieme all’apparecchio.
Leggere attentamente le istruzioni: ci sono
importanti informazioni sull’installazione, sull’uso
e sulla sicurezza.
In caso di trasloco tenere l’apparecchio in
posizione verticale; se fosse necessario, inclinarlo
sul lato posteriore.
Posizionamento e livellamento
1. Disimballare l’apparecchio e controllare che
non abbia subìto danni durante il trasporto.
Se fosse danneggiato non collegarlo e contattare
il rivenditore.
2. Sistemare la lavastoviglie facendo aderire i
fianchi o lo schienale ai mobili adiacenti o alla
parete. L’apparecchio può anche essere incassato
sotto a un piano di lavoro continuo* (
Montaggio
).
vedi foglio di
A
60
100
Collegamento del tubo di carico dellacqua
• A una presa d’acqua fredda: avvitare bene il
tubo di carico a un rubinetto con bocca filettata
da 3/4 gas; prima di avvitare, far scorrere
l’acqua finché non sia limpida affinché le
eventuali impurità non intasino l’apparecchio.
• A una presa d’acqua calda: nel caso di
impianto centralizzato di termosifoni, la
lavastoviglie può essere alimentata con acqua
calda di rete purché non superi la temperatura
di 60°C.
Avvitare il tubo al rubinetto come descritto per
la presa d’acqua fredda.
12083
121168
148
B
3. Posizionare la lavastoviglie su un pavimento
piano e rigido. Compensare le irregolarità svitando
o avvitando i piedini finché l’apparecchio non sia
orizzontale (non deve essere inclinato più di 2
gradi). Un accurato livellamento dà stabilità ed
evita vibrazioni, rumori e spostamenti.
4. Regolare l’altezza dei piedini posteriori
frontalmente*: con un cacciavite svitare o avvitare
le viti che si trovano nella parte bassa della
lavastoviglie.
Collegamenti idraulici ed elettrici
L’adattamento degli impianti elettrici e idraulici
per l’installazione deve essere eseguito solo
da personale qualificato.
La lavastoviglie non deve appoggiare sui tubi
o sul cavo di alimentazione elettrica.
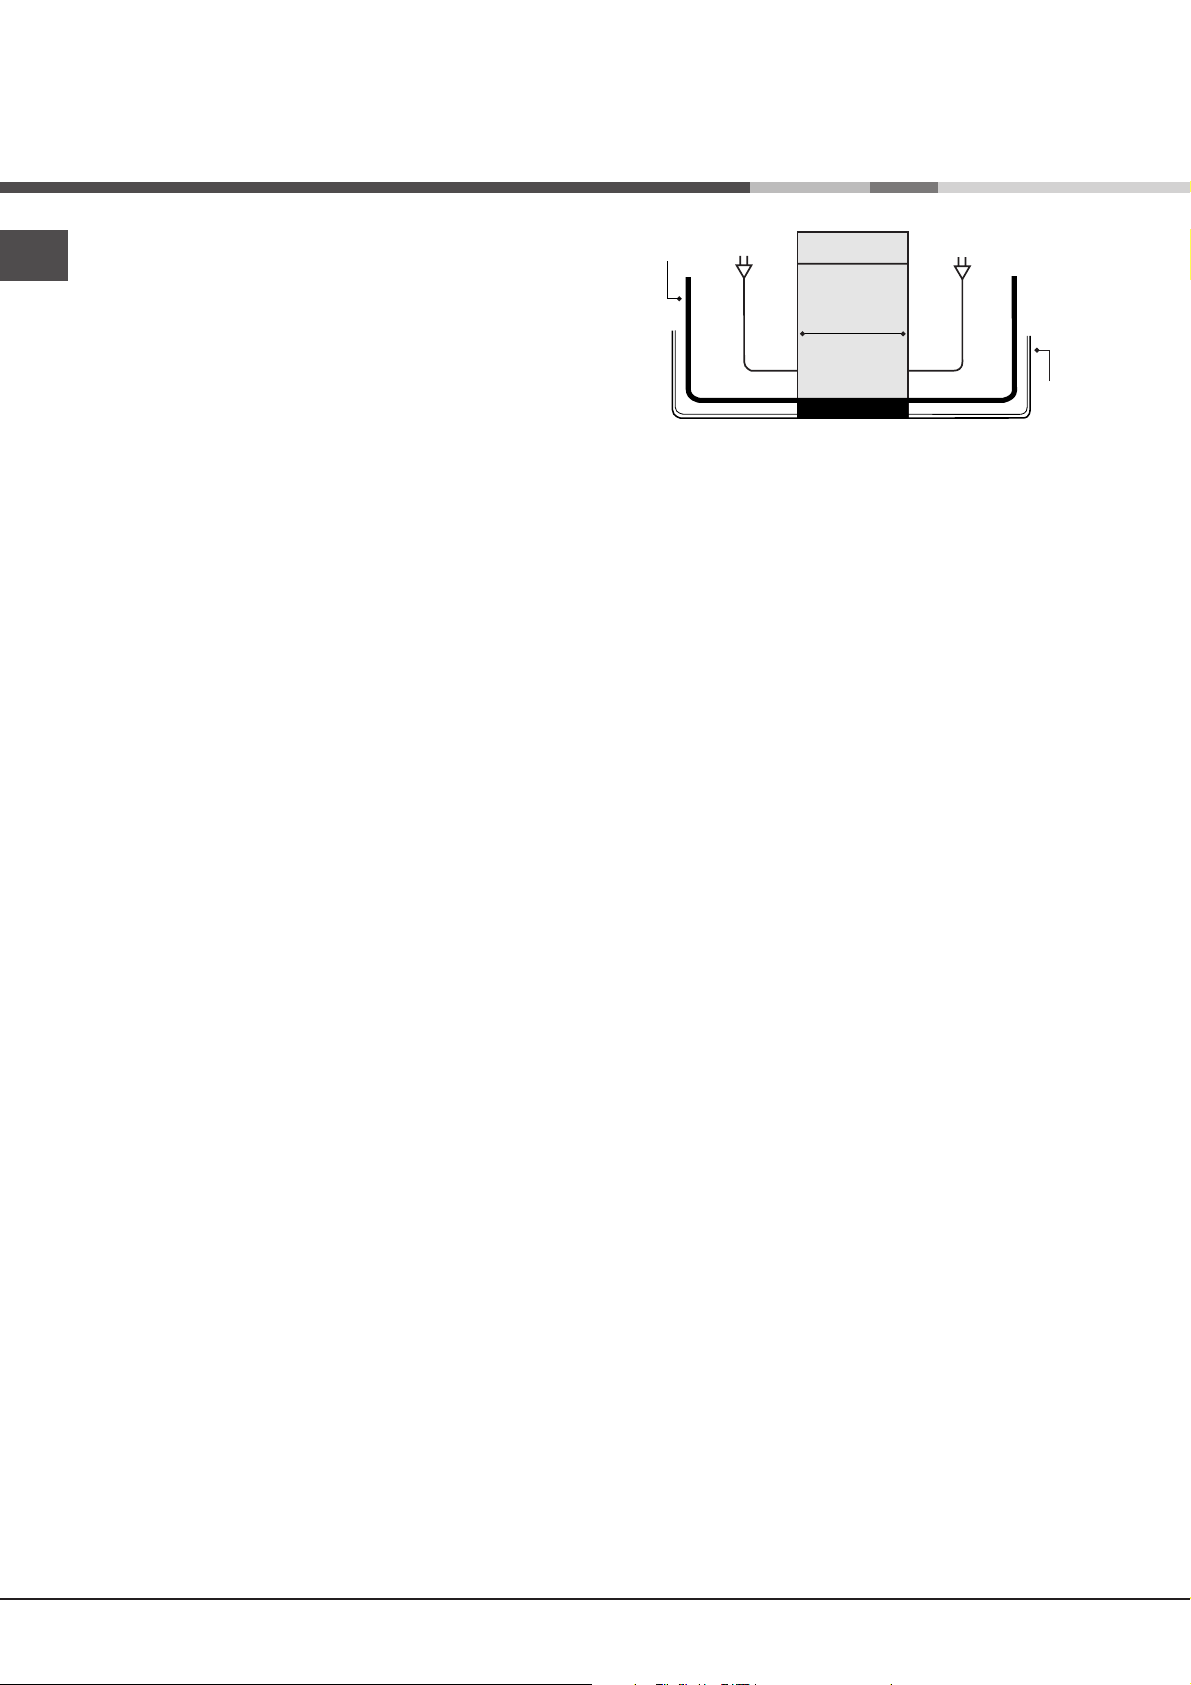
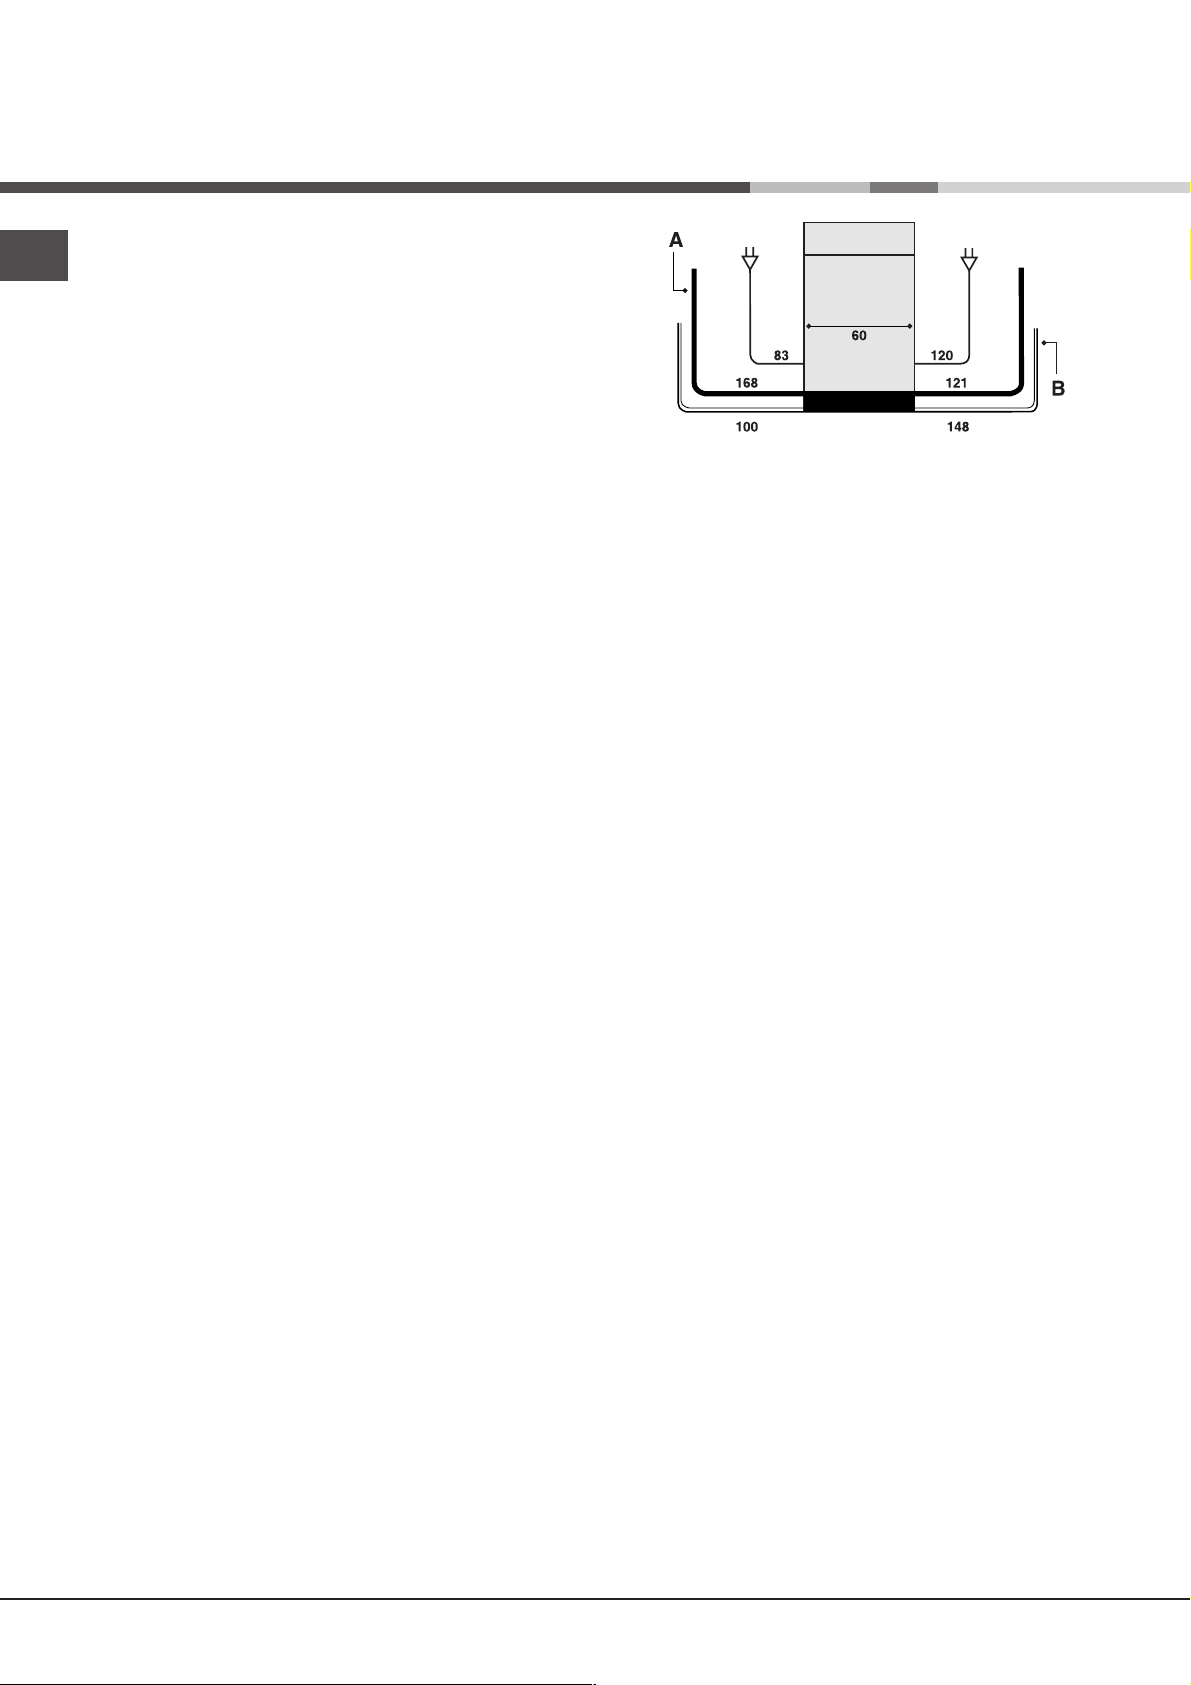
I tubi di carico (A) e di scarico (B) dell’acqua
e il cavo di alimentazione elettrica possono essere
orientati verso destra o sinistra per consentire
la migliore installazione (
vedi figura
).
Se la lunghezza del tubo di carico non è
sufficiente, rivolgersi a un negozio specializzato
o a un tecnico autorizzato (
La pressione dell’acqua deve essere compresa
nei valori riportati dalla tabella Dati tecnici (
).
sotto
Fare attenzione che nel tubo non ci siano né
pieghe né strozzature.
Sicurezza antiallagamento
Per garantire che non si generino allagamenti,
la lavastoviglie:
- è dotata di un sistema che interrompe l’ingresso
dell’acqua nel caso di anomalie o di perdite
dall’interno.
- è dotata di sicurezza
provvista di un tubo di carico dell’acqua costituito
da un tubo esterno trasparente e da uno interno
rosso: entrambi i tubi sopportano pressioni molto
alte. In caso di rottura del tubo interno, quello
esterno si colora di un rosso vivo e convoglia
l’acqua al posto di quello interno, evitando
perdite.
vedi Assistenza
Water Stop
*, cioè è
).
vedi
2
È molto importante controllare periodicamente il
A
tubo esterno: se lo si vede rosso vivo, deve
essere cambiato al più presto dall’Assistenza
tecnica autorizzata (
vedi Assistenza
).
Collegamento del tubo di scarico dellacqua
Il cavo deve essere controllato periodicamente
e sostituito solo da tecnici autorizzati
vedi Assistenza
(
).
L’Azienda declina ogni responsabilità qualora
queste norme non vengano rispettate.
IT
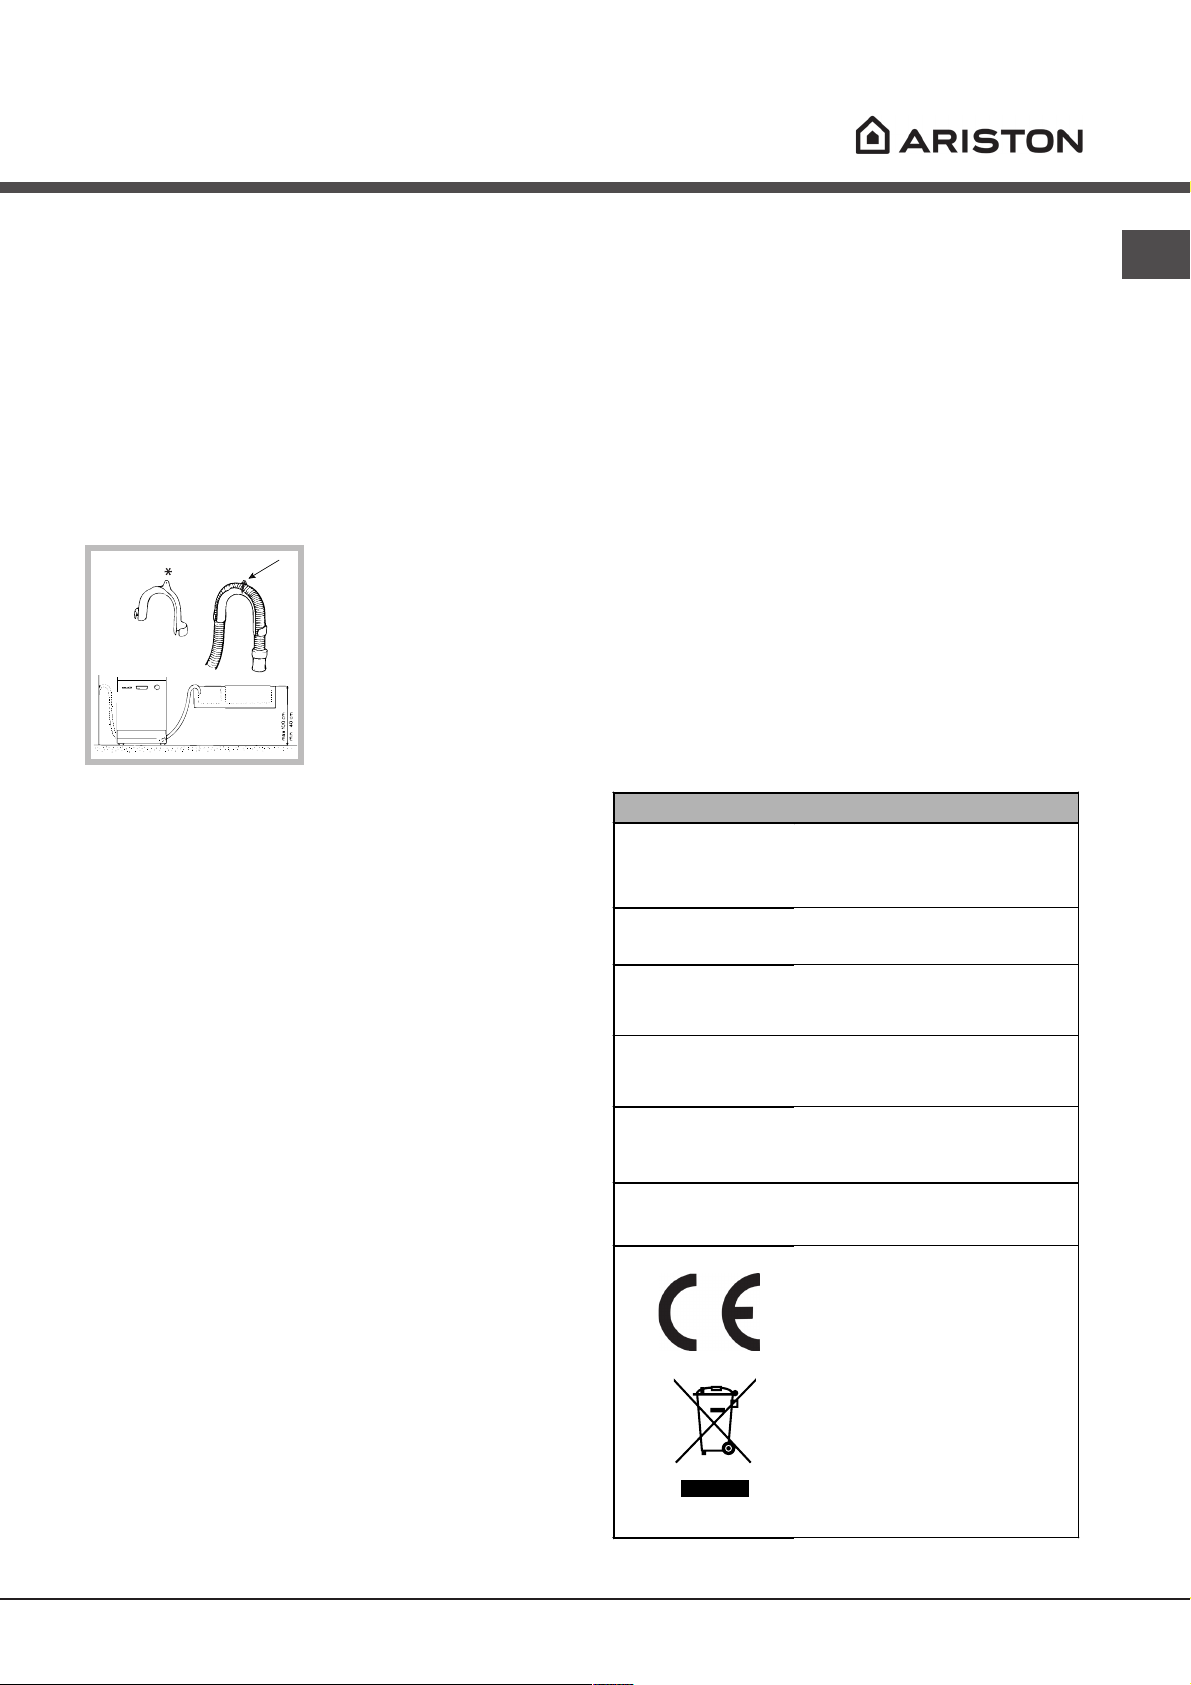
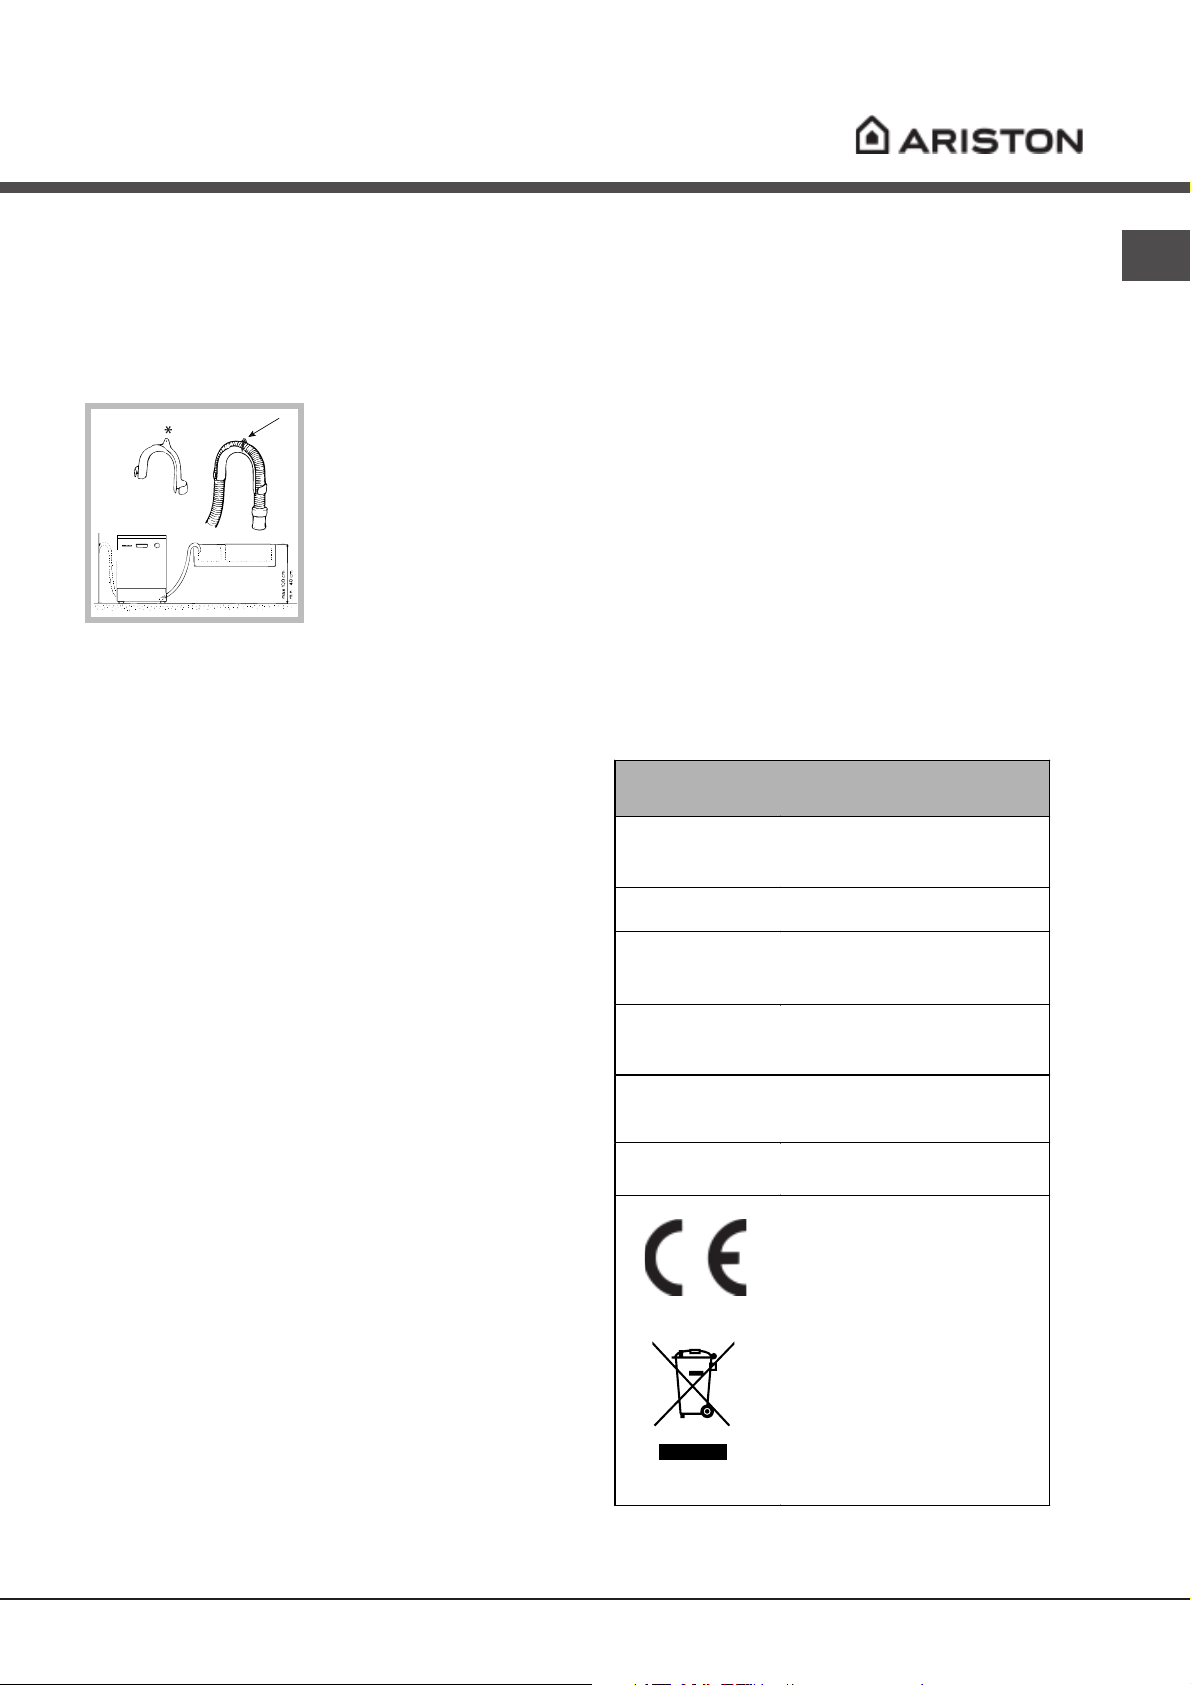
Collegare il tubo di scarico, senza piegarlo, a una
conduttura di scarico con diametro minimo di 4
cm. Oppure appoggiarlo al bordo di un lavandino
o di una vasca; l’estremità libera del tubo di
scarico non deve rimanere immersa nell’acqua.
Lo speciale gomito* in
plastica agevola una
sistemazione ottimale:
fissare saldamente il
gomito al muro per
evitare che il tubo si
muova e versi l’acqua
fuori dallo scarico.
La parte del tubo
contrassegnata con la
lettera A deve essere a un’altezza compresa tra
40 e 100 cm da terra
vedi figura
(
).
È sconsigliato usare tubi di prolunga.
Collegamento elettrico
Prima di inserire la spina nella presa della
corrente, accertarsi che:
• la presa abbia la messa a terra e sia a norma di
legge;
• la presa sia in grado di sopportare il carico
massimo di potenza della macchina, indicato
nella targhetta caratteristiche sulla controporta
vedi Descrizione della lavastoviglie
(
);
• la tensione di alimentazione sia compresa nei
valori indicati nella targhetta caratteristiche
sulla controporta;
• la presa sia compatibile con la spina
dell’apparecchio. In caso contrario richiedere la
sostituzione della spina a un tecnico autorizzato
vedi Assistenza
(
); non usare prolunghe o prese
multiple.
Ad apparecchio installato, il cavo di
alimentazione elettrica e la presa della corrente
devono essere facilmente raggiungibili.
Il cavo non deve subire piegature o
compressioni.
Striscia anticondensa*
Dopo aver incassato la lavastoviglie aprire la porta
e incollare la striscia adesiva trasparente sotto al
ripiano in legno per proteggerlo dalla eventuale
condensa.
Avvertenze per il primo lavaggio
Dopo l’installazione, immediatamente prima del
primo lavaggio, riempire completamente d’acqua il
serbatoio del sale e aggiungere circa 2 Kg di sale
vedi Brillantante e sale rigenerante
(
): è normale
che l’acqua trabocchi. È normale anche che dopo
il caricamento del sale la spia MANCANZA SALE*
continui a lampeggiare per alcuni cicli.
DATI TECNICI
Larghezza cm. 59,5
Dimensioni
Capacità
Pressione acqua
alimentazione
Tensione di
alimentazione
Potenza totale
assorbita
Fusibile
* Presente solo su alcuni modelli.
Altezza cm. 82
Profondità cm. 57
12 coperti standard
30 Kpa ÷ 1Mpa (0.3 ÷ 10 bar)
4,3 psi – 145 psi
vedi targhetta caratteristiche
vedi targhetta caratteristiche
vedi targhetta caratteristiche
Questa apparecchiatura è
conforme alle seguenti Direttive
Comunitarie:
-73/23/EEC del 19/02/73 (Bassa
Tensione) e successive
modifiche
-89/336/EEC del 03/05/89
(Compatibilità Elettromagnetica)
e successive modificazioni
-97/17/EC (Etichettatura)
-2002/96/CE
3
Descrizione
dellapparecchio
IT
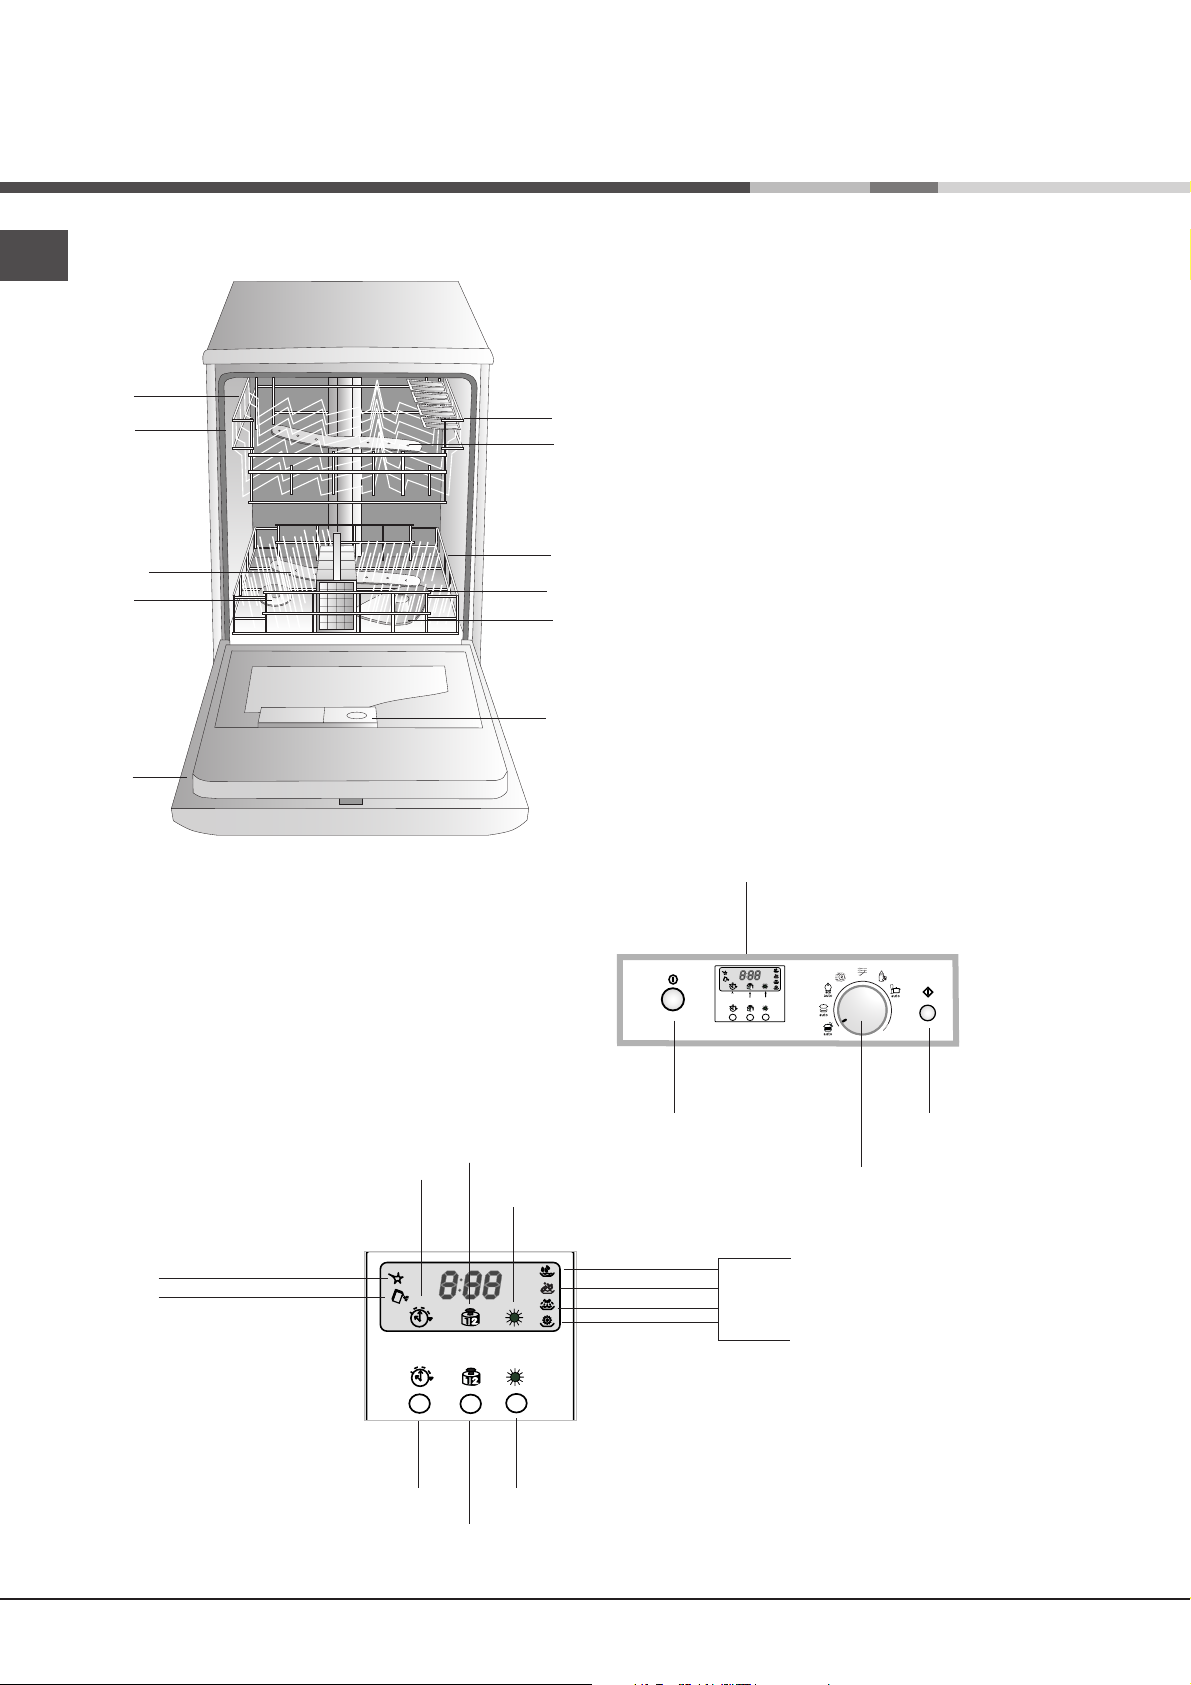
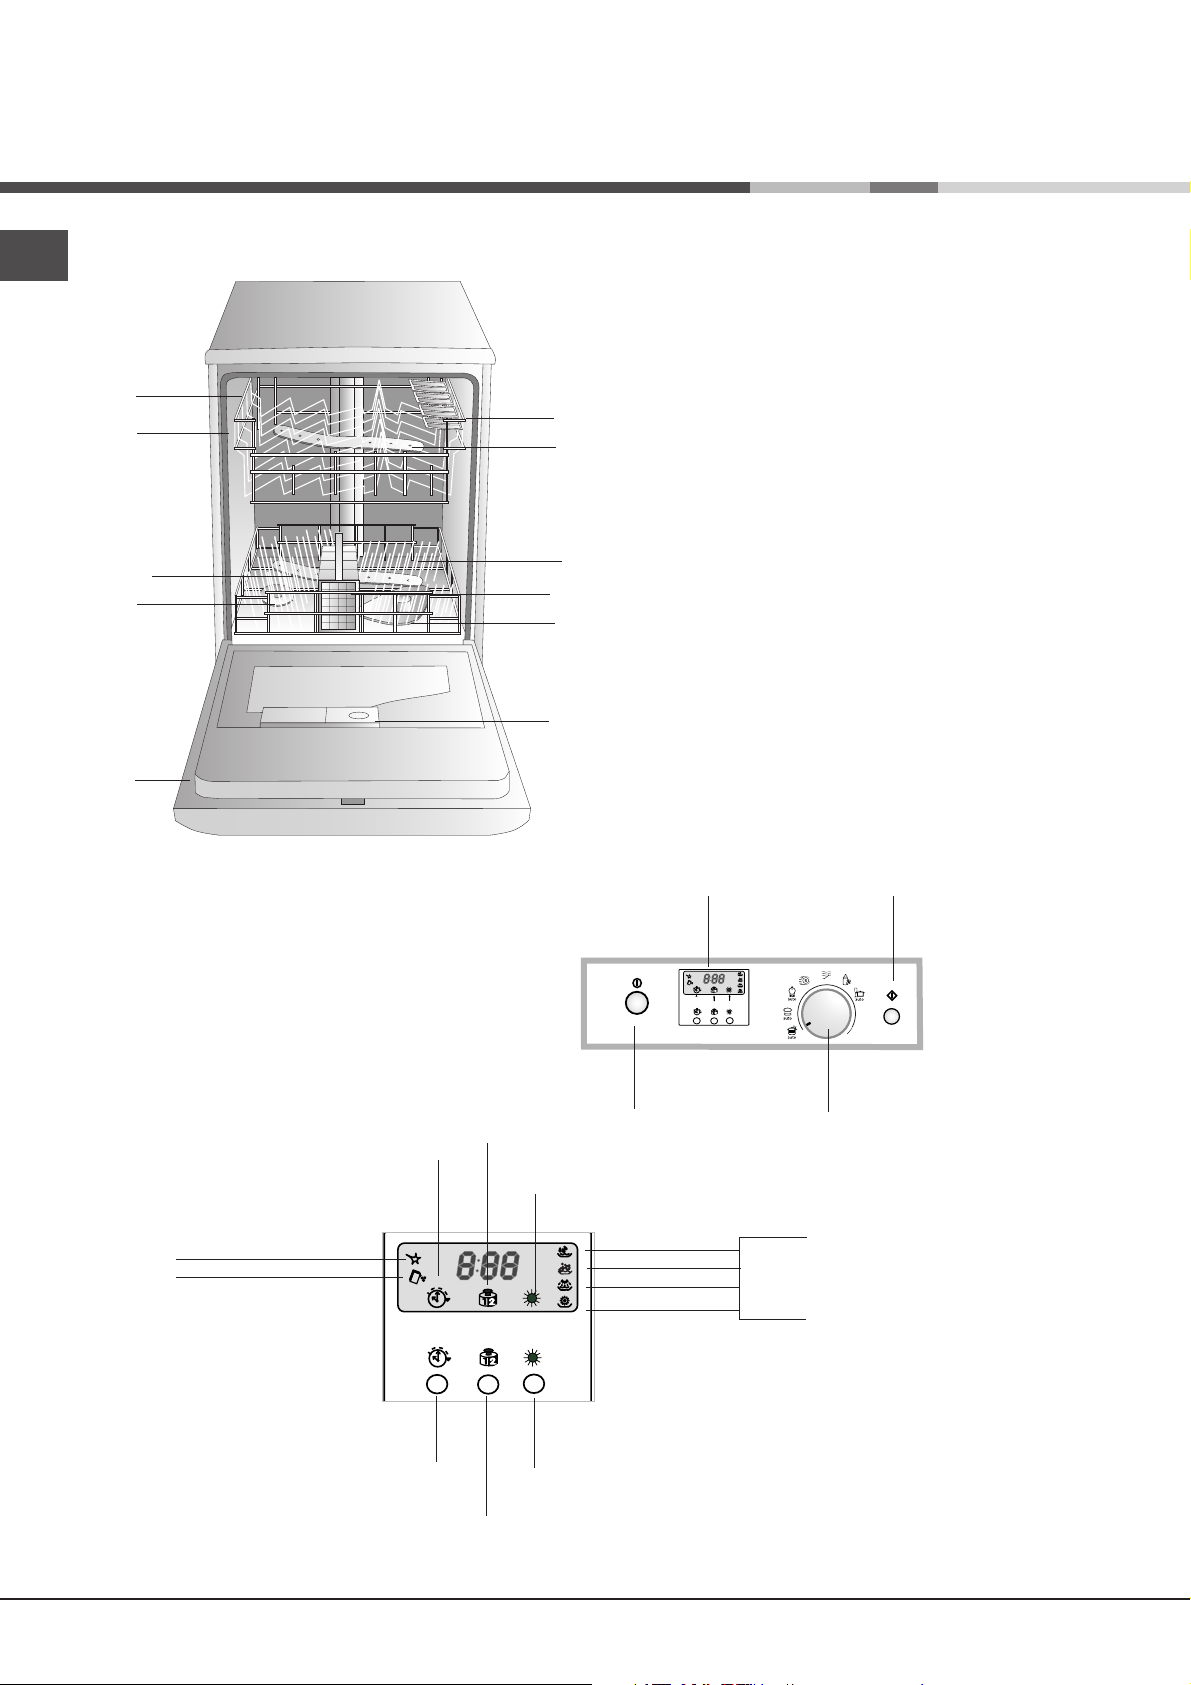
Vista dinsieme
1
4
6
9
11
3
2
5
7
8
10
1. Cestello superiore
2. Irroratore superiore
3. Ribaltine
4. Regolatore altezza cestello
5. Cestello inferiore
6. Irroratore inferiore
7. Cestello posate
8. Filtro lavaggio
9. Serbatoio sale
10. Vaschette detersivo e serbatoio brillantante
11. Targhetta caratteristiche
Pannello di controllo
Display
Spia
MANCANZA
BRILLANTANTE*
Spia
MANCANZA
SALE*
RITARDATO*
RITARDATO*
Spia
AVVIO
Tasto
AVVIO
Spia
MEZZO CARICO*
Spia
EXTRA ASCIUGATURA
Prelavaggio
Lavaggio
Risciacqui
Asciugatura
Tasto
EXTRA
ASCIUGATURA
Tasto
MEZZO CARICO*
DISPLAY
U
V
Z
Tasto
ON-OFF
Spie
AVANZAMENTO CICLO
Tasto
Manopola
SELEZIONE
PROGRAMMI
START/RESET
* Presente solo su alcuni modelli.
4
Caricare i cestelli
Prima di caricare, eliminare dalle stoviglie i residui di
cibo, mettere in ammollo solo con acqua pentole e padelle
incrostate, vuotare bicchieri e coppe dei liquidi rimasti.
Dopo aver caricato, controllare che gli irroratori ruotino
liberamente.
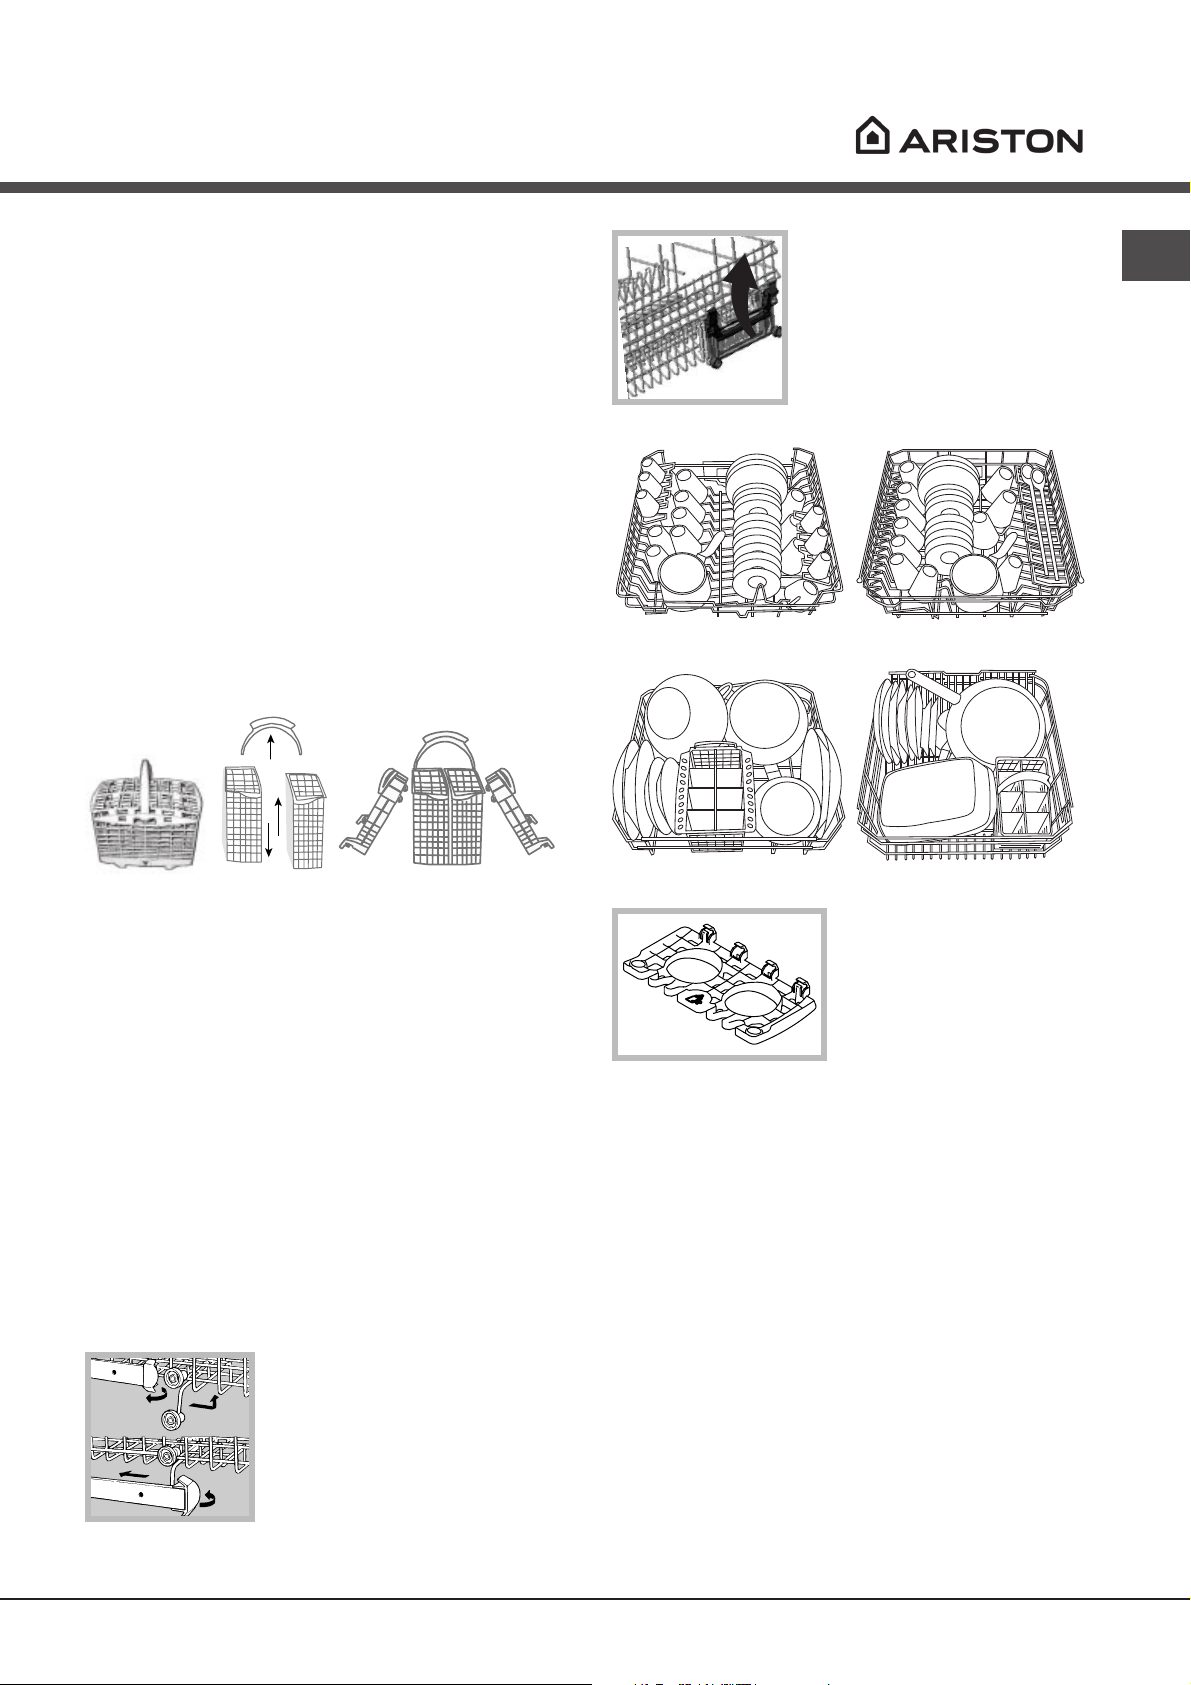
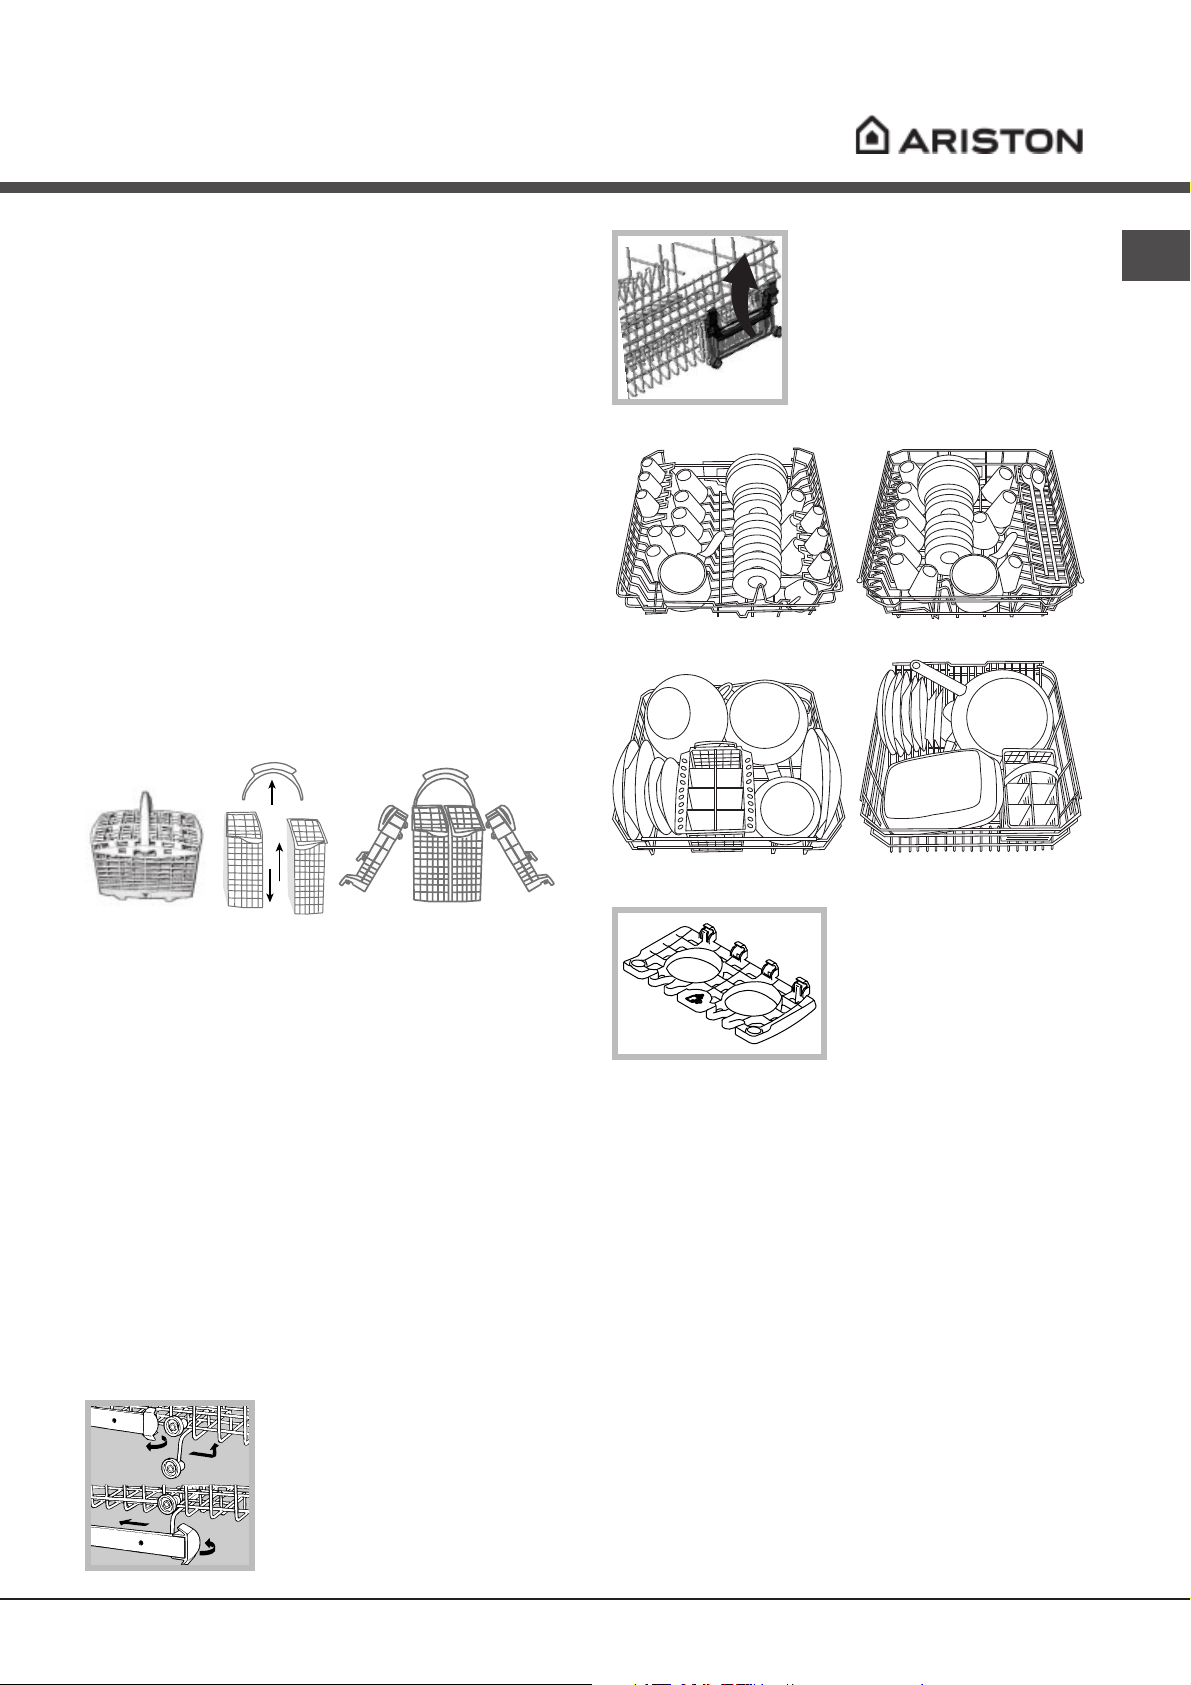
Cestello inferiore
Sistemarvi le stoviglie più difficili da lavare secondo gli
Esempi di caricamento
• Piatti da portata e coperchi: ai lati del cestello.
• Pentole e insalatiere: sempre capovolte.
• Stoviglie molto fonde: in posizione obliqua.
Per garantire migliori prestazioni di lavaggio
e asciugatura, la superficie del cestello inferiore è
più ruvida di quello superiore.
e avvalendosi dei supporti ribaltabili*.
Cestello delle posate
Il cestello delle posate può essere di tipo diverso a
seconda dei modelli di lavastoviglie.
I coltelli e gli utensili appuntiti devono essere sistemati
nel cestello delle posate con la punta rivolta verso il basso.
Se il cestello è dotato di maniglie
click clack* (
su o in giù per regolare l’altezza.
vedi figura
), tirarle in
Esempi di caricamento cestello superiore
Esempi di caricamento cestello inferiore
IT
Per dividere in due il corpo centrale*: sfilare la maniglia.
Le due alette laterali* si possono staccare e agganciare al
cestello superiore o inferiore.
I due elementi a griglia* si inseriscono sul cestello per
tenere separate le posate: inserirle nelle feritoie con i
manici verso il basso.
Cestello superiore
Caricarvi le stoviglie delicate e leggere: bicchieri, tazze
da tè e caffè, piattini, insalatiere basse, padelle, pentole
basse poco sporche, secondo gli
• Stoviglie leggere: sistemarle in modo che non vengano
spostate dai getti d’acqua.
• Tazze e tazzine: posizionarli sulle ribaltine**.
• Coltelli lunghi e acuminati, posate di servizio:
posizionarli sulle ribaltine**.
Regolare laltezza del cestello superiore
Per agevolare la sistemazione delle stoviglie, è possibile
sistemare il cestello superiore in
1
3
posizione alta o bassa:
aprire i fermi delle guide del
2
cestello a destra e a sinistra ed
estrarre il cestello; sistemarlo in
alto o in basso, farlo scivolare
lungo le guide fino a far entrare
4
anche le rotelle anteriori e chiudere
i fermi (
Esempi di caricamento
vedi figura
).
Ribaltine Baby
**
Nei modelli di lavastoviglie in
cui è presente il Ciclo Baby
vengono fornite in dotazione
apposite ribaltine per il
lavaggio di biberon, ghiere e
tettarelle.
Stoviglie non adatte al lavaggio in lavastoviglie
• Oggetti di legno, con impugnatura in legno
.
o in corno o con parti incollate.
• Oggetti di alluminio, rame, ottone, peltro o stagno.
• Stoviglie di plastica non termoresistente.
• Porcellane antiche o dipinte a mano.
• Argenteria antica. L’argenteria non antica può invece
essere lavata con un programma delicato e
accertandosi che non sia a contatto con altri metalli.
Si consiglia l’acquisto di stoviglie idonee al lavaggio in
lavastoviglie.
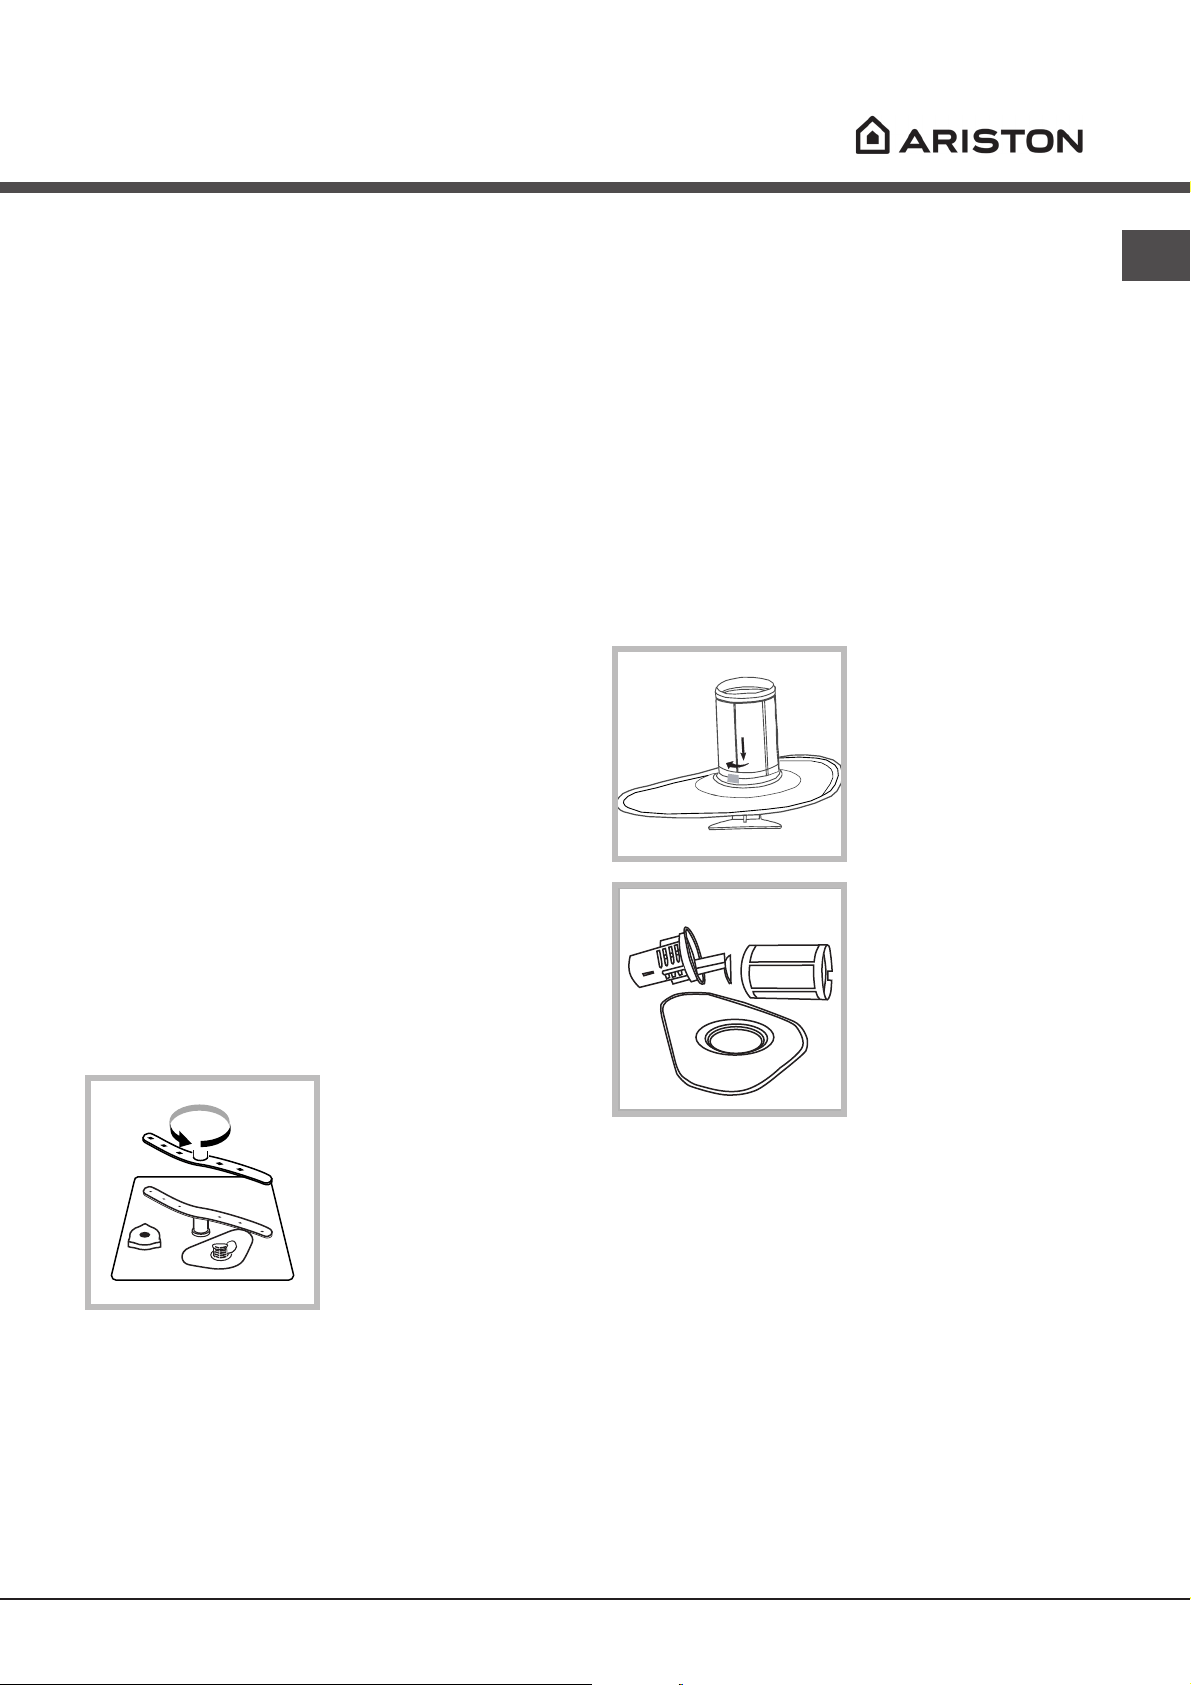
Lavaggio delle maniglie*
Per lavare le maniglie dei cestelli inferiore e superiore:
estrarre i due tappini di fissaggio, sfilare le maniglie,
lavarle sotto l’acqua corrente e fissarle sul cestello con i
tappini.
* Presente solo in alcuni modelli.
** Variabili per numero e posizione.
5

Avvio e utilizzo
A
B
D
C
IT
Avviare la lavastoviglie
1. Aprire il rubinetto dell’acqua.
2. Premere il tasto ON-OFF: il display si illumina.
3. Dosare il detersivo (
4. Caricare i cestelli (
porta.
5. Selezionare il programma ruotando la manopola
SELEZIONE PROGRAMMA in senso orario: far coincidere la
tacca sulla manopola con il numero o il simbolo del
programma.
6. Selezionare le opzioni di lavaggio (
7. Avviare premendo il tasto START/RESET: si sente un bip
di conferma. Le spie AVANZAMENTO CICLO segnalano lo
stato del programma: Prelavaggio, Lavaggio, Risciacquo,
Asciugatura.
8. Alla fine si sentono tre brevi segnali acustici
e sul diplay compare END. Spegnere l’apparecchio
premendo il tasto ON-OFF, chiudere il rubinetto dell’acqua e
staccare la spina dalla presa di corrente.
9. Aprire la porta e aspettare alcuni minuti prima
di togliere le stoviglie, per evitare di scottarsi. Scaricare i
cestelli iniziando da quello inferiore.
Modificare un programma in corso
Se si è selezionato un programma sbagliato è possibile
modificarlo, purché appena iniziato: tenere premuto il tasto
START/RESET per 4 secondi. Dopo un bip lungo e tre brevi,
la spia AVANZAMENTO CICLO si spegne: selezionare il
nuovo programma e avviare premendo il tasto START/
RESET.
Demo*
la scritta dON sul display indica che è attivo un programma
dimostrativo. Per disattivarlo premere contemporaneamente
i tasti START/RESET e ON-OFF, comparirà la scritta dOF.
Aggiungere altre stoviglie
Premere il tasto ON/OFF, aprire la porta facendo attenzione
alla fuoriuscita di vapore e inserire le stoviglie. Premere di
nuovo il tasto ON/OFF: il ciclo riprende.
Interruzioni accidentali
Se durante il lavaggio si apre la porta o si verifica
un’interruzione di corrente, il programma si interrompe.
Riprende dal punto in cui si era interrotto quando si chiude
la porta o torna la luce.
Caricare il detersivo
Il buon risultato del lavaggio dipende anche dal corretto
dosaggio del detersivo, riportato dalla casa produttrice.
Eccedendo non si lava in modo più efficace e si inquina
l’ambiente.
! Le migliori prestazioni di lavaggio ed asciugatura, si
ottengono solo con l’utilizzo di detersivo in polvere,
brillantante liquido e sale.
vaschetta A: Detersivo per lavaggio
vaschetta B: Detersivo per prelavaggio
vedi sotto
vedi Caricare i cestelli
).
vedi sotto
) e chiudere la
).
coperchio; quando ne richiede 2, mettere la seconda sul
fondo della vasca.
3. Eliminare i residui di detersivo dai bordi della vaschetta e
chiudere il coperchio fino allo scatto.
Opzioni di lavaggio
Avvio ritardato
È possibile posticipare da1 a 24 ore l’avvio
del programma:
1. Premere il tasto AVVIO RITARDATO: a ogni pressione si
sente un segnale acustico e si illumina la spia del ritardo
selezionato;
2. Selezionare il programma e premere il tasto START/
RESET: dopo il bip inizia il conto alla rovescia;
3. A tempo scaduto, la spia si spegne e il programma si
avvia.
Per modificare il ritardo premere il tasto AVVIO RITARDATO.
Per annullarlo premere il tasto in successione finché non si
avvia il programma e si illumina la spia AVANZAMENTO
CICLO corrispondente all’inizio del programma stesso.
Mezzo carico sul cesto superiore *
Se le stoviglie sono poche, si può effettuare il mezzo carico
risparmiando acqua, energia e detersivo. Prima di
selezionare il programma premere il tasto MEZZO CARICO:
la spia si illumina e si attiva il lavaggio solo nel cesto
superiore.
Ricordarsi di caricare le stoviglie solo sul cesto superiore e
di dimezzare la quantità di detersivo.
E’ preferibile utilizzare detersivo in polvere.
Extra asciugatura*
Per ottenere una asciugatura perfetta premere il tasto
EXTRA ASCIUGATURA prima di selezionare il programma.
Un segnale acustico prolungato indica l’attivazione di
questa opzione, uno breve la sua deselezione.
Con l’extra asciugatura i programmi durano più a lungo.
* Presente solo su alcuni modelli.
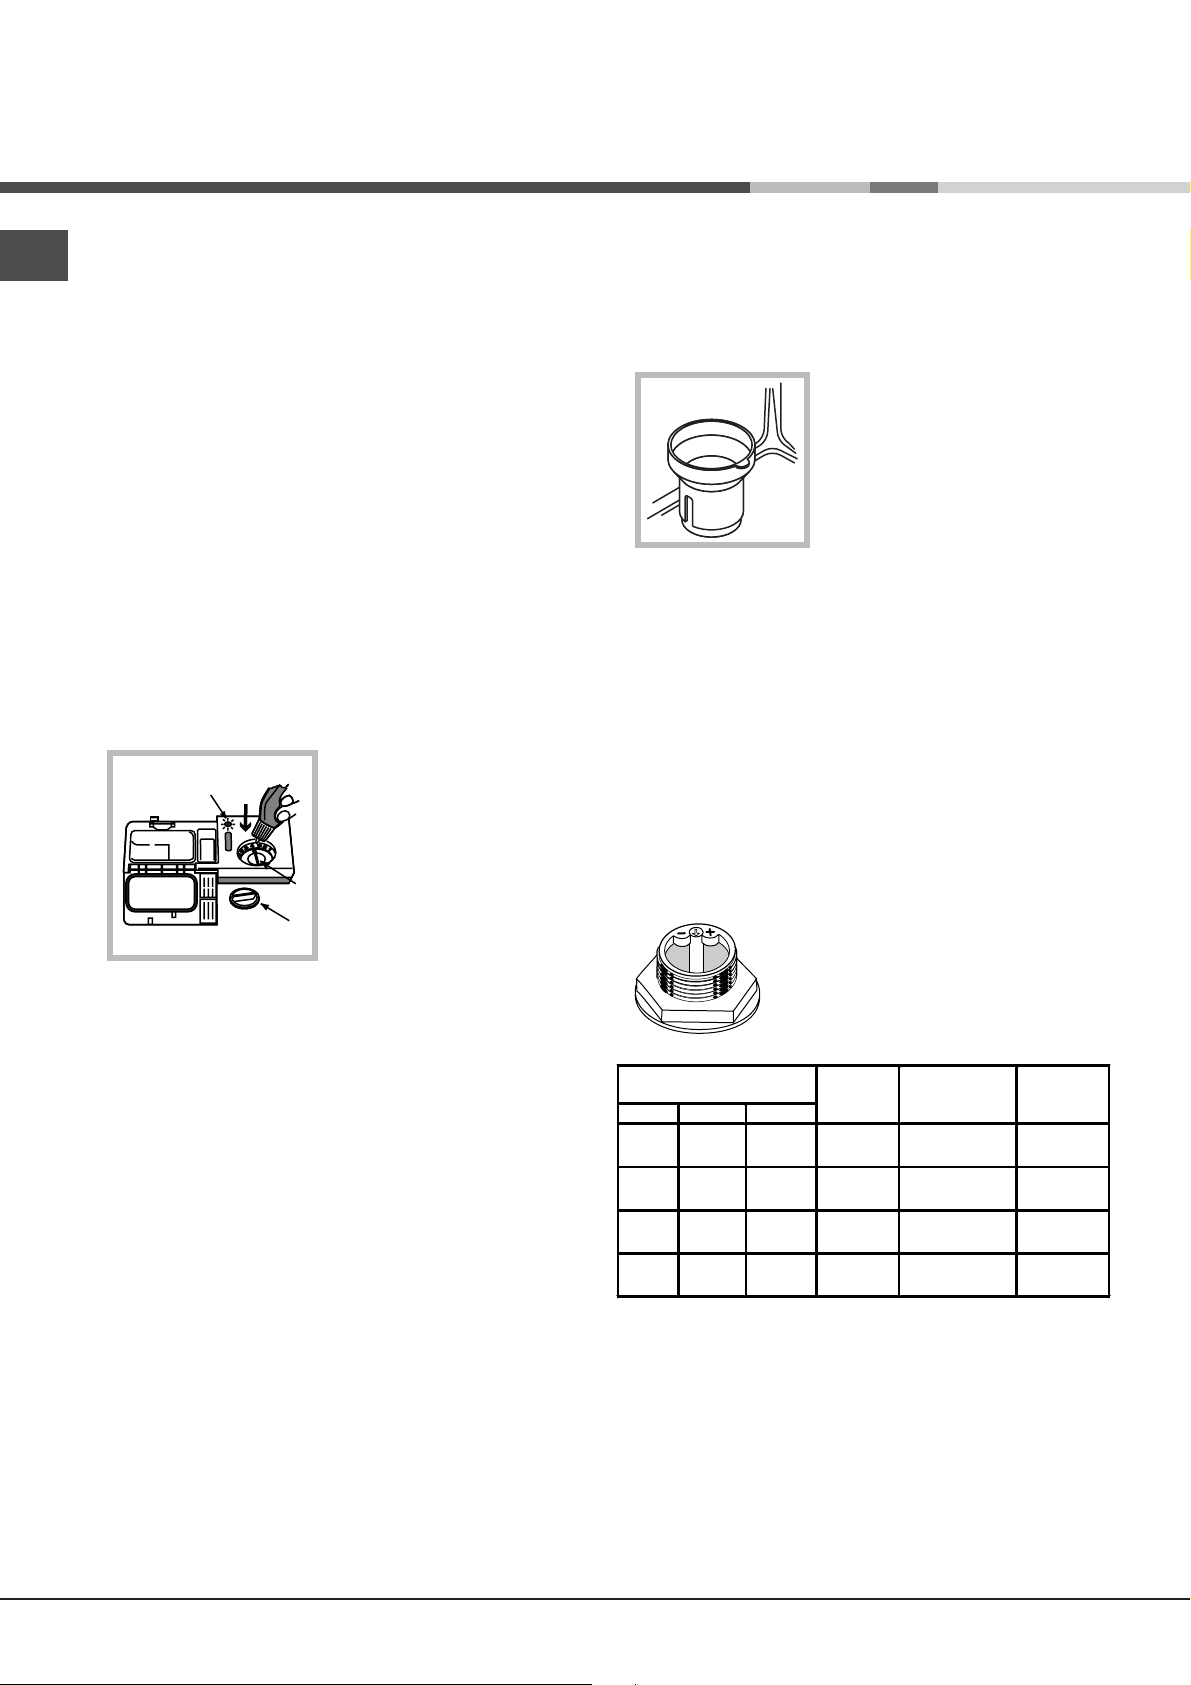
1. Aprire il coperchio C
premendo il pulsante D.
2. Dosare il detersivo
consultando la
programmi
• in polvere: vaschette A e
B.
• pastiglie: vaschetta A e
fondo vasca,
cioè quando il programma
ne richiede 1, metterla nella
vaschetta A e chiudere il
Tabella dei
:
6
Programmi
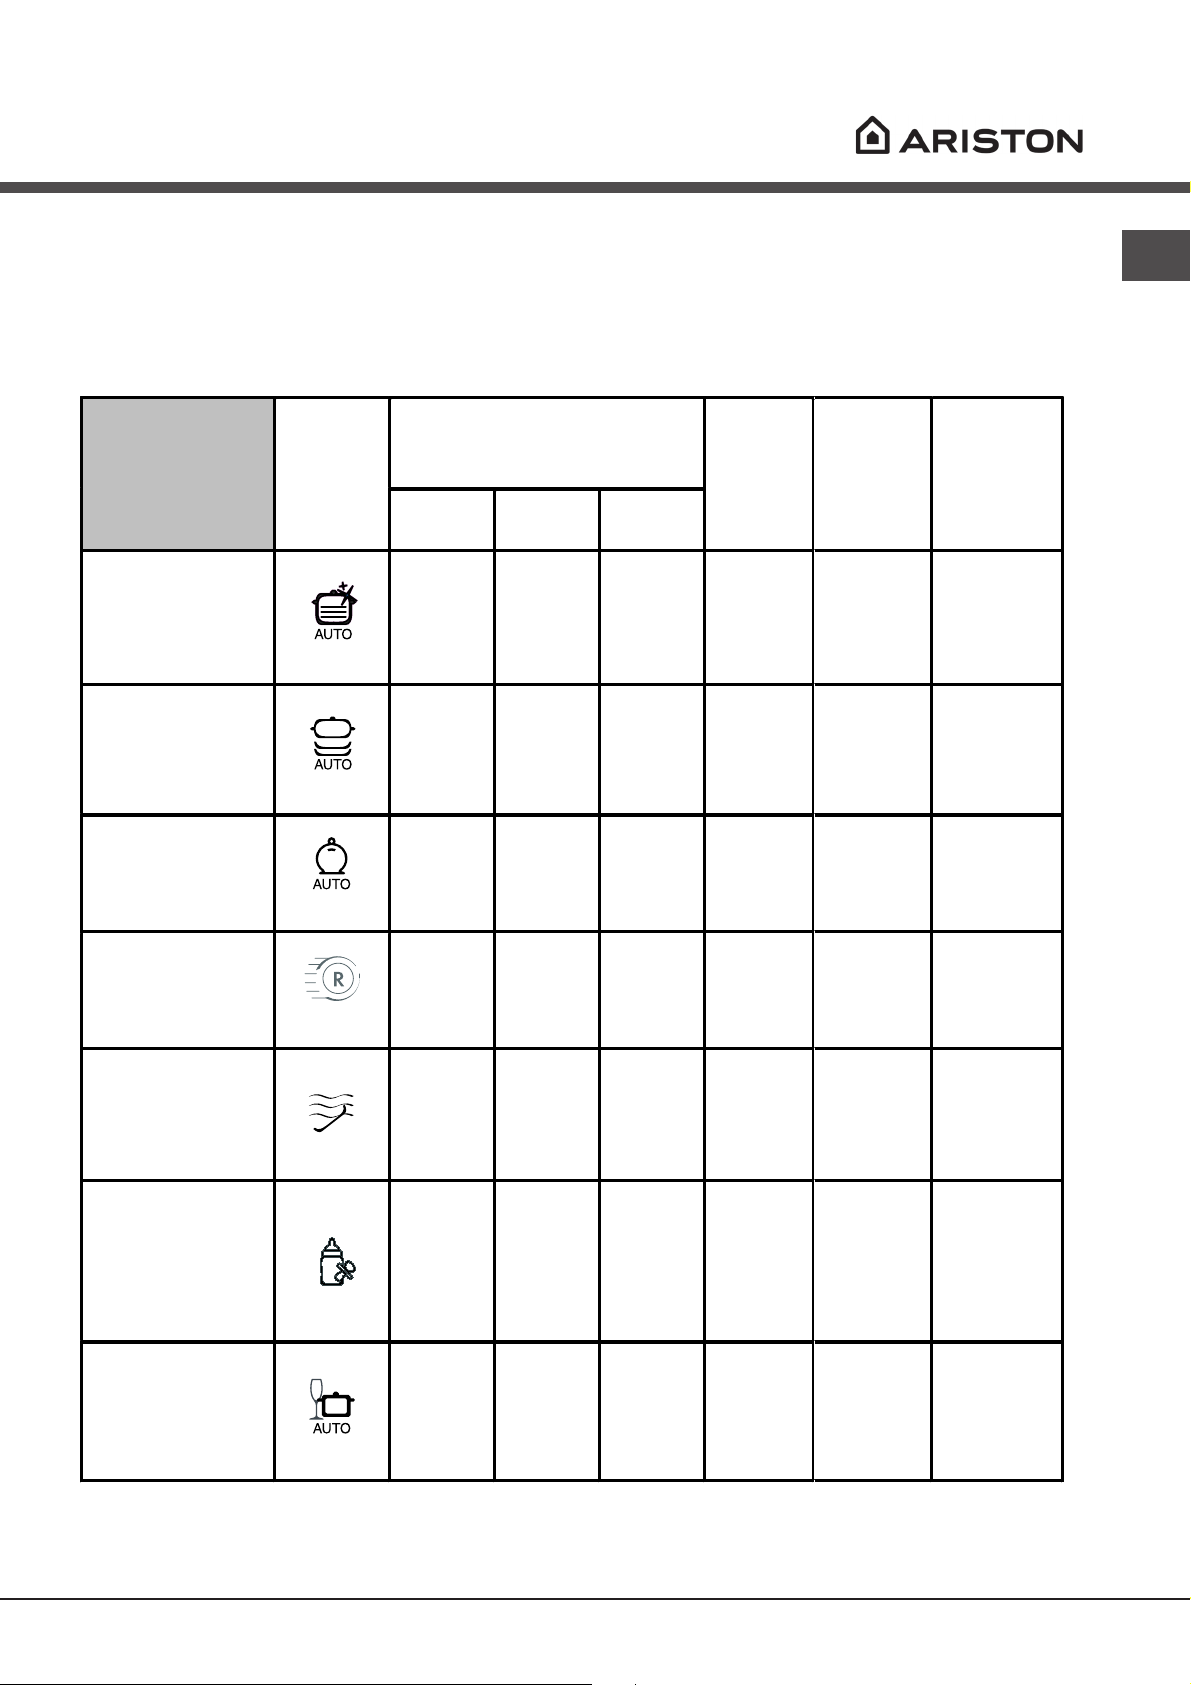
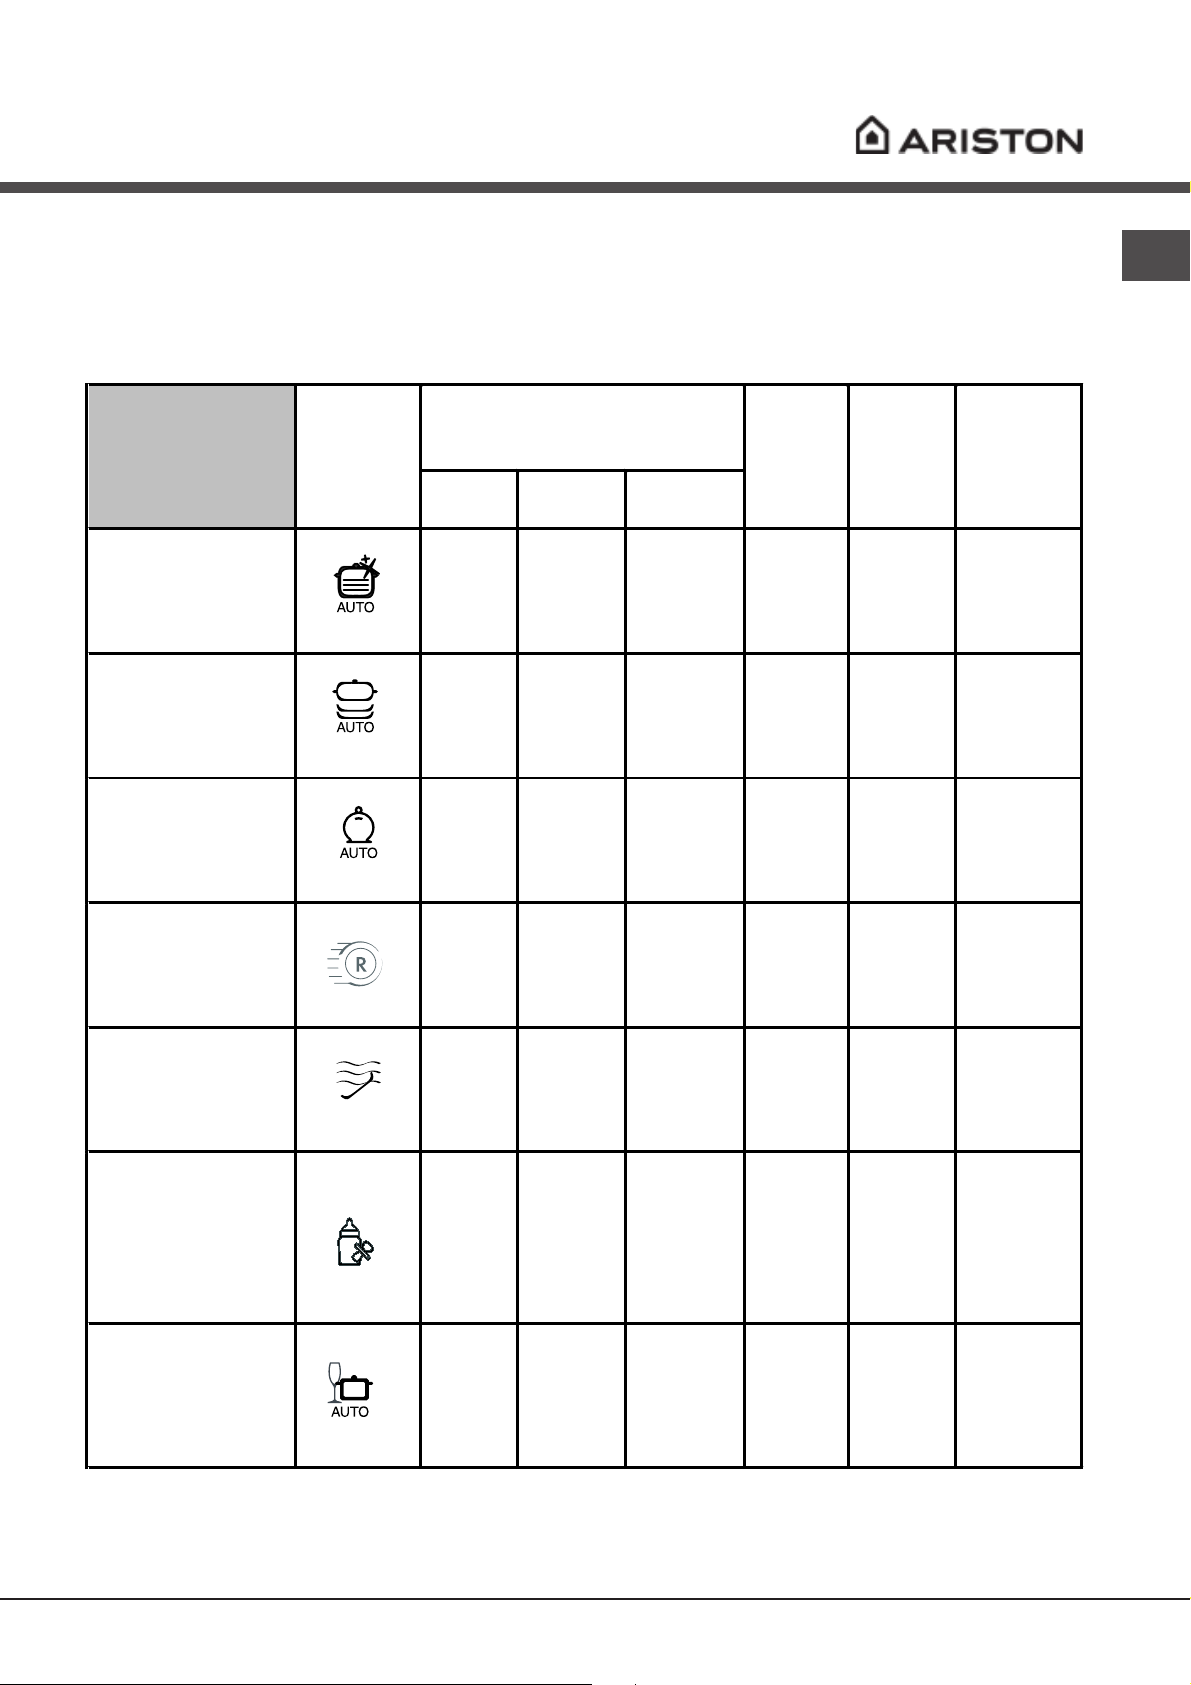
Tabella dei programmi
Le lavastoviglie Ariston sono dotate di un sistema automatico di pulizia dei filtri che può prolungare la durata dei programmi.
PROGRAMMI AUTO:questo modello di lavastoviglie è dotato di un particolare sensore che può valutare il grado di sporco e
impostare il lavaggio più efficiente ed economico.La durata dei programmi auto potrà variare per l’ntervento del sensore.
Se le stoviglie sono poco sporche o sono state sciacquate precedentemente sotto l’acqua, ridurre
sensibilmente la dose del detersivo.
Indicazioni per la
scelta
dei programmi
Stoviglie e pentole
molto sporche (da non
usare per pezzi
delicati).
Stoviglie e pentole
normalmente sporche.
Programma standard
giornaliero.
Programma
intensivo
Normale
Detersivo
(A) = vaschetta A
(B) = vaschetta B
In polvere liquido pastiglie
30 g (A)
5 g (B)
30 g (A) 30 ml (A) 1 (A)
30 ml (A)
5 ml (B)
1 (A)
1 (fondo
vasca)
Prelavaggio Asciugatura
•
•
•
•
Durata del
programma
(tolleranza
±10%)
2:00’
1:40’
IT
Lavaggio ecologico a
bassi consumi
energetici, adatto a
stoviglie e pentole.
Ciclo economico e
veloce da utilizzare per
stoviglie poco sporche,
subito dopo l'uso.
Lavaggio preliminare in
attesa di completare il
carico al pasto
successivo.
Ciclo igienizzante per
lavare biberon, ghiere,
tettarelle insieme a
piatti, tazzine, bicchieri
e posate. ı Caricare le
stoviglie solo sul cesto
superiore.
Lavaggio differenziato
sui due cesti: delicato
sul superiore per cristalli
e bicchieri, energico per
pentole sul cesto
inferiore.
Eco
Rapido
Ammollo
Baby
Duo Wash
25 g (A)
5 g (B)
25 g (A) 25 ml (A) 30'
12'
20 g (A) 20 ml (A)
25 gr (A)
5 gr (B)
25 ml (A)
5 ml (B)
25 ml (A)
5 ml (B)
1 (A)
1 (A)
•
•
•
•
2:25’
1:00'
1:48
Nota
Per facilitare il dosaggio del detersivo è bene sapere che:
1 cucchiaio da cucina = 15 grammi di polvere = 15 ml di liquido circa
1 cucchiaino da cucina = 5 grammi di polvere = 5 ml di liquido circa
7
Brillantante e sale rigenerante
auqca'lledazzeruD
enoizisoP
erotteles
elasomusnoC
)olcic/immarg(
aimonotuA
)gK2/ilcic(
Hd°Hf°l/lomm°
01-071-07,1-0/ 0 /
52-0144-814,4-8,1- 0206
05-5298-549,8-5,4DEM0404
05>98>9,8>+ 0652
IT
Usare solo prodotti specifici per lavastoviglie.
Non usare sale alimentare o industriale.
Se si usa un prodotto multifunzione (2in1, 3in1,
4in1, ecc.) non è necessario aggiungere
brillantante, si consiglia invece di aggiungere
sale, specie se l’acqua è dura o molto dura. Non
aggiungendo né sale né brillantante è normale che
le spie MANCANZA SALE* e MANCANZA
BRILLANTANTE* continuino a lampeggiare.
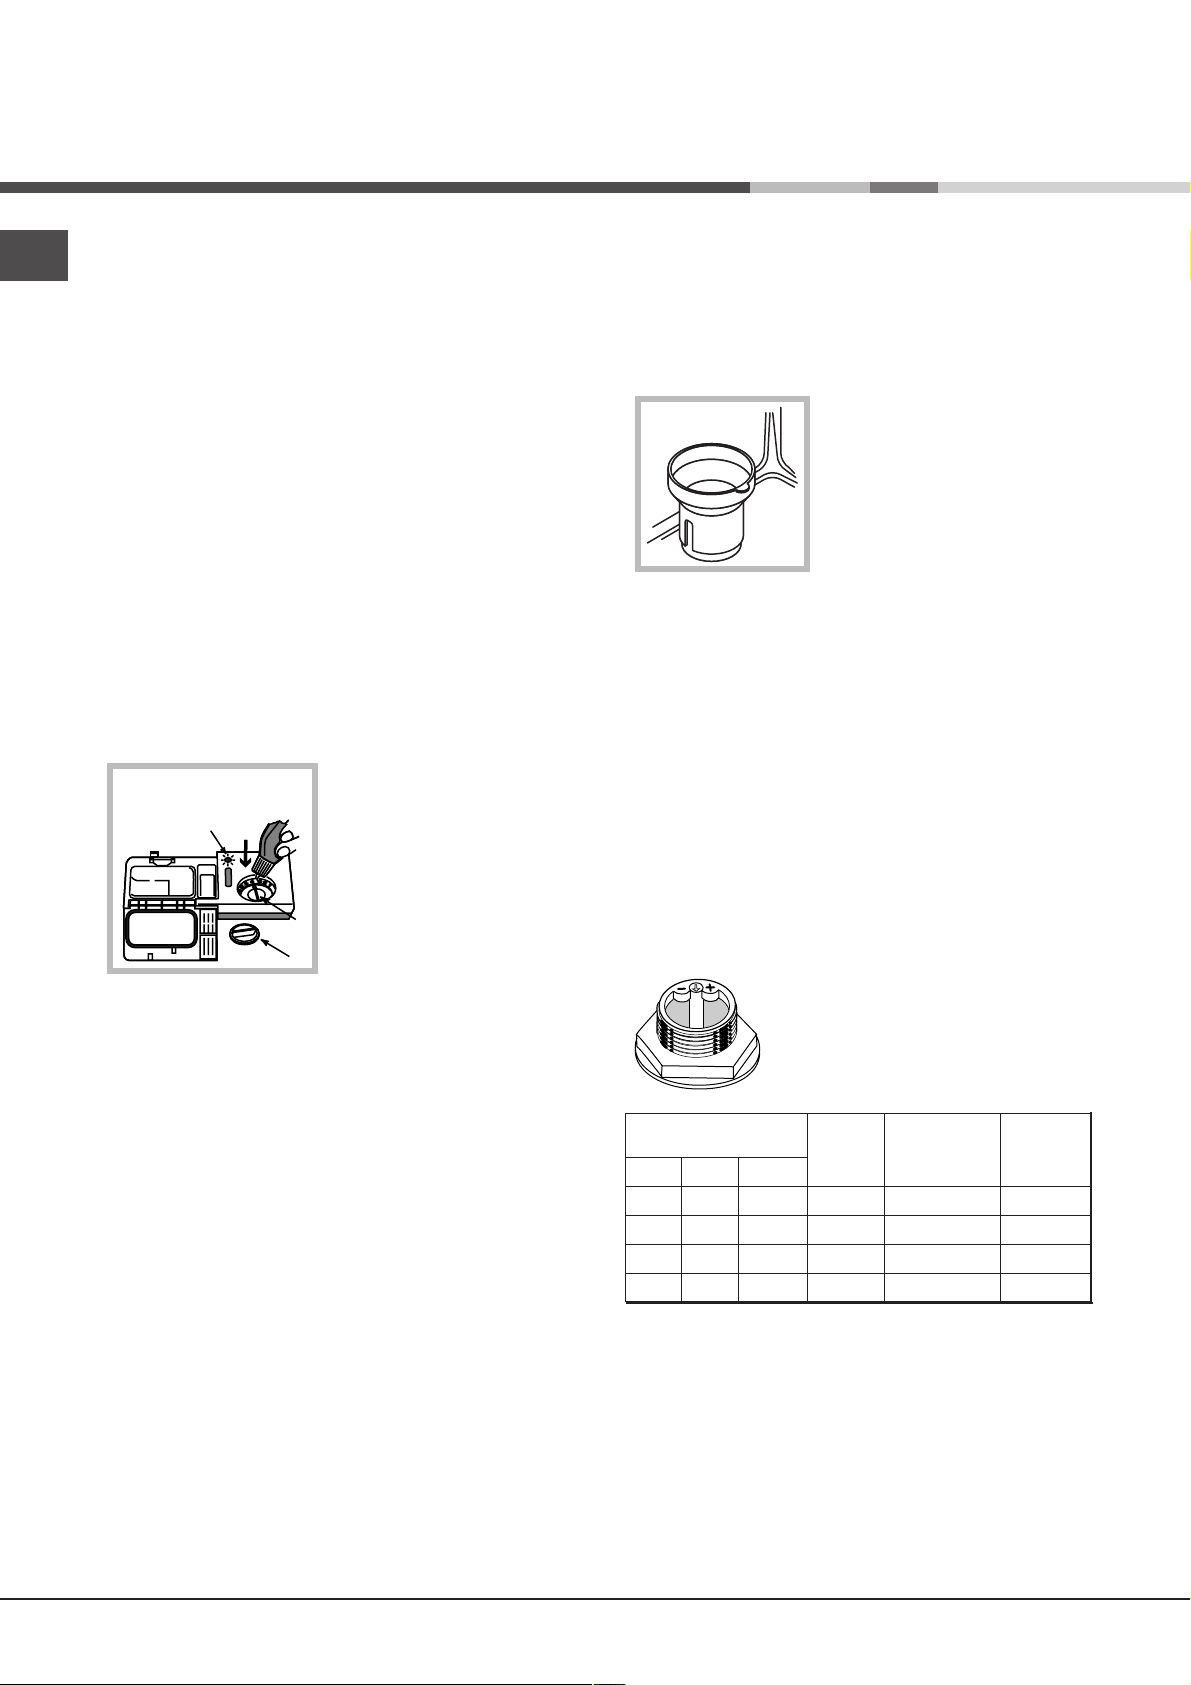
Caricare il brillantante
Il brillantante facilita l’asciugatura delle stoviglie
facendo scivolare l’acqua dalla superficie, così che
non rimangano striature o macchie.
Il serbatoio del brillantante va riempito:
• quando lo si vede vuoto attraverso la spia ottica
(H). Spia chiara: aggiungere brillantante; spia
scura: brillantante sufficiente;
• quando sul pannello lampeggia la spia
MANCANZA BRILLANTANTE*;
1. Aprire il serbatoio
ruotando il tappo (G) in
H
brillantante direttamente all’interno della vasca.
Regolare la dose di brillantante
Se non si è soddisfatti del risultato del lavaggio o
dell’asciugatura, è possibile regolare la dose di
brillantante. Con un cacciavite girare il regolatore
(F) scegliendo tra 6 posizioni (la regolazione di
fabbrica è sul 4):
• se sulle stoviglie ci sono striature bluastre
girare verso i numeri bassi (1-3).
• se ci sono gocce d’acqua o macchie di calcare
girare verso i numeri alti (4-6).
Se si utilizzano le pastiglie multifunzione (2in1,
3in1, 4in1, ecc.) e si vuole ottenere una migliore
asciugatura, riempire comunque il serbatoio e
regolare sul 2.
senso antiorario.
2. Versare il brillantante
evitando che fuoriesca.
Se accade, pulire subito
con una spugna.
F
3. Riavvitare il tappo.
G
Non versare MAI il
• quando il galleggiante verde* non è visibile
osservando il tappo del sale;
• quando sul pannello lampeggia la spia
MANCANZA SALE*;
• in assenza di spia o di galleggiante verde:
circa ogni 30 cicli di lavaggio;
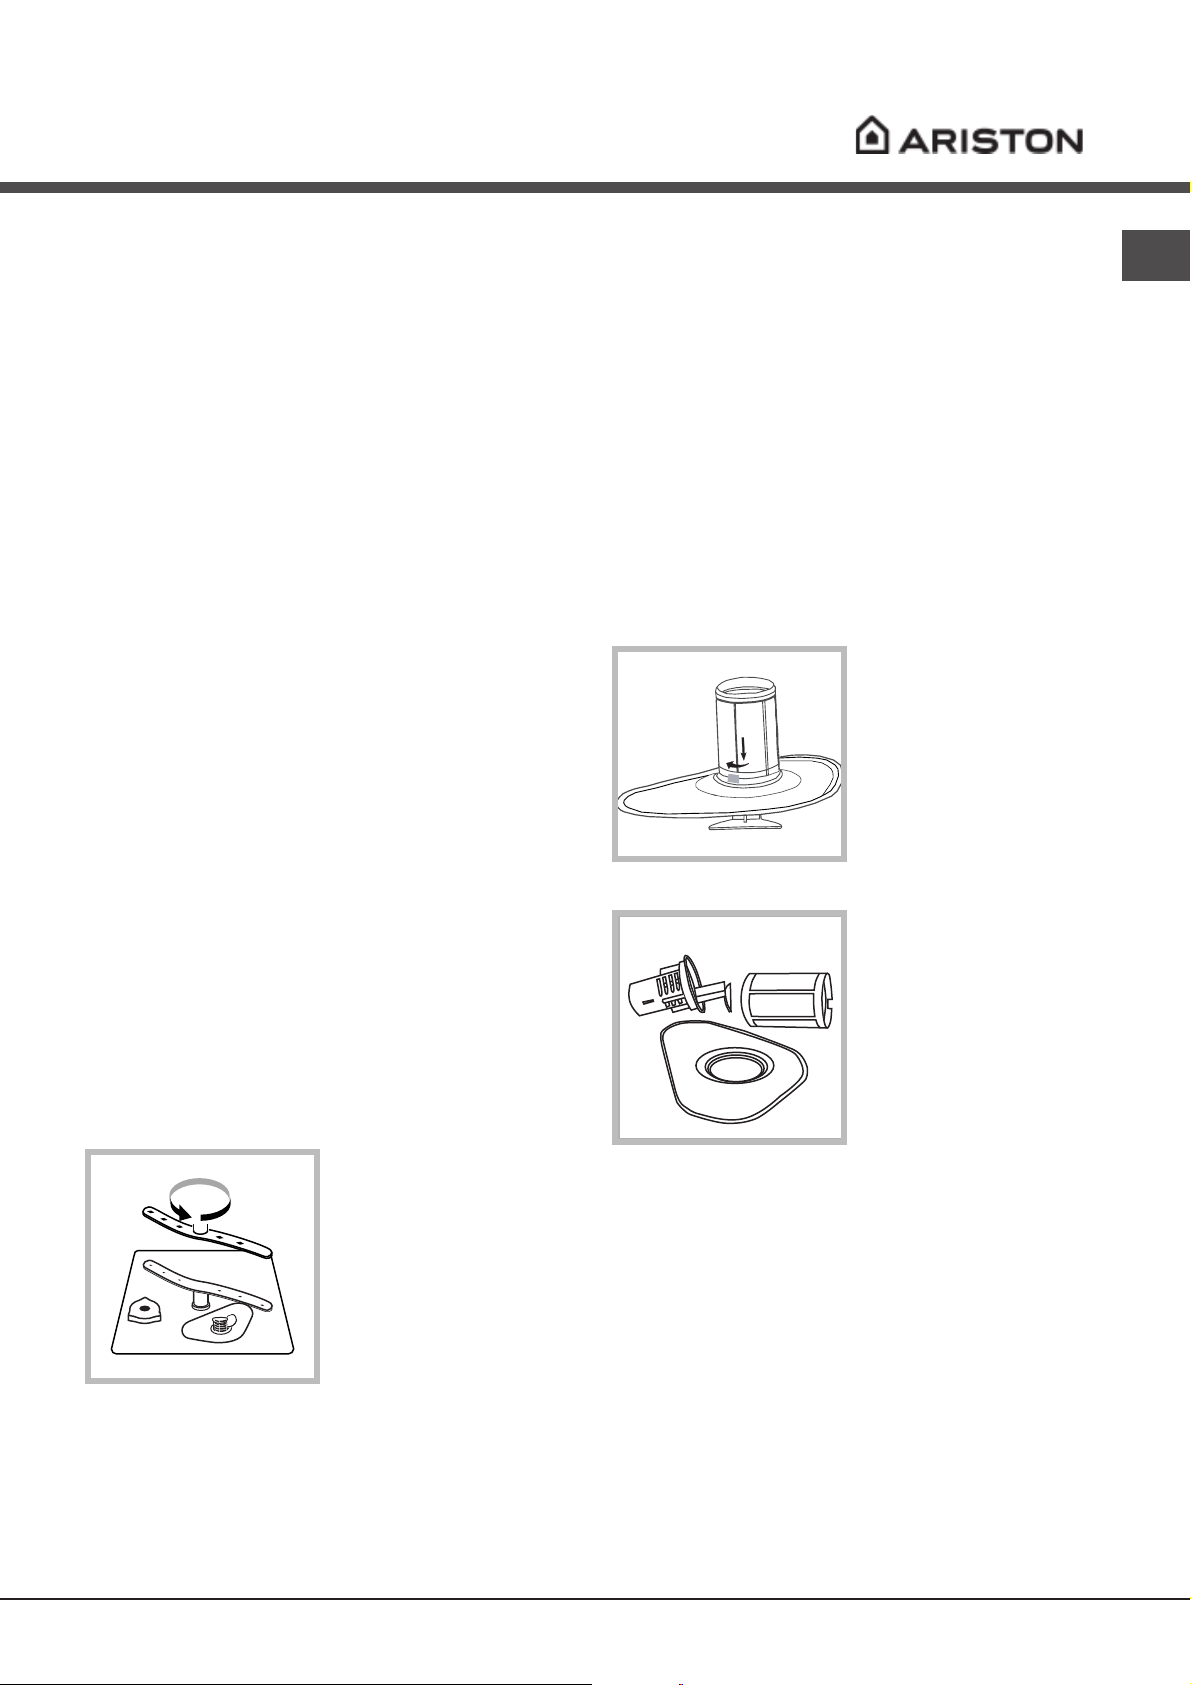
1. Estrarre il cestello inferiore
e svitare il tappo del
serbatoio in senso antiorario.
2. Solo per il primo utilizzo:
riempire il serbatoio di acqua
fino al bordo.
3. Posizionare l’imbuto
in dotazione (
vedi figura
)
e riempire il serbatoio di sale fino al bordo (circa
2 kg); è normale che trabocchi un po’ d’acqua.
4. Togliere l’imbuto, eliminare i residui di sale dalla
filettatura e avvitare bene il tappo, affinché nel
serbatoio non entri detersivo durante il lavaggio
(potrebbe danneggiarsi irrimediabilmente il
decalcificatore).
Quando si aggiunge il sale, avviare subito un ciclo
di lavaggio senza stoviglie per eliminare la
soluzione salina traboccata ed evitare la corrosione.
Regolare la dose di sale*
È possibile regolare il consumo di sale in base
alla durezza della propria acqua, dato reperibile
presso l’Ente erogatore dell’acqua potabile.
1. Svitare il tappo del serbatoio.
2. Ruotare la freccia sul collare
vedi figura
(
) verso il + o verso il –
facendo riferimento alla tabella:
Il decalcificatore è regolato di fabbrica sul +.
Caricare il sale rigenerante
Per avere buoni risultati di lavaggio è indispensabile
verificare che il serbatoio del sale non sia mai
vuoto. Il sale rigenerante elimina il calcare
dall’acqua, evitando che si depositi sulle stoviglie. Il
serbatoio del sale è posto nella parte inferiore della
lavastoviglie (
8
vedi Descrizione
) e va riempito:
Se si utilizzano le pastiglie multifunzione (2in1,
3in1, 4in1, ecc.) riempire comunque il serbatoio
del sale e regolare su –; se la durezza dell’acqua
è superiore a 60°fH, regolare su +.
* Presente solo su alcuni modelli.
Manutenzione e cura
A
B
C
Escludere acqua e corrente elettrica
• Chiudere il rubinetto dell’acqua dopo ogni
lavaggio per eliminare il pericolo di perdite.
• Staccare la spina della corrente quando si
pulisce la macchina e durante i lavori di
manutenzione.
Pulire la lavastoviglie
• La superficie esterna e il pannello di controllo
possono essere puliti con un panno inumidito
con acqua non abrasivo. Non usare solventi
o abrasivi.
• La vasca interna può essere pulita da eventuali
macchie con un panno imbevuto di acqua e poco
aceto.
Evitare i cattivi odori
• Lasciare sempre socchiusa la porta per evitare il
ristagno di umidità.
Pulire i filtri
I filtri puliscono l’acqua di lavaggio dai residui di
cibo e la rimettono in circolo: per avere buoni
risultati di lavaggio è necessario pulirli.
Pulire i filtri con regolarità.
Dopo la pulizia verificare che il gruppo filtrante sia
stato correttamente inserito.
La lavastoviglie non deve essere usata senza
filtri o con filtro sganciato.
1. Estrarre i filtri tirando il manico verso l’alto.
2. Pulire i filtri:
• dopo ogni lavaggio
pulire il piatto
C
1
2
A
B
semicircolare A
e il bicchiere B (si
estraggono tirando il
manico) dai residui più
grossi, sciacquandoli
sotto acqua corrente.
IT
• Pulire regolarmente le guarnizioni perimetrali di
tenuta della porta e delle vaschette detersivo con
una spugnetta umida. Si eviteranno così ristagni
di cibo, principali responsabili del cattivo odore.
Pulire gli irroratori
Può succedere che
residui di cibo si
attacchino agli
irroratori e ostruiscano
i fori da cui esce
l’acqua: di tanto in
tanto è bene controllarli
e pulirli con uno
spazzolino non
metallico.
• una volta al mese
pulire accuratamente
tutto il gruppo filtrante:
piatto semicircolare A,
bicchiere B e filtro
cilindrico C (si estrae
ruotandolo in senso
antiorario). Per la
pulizia aiutarsi con uno
spazzolino non
metallico.
3. Rimontare il gruppo filtrante e ricollocarlo nella
sua sede seguendo i movimenti 1 e 2, indicati in
figura, fino allo scatto.
Se ci si assenta per lunghi periodi
• Fare un lavaggio a vuoto.
• Staccare i collegamenti elettrici e idraulici.
• Lasciare socchiusa la porta.
9

Precauzioni e consigli
IT
L’apparecchio è stato progettato e costruito in
conformità alle norme internazionali di sicurezza.
Queste avvertenze sono fornite per ragioni di
sicurezza e devono essere lette attentamente.
Sicurezza generale
• L’apparecchio è stato concepito per un uso di
tipo non professionale all’interno dell’abitazione.
• L’apparecchio deve essere usato per il lavaggio
delle stoviglie a uso domestico, solo da persone
adulte e secondo le istruzioni riportate in questo
libretto.
• L’apparecchio non va installato all’aperto,
nemmeno se lo spazio è riparato, perché è molto
pericoloso lasciarlo esposto a pioggia e
temporali.
• Non toccare la lavastoviglie a piedi nudi.
• Non staccare la spina dalla presa della corrente
tirando il cavo, bensì afferrando la spina.
• È necessario chiudere il rubinetto dell’acqua e
staccare la spina dalla presa della corrente prima
di effettuare operazioni di pulizia e
manutenzione.
• In caso di guasto, in nessun caso accedere ai
meccanismi interni per tentare una riparazione.
• Non toccare mai la resistenza.
• Non appoggiarsi o sedersi sulla porta aperta:
l’apparecchio potrebbe ribaltarsi.
• Tenere il detersivo e il brillantante fuori dalla
portata dei bambini.
• Gli imballaggi non sono giocattoli per bambini.
Smaltimento
• Smaltimento del materiale di imballaggio:
attenersi alle norme locali, così gli imballaggi
potranno essere riutilizzati.
• La direttiva Europea 2002/96/CE sui rifiuti di
apparecchiature elettriche ed elettroniche
(RAEE), prevede che gli elettrodomestici non
debbano essere smaltiti nel normale flusso dei
rifiuti solidi urbani. Gli apparecchi dismessi
devono essere raccolti separatamente per
ottimizzare il tasso di recupero e riciclaggio dei
materiali che li compongono e impedire potenziali
danni per la salute e l’ambiente. Il simbolo del
cestino barrato è riportato su tutti i prodotti per
ricordare gli obblighi di raccolta separata.
Per ulteriori informazioni, sulla corretta
dismissione degli elettrodomestici, i detentori
potranno rivolgersi al servizio pubblico preposto
o ai rivenditori.
Risparmiare e rispettare lambiente
Risparmiare acqua ed energia
• Avviare la lavastoviglie solo a pieno carico. In
attesa che la macchina sia piena, prevenire i
cattivi odori con il ciclo Ammollo (
• Selezionare un programma adatto al tipo di
stoviglie e al grado di sporco consultando la
Tabella dei programmi
- per stoviglie normalmente sporche utilizzare il
programma Eco, che garantisce bassi consumi
energetici e di acqua.
- se il carico è ridotto attivare l’opzione Mezzo
carico (
• Se il proprio contratto di erogazione dell’energia
elettrica prevede fasce orarie di risparmio
energetico, effettuare i lavaggi negli orari a tariffa
ridotta. L’opzione Avvio ritardato* (
utilizzo
senso.
Detersivi senza fosfati, senza cloro
e contenenti enzimi
• Si consiglia vivamente di usare i detersivi senza
fosfati e senza cloro che sono i più indicati per la
tutela dell’ambiente.
• Gli enzimi sviluppano un’azione particolarmente
efficace con temperature prossime ai 50°C, per
cui con i detersivi con enzimi si possono
impostare lavaggi a basse temperature e ottenere
gli stessi risultati che si avrebbero a 65°C.
• Dosare bene il detersivo in base alle indicazioni
del produttore, alla durezza dell’acqua, al grado
di sporco e alla quantità di stoviglie per evitare
sprechi. Pur biodegradabili, i detersivi
contengono elementi che alterano l’equilibrio
della natura.
vedi Avvio e utilizzo
) può aiutare a organizzare i lavaggi in tal
:
vedi Programmi
).
vedi Avvio e
).
10
* Presente solo su alcuni modelli.
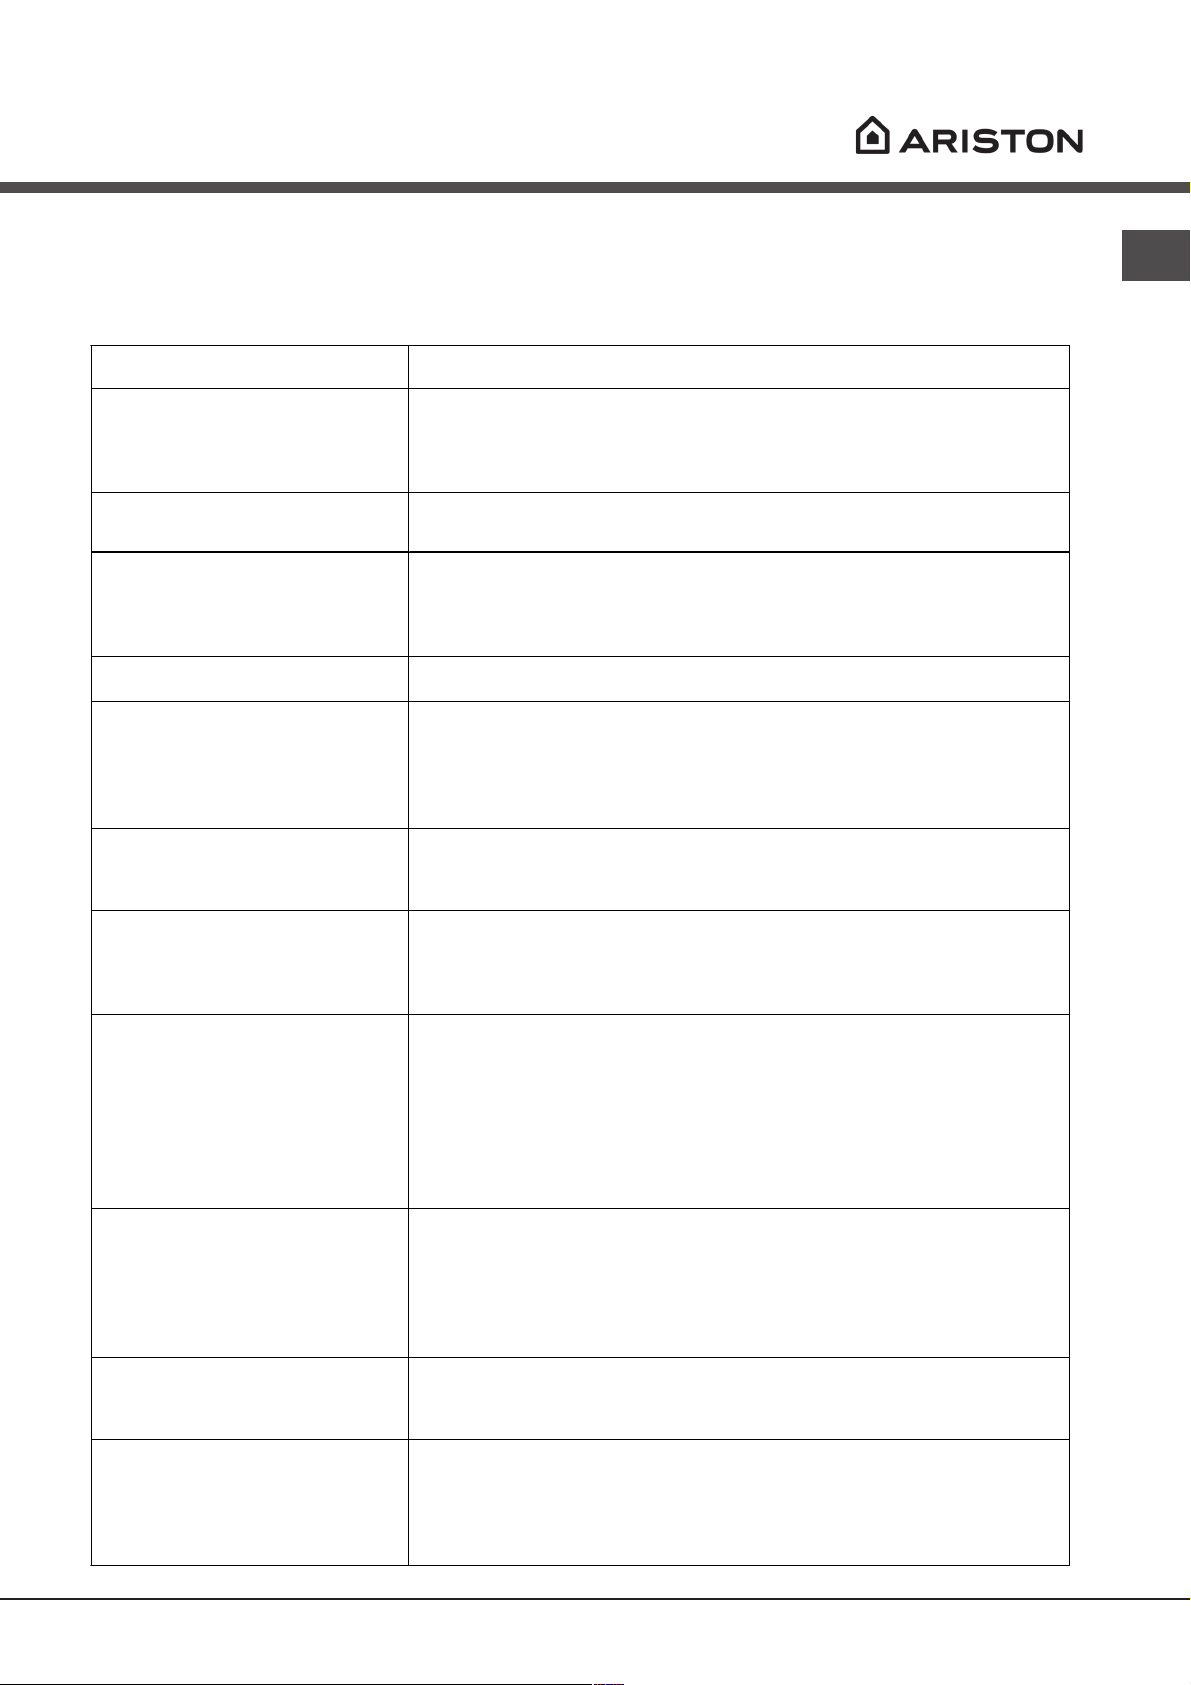
Anomalie e rimedi
Qualora l’apparecchio presenti delle anomalie di funzionamento, controllare i seguenti punti prima di rivolgersi
all’Assistenza.
Alcune anomalie vengono segnalate da alcuni codici che lampeggiano sul display: prendere nota di quali
codici lampeggiano prima di chiamare l’Assistenza.
Anomalie: Possibili cause / Soluzione:
La lavastoviglienon parte.
La lavastoviglie non carica
acqua.
La lavastoviglie non scarica
acqua.
La lavastoviglie fa rumore.
Su stoviglie e bicchieri ci
sono depositi calcarei o una
patina biancastra.
La spina non è ben inserita nella presa di corrente oppure in
casa non cè corrente.
La porta della lavastoviglie non è ben chiusa.
Si è impostato un Avvio ritardato (vedi Avvio e utilizzo).
Manca lacqua nella rete idrica.
Il tubo di carico dellacqua è piegato (vedi Installazione).
Il programma non è ancora terminato.
Il tubo di scarico dellacqua è piegato (vedi Installazione).
Lo scarico del lavello è ostruito.
Il filtro è intasato da residui di cibo.
Le stoviglie sbattono tra loro o contro gli irroratori.
Manca il sale rigenerante o la sua regolazione non è adeguata
alla durezza dellacqua (vedi Brillantante e sale).
Il tappo del serbatoio del sale non è chiuso bene.
Il brillantante è esaurito o il dosaggio è insufficiente.
Le stoviglie sono in materiale antiaderente.
IT
Su stoviglie e bicchieri ci
sono striature o sfumature
bluastre.
Le stoviglie sono poco
asciutte.
Le stoviglie non sono pulite.
Allarme rubinetto chiuso.
(si sentono dei brevi bip)
(lampeggia sul display il codice
AO6).
Allarme filtri intasati
(lampeggia sul display il codice
AO5).
Il dosaggio del brillantante è eccessivo.
È stato selezionato un programma senza asciugatura.
Il brillantante è esaurito o il dosaggio è insufficiente
(vedi Brillantante e sale).
La regolazione del brillantante non è adeguata.
I cestelli sono troppo carichi (vedi Caricare i cestelli).
Le stoviglie non sono sistemate bene.
Gli irroratori non sono liberi di ruotare.
Il programma di lavaggio è troppo blando (vedi Programmi).
Il detersivo non è dosato adeguatamente o non è adatto
(vedi Avvio e utilizzo).
Il filtro è sporco o intasato (vedi Manutenzione e cura).
Manca il sale rigenerante (vedi Brillantante e sale).
Aprire il rubinetto e lapparecchio si avvia dopo pochi minuti.
Lapparecchio si è bloccato perché non si è intervenuti al
suono dei bip. Spegnere la macchina con il tasto ON/OFF,
aprire il rubinetto e dopo 20 secondi riaccendere premendo lo
stesso tasto. Riprogrammare la macchina e riavviare.
Spegnere la macchina premendo il tasto ON/OFF e pulire i
filtri (vedi Manutenzione), poi riaccendere premendo lo stesso
tasto. Riprogrammare la macchina e riavviare.
Allarme guasto
elettrovalvola
di carico dellacqua
(lampeggia sul display il codice
AO2).
Spegnere la macchina premendo il tasto ON/OFF e
riaccendere dopo un minuto. Se lallarme permane chiudere il
rubinetto dellacqua per evitare allagamenti, staccare la spina
della corrente e chiamare lAssistenza.
11
Assistenza
IT
Prima di contattare lAssistenza:
• Verificare se l’anomalia può essere risolta da soli (
• Riavviare il programma per controllare se l’inconveniente è stato ovviato.
• In caso negativo, contattare il Servizio Assistenza Tecnico Autorizzato.
Non ricorrere mai a tecnici non autorizzati.
Comunicare:
• il tipo di anomalia;
• il modello della macchina (Mod.);
• il numero di serie (S/N).
Queste informazioni si trovano sulla targhetta caratteristiche posta sull’apparecchio
vedi Descrizione dell’apparecchio
(
).
vedi Anomalie e Rimedi
).
Assistenza Attiva 7 giorni su 7
Se nasce il bisogno di intervento chiamare il Numero Unico Nazionale 199.199.199*.
Un operatore sarà a completa disposizione per fissare un appuntamento con Centro Assistenza
Tecnico autorizzato più vicino al luogo da cui si chiama.
È attivo 7 giorni su 7, sabato e domenica compresi, e non lascia mai inascoltata una richiesta.
12
* Al costo di 14,25 centesimi di Euro al minuto (iva inclusa) dal Lun. al Ven. dalle 08:00 alle 18:30, il Sab. dalle 08:00 alle
13:00 e di 5,58 centesimi di Euro al minuto (iva inclusa) dal Lun. al Ven. dalle 18:30 alle 08:00, il Sab. dalle 13:00 alle
08:00 e i giorni festivi, per chi chiama dal telefono fisso.
Per chi chiama da radiomobile le tariffe sono legate al piano tariffario dell’operatore telefonico utilizzato.
Le suddette tariffe potrebbero essere soggette a variazione da parte dell’operatore telefonico; per maggiori informazioni
consultare il sito www.aristonchannel.com.

Instruction booklet
DISHWASHER
EN
English, 13
LZ 705 EXTRA
Contents
Installation, 14-15
Positioning and levelling
Connecting the water and electricity supplies
Technical data
Description of the appliance, 16
Overall view
Control panel
Loading the racks, 17
Lower rack
Cutlery basket
Upper rack
Start-up and use, 18
Starting the dishwasher
Loading the detergent
Washing options
Wash cycles, 19
Wash cycle table
Rinse aid and refined salt, 20
Loading the rinse aid
Loading the refined salt
Care and maintenance, 21
Shutting off the water and electricity supplies
Cleaning the dishwasher
Preventing unpleasant odours
Cleaning the sprayer arms
Cleaning the filters
Leaving the machine unused for extended periods
Precautions and advice, 22
General safety
Disposal
Saving energy and respecting the environment
Troubleshooting, 23
Assistance, 24
Before calling for Assistance
Installation
EN
Keep this instruction manual in a safe place for
future reference. If the appliance is sold, given away
or moved, please ensure the manual is kept with the
machine, so that the new owner may benefit from the
advice contained within it.
Please read this instruction manual carefully: it
contains important information regarding the safe
installation, use and maintenance of the appliance.
If the appliance must be moved at any time, keep
it in an upright position; if absolutely necessary, it
may be tilted onto its back.
Positioning and levelling
1. Remove the appliance from all packaging and
check that it has not been damaged during
transportation.
If it has been damaged, contact the retailer and do
not proceed any further with the installation process.
2. Check the dishwasher by placing it so that its
sides or back panel are in contact with the adjacent
cabinets or even with the wall. This appliance can
also be recessed under a single worktop* (
Assembly instruction sheet
).
see the
Connecting the water inlet hose
• To a suitable cold water connection point: before
attaching the hose, run the water until it is
perfectly clear so that any impurities that may be
present in the water do not clog the appliance;
after performing this operation, screw the inlet
hose tightly onto a tap with a ¾ gas threaded
connection.
• To a suitable hot water connection point: your
dishwasher may be provided with hot water from
the mains supply (if you have a central heating
system with radiators) provided that it does not
exceed a temperature of 60°C.
Screw the hose to the tap as described for
connection to a cold water supply.
3. Position the dishwasher on a level and sturdy floor.
If the floor is uneven, the front feet of the appliance
may be adjusted until it reaches a horizontal position
(the angle of inclination must not exceed 2 degrees).
If the appliance is levelled correctly, it will be more
stable and much less likely to move or cause
vibrations and noise while it is operating.
4. Adjust the height of the rear feet from the front of
the appliance*: use a screwdriver to tighten or
loosen the screws on the lower part of the
dishwasher.
Connecting the water and electricity
supplies
Connection to the water and electricity supplies
should only be performed by a qualified technician.
The dishwasher should not stand on top of the
water hoses or the electricity supply cable.
The water inlet (A) and outlet (B) hoses and the
electricity supply cable may be positioned towards
the right or the left in order to achieve the best
possible installation (
see figure
).
If the inlet hose is not long enough, contact a
specialist store or an authorised technician (
Assistance
The water pressure must be within the values
indicated in the Technical data table (
The hose should not be bent or compressed.
Anti-flooding protection
To ensure floods do not occur, the dishwasher:
- is provided with a special system which blocks the
water supply in the event of anomalies or leaks from
inside the appliance.
- is provided with a
other words it has a water inlet hose that consists of
a transparent hose on the outside and a red hose on
the inside: both the hoses can withstand extremely
high pressure. If the internal hose breaks, the
external hose becomes a bright red colour and
carries the water instead, thus avoiding any leakage.
It is very important to check the external hose
regularly: if it is a bright red colour, it must be
replaced by an authorised technician as soon as
possible (
).
Water Stop
see Assistance
* safety device, in
).
see
see below
).
14
* Only available in selected models.
Connecting the water outlet hose
A
Connect the outlet hose (without bending it) to a
drain duct with a minimum diameter of 4 cm.
Alternatively, rest it over a sink or tub; the free end
of the hose should not remain immersed in water.
The special plastic
elbow* makes it easier to
find the best layout: fix
the elbow to the wall
securely in order to
prevent the outlet hose
from moving and spilling
the dirty water.
The part of the hose
marked with the letter A
should be between 40 and 100 cm above the ground
see figure
(
).
The Company shall not be held responsible for any
incidents that occur if these regulations are not
observed.
Advice regarding the first wash cycle
After the appliance has been installed, immediately
before running the first wash cycle, completely fill
the salt dispenser with water and add approximately
2 kg of salt (
see Rinse aid and refined salt
). The
water may overflow: this is normal and is not a
cause for concern. It is also normal that the LOW
SALT* indicator light continues to flash for a few
cycles after the salt has been loaded.
Anti-condensation strip*
After installing the dishwasher, open the door and
stick the adhesive transparent strip under the
wooden shelf in order to protect it from any
condensation that may form.
EN
We advise against the use of hose extensions.
Electrical connection
Before inserting the plug into the electrical socket,
make sure that:
• the socket is earthed and complies with current
regulations;
• the socket can withstand the maximum load of
the appliance, which is indicated on the data
plate located on the inside of the door (
Description of the appliance
);
see
• the power supply voltage falls within the values
indicated on the data plate on the inside of the
door;
• the socket is compatible with the plug of the
appliance. If this is not the case, ask an
authorised technician to replace the plug (
Assistance
); do not use extension cables or
see
multiple sockets.
Once the appliance has been installed, the power
supply cable and the electrical socket should be
easily accessible.
The cable should not be bent or compressed.
The cable should be checked regularly and
replaced by authorised technicians only (
Assistance
see
).
Technical data
Dimensions
Capacity
Water supply
pressure
Power supply
voltage
Total absorbed
power
Fuse
width 59.5 cm
height 82 cm
depth 57 cm
12 standard place-settings
30 Kpa ÷ 1Mpa (0.3 ÷ 10 bar)
4.3 psi – 145 psi
See appliance data plate
See appliance data plate
See appliance data plate
This dishwasher conforms to
the following European
Community Directives:
-73/23/EEC dated 19/02/73
(Low Voltage) and subsequent
modifications
-89/336/EEC dated 03/05/89
(Electromagnetic Compatibility)
and subsequent modifications
-97/17/EC (Labelling)
-2002/96/ CE (
Waste
Electrical and Electronic
Equipment WEEE)
* Only available in selected models.
15
Description of the appliance
EN
Overall view
1
4
6
9
11
7
10
1. Upper rack
2. Upper sprayer arm
3. Tip-up compartments
4. Rack height adjuster
5. Lower rack
3
2
6. Lower sprayer arm
7. Cutlery basket
8. Washing filter
9. Salt dispenser
10. Detergent and rinse aid dispensers
11. Data plate
5
8
Control panel
Display
LOW RINSE AID
indicator light*
LOW SALT
indicator light*
DELAYED
START
indicator light*
DELAYED START
button*
HALF LOAD
indicator light*
EXTRA DRYING
indicator light*
EXTRA DRYING
button*
ON-OFF
button
PRE-WASH
WASH
RINSE
DRYING
DISPLAY
U
V
Z
WASH CYCLE PHASE
indicator lights
START/RESET
button
WASH CYCLE
SELECT
knob
16
HALF LOAD
button*
* Only available in selected models.
Loading the racks
Before loading the rack, remove all food residue from the
crockery, leave saucepans and frying pans with burnt-on
residue to soak
from cups and glasses. After loading the appliance, check
that the sprayer arms can rotate freely.
in water only and empty all remaining liquid
Lower rack
Arrange the more difficult items to wash using the
examples
needed.
as a guide and use the collapsible supports* where
• Serving dishes and lids: place these at the sides
of the rack.
• Saucepans and salad bowls: always turn these
upside down.
• Very deep dishes: position these at an angle.
In order to guarantee the best washing and drying
performance, the surface of the lower rack is more uneven
than that of the upper rack.
Loading
Cutlery basket
The type of cutlery basket may vary according to the
dishwasher model.
Knives and other sharp utensils should be placed in the
cutlery basket with the point facing downwards.
If the rack is equipped with the click
clack handles* (
them upwards or downwards to
adjust the height.
see figure
Loading examples for the upper rack
Loading examples for the lower rack
), pull
EN
To divide the central basket* into two separate pieces: pull out
the handle. The two detachable side compartments* may be
hooked onto the upper or lower rack.
The two grids* may be positioned in the basket to separate
the cutlery: place the pieces of cutlery into the appropriate
compartments with the handles at the bottom.
Upper rack
Load this rack with delicate and lightweight crockery: glasses,
tea and coffee cups, saucers, small salad bowls, saucepans
and small saucepans that are not too soiled, using the
examples
as a guide.
• Lightweight crockery: position these dishes so
that they will not be moved by the jets of water.
• Mugs and cups: place these on the tip-up
compartments**.
• Long sharp knives and serving utensils: place
these on the tip-up compartments**.
Adjusting the height of the upper rack
In order to make it easier to arrange
the crockery, the upper rack may be
1
3
moved to a higher or lower level.
2
Open the left and right guide rail
stops and pull out the rack; position
it higher or lower as required, slide it
along the guide rails until the front
4
wheels are in place and close the
stops (
see figure
).
Loading
Baby Tip-up compartments
**
For dishwasher models with a
Baby Cycle, tip-up
compartments suitable for
washing bottles, rings and
teats are provided.
Items that should not be washed in the dishwasher
• Wooden items, objects with wooden or horn
handles or glued-on parts.
• Items made from aluminium, copper, brass,
pewter or tin.
• Items made from plastic that is not heatresistant.
• Antique or hand-painted porcelain.
• Antique silver. Silver that is not antique may,
however, be washed in the dishwasher using a
delicate wash cycle, provided that it does not
come into contact with other metals.
When buying crockery and cutlery we recommend that you
check whether it can be washed using the dishwasher.
Washing the handles*
To wash the upper and lower rack handles: remove the two
fastening plugs, lift out the handles and rinse them under
running water, then fasten them to the rack using the same
plugs.
* Only available in selected models.
** The number and position may vary.
17

A
B
D
C
Start-up and use
EN
1. Turn the water tap on.
2. Press the ON/OFF button: the display will light up.
3. Measure out the detergent (
4. Load the racks (see Loading the racks) and shut the door.
5. Select the programme by turning the WASH CYCLE
SELECT knob in a clockwise direction: align the notch on the
knob with the number or symbol representing the desired
wash cycle.
6. Select the wash options (
7. Start the cycle by pressing the START/RESET button: the
machine will emit a confirmation beep. The WASH CYCLE
PHASE indicator lights display the status of the cycle: Prewash, Wash, Rinse, or Drying.
8. At the end of the cycle three short beeps will sound and
END will appear on the display. Switch off the appliance by
pressing the ON/OFF button, shut off the water tap and
unplug the appliance from the electricity socket.
9. Open the door and wait for a few minutes before removing
the crockery, in order to avoid burns. Unload the racks,
beginning with the lower level.
see below
see below
).
).
Demo*
If dON appears on the display, this means that the appliance
is in demonstration mode. To deactivate it, press the START/
RESET and ON/OFF buttons simultaneously: dOF should
appear on the display.
Modifying a wash cycle in progress
If a mistake was made during the wash cycle selection
process it is possible to change the cycle, provided that it has
only just begun: press and hold the START/RESET button for 4
seconds. After one long beep and three short beeps, the
WASH CYCLE PHASE indicator light will switch off. Select the
new cycle and switch the machine back on by pressing the
START/RESET button.
Adding extra crockery
Press the ON/OFF button and open the door, taking care to
avoid the escaping steam, and place the crockery inside the
dishwasher. Press the ON/OFF button again: the cycle starts
from the point at which it was interrupted.
Accidental interruptions
If the door is opened during the wash cycle, or if there is a
power cut, the cycle stops. It starts again from the point at
which it was interrupted once the door has been shut or the
electricity supply is restored.
Loading the detergent
A successful wash also depends on the correct amount of
detergent being used, as recommended by the manufacturer.
Exceeding the recommended amount does not result in a
more effective wash and pollutes the environment.
To obtain the best results from each washing and drying cy-
cle, powder detergent, rinse aid liquid and salt should be
used.
compartment A:compartment A:
compartment A: Washing detergent
compartment A:compartment A:
compartment B:compartment B:
compartment B: Pre-wash detergent
compartment B:compartment B:
requires 2, place the second tablet at the bottom of the
appliance.
3. Remove detergent residues from the edges of the
compartment and close the cover until it clicks.
Washing options
Delayed start
It is possible to delay the start time of the cycle for a period of
time between 1 and 24 hours.
1. Press the DELAYED START button: every time the button is
pressed, the time selected appears on the display and the
delayed start indicator light illuminates.
2. Select the wash cycle and press the START/RESET button:
after the beep sounds, the timer begins counting down.
3.Once this time is up, the indicator light switches off and the
wash cycle begins.
To adjust the delay time and select a lower period of time,
press the DELAYED START button. To cancel it, press the
button repeatedly until the wash cycle begins and the WASH
CYCLE PHASE indicator light corresponding to the start of the
cycle in progress illuminates.
Half load using the upper rack*
If there are not many dishes to be washed, a half load cycle
may be used in order to save water, electricity and detergent.
Before selecting the wash cycle press the HALF LOAD button
repeatedly: the indicator light will illuminate and the wash cycle
will take place only in the upper rack.
Remember to load the upper rack only, and to reduce the
amount of detergent accordingly.
It is better to use powder detergent in this case.
Extra drying*
To make sure that the crockery is completely dry at the end of
the cycle, press the EXTRA DRYING button before selecting
the wash cycle. A prolonged beep will sound to indicate that
this option has been selected and a short beep will sound to
indicate when it has been deselected.
If the Extra drying option is selected, the wash cycles will last
longer.
Starting the dishwasher
1. Open cover C by pressing
button D.
2. Pour in the detergent after
consulting the
table
:
• for powder detergent use
compartments A and B
• for tablets, use
compartment A and the
bottom of the appliance, i.e.
when the cycle requires 1
tablet, place it in compartment
A and close the cover; when it
Wash cycle
* Only available in selected models.
18
Wash cycles
Wash cycle table
Ariston dishwashers are fitted with an automatic filter cleaning system that may increase the cycle duration.
AUTO WASH CYCLES: This model of dishwasher is equipped with a special sensor which can be used to assess the level of
soiling and automatically select the most efficient and economic wash cycle accordingly. The duration of the auto wash cycles may
vary due to the operation of the sensor.
If the crockery is only lightly soiled or if it has been rinsed with water before being placed in the dishwasher, reduce the amount of
detergent used accordingly.
EN
Detergent
Wash cycle selection
instructions
Extremely soiled dishes
and pans (not to be
used for delicate items).
Normally soiled pans
and dishes. Standard
daily wash cycle.
Environmentally-friendly
wash cycle with low
energy consumption
levels, suitable for pans
and dishes.
Economic and fast
wash cycle to be used
for lightly soiled dishes.
(Run cycle immediately
after use.)
Preliminary wash cycle
for dishes while the load
is awaiting completion
with the dishes from the
next meal.
Disinfecting wash cycle
suitable for washing
bottles, rings and teats
together with plates,
cups, glasses and
cutlery. Load the items
on the upper rack only.
Wash differentiated on
the two racks delicate
for glassware and
glasses on the upper
rack and heavy duty for
the pans on the lower
rack. Duo Wash
Wash cycle
Powder Liquid Tablets
30 g (A)
5 g (B)
Super Wash
30 g (A) 30 ml (A) 1 (A)
Normal
25 g (A)
5 g (B)
Eco
25 g (A) 25 ml (A) 30’
Rapid
Soak
20 g (A) 20 ml (A)
Baby Care
25 g (A)
5 g (B)
(A) = compartment A
(B) = compartment B
30 ml (A)
5 ml (B)
25 ml (A)
5 ml (B)
12'
25 ml (A)
5 ml (B)
1 (A)
1 (bottom of
the
appliance)
1 (A)
1 (A)
Pre-wash Drying
•
•
•
•
Wash cycle
duration
(tolerance
±10%)
•
•
•
•
2:00’
1:40’
2:25’
1:00'
1:48’
Note
To make it easier to measure out the detergent, it is worth remembering that:
1 tablespoon = 15 grams of powder = approximately 15 ml of liquid
1 teaspoon = 5 grams of powder = approximately 5 ml of liquid
19
Rinse aid and refined salt
EN
Only use products that have been specifically designed for
dishwashers.
Do not use table salt or industrial salt.
If using a multi-functional product (2-in-1, 3-in-1, 4-in-1,etc.) it is
not necessary to add rinse aid; however, we recommend that
you add salt, especially if you live in an area where the water is
hard or very hard. If you do not add salt or rinse aid, the LOW
SALT* and LOW RINSE AID* indicator lights will flash
continuously.
Loading the rinse aid
Rinse aid makes it easier for the crockery to dry, as water runs
off surfaces more readily and therefore does not leave streaks
or marks.
The rinse aid dispenser should be filled:
• whenever the indicator light (H) signals that it is empty.
Illuminated light: add rinse aid; unlit light: there is no
shortage of rinse aid in the dispenser.
• when the LOW RINSE AID* indicator light on the panel
flashes;
1. Open the dispenser by
H
directly into the appliance tub.
turning the lid (G) in an
anticlockwise direction.
2. Pour in the rinse aid, making
sure it does not overflow from
the dispenser. If this happens,
F
clean the spill immediately with a
sponge.
G
3. Screw the lid back on.
NEVER pour the rinse aid
the cap of the salt dispenser;
• when the LOW SALT* indicator light on the panel flashes;
• if your machine is not equipped with an indicator light or a
green float:
approximately every 30 wash cycles;
1. Remove the lower rack and
unscrew the cap of the dispenser
(in an anti-clockwise direction).
2. For the first wash cycle only: fill
the dispenser up to the edges with
water.
3. Position the funnel provided
correctly (
dispenser up to the edges (approximately 2 kg); it is normal
for a little water to leak out.
4. Remove the funnel, wipe away any salt residue from the
thread and screw the cap on tightly, so that detergent does
not leak into the dispenser during the wash cycle (this could
damage the water softening system beyond repair).
When salt has been added, run a wash cycle immediately,
without crockery, in order to remove any salt solution that has
leaked out and to avoid corrosion.
see figure
) and fill the salt
Adjusting the amount of salt*
It is possible to adjust the amount of salt used according to the
hardness of the water in your area (this information is available
from your local water board).
1. Unscrew the dispenser cap.
2. Turn the arrow on the neck of the
dispenser (
symbols, using the table below as a guide.
see figure
) towards the + or -
Adjusting the amount of rinse aid
If you are not completely satisfied with the washing or drying
results, you may adjust the quantity of rinse aid used. Use a
screwdriver to turn the dosage adjuster to one of the 6 pre-set
positions (the default position is set to 4):
• if there are bluish streaks on the crockery, set the adjuster
to a lower number (1-3).
• if drops of water remain on the crockery or there are
limescale marks present after the cycle has finished, set the
adjuster to a higher number (4-6).
If you are using multi-functional tablets (2-in-1, 3-in-1, 4-in1,etc.) and you wish to further improve the drying
performance of the appliance, fill the dispenser and set the
dosage adjuster to 2.
Loading the refined salt
In order to obtain the best possible results from a wash cycle,
make sure that the dispenser is never empty. Refined salt
removes limescale from the water, thus avoiding the formation
of deposits on crockery. The salt dispenser is located in the
lower part of the dishwasher (
filled:
• when the green float* cannot be seen by simply looking at
see Description
) and should be
Hardness of the water
°dH °fH °mmol/l
0 - 10 0 - 17 0 - 1.7 / 0 /
10 – 25 18 – 44 1.8 – 4.4
25 – 50 45 – 89 4.5 – 8.9 MED 40 40
> 50 > 89 > 8.9 + 60 25
The default setting of the water softening system is +.
- If using multi-functional tablets (2-in-1, 3-in-1, 4-in-1,etc.) fill the
salt dispenser and set the adjuster to -; if the hardness of the
water is greater than 60°fH, set it to +.
* Only available in selected models.
Selector
knob
position
- 20 60
Salt
consumption
(grams/cycle)
Autonomy
(cycles/2 kg)
20
A
B
C
Care and maintenance
Shutting off the water and electricity
supplies
• Turn off the water tap after every wash cycle to
avoid leaks.
• Remove the plug from the socket when cleaning
the machine and when carrying out maintenance
work.
Cleaning the dishwasher
• The external surfaces of the machine and the
control panel may be cleaned using a nonabrasive cloth which has been dampened with
water. Do not use solvents or abrasive products.
• Any marks on the appliance interior may be
removed using a cloth dampened with water and
a little vinegar.
Preventing unpleasant odours
• Always keep the door of the appliance ajar in
order to avoid moisture from forming and being
trapped inside the machine.
• Clean the seals around the door and detergent
dispensers regularly using a damp sponge. This
will avoid food becoming trapped in the seals,
which is the main cause of the formation of
unpleasant odours.
Cleaning the sprayer arms
Food residue may
become encrusted onto
the sprayer arms and
block the holes used to
spray the water. It is
therefore recommended
that the arms are
checked from time to
time and cleaned with a
small non-metallic
brush.
Cleaning the filters
The filters remove food residue from the water used
in the wash cycle: to obtain the best results from
each wash, they should be cleaned.
Clean the filters regularly.
After cleaning check that the filter assembly has
been replaced correctly.
The dishwasher should not be used without filters
or when the filter is loose.
1. Remove the filters by pulling the handle upwards.
2. Clean the filters:
• after every wash
cycle, remove the
C
1
2
A
B
non-metallic brush to clean these parts.
3. Reconstruct the filter assembly and replace it in
the correct position, following movements 1 and 2 as
shown in the figure, until it clicks into place.
largest pieces of
residue from
semicircular plate A
and glass B (these
may be removed by
pulling the handle) by
rinsing them under
running water.
• The entire filter
assembly should be
cleaned thoroughly
once a month: this
includes the
semicircular plate A,
the glass B and the
cylinder C (this may be
removed by turning it in
an anti-clockwise
direction). Use a small
Leaving the machine unused for
extended periods
• Run a wash cycle when the dishwasher is empty.
EN
• Unplug the appliance and disconnect the water
supply.
• Leave the door of the appliance ajar.
21

Precautions and advice
EN
The appliance was designed and manufactured in
compliance with current international safety
standards. The following information has been
provided for safety reasons and should therefore be
read carefully.
General safety
• The appliance was designed for domestic use
inside the home and is not intended for
commercial or industrial use.
• The appliance must be used by adults only, to
wash domestic crockery according to the
instructions in this manual.
• The appliance must not be installed outdoors,
even in covered areas. It is extremely dangerous
to leave the machine exposed to rain and storms.
• Do not touch the appliance when barefoot.
• When unplugging the appliance always pull the
plug from the mains socket, do not pull on the
cable.
• The water supply tap must be shut off and the
plug should be removed from the electrical
socket before cleaning the appliance or carrying
out any maintenance work.
• If the appliance breaks down, do not under any
circumstances touch the internal parts in an
attempt to carry out the repair work yourself.
• Never touch the heating element.
• Do not lean or sit on the open door of the
appliance: this may cause the appliance to
overturn.
• Keep detergent and rinse aid out of reach of
children.
• The packaging material should not be used as a
toy: it can become a choking or suffocation
hazard.
Disposal of old electrical appliances
The European Directive 2002/96/EC on Waste
Electrical and Electronic Equipment (WEEE),
requires that old household electrical appliances
must not be disposed of in the normal unsorted
municipal waste stream. Old appliances must be
collected separately in order to optimise the
recovery and recycling of the materials they contain
and reduce the impact on human health and the
environment. The crossed out "wheeled bin" symbol
on the product reminds you of your obligation, that
when you dispose of the appliance it must be
separately collected.
Consumers should contact their local authority or
retailer for information concerning the correct
disposal of their old appliance.
Saving energy and respecting the
environment
Saving water and energy
• Only start a wash cycle when the dishwasher is
full. While waiting for the dishwasher to be filled,
prevent unpleasant odours with the Soak cycle
see Wash Cycles
(
• Select a wash cycle that is suited to the type of
crockery and to the soil level of the crockery
using the
- for dishes with a normal soil level, use the Eco
wash cycle, which guarantees low energy and
water consumption levels.
- if the load is smaller than usual activate the Half
load option (
• If your electricity supply contract gives details of
electricity saving time bands, run wash cycles
during the periods when a lower tariff is applied.
The Delayed start* button (
helps you organise the wash cycles accordingly.
Phosphate-free and chlorine-free detergents
containing enzymes
• We strongly recommend that you use detergents
that do not contain phosphates or chlorine, as
these products are harmful to the environment.
• Enzymes provide a particularly effective action at
temperatures around 50°C, and as a result
detergents containing enzymes can be used in
conjunction with low-temperature wash cycles in
order to achieve the same results as a normal
65°C wash cycle.
• To avoid wasting detergent, use the product in
appropriate quantities based on the
manufacturer’s recommendations, the hardness
of the water and the soil level and quantity of the
crockery. Even if they are biodegradable,
detergents contain substances that may alter the
balance of nature.
Wash cycle table
).
:
see Start-up and use
see Start-up and use
).
)
22
* Only available in selected models.
Troubleshooting
Whenever the appliance fails to work, check for a solution from the following list before calling for Technical
Assistance Centre.
Some problems are indicated by specific codes that flash on the display: make a note of any codes displayed
before calling Assistance.
Malfunction: Possible causes / Solutions:
The dishwasher does not start.
No water enters the dishwasher.
No water drains out from the
dishwasher.
The dishwasher makes
excessive noise.
The dishes and glasses are
covered in a white film or
limescale deposits.
The dishes and glasses are
streaked or have a bluish
tinge.
The crockery has not been dried
properly.
The dishes are not clean.
Shut off tap alarm.
(you will hear several short beeps)
(the code AO6 flashes on the
display).
Blocked filter alarm
(the code AO5 flashes on the
display).
Water loading solenoid valve
malfunction alarm
(the code AO2 flashes on the
display).
The plug has not been inserted into the electrical socket
properly, or there is no power in the house.
The dishwasher door has not been shut properly.
A delayed start has been programmed (see Start-up and use).
There is no water in the mains supply.
The water inlet hose is bent (see Installation).
The dishwasher cycle has not yet finished.
The water outlet hose is bent (see Installation).
The drain duct is blocked.
The filter is clogged up with food residues.
The dishes are rattling against each other or against the
sprayer arms.
The level of the refined salt is low or the dosage setting is not
suited to the hardness of the water (see Rinse aid and salt).
The lid on the salt dispenser is not closed properly.
The rinse aid has been used up or the dosage is too low.
The crockery is made from non-stick material.
The rinse aid dosage is too high.
The rinse aid has been used up or the dosage is too low (see
Rinse aid and salt).
The rinse aid dispenser setting is not high enough.
A wash cycle without a drying programme has been selected.
The racks are overloaded (see Loading the racks).
The crockery has not been arranged well.
The sprayer arms cannot move freely.
The wash cycle is too gentle (see Wash cycles).
The detergent has not been measured out correctly or it is not
suited to the type of wash cycle (see Start-up and use).
The filter is dirty or blocked (see Care and maintenance).
The refined salt level is low (see Rinse aid and salt).
Turn on the tap and the appliance will start after a few
minutes.
The appliance lock has been activated because nothing was
done when the beeps sounded. Switch off the machine using
the ON/OFF button, turn on the tap and switch the machine
back on after 20 seconds by pressing the same button. Re-
programme the machine and restart the wash cycle.
Switch off the machine by pressing the ON/OFF button and
clean the filters (see Maintenance), then switch the
dishwasher back on by pressing the same button. Re-
programme the machine and restart the wash cycle.
Switch off the appliance by pressing the ON/OFF button and
switch it back on after a minute. If the alarm continues, turn
off the water tap to reduce the risk of flooding, remove the
plug from the electrical socket and call Assistance.
EN
23

Assistance
EN
Before calling for Assistance:
• Check whether you can solve the problem on
your own (
• Restart the programme to check whether the
problem has been solved;
• If this is not the case, contact an authorised
Technical Assistance Centre on the telephone
number provided on the guarantee certificate.
Always request the assistance of authorised
servicemen.
Notify the operator of:
• the type of problem.
• the appliance model (Mod.).
• the serial number (S/N).
This information can be found on the data plate
situated on the internal edge of the stainless steel
door (see Description of the appliance).
see Troubleshooting
);
24

Mode demploi
LAVE-VAISSELLE
FR
Français, 25
LZ 705 EXTRA
Sommaire
Installation, 26-27
Mise en place et mise à niveau
Raccordements eau et électricité
Caractéristiques techniques
Description de lappareil, 28
Vue d’ensemble
Bandeau de commandes
Charger les paniers, 29
Panier inférieur
Panier à couverts
Panier supérieur
Mise en marche et utilisation, 30
Mettre en marche le lave-vaisselle
Charger le produit de lavage
Options de lavage
Programmes, 31
Tableau des programmes
Produit de rinçage et sel régénérant, 32
Charger le produit de rinçage
Charger le sel régénérant
FR
Entretien et soin, 33
Coupure de l’arrivée d’eau et de courant
Nettoyer le lave-vaisselle
Eviter les mauvaises odeurs
Nettoyer les bras de lavage
Nettoyer les filtres
Si vous vous absentez pendant une longue
période
Précautions et conseils, 34
Sécurité générale
Mise au rebut
Economies et respect de l’environnement
Anomalies et remèdes, 35
Assistance, 36

Installation
FR
Conservez ce mode d’emploi pour pouvoir le
consulter à tout moment. En cas de vente, de
cession ou de déménagement, veillez à ce qu’il
suive toujours l’appareil.
Lisez attentivement les instructions : elles
contiennent des conseils importants sur
l’installation, l’utilisation et la sécurité de
l’appareil.
En cas de déménagement, transportez l’appareil
verticalement; si besoin est, inclinez-le sur le dos.
Mise en place et mise à niveau
1. Déballez l’appareil et assurez-vous qu’il n’a pas
été endommagé pendant le transport.
S’il est abîmé, ne le raccordez pas et prenez
contact avec votre revendeur.
2. Installez le lave-vaisselle de manière à ce que
les côtés et la paroi arrière touchent aux meubles
adjacents ou au mur. L’appareil peut être encastré
sous un plan de travail continu* (
Montage
).
voir feuille de
A
60
100
Raccord du tuyau damenée de leau
• A une prise d’eau froide : vissez bien le tuyau
d’amenée à un robinet à embout fileté 3/4 gaz;
avant de visser, faites couler l’eau jusqu’à ce
quelle devienne limpide et dépourvue
d’impuretés qui pourraient engorger l’appareil.
• A une prise d’eau chaude : en cas
d’installation de chauffage centralisé
(radiateurs), le lave-vaisselle peut être alimenté
avec de l’eau chaude de réseau ne dépassant
pas 60°C.
Vissez le tuyau au robinet en procédant comme
pour la prise d’eau froide.
12083
121168
148
B
3. Installez le lave-vaisselle sur un sol plat et
rigide. Compensez les irrégularités en vissant ou
en dévissant les pieds jusqu’à ce que
l’horizontalité de l’appareil soit parfaite (son angle
d’inclinaison ne doit pas dépasser 2 degrés). Une
bonne horizontalité garantit la stabilité de
l’appareil et supprime les vibrations, les bruits et
les déplacements.
4. Pour régler, par l'avant, la hauteur des pieds
arrière*: vissez ou dévissez, à l'aide d'un tournevis,
les vis qui se trouvent dans la partie inférieure avant
du lave-vaisselle.
Raccordements eau et électricité
L’adaptation des installations électriques et les
travaux de plomberie de l’installation doivent être
effectués par du personnel qualifié.
Le lave-vaisselle ne doit pas écraser les tuyaux
ou le câble d’alimentation électrique.
Les tuyaux d’amenée (A) et d’évacuation (B) de
l’eau et le câble d’alimentation électrique peuvent
être orientés vers la droite ou vers la gauche pour
simplifier l’installation (
voir figure
).
Si la longueur du tuyau d’amenée ne suffit pas,
adressez-vous à un magasin spécialisé ou à un
technicien agréé (
La pression de l’eau doit être comprise entre les
valeurs reportées dans le tableau des
Caractéristiques techniques (
Faites attention à ce que le tuyau ne soit ni plié
ni écrasé.
Sécurité anti-fuite
Pour éviter tout risque d’inondation, le lavevaisselle :
- est équipé d’un dispositif qui coupe l’arrivée de
l’eau en cas d’anomalie ou de fuite à l’intérieur de
l’appareil.
- est équipé d’une sécurité
autrement dit équipé d’un tuyau d’amenée de l’eau
formé d’un tuyau extérieur transparent et d’un
tuyau intérieur rouge : les deux tuyaux supportent
des pressions très élevées. En cas de rupture du
tuyau intérieur, le tuyau extérieur devient rouge vif
et achemine l’eau à la place du tuyau intérieur,
pour éviter tout risque de fuites.
Il est très important de contrôler périodiquement
l’état du tuyau extérieur : s’il devient rouge vif, il
faut le faire changer aussitôt par le service
d’assistance technique agréé (
voir Assistance
).
voir plus bas
Water Stop
voir Assistance
).
*, il est
).
26
* Présent uniquement sur certains modèles.

Raccord du tuyau dévacuation de leau
A
Raccordez le tuyau d’évacuation, sans le plier, à
une conduite d’évacuation ayant au moins 4 cm
de diamètre. Ou bien accrochez-le au bord d’un
évier; l’extrémité libre du tuyau de vidange ne doit
pas être plongée dans l’eau.
Un coude* plastique
spécial facilite une
installation optimale :
fixez solidement le
coude au mur pour
éviter que le tuyau se
déplace et déverse
l’eau hors du conduit.
La portion de tuyau
repérée par la lettre A
doit se trouver à une distance du sol comprise
entre 40 et 100 cm (
voir figure
).
L’utilisation de tuyaux de rallonge est
déconseillé.
Nous déclinons toute responsabilité en cas de
non-respect des normes énumérées ci-dessus.
Conseils pour le premier lavage
Une fois l’installation terminée et tout de suite
avant le premier lavage, remplissez complètement
d’eau le réservoir à sel et ajoutez environ 2 kg de
voir Produit de rinçage et sel régénérant
sel (
) : il
est tout à fait normal que de l’eau déborde. De
même, il est normal qu’après avoir chargé le sel,
le voyant SEL* continue à clignoter pendant
quelques cycles de lavage.
Ruban anti-condensation*
Après avoir encastré le lave-vaisselle, ouvrez la
porte et collez le ruban adhésif transparent sous le
plan en bois pour le protéger contre la formation de
condensation.
Caractéristiques techniques
FR
Branchement électrique
Avant de brancher la fiche dans la prise de
courant, assurez-vous que :
• la prise dispose de mise à la terre et est
conforme aux normes;
• la prise est bien apte à supporter la puissance
maximale de la machine reportée sur la
plaquette signalétique fixée à la contre-porte
voir Description du lave-vaisselle
(
);
• la tension d’alimentation est bien comprise
entre les valeurs figurant sur la plaquette
signalétique de la contre-porte;
• la prise est bien compatible avec la fiche de
l’appareil. Autrement, faites remplacer la fiche
par un technicien agréé (
voir Assistance
);
n’utilisez ni rallonges ni prises multiples.
Après installation de l’appareil, le câble
d’alimentation électrique et la prise de courant
doivent être facilement accessibles.
Le câble ne doit être ni plié ni trop écrasé.
Le câble d’alimentation doit être contrôlé
périodiquement et ne doit être remplacé que par
des techniciens agréés (
voir Assistance
).
Dimensions
Capacité
Pression eau
d’alimentation
Tension
d’alimentation
Puissance totale
absorbée
Fusible
largeur 59.5 cm
hauteur 82 cm
profondeur 57 cm
12 couverts standard
30 Kpa ÷ Mpa (0,3 ÷ 10 bar)
4,3 psi – 145 psi
Voir étiquette des
caractéristiques
Voir étiquette des
caractéristiques
Voir étiquette des
caractéristiques
Cet appareil est conforme aux
Directives Communautaires
suivantes :
- 73/23/CEE du 19/02/73 (Basse
Tension) et modifications
suivantes
- 89/336/CEE du 03/05/89
(Compatibilité
Electromagnétique) et
modifications suivantes
- 97/17/CE (étiquetage)
- 2002/96/CE
* Présent uniquement sur certains modèles.
27

Description de lappareil
FR
Vue densemble
1
4
6
9
11
7
10
1. Panier supérieur
2. Bras de lavage supérieur
3. Etagères rabattables
4. Réglage hauteur du panier
5. Panier inférieur
3
2
6. Bras de lavage inférieur
7. Panier à couverts
8. Filtre lavage
9. Réservoir à sel
10. Bacs produit de lavage et réservoir à
produit de rinçage
5
11. Plaquette signalétique
8
Bandeau de commandes
Afficheur
DEPART
Voyant
PRODUIT DE
RINCAGE*
Voyant
SEL*
DIFFERE*
DEPART
DIFFERE*
Touche
Touche
ON-OFF
Voyant
DEMI-CHARGE *Voyant
Voyant
SECHAGE SUPER*
Touche
SECHAGE
SUPER*
Touche
DEMI-CHARGE
AFFICHEUR
U
V
Z
PRELAVAGE
LAVAGE
RINCAGES
SECHAGE
Touche
START/RESET
Bouton
SELECTION
PROGRAMME
Voyants
DEROULEMENT DU CYCLE
28
* Présent uniquement sur certains modèles.

Charger les paniers
Avant de charger votre lave-vaisselle, éliminez les déchets
plus importants, faire tremper dans l’eau uniquement vos
casseroles et poêles particulièrement sales, videz les verres
et les coupes de leur contenu. Après avoir chargé votre
lave-vaisselle, assurez-vous que les bras de lavage tournent
librement.
Panier inférieur
Rangez la vaisselle plus difficile à laver en suivant les
Exemples de chargement
rabattables*.
• Plats et couvercles : sur les côtés du panier.
• Casseroles et saladiers : toujours sens dessus
dessous.
• Vaisselle très creuse : en position oblique.
Pour garantir de meilleures performances de lavage et de
séchage, la surface du panier inférieur est plus rêche que
celle du panier supérieur.
et en vous servant des supports
Panier à couverts
Le panier à couverts peut varier selon le modèle de lavevaisselle.
Ranger les couteaux et les ustensiles de cuisine dans le
panier à couverts, pointes tournées vers le bas.
Si le panier est équipé de
poignées click clack* (
tirez-les vers le haut ou vers le
bas pour régler leur hauteur.
voir figure
Exemples de chargement du panier supérieur
Exemples de chargement du panier inférieur
),
FR
Pour séparer en deux le corps central* : dégagez la
poignée. Les deux ailettes sur les côtés peuvent être
séparées et accrochées au panier supérieur ou inférieur.
Insérez les deux éléments grillagés* dans le panier pour
bien séparer les couverts entre eux : insérez-les dans les
fentes, manches tournés vers le bas.
Panier supérieur
Chargez-y la vaisselle fragile et légère : verres, tasses à
thé et à café, soucoupes, saladiers bas, casseroles basses
peu sales, en suivant les
• Vaisselle légère : rangez-la de manière à ce qu’elle ne
risque pas d’être déplacée par les jets d’eau.
• Tasses et tasses à café : placez-les sur les étagères
rabattables**.
• Couteaux longs et pointus, couverts de service :
placez-les sur les étagères rabattables**.
Réglez la hauteur du panier supérieur
1
3
avant entrent elles aussi et refermez les butées (
2
4
Exemples de chargement
Pour optimiser le rangement de la
vaisselle, vous pouvez régler le
panier supérieur en position haute
ou basse :
ouvrez les butées des glissières du
panier à droite et à gauche et sortez
le panier; positionnez-le en haut ou
en bas, faites-le glisser le long des
glissières jusqu’à ce que les roues
.
voir figure
).
Etagères rabattables Baby
**
Les modèles de lavevaisselle avec Cycle Baby
sont fournis équipés
d’étagères rabattables
spéciales pour le lavage de
biberons, bagues et tétines.
Vaisselle nallant pas au lave-vaisselle
• Objets en bois, avec des manches en bois ou en corne
ou ayant des parties collées.
• Objets en aluminium, cuivre, laiton ou étain.
• Vaisselle en plastique thermorésistant.
• Porcelaines anciennes ou peintes à la main.
• Argenterie ancienne. Les pièces d’argenterie non
ancienne peuvent par contre être lavées avec un
programme délicat après s’être assuré qu’elles ne
touchent pas à d’autres métaux.
Avant tout achat de vaisselle et de couverts, nous vous
conseillons de vérifier s’ils sont bien lavables au lavevaisselle.
Lavage des poignées*
Pour laver les poignées des paniers, inférieur et supérieur :
dégagez les deux bouchons de fixation, sortez les
poignées, lavez-les à l’eau courante et fixez-les au panier à
l’aide des bouchons.
* Présent uniquement sur certains modèles.
** Leur nombre et leur position varient.
29

A
B
D
C
Mise en marche et utilisation
FR
Mettre en marche le lave-vaisselle
1. Ouvrez le robinet de l'eau.
2. Appuyez sur la touche ON-OFF : l'afficheur s'allume.
3. Dosez le produit de lavage (voir plus bas).
4. Chargez les paniers (voir Charger les paniers) et fermez la
porte.
5. Pour sélectionner le programme souhaité, tournez le bouton
SELECTION PROGRAMME dans le sens des aiguilles d'une
montre : amenez le repère en face du symbole ou du numéro
du programme.
6. Sélectionnez les options de lavage (voir plus bas).
7. Appuyez sur la touche START/RESET pour lancer le
programme : un bip de confirmation retentit. Les voyants
DEROULEMENT DU CYCLE signalent le stade d'avancement
du programme : Prélavage, lavage, rinçage, séchage.
8. A la fin, trois bips retentissent et l'afficheur visualise END.
Eteignez l'appareil en appuyant sur la touche ON-OFF, fermez
le robinet de l'eau et débranchez la fiche de la prise de
courant.
9. Ouvrez la porte et attendez quelques minutes avant de
sortir la vaisselle pour éviter de vous brûler. Déchargez les
paniers en commençant par celui du bas.
Demo*
L’affichage du message dON indique qu’un programme de
démonstration est activé. Pour le désactiver, appuyez
simultanément sur les touches START/RESET et ON-OFF, le
message dOF sera affiché.
Modification dun programme en cours
Si vous vous êtes trompé, vous pouvez modifier votre
sélection de programme à condition que ce dernier ait à peine
démarré : gardez la touche START/RESET enfoncée pendant
4 secondes. Après un bip long et trois courts, le voyant
DEROULEMENT DU CYCLE s’éteint : sélectionnez le nouveau
programme et appuyez sur la touche START/RESET pour le
faire démarrer.
Introduire de la vaisselle en cours de lavage
Appuyez sur la touche ON-OFF, ouvrez la porte en faisant
attention à la vapeur chaude qui s’échappe et introduisez
votre vaisselle. Appuyez à nouveau sur la touche de ON-OFF:
le cycle redémarre.
Interruptions accidentelles
En cas d’ouverture de la porte en cours de lavage
ou de coupure de courant, le programme s’arrête. Il
redémarre du point où il a été interrompu dès que le
courant revient ou que vous refermez la porte.
bac A : bac A :
bac A : Produit de lavage
bac A : bac A :
bac Bbac B
bac B : Produit de prélavage
bac Bbac B
1. Appuyez sur la touche D
pour ouvrir le couvercle C.
2. Pour doser le produit de
lavage reportez-vous au
tableau
Tableau des
programmes
• en poudre : bacs A et B.
• pastilles : dans le bac A
et sur le fond de la cuve, ce
qui signifie que si le
programme en prévoit 1,
placez-la dans le bac A et
fermez le couvercle; s’il en
prévoit 2, mettez la deuxième sur le fond de la cuve.
3. Eliminez les résidus de produit de lavage sur les bords du
bac et fermez le couvercle jusqu’au déclic.
:
Options de lavage*
Départ différé
Il est possible de différer de 1 à 24 heures le démarrage du
programme :
1. Appuyez sur la touche DEPART DIFFERE : à chaque
pression sur la touche, il y a affichage du temps sélectionné et
le voyant correspondant au départ différé s’allume;
2. Sélectionnez le programme et appuyez sur la touche
START/RESET: après le bip le compte à rebours démarre;
3. A l’expiration du délai d’attente, le voyant s’éteint et le
programme démarre.
Pour modifier le délai d’attente et sélectionner un temps
inférieur appuyez sur la touche DEPART DIFFERE. Pour
l’annuler, appuyez plusieurs fois de suite sur la touche jusqu’à
ce que le programme démarre et jusqu’à ce que le voyant
DEROULEMENT DU CYCLE correspondant au départ du
programme s’allume.
Demi-charge dans le panier supérieur*
Si vous avez une petite vaisselle, vous pouvez choisir le
programme demi-charge, vous ferez des économies d’eau,
d’électricité et de produit de lavage. Avant de sélectionner ce
programme, appuyez sur la touche DEMI-CHARGE : le voyant
s’allume et le lavage n’est lancé que dans le panier supérieur.
Pensez à ne ranger votre vaisselle que dans le panier
supérieur et à réduire de moitié la quantité de produit de
lavage.
Mieux vaut utiliser du produit de lavage en poudre
Charger le produit de lavage
Un bon résultat de lavage dépend aussi d’un bon dosage du
produit de lavage, suivez les conseils du fabricant. Un excès
de produit de lavage ne lave pas mieux et pollue
l’environnement.
Pour obtenir un séchage parfait, appuyez sur la touche
SECHAGE SUPER avant de sélectionner le programme. Un
bip prolongé signale l'activation de cette fonction, un bip bref
indique sa désactivation.
Si le séchage super est activé, les programmes durent plus
longtemps.
Pour obtenir des performances de lavage et de séchage
Séchage super*
optimales, utiliser des produits de lavage en poudre, du
liquide de rinçage et du sel.
* Présent uniquement sur certains modèles
30

Programmes
Tableau des programmes
Les lave-vaisselle Ariston sont équipés d’un système automatique de nettoyage des filtres qui peut prolonger la durée des programmes.
PROGRAMMES AUTO. : grâce à un capteur spécial, ce modèle de lave-vaisselle peut évaluer le degré de salissure et sélectionner
le lavage le plus efficace et le plus économique. La durée des programmes automatiques peut varier du fait de l’intervention du
capteur.
En cas de vaisselle peu sale ou précédemment rincée à l’eau, réduire considérablement la quantité de produit de lavage.
FR
Indications sur le
choix des
programmes
Vaisselle et casseroles
très sales (déconseillé
pour la vaisselle fragile)
Vaisselle et casseroles
normalement sales.
Programme standard
quotidien.
Lavage écologique à
faible consommation
d’électricité pour
vaisselle et casseroles.
Cycle économique et
rapide conseillé en cas
de vaisselle peu sale,
tout de suite après
l’usage.
Programme
Lavage
Super
Normal
Eco
Rapide
Produit de lavage
(A) = bac A
(B) = bac B
en poudre Liquide Pastilles
30 g (A)
5 g (B)
30 g (A) 30 ml (A) 1 (A)
25 g (A)
5 g (B)
25 g (A) 25 ml (A) 30’
30 ml (A)
5 ml (B)
25 ml (A)
5 ml (B)
1 (A)
1 (fond de
cuve)
1 (A)
Prélavage Séchage
•
•
•
•
•
•
Durée du
programme
(tolérance
±10% )
2 :00’
1 :40’
2 :25’
Lavage préalable dans
l’attente de compléter le
chargement au repas
suivant
Cycle de lavage pour
l’hygiène des biberons,
bagues, tétines lavés en
même temps
qu’assiettes, tasses,
verres et couverts.
Charger la vasseille
dans le panier
supérieur.
Lavage différencié dans
les deux paniers délicat
dans celui du haut pour
verres et cristallerie,
énergique dans celui du
bas pour les casseroles
Trempage
Baby
Duo Wash
12'
20 g (A) 20 ml (A)
25 g (A)
5 g (B)
25 ml (A)
5 ml (B)
1 (A)
Remarque
Pour simplifier le dosage du produit de lavage, sachez que :
1 cuillère à soupe = 15 grammes de poudre = 15 ml de liquide environ
1 cuillère à café = 5 grammes de poudre = 5 ml de liquide environ
•
•
1 :00’
1 :48’
31

Produit de rinçage
et sel régénérant
FR
N’utilisez que des produits de lavage spéciaux lavevaisselle.
N’utilisez pas de sel alimentaire ou industriel.
Si vous utilisez un produit multifonction (2 en 1, 3 en 1, 4
en 1,etc.) pas besoin d’ajouter du produit de rinçage mais
nous vous conseillons par contre d’ajouter du sel, surtout si
votre eau est dure ou très dure. Si vous n’ajoutez ni sel ni
produit de rinçage, il est normal que les voyants SEL* et
PRODUIT DE RINCAGE* continuent à clignoter.
Charger le produit de rinçage
Le produit de rinçage aide au séchage de la vaisselle car il
fait glisser l’eau de la surface et évite ainsi la formation de
traces ou de taches.
Il faut remplir le réservoir à produit de rinçage :
• dès que vous voyez qu’il est vide à travers l’indicateur
optique (H). Indicateur clair : ajoutez du produit de
rinçage; indicateur foncé : produit de rinçage suffisant;
• quand le voyant PRODUIT DE RINCAGE* du bandeau
se met à clignoter;
1. Ouvrez le réservoir en
H
Ne JAMAIS verser le liquide de rinçage directement à
l’intérieur de la cuve.
Réglez la dose de produit de rinçage
Si le résultat du lavage ou du séchage n’est pas satisfaisant,
vous pouvez régler la dose de produit de rinçage. A l’aide
d’un tournevis agissez sur le dispositif de réglage (F) et
amenez-le sur une des 6 positions au choix (il est réglé en
usine sur 4) :
• si vous remarquez des traces bleuâtres sur votre vaisselle,
amenez-le sur des chiffres plus bas (1-3).
• s’il y a des gouttes d’eau ou des taches de calcaire,
amenez-le sur des chiffres plus élevés (4-6).
En cas d’utilisation de pastilles multifonction (2 en 1, 3 en
1, 4 en 1,etc.) et pour obtenir un meilleur séchage,
remplissez tout de même le réservoir et réglez sur la
position 2.
tournant le couvercle (G) dans
le sens inverse des aiguilles
d’une montre.
2. Versez le produit de rinçage
sans le faire déborder. Si cela
F
se produit, nettoyez aussitôt
avec une éponge.
G
3. Revissez le couvercle.
doit être rempli :
• quand le flotteur vert* n’est plus visible à travers le
couvercle du sel;
• quand le voyant SEL* du bandeau se met à clignoter;
• si votre appareil est dépourvu de voyant ou de flotteur
vert :
environ tous les 30 cycles de lavage;
1. Sortez le panier inférieur et
dévissez le couvercle du réservoir
dans le sens inverse des aiguilles
d’une montre.
2. Lors de la première utilisation :
remplissez le réservoir d’eau
jusqu’au bord.
3. Utilisez l’entonnoir fourni avec
l’appareil (
jusqu’au bord (2 kg environ); il est tout à fait normal que de
l’eau déborde.
4. Enlevez l’entonnoir, éliminez les résidus de sel sur le
filetage et vissez bien le couvercle pour éviter que du produit
de lavage pénètre à l’intérieur du réservoir pendant le lavage
(cela pourrait endommager irrémédiablement l’adoucisseur).
Lors de rajout de sel, démarrez aussitôt un cycle de
lavage à vide pour éliminer la solution saline qui a débordé
et éviter ainsi toute corrosion.
voir figure
) pour remplir le réservoir de sel
Régler la dose de sel*
Vous pouvez régler la dose de sel en fonction de la dureté
de votre eau, vous pouvez demander ce renseignement à
l’organisme distributeur de l’eau potable.
1. Dévissez le bouchon du réservoir.
2. Tournez la flèche située sur la
Position
sélect eur
voir figure
collerette (
en suivant les indications
du tableau suivant :
Duret é de l’eau
°dH °fH °mmol /l
0 - 10 0 - 17 0 - 1,7 / 0 /
10 25 18 44 1,8 4,4 - 20 60
25 50 45 89 4,5 8,9 MED 40 40
> 50 > 89 > 8,9 + 60 25
) vers + ou vers –
Consommation
sel
(grammes/cycle)
Autonomie
(cycl es/2Kg)
Charger le sel régénérant
Pour obtenir de bons résultats de lavage, veillez à ce que le
réservoir à sel ne soit jamais vide. Le sel régénérant élimine
le calcaire présent dans l’eau et évite ainsi qu’il ne se
dépose sur la vaisselle. Le réservoir à sel qui se trouve
dans la partie inférieure du lave-vaisselle (
32
voir Description
- L’adoucisseur est réglé en usine sur +.
En cas d’utilisation de pastilles multifonction (2 en 1, 3 en 1,
4 en 1,etc.) remplissez tout de même le réservoir de sel et
réglez sur –; si la dureté de l’eau dépasse 60°fH, réglez sur
+.
)
* Présent uniquement sur certains modèles.

A
B
C
Entretien et soin
Coupure de larrivée deau et de
courant
• Fermez le robinet de l’eau après chaque lavage
pour éviter tout risque de fuites.
• Débranchez la fiche de la prise de courant
quand vous nettoyez votre appareil et pendant
tous vos travaux d’entretien.
Nettoyer le lave-vaisselle
• Pour nettoyer l’extérieur et le bandeau de
commande, utiliser un chiffon humide d’eau non
abrasif. N’utiliser ni solvants ni abrasifs.
• Pour nettoyer la cuve intérieure et enlever toute
tache, utilisez un chiffon imbibé d’eau
additionnée d’un peu de vinaigre.
Eviter les mauvaises odeurs
• Laissez toujours la porte entrouverte pour éviter
toute stagnation d’humidité.
• Nettoyez régulièrement les joints d’étanchéité
de la porte et des bacs à produits de lavage
avec une éponge humide. Vous éviterez ainsi
le dépôt de déchets d’aliment qui sont les
principaux responsables de la formation de
mauvaises odeurs.
Nettoyer les bras de lavage
Il peut arriver que des
déchets restent collés
aux bras de lavage et
bouchent les orifices
de sortie de l’eau :
mieux vaut les
contrôler de temps en
temps et les nettoyer
avec une petite brosse
non métallique.
Nettoyer les filtres
Les filtres débarrassent l’eau de lavage des
résidus d’aliment et la remettent en circulation :
pour obtenir de bons résultats de lavage, il faut
les nettoyer.
Nettoyez les filtres régulièrement.
Après le nettoyage, vérifiez que le groupe filtrant
ait été correctement monté.
N’utilisez pas votre lave-vaisselle sans filtres ou
avec filtre mal fixé.
1. Sortez les filtres en tirant la poignée vers le
haut.
2. Nettoyer les filtres :
• après chaque
lavage, débarrassez le
C
1
2
A
B
nettoyer, servez-vous d’une petite brosse non
métallique.
3. Remontez le groupe filtrant et remettez-le à sa
place en suivant dans l’ordre les mouvements 1 et
2, illustrés (voir figure) jusqu’au déclic.
plat semi-circulaire A
et le gobelet B (tirez
sur la poignée pour les
dégager) des déchets
plus importants et
rincez-les à l’eau
courante.
• nettoyez
soigneusement, une
fois par mois, tout le
groupe filtrant : plat
semi-circulaire A,
gobelet B et filtre
cylindrique C (pour le
sortir tournez-le dans
le sens inverse des
aiguilles d’une
montre). Pour le
FR
Si vous vous absentez pendant une
longue période
• Effectuez un lavage à vide
• Débranchez les raccordements électriques et
hydrauliques.
• Laissez la porte entrouverte.
33

Précautions et conseils
FR
Cet appareil a été conçu et fabriqué
conformément aux normes internationales de
sécurité. Ces avertissements sont fournis pour
des raisons de sécurité, il faut les lire
attentivement.
Sécurité générale
• Cet appareil est conçu pour un usage de type
non professionnel à l’intérieur d’une habitation.
• Cet appareil est destiné au lavage de vaisselle
à usage domestique, il ne doit être utilisé que
par des adultes et selon les instructions
reportées dans cette notice.
• N’installez pas l’appareil à l’extérieur, même
dans un emplacement protégé, car il est
extrêmement dangereux de l’exposer à la pluie
et aux orages.
• Ne touchez pas au lave-vaisselle pieds nus.
• Ne tirez jamais sur le câble pour débrancher la
fiche de la prise de courant.
• Fermez le robinet de l’eau et débranchez la
fiche de la prise de courant avant d’effectuer
tous travaux de nettoyage et d’entretien.
• En cas de panne, n’essayez en aucun cas
d’accéder aux mécanismes internes pour tenter
de la réparer.
• Ne touchez jamais à la résistance.
• Ne pas s’appuyer à la porte ouverte ou s’y
asseoir : l’appareil pourrait basculer.
• Gardez les produits de lavage et de rinçage
hors de la porte des enfants.
• Les emballages ne sont pas des jouets pour
enfants.
Enlèvement des appareils ménagers
usagés
La Directive Européenne 2002/96/EC sur les
Déchets des Equipements Electriques et
Electroniques (DEEE), exige que les appareils
ménagers usagés ne soient pas jetés dans le flux
normal des déchets municipaux. Les appareils
usagés doivent être collectés séparément afin
d'optimiser le taux de récupération et le recyclage
des matériaux qui les composent et réduire
l'impact sur la santé humaine et l'environnement.
Le symbole de la ''poubelle barrée'' est apposée
sur tous les produits pour rappeler les obligations
de collecte séparée.
Economies et respect de
lenvironnement
Faire des économies d’eau et d’électricité
• Ne faites fonctionner votre lave-vaisselle que
quand il est rempli au maximum de sa
capacité. Dans l’attente de remplir votre
machine, lancez le cycle de Trempage pour
éviter la formation de mauvaises odeurs (
Programmes
• Sélectionnez un programme adapté au type de
vaisselle et à son degré de salissure,
consultez pour cela le
programmes
- pour de la vaisselle normalement sale,
choisissez le programme Eco (économique), il
limite la quantité d’eau et d’électricité utilisées.
- pour une quantité réduite de vaisselle,
choisissez l’option Demi-charge (
marche et utilisation
• Si votre contrat de fourniture d’électricité
prévoit des tranches horaires à prix réduit,
effectuez vos lavages pendant ces heures
creuses. L’option Départ différé* (
marche et utilisation
organiser vos lavages dans ce sens.
Produits de lavage sans phosphates, sans
chlore et aux enzymes
• Il est vivement conseillé d’utiliser des produits
de lavage sans phosphates et sans chlore,
plus indiqués pour la protection de
l’environnement.
• Les enzymes développent une action
particulièrement efficace à des températures
avoisinant 50°C, les produits de lavage aux
enzymes permettent donc de sélectionner des
lavages à de basses températures et d’obtenir
les mêmes résultats qu’à une température de
65°C.
• Pour bien doser le produit de lavage, tenez
compte des indications du fabricant, de la
dureté de votre eau, de la quantité de vaisselle
et de son degré de salissure pour éviter tout
gaspillage. Bien que biodégradables, les
produits de lavage contiennent des éléments
qui altèrent l’équilibre de la nature.
).
Tableau des
:
voir Mise en
).
voir Mise en
) peut vous aider à
voir
Les consommateurs devront contacter les
autorités locales ou leur revendeur concernant la
démarche à suivre pour l'enlèvement de leur vieil
appareil.
34
* Présent uniquement sur certains modèles.

Anomalies et remèdes
Si votre appareil présente des anomalies de fonctionnement, procédez aux contrôles suivants avant de
prendre contact avec le service d’assistance technique (
voir Assistance
).
Certaines anomalies sont signalées par des codes spéciaux qui se mettent à clignoter sur l’afficheur :
prenez note des codes qui clignotent avant de faire appel au service d’assistance technique.
Anomalies Causes / Solutions possibles :
Le lave-vaisselle ne démarre
pas.
Il ny a pas darrivée deau.
Le lave-vaisselle ne vidange
pas.
Le lave-vaisselle est bruyant.
La vaisselle et les verres
présentent des dépôts de
calcaire ou une couche
blanchâtre.
La vaisselle et les verres
présentent des traces
blanches ou des reflets
bleuâtres.
La vaisselle nest pas bien
séchée.
La vaisselle nest pas propre.
Alarme robinet fermé.
(des bips sont émis)
(le code A06 clignote sur lafficheur).
Alarme filtres bouchés
(le code A05 clignote sur
lafficheur).
Alarme électrovanne
darrivée de leau en panne
(le code A02 clignote sur
lafficheur).
La fiche nest pas bien branchée dans la prise ou il y a une
coupure de courant.
La porte du lave-vaisselle nest pas bien fermée.
Un Départ différé (voir Mise en marche et utilisation) a été
sélectionné.
Il y a une coupure deau.
Le tuyau darrivée de leau est plié (voir Installation).
Le programme nest pas encore terminé.
Le tuyau de vidange est plié (voir Installation).
Lévacuation de lévier est bouchée.
Le filtre est bouché par des déchets de nourriture.
La vaisselle sentrechoque ou butte contre les bras de lavage.
Il manque du sel régénérant ou son réglage nest pas adapté à la
dureté de leau (voir Produit de rinçage et sel).
Le couvercle du réservoir à sel nest pas bien fermé.
Il ny a plus de produit de rinçage ou son dosage est insuffisant.
La vaisselle est en matériau antiadhésif.
Le dosage du produit de rinçage est excessif.
Il ny a plus de produit de rinçage ou son dosage est insuffisant
(voir Produit de rinçage et sel).
Le réglage du produit de rinçage nest pas approprié.
Vous avez sélectionné un programme sans séchage.
Les paniers sont trop chargés (voir Charger les paniers).
La vaisselle nest pas bien rangée.
Les bras de lavage ne tournent pas librement.
Le programme de lavage nest pas assez puissant (voir
Programmes).
Le produit de lavage nest pas bien dosé ou nest pas approprié
(voir Mise en marche et utilisation).
Le filtre est sale ou bouché (voir Entretien et soin).
Il manque du sel régénérant (voir Produit de rinçage et sel).
Ouvrez le robinet, lappareil se mettra en marche au bout de
quelques minutes.
Lappareil sest bloqué car vous navez pas donné suite aux bips
davertissement. Eteignez lappareil à laide de la touche
ON/OFF, ouvrez le robinet et au bout de 20 secondes rallumez
en appuyant à nouveau sur la même touche. Reprogrammez
lappareil et remettez-le en marche.
Eteignez lappareil à laide de la touche ON/OFF et nettoyez les
filtres (voir Entretien), puis rallumez en appuyant à nouveau sur
la même touche. Reprogrammez lappareil et remettez-le en
marche.
Eteignez lappareil à laide de la touche ON/OFF et rallumez au
bout dune minute. Si lalarme continue, fermez le robinet de
leau pour éviter tout risque dinondation, débranchez la fiche de
la prise de courant et prenez contact avec le service
dassistance technique.
FR
35

Service
FR
Avant d'appeler le service après-vente :
• Vérifiez si vous ne pouvez pas résoudre vousmême le problème (voir Anomalies et
remèdes).
• Remettez le programme en marche pour
contrôler si l'inconvénient a disparu.
• Autrement, contactez le service d'Assistance
technique agréé au numéro de téléphone
indiqué sur le certificat de garantie.
Ne vous adressez jamais à des techniciens non
agréés.
Communiquer :
• le type de panne
• le modèle de la machine (Mod.)
• le numéro de série (S/N)
Vous trouverez ces renseignements sur l'étiquette
signalétique appliquée sur le côté de la porte inox
(voir Description du lave-vaisselle).
36

Bedienungsanleitung
Inhaltsverzeichnis
DE
Installation, 38-39
Deutsch, 37
Positionierung und Nivellierung
Wasser- und Elektroanschlüsse
Technische Daten
Beschreibung Ihres Geschirrspülers, 40
Geräteansicht
Bedienblende
Beschickung der Körbe, 41
Unterkorb
Besteckkorb
Oberkorb
Start und Inbetriebnahme, 42
So starten Sie Ihren Geschirrspüler
Einfüllen des Spülmittels
Spüloptionen
GESCHIRRSPÜLER
LZ 705 EXTRA
Spülprogramme, 43
Programmtabelle
Klarspüler und Regeneriersalz, 44
Einfüllen des Klarspülers
Einfüllen des Regeneriersalzes
Reinigung und Pflege, 45
Abstellen der Wasser- und Stromversorgung
Reinigung des Geschirrspülers
Vermeidung von Geruchsbildung
Reinigung der Sprüharme
Reinigung der Filtersiebe
Was tun, bevor Sie für längere Zeit verreisen
Vorsichtsmaßregeln und Hinweise, 46
Allgemeine Sicherheit
Entsorgung von Elektroaltgeräten
Energie sparen und Umwelt schonen
Störungen und Abhilfe, 47
Kundendienst, 48
Bevor Sie sich an den Kundendienst wenden

Installation
DE
Es ist äußerst wichtig, diese Bedienungsanleitung
sorgfältig aufzubewahren, um sie jederzeit zu Rate
ziehen zu können. Sorgen Sie dafür, dass sie im Falle
eines Umzugs oder Übergabe an einen anderen
Benutzer das Gerät stets begleitet.
Lesen Sie bitte folgende Hinweise aufmerksam
durch, sie liefern wichtige Informationen hinsichtlich
der Installation, dem Gebrauch und der Sicherheit.
Im Falle eines Umzugs sollte das Gerät möglichst in
vertikaler Position transportiert werden, falls
erforderlich, neigen Sie das Gerät zur Rückseite hin.
Positionierung und Nivellierung
1. Nehmen Sie das Verpackungsmaterial ab und prüfen
Sie Ihr Gerät auf eventuelle Transportschäden.
Schließen Sie das Gerät im Falle einer Beschädigung
bitte nicht an, sondern fordern Sie den Kundendienst an.
2. Stellen Sie das Gerät so auf, dass es mit den
Seitenteilen oder mit der Rückwand an den
anliegenden Möbeln oder an der Wand anlehnt. Das
Gerät kann auch unter einer durchlaufenden
Arbeitsplatte eingebaut werden* (
Montageanleitung
3. Stellen Sie den Geschirrspüler auf einem ebenen
und festen Boden auf. Gleichen Sie eventuelle
Unebenheiten durch Anziehen oder Lösen der
Stellfüße aus, bis das Gerät eben steht (eine Neigung
von 2 Grad darf nicht überschritten werden). Eine
präzise Nivellierung verleiht dem Gerät die
erforderliche Stabilität, durch die Vibrationen,
Betriebsgeräusche und ein Verrücken des Gerätes
vermieden werden.
).
siehe
Der Wasserzulaufschlauch (A), der
Wasserablaufschlauch (B) und das Netzkabel können
sowohl nach rechts als auch nach links ausgerichtet
werden, wodurch eine optimale Installation
gewährleistet wird (
siehe Abbildung
).
Anschluss des Zulaufschlauchs
• An einen Kaltwasserhahn: Schrauben Sie den
Wasserzulaufschlauch fest an einen mit ¾“Gewindeanschluss versehenen Hahn; bevor Sie
ihn jedoch anschrauben, lassen Sie Wasser
auslaufen, bis klares Wasser austritt, um das Gerät
vor Verstopfen durch Unreinheiten zu bewahren.
• An einen Warmwasserhahn: Im Falle einer
Zentralheizungsanlage kann der Geschirrspüler
auch durch heißes Leitungswasser gespeist
werden, vorausgesetzt dass die Temperatur 60°C
nicht übersteigt.
Schrauben Sie den Schlauch an den Wasserhahn,
so wie für den Anschluss an den Kaltwasserhahn
beschrieben.
Sollte der Zulaufschlauch nicht lang genug sein,
dann wenden Sie sich bitte an einen Fachhändler
oder an einen autorisierten Techniker (
Kundendienst
Der Wasserleitungsdruck muss innerhalb der in der
Tabelle der technischen Daten (
angegebenen Werte liegen.
Der Schlauch darf nicht eingeklemmt oder
abgeknickt werden.
).
siehe
siehe unten
)
Schutz vor Überschwemmungen
4. Regulieren Sie die Höhe der hinteren Stellfüße von
vorne*: Schrauben Sie die sich im unteren Teil des
Geschirrspülers befindlichen Schrauben mit einem
Schraubenzieher heraus bzw. hinein.
Wasser- und Elektroanschlüsse
Die Anpassung der Elektro- und Wasseranlagen zur
Installation des Gerätes darf nur durch Fachpersonal
erfolgen.
Der Geschirrspüler darf nicht auf Rohrleitungen oder
auf dem Netzkabel aufstützen.
A
60
100
38
12083
121168
148
B
Um Überschwemmungen auszuschließen, wurde der
Geschirrspüler:
- mit einem System versehen, dank dessen der
Wasserzulauf bei Anomalien oder internem
Wasserverlust unterbrochen wird;
- mit einem
d.h. er ist mit einem Wasserzulaufschlauch bestückt,
der aus einem durchsichtigen Außenschlauch und
einem roten Innenschlauch besteht; beide Schläuche
halten einem äußerst hohen Wasserdruck stand. Bei
Beschädigung des Innenschlauchs verfärbt sich der
Außenschlauch leuchtend rot und leitet das Wasser,
anstelle des Innenschlauchs, in den Geschirrspüler,
wodurch Austreten von Wasser vermieden wird.
Es ist äußerst wichtig, den Außenschlauch
regelmäßig zu kontrollieren. Hat er eine leuchtend
rote Farbe angenommen, muss er schnellstmöglich
durch das Kundendienstpersonal ausgetauscht
werden (
*Nur an einigen Modellen
Water Stop
siehe Kundendienst
*-Schutzsystem ausgerüstet,
).

Anschluss des Ablaufschlauchs
Schließen Sie den Ablaufschlauch, ohne ihn zu
krümmen, an eine Ablaufleitung mit
Mindestdurchmesser von 4 cm an. Oder hängen Sie
ihn in ein Becken oder eine Wanne ein; das freie
Ablaufschlauchende darf nicht unter Wasser bleiben.
Der spezielle
A
Kunststoffbügel*
erleichtert Ihnen eine
optimale Anbringung.
Befestigen Sie den
Kunststoffbügel so an
der Mauer, dass er nicht
verrutscht und somit
kein Wasser außerhalb
des Ablaufs austritt.
Der mit dem
Buchstaben A versehene Schlauchteil muss auf einer
Höhe von 40 - 100 cm vom Boden liegen (
Abbildung
Es sollten keine Verlängerungsschläuche verwendet
werden.
).
siehe
Stromanschluss
Vor Einfügen des Netzsteckers in die Steckdose ist
sicherzustellen, dass:
• die Steckdose über eine normgerechte Erdung
verfügt;
Das Netzkabel muss regelmäßig kontrolliert und darf
nur durch autorisierte Techniker ausgetauscht werden
siehe Kundendienst
(
Der Hersteller übernimmt keinerlei Haftung, sollten
diese Vorschriften nicht genau beachtet werden.
).
Hinweise zur ersten Inbetriebnahme
Füllen Sie nach der Installation des Gerätes und direkt
vor dem ersten Spülgang den Salzbehälter ganz mit
Wasser und fügen Sie ca. 2 kg Salz hinzu (
Klarspüler und Regeneriersalz
dass Wasser austritt. Es ist ebenfalls ganz normal,
dass nach Einfüllen des Salzes die Kontrollleuchte
der SALZNACHFÜLLANZEIGE* noch für einige
weitere Spülgänge blinkt.
): Es ist völlig normal,
siehe
Kondensationsschutzstreifen*
Öffnen Sie nach dem Einbau des Geschirrspülers die
Gerätetür und bringen Sie den transparenten
Klebestreifen unter dem Holzbord an, um es vor
eventuellem Kondenswasser zu schützen.
Technische Daten
Breite 59.5 cm
Abmessungen
Fassungsvermögen
Höhe 82 cm
Tiefe 57 cm
12 Maßgedecke
DE
• die Netzsteckdose die auf dem Typenschild
(befindlich auf der Innentür) angegebene max.
Leistungsaufnahme des Gerätes trägt (
Beschreibung Ihres Geschirrspülers
• die Versorgungsspannung den auf dem
Typenschild (auf der Innentür) vermerkten Werten
entspricht;
• die Steckdose mit dem Netzstecker des Gerätes
kompatibel ist. Andernfalls muss der Netzstecker
seitens eines autorisierten Technikers
ausgetauscht werden (
verwenden Sie bitte keine Verlängerungen oder
Vielfachstecker.
Der Netzstecker, das Netzkabel und die Steckdose
sollten bei installiertem Gerät leicht zugänglich sein.
Das Netzkabel darf nicht gebogen bzw. eingeklemmt
werden.
siehe Kundendienst
siehe
);
),
Wasserversorgungsdruck
Versorgungsspannung
Maximale
Leistungsaufnahme
Schmelzsicherung
*Nur an einigen Modellen
30 KPa÷1MPa (0,3 ÷10 bar)
4.3 psi – 145 psi
Siehe Typenschild
Siehe Typenschild
Siehe Typenschild
Dieses Gerät entspricht
folgenden EG-Richtlinien:
- 73/23/EWG vom 19.02.73
(Niederspannung) und
nachfolgenden Änderungen;
- 89/336/EWG vom 03.05.89
(elektromagnetische
Verträglichkeit) und
nachfolgenden Änderungen.
- 97/17/EG (Etikettierung)
- 2002/96/EC
39

Beschreibung Ihres
Geschirrspülers
DE
Geräteansicht
1
4
6
9
11
7
10
1. Oberkorb
2. Oberer Sprüharm
3. Hochklappbare Ablagen
4. Einstellung der Korbhöhe
5. Unterkorb
3
2
6. Unterer Sprüharm
7. Besteckkorb
8. Spülsiebe
9. Salzbehälter
10. Spülmittelkammern und Klaspülerbehälter
11. Typenschild
5
8
Bedienblende
Display
KLARSPÜLER-
Nachfüllanzeige
SALZ-
Nachfüllanzeige
STARTZEITVORWAHL
Kontrollleuchte
Taste
STARTZEITVORWAHL*
DISPLAY
U
V
Z
Taste
ON-OFF
EIN/AUS
Kontrollleuchte
**
*
**
HALBE FÜLLUNG OBERKORB*
Kontrollleuchte
EXTRA TROCKEN*
VORSPÜLEN
SPÜLEN
KLARSPÜLEN
TROCKNEN
Taste
EXTRA
TROCKEN*
Taste
HALBE FÜLLUNG*
Knopf
PROGRAMMWÄLHER
SPÜLPHASEN-
Anzeigeleuchten
Taste
START/RESET
40
*Nur an einigen Modellen

Beschickung der Körbe
Bevor Sie das Geschirr in den Geschirrspüler einräumen,
befreien Sie es von den Speiserückständen, weichen Sie
verkrustete Töpfe und Pfannen nur in klarem Wasser ein,
entleeren Sie Gläser und Schalen von Getränkeresten.
Stellen Sie nach Einräumen des Geschirrs sicher, dass sich
die Sprüharme frei bewegen können.
Unterkorb
Ordnen Sie das schwerer zu reinigende Geschirr gemäß
den
Beschickungs-Beispielen
klappbaren Ablagen ein*.
• Servierteller und Deckel: am Rand des Geschirrkorbes.
• Töpfe, Salatschüsseln: immer umgestülpt.
• Sehr tiefe Geschirrteile: in Schrägstellung.
Zur Gewährleistung besserer Leistungen und Trocknung,
ist die Oberfläche des Unterkorbes rauher konzipiert, als
die des Oberkorbs.
und unter Verwendung der
Besteckkorb
Der Besteckkorb kann unterschiedlicher Ausführung sein, je
nach Geschirrspülermodell.
Messer und spitze Küchengegenstände sollten stets mit
nach unten gerichteten Spitzen in den Besteckkorb
eingeordnet werden.
Verfügt der Korb über „KlickKlack“-Griffe* (
dann verstellen Sie diese nach
unten oder oben, um die Höhe
einzustellen.
siehe Abbildung
Beschickungsbeispiele für den Oberkorb
Beschickungsbeispiele für den Unterkorb
),
DE
Um den zentralen Korpus* zu teilen, ziehen Sie den Griff ab.
Die beiden seitlichen Flügel* können abgenommen, und in
den Ober- oder Unterkorb eingehängt werden.Die beiden
gitterförmigen Teile* werden auf den Besteckkorb gesetzt,
um das Besteck getrennt zu halten. Stecken Sie sie in die
Schlitze mit nach unten gerichteten Griffen.
Oberkorb
Räumen Sie in diesen empfindliches und leichtes Geschirr
ein, wie Gläser, Tee- und Mokkatassen, Untertassen, flache
Schüsseln, Pfannen, flache, nur leicht verschmutzte Töpfe
gemäß den
• Leichtes Geschirr: Ordnen Sie dieses so ein, dass es
vom Wasserstrahl nicht umgeworfen werden kann.
• Tassen und Mokkatassen: auf den hochklappbaren
Ablagen**.
• Lange und spitze Messer, Servierbesteck: auf den
hochklappbaren Ablagen**.
Höheneinstellung des Oberkorbes
Um das Einordnen des Geschirrs zu vereinfachen, kann
über die Führungen nach hinten gleiten und schieben Sie
hierbei auch die Vorderräder ein; schließen Sie die
Arretierstifte (
Beschickungsbeispielen
1
3
2
4
siehe Abbildung
.
der Oberkorb je nach Bedarf in
Hoch- oder Niedrigstellung
eingeschoben werden.
Öffnen Sie den rechten und linken
Arretierstift der Korbführungen und
ziehen Sie den Korb heraus;
schieben Sie ihn in Hoch- oder
Niedrigstellung ein; lassen Sie ihn
).
Hochklappbare Ablagen Baby**
Bei den Geschirrspülermodellen,
die einen Spülzyklus “Baby”
vorsehen, werden
entsprechende hochklappbare
Ablagen mitgeliefert, auf die
Babyflaschen, Sauger und
Schnuller gegeben werden
können.
Nicht geschirrspülergeeignetes Geschirr
• Gegenstände aus Holz, mit Holzgriffen, aus Horn, oder
mit geleimten Teilen.
• Gegenstände aus Aluminium, Kupfer, Messing, Zinn.
• Nicht hitzefestes Geschirr aus Kunststoff.
• Antikes, oder handbemaltes Porzellan.
• Antike Silberwaren. Nicht antike Silberwaren dagegen
können im Geschirrspüler gespült werden. Stellen Sie
ein sanftes Programm ein, und vermeiden Sie den
Kontakt mit anderem Metall.
Achten Sie beim Kauf von Geschirr und Besteck darauf,
dass es spülmaschinenfest ist.
Reinigung der Griffe*
Zur Reinigung der Ober- und Unterkorbgriffe ziehen Sie die
beiden Befestigungsstöpsel heraus, nehmen die Griffe ab
und reinigen Sie diese unter fließendem Wasser. Befestigen
Sie sie abschließend wieder mittels der Stöpsel am Korb.
* Nur an einigen Modellen.
** In unterschiedlicher Anzahl und Platzierung.
41

Start und
Inbetriebnahme
DE
So starten Sie Ihren Geschirrspüler
1. Öffnen Sie den Wasserhahn.
2. Drücken Sie die Taste ON-OFF: Das Display schaltet sich
ein.
3. Dosieren Sie das Spülmittel (siehe unten).
4. Befüllen Sie die Geschirrkörbe (siehe
Beschickungsbeispiele) und schließen Sie die Gerätetür.
5. Wählen Sie ein Programm aus, indem Sie den
Schalterknopf PROGRAMMWAHL im Uhrzeigersinn drehen:
Stellen Sie die sich auf dem Knopf befindliche Bezugskerbe
auf die Programmnummer bzw. das Programmsymbol.
6. Wählen Sie die Spüloptionen (siehe unten).
7. Setzen Sie das Programm durch Drücken der Taste
START/RESET in Gang. Es ertönt ein kurzes BestätigungsTonsignal. Die SPÜLPHASEN-Anzeigeleuchten zeigen den
Programmstand an: Vorspülen, Spülen, Klarspülen,
Trocknen.
8. Abschließend vernehmen Sie drei kurze Signaltöne und
auf dem Display erscheint die Anzeige END. Schalten Sie
das Gerät mittels der Taste ON-OFF aus, schließen Sie den
Wasserhahn und ziehen Sie den Stecker aus der
Steckdose.
9. Öffnen Sie die Gerätetür und warten Sie einige Minuten,
bevor Sie das Geschirr herausnehmen. Sie könnten sich
daran verbrennen. Entleeren Sie die Körbe, beginnen Sie
mit dem Unterkorb.
Demo*
Die Anzeige dON auf dem Display ist ein Zeichen dafür,
dass der Vorführmodus eingestellt ist. Um diesen zu
deaktivieren drücken Sie gleichzeitig die Tasten START/
RESET und ON-OFF, daraufhin erscheint die Anzeige dOF.
Änderung eines laufenden Programms
Sollten Sie irrtümlich ein falsches Programm gewählt haben,
dann kann es noch geändert werden, vorausgesetzt, es
wurde gerade erst in Gang gesetzt. Halten Sie die Taste
START/RESET für mindestens 4 Sekunden gedrückt. Nach
einem langen und 3 kurzen Bip-Tönen erlischt die
SPÜLPHASEN-Anzeigeleuchte: Wählen Sie das neue
Programm, und setzen Sie es durch Druck auf die Taste
START/RESET in Gang.
Hinzufügen von weiterem Geschirr
Drücken Sie die ON-OFF-Taste, öffnen Sie die Gerätetür,
Vorsicht, es könnte heißer Dampf austreten, und räumen Sie
das Geschirr ein. Drücken Sie die ON-OFF-Taste erneut:
Das Spülprogramm läuft weiter.
Unbeabsichtigtes Unterbrechen eines
Spülprogramms
Wird während des Spülgangs die Gerätetür geöffnet, oder
sollte ein Stromausfall stattfinden, wird der Spülgang
unterbrochen. Wird die Gerätetür geschlossen, oder setzt
der Stromkreislauf wieder ein, läuft das Programm dort
weiter, wo es unterbrochen wurde.
Einfüllen des Spülmittels
Ein gutes Spülergebnis hängt auch von einer korrekten
Spülmitteldosierung gemäß der Angabe der Herstellerfirma
ab. Eine zu hohe Dosierung ist nicht gleichzusetzen mit
einem besseren Spülergebnis, man belastet dadurch nur
die Umwelt.
Die besten Spül- und Trockenergebnisse erhalten Sie nur
durch Einsatz von Spülmitteln in Pulverform, flüssigen
Klarspülern und Salz.
Kammer AKammer A
Kammer A: Spülmittel für den Hauptspülgang
Kammer AKammer A
Kammer BKammer B
Kammer B: Spülmittel für den Vorspülgang
Kammer BKammer B
D
A
B
C
es dagegen 2 Tabs, dann geben Sie den zweiten Tab auf
den Geräteboden.
3. Entfernen Sie eventuelle Spülmittelrückstände von den
Kanten der Kammern und schließen Sie den Deckel so,
dass er einrastet.
1. Öffnen Sie den Deckel C und
drücken Sie die Taste D.
2. Hinsichtlich der Dosierung
verweisen wir auf die
Programmtabelle
• Spülpulver: Kammern A und B.
• Spültabs: Kammer A und
Geräteboden; erfordert das
Spülprogramm 1 Tab, geben Sie
diesen in Kammer A und
schließen den Deckel. Erfordert
:
Spüloptionen
Startzeitvorwahl
Der Start des Spülprogramms kann um 1 bis 24 Std.
verschoben werden.
1. Drücken Sie die Taste STARTZEITVORWAHL. Ein jeder
Druck verzögert den Start um 1 Stunde; die der gewählten
Zeit entsprechende Kontrollleuchte leuchtet auf.
2. Wählen Sie das Spülprogramm und drücken Sie die
Taste START/RESET. Nach einem kurzen Bip-Ton setzt sich
die rücklaufende Zeitrechnung in Gang.
3. Ist die Zeit abgelaufen, erlischt die Anzeigeleuchte und
das Spülprogramm startet.
Zur Änderung der Startzeit und Wahl eines früheren Starts
drücken Sie die Taste STARTZEITVORWAHL. Um sie zu
löschen drücken Sie die Taste so oft, bis das Programm
startet und die dem Anfang desselben entsprechende
SPÜLPHASENANZEIGELEUCHTE aufleuchtet.
Halbe Gerätefüllung im Oberkorb*
Haben Sie nur wenig Geschirr zu spülen, wählen Sie den
Spülgang "Halbe Füllung". Sie sparen Wasser, Strom und
Spülmittel. Drücken Sie vor der Wahl des Spülprogramms
die Taste HALBE FÜLLUNG. Die Kontrollleuchte leuchtet
daraufhin auf und es wird ein Spülgang nur für den
Oberkorb aktiviert.
Achten Sie darauf, nur den Oberkorb zu füllen und nur die
Hälfte des Spülmittels einzugeben.
In diesem Fall empfiehlt sich der Einsatz von Spülpulver.
Extratrocken*
Für ein perfektes Trocknen des Geschirrs drücken Sie die
Taste EXTRATROCKEN vor der Programmwahl. Ein
längeres akustisches Signal gibt an, dass diese Option
aktiviert wurde; ein kurzer Signalton meldet dagegen, dass
sie ausgeschaltet wurde.
Mit der Option Extratrocknen dauern die Programme
länger.
*Nur an einigen Modellen
42

Spülprogramme
Programmtabelle
Die Ariston-Geschirrspüler sind mit einem automatischen Siebfilter-Reinigungssystem ausgestattet, die Dauer der
Spülprogramme könnte hierdurch verlängert werden.
AUTOMATIK-PROGRAMME: Dieses Geschirrspülgerät ist mit einem Spezialfühler ausgestattet, der in der Lage ist, den
Verschmutzungsgrad zu erfassen, diesen auszuwerten und demnach das effektiv und wirtschaftlich geeignetste
Spülprogramm einzustellen. Die Dauer der Automatik-Programme kann wegen des Ansprechens des Sensors variieren.
Für nur leicht verschmutztes Geschirr, oder für Geschirr, das vorher unter laufendem Wasser abgespült wurde, kann die
Spülmittelmenge erheblich reduziert werden.
Hinweise zur
Programmwahl
Stark verschmutztes
Geschirr, Töpfe und
Pfannen (nicht geeignet
für empfindliches
Geschirr).
Normal verschmutztes
Geschirr und Töpfe.
Normaler täglicher
Abwasch
Spülpro-
gramm
Intensiv
Normal
Spülmittel
(A) = Dosierkammer A
(B) = Dosierkammer B
Vorspülen Trocknen
in pulverform flüssig Tabs
30 gr (A)
5 gr (B)
30 gr (A) 30 ml (A) 1 (A) • • 1:40’
30 ml (A)
5 ml (B)
1 (A)
1 (Geräte-
boden)
• • 2:00
Program-
mdauer
(Toleranz
±10%)
DE
Öko-Programm mit
niedrigem
Energieverbrauch,
geeignet für Geschirr und
Töpfe.
Kurzes Sparprogramm für
nur leicht verschmutztes,
sofort nach dem
Gebrauch gespültes
Geschirr
Abspülen des Geschirrs,
das erst später,
zusammen mit weiterem
Geschirr, gespült werden
soll.
Hygieneprogramm für
Babyflaschen, Sauger
und Schnuller zusammen
mit Tellern, Tassen,
Gläsern und Besteck. Es
wird nur im Oberkorb
gespült.
Unterschiedliches
Programm für die beiden
Körbe: schonend für
Kristallgläser und Gläser
im oberen Korb; intensiv
für Töpfe und Pfannen im
unteren Korb.
Automatik
Kurz
Einweichen
Baby
Duo Wash
25 gr (A)
5 gr (B)
25 gr (A) 25 ml (A) 30’
12'
20 gr (A) 20 ml (A) 1:00'
25 gr (A)
5 gr (B)
25 ml (A)
5 ml (B)
25 ml (A)
5 ml (B)
1 (A) • • 2:25’
1 (A) • • 1:48’
Hinweis
Zur Vereinfachung der Spülmitteldosierung berücksichtigen Sie bitte Folgendes:
1 Esslöffel = ca. 15 gr Spülpulver = ca. 15 ml Flüssigspülmittel
1 Teelöffel = ca. 5 gr Spülpulver = ca. 5 ml Flüssigspülmittel
43

Klarspüler und Regeneriersalz
DE
Verwenden Sie bitte nur Spezialspülmittel für
Geschirrspüler.
Verwenden Sie bitte kein Kochsalz oder Industriesalz.
Sollten Sie ein Multifunktionsprodukt des Typs 2in1, 3in1,
4in1, etc. verwenden, ist ein Hinzufügen von weiterem
Klarspüler nicht erforderlich. Der Zusatz von Regeneriersalz
ist jedoch ratsam, besonders bei hartem oder sehr hartem
Wasser. Da weder Salz noch Klarspüler eingefüllt wird, ist
es ganz normal, dass die SALZNACHFÜLLANZEIGE* und
die KLARSPÜLERNACHFÜLLANZEIGE* laufend blinken.
Einfüllen des Klarspülers
Der Klarspüler fördert das Trocknen des Geschirrs, da das
Wasser von der Geschirroberfläche abläuft; es verbleiben
weder Streifen noch Flecken.
Der Klarspülerbehälter muss aufgefüllt werden:
• wenn Sie anhand des Sichtfensters (H) sehen, dass er
leer ist. Klares Sichtfenster: Klarspüler nachfüllen;
dunkles Sichtfenster: Klarspüler noch ausreichend;
• wenn auf der Bedienblende die
KLARSPÜLERNACHFÜLLANZEIGE* blinkt.
1. Behälter durch Drehen des
H
Füllen Sie den Klarspüler NIEMALS direkt ins Innere des
Geschirrspülers.
Klarspülerdosierung
Sollte das Spül- oder Trockenergebnis unzufrieden stellend
sein, kann die Klarspülerdosierung neu eingestellt werden.
Drehen Sie den Regler (F) mit Hilfe eines Schraubenziehers
auf eine der 6 Einstellungen (werkseitig eingestellt auf 4):
• Weist das Geschirr bläuliche Streifen auf, drehen Sie
den Regler auf eine niedrige Einstellung (1-3).
• Befinden sich Wassertropfen oder Kalkflecken darauf,
drehen Sie den Regler auf höhere Einstellungen (4-6).
Sollten Sie Multifunktionstabs (2in1, 3in1, 4in1,etc.)
verwenden und ein noch intensiveres Trocknen wünschen,
empfiehlt es sich, den Klarspülerbehälter doch zu füllen und
ihn auf 2 einzustellen.
Stöpsels (G) gegen den
Uhrzeigersinn öffnen.
2. Klarspüler einfüllen, er darf
nicht überlaufen. Andernfalls
sofort mit einem Schwamm
F
abwischen.
G
3. Stöpsel wieder
aufschrauben.
• Wenn der grüne Schwimmer* durch den Salzstöpsel
hindurch nicht sichtbar ist;
• wenn auf der Bedienblende die
SALZNACHFÜLLANZEIGE* blinkt.
• Bei Fehlen einer Salznachfüllanzeige oder eines grünen
Schwimmers:
ca. alle 30 Spülgänge.
1. Ziehen Sie den unteren Korb
heraus und schrauben Sie den
Salzbehälterdeckel gegen den
Uhrzeigersinn ab.
2. Nur bei erstmaliger
Inbetriebnahme: Füllen Sie den
Behälter bis zum Rand mit Wasser.
3. Setzen Sie den mitgelieferten
Trichter auf (
bis zum Rand mit Salz (ca. 2 kg), es ist normal, wenn etwas
Wasser ausläuft.
4. Nehmen Sie den Trichter ab, entfernen Sie Salzreste vom
Gewinde und schrauben Sie den Stöpsel fest auf, damit
während des Spülgangs keine Spüllauge eintreten kann.
(Diese könnte den Entkalker dauerhaft beschädigen).
Wird Salz nachgefüllt, sollte sofort darauf ein kompletter
Spülgang ohne Geschirr gestartet werden, um die
übergelaufene Salzlösung zu entfernen, und somit das
Gerät vor Korrosion zu schützen.
siehe Abbildung
) und füllen Sie den Behälter
Salzdosierung*
Der Salzverbrauch kann je nach Härte des Wassers
reguliert werden. Die Werte hinsichtlich Ihres Wassers
erfahren Sie bei Ihrem Wasserwerk.
1. Salzbehälter-Deckel abschrauben.
2. Drehen Sie den am oberen Rand
befindlichen Pfeil (
unter Zugrundelegung der
nachstehenden Tabelle in Richtung +
oder -.
Wasserhärte
°dH °fH °mmol /l
0 - 10 0 - 17 0 - 1,7 / 0 /
10 – 25 18 – 44 1,8 – 4,4 - 20 60
25 – 50 45 – 89 4,5 – 8,9 MITTL. 40 40
> 50 > 89 > 8,9 + 60 25
Wähler-
einstellung
siehe Abbildung
Salzverbrauch
(gr/pro Zyklus
)
Autonomie
(Zyklen/pro 2
kg)
Einfüllen des Regeneriersalzes
Um ein optimales Spülergebnis zu gewährleisten, sollte der
Salzbehälter niemals leer sein. Durch das Regeneriersalz
wird das Wasser entkalkt; demnach setzt sich kein Kalk auf
Ihrem Geschirr ab. Der Salzbehälter befindet sich im
Geschirrspülerboden (
aufgefüllt werden:
44
siehe Beschreibung
) und muss
Der Entkalker wurde werkseitig auf + eingestellt.
Sollten Sie Multifunktionstabs (2in1, 3in1, 4in1,etc.)
verwenden, empfiehlt es sich, den Salzbehälter doch zu
füllen und ihn auf - einzustellen, oder auf +, wenn der
Härtegrad Ihres Wassers 60°fH übersteigt.
*Nur an einigen Modellen

A
B
C
Reinigung und Pflege
Abstellen der Wasser- und
Stromversorgung
• Drehen Sie den Wasserhahn nach jedem
Spülgang zu, um Schäden durch eventuelles
Austreten von Wasser auszuschließen.
• Ziehen Sie den Netzstecker aus der Steckdose,
bevor Sie Ihren Geschirrspüler reinigen oder
Wartungsmaßnahmen getroffen werden.
Reinigung des Geschirrspülers
• Die Gehäuseteile und die Bedienblende können
mit einem mit Wasser angefeuchteten, weichen
Tuch gereinigt werden. Vermeiden Sie Löse- und
Scheuermittel.
• Zur Beseitigung von evtl. Flecken im Innenraum
des Gerätes verwenden Sie ein feuchtes Tuch, auf
das Sie etwas weißen Essig träufeln.
Vermeidung von Geruchsbildung
• Lassen Sie die Gerätetür stets nur angelehnt; auf
diese Weise kann sich keine Feuchtigkeit
ansammeln.
• Die Dichtungen der Tür und der Reinigerkammern
sollten regelmäßig mit einem feuchten Tuch
gereinigt werden. Sie vermeiden so die
Ansammlung von Speiseresten, hauptsächliche
Ursache von Geruchsbildung im Geschirrspüler.
Reinigung der Sprüharme
An den Sprüharmen
könnten
Speiserückstände
festkleben, und die
Wasserdüsen
verstopfen. Ab und zu
sollten diese demnach
kontrolliert und mit
einem Bürstchen, das
nicht aus Metall sein
darf, gereinigt werden.
Reinigung der Filtersiebe
Dank der Filtersiebe wird das Spülwasser von
Speiseresten befreit und wieder in Umlauf gebracht.
Um optimale Spülergebnisse zu gewährleisten,
müssen diese gereinigt werden.
Reinigen Sie die Filtersiebe regelmäßig.
Stellen Sie nach der Reinigung sicher, dass die
Filtersiebkomposition korrekt wieder eingesetzt wurde.
Der Geschirrspüler darf nie ohne Filtersiebe oder mit
ausgehängten Filtern arbeiten.
1. Ziehen Sie die Siebe an ihrem Griff nach oben hin
heraus.
2. Filtersiebreinigung:
• Kontrollieren Sie das
C
1
2
A
B
werden. Verwenden Sie hierzu eine kleine Bürste (die
nicht aus Metall sein darf).
3. Fügen Sie die Einzelteile wieder zusammen und
setzen Sie die Siebkomposition gemäß der Abbildung
1 und 2 wieder in ihren Sitz ein, bis sie einrastet.
halbrunde Feinsieb A
und den Siebeinsatz B
(am Griff herausziehen)
auf Verschmutzung, und
spülen Sie diese unter
fließendem Wasser aus.
• Mindestens einmal
pro Monat sollte die
gesamte
Siebkomposition,
bestehend aus dem
halbrunden Feinsieb A,
dem Siebeinsatz B und
dem Mikrosieb C (gegen
den Uhrzeigersinn
herausdrehen),
sorgfältig gereinigt
Was tun, bevor Sie für längere Zeit
verreisen
DE
• Führen Sie einen Reinigungsgang ohne Geschirr
durch.
• Schalten Sie sämtliche Elektro- und
Wasseranschlüsse ab.
• Lassen Sie die Gerätetür leicht aufstehen.
45

Vorsichtsmaßregeln und
Hinweise
DE
Das Gerät wurde nach den strengsten
internationalen Sicherheitsvorschriften entworfen und
gebaut. Nachstehende Hinweise werden aus
Sicherheitsgründen geliefert und sollten aufmerksam
gelesen werden.
Allgemeine Sicherheit
• Dieses Gerät ist für den nicht professionellen
Einsatz im privaten Haushalt bestimmt.
• Das Gerät darf nur zum Spülen von
Haushaltsgeschirr verwendet werden, und nur
durch Erwachsene und gemäß den Anleitungen
dieses Handbuchs bedient werden.
• Das Gerät darf nicht im Freien installiert werden,
auch nicht, wenn es sich um einen geschützten
Platz handelt. Es ist gefährlich, wenn es Gewittern
und Unwettern ausgesetzt wird.
• Berühren Sie den Geschirrspüler nicht, wenn Sie
barfuß sind.
• Ziehen Sie den Netzstecker nicht am Netzkabel
aus der Steckdose, sondern nur am Netzstecker
selbst.
• Vor Reinigungs- und Wartungsmaßnahmen muss
der Wasserhahn zugedreht und der Netzstecker
aus der Steckdose gezogen werden.
• Bei etwaigen Störungen versuchen Sie bitte nicht,
Innenteile selbst zu reparieren.
• Berühren Sie bitte niemals den Heizwiderstand.
• Stützen Sie sich und setzen Sie sich bitte nicht auf
die offen stehende Gerätetür, das Gerät könnte
umkippen.
• Bewahren Sie das Spülmittel und den Klarspüler
außerhalb der Reichweite von Kindern auf.
• Verpackungsmaterial ist kein Spielzeug für Kinder.
Entsorgung von Elektroaltgeräten
Gemäß der Europäischen Richtlinie 2002/96/EC über
Elektro- und Elektronik-Altgeräte (WEEE) dürfen
Elektrohaushalts-Altgeräte nicht über den
herkömmlichen Haushaltsmüllkreislauf entsorgt
werden. Altgeräte müssen separat gesammelt werden,
um die Wiederverwertung und das Recycling der
beinhalteten Materialien zu optimieren und die
Einflüsse auf die Umwelt und die Gesundheit zu
reduzieren. Das Symbol "durchgestrichene Mülltonne"
auf jedem Produkt erinnert Sie an Ihre Verpflichtung,
dass Elektrohaushaltsgeräte gesondert entsorgt
werden müssen.
Energie sparen und Umwelt schonen
Wasser und Strom sparen
• Setzen Sie den Geschirrspüler nur bei voller
Ladung in Betrieb. Um in der Zwischenzeit, d.h. bis
das Gerät ganz gefüllt ist, die Bildung schlechter
Gerüche zu vermeiden, setzen Sie den
Einweichzyklus in Gang (
• Wählen Sie ein für das zu spülende Geschirr und
den Verschmutzungsgrad geeignetes Programm.
Ziehen Sie hierzu die
- Verwenden Sie für normal verschmutztes
Geschirr das umweltfreundliche Sparprogramm
Eco, das einen niedrigen Wasser- und
Stromverbrauch gewährleistet.
- Bei nur geringfügiger Beschickung aktivieren Sie
die Option Halbe Füllung (
Inbetriebnahme
• Sieht Ihr Stromliefervertrag Billigstromzeiten vor,
empfiehlt es sich, das Gerät in diesen
Niedrigtarifzeiten in Betrieb zu setzen. Die Option
Startzeitvorwahl* (
ist Ihnen in diesem Fall eine wertvolle Stütze.
Phosphat- und chlorfreie, enzymhaltige
Reinigungsmittel
• Wir empfehlen dringend den Einsatz von phosphatund chlorfreien Spülmitteln, da diese die Umwelt
nicht zu sehr belasten.
• Die optimale Wirkung der Enzyme ist bei einer
Temperatur von ca. 50°C gegeben, demnach
können bei enzymhaltigen Spülmitteln Spülgänge
bei Niedrigtemperaturen eingestellt und dennoch
dieselben Ergebnisse erzielt werden, wie bei 65°CProgrammen.
• Dosieren Sie das Spülmittel sparsam je nach
Angabe des Herstellers, Wasserhärte,
Verschmutzungsgrad und Menge des Geschirrs,
um Verschwendungen zu vermeiden. Obwohl sie
biologisch abbaubar sind, beinhalten sie dennoch
Stoffe, die die Umwelt belasten.
).
siehe Start und Inbetriebnahme
siehe Spülprogramme
Programmtabelle
siehe Start und
zu Rate:
).
)
Endverbraucher können sich an Abfallämter der
Gemeinden wenden, um mehr Informationen über die
korrekte Entsorgung ihrer Elektrohaushaltsgeräte zu
erhalten.
46
*Nur an einigen Modellen

Störungen und Abhilfe
Sollten Betriebsstörungen auftreten, kontrollieren Sie bitte die nachfolgenden Punkte, bevor Sie sich an den
Kundendienst wenden (
Einige Störungen werden auf dem Display durch Codenummern-Blinklichtanzeigen gemeldet. Notieren Sie sich
diese Anzeigen, bevor Sie den Kundendienst anfordern.
siehe Kundendienst
).
Störungen: Mögliche Ursachen / Lösungen:
Der Geschirrspülerstartet
nicht.
Der Geschirrspüler lädt kein
Wasser.
Der Geschirrspüler pumpt
das Wasser nicht ab.
Der Geschirrspüler ist zu
laut.
Auf dem Geschirr und auf
den Gläsern befinden sich
Kalkablagerungen oder ein
weißer Belag.
Das Geschirr und die Gläser
weisen weiße Streifen bzw.
bläuliche Schattierungen
Der Netzstecker steckt nicht fest genug in der Steckdose, oder
es besteht ein Stromausfall.
Die Gerätetür ist nicht ganz geschlossen.
Es wurde eine Startzeitvorwahl programmiert (siehe Start und
Inbetriebnahme).
Es besteht eine Unterbrechung der Wasserzufuhr.
Der Zulaufschlauch ist geknickt (siehe Installation).
Das Spülprogramm ist noch nicht ganz abgelaufen.
Der Ablaufschlauch ist geknickt (siehe Installation).
Der Ablauf des Spülbeckens ist verstopft.
Im Filtersieb haben sich Speisereste angesammelt.
Das Geschirr schlägt aneinander oder gegen die Sprüharme.
Es fehlt Regeneriersalz bzw. die Dosierung entspricht nicht der
Wasserhärte (siehe Klarspüler und Regeneriersalz).
Der Deckel des Salzbehälters ist nicht ordnungsgemäß
geschlossen.
Es fehlt Klarspülmittel oder es wird unzureichend dosiert.
Das Geschirr besteht aus Antihaftmaterial.
Der Klarspüler wurde zu hoch dosiert.
auf.
Das Geschirr ist nicht ganz
trocken.
Das Geschirr ist nicht
sauber geworden.
Alarmanzeige Wasserhahn
abgedreht.
(Sie vernehmen kurze Signaltöne)
(auf dem Display blinkt die
Codeanzeige AO6).
Alarmanzeige "Siebe verstopft"
(auf dem Display blinkt die
Codeanzeige AO5).
Alarmanzeige aufgrund einer
Störung des Magnetventils der
Wasserversorgung
(auf dem Display blinkt die
Codeanzeige AO2).
Es fehlt Klarspülmittel oder es wird unzureichend dosiert (siehe
Klarspüler und Regeneriersalz).
Die Klarspüler-Dosiereinstellung ist nicht angemessen.
Es wurde ein Spülprogramm, das keinen Trockengang vorsieht,
eingestellt.
Die Körbe wurden zu voll geladen (siehe Beschickung der
Körbe).
Das Geschirr wurde nicht korrekt eingeräumt.
Die Sprüharme können sich nicht frei bewegen.
Das Spülprogramm ist zu schwach (siehe Spülprogramme).
Die Spülmittel wurde unkorrekt dosiert oder es ist ungeeignet
(siehe Start und Inbetriebnahme).
Das Filtersieb ist schmutzig oder verstopft (siehe Wartung und
Pflege).
Es fehlt Regeneriersalz (siehe Klarspüler und Regeneriersalz).
Öffnen Sie den Wasserhahn; das Gerät setzt sich nach wenigen
Minuten in Gang.
Schalten Sie das Gerät über die EIN/AUS-Taste aus, öffnen Sie den
Wasserhahn und schalten Sie das Gerät nach 20 Sekunden über dieselbe
Taste wieder ein. Wiederholen Sie die Geräteeinstellungen und starten Sie
das Gerät erneut.
Schalten Sie das Gerät durch Drücken der EIN/AUS-Taste aus und reinigen
Sie die Filtersiebe (siehe Wartung und Pflege). Wiederholen Sie die
Geräteeinstellungen und starten Sie das Gerät erneut.
Schalten Sie das Gerät durch Drücken der EIN/AUS-Taste aus und schalten
Sie es nach einer Minute wieder ein. Besteht der Alarm weiterhin, drehen Sie
den Wasserhahn zu, um Überschwemmungen zu vermeiden, ziehen Sie den
Netzstecker aus der Steckdose und fordern Sie den Kundendienst an.
DE
47

Kundendienst
DE
Bevor Sie sich an den Kundendienst
wenden:
• Kontrollieren Sie zuerst, ob das Problem nicht
allein gelöst werden kann (siehe Störungen und
Abhilfe).
• Starten Sie das Programm erneut, um
sicherzustellen, dass die Störung auch wirklich
behoben wurde.
• Sollte dies der Fall sein, fordern Sie den
autorisierten Kundendienst unter der auf dem
Garantieschein angegebenen Nummer an.
Wenden Sie sich auf keinen Fall an nicht autorisierte
Techniker.
Geben Sie bitte Folgendes an:
• die Art der Störung
• das Maschinenmodell (Mod.)
• die Seriennummer (S/N).
Diese Informationen können Sie auf dem Typenschild,
befindlich auf dem Seitenrand der Inox-Innentür
ablesen (siehe Beschreibung Ihres Geschirrspülers).
48

Gebruiksaanwijzing
Inhoud
NL
Installatie, 50-51
Nederlands, 49
LZ 705 EXTRA
Plaatsing en nivellering
Hydraulische en elektrische aansluitingen
Technische gegevens
Beschrijving van het apparaat, 52
Algemeen aanzicht
Bedieningspaneel
Het laden van de rekken, 53
Onderrek
Bestekkorf
Bovenrek
Starten en gebruik, 54
Het starten van de afwasautomaat
Het afwasmiddel toevoegen
Afwasopties
AFWASAUTOMAAT
Programmas, 55
Tabel van de programma’s
Glansmiddel en zout, 56
Het glansmiddel toevoegen
Het zout toevoegen
Onderhoud en verzorging, 57
Water en elektrische stroom afsluiten
Reinigen van de afwasautomaat
Vermijden van vervelende luchtjes
Reinigen van de sproeiarmen
Reinigen van de filters
Als u langere tijd geen gebruik maakt van de
afwasautomaat
Voorzorgsmaatregelen en advies, 58
Algemene veiligheid
Afvalverwijdering
Energiebesparing en respect voor het milieu
Storingen en oplossingen, 59
Service, 60

Installatie
NL
Bewaar dit boekje zorgvuldig voor eventuele
toekomstige raadpleging. Wanneer u het product
weggeeft, verkoopt of wanneer u verhuist, dient u
dit boekje bij het apparaat te bewaren.
Lees de gebruiksaanwijzingen zorgvuldig door:
er staat belangrijke informatie in over installatie,
gebruik en veiligheid.
Als u het apparaat verplaatst moet u het
verticaal houden; als dit niet mogelijk is moet u
het naar achteren kantelen.
Plaatsing en nivellering
1. Haal het apparaat uit de verpakking en
controleer dat het geen schade heeft geleden
tijdens het transport.
Als het apparaat beschadigd is, moet u het niet
aansluiten maar de dealer inschakelen.
2. De afwasautomaat moet met de zijkant of de
achterkant tegen de aangrenzende kastjes of de
wand worden geïnstalleerd. Dit apparaat kan ook
onder het aanrecht worden ingebouwd* (
Installatieblad
3. Plaats de afwasautomaat op een rechte en
stevige vloer. Compenseer eventuele
onregelmatigheden door de pootjes los- of vast te
draaien, totdat het apparaat horizontaal staat (het
mag niet meer dan 2 graden hellen). Een correcte
nivellering geeft stabiliteit en voorkomt trillingen,
geluiden en verplaatsingen.
4. Het regelen van de hoogte van de achterste
stelvoetjes, vanaf de voorzijde*: schroef met een
schroevendraaier de schroeven die zich in het
onderste gedeelte van de afwasautomaat
bevinden vast of los.
).
zie
Hydraulische en elektrische
aansluitingen
Het voor de installatie aanpassen aan het
elektrische en hydraulische systeem mag alleen
door erkende technici worden uitgevoerd.
De afwasautomaat mag niet bovenop de buizen
of de elektrische voedingskabel worden geplaatst.
Aansluiting van de buis voor de watertoevoer
• Aansluiting op de koudwaterkraan: schroef de
toevoerbuis op een kraan met schroefdraad
van 3/4 gas; voordat u hem vastschroeft moet
u het water laten lopen totdat het compleet
helder is. Zo voorkomt u dat eventuele
onzuiverheden het apparaat doen verstoppen.
• Aansluiting op de warmwaterkraan: als er een
centrale verwarming is met radiatoren kan de
afwasautomaat worden voorzien met warm
water mits dit water niet warmer is dan 60°C.
Schroef de buis aan de kraan zoals beschreven
voor de koudwateraansluiting.
Als de lengte van de toevoerbuis niet toereikend
is, dient u zich te wenden tot een speciaalzaak of
tot een erkende monteur (
De waterdruk moet zich bevinden tussen de
waarden die staan vermeld in de tabel met
Technische gegevens (
Zorg ervoor dat de buis niet wordt gebogen of
samengedrukt.
Lekkagebeveiliging
Om te garanderen dat er geen lekkages worden
veroorzaakt is de afwasautomaat:
- voorzien van een systeem dat de watertoevoer
onderbreekt in geval van storingen of lekkages
van binnenuit.
- voorzien van het veiligheidssysteem
*; oftewel hij is voorzien van een
Stop
watertoevoerbuis bestaande uit een externe
transparante buis en een interne rode buis: beide
buizen kunnen een erg hoge druk verdragen. In
het geval de binnenste buis kapotgaat, zal de
buitenste hardrood worden en zal het water
hierdoor vloeien, zodat lekkages worden
vermeden.
zie Service
zie onder
).
).
Water
De buizen voor de toevoer (A) en de afvoer (B)
van het water, en de elektrische voedingskabel
kunnen voor een betere installatie zowel naar
rechts of naar links worden gericht (
afbeelding
50
).
zie
Het is heel belangrijk om geregeld de externe
buis te controleren: als u ziet dat hij hardrood is
geworden, moet hij zo spoedig mogelijk worden
vervangen door de erkende Technische Dienst (
Service
).
*Alleen aanwezig op bepaalde modellen.
zie

Aansluiting van de buis op de waterafvoer
Verbindt de afvoerbuis, zonder hem te buigen,
aan een afvoerleiding met een minimum
doorsnede van 4cm. U kunt hem ook op de rand
van een wasbak of een badkuip hangen; het vrije
uiteinde van de afvoerbuis mag niet onder water
liggen.
De speciale plastic
A
elleboogpijp* zorgt
ervoor dat u hem goed
vast kunt zetten:
bevestig de
elleboogpijp goed aan
de muur om te
voorkomen dat de
afvoerbuis beweegt en
het water lekt.
Het deel van de buis
dat is aangegeven met de letter A moet zich op
een hoogte van tussen de 40 en de 100 cm van
de grond bevinden (
zie afbeelding
).
Er wordt afgeraden verlengbuizen te gebruiken.
Elektrische aansluiting
Voordat u de stekker in het stopcontact steekt,
moet u zich ervan verzekeren dat:
• het stopcontact geaard is en voldoet aan de
geldende normen;
• het stopcontact in staat is het maximale
vermogen van het apparaat te dragen. Dit
vermogen wordt aangegeven op het
typeplaatje aan de binnenkant van de deur (
Beschrijving van de afwasautomaat
);
zie
• de spanningswaarden zich bevinden tussen de
waarden die staan aangegeven op het
typeplaatje aan de binnenkant van de deur;
De kabel moet geregeld worden gecontroleerd en
mag alleen door bevoegde monteurs worden
vervangen (
zie Service
).
De fabrikant kan niet verantwoordelijk worden
gesteld als deze normen niet worden nageleefd.
Anticondensstrip*
Nadat u de afwasautomaat heeft ingebouwd opent
u de deur en plakt u de doorzichtige plakstrip
onder het houten werkvlak, zodat u het beschermt
tegen eventuele condens.
Aanwijzingen voor de eerste afwascyclus
Nadat het apparaat is geïnstalleerd, onmiddellijk
voor de eerste afwasbeurt, moet u het
zoutreservoir volledig met water vullen en
ongeveer 2 kg zout toevoegen (
en zout
): het is normaal dat er tijdens deze
zie Glansmiddel
handeling water overloopt. Het is ook normaal dat
ondanks het toevoegen van het zout, het
controlelampje ZOUT TOEVOEGEN* voor enkele
afwasbeurten zal blijven knipperen.
Technische gegevens
breedte cm 59,5
Afmetingen
Capaciteit
Waterdruk toevoer
Netspanning
Totaal
opnemingsvermog
en
Zekering
hoogte cm 82
diepte cm 57
12 bordensets
30 Kpa ÷ !Mpa (0,3 ÷ 10 bar)
4,3 psi – 145 psi
Zie typeplaatje
Zie typeplaatje
Zie typeplaatje
NL
• de stekker van het apparaat en het stopcontact
overeenkomen. Als dit niet het geval is moet u
een bevoegde monteur inschakelen om de
stekker te laten vervangen (
zie Service
);
gebruik geen verlengsnoeren of
dubbelstekkers.
Wanneer het apparaat is geïnstalleerd, moeten
de elektrische voedingskabel en het stopcontact
makkelijk te bereiken zijn.
De kabel mag niet worden gebogen of
samengedrukt.
Deze afwasautomaat voldoet aan
de volgende EU richtlijnen:
- 73/23/EEG van 19/02/73
(Laagspanning) en
daaropvolgende wijzigingen
*Alleen aanwezig op bepaalde modellen.
- 89/336/EEG van 03/05/89
(Elektromagnetische
Compatibiliteit) en daaropvolgende
wijzigingen
- 97/17/EG (Etikettering)
- 2002/96/EC
51

Beschrijving van het apparaat
NL
Algemeen aanzicht
1
4
6
9
11
7
10
1. Bovenrek
2. Bovenste sproeiarm
3. Opklaprekjes
4. Regelen hoogte rek
5. Onderrek
3
2
6. Onderste sproeiarm
7. Bestekkorf
8. Filter
9. Zoutreservoir
10. Bakje voor afwasmiddel en
glansmiddelreservoir
5
11. Typeplaatje
8
Bedieningspaneel
Display
Controlelampje
GLANSMIDDEL
TOEVOEGEN*
Controlelampje
ZOUT
TOEVOEGEN*
Controlelampje
UITGESTELDE
START*
Toets
UITGESTELDE
START*
ON/OFF
Controlelampje
HALVE LADING*
Controlelampje
EXTRA DROGEN*
VOORWAS
HOOFDWAS
SPOELEN
DROGEN
Toets
EXTRA DROGEN*
Toets
HALVE LADING*
Toets
START/RESET
U
V
Z
DISPLAY
Controlelampjes
VERLOOP WASCYCLUS
Toets
Knop
SELECTEREN
PROGRAMMA
52
*Alleen aanwezig op bepaalde modellen.

Het laden van de rekken
Voordat u de vaat inlaadt moet u overtollige etensresten
verwijderen, aangekoekte pannen en steelpannen in water
laten weken en glazen en bekers legen. Nadat u alles heeft
ingeladen moet u controleren of de sproeiarmen vrij kunnen
ronddraaien.
Onderrek
Plaats hier de vaat die moeilijker te reinigen is volgens de
Inlaadvoorbeelden
• Dienschalen en deksels: aan de zijkanten van het rek.
• Pannen en slabakken: altijd ondersteboven.
• Diepe pannen of schalen: schuin.
Om betere was- en droogprestaties te garanderen, is het
oppervlak van het onderrek ruwer dan dat van het
bovenrek.
en met behulp van de opklaprekjes*.
Bestekkorf
De bestekkorf verschilt aan de hand van het model
afwasautomaat.
Messen en scherpe gebruiksvoorwerpen moeten in de
bestekkorf worden geplaatst, met de punt naar beneden.
Als het rek voorzien is van click
clack handvaten* (
moet u ze naar beneden of naar
boven trekken om de hoogte te
regelen.
zie afbeelding
Voorbeelden van het inladen van het bovenrek
Voorbeelden van het inladen van het onderrek
),
NL
Om het middenstuk in tweeën te delen* moet u het handvat
loshalen. De twee zijelementen* kunnen worden losgemaakt
en aan het boven- of onderrek worden vastgehaakt.
De twee roosters* kunnen op de korf worden bevestigd om
het bestek gescheiden te houden: voeg het bestek in de
openingen met de handvaten naar beneden gericht.
Bovenrek
Plaats hier de fijnere en lichtere vaat: glazen, theekopjes,
mokken, bordjes, kleine slabakken, koekenpannen, lage,
niet zo vuile pannen, zoals beschreven in de
Inlaadvoorbeelden
• Lichte vaat: plaats deze voorwerpen zodanig dat ze niet
verplaatst worden door de waterstralen.
• Mokken en kopjes: plaats deze op de opklaprekjes**.
• Lange en scherpe messen, opschepbestek: op de
opklaprekjes**.
Het regelen van de hoogte van het bovenrek
Om de vaat beter te kunnen verdelen, kunt u het bovenrek
1
3
.
hoger of lager zetten:
open de grendeltjes van de rails
aan de rechter- en aan de
2
linkerkant en haal het rek naar
buiten; plaats het boven of onder
en schuif het over de rails totdat
ook de voorste wieltjes erin zitten;
4
sluit vervolgens de grendeltjes (
afbeelding
).
zie
Baby Opklaprekjes
**
In de modellen
afwasautomaat waar een
Baby Cyclus aanwezig is,
worden speciale
opklaprekjes geleverd voor
het wassen van zuigflessen,
ringen en spenen.
Vaat die niet geschikt is voor de afwasautomaat
• Houten voorwerpen of met een handvat van hout, hoorn
of met delen die vastgelijmd zijn.
• Voorwerpen van aluminium, koper, messing of tin.
• Niet hittebestendige plastic voorwerpen.
• Antiek of handbeschilderd porselein.
• Antiek zilver. Niet antiek zilver kan echter wel met een
fijn programma worden gewassen. Zorg ervoor dat het
niet in contact komt met andere metalen.
Als u vaatwerk of bestek koopt raden wij u aan te
controleren of het geschikt is voor de afwasautomaat.
Het reinigen van de handvaten *
Om de handvaten van het boven- en onderrek te reinigen:
verwijder de twee bevestigingsdoppen, verwijder de
handvaten, was ze onder het stromend water en bevestig
ze weer op het rek met de dopjes.
*Alleen aanwezig op bepaalde modellen.
** Variabele aantallen en standen.
53

A
B
D
C
Starten en gebruik
NL
1. Open de waterkraan.
2. Druk op de ON-OFF toets: het display wordt verlicht.
3. Doseer het wasmiddel (
4. Laadt de rekken (
de deur.
5. Selecteer het programma door de knop SELECTEREN
PROGRAMMA met de klok mee te draaien: de wijzer op de
knop moet samenvallen met het nummer of het symbool van
het desbetreffende programma.
6. Selecteer de wasopties (
7. Start door te drukken op de toets START/RESET: u hoort
een geluidssignaal ter bevestiging. De controlelampjes
VERLOOP WASCYCLUS geven aan op welk punt het
programma is: Voorwas, Hoofdwas, Spoelen, Drogen.
8. Aan het einde van de cyclus hoort u drie korte
geluidssignalen en verschijnt op het display het woord
END. Schakel het apparaat uit met de ON-OFF toets, doe
de waterkraan dicht en haal de stekker uit het stopcontact.
9. Open de deur en wacht enkele minuten voordat u de vaat
eruit haalt om te voorkomen dat u zich verbrandt. Laadt de
vaat uit door te beginnen bij het onderrek.
zie onder
zie Het laden van de rekken
zie onder
).
).
Demo*
De tekst dON op het display geeft aan dat er een demo
programma gaande is. Om dit programma uit te schakelen
moet u tegelijkertijd op de toetsen START/RESET en ONOFF drukken. De tekst dOF zal verschijnen.
Het wijzigen van een reeds gestart programma
Als u een verkeerd programma heeft geselecteerd kunt u
dit wijzigen, mits het net gestart is: houdt de toets START/
RESET 4 seconden lang ingedrukt. Na één lange en drie
korte pieptonen, gaat het controlelampje VERLOOP
WASCYCLUS uit: selecteer een nieuw programma en start
door te drukken op de toets START/RESET.
Het toevoegen van overige vaat
Druk op de toets ON-OFF, open de deur, pas op de
vrijkomende hete stoom, en doe de vaat in de
afwasautomaat. Druk opnieuw op de ON-OFF toets: de
wascyclus wordt hervat.
Accidentele onderbrekingen
Als tijdens het wassen de deur wordt geopend of er een
stroomonderbreking plaatsvindt, wordt het programma
onderbroken. Het zal worden hervat op het punt waar het
werd onderbroken als de deur weer wordt dichtgedaan of
wanneer de stroom terugkeert.
Het afwasmiddel toevoegen
Een goed wasresultaat hangt ook af van de juiste dosering
afwasmiddel die wordt aangegeven door de fabrikant.
Teveel afwasmiddel betekent niet automatisch een
efficiëntere reiniging. Bovendien is dit niet goed voor het
milieu.
De beste was- en droogprestaties bereikt u met het gebruik
van een vaatwasmiddel in poedervorm, een vloeibaar
glansspoelmiddel en zout.
bakje A: Wasmiddel hoofdwasbakje A: Wasmiddel hoofdwas
bakje A: Wasmiddel hoofdwas
bakje A: Wasmiddel hoofdwasbakje A: Wasmiddel hoofdwas
bakje B: Wasmiddel voorwasbakje B: Wasmiddel voorwas
bakje B: Wasmiddel voorwas
bakje B: Wasmiddel voorwasbakje B: Wasmiddel voorwas
) en sluit
deksel. Wanneer het programma 2 tabletten vereist, doet u
de tweede op de bodem van de afwasautomaat.
3. Verwijder de wasmiddelresten van de rand van het
bakje en sluit het deksel met een klik.
Afwasopties
Uitgestelde start
Het is mogelijk de start van het programma 1 tot 24 uur uit
te stellen:
1.druk op de toets UITGESTELDE START: elke keer dat u
op de toets drukt verschijnt op het display de
geselecteerde tijd en zal het controlelampje van de
gekozen start oplichten;
2. Selecteer het programma en druk op de toets START/
RESET: na de pieptoon begint het terugtellen;
3. Als de tijd verstreken is gaat het controlelampje uit en
wordt het programma gestart.
Om de uitgestelde start te wijzigen en een korter uitstel te
selecteren moet u op de toets UITGESTELDE START
drukken. Om de uitgestelde start te annuleren moet u
enkele keren op de toets drukken totdat het programma
begint en het controlelampje VERLOOP WASCYCLUS
aangaat dat overeenkomt met het begin van het
programma.
Halve lading op het bovenrek*
Als u weinig vaat heeft kunt u een halve lading wassen en
zo water, energie en afwasmiddel sparen. Voordat u het
programma selecteert moet u enkele keren op de toets
HALVE LADING drukken: het controlelampje gaat aan en
het wassen wordt alleen in het bovenrek uitgevoerd.
Laadt de vaat alleen in het bovenrek en doe slechts de helft
van de hoeveelheid wasmiddel in het bakje.
We raden u aan afwasmiddel in poeder te gebruiken.
Extra drogen*
Om een perfect droge vaat te verkrijgen drukt u op de
toets EXTRA DROOG voor u het programma selecteert. Een
lang geluidssignaal geeft de activering van deze optie
weer, een kort geluidssignaal geeft aan dat deze is
uitgeschakeld.
Met extra drogen duren de programma's iets langer.
*Alleen aanwezig op bepaalde modellen.
Het starten van de afwasautomaat
1. Open het deksel C door
middel van de knop D.
2. Doseer het afwasmiddel
met behulp van de
van de programma’s
• afwasmiddel in poeder:
bakjes A en B.
• afwasmiddel in tabletten:
in bakje A en op bodem
afwasautomaat. Wanneer
het programma 1 tablet
vereist doet u hem in het
bakje A en sluit u het
Tabel
:
54

Programmas
Tabel van de programmas
De Ariston afwasautomaten zijn voorzien van een automatisch reinigingssysteem van de filters dat de duur van de programma’s
kan verlengen.
AUTOMATISCHE PROGRAMMA’S: dit model afwasautomaat beschikt over een speciale sensor die kan waarnemen hoe vuil de
vaat is en het meest efficiënte en zuinige wasprogramma ervoor instellen. De duur van de automatische programma’s hangt als
gevolg af van wat de sensor waarneemt.
Als de vaat niet zo vuil is of reeds is afgespoeld, dient u de dosis vaatwasmiddel aanzienlijk te beperken.
NL
Aanwijzingen voor de
programmakeuze
Zeer vuile vaat en
pannen (niet voor
breekbare vaat)
Normaal vuile vaat en
pannen. Dagelijks
standaard programma.
Ecologisch
wasprogramma met
laag energieverbruik,
geschikt voor normaal
vuile vaat en pannen.
Zuinige snelle cyclus
voor niet zo vuile vaat,
direct na gebruik.
Programma
Intensief
Normaal
Eco
Snel
Afwasmiddel
(A) = bakje A
(B) = bakje B
Poeder Vloeibaar Tabletten
30 gr (A)
5 gr (B)
30 gr (A) 30 ml (A) 1 (A)
25 gr (A)
5 gr (B)
25 gr (A) 25 ml (A) 30’
30 ml (A)
5 ml (B)
25 ml (A)
5 ml (B)
1 (A)
1 (bodem
afwasautomaat)
1 (A)
Voorwas Drogen
•
•
•
•
•
•
Duur van het
programma
(tolerantie
±10%)
2:00’
1:40’
2:25’
Voorwas in afwachting
van de lading van de
volgende maaltijd.
Hygiënische cyclus voor
zuigflessen, ringen en
spenen, samen met
borden, kopjes, glazen
en bestek. Alleen op het
bovenste rek.
Gedifferenciëer-de
afwas op twee korven:
voorzichtig op
bovenkorf voor
glaswerk, intensief voor
pannen op onderkorf.
Inweken
Baby
Duo Wash
12'
20 gr (A) 20 ml (A)
25 gr (A)
5 gr (B)
25 ml (A)
5 ml (B)
1 (A)
•
N.B.
Om de dosering van het afwasmiddel te vereenvoudigen is het goed te weten dat:
1 eetlepel = 15 gram poeder = 15 ml vloeibaar wasmiddel circa
1 theelepel = 5 gram poeder = 5 ml vloeibaar wasmiddel circa
•
1:00'
1:48’
55

Glansmiddel en zout
NL
Gebruik uitsluitend producten die speciaal voor
afwasautomaten zijn bestemd.
Gebruik geen keuken- of industrieel zout.
Als u een multifunctie product gebruikt (2in1,
3in1, 4in1, etc.) is het niet nodig een glansmiddel
toe te voegen. We raden u echter wel aan zout toe
te voegen als het water hard of zeer hard is. Als u
geen zout of glansmiddel toevoegt is het normaal
dat de controlelampjes ZOUT TOEVOEGEN* en
GLANSMIDDEL TOEVOEGEN* blijven knipperen.
Het glansmiddel toevoegen
Het glansmiddel bevordert het drogen van de vaat
door het water van het oppervlak te laten glijden.
Op deze manier voorkomt u strepen en vlekken.
Het glansmiddelreservoir moet worden gevuld:
• als u door het controlelampje ziet dat het leeg
is (H). Controlelampje licht: glansmiddel
toevoegen; controlelampje donker: voldoende
glansmiddel;
• als op het paneel het controlelampje
GLANSMIDDEL TOEVOEGEN* knippert;
1. Open het reservoir door
H
de dop (G) tegen de klok
in te draaien.
2. Giet het glansmiddel in
het reservoir zonder te
morsen. Als u wel morst,
F
moet u het product gelijk
met een sponsje
G
verwijderen.
3. Draai de dop er weer
op. Giet het glansmiddel NOOIT direct in de
machine.
Het regelen van de dosis glansmiddel
Als u niet tevreden bent over de was- of
droogresultaten, kunt u de dosis glansmiddel
afregelen. U kunt met een schroevendraaier aan de
regelaar (F) draaien en kiezen tussen 6 verschillende
standen (de fabrieksinstelling is op stand 4):
• als u op de vaat blauwachtige strepen aantreft
moet u een lagere stand instellen (1-3).
• als u waterdruppels of kalkaanslag aantreft
moet u een hogere stand instellen (4-6).
Als u multifunctie tabletten gebruikt (2in1, 3in1,
4in1, etc.) en u wilt dat de vaat droger wordt, kunt
u het reservoir in elk geval vullen en instellen op
stand 2.
Het zout toevoegen
Om goede wasresultaten te bereiken moet u altijd
controleren of het zoutreservoir voldoende gevuld
is. Het zout verwijdert het kalk uit het water en
zorgt ervoor dat er geen kalkaanslag op de vaat
achterblijft. Het zoutreservoir bevindt zich aan de
onderzijde van de afwasautomaat (
zie
Beschrijving
) en moet worden gevuld:
• als de groene drijver* niet zichtbaar is wanneer
u de dop van het zoutreservoir bekijkt;
• als op het paneel het controlelampje ZOUT
TOEVOEGEN* knippert;
• als er geen controlelampje of groene drijver is:
ongeveer na iedere 30 wasbeurten;
1. Haal het onderrek naar
voren en draai de dop van
het zoutreservoir tegen de
klok in.
2. Alleen voor de eerste
afwasbeurt: vul het reservoir
tot aan de rand met water.
3. Plaats bijgeleverde
trechter op de opening (
zie afbeelding
) en vul het
reservoir tot aan de rand met zout (ongeveer 2
kg); het is normaal dat er wat water overloopt.
4. Verwijder de trechter, haal de zoutresten uit de
groeven en schroef de dop weer op zijn plaats,
zodat tijdens het wassen geen wasmiddel in het
reservoir kan komen (de ontkalker zou
onherstelbaar kunnen worden beschadigd).
Wanneer u zout toevoegt moet u direct daarna
een wascyclus zonder vaat starten, zodat de
overgelopen zoutoplossing direct wordt verwijderd
en u corrosie voorkomt.
Het regelen van de dosis zout*
Het is mogelijk het zoutverbruik te regelen op
basis van de waterhardheid van uw leefgebied. Dit
gegeven is verkrijgbaar bij uw Gemeentelijke
Waterbedrijf.
1. Schroef het deksel van het
reservoir los.
2. Draai de pijl op de rand (
afbeelding
) richting de + o de - en
zie
baseer u op de volgende tabel:
Hardheid van het water
°dH °fH °mmol/l
0 - 10 0 - 17 0 - 1,7 / 0 /
10 25 18 44 1,8 4,4 - 20 60
25 50 45 89 4,5 8,9 MED 40 40
> 50 > 89 > 8,9 + 60 25
Stand pi jl
Zoutverbruik
(gram/cyclus)
Autonomie
(cycli/2kg)
De ontkalker is in de fabriek ingesteld op +.
Als u multifunctie tabletten gebruikt (2in1, 3in1,
4in1, etc.) kunt u toch het zoutreservoir vullen en
het op - afstellen; als de waterhardheid hoger is
dan 60°fH, dient u het op + te zetten.
*Alleen aanwezig op bepaalde modellen.
56

A
B
C
Onderhoud en
verzorging
Water en elektrische stroom afsluiten
• Sluit na elke afwasbeurt de waterkraan af om
lekkage te voorkomen.
• Haal de stekker uit het stopcontact tijdens
reiniging en onderhoud.
Reinigen van de afwasautomaat
• De buitenkant en het bedieningspaneel kunnen
worden gereinigd met een natte, niet schurende
doek. Gebruik geen oplosmiddelen of
schuurmiddelen.
• De vlekken aan de binnenkant van de
afwasautomaat kunnen worden verwijderd met
een natte doek en wat azijn.
Vermijden van vervelende luchtjes
• Laat de deur altijd op een kier om het ophopen
van damp te voorkomen.
• Reinig geregeld de afdichtingen rondom de
deur en de wasmiddelbakjes met een vochtige
spons. Zo vermijdt u het ophopen van
etensresten die de hoofdoorzaak zijn van
vervelende luchtjes.
Reinigen van de sproeiarmen
Het kan gebeuren dat
er etensresten aan de
sproeiarmen blijven
kleven en de gaatjes
waar water uit komt
verstoppen: u doet er
goed aan ze
regelmatig te
controleren en te
reinigen met een nietmetalen borsteltje.
Reinigen van de filters
De filters reinigen het waswater van etensresten
en zorgen dat het weer in het watercircuit komt:
voor een beter resultaat moeten de filters
regelmatig worden schoongemaakt.
Reinig de filters regelmatig.
Controleer na het reinigen dat het filter goed op
zijn plaats zit.
De afwasautomaat mag niet zonder filters of met
een los filter worden gebruikt.
1. Verwijder de filters door het handvat naar boven
te trekken.
2. Reinigen van de filters:
• reinig na elke
wasbeurt het halfronde
C
1
2
A
B
3. Zet de filtergroep weer op zijn plaats totdat u
klik hoort volgens de handelingen 1 en 2, zoals
aangegeven in de afbeelding.
bord A en de koker B
(u verwijdert ze door
aan het handvat te
trekken). Verwijder de
grootste etensresten
door ze onder het
stromende water af te
spoelen.
• de filtergroep moet
eens per maand
grondig worden
schoongemaakt:
halfrond bord A, koker
B en cilindrisch filter C
(wordt verwijderd door
het tegen de klok in te
draaien). Gebruik voor
het reinigen een nietmetalen borsteltje.
NL
Als u langere tijd geen gebruik maakt
van de afwasautomaat
• Start een wascyclus zonder vaat.
• Schakel de elektrische en hydraulische
verbindingen uit.
• Laat de deur op een kier staan.
57

Voorzorgsmaatregelen en advies
NL
Het apparaat is ontworpen en gebouwd
overeenkomstig de internationale
veiligheidsnormen. Deze aanwijzingen zijn
geschreven om veiligheidsredenen en moeten
zorgvuldig worden doorgenomen.
Algemene veiligheid
• Dit apparaat is ontwikkeld voor nietprofessioneel gebruik binnenshuis.
• Dit apparaat moet worden gebruikt voor het
wassen van huishoudelijke vaat en alleen door
volwassenen volgens de aanwijzingen die terug
zijn te vinden in dit boekje.
• De afwasautomaat mag niet buitenshuis
worden geïnstalleerd, ook niet in overdekte
toestand. Het is zeer gevaarlijk hem bloot te
stellen aan regen en onweer.
• Raak de afwasautomaat niet blootsvoets aan.
• Haal de stekker niet uit het stopcontact door
eraan te trekken, maar door hem beet te
pakken.
• Voordat u de afwasautomaat reinigt of
onderhoud uitvoert moet u de waterkraan
afsluiten en de stekker uit het stopcontact
halen.
• In het geval van een storing mag u in geen
enkel geval aan de interne mechanismen
sleutelen om een reparatie trachten uit te
voeren.
• Raak nooit de weerstand aan.
• Leun of zit nooit op de open deur: het apparaat
zou om kunnen vallen.
• Houdt was- en glansmiddelen buiten het bereik
van kinderen.
• Het verpakkingsmateriaal is geen speelgoed
voor kinderen.
Vernietiging van oude electrische
apparaten
De Europese Richtlijn 2002/96/EC over
Vernietiging van Electrische en Electronische
Apparatuur (WEEE), vereist dat oude
huishoudelijke electrische apparaten niet mogen
vernietigd via de normale ongesorteerde
afvalstroom. Oude apparaten moeten apart
worden ingezameld om zo het hergebruik van de
gebruikte materialen te optimaliseren en de
negatieve invloed op de gezondheid en het milieu
te reduceren. Het symbool op het product van de
"afvalcontainer met een kruis erdoor" herinnert u
aan uw verplichting, dat wanneer u het apparaat
vernietigt, het apparaat apart moet worden
ingezameld.
Consumenten moeten contact opnemen met de
locale autoriteiten voor informatie over de juiste
wijze van vernietiging van hun oude apparaat.
Energiebesparing en respect voor het
milieu
Water en energie besparen
• Start de afwasautomaat alleen als hij volledig
volgeladen is. Als u moet wachten totdat de
afwasautomaat gevuld is, kunt u vervelende
luchtjes vermijden door het programma
Inweken te gebruiken (
• Selecteer een programma wat geschikt is voor
het type vaat en het soort vuil door de
van de programma’s
- voor een gemiddeld vuile vaat gebruikt u het
programma Eco, dat een laag energie- en
waterverbruik garandeert.
- als u een kleine vaat heeft activeert u de
optie Halve lading (
• Als u elektriciteitsbedrijf op bepaalde tijden of
dagen goedkopere tarieven heeft, dient u de
afwasautomaat te gebruiken op deze tijden. De
optie Uitgestelde start* (
kan u erbij helpen het wassen op deze wijze te
organiseren.
Afwasmiddelen zonder fosfaten, zonder chloor
en met enzymen.
• We raden u sterk aan afwasmiddelen zonder
fosfaten of chloor te gebruiken omdat deze
geschikter zijn voor het behoud van het milieu.
• Enzymen zorgen voor een effectieve werking
op temperaturen van ongeveer 50°C. Daarom
kan u met afwasmiddelen met enzymen op
lage temperaturen resultaten bereiken die u
anders pas op 65°C zou hebben.
• Doseer het afwasmiddel goed op basis van de
aanwijzingen van de fabrikant, van de
waterhardheid, de hoeveelheid vuil en de
hoeveelheid vaat, om zo verspillingen te
voorkomen. Ook al zijn ze biologisch
afbreekbaar, afwasmiddelen bevatten
elementen die het evenwicht van de natuur
verstoren.
zie Programma’s
te raadplegen:
zie Starten en gebruik
zie Starten en gebruik
).
Tabel
).
)
58

Storingen en oplossingen
Als er storingen zijn in de werking van het apparaat dient u eerst de volgende punten na te gaan voor u
zich tot de Service Dienst wendt (
zie Service
Enkele storingen worden aangegeven door knipperende codes op het display: noteer welke codes
knipperen voordat u de Service Dienst inschakelt.
Storingen: Mogelijke oorzaken / Oplossingen:
De afwasautomaatstart niet.
De afwasautomaat vult zich
niet met water.
De stekker zit niet goed in het stopcontact of het hele huis zit
zonder stroom.
De deur van de afwasautomaat is niet goed dicht.
U heeft een Uitgestelde start ingesteld (zie Starten en gebruik).
Er zit geen water in de waterleiding.
De watertoevoerbuis is gebogen (zie Installatie).
De afwasautomaat laat het
water niet wegstromen.
De afwasautomaat maakt
Het programma is nog niet beëindigd.
De waterafvoerbuis is gebogen (zie Installatie).
De afvoer van de wasbak is verstopt.
Het filter is verstopt met etensresten.
De vaat stoot tegen elkaar of tegen de sproeiarmen..
gelui d.
Er blijven op vaat en glazen
kalkafzettingen achter of
een witte aanslag.
Er blijven op vaat en glazen
strepen of blauwe kringen
Er zit niet genoeg zout in het reservoir of zijn afregeling is niet
toereikend voor de waterhardheid (zie Glansmiddel en zout).
Het deksel van het zoutreservoir is niet goed dicht.
Het glansmiddel is op of de dosering is ontoereikend.
Het vaatwerk is voorzien van een antiaanbaklaag.
De dosis glansmiddel is te groot.
achter.
De vaat is niet droog
genoeg.
De vaat is niet schoon.
Alarm kraan dicht.
(u hoort enkele korte
pieptonen)
(op het display knippert de
code AO6)
Alarm filters verstopt
(op het display knippert de
code AO5).
Alarm storing aan de
elektromagnetische klep van
de watertoevoer
(op het display knippert de
Code A02).
Het glansmiddel is op of de dosering is ontoereikend (zie
Glansmiddel en zout).
De regeling van het glansmiddel is niet juist.
U heeft een programma zonder drogen ingesteld.
De rekken zijn te vol geladen (zie Het laden van de rekken).
De vaat is niet goed verdeeld.
De sproeiarmen kunnen niet vrijuit draaien.
Het wasprogramma is te zacht (zie Programmas).
Het wasmiddel is niet goed gedoseerd of is niet geschikt (zie
Starten en gebruik).
Het filter is vuil of verstopt (zie Onderhoud en verzorging).
Er is niet genoeg zout (zie Glansmiddel en zout).
Open de kraan en het apparaat start na enkele minuten vanzelf.
Het apparaat is geblokkeerd omdat u niet heeft ingegrepen na de
pieptonen. Schakel de afwasautomaat uit met de toets ON/OFF,
open de kraan en schakel hem na 20 seconden opnieuw in door
middel van dezelfde toets. Herprogrammeer de afwasautomaat
en start hem opnieuw.
Schakel de afwasautomaat uit met de toets ON/OFF en reinig de
filters (zie Onderhoud), schakel hem opnieuw in door middel van
dezelfde toets. Herprogrammeer de afwasautomaat en start hem
opnieuw.
Schakel het apparaat uit door te drukken op de toets ON/OFF en
schakel het na een minuut weer in. Als het alarm blijft gaan moet
u de waterkraan dichtdraaien om lekkages te vermijden,
vervolgens de stekker uit het stopcontact halen en de
Servicedienst inschakelen.
).
NL
59

Service
NL
Voordat u er de installateur bijhaalt:
• Kijk eerst even of u het probleem zelf kunt
oplossen (zie Storingen en oplossingen);
• Start het programma om te controleren of de
storing is verholpen.
• Als de storing nog niet is opgelost moet u de
Servicedienst bellen op het nummer wat op het
garantiecertificaat is aangegeven.
Nooit een niet-bevoegde installateur erbij halen.
Vermeld:
• het soort storing
• het model van de machine (Mod.)
• het serienummer (S/N)
Deze informatie vindt u op het typeplaatje aan de
zijkant van de deur (zie Beschrijving van de
vaatwasser).
60

Manual de
Instrucciones
ES
Espanol, 61
LZ 705 EXTRA
LAVAVAJILLAS
Sumario
Instalación, 62-63
Colocación y nivelación
Conexiones hidráulicas y eléctricas
Datos técnicos
Descripción del aparato, 64
Vista de conjunto
Panel de control
Cargar los cestos, 65
Cesto inferior
Cesto de los cubiertos
Cesto superior
Puesta en funcionamiento y uso, 66
Poner en marcha el lavavajilla
Cargar el detergente
Opciones de lavado
Programas, 67
Tabla de programas
Abrillantador y sal regeneradora, 68
Cargar el abrillantador
Cargar la sal regeneradora
Mantenimiento y cuidados, 69
Cortar el agua y la corriente eléctrica
Limpiar el lavavajillas
Evitar los malos olores
Limpiar los rociadores
Limpiar los filtros
Si se ausenta durante largos períodos
Precauciones y consejos, 70
Seguridad general
Eliminación
Ahorrar y respetar el medio ambiente
Anomalías y soluciones, 71
Asistencia, 72

Instalación
ES
Es importante conservar este manual para poder
consultarlo en cualquier momento. En caso de
venta, de cesión o de traslado, controle que
permanezca junto con el aparato.
Lea atentamente las instrucciones: contienen
información importante sobre la instalación, sobre
el uso y sobre la seguridad.
En caso de traslado mantenga el aparato en
posición vertical; si fuera necesario inclinarlo,
hágalo hacia la parte posterior.
Colocación y nivelación
1. Desembale el aparato y controle que no haya
sufrido daños durante el transporte.
Si estuviera dañado, no lo conecte y llame al
revendedor.
2. Coloque el lavavajillas haciendo adherir los
costados o la parte posterior a los muebles
adyacentes o a la pared. El aparato también se
puede empotrar debajo de una superficie de
trabajo continua* (
ver la hoja de Montaje
).
Conexión del tubo de carga de agua
• A una toma de agua fría: enrosque bien el tubo
de carga a un grifo con boca roscada de ¾ gas;
antes de enroscarlo, haga correr agua hasta que
salga límpida para que las impurezas que
pudiera contener no obstruyan el aparato.
• A una toma de agua caliente: en el caso de una
instalación centralizada de radiadores, el
lavavajillas se puede alimentar con agua
caliente de la red, mientras no supere una
temperatura de 60ºC.
Enrosque el tubo al grifo de la misma forma
descrita para la toma de agua fría.
3. Coloque el lavavajillas sobre un piso plano y
rígido. Compense las irregularidades del mismo,
enroscando o desenroscando las patas hasta que
el aparato quede en posición horizontal (no debe
estar inclinado más de 2 grados). Una cuidadosa
nivelación brinda estabilidad y evita vibraciones,
ruidos y desplazamientos.
4. Regule la altura de las patas posteriores desde el
frente*: con un destornillador enrosque o
desenrosque los tornillos que se encuentran en la
parte baja del lavavajillas.
Conexiones hidráulicas y eléctricas
La adaptación de las redes eléctricas e
hidráulicas para la instalación debe ser realizada
sólo por personal especializado.
El lavavajillas no se debe apoyar en los tubos ni
en el cable de alimentación eléctrica.
Los tubos de carga (A) y de descarga (B) de agua y
el cable de alimentación eléctrica se pueden
orientar hacia la derecha o hacia la izquierda para
permitir una mejor instalación (
ver la figura
).
Si la longitud del tubo de carga no es la
adecuada, diríjase a un negocio especializado o a
un técnico autorizado (
La presión del agua debe estar comprendida
entre los valores indicados en la tabla de Datos
técnicos (
Controle que en el tubo no hayan pliegues ni
estrangulaciones.
Dispositivo de seguridad contra inundación
Para garantizar que no se produzcan
inundaciones, el lavavajillas:
- posee un sistema que interrumpe la entrada de
agua en el caso de anomalías o de pérdidas desde
el interior.
- posee un dispositivo de seguridad
sea, un tubo de carga de agua constituido por un
tubo exterior transparente y por otro interior rojo:
ambos tubos soportan presiones muy altas. Si se
rompe el tubo interno, el externo se colorea de rojo
fuerte y transporta el agua que contenía el interno,
evitando pérdidas.
Es muy importante controlar periódicamente el
tubo externo: si se lo ve de color rojo fuerte, debe
ser cambiado lo más rápido posible por el Servicio
de Asistencia técnica autorizado (
ver más adelante
ver Asistencia
).
).
Water Stop
ver Asistencia
*, o
).
62
* Presente sólo en algunos modelos.

Conexión del tubo de descarga de agua
A
Conecte el tubo de descarga, sin plegarlo, a una
tubería de descarga con un diámetro mínimo de 4
cm. También puede apoyarlo en el borde de un
lavamanos o de una bañera; el extremo libre del
tubo de descarga no debe permanecer sumergido
en agua.
El codo* de plástico
especial facilita una
colocación óptima: fije
firmemente el codo a la
pared para evitar que el
tubo se mueva y vierta
agua fuera de la
descarga.
La parte del tubo
marcada con la letra A
debe estar a una altura comprendida entre 40 y
100 cm. desde el suelo (
ver la figura
).
No se aconseja utilizar tubos de prolongación.
Conexión eléctrica
Antes de introducir el enchufe en la toma de
corriente, controle que:
• la toma posea conexión a tierra y que sea
conforme con la ley;
• la toma sea capaz de soportar la carga
máxima de potencia de la máquina indicada en
la placa de características ubicada en la
contrapuerta (
ver Descripción del lavavajillas
);
La Empresa declina toda responsabilidad
cuando no se hayan respetado estas normas.
Advertencias para el primer lavado
Después de la instalación e inmediatamente antes
del primer lavado, llene completamente de agua el
depósito de sal y agregue aproximadamente 2 kg.
de sal (
ver Abrillantador y sal regeneradora
): es
normal que el agua se derrame. Es normal también
que después de la carga de sal, el piloto FALTA DE
SAL* continúe centelleando durante algunos
ciclos.
Cinta anticondensación*
Después de haber empotrado el lavavajillas, abra la
puerta y pegue la cinta adhesiva transparente
debajo de la superficie de madera para protegerla
de la posible condensación.
Datos Técnicos
Dimensiones
Capacidad
Presión del agua
de alimentación
Tensión de
alimentación
ancho: 59,5 cm
altura: 82 cm
profundidad: 57 cm
12 cubiertos estándar
30 Kpa ÷ 1Mpa (0,3 ÷ 10 bar)
4,3 si – 145 psi
Ver la placa de características
ES
• la tensión de alimentación esté comprendida
dentro de los valores indicados en la placa de
características ubicada en la contrapuerta;
• la toma sea compatible con el enchufe del
aparato. Si no es así, solicite la sustitución del
enchufe a un técnico autorizado (
Asistencia
); no utilice prolongaciones ni tomas
ver
múltiples.
Una vez instalado el aparato, el cable de
alimentación eléctrica y la toma de corriente
deben ser fácilmente accesibles.
El cable no se debe plegar ni comprimir.
El cable debe ser controlado periódicamente y
sustituido sólo por técnicos autorizados (
Asistencia
).
ver
Potencia total
absorbida
Fusible
Ver la placa de características
Ver la placa de características
Este aparato es conforme a las
siguientes Directivas de la
Comunidad:
-73/23/CEE del 19/02/73 (Bajo
Voltaje) y sucesivas
modificaciones;
-89/336/CEE del 03/05/89
(Compatibilidad
Electromagnética) y sucesivas
modificaciones.
-97/17/CE (etiquetado)
-2002/96/CE
* Presente sólo en algunos modelos.
63

Descripción del aparato
ES
Vista de conjunto
1
4
6
9
11
3
2
5
7
8
10
1. Cesto superior
2. Rociador superior
3. Cestos adicionales
4. Regulador de la altura del cesto
5. Cesto inferior
6. Rociador inferior
7. Cesto para cubiertos
8. Filtro de lavado
9. Depósito de sal
10. Cubetas de detergente y depósito de
abrillantador
11. Placa de características
Panel de control
Display
Piloto
FALTA DE
ABRILLANTADOR*
Piloto
FALTA DE SAL*
ENCENDIDO-
APAGADO
Piloto
COMIENZO
RETRASADO*
Botón
COMIENZO
RETRASADO*
DISPLAY
Botón
Piloto
MEDIA CARGA
Piloto
SECADO EXTRA*
Botón
MEDIA CARGA
START/RESET
U
V
Z
**
*
**
PRELAVADO
LAVADO
ACLARADOS
SECADO
Botón
SECADO EXTRA*
**
*
**
Botón
Perilla
SELECCION
DE PROGRAMAS
Pilotos
AVANCE DEL CICLO
64
* Presente sólo en algunos modelos.

Cargar los cestos
Antes de realizar la carga, elimine de la vajilla los residuos
de comida, coloque en remojo (sólo con agua)
sartenes con incrustaciones y vacíe los vasos y copas.
Después de haber realizado la carga, controle que los
rociadores giren libremente.
ollas y
Cesto inferior
Coloque en este cesto la vajilla más difícil de lavar como
se indica en los
soportes abatibles*.
• Fuentes y tapas: a los costados del cesto.
• Ollas y ensaladeras: siempre volcadas.
• Vajilla muy honda: en posición oblicua.
Para garantizar mejores prestaciones de lavado y secado,
la superficie del cesto inferior es más áspera que la del
superior.
Ejemplos de carga
y con la ayuda de los
Cesto de los cubiertos
El cesto de los cubiertos puede ser diferente según el
modelo de lavavajillas.
Los cuchillos y los utensilios con punta se deben colocar
en el cesto de los cubiertos con la punta dirigida hacia
abajo.
Si el cesto posee manijas click
clack* (
bájelas para regular la altura.
ver la figura
Ejemplos de carga del cesto superior
Ejemplos de carga del cesto inferior
), levántelas o
ES
Para dividir en dos partes el cuerpo central*: quite la
manija. Las dos aletas laterales* se pueden desprender y
enganchar en el cesto superior o inferior.
Los dos elementos con rejilla* se introducen en el cesto
para tener separados los cubiertos: introdúzcalos en las
ranuras con los mangos dirigidos hacia abajo.
Cesto superior
Cargue en este cesto la vajilla delicada y liviana: vasos,
tazas de té y de café, platitos, ensaladeras bajas,
sartenes, ollas bajas poco sucias, como se indica en los
Ejemplos de carga
• Vajilla liviana: colóquela de modo tal que no sea
desplazada por los chorros de agua.
• Tazas y tacitas: colóquelas en los cestos adicionales**.
• Cuchillos largos y puntiagudos, cubiertos para servir:
colóquelos en los cestos adicionales**.
Regular la altura del cesto superior
1
3
delanteras y cierre los sujetadores (
.
Para facilitar la colocación de la
vajilla, se puede ubicar el cesto
superior en posición alta o baja:
2
abra los sujetadores de las guías
del cesto, a la izquierda y a la
derecha, y extráigalo; colóquelo
arriba o abajo, hágalo deslizar a lo
4
largo de las guías hasta hacer
entrar también las ruedas
ver la figura
).
Cestos adicionales Baby**
Con los modelos de
lavavajillas que incluyen el
Ciclo Baby, se suministran
cestos adicionales
especiales para el lavado del
biberón, arandelas y tetinas.
Vajilla no adecuada para el lavado en
lavavajillas
• Objetos de madera, con empuñadura de madera o de
cuerno o con partes encoladas.
• Objetos de aluminio, cobre, latón, peltre o estaño.
• Vajilla de plástico que no sea termorresistente.
• Porcelanas antiguas o pintadas a mano.
• Vajilla de plata antigua. En cambio, la vajilla de plata
que no es antigua se puede lavar con un programa
delicado y controlando que no esté en contacto con
otros metales.
Cuando se compra vajilla y cubiertos, se aconseja
verificar la posibilidad de lavarlos en el lavavajillas.
Lavado de las manijas*
Para lavar las manijas de los cestos inferior y superior:
quite los dos tapones de fijación, extraiga las manijas,
lávelas con agua corriente y fíjelas al cesto con los tapones.
* Presente sólo en algunos modelos.
** Cantidad y posición variables.
65

A
B
D
C
ES
Puesta en
funcionamiento y uso
Poner en marcha el lavavajillas
1. Abra el grifo de agua.
2. Presione el botón ENCENDIDO-APAGADO: se iluminará el
display.
3. Dosifique el detergente (
4. Cargue los cestos (
puerta.
5. Seleccione el programa girando el mando de SELECCIÓN
DE PROGRAMA en sentido horario: haga coincidir la muesca
que se encuentra en el mando con el número o con el símbolo
del programa.
6. Seleccione las opciones de lavado (
7. Póngalo en funcionamiento presionando el botón START/
RESET: se escuchará un sonido de confirmación. Los pilotos
de AVANCE DEL CICLO indican el estado del programa:
Prelavado, Lavado, Aclarado, Secado.
8. Al final se escucharán tres breves señales sonoras y en el
display aparecerá la palabra END. Apague el aparato
presionando el botón ENCENDIDO-APAGADO, cierre el grifo
de agua y desenchufe el aparato.
9. Abra la puerta y espere algunos minutos antes de extraer la
vajilla para evitar quemarse. Descargue los cestos
comenzando por el inferior.
Demo*
El mensaje dON en el display indica que se ha activado un
programa demostrativo. Para desactivarlo presione
simultáneamente los botones START/RESET y ENCENDIDOAPAGADO, aparecerá el mensaje dOF.
Modificar un programa en curso
Si no se ha seleccionado el programa deseado, es posible
modificarlo, siempre que haya comenzado recién. mantenga
presionado el botón START/RESET durante 4 segundos.
Después de un sonido largo y tres breves, el piloto de
AVANCE DEL CICLO se apagará: seleccione un nuevo
programa y póngalo en funcionamiento presionando el botón
START/RESET.
Agregar vajilla
Presione el botón ENCENDIDO-APAGADO, abra la puerta
teniendo cuidado con el escape de vapor e introduzca la
vajilla. Presione de nuevo el botón ENCENDIDO-APAGADO: el
ciclo se reanudará.
Interrupciones accidentales
Si durante el lavado se abre la puerta o se produce una
interrupción de corriente, el programa se interrumpe. Cuando
se cierra la puerta o vuelve la corriente, el programa se
reanuda a partir del punto en el que se había interrumpido.
Cargar el detergente
El éxito del lavado depende también de la correcta
dosificación del detergente, indicada por el fabricante. Si se
excede la cantidad indicada, no se lava más eficazmente y se
contamina el medio ambiente.
Las mejores prestaciones de lavado y secado se obtienen
sólo con el uso de detergente en polvo, abrillantador líquido y
sal.
ver más adelante
ver Cargar los cestos
ver más adelante
).
) y cierre la
).
cubeta A:cubeta A:
cubeta A: Detergente para lavado
cubeta A:cubeta A:
cubeta B:cubeta B:
cubeta B: Detergente para prelavado
cubeta B:cubeta B:
1. Abra la tapa C
presionando el botón D.
2. Dosifique el detergente
consultando la
programas
• en polvo: cubetas A y B.
• en pastillas: cubeta A y
fondo de la cuba, o sea,
cuando el programa requiere
1. colóquela en la cubeta A y
cierre la tapa; cuando el
programa requiere 2,
coloque la segunda en el
fondo de la cuba.
3. Elimine los residuos de detergente de los bordes de la
cubeta y cierre la tapa hasta el enganche.
Tabla de
:
Opciones de lavado
Comienzo retrasado
Es posible postergar el comienzo del programa
hasta 24 horas:
1. presione el botón COMIENZO RETRASADO: cada vez que
se presiona, aparece en el display el tiempo seleccionado y
se ilumina el piloto correspondiente al retraso elegido;
2. seleccione el programa y presione el botón START/RESET:
después del sonido comenzará la cuenta al revés;
3.una vez cumplido el tiempo, el piloto se apagará y
comenzará el programa.
Para modificar el retraso presione el botón COMIENZO
RETRASADO. Para anularlo, presione el botón varias veces
hasta que se ponga en marcha el programa y se ilumine el
piloto de AVANCE DEL CICLO correspondiente al comienzo
de dicho programa.
Media carga en el cesto superior*
Si la vajilla que debe lavar es poca, se puede utilizar la media
carga que permite ahorrar agua, energía y detergente. Antes
de seleccionar el programa, presione el botón MEDIA CARGA
varias veces: el piloto se iluminará y se activará el lavado sólo
en el cesto superior.
Recuerde cargar la vajilla sólo en el cesto superior y disminuir
a la mitad la cantidad de detergente.
Es preferible utilizar detergente en polvo.
Secado extra*
Para obtener un secado perfecto, presione el botón SECADO
EXTRA antes de seleccionar el programa. Una señal sonora
prolongada indica la activación de esta opción, una señal
breve indica su desactivación.
Con el secado extra los programas duran más tiempo.
* Presente sólo en algunos modelos.
66

Programas
Tabla de programas
Los lavavajillas Ariston poseen un sistema automático de limpieza de los filtros que puede prolongar la duración de los programas.
PROGRAMAS AUTO: este modelo de lavavajillas puede evaluar el grado de suciedad a través de un sensor particular y
seleccionar luego, el lavado más eficiente y económico. La duración de los programas auto podrá variar debido a la intervención
del sensor.
Si la vajilla está poco sucia o ha sido aclarada precedentemente bajo el agua, recuerde disminuir la dosis de detergente.
Indicaciones para la
selección de
programas
Vajilla y ollas muy
sucias (no usar para
piezas delicadas).
Vajilla y ollas
normalmente sucias.
Programa estándar
diario.
Programa
Intensivo
Normal
Detergente
(A) = cubeta A
(B) = cubeta B
en polvo Líquido Pastillas
30 g (A)
5 g (B)
30 g (A) 30 ml (A) 1 (A)
30 ml (A)
5 ml (B)
1 (A)
1 (fondo
cuba
Prelavado Secado
• •
• •
Duración del
programa
(tolerancia
±10%)
2:00'
1:40’
ES
Lavado ecológico de
bajo consumo
energético, adecuado
para vajilla y ollas.
Ciclo económico y veloz
que se utiliza para
vajilla poco sucia,
inmediatamente
después del uso. Rápido
Lavado preliminar a la
espera de completar la
carga en la comida
sucesiva.
Ciclo higiénico para
lavar biberones,
arandelas y tetinas
junto con platos, tacitas,
vasos y cubiertos.
Cargue sólo en el cesto
superior.
Lavado diferenciado en
los dos cestos: delicado
en el superior para
cristales y vasos,
enérgico para ollas en
el cesto inferior. Duo Wash
Eco
Remojo
Baby
25 g (A)
5 g (B)
25 g (A) 25 ml (A)
20 g (A) 20 ml (A)
25 g (A)
5 g (B)
25 ml (A)
5 ml (B)
25 ml (A)
5 ml (B)
1 (A)
1 (A)
• •
• •
2:25’
30’
12'
1:00'
1:48’
Nota:
Para facilitar la dosificación del detergente, es importante saber que:
1 cucharada = 15 gramos de polvo = 15 ml. de líquido aproximadamente
1 cucharadita = 5 gramos de polvo = 5 ml. de líquido aproximadamente
67

Abrillantador y sal regeneradora
ES
Use solamente productos específicos para lavavajillas.
No utilice sal de cocina o industrial.
Si utiliza un producto multifunción (2in1, 3in1, 4in1, etc.) no
es necesario agregar abrillantador pero se aconseja
agregar sal, especialmente si el agua es dura. Si no se
agrega ni sal ni abrillantador, es normal que los pilotos
FALTA DE SAL* y FALTA DE ABRILLANTADOR* continúen
centelleando.
Cargar el abrillantador
El abrillantador facilita el secado de la vajilla haciendo
deslizar el agua por la superficie para que no se
produzcan estrías o manchas.
El depósito del abrillantador se debe llenar:
• cuando se lo ve vacío a través del piloto (H). Piloto
claro: agregar abrillantador; piloto oscuro: cantidad de
abrillantador suficiente;
• cuando en el panel centellea el piloto FALTA DE
ABRILLANTADOR*;
1. Abra el depósito girando el
H
abrillantador directamente en el interior de la cuba.
tapón (G) en sentido
antihorario.
2. Vierta el abrillantador
evitando que se derrame. Si
esto sucede, limpie
F
rápidamente con una
G
esponja.
3. Vuelva a enroscar el tapón.
No vierta NUNCA el
• si no posee piloto o flotador verde:
aproximadamente cada 30 ciclos de lavado;
1. Extraiga el cesto inferior y
desenrosque el tapón del
depósito en sentido antihorario.
2. Sólo la primera vez que se
utiliza: llene el depósito de agua
hasta el borde.
3. Coloque el embudo
suministrado con el aparato (
) y llene el depósito de sal hasta el borde
figura
(aproximadamente 2 kg.); es normal que se derrame un
poco de agua.
4. Extraiga el embudo, elimine los residuos de sal de la
rosca y enrosque bien el tapón para que en el depósito no
entre detergente durante el lavado (podría dañarse
irremediablemente el descalcificador).
Cuando se agrega sal, ponga en marcha inmediatamente
un ciclo de lavado sin vajilla para eliminar la solución salina
derramada y evitar la corrosión.
ver la
Regular la dosis de sal*
Es posible regular el consumo de sal según la dureza del
agua, este dato se puede obtener en la Administración que
suministra el agua potable.
1. Desenrosque el tapón del depósito.
2. Gire la flecha que se encuentra en el
ver la figura
collar (
– según lo indicado en la tabla:
) hacia el + o hacia el
Regular la dosis de abrillantador
Si no está satisfecho con el resultado del lavado o del
secado, puede regular la dosis de abrillantador. Con un
destornillador gire el regulador (F) eligiendo entre 6
posiciones (la regulación de fábrica es en la posición 4):
• si en la vajilla se producen estrías azuladas, gire el
regulador hacia los números bajos (1-3).
• si hay gotas de agua o manchas de caliza, gire el
regulador hacia los números altos (4-6).
Si se utilizan las pastillas multifunción (2in1, 3in1, 4in1,
etc.) y se desea obtener un mejor secado, llene el depósito
y coloque el regulador en 2.
Cargar la sal regeneradora
Para obtener buenos resultados en el lavado, es
indispensable verificar que el depósito de sal no esté
nunca vacío. La sal regeneradora elimina la caliza del agua
evitando que se deposite sobre la vajilla. El depósito de sal
está ubicado en la parte inferior del lavavajillas (
Descripción
• cuando, observando el tapón de sal, no se ve el
flotador verde*;
• cuando en el panel centellea el piloto FALTA DE SAL*;
) y se debe llenar:
ver
Dureza del agua
°dH °fH °mmol/l
0 - 10 0 - 17 0 - 1,7 / 0 /
10 25 18 44 1,8 4,4 - 20 60
25 50 45 89 4,5 8,9 MED 40 40
> 50 > 89 > 8, 9 + 60 25
El descalcificador está regulado de fábrica en +.
- Si se utilizan las pastillas multifunción (2in1, 3in1, 4in1,
etc.) llene el depósito de sal y regule la posición en -; si la
dureza del agua es mayor que 60°fH, regule la posición en
+.
* Presente sólo en algunos modelos.
Posición
del selector
Consumo de
sal
(gramos/ciclo)
Auton omía
(ciclos/2kg)
68

Mantenimiento y
cuidados
Cortar el agua y la corriente eléctrica
• Cierre el grifo de agua después de cada
lavado para eliminar el riesgo de pérdidas.
• Desenchufe el aparato antes de limpiarlo y
durante los trabajos de mantenimiento.
Limpiar el lavavajillas
• La superficie externa y el panel de control se
pueden limpiar con un paño empapado en agua
y no abrasivo. No utilice disolventes ni productos
abrasivos.
• Se pueden eliminar las manchas de la cuba
interna con un paño empapado en agua y un
poco de vinagre.
Evitar los malos olores
• Deje siempre semicerrada la puerta para evitar
la estancación de humedad.
Limpiar los filtros
Los filtros eliminan del agua de lavado los residuos
de alimentos y la reciclan: para obtener buenos
resultados en el lavado, es necesario limpiarlos.
Limpie los filtros regularmente.
Después de la limpieza, verifique que el grupo
filtrante esté correctamente colocado.
El lavavajillas no se debe utilizar sin filtros o con
el filtro desenganchado.
1. Extraiga los filtros tirando el mango hacia arriba.
2. Limpie los filtros:
• después de cada
lavado elimine del
C
1
2
A
B
plato semicircular A y
del vaso B (se extraen
tirando del mango) los
residuos más grandes
y enjuáguelos con
agua corriente.
ES
• Limpie regularmente las juntas perimétricas de
la puerta y de las cubetas de detergente con
una esponja húmeda. De este modo se
evitarán estancamientos de comida que son
los principales responsables del mal olor.
Limpiar los rociadores
Puede suceder que
algunos residuos de
comida se adhieran a
los brazos rociadores
y obstruyan los
orificios por los que
debe salir el agua:
cada tanto es
importante controlarlos
y limpiarlos con un
cepillo no metálico.
• una vez al mes
B
C
A
3. Vuelva a montar el grupo filtrante y colóquelo en
su asiento siguiendo los movimientos 1 y 2
indicados en la figura, hasta el enganche.
limpie
cuidadosamente todo
el grupo filtrante: plato
semicircular A, vaso B
y filtro cilíndrico C (se
extrae girándolo en
sentido antihorario).
Para la limpieza utilice
un cepillo no metálico.
Si se ausenta durante largos períodos
• Haga un lavado en vacío.
• Desconecte el aparato de las conexiones
eléctricas e hidráulicas.
• Deje la puerta semicerrada.
69

Precauciones y
consejos
ES
El aparato ha sido proyectado y fabricado en
conformidad con las normas internacionales sobre
seguridad. Estas advertencias se suministran por
razones de seguridad y deben ser leídas
atentamente.
Seguridad general
• El aparato ha sido fabricado para un uso de tipo
no profesional en el interior de una vivienda.
• El aparato debe ser utilizado para el lavado de
la vajilla de uso doméstico, sólo por personas
adultas y según las instrucciones contenidas en
este manual.
• El aparato no se debe instalar al aire libre, ni
siquiera si el lugar está reparado porque es muy
peligroso dejarlo expuesto a la lluvia o a las
tormentas.
• No toque el lavavajillas si está descalzo.
• No desenchufe el aparato tirando del cable sino
sujetando el enchufe.
• Es necesario cerrar el grifo de agua y
desenchufar el aparato antes de realizar
operaciones de limpieza y mantenimiento.
• En caso de avería, no acceda nunca a los
mecanismos internos para intentar su
reparación.
• No toque nunca la resistencia.
• No se apoye ni se siente sobre la puerta abierta:
el aparato podría volcarse.
• Conserve el detergente y el abrillantador fuera
del alcance de los niños.
• Los embalajes no son juguetes para los niños.
Eliminación del electrodoméstico viejo
En base a la Norma europea 2002/96/CE de
Residuos de aparatos Eléctricos y Electrónicos
(RAEE), los electrodomésticos viejos no pueden ser
arrojados en los contenedores municipales
habituales; tienen que ser recogidos selectivamente
para optimizar la recuperación y reciclado de los
componentes y materiales que los constituyen, y
reducir el impacto en la salud humana y el
medioambiente. El símbolo del cubo de basura
tachado se marca sobre todos los productos para
recordar al consumidor la obligación de separarlos
para la recogida selectiva.
Ahorrar y respetar el medio ambiente
Ahorre agua y energía
• Ponga en funcionamiento el lavavajillas sólo con
plena carga. A la espera de que la máquina esté
llena, prevenga los malos olores con el ciclo
Remojo (
• Seleccione un programa adecuado al tipo de
vajilla y al grado de suciedad consultando la
Tabla de programas
- para vajilla normalmente sucia utilice el
programa Eco que garantiza un bajo consumo
energético y de agua.
- si la carga es poca, active la opción Media
carga (
• Si el suministro de energía eléctrica prevé
horarios de ahorro energético, realice los
lavados en los horarios con tarifa reducida. La
opción Comienzo retrasado* (
funcionamiento y uso
los lavados en ese sentido.
Detergentes sin fosfatos, sin cloro y que
contengan enzimas
• Se aconseja usar detergentes sin fosfatos y sin
cloro que son los más indicados para proteger el
medio ambiente.
• Las enzimas desarrollan una acción
particularmente eficaz con temperaturas
próximas a los 50ºC, por lo tanto, utilizando
detergentes con enzimas se pueden elegir
lavados a bajas temperaturas y obtener los
mismos resultados que si se realizaran a 65ºC.
• Para evitar derroches, dosifique bien el
detergente, teniendo en cuenta las indicaciones
del fabricante, la dureza del agua, el grado de
suciedad y la cantidad de vajilla que debe lavar.
Aún siendo biodegradables, los detergentes
contienen elementos que alteran el equilibrio de
la naturaleza.
ver Programas
ver Puesta en funcionamiento y uso
).
:
).
ver Puesta en
) puede ayudar a organizar
El consumidor debe contactar con la autoridad
local o con el vendedor para informarse en relación
a la correcta eleminación de su electrodoméstico
viejo.
70
* Presente sólo en algunos modelos.

Anomalías y soluciones
Si el aparato presente anomalías de funcionamiento, controle los siguientes puntos antes de llamar al Servicio
de Asistencia Técnica (
ver Asistencia
).
Algunas anomalías están señaladas por códigos que centellean en el display: tome nota de cuáles son los
códigos que centellean antes de llamar al Servicio de Asistencia Técnica.
Anomalías: Posibles causas / Solución:
El lavavajillas no arranca.
El lavavajillas no carga agua.
El lavavajillas no descarga agua.
El lavavajillas hace ruido.
En la vajilla y en los vasos
quedan depósitos calcáreos o
una pátina blanquecina.
En la vajilla y en los vasos
quedan estrías o matices
azulados.
La vajilla no queda bien seca.
La vajilla no queda limpia.
Alarma por grifo cerrado.
(se escuchan breves sonidos)
(centellea en el display el
código AO6).
Alarma por filtros atascados
(centellea en el display el
código AO5)
Alarma por avería en la
electroválvula de carga de
agua
(centellea en el display el
código AO2).
El enchufe no está bien introducido en la toma de corriente o en
la casa no hay corriente.
La puerta del lavavajillas no está bien cerrada.
Se ha seleccionado un Comienzo retrasado (ver Puesta en
funcionamiento y uso).
Falta agua en la red hídrica.
El tubo de carga de agua está plegado (ver Instalación).
El programa no ha terminado aún.
El tubo de descarga de agua está plegado (ver Instalación).
La descarga del lavamanos está obstruida.
El filtro está obstruido con residuos de comida.
Los elementos de la vajilla se golpean entre sí o contra los
rociadores.
Falta la sal regeneradora o su regulación no es la adecuada para
la dureza del agua (ver Abrillantador y sal).
El tapón del depósito de sal no está bien cerrado.
El abrillantador se ha terminado o la dosificación es insuficiente.
La vajilla es de material antiadherente.
La dosificación del abrillantador es excesiva.
El abrillantador se ha terminado o la dosificación es insuficiente
(ver Abrillantador y sal).
La regulación del abrillantador no es la adecuada.
Se ha seleccionado un programa sin secado.
Los cestos están demasiado cargados (ver Cargar los cestos).
La vajilla no está bien distribuida.
Los rociadores no giran libremente.
El programa de lavado no es suficientemente enérgico (ver
Programas).
El detergente no está dosificado adecuadamente o no es el
adecuado (ver Puesta en funcionamiento y uso).
El filtro está sucio u obstruido (ver Mantenimiento y cuidados).
Falta sal regeneradora (ver Abrillantador y sal).
Abra el grifo y el aparato comenzará a funcionar en pocos
minutos.
El aparato se ha bloqueado porque no se ha intervenido al sonar
la alarma. Apague la máquina con el botón
ENCENDIDO/APAGADO, abra el grifo y después de 20 segundos
vuelva a encenderla presionando el mismo botón. Vuelva a
programar la máquina y póngala en funcionamiento.
Apague la máquina presionando el botón ENCENDIDO/APAGADO
y limpie los filtros (ver Mantenimiento), luego vuelva a
encenderla presionando el mismo botón. Vuelva a programar la
máquina y póngala en funcionamiento.
Apague la máquina presionando el botón ENCENDIDO/APAGADO
y vuelva a encenderla después de un minuto. Si la alarma
permanece, cierre el grifo de agua para evitar inundaciones,
desenchufe el aparato y llame al Servicio de Asistencia Técnica.
ES
71

Asistencia
ES
Antes de llamar a la Asistencia
Técnica:
• Verifique si la anomalía la puede resolver solo
(ver Anomalías y soluciones).
• Vuelva a poner en marcha el programa para
controlar si el inconveniente fue resuelto.
• Si la anomalía no ha sido resuelta, llame al
Servicio de Asistencia Técnica Autorizado, al
número que se encuentra en el certificado de
garantía.
No recurra nunca a técnicos no autorizados.
Comunicar:
• el tipo de anomalía
• el modelo de la máquina (Mod.)
• el número de serie (S/N ).
Estas informaciones se encuentran en la placa que
está fijada en la parte lateral de la puerta de acero
inox (ver Descripción del lavavajilla).
72

Instruções de uso
MÁQUINA DE LAVAR LOUÇA
PT
Português, 73
LZ 705 EXTRA
Índice
Instalação, 74-75
Posicionamento e nivelamento
Ligações hidráulicas e eléctricas
Dados técnicos
Descrição do aparelho, 76
Visão de conjunto
Painel de controlo
Carregar os cestos, 77
Cesto inferior
Cesto dos talheres
Cesto superior
Início e utilização, 78
Ligar a máquina de lavar louça
Carregar o detergente
Opções de lavagem
Programas, 79
Tabela dos programas
Abrilhantador e sal regenerante, 80
Carregar o abrilhantador
Carregar o sal regenerante
Manutenção e cuidados, 81
Excluir a água e a corrente eléctrica
Limpar a máquina de lavar louça
Evitar cheiros desagradáveis
Limpar os braços aspersores
Limpar os filtros
Longos períodos de ausência
Precauções e conselhos, 82
Segurança geral
Eliminação
Economizar e respeitar o ambiente
Anomalias e soluções, 83
Assistência, 84

Instalação
PT
É importante conservar este manual para poder
consultá-lo em qualquer momento. Em caso de
venda, cessão ou mudança, certifique-se que o
mesmo fique junto ao aparelho.
Leia atentamente as instruções: há informações
importantes sobre a instalação, o uso e a
segurança.
No caso de mudança mantenha o aparelho em
posição vertical; se for necessário, deite-o para
trás.
Posicionamento e nivelamento
1. Desembale o aparelho e controle que não tenha
sofrido danos durante o transporte.
Se estiver danificado, não o acenda e contacte o
revendedor.
2. Posicione a máquina de lavar louça fazendo
aderir as laterais ou o fundo aos móveis adjacentes
ou a uma parede. O aparelho pode ser encaixado
embaixo de um plano de trabalho contínuo* (
a folha de Montagem
3. Posicione a máquina de lavar louça sobre um
pavimento plano e rígido. Compense as
irregularidades desparafusando ou parafusando os
pés até que o aparelho se encontre em posição
horizontal (não deve estar inclinado por mais de 2
graus). Um nivelamento cuidadoso dá estabilidade
e evita vibrações, ruídos e deslocamentos.
4. Regule a altura dos pezinhos traseiros pela
frente*: com uma chave de parafuso atarraxe ou
desatarraxe os parafusos que há na parte baixa
da máquina de lavar louça.
).
veja
Ligações hidráulicas e eléctricas
A adaptação das instalações eléctricas e
hidráulicas deve ser efectuada somente por
pessoal qualificado.
A máquina de lavar louça não deve ficar apoiada
sobre tubos ou sobre o cabo de alimentação
eléctrica.
Os tubos de carregamento (A) e de
descarregamento (B) da água e o cabo de
alimentação eléctrica podem ser virados para a
direita ou para a esquerda para consentir uma
melhor instalação (
veja a figura
).
Ligação do tubo de carregamento da água
• A uma entrada de água fria: parafusar bem o
tubo de carregamento a uma torneira com boca
rosqueada de 3/4 gás; antes de parafusar,
deixe correr a água até que esteja límpida para
que as eventuais impurezas não obstruam o
aparelho.
• A uma entrada de água quente: no caso de
sistema centralizado de esquentador, a
máquina de lavar louça poderá ser alimentada
com água quente da rede desde que não
ultrapasse os 60ºC.
Parafuse o tubo à torneira como descrito para a
entrada de água fria.
Se o comprimento do tubo de carregamento não
for suficiente, contacte uma loja especializada ou
um técnico autorizado (
A pressão da água deve estar incluída entre os
valores indicados na tabela dos Dados técnicos
veja abaixo
(
Preste atenção para que o tubo não esteja
dobrado ou amassado.
Segurança contra alagamentos
Para garantir que não se verifiquem alagamentos,
a máquina de lavar louça:
- é equipada com um sistema que interrompe a
entrada da água no caso de anomalias ou
vazamentos no interior.
- é dotada de uma segurança
seja, dispõe de um tubo de carregamento da
água constituído por um tubo externo transparente
e por um tubo interno vermelho: ambos os tubos
suportam pressões muito altas. Em caso de
quebra do tubo interno, aquele externo ficará
vermelho vivo e transportará a água no lugar
daquele interno, evitando vazamentos.
É muito importante controlar periodicamente o
tubo externo: se estiver vermelho vivo, deverá ser
substituído o quanto antes pela Assistência
técnica autorizada (
).
veja Assistência
Water Stop
veja Assistência
).
*, ou
).
74
* Presente somente em alguns modelos.

Ligação do tubo de descarregamento da água
A
Ligar o tubo de descarregamento, sem dobrá-lo, a
um conduto de descarga com diâmetro mínimo de
4 cm. Em alternativa, apoie-o na borda de um
lavabo ou de uma banheira; a extremidade livre
do tubo de descarga não deve ficar imersa na
água.
O especial cotovelo* de
matéria plástica facilita
o posicionamento ideal:
fixe firmemente o
cotovelo ao muro para
evitar que o tubo se
mova e derrame a água
fora da descarga
A parte da mangueira
marcada com a letra A
deve ficar entre 40 e 100 cm. de altura (
)
figura
veja a
Advertências para a primeira lavagem
Após a instalação, imediatamente antes da
primeira lavagem, encha completamente de água
o reservatório do sal e acrescente
aproximadamente 2 kg de sal (
e sal regenerante
reservatório. É normal também que após o
carregamento do sal o indicador luminoso de
FALTA DE SAL* continue a piscar por alguns
ciclos.
Fita contra a condensação*
Depois de ter encaixado a máquina de lavar
louça, abra a porta e cole a fita adesiva
transparente embaixo da prateleira de madeira
para protegê-la contra eventual condensação.
Dados Técnicos
): é normal que a água saia do
veja Abrilhantador
PT
É desaconselhado o uso de tubos de extensão.
Ligação eléctrica
Antes de colocar a ficha eléctrica na tomada,
certifique-se de que:
• a tomada tenha a ligação de terra e que esteja
conforme às normas de lei;
• a tomada possa suportar a carga máxima de
potência da máquina, indicada na placa das
características colocada na contra porta (
Descrição da máquina de lavar louça
• a tensão de alimentação esteja incluída nos
valores indicados na placa das características
colocada na contra porta;
• a tomada seja compatível com a ficha do
aparelho. Caso contrário, peça a substituição
da ficha a um técnico autorizado (
Assistência
múltiplas.
Uma vez que a máquina estiver instalada, o
cabo de alimentação eléctrica e a tomada deverão
ser facilmente alcançáveis.
O cabo não deve ficar dobrado ou compresso.
O cabo deve ser controlado periodicamente e
substituído apenas por técnicos autorizados (
Assistência
A Empresa declina qualquer responsabilidade no
caso em que estas normas não sejam
respeitadas.
); não use extensões ou tomadas
).
veja
veja
);
veja
largura 59,5 cm
Dimensões
Capacidade
Pressão da água
na alimentação
Tensão de
alimentação
Potência total
absorvida
Fusível
* Presente somente em alguns modelos.
altura 82 cm.
profundidade 57 cm
12 pessoas padrão
30 Kpa ÷ !Mpa
(0,3 ÷ 10 bar)
4,3 psi – 145 psi
Veja a placa das características
Veja a placa das características
Veja a placa das características
Esta aparelhagem é em
conformidade com as seguintes
Directivas Comunitárias:
-73/23/CEE de 19/02/73 (Baixa
Tensão) e posteriores
modificações.
-89/336/CEE dl 03/05/89
(Compatibilidade
Electromagnética) e posteriores
modificações.
-97/17/CE (Aplicação de
rótulos)
-2002/96/CE (RAEE)
75

Descrição do aparelho
PT
Visão de conjunto
1
4
6
9
11
3
2
5
7
8
10
1. Cesto superior
2. Braço aspersor superior
3. Peças basculantes
4. Regulação da altura do cesto
5. Cesto inferior
6. Braço aspersor inferior
7. Cesto dos talheres
8. Filtro de lavagem
9. Reservatório do sal
10. Recipientes detergente e reservatório
abrilhantador
11. Placa das características
Painel de controlo
Display
Indicador luminoso
Indicador luminoso
FALTA DE ADITIVO
PARA BRILHO*
Indicador luminoso
FALTA DE SAL*
INÍCIO
POSTERIOR*
Tecla
ON/OFF
Indicador luminoso
MEIA CARGA
Indicador luminoso
EXTRA
SECAGEM*
**
*
**
PRÉ-LAVAGEM
LAVAGEM
ENXAGUADAS
SECAGEM
U
V
Z
DISPLAY
START/RESET
Tecla
Botão
SELECÇÃO
DO PROGRAMA
Indicadores luminosos
AVANÇO DE CICLO
76
Tecla
INÍCIO
POSTERIOR*
Tecla
EXTRA
SECAGEM*
Tecla
MEIA CARGA*
* Presente somente em alguns modelos.

Carregar os cestos
Antes de carregar, elimine os resíduos de comida das
louças, deixar os tachos incrustados em amolecimento
apenas com água, esvazie os copos e as taças dos
resíduos de líquido. Depois de ter carregado, controle se
os aspersores rodam livremente.
Cesto inferior
Coloque as louças mais difíceis de lavar conforme os
Exemplos de carregamento
escamoteáveis*.
• Travessas e tampas: aos lados do cesto.
• Panelas e saladeiras: sempre com o fundo para cima.
• Peças muito fundas: em posição oblíqua.
Para garantir melhores prestações de lavagem e secagem,
a superfície do cesto inferior é mais áspera que a do cesto
superior.
e servindo-se dos suportes
Cesto dos talheres
O cesto dos talheres pode ser de tipo diferente, conforme
o modelo de máquina de lavar louça.
As facas e os utensílios pontiagudos devem ser
carregados no cesto dos talheres com as pontas viradas
para baixo.
Se o cesto for dotado de pegas
“click clack”* (
as para cima ou para baixo para
regular a sua altura.
veja a figura
), puxe-
Exemplos de carregamento do cesto superior
Exemplos de carregamento do cesto inferior
PT
Para dividir em dois o corpo central *: desfiar a alça. As
duas linguetas laterais * podem-se destacar e enganchar
ao cesto superior ou inferior.
Os dois elementos tipo grelha * vão inseridos no cesto para
deixar separados os talheres: enfie os talheres nas fendas
com os cabos virados para baixo.
Cesto superior
Carregue as louças delicadas e leves: copos, chávenas de
chá e de café, tigelas baixas, frigideiras, panelas baixas e
pouco sujas, conforme os
• Peças leves: arrume-as de maneira que não se
desloquem com os jactos de água.
• Chávenas e xícaras: posicione-as sobre as peças
basculantes**.
• Facas compridas e pontiagudas, talheres de cozinha:
posicione-as sobre as peças basculantes**.
Regule a altura do cesto superior.
Para facilitar o posicionamento das louças, é possível
figura
1
3
).
2
4
Exemplos de carregamento
colocar o cesto superior em
posição alta ou baixa:
abra os trincos das guias do cesto
à direita e à esquerda e retire o
cesto; disponha-o no alto ou em
baixo, faça-o deslizar ao longo das
guias até entraram também as
rodinhas anteriores e feche
novamente os trincos (
.
veja a
Peças basculantes Baby
**
Nos modelos de máquina de
lavar louça nos quais há o
Ciclo Baby são fornecidas
específicas peças
basculantes para a lavagem
de mamadeiras, aros e
chupetas.
Louças não adaptas à lavagem em máquina de
lavar louça
• Objectos de madeira, com cabos de madeira ou osso
ou com partes coladas.
• Objectos de alumínio, cobre, latão, peltre ou estanho
• Louças de plástico não termorresistente.
• Porcelanas antigas ou pintadas à mão.
• Prataria antiga. A prataria não antiga pode ser lavada
com um programa delicado e controlando que não
entre em contacto com outros metais.
Quando comprar louças e talheres verifique se são
adaptos à lavagem à máquina.
Lavagem das pegas*
Para lavar as pegas dos cestos inferior e superior: tire as
duas tampinhas de fixação, desfie as pegas, lave-as com
água corrente e fixe-as no cesto com as tampinhas.
* Presente somente em alguns modelos.
** Variáveis por número e posição.
77

A
B
D
C
Início e utilização
PT
Ligue a máquina de lavar louça
1. Abra a torneira da água.
2. Carregue na tecla ON-OFF: o display acende-se.
3. Doseie o detergente
4. Carregue os cestos (
porta.
5. Para seleccionar o programa rode o selector de
SELECÇÃO DE PROGRAMA na direcção dos ponteiros do
relógio: faça a marca no selector coincidir com o número ou
o símbolo do programa.
6. Seleccione as opções de lavagem (
7. Iniciar carregando na tecla START/RESET: ouve-se um
"bip" de confirmação. Os indicadores luminosos de
AVANÇO DE CICLO sinalizam o estado do programa: Prélavagem, Lavagem, Enxaguadura, Secagem.
8. No fim, ouvem-se três breves sinais acústicos e no
display aparece a escrita END. Para desligar o aparelho
carregue na tecla ON-OFF, feche a torneira da água e
desligue a ficha de tomada eléctrica.
9. Abra a porta e aguarde alguns minutos antes de tirar as
louças para evitar queimaduras. Descarregue os cestos
iniciando pelo inferior.
Demo*
A escrita dON no display indica que está activo um
programa de demonstração. Para desactivá-lo carregue
contemporaneamente nas teclas START/RESET e
ON-OFF, aparecerá a escrita dOF.
Modificação do programa em curso.
Se foi seleccionado um programa errado, é possível
modificá-lo desde que tenha começado há pouco tempo:
mantenha pressionada a tecla START/RESET por 4
segundos. Após um “bip” longo e três breves o indicador
luminoso de AVANÇO DE CICLO irá desligar-se: seleccione
o novo programa e inicie carregando na tecla START/
RESET.
(veja a seguir
veja Carregar os cestos
).
veja abaixo
) e feche a
).
recipiente A:recipiente A:
recipiente A: Detergente para a lavagem
recipiente A:recipiente A:
recipiente B:recipiente B:
recipiente B: Detergente para a pré-lavagem
recipiente B:recipiente B:
1. Abra a tampa “C”
carregando no botão “B”.
2. Dose o detergente
consultando a
programas
• em pó: recipientes A e B.
• pastilhas: recipiente A e
fundo do tambor, ou seja,
quando o programa pedir
uma pastilha, colocá-la no
recipiente A e fechar a
tampa; quando pedir duas,
colocar a segunda no fundo
do tambor.
3. Elimine os resíduos de detergente das beiradas do
recipiente e feche a tampa até o “clique”.
Tabela dos
:
Opções de lavagem
Início posterior
É possível adiar de 1 a 24 horas o início do programa:
1. carregue na tecla INÍCIO POSTERIOR: cada vez que
carregar na tecla, irá aparecer no display o tempo
seleccionado e se ilumina o indicador luminoso do atraso
seleccionado.
2. Seleccione o programa e carregue na tecla START/
RESET: após o “bip” começará a contagem regressiva.
3. Quando terminar este tempo, o indicador apaga-se e o
programa inicia.
Para modificar carregue na tecla INÍCIO POSTERIOR. Para
anulá-lo carregar na tecla em sucessão até que o programa
inicie e se ilumine o indicador luminoso AVANÇO DO CICLO
correspondente ao início do próprio programa.
Acrescentar outras louças
Carregue na tecla ON-OFF, abra a porta prestando
atenção à saída de vapor e introduza as louças. Carregue
novamente na tecla ON-OFF: o ciclo recomeçará.
Interrupções acidentais
Se durante a lavagem for aberta a porta ou houver uma
interrupção da corrente eléctrica, o programa irá
interromper-se. Reiniciará do ponto em que foi interrompido
quando a porta for fechada ou a electricidade voltar.
Meia carga no cesto superior*
Se houver poucas louças para lavar, pode-se efectuar a
meia carga e economizar água, energia e detergente. Antes
de seleccionar o programa carregue na tecla MEIA CARGA
várias vezes: o indicador luminoso acende-se e activa-se a
lavagem apenas no cesto superior .
Lembre-se de carregar as louças apenas no cesto superior
e de reduzir para a metade a quantidade de detergente.
É preferível utilizar detergente em pó.
Extra secagem*
Carregar o detergente
O bom resultado da lavagem depende também da
dosagem correcta do detergente, indicada pelo fabricante
do mesmo. Uma dose excessiva não lava em modo mais
eficaz e polui o ambiente.
As melhores performances de lavagem e secagem são
obtidas somente se empregar detergente em pó,
abrilhantador líquido e sal.
Para obter uma secagem perfeita carregue na EXTRA
SECAGEM antes de seleccionar o programa. Um sinal
acústico prolongado indicará a activação desta opção, um
breve a sua desactivação.
Com a extra secagem os programas duram mais tempo.
* Presente somente em alguns modelos.
78

Programas
Tabela dos programas
As máquinas de lavar louça da Ariston dispõem de um sistema automático de limpeza dos filtros que pode prolongar a duração
dos programas.
PROGRAMAS AUTO este modelo de máquina de lavar louça é equipado com um sensor especial capaz de avaliar o nível da
sujidade e definir qual é a lavagem mais eficiente e económica. A duração dos programas auto poderá variar por causa de
uma intervenção do sensor.
Se a louça estiver pouco suja ou tiver antes sido enxaguada com água, diminuir bastante a dose de detergente.
Indicações para
escolha de programas
Louça e panelas muito
sujas (não use com
peças delicadas).
Louça e panelas
normalmente sujas.
Programa normal diário.
Programa
Intensivo
Normal
Detergente
(A) = recipiente A
(B) = recipiente B
em pó liquido pastiglie
30 gr (A)
5 gr (B)
30 gr (A) 30 ml (A) 1 (A) 1:40
30 ml (A)
5 ml (B)
1 (A)
1 (fundo
tambor)
Pré-lavagem Enxugar
2:00
Duração do
programa
(tolerância
±10%)
PT
Lavagem ecológica com
baixos consumos
energéticos adapta para
louças e panelas.
Eco
Ciclo económico e veloz
a ser utilizado para
louça pouco suja, logo
depois de usada.
Rápida
Lavagem preliminar a
aguardar completar a
carga na próxima
refeição.
Molho
Ciclo higienizante para
lavar mamadeiras, aros
e chupetas, junto a
pratos, chávenas,
copos e talheres.
Carregue as louça no
cesto superior. Baby
Delicado no superior
para cristais e copos,
enérgico para panelas
no cesto inferior.
Duo Wash
25 gr (A)
5 gr (B)
25 gr (A) 25 ml (A) 30
12'
20 gr (A) 20 ml (A)
25 gr (A)
5 gr (B)
25 ml (A)
5 ml (B)
25 ml (A)
5 ml (B)
1 (A) 2:25
1 (A) 1:48
1:00'
Observação
Para facilitar a dosagem do detergente é bom saber que:
uma colher de cozinha =15 gramas de pó=15 ml de líquido, aproximadamente
uma colher de cozinha =5 gramas de pó=5 ml de líquido, aproximadamente
79

Abrilhantador e sal regenerante
PT
Use somente produtos específicos para máquinas de
lavar louça.
Não use sal de cozinha ou industrial.
Se utilizar um produto multifunção (2 em 1, 3 em 1, 4 em 1,
etc.) não será necessário acrescentar abrilhantador e
aconselha-se a adição de sal, especialmente se a água for
dura ou muito dura. Se não forem adicionados o sal e o
abrilhantador é normal que os indicadores luminosos FALTA
DE SAL * e FALTA DE ABRILHANTADOR* continuem a
piscar.
Carregar o abrilhantador
O abrilhantador facilita a secagem das louças fazendo
escorregar a água da superfícies, de modo que não se
formem listras brancas ou manchas.
O recipiente do abrilhantador deve ser enchido:
• quando vê-lo vazio através do visor óptico (H).
Indicador luminoso claro: acrescentar abrilhantador;
indicador luminoso escuro: abrilhantador suficiente;
• quando no painel piscar o indicador luminoso FALTA DE
ABRILHANTADOR *;
1. Abra o recipiente rodando a
H
máquina.
tampa (G) na direcção antihorária.
2. Deite o abrilhantador
evitando que vaze. Se vazar,
limpe logo com uma esponja.
F
3. Atarraxe novamente a
tampa.
G
NUNCA deitar abrilhantador
directamente dentro da
Regule a dose de abrilhantador.
Se não ficar satisfeito com o resultado da lavagem ou da
secagem, será possível regular a dose de abrilhantador.
Com uma chave de fendas, gire o regulador (F) escolhendo
entre 6 posições (a regulação de fábrica é 4):
• se nas peças lavadas houver listras azuladas, gire o
regulador em números mais baixos (1-3);
• se houver gotas de água ou manchas de calcário, gire
em números mais altos (4-6).
Se utilizar as pastilhas multifunção (2 em 1, 3 em 1, 4 em
1, etc.) e quiser obter uma secagem melhor encha o
recipiente e regule no número 2.
Carregar o sal regenerante
Para ter bons resultados de lavagem, é indispensável
verificar que o recipiente do sal não fique nunca vazio. O
sal regenerante elimina o calcário da água, evitando que se
deposite sobre as louças. O recipiente do sal está
colocado na parte inferior da máquina de lavar louças (
Descrição
• quando a bóia verde* não for visível observando a
) e deve ser enchido:
tampa do sal;
veja
• quando no painel piscar o indicador luminoso FALTA DE
SAL *;
• em caso de falta de indicador ou de bóia verde:
aproximadamente a cada 30 ciclos de lavagem;
1. Extraia o cesto inferior e
desatarraxe a tampa do
reservatório no sentido antihorário.
2. Somente para a primeira
utilização: encha o reservatório de
água até a beira.
3. Posicione o funil fornecido em
dotação (
beira (aproximadamente 2 kg); é normal que saia um pouco
de água.
4. Retire o funil, elimine os resíduos de sal da rosca e
atarraxe bem a tampa, para que no reservatório não ente
detergente durante a lavagem (o dispositivo para
descalcificar poderia ser danificado irremediavelmente).
Quando acrescentar o sal, inicie logo um ciclo de lavagem
sem louças para eliminar a solução salina que vazou e
evitar a corrosão.
veja a figura
) e encha o recipiente de sal até a
Regule a dose de sal*.
É possível regular o consumo de sal conforme a dureza da
água, que pode ser informada pela Entidade fornecedora
de água potável.
1. Desatarraxe a tampa do recipiente.
2. Rode a seta na argola (
na direcção do + ou do – referindo-se à
tabela:
Dureza da água
°dH °fH °mmol/l
0 - 10 0 - 17 0 - 1,7 / 0 /
10 25 18 44 1,8 4,4 - 20 60
25 50 45 89 4,5 8,9 MED 40 40
> 50 > 89 > 8,9 + 60 25
O dispositivo para descalcificar foi regulado na fábrica no
+.
Se utilizar as pastilhas multifunção (2 em 1, 3 em 1, 4 em 1,
etc.) encha do mesmo jeito o recipiente do sal e regule no -;
se a dureza da água for superior a 60°fH, regule no +.
* Presente somente em alguns modelos.
Posição do
selector
veja a figura
Consumo de
sal (gramas
p/ ciclo)
)
Autonomia
(ciclos/2Kg)
80
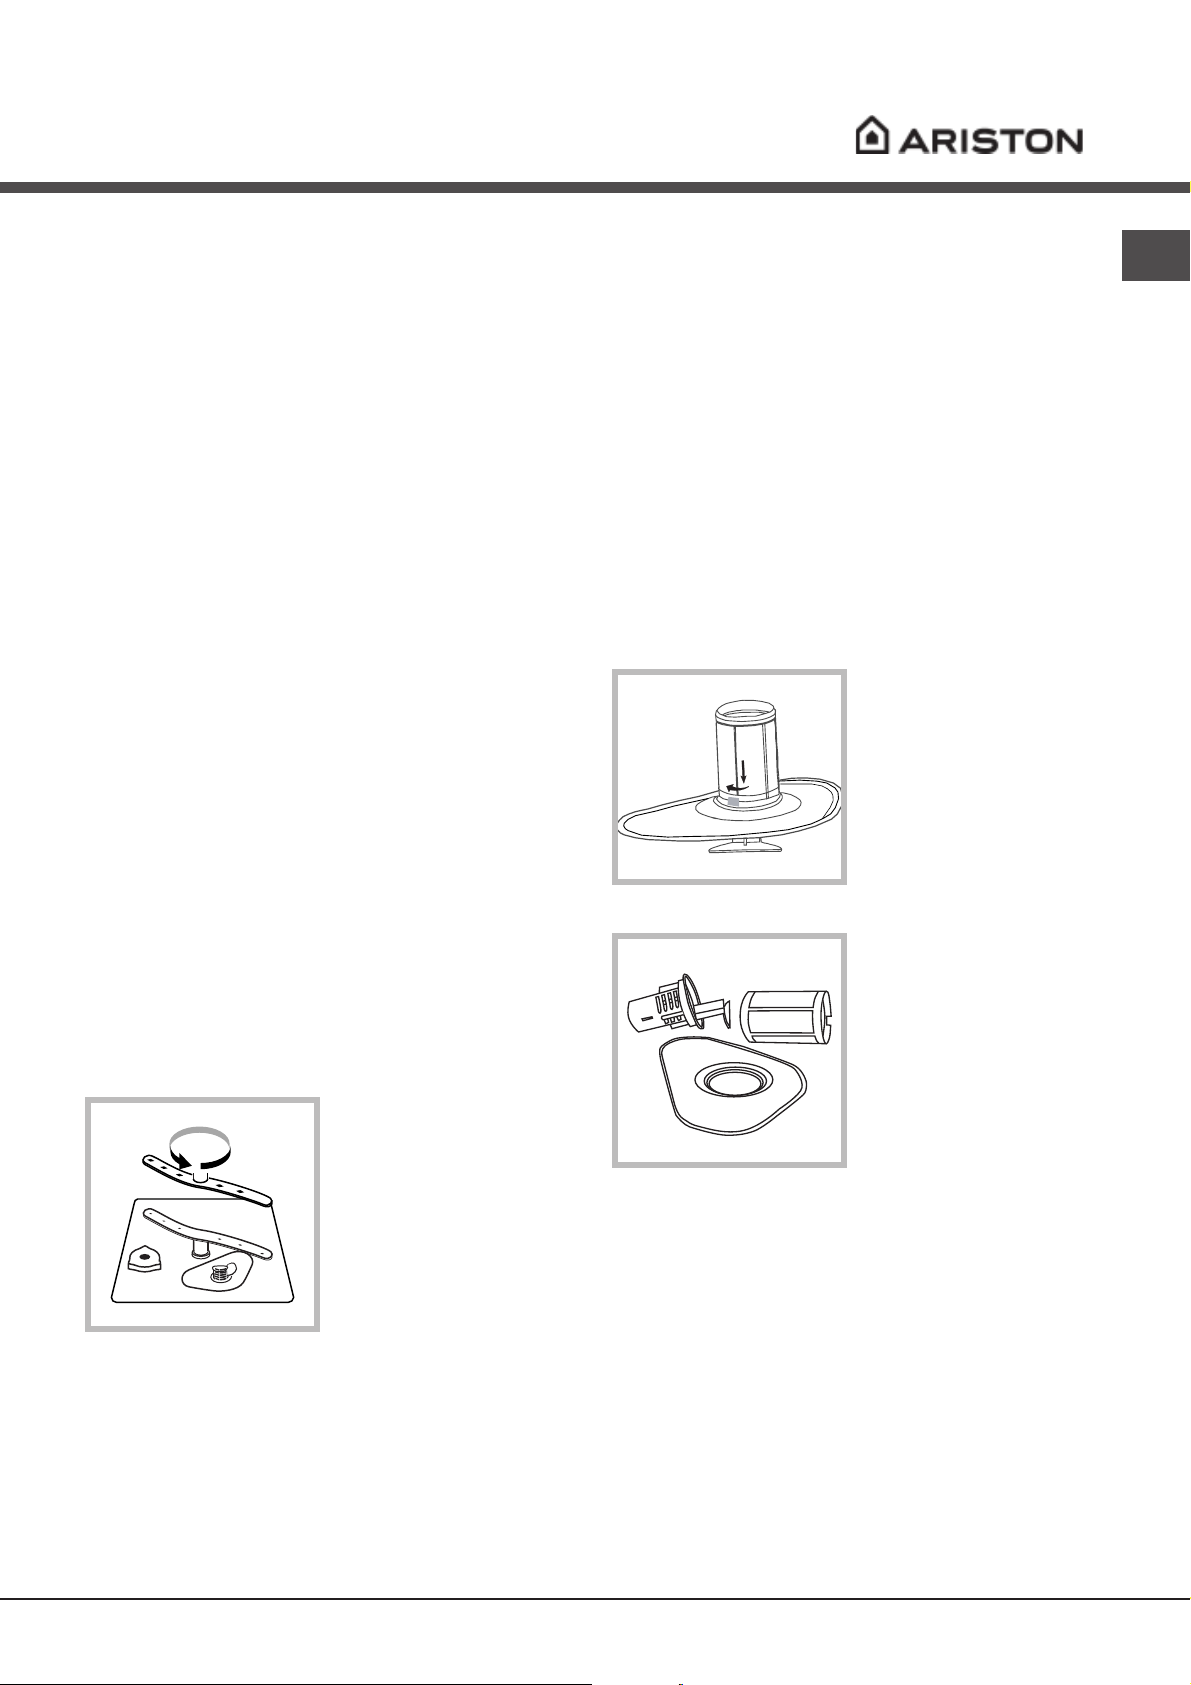
Manutenção e cuidados
Excluir a água e a corrente eléctrica
• Feche a torneira da água após cada lavagem
para eliminar o risco de vazamentos.
• Desligue a ficha da tomada quando limpar a
máquina e durante os serviços de manutenção.
Limpar a máquina de lavar louça
• A superfície externa e o painel de comandos
podem ser limpos com um pano não abrasivo
embebido de água. Não usar solventes nem
abrasivos.
• O tambor interno pode ser limpo de eventuais
manchas com um pano embebido de água e um
pouco de vinagre.
Evitar cheiros desagradáveis
• Deixe a porta sempre entreaberta para evitar
estagnações de humidade.
• Limpe regularmente as guarnições perimetrais
de vedação da porta e dos recipientes de
detergente com uma esponja húmida. Deste
modo, se evitarão estagnações de alimentos,
principais responsáveis pelos cheiros
desagradáveis.
Limpar os braços aspersores
Pode acontecer que
restos de comida
grudem-se nos braços
aspersores e tampem
os furos através dos
quais a água deve
passar: de vez em
quando é bom
controlá-los e limpá-los
com uma escovinha
não de metal.
Limpar os filtros
Os filtros limpam a água de lavagem dos resíduos
de comida e a colocam novamente em circulação:
para ter bons resultados de lavagem é necessário
limpá-los.
Limpar os filtros com regularidade.
Após a limpeza, verifique que o grupo filtrante
tenha sido inserido correctamente.
A máquina de lavar louça não deve ser utilizada
sem filtros nem com o filtro desenganchado.
1. Retire os filtros puxando o cabo para o alto.
2. Limpar os filtros:
• após cada
lavagem, limpe o
C
1
2
A
B
B
C
A
3. Monte novamente o grupo filtrante e coloque-o
na sua sede seguindo os movimentos 1 e 2,
indicados na figura, até ouvir o “clique”.
prato semicircular A e
o copinho B (para tirálos puxe o cabo) dos
resíduos mais grossos,
enxaguando-os
debaixo de água
corrente.
• Uma vez por mês é
necessário limpar com
cuidado todo o grupo
filtrante: prato
semicircular A, copinho
B e filtro cilíndrico C
(para tirá-lo rode-o no
sentido anti-horário).
Para a limpeza,
empregue uma
escovinha não de metal.
Longos períodos de ausência
PT
• Realize uma lavagem com a máquina vazia.
• Desligue as ligações eléctricas e hidráulicas.
• Deixe a porta entreaberta.
81

Precauções e conselhos
PT
O aparelho foi projectado e construído conforme
as normas internacionais de segurança. Estas
advertências são fornecidas por razões de
segurança e devem ser lidas com atenção.
Segurança geral
• O aparelho foi concebido para um uso de tipo
não profissional dentro do ambiente doméstico.
• O aparelho deve ser utilizado para a lavagem de
louças de utilização doméstica, exclusivamente
por pessoas adultas e conforme as instruções
escritas neste manual.
• Esta máquina de lavar louça não pode ser
instalada ao aberto, nem mesmo num lugar
protegido por um telhado: é muito perigoso
deixá-la exposta à chuva e aos temporais.
• Não toque a máquina com os pés descalços.
• Não tire a ficha da tomada de corrente puxando
o cabo, mas segure a ficha.
• É necessário fechar a torneira da água e tirar a
ficha da tomada da corrente eléctrica antes de
efectuar operações de limpeza e manutenção.
• Em caso de avarias, jamais aceda aos
mecanismos internos para tentar consertar
sozinho.
• Não toque a resistência.
• Não se apoie ou sente na porta aberta: o
aparelho poderia capotar.
• Guarde o detergente e o abrilhantador fora do
alcance das crianças.
• As embalagens não são brinquedos para
crianças.
Recolha dos electrodomésticos
A directiva Europeia 2002/96/CE referente à gestão
de resíduos de aparelhos eléctricos e electrónicos
(RAEE), prevê que os electrodomésticos não devem
ser escoados no fluxo normal dos resíduos sólidos
urbanos. Os aparelhos desactualizados devem ser
recolhidos separadamente para optimizar a taxa de
recuperação e reciclagem dos materiais que os
compõem e impedir potenciais danos para a saúde
humana e para o ambiente. O símbolo constituído
por um contentor de lixo barrado com uma cruz
deve ser colocado em todos os produtos por forma
a recordar a obrigatoriedade de recolha separada.
Economizar e respeitar o ambiente
Economizar água e energia
• Use a máquina de lavar louça somente com
carga plena. Enquanto espera que a máquina
fique cheia, previna os maus cheiros com o
ciclo de Molho (
• Seleccione um programa adapto ao tipo de
louças e ao grau de sujeira consultando a
Tabela dos programas:
- para louças normalmente sujas, utilize o
programa Eco, que garante baixos consumos
energéticos e de água.
- se a carga for reduzida, utilize a opção Meia
carga (
• Se o próprio contrato de fornecimento de
energia eléctrica previr faixas horárias de
economia energética, efectue as lavagens nos
horários com tarifa reduzida. A opção Início
posterior * (
a organizar as lavagens com base nos
horários.
Detergentes sem fosfatos, sem cloro e com
enzimas
• Aconselha-se vivamente utilizar os detergentes
sem fosfatos e sem cloro pois são os mais
indicados para a tutela do meio ambiente.
• As enzimas desenvolvem uma acção
particularmente eficaz com temperaturas
próximas aos 50ºC, portanto com os
detergentes com enzimas podem-se programar
lavagens com baixas temperaturas e obter os
mesmos resultados que se obteriam com
lavagens a 65ºC.
• Dose bem o detergente conforme as
indicações do produtor, a dureza da água, o
grau de sujeira e a quantidade de louças para
evitar desperdícios. Mesmo sendo
biodegradáveis, os detergentes contém
elementos que alteram o equilíbrio da natureza.
veja Início e utilização
veja Programas
veja Início e utilização
).
).
) pode ajudar
Os consumidores devem contactar as autoridades
locais ou os pontos de venda para solicitar
informação referente ao local apropriado onde
devem depositar os electrodomésticos velhos.
82
* Presente somente em alguns modelos.

Anomalias e soluções
No caso em que o aparelho apresente anomalias de funcionamento, controle os seguintes itens antes de
contactar a Assistência Técnica (
veja Assistência
)
Algumas anomalias são assinaladas por alguns códigos intermitentes no display: anote quais códigos piscam
antes de chamar a Assistência.
Anomalias: Possíveis causas / Soluções:
A máquina de lavar louça não
começa a funcionar.
A máquina de lavar louça não
carrega a água.
A máquina de lavar louça não
descarrega a água.
A máquina de lavar louça faz
ruído.
Nas louças e nos copos
permanecem depósitos de
calcário ou uma camada
branca.
Nas louças e nos copos há
listras brancas ou manchas
azuis.
As louças estão pouco secas.
As louças não estão limpas.
Alarme de torneira fechada
(ouvem-se "bips" breves)
(pisca no display o código
AO6).
Alarme dos filtros entupidos
(pisca no display o código
AO5).
Alarme por causa de defeito
da válvula eléctrica de
carregamento d'água.
(pisca no display o código
AO2).
A ficha não está bem inserida na tomada de corrente ou falta
corrente eléctrica em casa.
A porta da máquina de lavar louça não está bem fechada.
Foi programado um Início posterior (veja Início e utilização).
Falta água na rede hídrica.
O tubo de carregamento da água está dobrado (veja Instalação).
O programa ainda não terminou.
O tubo de descarregamento da água está dobrado (veja
Instalação).
A descarga do lavabo está obstruída.
O filtro está obstruído por resíduos de comida.
As louças chocam-se ente si ou contra os aspersores.
Falta sal regenerante ou a sua regulação não é adequada à
dureza da água (veja Abrilhantador e sal)
A tampa do recipiente de sal não está bem fechada.
O abrilhantador acabou ou a dosagem é insuficiente.
As louças são de material antiaderente.
A dosagem do abrilhantador é excessiva.
O abrilhantador acabou ou a dosagem é insuficiente (veja
Abrilhantador e sal).
A regulação do abrilhantador não é adequada.
Foi seleccionado um programa sem secagem.
Os cestos estão demasiadamente carregados (veja Carregar os
cestos).
As louças não foram bem posicionadas.
Os aspersores não têm livre rotação.
O programa de lavagem é delicado demais (veja Programas).
O detergente não foi doseado adequadamente ou não é adapto
(veja Início e utilização).
O filtro está sujo ou obstruído (veja Manutenção e cuidados).
Falta o sal regenerante (veja Abrilhantador e sal).
Abra a torneira e o aparelho irá reiniciar depois de poucos
minutos.
O aparelho bloqueou-se porque não se interveio
Desligue a máquina com a tecla ON-OFF, abra a torneira e,
depois de 20 segundos, ligue novamente a máquina carregando
na mesma tecla. Programe novamente a máquina e reinicie.
Desligue a máquina carregando na tecla ON-OFF e limpe os
filtros (veja Manutenção), em seguida, para ligar novamente,
carregue na mesma tecla. Programe novamente a máquina e
reinicie.
Para desligar a máquina carregue na tecla ON-OFF e, após um
minuto, ligue-a novamente. Se o alarme permanecer, feche a
torneira da água para evitar alagamentos e depois retire a ficha
da tomada de corrente e chame a assistência técnica.
PT
83

Assistência
195058170.00195058170.00
195058170.00
06/2006- Xerox Business Services
195058170.00195058170.00
PT
Antes de contactar a Assistência
Técnica:
• Verifique se consegue resolver a anomalia (veja
Anomalias e soluções);
• Reinicie o programa para verificar se o
inconveniente foi resolvido.
• Em caso negativo, contacte a Assistência
Técnica Autorizada no número de telefone
indicado no certificado de garantia.
Nunca recorra a técnicos não autorizados.
Comunique:
• o tipo de anomalia
• o modelo da máquina (Mod.)
• o número de série (S/N)
Estas informações encontram-se na placa colocada
na parte lateral da porta inoxidável (veja Descrição
da máquina de lavar louça).
84
 Loading...