


LTB 6M116
EN English
Operating instructions
DISHWASHER - Contents
Operating instructions,1 Precautions and advice, 2-3 Product Data, 6 Assistance, 8
Installation, 9-10
Description of the appliance, 11 Refined salt and rinse aid, 12 Loading the racks, 13-14 Detergent and dishwasher use, 15 Wash cycles, 16
Care and maintenance, 17 Troubleshooting, 18
ES Español
Manual de instrucciones
LAVAVAJILLAS - Índice
Instrucciones de uso, 1 Precauciones y consejos, 3-4 Ficha producto, 6 Asistencia, 8
Instalación, 19-20 Descripción del aparato, 21
Sal regeneradora y abrillantador, 22 Cargar los cestos, 23-24 Detergente y uso del lavavajillas, 25 Programas, 26
Mantenimiento y cuidados, 27 Anomalías y soluciones, 28
PT Português
Instruções de uso
MÁQUINA DE LAVAR LOUÇA - Índice
Instruções de uso, 1 Precauções e conselhos, 4-5 Ficha do produto, 7 Assistência, 8
Instalação, 29-30 Descrição do aparelho, 31
Sal, regenerador e abrilhantador, 32 Carregar os cestos, 33-34
Detergente e uso da máquina de lavar louça, 35 Programas, 36
Manutenção e cuidados, 37 Anomalias e soluções, 38

PT Precautions and advice
 This appliance was designed and manufacturedincompliancewithinternational safety standards. The following information has been provided for safety reasons and should be read carefully.
Keep this instruction manual in a safe place for future reference. If the appliance is sold, given away or moved, make sure the manual is kept with the machine.
Read the instructions carefully, as they include important information on safe installation, use and maintenance.
This appliance was designed for domestic use or similar applications, for example:
- farmhouses;
- use by guests in hotels, motels and other residential settings;
- bed & breakfasts.
Remove the appliance from all packaging and make sure it was not damaged during transportation. If it was damaged, contact the retailer and do not proceed any further with the installation process.
General safety
• This appliance should not be operated by children younger than 8 years, people with reduced physical, sensory or mental capacities, or inexperienced people who are not familiar with the product, unless they are given close supervision or instructions on how to use it safely and are made aware by a responsible person of the dangers its use might entail.
• Children must not play with the appliance.
• It is the user's responsibility to clean and maintain the appliance. Children should never clean or maintain it unless they are given supervision.
• The appliance was designed for domestic use inside the home and is not intended for commercial or industrial use.
• The appliance must be used to wash domestic crockery in accordance with the instructions in this manual.
• The appliance must not be installed outdoors, even in covered areas. It is extremely dangerous to leave the machine exposed to rain and storms.
• Do not touch the appliance when barefoot.
• When unplugging the appliance always
pull the plug from the mains socket. Do not pull on the cable.
• The water supply tap must be shut off and the plug should be removed from the electrical socket at the end of every cycle and before cleaning the appliance or carrying out any maintenance work.
• The maximum number of place settings is shown in the product sheet.
• If the appliance breaks down, do not under any circumstances touch the internal parts in an attempt to perform the repair work yourself.
• Do not lean or sit on the open door: this may cause the appliance to overturn.
• The door should not be left open as it may create a dangerous obstacle.
• Keep detergent and rinse aid out of reach of children.
• The packaging material should not be used as a toy.
• Knives and other utensils with sharp edges must be placed either with the points/blades facing downwards in the cutlery basket or horizontally on the tip-up compartments or in the tray/third basket, if available.
• Connect the appliance to the water mains using the new supply hose provided with the appliance. Do not re-use the old hose.
• Install the back side of a free-standing dishwasher against a wall.
Disposal
• To dispose of any packaging materials, follow local legislation so that the packagings may be reused.
• The European Directive 2012/19/EU relating to Waste Electrical and Electronic Equipment (WEEE) states that household appliances should not be disposed of using the normal solid urban waste cycle.
Exhausted appliances should be collected separately in order to optimise the cost of reusing and recycling the materials inside the machine, while preventing potential damage to the atmosphere and public health. The crossed-out dustbin symbol shown on all products reminds the owners of their obligations regarding separated waste collection.
For further information relating to the correct disposal of household appliances, owners may contact the relevant public authority or the local appliance dealer.
2

Saving energy and respecting the environment
Saving water and energy
• Only begin a wash cycle when the dishwasher is full. While waiting for the dishwasher to be filled, prevent unpleasant odours with the Soak cycle (if available, see
Wash Cycles).
• Select a wash cycle that is suited to the type of crockery and to the soil level using the Table of Wash Cycles:
- For dishes with a normal soil level, use the Eco wash cycle, which guarantees low energy and water consumption levels.
- If the load is smaller than usual activate
the Half Load option (see Special wash cycles
and options, if available).
• If your electricity supply contract gives details of electricity-saving time bands, run the wash cycles when electricity prices are lower. The Delayed Start option can help you organise the wash cycles accordingly
(see Special wash cycles and options, if available).
ES Precauciones y consejos
 El aparato ha sido proyectado y fabricado enconformidadconlasnormasinternacionales de seguridad Estas advertencias se suministran por razones de seguridad y deben ser leídas atentamente.
Es importante conservar este manual para poder consultarlo en cualquier momento. En caso de venta, de cesión o de traslado, el manual debe permanecer junto al aparato.
Lea atentamente las instrucciones: contienen información importante sobre la instalación, sobre el uso y sobre la seguridad.
Este aparato ha sido proyectado para uso doméstico y para aplicaciones similares, por ejemplo:
- cortijos;
- uso por parte de clientes en hoteles, moteles y otros ambientes de tipo residencial;
- bed and breakfast.
Desembalar el aparato y comprobar que no haya sufrido daños durante el transporte. Si estuviera dañado, no conectarlo; llamar al revendedor.
Seguridad general
• Este electrodoméstico puede ser utilizado por niños de no menos de 8 años de
edad y por personas con capacidades físicas, sensoriales o mentales reducidas, o carentesdeexperienciaodelconocimiento necesario, pero sólo bajo la estricta vigilancia de una persona responsable, siguiendo las instrucciones sobre el uso seguro y después de comprender bien los peligros inherentes.
• Los niños no deben jugar con el aparato.
• La limpieza y el mantenimiento del aparato deben ser efectuados por el usuario. No deben ser efectuados por niños sin vigilancia.
• El aparato ha sido fabricado para un uso de tipo no profesional en el interior de una vivienda.
• El aparato debe ser utilizado para el lavado de vajilla de uso doméstico y según las instrucciones contenidas en este manual.
• El aparato no se debe instalar al aire libre, ni siquiera si el lugar está protegido, porque es muy peligroso dejarlo expuesto a la lluvia o a las tormentas.
• No tocar el lavavajillas con los pies descalzos.
• No desconectar la clavija de la toma de corriente tirando del cable sino sujetando la clavija.
• Es necesario cerrar el grifo de agua y desconectar la clavija de la toma de corriente al final de cada ciclo antes de realizar operaciones de limpieza y mantenimiento.
• El número máximo de cubiertos se indica en la ficha del producto.
• En caso de avería, no acceder nunca a los mecanismos internos para intentar su reparación.
• No apoyarse ni sentarse sobre la puerta abierta: el aparato podría voltearse.
• La puerta no se debe dejar abierta, ya que podría causar tropiezos.
• Conservar el detergente y el abrillantador fuera del alcance de los niños.
• Los embalajes no son juguetes para los niños.
• Los cuchillos y utensilios con bordes filosos deben colocarse en el cesto para cubiertos con las puntas/hojas hacia abajo o en posición horizontal sobre los cestos especiales adicionales o en la bandeja o el tercer cesto en los modelos que lo tienen.
• El aparato se debe conectar a la red del agua utilizando el nuevo tubo de carga. El tubo de carga anterior no se debe reutilizar. Si el lavavajillas es de libre instalación, el
3

lado posterior debe quedar contra una pared.
Eliminación
• Eliminación del material de embalaje: respetar las normas locales para que los embalajes puedan ser reutilizados.
• La norma Europea 2012/19/EU sobre residuos de equipos eléctricos y electrónicos (REEE) establece que los electrodomésticos no se deben eliminar de la misma manera que los desechos sólidos urbanos. Los aparatos eliminados deben ser recogidos en forma separada para optimizar la tasa de recuperación y reciclado de los materiales que los componen e impedir que provoquen daños a la salud y el medio ambiente. El símbolo del cubo tachado se encuentra en todos los productos para recordar la obligación de recolección separada.
Para mayor información sobre la correcta eliminación de los electrodomésticos, los propietarios podrán dirigirse al servicio público encargado de la recolección o a los revendedores.
Ahorrar y respetar el medio ambiente
Ahorrar agua y energía
• Poner en funcionamiento el lavavajillas sólo con plena carga. A la espera de que la máquina se llene, prevenir los malos olores
con el ciclo Remojo (si lo hay - ver Programas).
• Seleccionar un programa adecuado al tipo de vajilla y al grado de suciedad consultando la Tabla de programas:
- para la vajilla con suciedad normal utilizar el programa Eco, que garantiza un bajo consumo energético y de agua.
- si la carga es reducida, activar la opción
Media carga (si la hay - ver Programas especiales
y opciones).
•Si el suministro de energía eléctrica prevé horarios de ahorro energético, realizar los lavados en los horarios con tarifa reducida. Para organizar mejor los lavados, puede ser útil la opción de Arranque diferido (si la
hay - ver Programas especiales y opciones).
PT Precauções e conselhos
 O aparelho foi projetado e construído conforme as normas internacionais de segurança. Estas advertências são
fornecidas por razões de segurança e devem ser lidas com atenção.
É importante conservar este manual para poder consultá-lo em qualquer momento.
Em caso de venda, cessão ou mudança, certifique-se que o mesmo fique junto ao aparelho.
Ler atentamente as instruções: nelas estão presentes informações importantes sobre a instalação, o uso e a segurança.
Este aparelho foi projetado para o uso doméstico ou para aplicações simples, como por exemplo:
- casas de férias;
- uso por parte de clientes em hotéis, motéis e outros ambientes de tipo residencial;
- bed and breakfast.
Desembale o aparelho e controle que não tenha sofrido danos durante o transporte. Se estiver danificado, não o acenda e contacte o revendedor.
Segurança geral
• Este eletrodoméstico pode ser utilizado por crianças com mais de 8 anos e pessoas com capacidades físicas, sensoriais ou mentais reduzidas, ou sem experiência e conhecimentos necessários, desde que sob rigorosa vigilância de uma pessoa responsável ou após terem recebido instruções relativas ao uso seguro do aparelho e à compreensão dos perigos associados ao uso.
• As crianças não devem brincar com o aparelho.
• A limpeza e manutenção do aparelho devem ser efetuadas pelo utilizador. Não deve ser efetuada por crianças sem vigilância.
• O aparelho foi concebido para um uso de tipo não profissional dentro do ambiente doméstico.
• O aparelho deve ser utilizado para a lavagemdelouçasdeutilizaçãodoméstica, conforme as instruções escritas neste manual.
• Esta máquina de lavar louça não pode ser instalada ao ar livre, nem mesmo num lugar protegido por um telhado: é muito perigoso deixá-la exposta à chuva e aos temporais.
• Não toque na máquina com os pés descalços.
• Não retire a ficha da tomada de corrente
4

puxando o cabo, mas segure a ficha.
• É necessário fechar a torneira da água e tirar a ficha da tomada da corrente elétrica no final de cada ciclo, antes de efetuar operações de limpeza e manutenção.
• O número máximo de louças é indicado na ficha do produto.
• Em caso de avarias, jamais aceda aos mecanismos internos para tentar reparar sozinho.
• Não se apoie nem se sente sobre a porta aberta: o aparelho pode voltar-se.
• A porta não pode ficar aberta para evitar o perigo de tropeçar.
• Mantenha o detergente e o abrilhantador fora do alcance das crianças.
• As embalagens não são brinquedos para crianças.
• As facas e utensílios com rebordos afiados devem ser colocados com as pontas/ lâminas viradas para baixo no cesto dos talheres ou em posição horizontal nas peças basculantes no tabuleiro/ terceiro cesto, nos modelos em que esteja presente.
• O aparelho deve ser ligado à rede hídrica através do novo tubo de carga e o tubo de carga antigo não deve ser reutilizado. Se a máquina de lavar louça for de instalação livre, o lado traseiro da mesma deve ser colocado contra uma parede.
Eliminação
• Eliminação do material de embalagem: respeite a normas locais, assim as embalagens poderão ser reaproveitadas.
• A diretiva Europeia 2012/19/EU relativa aos resíduos de equipamentos elétricos e eletrónicos (REEE) prevê que os eletrodomésticos não devem ser eliminados no normal fluxo dos resíduos sólidos urbanos. Os aparelhos em fim de vida devem ser recolhidos separadamente para otimizar a taxa de recuperação e reciclagem dos materiais que os compõem e impedir potenciais danos à saúde e ao meio ambiente. O símbolo do cesto do lixo cancelado está indicado em todos os produtos para lembrar o dever de coleta seletiva. Para mais informações sobre a correta eliminação dos eletrodomésticos, os proprietários poderão contactar o serviço de coleta público ou os revendedores.
Economizar e respeitar o ambiente
Economizar água e energia
• Use a máquina de lavar louça somente com carga plena. Enquanto espera que a máquina fique cheia, previna os maus cheiros com o ciclo de Amolecimento (se
disponível - ver Programas).
• Selecione um programa adequado ao tipo de louças e ao grau de sujidade consultando a tabela dos programas:
- para louças normalmente sujas, utilize o programa Eco, que garante baixos consumos energéticos e de água.
- se a carga for reduzida, utilize a opção
Meia carga (se disponível -ver Programas especiais
e opções).
•Se o seu contrato de fornecimento de energia elétrica previr faixas horárias de economia energética, efetue as lavagens nos horários com tarifa reduzida. A opção Início Posterior pode ajudar a organizar as lavagens nesse sentido (se disponível - ver
Programas especiais e opções).
5
EN Product Data (product fiche)
Product Fiche |
|
Brand |
ARISTON |
Model |
LTB 6M116 |
Rated capacity in standard place settings (1) |
14 |
Energy efficiency class on a scale from A+++ (low consumption) to D (high consumption) |
A+ |
Energy consumption per year in kWh (2) |
293 |
Energy consumption of the standard cleaning cycle in kWh |
1.03 |
Power consumption of the off-mode in W |
0.5 |
Power consumption of the left-on mode in W |
5.0 |
Water consumption per year in litres (3) |
3080 |
Drying efficacy class on a scale from G (low efficacy) to A (high efficacy) |
A |
Programme time for standard cleaning cycle in minutes |
190 |
The duration of the left-on mode in minutes |
12 |
Noise in dB(A) Re 1pW |
46 |
Built-in model |
Yes |
NOTES
1) The information on the label and fiche relates to the standard cleaning cycle, this programme is suitable to clean normally soiled tableware and it is the most efficient programme in terms of combined energy and water consumption. The standard cleaning cycle corresponds to the Eco cycle.
2) Based on 280 standard cleaning cycles using cold water fill and the consumption of the low power modes. Actual energy consumption depends on how the appliance is used.
3) Based on 280 standard cleaning cycles. Actual water consumption depends on how the appliance is used.
ES Ficha producto
Ficha producto
Marca |
ARISTON |
Modelo |
LTB 6M116 |
Capacidad nominal en número de cubiertos estándar (1) |
14 |
Clase de eficiencia energética sobre una escala de A+++ (bajo consumo) a D (alto consumo) |
A+ |
Consumo energético anual en kWh (2) |
293 |
Consumo energético del ciclo de lavado estándar en kWh |
1.03 |
Consumo de potencia en el modo apagado en W |
0.5 |
Consumo de potencia en el modo espera en W |
5.0 |
Consumo de agua anual en litros (3) |
3080 |
Clase de eficacia de secado sobre una escala de G (eficacia mínima) a A (eficacia máxima) |
A |
Duración del programa por ciclo de lavado estándar en minutos |
190 |
Duración del modo espera en minutos |
12 |
Nivel de ruido en dB(A) re 1 pW |
46 |
Modelo de encastre |
Sí |
NOTAS
1) La información contenida en la etiqueta y la ficha se refiere al ciclo estándar de lavado, este programa está diseñado para lavar normalmente vajillas manchadas y es el programa más eficiente en términos de consumo combinado de agua y energía. El ciclo estándar de lavado se corresponde con el ciclo Eco.
2) Basado en 280 ciclos de lavado estándar con agua fría y consumo de modos de bajo consumo energético. El consumo actual dependerá de cómo se utilice el aparato.
3) Basado en 280 ciclos de lavado estándar. El consumo actual de agua depende de cómo se utilice el aparato.
6
PT Ficha de produto
Ficha de produto
Marca |
ARISTON |
Modelo |
LTB 6M116 |
Capacidade nominal, em serviços de louça-padrão (1) |
14 |
Classe de eficiência energética numa escala de A+++ (baixos consumos) a D (altos consumos) |
A+ |
Consumo de energia anual em kWh (2) |
293 |
Consumo de energia do ciclo de lavagem normal em kWh |
1.03 |
Consumo, em termos de potência, em estado de desactivação em (W) |
0.5 |
Consumo, em termos de potência, em estado inactivo em (W) |
5.0 |
Consumo de água anual em litros (3) |
3080 |
Classe de eficácia de secagem numa escala da G (eficácia miníma) a A (eficácia máxima) |
A |
Duração do programa para o ciclo de lavagem normal, em minutos 5) |
190 |
Duração do estado inactivo expressa em minutos 6) |
12 |
Emissão de ruído aéreo expressa em dB(A) re 1 pW7) |
46 |
Produto de encastre |
Sim |
1) A informação constante na etiqueta e na tabela de características fazem referência ao programa normal de lavagem, este programa é adequado a lavar louça com um grau de sugidade normal e é o programa mais efeciente em termos de consumo combianado de energia e água.
2) Baseado em 280 ciclos de lavagem normal com enchimento a água fria e no consumo dos modos de baixo consumo de energia. O consumo real de energia dependerá das condições de utilização do aparelho.
3) Baseado em 280 ciclos de lavagem normal. O valor real do consumo de água dependerá do modo de utilização do aparelho.
7

EN Assistance
Before contacting Assistance:
•Check whether the problem can be resolved using the
Troubleshooting guide (see Troubleshooting).
•Restart the programme to check whether the problem has ceased to exist.
•If the problem persists, contact the Authorised Technical
Assistance Service.
 Never use the services of unauthorised technicians.
Please have the following information to hand:
•The type of malfunction.
•The appliance model (Mod.).
•The serial number (S/N).
This information can be found on the appliance data plate (see Description of the appliance).
ES Asistencia Técnica
Antes de llamar al Servicio de Asistencia Técnica:
•Verifique si la anomalía puede ser resuelta por Ud. mismo
(ver Anomalías y Soluciones).
•Vuelva a poner en funcionamiento el programa para controlar si el inconveniente ha sido resuelto.
•Si no es así, llame al Servicio de Asistencia Técnica
Autorizado.
 No llame nunca a técnicos no autorizados. Comunique:
•el tipo de anomalía;
•el modelo de la máquina (Mod.);
•y el número de serie (S/N).
Esta información se encuentra en la placa de características ubicada en el aparato (ver Descripción del aparato).
PT Assistência
Antes de contactar a Assistência:
•Verifique se pode resolver sozinho a anomalia(veja Anomalias e Soluções).
•Reinicie o programa para controlar se o inconveniente foi resolvido.
•Em caso negativo, contacte o Serviço de Assistência Técnica
Autorizado.
 Nunca recorra a técnicos não autorizados.
Comunique:
•o tipo de defeito;
•o modelo da máquina (Mod.);
•o número de série (S/N).
Estas informações encontram-se na placa de identificação situada no aparelho (veja Descrição do Aparelho).
8
Installation
 If the appliance must be moved at any time, keep it in an upright position; if absolutely necessary, it may be tilted onto its back.
Connecting the water supply
 Adaptation of the water supply for installation should only be performed by a qualified technician.
The water inlet and outlet hoses may be positioned towards the right or the left in order to achieve the best possible installation.
Make sure the dishwasher does not bend or squash the hoses.
Connecting the water inlet hose
•To a 3/4” gas cold or hot water connection point (max. 60°C).
•Run the water until it is perfectly clear.
•Screw the inlet hose tightly into position and turn off the tap.
 If the inlet hose is not long enough, contact a specialist store or an authorised technician (see Assistance).
 The water pressure must be within the values indicated in the Technical Data table - otherwise the dishwasher may be function properly.
 Make sure the hose is not bent or compressed.
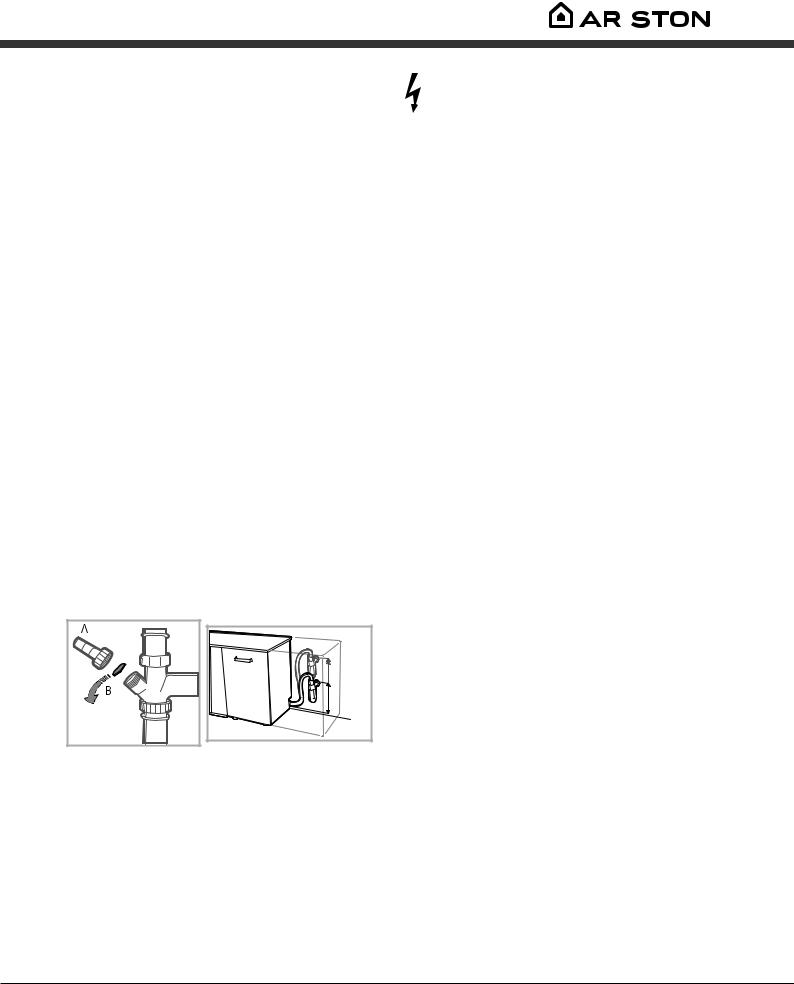
Connecting the water outlet hose
Connect the outlet hose to a drain duct with a minimum diameter of 2 cm. (A)
The outlet hose connection must be at a height ranging from 40 to 80 cm from the floor or surface where the dishwasher
MAX 80 cm |
MIN 40 cm |
Before connecting the water outlet hose to the sink drain, remove the plastic plug (B).
Anti-flooding protection
To ensure floods do not occur, the dishwasher:
- is provided with a special system which blocks the water supply in the event of anomalies or leaks from inside the appliance.
Some models are also equipped with the supplementary safety device New Acqua Stop*, which guarantees antiflooding protection even in the event of a supply hose rupture.
|
|
|
WARNING: HAZARDOUS VOLTAGE! |
|
|
EN |
||
|
|
|
Under no circumstances should the water inlet hose be cut as it contains live electrical parts.
Electrical connection
Before inserting the plug into the electrical socket, make sure that:
•The socket is earthed and complies with current regulations;
•the socket can withstand the maximum load of the appliance as shown on the data plate located on the inside of the door
(see chapter Description of the appliance);
•The power supply voltage falls within the values indicated on the data plate on the inside of the door.
•The socket is compatible with the plug of the appliance. If this is not the case, ask an authorised technician to replace the plug (see Assistance). Do not use extension cables or multiple sockets.
 Once the appliance has been installed, the power supply cable and the electrical socket should be easily accessible.
 The cable should not be bent or compressed.
 If the power supply cable is damaged, have it replaced by the manufacturer or its authorised Technical Assistance Service in order to prevent all potential hazards. (See Assistance)
 The Company shall not be held responsible for any incidents, if these regulations are not observed.
Positioning and levelling
1.Position the dishwasher on a level sturdy floor. If the floor is uneven, the front feet of the appliance may be adjusted until it reaches a horizontal position. If the appliance is levelled correctly, it will be more stable and much less likely to move or cause vibrations and noise while it is operating.
2.Before recessing the dishwasher, stick the adhesive transparent strip* under the wooden shelf in order to protect it from any condensation which may form.
3.Place the dishwasher so that its sides or back panel are in contact with the adjacent cabinets or the wall. This appliance
can also be recessed under a single worktop* (see the Assembly instruction sheet).
4*. To adjust the height of the rear foot, turn the red hexagonal bushing on the lower central part at the front of the dishwasher using a hexagonal spanner with an opening of 8 mm. Turn the spanner in a clockwise direction to increase the height and in an anticlockwise direction to decrease it. (see Building-in instruction sheet attached to the documentation)
* Only available in selected models.
9

Advice regarding the first wash cycle
EN After the installation, remove the stoppers from the racks and the retaining elastic elements from the upper rack (if any).
Water softener settings
Before starting the first wash cycle, set the hardness level of the water from the mains supply. (see chapter Rinse aid and refined salt).
First load the softener tank with water, then introduce about 1 kg of salt. It is perfectly normal for water to flow out.
As soon as this procedure is complete, run a wash cycle. Only use salt that has been specifically designed for dishwashers.
After the salt has been poured into the machine, the LOW SALT indicator light* switches off.
 If the salt container is not filled, the water softener and the heating element may be damaged as a result.
The machine has a buzzer/set of tones (depending on the dishwasher model) to inform the user that a command has been implemented: power on, cycle end etc.
The symbols/indicator lights/LEDs on the control panel/ display may vary in colour and may have a flashing or fixed light (depending on the dishwasher model).
The display provides useful information concerning the type of wash cycle, drying/wash-cycle phase, remaining time, temperature etc etc.
Technical data
Dimensions |
width 59,5 cm |
||
height 82 cm |
|||
|
|
|
depth 57 cm |
Capacity |
14 standard place-settings |
||
Water supply pressure |
0,05 ÷ 1MPa (0.5 ÷ 10 bar) |
||
7,25 psi – 145 psi |
|||
Power supply voltage |
See appliance data plate |
||
|
|
|
|
Total absorbed power |
See appliance data plate |
||
|
|
|
|
Fuse |
See appliance data plate |
||
|
|
|
This dishwasher conforms to the |
|
|
|
following European Community |
|
|
|
Directives: |
|
|
|
-2006/95/EC (Low Voltage) |
|
|
|
-2004/108/EC (Electromagnetic |
|
|
|
Compatibility) |
|
|
|
-2009/125/EC (Comm. Reg. |
|
|
|
1016/2010) (Ecodesign) |
|
|
|
-97/17/EC (Labelling) |
|
|
|
-2012/19/CE Waste Electrical |
|
|
|
and Electronic Equipment (WEEE) |
|
|
|
|
* Only available in selected models.
10

Description of the appliance
Overall view |
EN |
|
1. Upper rack
2. Upper spray arm
3. Tip-up dispensers
4. Rack height adjuster
5. Lower rack
6. Lower spray arm
7.Washing filter
8.Salt dispenser
9. Detergent and rinse-aid dispenser
10. Data plate
11. Control panel***
Control panel
Select wash cycle button |
|
|
Salt indicator light |
|||||||||
|
||||||||||||
|
|
|
|
|
|
|
|
|||||
ON-OFF/Reset button |
|
|
|
|
|
|
Wash cycle indicator light |
|
|
|
||
|
|
|
|
|
|
|
|
|||||
and indicator light |
|
|
|
|
|
|
|
|
||||
|
|
|
|
|
|
|
|
|
|
|
|
|
|
|
|
|
|
|
|
|
|
|
|
|
|
|
|
|
|
|
|
|
|
|
|
|
|
|
|
|
|
|
|
|
|
|
|
|
|
|
|
|
|
|
|
|
|
|
|
|
|
|
|
|
|
|
|
|
|
|
|
|
|
|
|
|
|
|
|
|
|
|
|
|
|
|
|
|
|
|
|
|
|
|
|
|
|
|
|
|
|
|
|
|
|
|
|
|
|
|
|
|
|
|
|
|
Rinse aid indicator light
***Only in completely built-in models. * Only available in selected models.
The number and type of wash cycles and options may vary depending on the dishwasher model.
11
Refined Salt and Rinse Aid
EN |
|
|
Only use products which have been specifically designed |
|
|
||
|
for dishwashers. Do not use table salt or industrial salt. |
||
|
|
||
|
|
Follow the instructions given on the packaging. |
|
 If you are using a multi-function product, we recommend that you add salt in any case, especially if the water is hard or very hard. (Follow the instructions given on the packaging.)
 If you do not add salt or rinse aid, the LOW SALT* and LOW RINSE AID* indicator lights will remain lit.
Measuring out the refined salt
The use of salt prevents the formation of LIMESCALE on the dishes and on the machine's functional components.
•It is important that the salt dispenser be never empty.
•It is important to set the water hardness.
The salt dispenser is located in the lower part of the dishwasher (see Description) and should be filled:
•When the LOW RINSE AID indicator light in the control panel is lit *;
•When the green float* on the cap of the salt dispenser is no longer visible.
•See autonomy in the water hardness table.
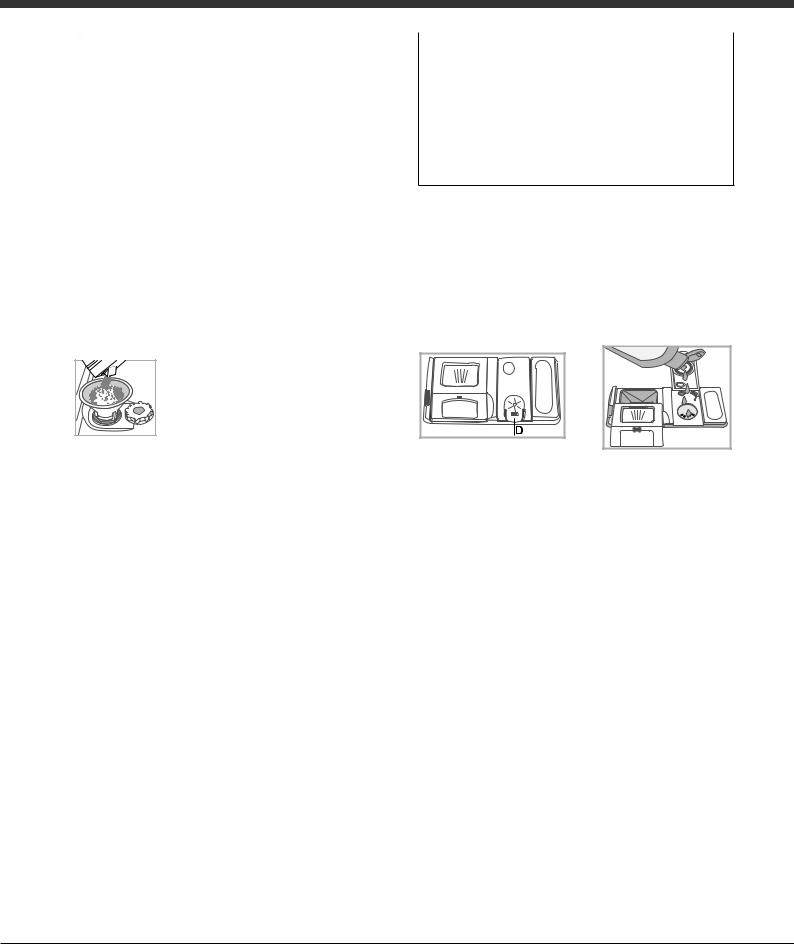
1. Remove the lower rack and unscrew the
container cap (anticlockwise).
2. Only the first time you do this: fill the water
dispenser up to the edge.
3. Position the funnel (see figure) and fill the salt container right up to its edge
(approximately 1 kg); it is not unusual for a little water to leak out.
4. Remove the funnel and wipe any salt residue away from the opening; rinse the cap under running water and then screw it on. It is advisable to perform this procedure every time you add salt to the container.
Make sure the cap is screwed on tightly, so that no detergent can get into the container during the wash cycle (this could damage the water softener beyond repair).
 Whenever you need to add salt, we recommend carrying out the procedure before the washing cycle is started.
Setting the water hardness
For perfect water softener operation, it is essential that the adjustment be based on the water hardness in your house. Ask your local water supplier for this information. The factory setting is for medium water hardness.
•Switch the dishwasher on using the On/Off button. 
•Switch it off using the On/Off button 
•Hold down button P for 5 seconds until you hear a beep.
•Switch it on using the On/Off button 
•The current selection level number and salt indicator light flash (flashing indicator only).
•Press button P to select the desired hardness level (see hardness table).
•Switch it off using the On/Off button 
•Setting is complete!
Even if using multi-functional tablets, the salt dispenser should still be filled.
|
|
|
|
|
|
|
|
|
|
|
|
|
|
|
|
|
|
|
|
Water Hardness Table |
Average autonomy |
|
|||||||
salt dispenser with 1 |
|||||||||
|
|
|
|
|
|
|
wash cycle per day |
||
level |
°dH |
|
°fH |
mmol/l |
|
months |
|
||
1 |
0 |
- 6 |
|
0 - 10 |
0 - 1 |
|
7 months |
|
|
2 |
6 - 11 |
|
11 - 20 |
1.1 - 2 |
|
5 months |
|
||
3 |
12 |
- 17 |
|
21 - 30 |
2.1 - 3 |
|
3 months |
|
|
4 |
17 |
- 34 |
|
31 - 60 |
3.1 - 6 |
|
2 months |
|
|
5* |
34 |
- 50 |
|
61 - 90 |
6.1 - 9 |
|
2/3 weeks |
|
|
For values between 0°f and 10°f, we do not recommend the use of salt. A setting of 5 may increase cycle duration.
(°dH = hardness measured in German degrees - °f = hardness measured in French degrees – mmol/l = millimoles per litre)
Measuring out the rinse aid
Rinse aid makes dish DRYING easier. The rinse aid dispenser should be filled:
•When the LOW RINSE AID indicator light on the panel/display is lit *;
•When the dark optical indicator* on the dispenser door “D” becomes transparent.
A |
X |
M |
1.Open the dispenser “D” by pressing and pulling up the tab on the lid;
2.Carefully introduce the rinse aid as far as the maximum reference notch in the filling space - avoid spilling it. If this happens, clean the spill immediately with a dry cloth.
3.Press the lid down until you hear a click to close it.
NEVER pour the rinse aid directly into the tub.
Adjusting the amount of rinse aid
If you are not completely satisfied with the drying results, you may want to adjust the quantity of rinse aid used.
•Switch the dishwasher on using the On/Off button. 
•Switch it off using the On/Off button 
•Press button P three times - a beep will be heard.
•Switch it on using the On/Off button 
•The current selection level number and rinse aid indicator light flash (flashing indicator only).
•Press button P to select the level of rinse aid quantity to be supplied.
•Switch it off using the On/Off button 
•Setting is complete!
If the rinse aid level is set to ZERO, the rinse aid will not be supplied and the low rinse aid indicator light will not be lit if you run out of it.
A maximum of 4 levels can be set according to the dishwasher model. The factory setting is for a medium level.
•If you see bluish streaks on the dishes, set a low number (1-2).
•If there are drops of water or limescale marks on the dishes, set a high number (3-4).
*Only available in selected models.
12
 Loading...