

Page 1
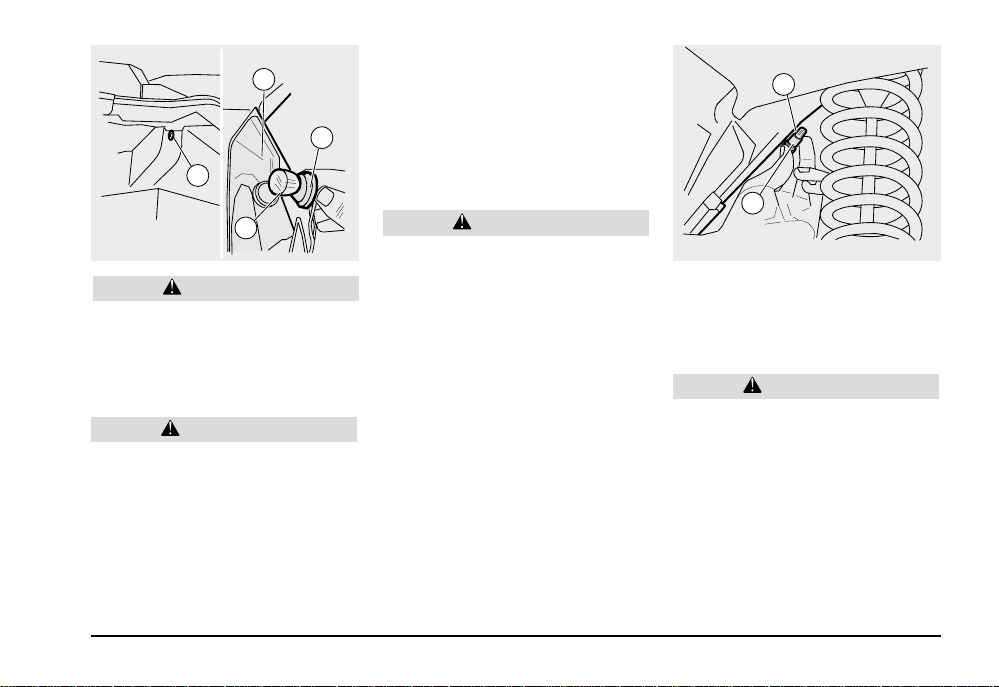
6
7
5
8
CAUTION
While carrying on the following operations, neither pull nor force the electric
cables.
♦ Extract the rear lighting group (6) remov-
ing the upper part first and then take it out
of its seat.
CAUTION
Proceed with care.
Do not damage the tangs and/or their
seats.
♦ Holding the rear lighting group in your
hands, rotate the bulb socket (7) anticlockwise and extract it with the bulb (8).of the
parabola (6).
♦ Extract the bulb from its seat.
IMPORTANT Insert the bulb into the bulb
socket by making the two elements coincide
with the respective guides on the bulb socket.
♦ Correctly install a bulb of the same kind.
IMPORTANT Upon reassembly, fit the
protection screen correctly in its seat.
CAUTION
Carefully tighten the screw (5) in order to
avoid damaging the protection screen.
2
1
REPLACING THE NUMBER
PLATE BULB
Carefully read page 61 (BULBS).
To replace the bulb:
CAUTION
While extracting the bulb socket, do not
pull the electric cables.
♦ Grasp the bulb socket (1), pull it and then
take it out of its seat.
♦ Extract the bulb (2) and replace it with one
of the same kind.
use and maintenance
Atlantic 500
65
Page 2
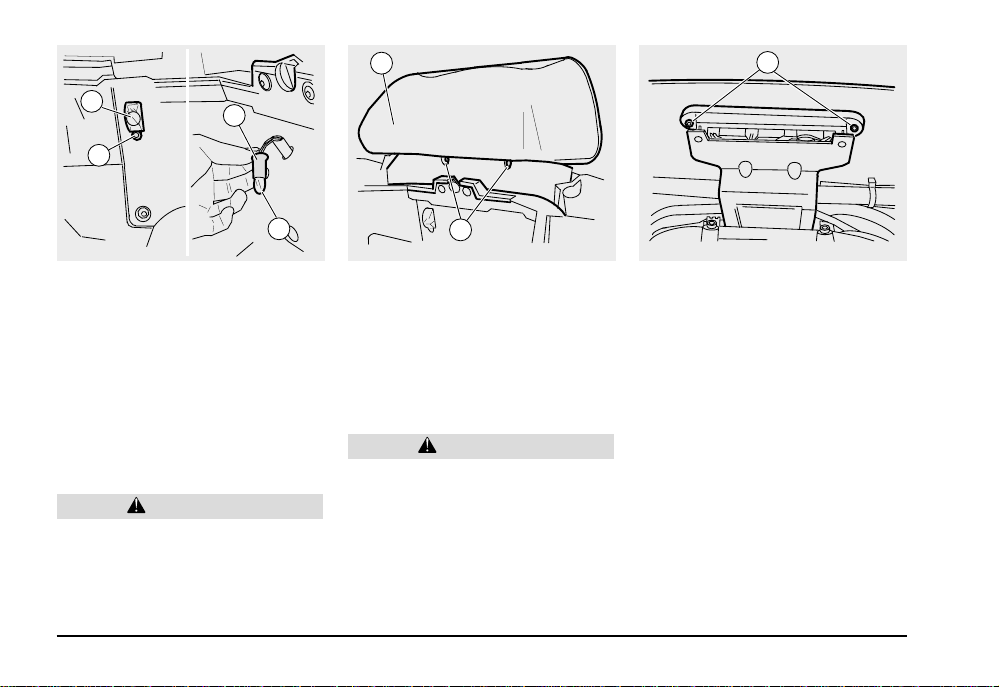
2
3
4
5
3
6
REPLACING THE CRASH
HELMET COMPAR TMENT BULB
Carefully read page 61 (BULBS).
To replace the bulb:
♦ Raise the saddle, see page 23 (UNLOCK-
ING/LOCKING THE SADDLE).
♦ Loosen and remove the screw (3) fasten-
ing the transparent cover to the battery
cover.
♦ Remove the transparent cover (4) by pull-
ing it downwards.
CAUTION
While extracting the bulb socket, do not
pull the electric cables.
♦ Grasp the bulb socket (5), pull it and then
extract it from its seat.
♦ Extract the bulb and replace it with a new
one of the same kind.
use and maintenance Atlantic 500
66
1
REPLACING THE THIRD
STOPLIGHT BULB
Carefully read page 61 (BULBS).
To replace the bulb:
♦ Raise the saddle, see page 23 (UNLOCK-
ING/LOCKING THE SADDLE).
♦ Loosen and remove the two screws (1) fas-
tening the backrest to the vehicle.
CAUTION
While removing the backrest, proceed
with care in order to avoid breaking the
clutch claws.
♦ Remove the backrest (2) by pulling it up-
wards.
♦ Loosen and remove the two screws (3) fas-
tening the protection screen (4) of the third
stoplight.
♦ Remove the bulbs (5) from the seat.
♦ Replace the bulb with a new one of the
same kind.
Page 3
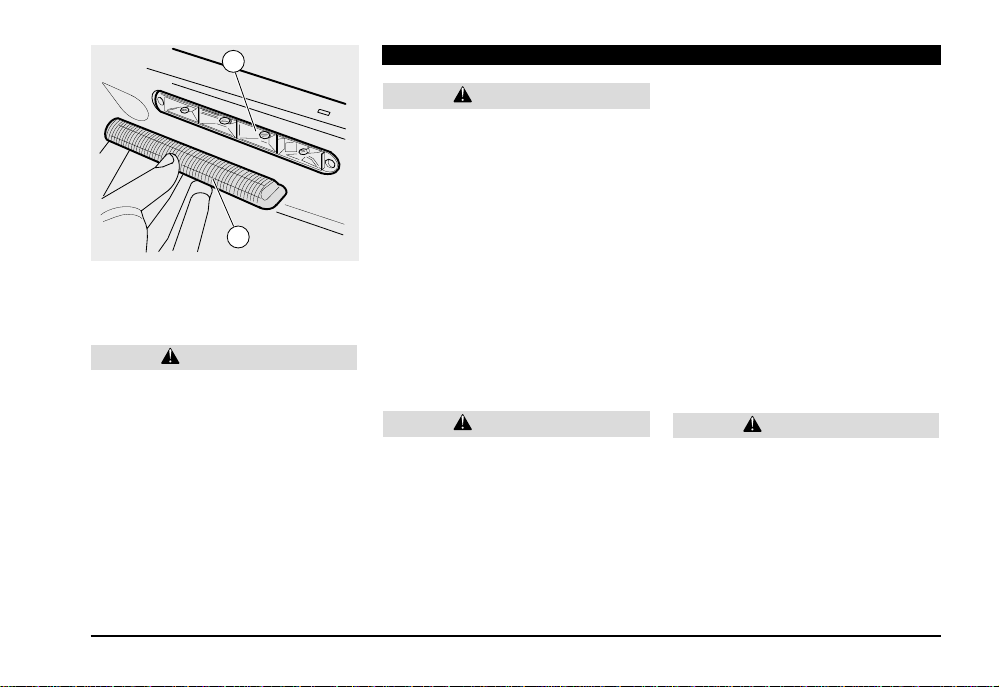
5
4
IMPORTANT Upon reassembly, fit the
protection screen correctly in its seat.
CAUTION
Carefully tighten the screw (3) to avoid
damaging the protection screen.
TRANSPORT
WARNING
Before transporting the vehicle, it is necessary to empty the fuel tank and the carburettor completely, see page 83 (DRAINING THE FUEL TANK), making sure that
both are completely dry.
During transport, the vehicle must be kept
in vertical position and be firmly anchored
in order to avoid leaks of fuel, oil and coolant.
In case of failure, do not tow the vehicle,
but ask for assistance.
DRAINING THE FUEL TANK
Carefully read page 25 (FUEL)
WARNING
Danger of fire.
Wait until the exhaust silencer and the
engine have completely cooled down.
Fuel vapours are noxious for your health.
Before proceeding, make sure that the
room in which you are working is suitably ventilated.
Do not inhale fuel vapours.
Neither smoke nor use naked flames.
DO NOT DISPOSE OF THE FUEL IN THE
ENVIRONMENT.
♦ Position the vehicle on the central stand
on firm and flat ground.
♦ Stop the engine and wait until it has cooled
down.
♦ T ake a container with capacity exceeding
the fuel quantity in the tank and place it
on the ground on the left side of the vehicle.
♦ Remove the filler cap.
♦ T o drain the fuel tank, use a manual pump
or a similar system. Do not damage the
pump group (fuel level sensor in the tank).
WARNING
After draining the tank, put back the filler
cap.
use and maintenance
Atlantic 500
67
Page 4

CLEANING
Clean the vehicle frequently if you use it in
particular areas or conditions, such as:
♦ Pollution (cities and industrial areas).
♦ Salinity and humidity in the atmosphere
(sea areas, hot and humid climates).
♦ Particular environmental/seasonal condi-
tions (use of salt and anti-ice chemical
products on roads in winter).
♦ Avoid leaving deposits of industrial and
polluting powders, tar spots, dead insects,
bird droppings, etc on the body of the vehicle.
♦ Avoid parking the vehicle under trees, since
in some seasons residues, resins, fruits or
leaves fall down, which contain chemical
substances that may damage the paint.
use and maintenance Atlantic 500
68
WARNING
After the vehicle has been washed, the
braking functions could be temporarily
impaired because of the presence of water on the grip surfaces. Calculate long
braking distances to avoid accidents.
Brake repeatedly to restore normal conditions.
Carry on the preliminary check operations, see page 33 (TABLE OF PRELIMINARY CHECKS).
To remove dirt and mud from the painted
surfaces use a low-pressure water jet, carefully wet the dirty parts, remove mud and filth
with a soft car sponge impregnated with a
lot of water and shampoo (2÷4 % parts of
shampoo in water).
Then rinse with plenty of water and dry with
chamois leather.
To clean the outer parts of the engine use
degreasers, brushes and wipers.
CAUTION
Wehicle washing warning:
- Remove all the objects from the front
and underseat compartments.
- Remove the moquette pad from the
underseat.
- Make sure of the compartments right
closure.
CAUTION
Polish with silicone wax only after having carefully washed the vehicle.
Do not polish matt paints with polishing
pastes.
Do not wash the vehicle under the sun,
especially during the summer, when the
body is still warm, since if the shampoo
dries before being rinsed away, it can
damage the paint.
Do not use liquids at a temperature higher
than 40° C to clean the plastic components of the vehicle.
Do not use high pressure water/air jets
or vapour jets on the following parts:
wheel hubs, controls on the right and left
side of the handlebar, bearings, brake
pumps, instruments and indicators, silencer exhaust, crash helmet/tool kit compartment, ignition switch/steering lock.
Do not use alcohol, petrol or solvents to
clean the rubber and plastic parts and the
saddle: use water and mild soap only.
WARNING
Do not apply protection waxes on the saddle to avoid making it too slippery.
Page 5

I
D
A
Z
P
U
S
H
LONG PERIODS OF INACTIVITY
Some precautions are necessary to avoid
any problem after a long period of inactivity
of the vehicle.
Furthermore, it is important to carry on the
necessary repairs and a general check before the period of inactivity, since you could
forget to carry them on later.
Proceed as follows:
♦ Empty the fuel tank and the carburettor
completely, see page 65 (DRAINING THE
FUEL TANK).
♦ Remove the spark plug, see page 56
(SPARK PLUG).
♦ Pour a teaspoon of engine oil (5-10 cm
into the cylinder.
IMPORTANT Put a clean cloth on the
cylinder, near the spark plug seat, in order
to protect it from oil sprays.
♦ Move the ignition switch to position “ ”
and press the engine start push-button “
for a few seconds to distribute the oil evenly
on the cylinder surfaces.
♦ Remove the cloth.
♦ Put back the spark plug.
♦ Remove the battery, see page 58 (REMOV -
ING THE BATTER Y) and page 57 (LONG
INACTIVITY OF THE BATTERY).
♦ Wash and dry the vehicle, see page 68
(CLEANING).
♦ Polish the painted surfaces with wax.
♦ Inflate the tyres, see page 70 (TECHNI-
CAL DATA).
♦ By means of a suitable support, position
the vehicle so that both tyres are raised
3
)
from the ground.
♦ Place the vehicle in an unheated, not-hu-
mid room, away from sunlight, with minimum temperature variations.
♦ Position and tie a plastic bag on the final
pipe of the exhaust silencer, in order to pre-
”
vent moisture from entering it.
♦ Cover the vehicle avoiding the use of plas-
tic or waterproof materials.
AFTER A PERIOD OF INACTIVITY
♦ Uncover and clean the vehicle, see page
68 (CLEANING).
♦ Check the battery charge, see page 59
(RECHARGING THE BATTERY) and install it, see page 59 (INSTALLING THE
BATTERY).
♦ Refuel, see page 25 (FUEL).
♦
Carry on the preliminary checks, see page
33 (TABLE OF PRELIMINARY CHECKS).
WARNING
Have a test ride at moderate speed in a
low-traffic area.
use and maintenance
Atlantic 500
69
Page 6
TECHNICAL DATA
Description
DIMENSIONS
Max. length 2270 mm
Max. width 720 mm
Max. height (fairing included) 1450 mm
Height (saddle included) 780 mm
Distance between centres 1575 mm
Min. ground clearance 150 mm
Weight ready for starting 200 kg
ENGINE
TRANSMISSION
use and maintenance Atlantic 500
70
Type
Number of valves 4
Number of cylinders 1
Total displacement 460 cm
Bore/stroke 92 mm / 69 mm
Compression ratio 10.5 : 1
Starting Electric
Engine idling rpm 1450 ± 50 rpm
Clutch Automatic, dry centrifugal clutch
Change gear Automatic
Lubrication system
Cooling
Speed variator Automatic stepless
Primary V-belt
Secondary Gears
Total engine/wheel ratio Minimum 1/11.988
Four-stroke, single-cylinder engine, 4 valve timing with cam
shaft in cylinder head, chain-drive on the flywheel side
3
Forced circulation with trochoid pump (inside the oil pan),
oil filter and pressure adjustment by-pass.
Liquid cooling, forced circulation with centrifugal pump
Maximum 1/4.86
Page 7

Description
CAPACITIES
Fuel (reserve included) 17 l
Fuel reserve 4 l
Engine oil
-engine oil and engine oil filter change 1500 cm
-change for engine overhaul 1700 cm
Transmission oil ~ 250 cm
Coolant
(50% water + 50% antifreeze with ethylene glycol)
Front fork oil 220 cm
1,5 l
3
(for each rod)
Seats 2
Vehicle max. load
(driver + luggage)
Vehicle max. load
(driver + passenger + luggage)
105 kg
180 kg
3
3
THROTTLE BODY
FUEL SUPPLY
FRAME
Model Ø38 mm and single injector
Choque tube Ø39 mm
Type Electronic injection with electric fuel pump
Fuel Unleaded (4 Stars
) premium grade
petrol, min. O.N. 95 (N.O.R.M.) and 85 (N.O.M.M.)
Type IN STEEL TUBES WITH HIGH YIELD POINT
Steering inclination angle 28°, 50’
Fore stroke 118 mm
use and maintenance
Atlantic 500
71
Page 8

Description
SUSPENSIONS
Front Hydraulically operated telescopic fork
Stroke 100 mm (rear)
Rear two hydraulic shock absorbers with double effect
and preload adjustment with five positions
Wheel stroke 100 mm
BRAKES
WHEEL RIMS
TYRES
use and maintenance Atlantic 500
72
Front Disk brake – Ø 260 mm – with hydraulic transmission
Rear (combined) Double disk brake – front disk
Ø 260 mm / rear disk 220 mm
Type In light alloy
Front 15x3.00
Rear 14x3.75
Type Tubeless
FRONT 120 /70 -15 M/C 56R
REAR 140 /60 -14 M/C REINF. 64R
STANDARD INFLATION PRESSURE
Front 2.1 bar
Rear 2.3 bar
INFLATION PRESSURE WITH PASSENGER
Front 2.2
Rear 2.6
Page 9

Description
IGNITION
Type C.D.I./Inductive
Spark advance Variable advance controlled by the injection central unit
SPARK PLUG
ELECTRIC SYSTEM
BULBS
WARNING LIGHTS
Standard CHAMPION RG6YC
– Alternatively NGK - CR7EKB
Spark plug gap 0.7 – 0.8 mm
Battery 12 V - 12 Ah
Fuses 30 -15 - 3 A
Generator (with permanent magnet) 14V - 330W
Low/high beam 12V - 55W / 12V - 35W
Front parking light 12V - 10W
Direction indicators 12V - 16W
Rear parking light/stoplight 12V - 5/21W
Helmet compartment lighting 12V - 5W
Number plate light 12V - 5W
Dashboard lighting LED
Third stoplight 12V - 2.3W
Direction indicators LED
Engine oil pressure LED
Low beam LED
High beam LED
Low fuel LED
Brake pad wear LED
Coolant high temperature warning light LED
use and maintenance
Atlantic 500
73
Page 10

LUBRICANT CHART
Engine oil (recommended): SUPERBIKE 4, SAE 5W - 40.
As an alternative to the recommended oil, it is possible to use high-quality oils with characteristics in compliance with or superior to the A.P.I.
SJ specifications.
Transmission oil (recommended): F.C., SAE 75W - 90.
As an alternative to the recommended oil, it is possible to use high-quality oils with characteristics in compliance with or superior to the A.P.I.
GL3 specifications.
Fork oil (recommended): F.A. 5W or F.A. 20W.
If you need an oil with intermediate characteristics in comparison with the
SAE 10W =
SAE 15W =
Bearings and other lubrication points (recommended):SYSTEM TW 249 AREXONS.
As an alternative to the recommended product, use high-quality grease for rolling bearings, working temperature range –30° C … + 140° C,
dripping point 150° C …230° C, high protection against corrosion, good resistance to water and oxidation.
Protection of the battery poles: neutral grease or vaseline.
F. A. 5W 67% of the volume + F. A. 20W 33% of the volume;
F. A. 5W 33% of the volume + F. A. 20W 67% of the volume;
F. A. 5W and F. A. 20W:
WARNING
Brake fluid (recommended): TUTELA TOP 4.
As an alternative to the recommended product, it is possible to use fluids with characteristics in compliance with or superior to the SAE
J1703, NHTSA 116 DOT 4, ISO 4925 specifications, relative to synthetic fluids.
Use new brake fluid only.
WARNING
Use only antifreeze and anticorrosive without nitrite, ensuring protection at -35°C at least.
Engine coolant (recommended): PARAFLU 11 FE (diluted).
As an alternative to the recommended product, it is possible to use coolants with characteristics in compliance with or superior to the CUNA
NC 956-16 specifications, relative to antifreezes with ethylene glycol.
use and maintenance Atlantic 500
74
Page 11

NOTE
ASK FOR GENUINE SPARE PARTS ONLY
use and maintenance
Atlantic 500
75
Page 12

Importers
METRO MOTOR MARKETING LTD.
use and maintenance Atlantic 500
76
ING-KART d.o.o.
via G. Galilei, 1 - 30033 Noale (VE) Italy - Tel. +39(0)41 5829111 - Fax +39(0)41 441054
Servizio Clienti aprilia +39(0)41 5786269 - E-mail: aprilia@aprilia.it
Z.A. Central Parc - 255 BLV Robert Ballanger
B.P. 77-93421 Villepinte (F) - Tel. (0) 149634747 - Fax (0) 149638750
Am Seestern 3 D-40547 Düsseldorf (D)
Tel. (211) 59018-00 - Fax (211) 5901819
Edificio America, Av. da de Arangòn 334 - 28022 - Madrid (E)
Tel. (91) 7460066 - Fax (91) 7460065
Nikkelstraat 1 - 4823 AE Breda (NL)
Tel. (076) 5431640 - Fax (076) 5431649
Dunragit - Stranraer - Wigtownshire DG9 8PN - Scotland (UK)
Tel. (01776) 888670 - Fax (01581) 400661 - E-mail: aprilia@aol.com
110 Londonderry Court, Suite 130 - Woodstock, GA 30188 (USA)
Tel. 770 592 2261 - Fax 770 592 4878
Frankenburgerstrasse 19 - 4910 Ried im Innkreis (A)
Tel. (7752) 88077 - Fax (7752) 70684 - E-mail: elke.ginzinger@ivnet.co.at
Avenida da Republica 692 - 4450-238 Matosinhos (P)
Tel. 229382450 - Fax 229371305 - E-mail: milfa@meganet.pt
P.o.B. 18 - 29250 Nakkila (SF)
Puh. (02) 5352500 - Fax (02) 5372793 - E-mail: varaosat@npm.fi
Industriegebied - Landegemstraat 4 - (B) - 9031 Drongen-Baarle
Tel. (09) 2829410 - Fax (09) 2810012 - E-mail: aprilia@rad.be
Lahana 12 N. Filadelphia 143 42 - Athens (GR)
Tel. (1) 2714748 - Fax (1) 2776688 - E-mail: glyniadakis@acropolis.net / kelafis@internet.gr
Bernerstrasse Nord 202 - 8064 Zurich (CH)
Tel. (1) 4348686 - Fax (1) 4348606 - E-mail: info@mohag.ch
Islandsvej 3 - 7900 Nykøbing Mors (DK)
Tel. 97722233 - Fax 97722143/33 - E-mail: t_m_p@post4.tele.dk
12, Tushia Street - P.o. Box 57266 61572 Tel-Aviv (IL)
Tel. 00972-3-5623951 - Fax 00972-3-5623950 - E-mail: metro@inter.net.il
Samoborska cesta 258 - 10000 Zagreb (HR)
Tel. 00385-1-3498000 - Fax 00385-1-3499111 - E-mail: ing-kart@zg.tel.hr
Page 13

Importers
MILLE MOTOR KFT.
HARO SKANDINAVIA A.S.
MX
APRILIA DE MEXICO, SA. de CV.
22-25 Hakunoshima 2 Chome Minoo-Shi 562 Osaka
562-0012 OSAKA (J) - Tel. (0727) 253311 - Fax (0727) 253322 - E-mail: aprilia@bosco-moto.com
20 Mactaggart Road, #01-01 Khong Guan Industrial Building 368079 Singapore (SGP)
Tel. 2820082 - Fax 2821012 - E-mail: idealmtr@mbox4.singnet.com.sg
Hold utca 23 H-1054 - Budapest (HU)
Tel. (1) 3329938 - Fax (1) 2693044 - E-mail: bertinus@elender.hu
YeungSoo BLDG 302 206-25, Ohjang-dong, Chung-ku, Seoul (ROK)
Tel. (02) 2275-6130 - Fax (02) 2275-6132 - E-mail: kukbike@yahoo.co.kr
Av. Europa, 352 - Jardim Europa - 01449-001 Sao Paulo-SP (BR)
Tel. (11) 30691220 - Fax (11) 30691221 - E-mail: hideki@aprilia.com.br
8, Sheridan Close - NSW 2214 - Milperra - Sydney (AUS)
Tel. (2) 97722666 - Fax (2) 97742321 - E-mail: jcaruso@jsg.com.au
Old Pretoria Road - Wynberg - Johannesburg (RSA)
Tel. (11) 7868486 - Fax (11) 7868482 - E-mail: motovelo@betech.co.za
35, Manchester Street - P.o.B. 22416 - Christchurch (NZ)
Tel. (3) 3660129 - Fax (3) 3667580 - E-mail: guzzi@motorcycling-nz.co.nz
Miroslava Magdalenica, 1 - 10000 Zagreb (HR)
Tel. (1) 3491107 / 3491091 - Fax (1) 3491555 - E-mail: ing-kart@zg.tel.hr
Baragova 5 - 1113 Ljubljana (SLO)
Tel. (61) 5883 421 - Fax (61) 5883 465 - E-mail: ziga.martincic@avto-triglav.si
Mihrabat Caddesi Akbeysokak Yetimoglu ls Merkezi - 81640 - Kavacik-Istambul (TR)
Tel. (0216) 4251565 - Fax (0216) 3312606
Cernokostelecka 116 - 100 00 Praha 10 (CZ)
Tel. (02) 72703049 - Fax (02) 72702156 - E-mail: pistek@aspirit.cz
17 Wood Street - Dublin 8 (IRL)
Tel. (1) 4756046 - Fax (1) 4756461
Kjørbekkdalen 6, 3735 Skien, Norway (N)
Tel. 35506780 - Fax 35506781 - E-mail: tore@aprilia.no
San Jeronimo, 64640, 552 Monterrey N.L. (MX)
Tel. 0052-8333-4493 - Fax 0052-8348-9398 - E-mail: javier@aprilia.com.mx
use and maintenance
Atlantic 500
77
Page 14

WIRING DIAGRAM - Atlantic 500
45
R
B
46
N
48
51
49
RR
B
N
B
Bi
B
Bi
50
N
B
B
Bi
Bi
GG
Az
Az
G
G
B
B
1
B
Az
47
52
FUSIBILI SECONDARI:
A - INIEZIONE, AVVIAMENTO.
B - ENGINE KILL, LUCI STOP.
C - LUCI, CLAXON, CRUSCOTTO, RELE' VENTOLA.
D - PRESA DI CORRENTE.
E - ALIMENTAZIONE PERMANENTE E.C.U.
F - LIBERO.
use and maintenance Atlantic 500
78
44
B
B/Ar
Gr/Bi
V
Vi
1
B/Ar
Gr/Bi
Gr/B
M/Bi
1
V/G
2
Az/R
3
Ar
4
R/B
5
Vi
6
B
7
Ro/G
8
M
9
R
10
M/G
11
B/N
12
Gr/R
13
Az
14
Az/V
15
Ro/G
16
Ar/N
17
Ro/N
18
Vi/N
19
Ar/Bi
20
G
21
Gr
22
N
23
Ro
CENTRALINA E.C.U.
24
25
Gr/N
26
N
N
N
1
2
G/Gr
G
19
35
R/Bi
V/N
R/Bi R/Bi
V/R V/R
22
30A
30A
R
R R
R/N
B/G
R/Bi
26
Ar/N
B
1
G
B
25
1
1
MODIFICA PER VERSIONE ASD
37
G/R
V/G
V/N
V/N
1
55
863085
87
1
V/G
B
V/G
B
R
R
V/G
V/G
G
G
B
B
G
G
V/G
V/G
B
B
Az
Az
1
G/GrBG
B
B
G/R
R/Bi
B/Bi
R
R
M
21
20
34
V/G
Gr/N
R/Gr
R/N
V/N
56
R
B
29
32
V/G
54
G
31
58
B
31
G
58
V/G
31
54
B
31
53
B
Az
30
27
43
!!!!!!!!
x1000r/min
EFI
EFI
EFI
EFI
ABSABS
ABS
W
G/V
Ar/NBB
1
ABS
SET
1
910111267823451
1514 16 987564231
Vi13Az/Bi
R/Bi
Bi/G
R/Bi
Az/R
B/Bi
R/Bi
B/N
GViRo
Az
M
Ar/R
Gr/Bi
Az/V
Gr/B
AzRM/V
B
Ar/Bi
R/M
Gr/R
R/M
4
P
6
5
7
!!!!!!!!
mp/h
Km/h
TRIP
B
G/GrRoV
B/ArArBi/N
B
M
R
54
G/V
Ar/N
R/M
M/N
1
8
42
20191816 17151413121110
G/B
BNBi
1
57
M
Ro
M/V
M/N
BN
Gr/N
R/B
Ar/V
R/M
R/N
Ar/V
Gr/N
1
1
858687
30
R/M
2
109
Ro/G
5
3
1
V
M
123
11
39
SCROLL
PASSING
STOP
40
1
Gr
V
R/Bi
M/G
M/Bi
Gr
V/G
1
13
33
V/G
AzRB/N
G/N
RoMB/Bi
V
Gr
B
N
V/N
Bi
Az/Bi
B/N
G/N
Bi/G
B/Bi
B
Gr
N
V
Bi
V
B/G
Ar/R
Bi/N
Gr
Ar
Gr
Ro/N
11
14
15
37
38
R/N
873085
G/N
R/Bi
Vi/NVAr
Gr/N
G/N
B
B
G/N
16
34
Gr/N
V/G
36
V/G
G/R
R/Gr
R/N
V/N
G
G/N
1
86
G/R
B/G
V
G/Gr
G/N
B
V/R
V/R
GG
GBBV
V
R/Bi
R/Bi
G
17
1
Gr/N
R/N
R/Gr
Bi/N
N
28
1
V
B
Ro/G
Gr
24
R/Gr
V/N
15A
B
V/N
V
15A
C
Ar/N
V/R
3A
E
Ar/V
V/R
15A
A
R/Bi
Ar
15A
D
F
23
B
G
1
G
N
GGG
18
Page 15

WIRING DIAGRAM KEY - Atlantic 500
1) Multiple connectors
2) Revolution sensor
3) Stepper motor
4) Coil
5) Spark plug
6) Fuel injector
7) Fuel pump
8) Fuel level sensor
9) Injection primary relay (with diode)
10) Injection secondary relay
11) Side stand switch
12) Lambda sensor (not available)
13) Accelerator sensor
14) Engine air thermistor
15) Dashboard/engine water thermistor
16) Fan
17) Voltage regulator
18) Flywheel
19) Battery
20) Start relay
21) Starter
22) Primary fuses
23) Outlet
24) Secondary fuses
25) Rear box compartment light
26) Compartment light switch
27) Number plate light
28) Car radio set power supply
29) Rear right direction indicator
30) Rear left direction indicator
31) Stoplight/parking light bulbs
32) Rear right light
33) Rear stoplight switch
34) Front stoplight switch
35) Key selector
36) Fall sensor
37) Right dimmer
38) Fan relay
39) Left dimmer
40) Horn
41) –
42) Dashboard air T thermistor
43) Dashboard
44) Speed sensor
45) Oil pressure sensor
46) Front right direction indicator
47) Front left direction indicator
48) Low beam bulb
49) High beam bulb
50) Parking light bulb
51) Headlight
52) E.C.U. central unit
53) Rear left light
54) Diagnostics outlet
55) Stoplight relay
56) Third stoplight bulbs
57) Parking brake switch (optional)
58) –
59) –
60) –
CABLE COLOURS
Ar orange
Az light blue
B blue
Bi white
G yellow
Gr grey
M brown
N black
R red
V green
Vi violet
Ro pink
use and maintenance
Atlantic 500
79
Page 16

NOTE
ASK FOR GENUINE SPARE PARTS ONLY
use and maintenance Atlantic 500
80
Page 17

NOTE
ASK FOR GENUINE SPARE PARTS ONLY
use and maintenance
Atlantic 500
81
Page 18

NOTE
ASK FOR GENUINE SPARE PARTS ONLY
use and maintenance Atlantic 500
82
Page 19

NOTE
ASK FOR GENUINE SPARE PARTS ONLY
use and maintenance
Atlantic 500
83
Page 20

use and maintenance Atlantic 500
84
aprilia s.p.a. wishes to thank its customers for the purchase of this vehicle.
- Do not dispose of oil, fuel, polluting substances and components in the
environment.
- Do not keep the engine running if it isn’t necessary.
- Avoid disturbing noises.
- Respect nature.
 Loading...