

Page 1
MAIN INDIPENDENT CONTROLS
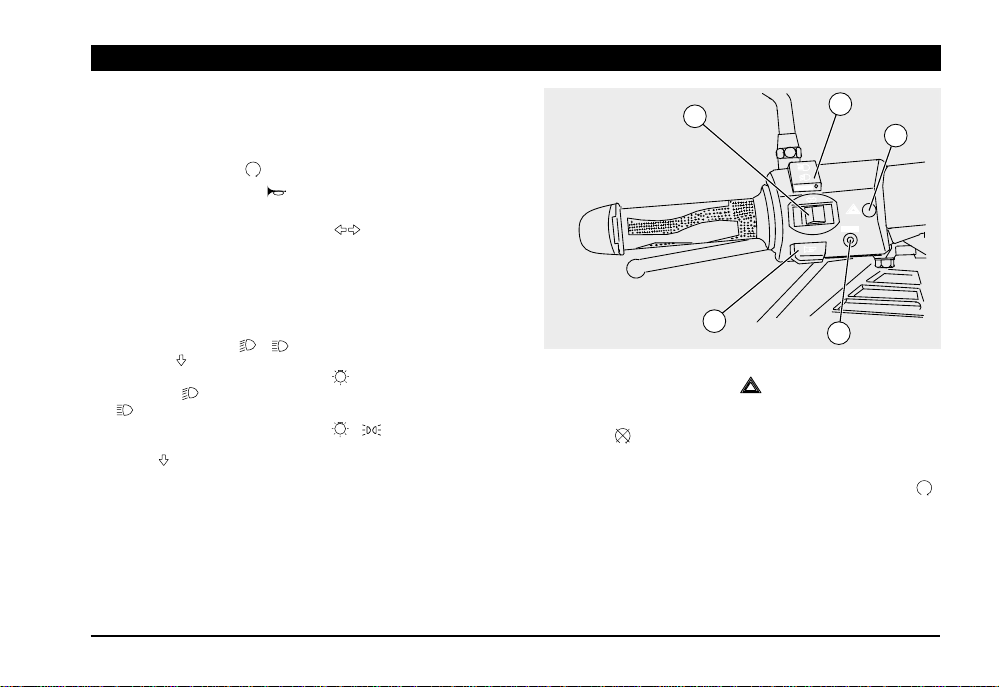
CONTROLS ON THE LEFT SIDE OF THE HANDLEBAR
IMPORTANT The electric components work only when the igni-
tion switch is in position “
1) HORN PUSH-BUTTON (
When it is pressed, the horn is operated.
2) DIRECTION INDICATOR SWITCH (
Move the switch to the left in order to indicate the turn to the left;
move the switch to the right in order to indicate the turn to the
right. Press the switch on its centre to turn off the direction indicator. With moving vehicle, the automatic return system is triggered and turns off the direction indicator after 40 seconds or
500 m.
3) DIMMER SWITCH (
(PASSING )
When the light switch is in position "
in position "
", the high beam comes on.
"
", the low beam comes on, while if it is in position
Regardless of the light switch position (
signaller is operated by pressing the dimmer switch to position
“PASSING ”.
”.
)
)
- ) / HIGH BEAM PUSH-BUTTON
": if the dimmer switch is
- - •), the high beam
IMPORTANT When releasing the dimmer switch, the high beam
signaller is deactivated.
4) MODE PUSH-BUTTON
Press it more than once to select the data shown on the
multifunction LCD display.
2
3
5
G
IN
S
S
A
P
MODE
1
5) HAZARD PUSH-BUTTON ( )
ACTIVATION Press the push-button to activate the four direc-
tion indicators; now it is possible to turn the ignition switch to
position
DEACTIVATION
Insert the key into the ignition switch and turn it to position “ ”,
press the HAZARD push-button again to deactivate the system.
and extract the key.
use and maintenance Atlantic 500
4
17
Page 2
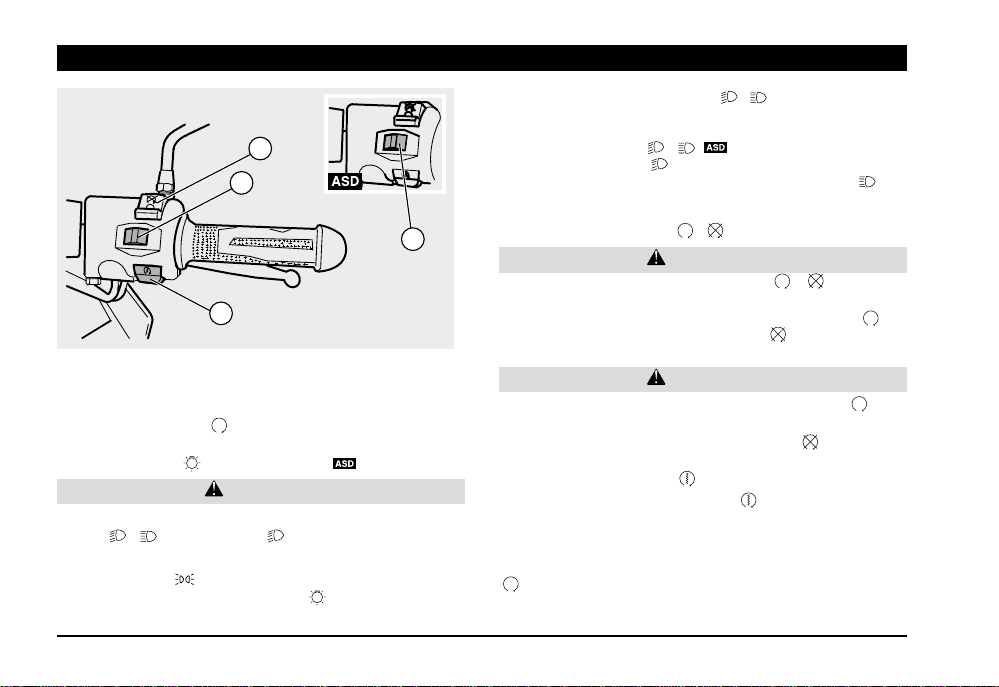
By means of the dimmer switch, ( - ), it is possible to operate the high beam.
2
1
1a
1a) DIMMER SWITCH ( - )
When it is in position “ ” the parking lights, the dashboard light
and the low beams are always on; when it is in position “
high beam comes on.
2) ENGINE STOP SWITCH (
- )
”, the
WARNING
Do not operate the engine stop switch “
3
conditions.
It is a safety or emergency switch. When it is in position “
engine can be started. If it is in position “
- ” in running
”,the
”,the engine stops.
CONTROLS ON THE RIGHT SIDE OF THE HANDLEBAR
IMPORTANT The electric components work only when the igni-
tion switch is in position “
1) LIGHT SWITCH ( -
”.
) (non provided )
•
CAUTION
Before operating the light switch, make sure that the dimmer
switch (
18
- ) is in position “ ”.
When the light switch is in position “
it is in position “
are on; when the switch is in position “
dashboard light and the low beams are on.
use and maintenance Atlantic 500
“, the parking lights and the dashboard light
”, the lights are off; when
•
” the parking lights, the
CAUTION
With stopped engine and ignition switch in position “
battery may run down. With stopped vehicle, stop the engine
and then turn the ignition switch to position “
3) START PUSH-BUTTON (
By pressing the start push-button “
engine run. For the starting, see page 34 (STARTING).
DEACTIVATION
By inserting the key into the ignition switch and turning it to position
“
”, the device is automatically disconnected.
)
“, the starter makes the
” the
”.
Page 3

1
2
Position
Function
Key
removal
P
ZADI
PUSH
IGNITION SWITCH
The ignition switch (1) is positioned on the
right side, near the steering sleeve.
IMPORTANT The key (2) operates the
ignition switch /steering lock, the saddle lock
and the glove compartment flap.
Two keys are delivered along with the vehicle (one spare key).
IMPORTANT Do not keep the spare key
on the vehicle.
I
D
A
Z
PUSH
STEERING LOCK
WARNING
Never turn the key to position “ ” during the ride so as to avoid losing control
of the vehicle.
WORKING
To lock the steering:
♦ Turn the handlebar completely leftwards
♦
Turn the key (2) to position “ ”. or, in the
preset versions, to position “
switch on the front parking light and the
rear parking lights in case of night parking
and poor visibility.
♦ Extract the key.
To open the compartments:
♦ Press the key (2) and then turn it clock-
wise to open the glove compartment.
♦ Press the key (2) and then turn it anticlock-
wise to unlock/lock the saddle and open
the compartment under the saddle.
” so as to
P
The steering
is locked.
It is not pos-
lock
sible to start
the engine or
switch on the
Steering
lights.
Neither the
engine nor
the lights
can be operated.
The engine
and the
lights can be
operated.
The front and
rear parking
lights can be
P
operated.
use and maintenance Atlantic 500
It is possible
to remove
the key.
It is possible
to remove
the key.
It is not possible to remove the
key.
It is possible
to remove
the key.
19
Page 4

1
ABS
2
3
DIGITAL CLOCK/DATE SETUP
IMPORTANT LCD displays work only
when the ignition switch is in position “
Describing the LCD display functions (1):
♦ Normal display: hours and minutes.
♦ Date display: press the key SET (3), the
month and the day are displayed for less
than five seconds.
use and maintenance Atlantic 500
20
Setting the clock:
IMPORTANT The clock must be set
when the engine is not running, the vehicle
is at rest and the direction indicators are
deactivated.
♦ Press the key W (2) for more than three
seconds to activate the clock setting (ONLY
WHEN THE TIME IS DISPLAYED).
♦ Press or keep the key SET (3) pressed to
set the desired time.
♦ Press the key W (2) to confirm the time
setting: the clock is brought automatically
to the minute setting.
♦ Press or keep the key SET (3) pressed to
”.
set the desired minutes.
♦ Press the key W (2) to confirm the minute
setting
♦ The clock is now set and it is possible to
return to the normal working.
Setting the date:
♦ Press the key W (2) for more than three
seconds to activate the date setting (ONLY
WHEN THE DATE IS DISPLAYED).
♦ Press or keep the key SET (3) pressed to
set the desired day.
♦ Press the key W (2) to confirm the day set-
ting: the instrument is switched automatically to the month setting.
♦ Press or keep the key SET (3) pressed to
set the desired month.
♦ Press the key W (2) to confirm the month
setting
♦ The date is now set and it is possible to
return to the normal working.
CAUTION
The clock and date setting can be carried
on only when the engine is not running,
the vehicle is at rest and the direction indicators are deactivated.
 Loading...