

Page 1

INSTRUCTIONS FOR USE
WARNING
Before departure, always carry on a preliminary check of the vehicle to make sure
that it works safely and correctly, see the
following table (TABLE OF PRELIMINAR Y
CHECKS). The non-performance of such
operations can cause serious injuries to
people or damages to the vehicle.
Do not hesitate to contact your aprilia
Official Dealer if you do not understand
the working of the controls or if you suspect or discover some irregularities.
It does not take long to carry on a checking operation and the resulting safety is
considerable.
TABLE OF PRELIMINARY CHECKS
Component
Front and rear disk
brakes
Brake levers
Accelerator
Engine oil
Wheels/tyres
Steering
Side stand and cen-
tral stand
Fastening elements
Fuel tank
Coolant
Engine stop switch
- )
(
Lights, warning lights,
injection warning light,
horn and electric devices
Injection pump
Check the working, the idle stroke of the control levers,
the fluid level and make sure that there are no leaks. Check
the wear of the pads. If necessary, carry on the topping
up of the brake reservoir.
Make sure that they work smoothly.
If necessary, lubricate the articulations.
Make sure that it works smoothly and that it can be
opened and closed completely, in all steering positions.
Adjust and/or lubricate it, if necessary.
If necessary, check it and/or top up the oil reservoir.
Check the tyre surface, the inflation pressure, wear and
any damage.
Make sure that it rotates smoothly, without any clear-
ance or slackening.
Make sure that they work smoothly and that the spring
tension brings them back to their normal position. If necessary, lubricate joints and articulations.
Make sure that the fastening elements are not loose. If
necessary, adjust or tighten them.
Check the fuel level and top up, if necessary. Make sure that
there are no leaks or occlusions in the circuit. Make sure
that the fuel filler cap is correctly tightened.
The coolant level in the expansion tank must be included
between the MIN and MAX marks.
Check the correct working.
Make sure that the acoustic and visual devices work
correctly. Replace the bulbs or carry out the necessary repairs in case of failure.
Make sure it works correctly.
Check
Page
26, 48
24, 65
28, 29
57 - 64
use and maintenance Atlantic 500
–
55
26
30
51
49
–
19
–
33
Page 2
3
1
2
I
D
A
Z
P
U
S
G
N
I
S
S
A
P
MODE
H
5
8
STARTING
WARNING
Exhaust gases contain carbon monoxide,
a substance that is extremely noxious if
inhaled. Avoid starting the engine in
badly-ventilated or closed rooms. The
non-observance of this warning may
cause loss of consciousness and even
death by asphyxia.
Do not get on the vehicle for the starting.
Do not start the engine if the vehicle is
positioned on the side stand.
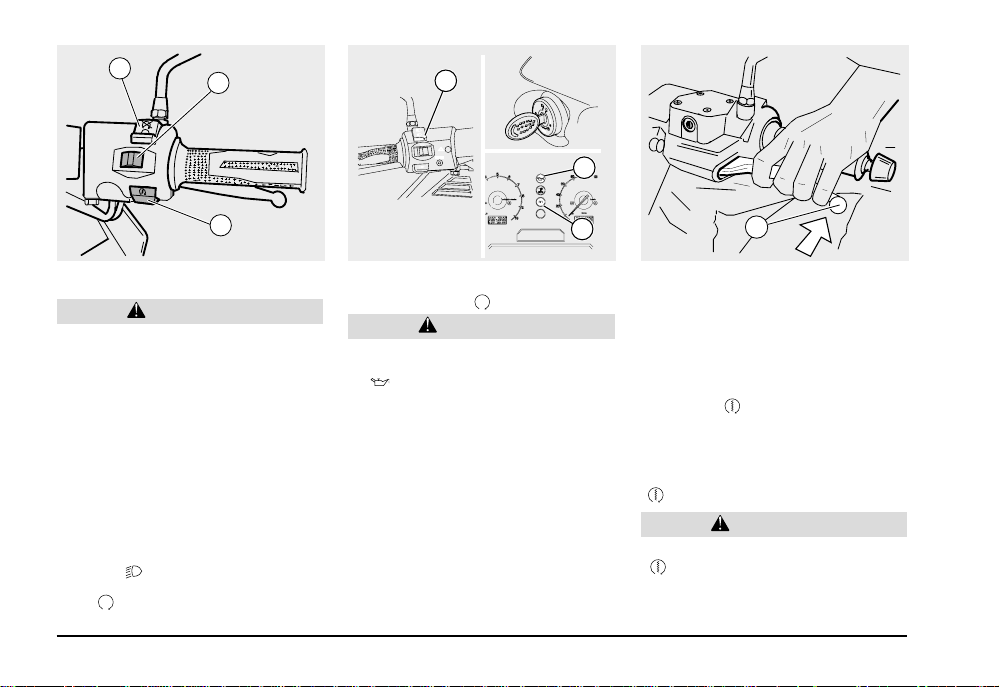
♦ Position the vehicle on the central stand
to start the engine.
♦ Make sure that the light switch (1) is in
position “•”.
♦ Make sure that the dimmer switch (2) is in
position “ ”.
♦ Move the engine stop switch (3) to posi-
” (in the countries where required).
tion “
use and maintenance Atlantic 500
34
6
♦ Turn the key (4) and move the ignition
switch to position “
”.
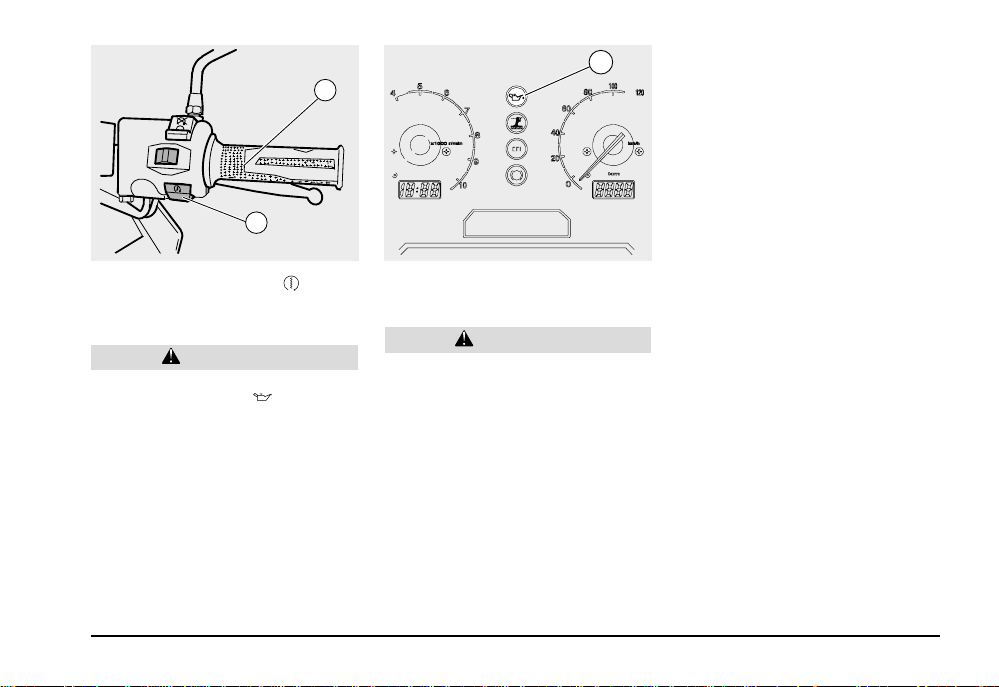
CAUTION
At this point:
– the engine oil pressure warning light
” (5), positioned on the dash-
“
board, comes on and remains on until
the engine starts. The Engine Fuel Injection (EFI) warning light (6) remains
on for about three seconds, after all the
other warning lights have gone out. If
it does not come on or if both warning
lights should not go out after three seconds, contact your aprilia Official
Dealer.
♦ Lock one wheel at least by means of a
brake lever (6). If this operation is not carried on, the start relay receives no current
and the engine does not start.
7
IMPORTANT After a long period of in-
activity of the vehicle, carry on the operations described on page 36 (STARTING
AFTER A LONG PERIOD OF INACTIVITY).
IMPORTANT To avoid the excessive
wear of the battery, do not keep the start
push-button “ ” pressed for more than five
seconds (ten in case of starting after a long
period of inactivity). If the engine does not
start within this lapse of time, wait ten seconds and press the start push-button again
“
”.
CAUTION
Avoid pressing the start push-button
“
” (8) while the engine is running be-
cause you may damage the starter.
Page 3
5
9
DIFFICULT STARTING
The feeding system of the vehicle is able to
control the starting according to both engine
conditions (warm/cold) and room temperature and pressure.
ABS
8
♦ Press the start push-button “ ” (8) with-
out accelerating and release it as soon as
the engine starts.
CAUTION
After the engine starting, the engine oil
pressure warning light “
out. If the warning light remains on, or if
it comes on during the normal working of
the engine, it means that the oil pressure
in the circuit is not sufficient. In this case,
stop the engine immediately and contact
your aprilia Official Dealer. Do not use the
vehicle if the engine oil quantity is insufficient so as to avoid damaging the engine components.
” (5) must go
♦ Keep at least one brake lever pulled and
do not accelerate until you start.
CAUTION
Do not leave abruptly with cold engine.
To reduce the emission of polluting substances and the fuel consumption, it is
advisable to warm the engine up by driving at slow speed for the first kilometres.
use and maintenance Atlantic 500
35
Page 4
STARTING AFTER A LONG PERIOD OF
INACTIVITY
After a long period of inactivity, if the starting
is not immediate, the fuel feeding circuit may
be partially empty.
DEPARTURE AND DRIVE
IMPORT ANT Before departure, carefully
read the “Safe drive” chapter, see page 5
(SAFE GUIDE).
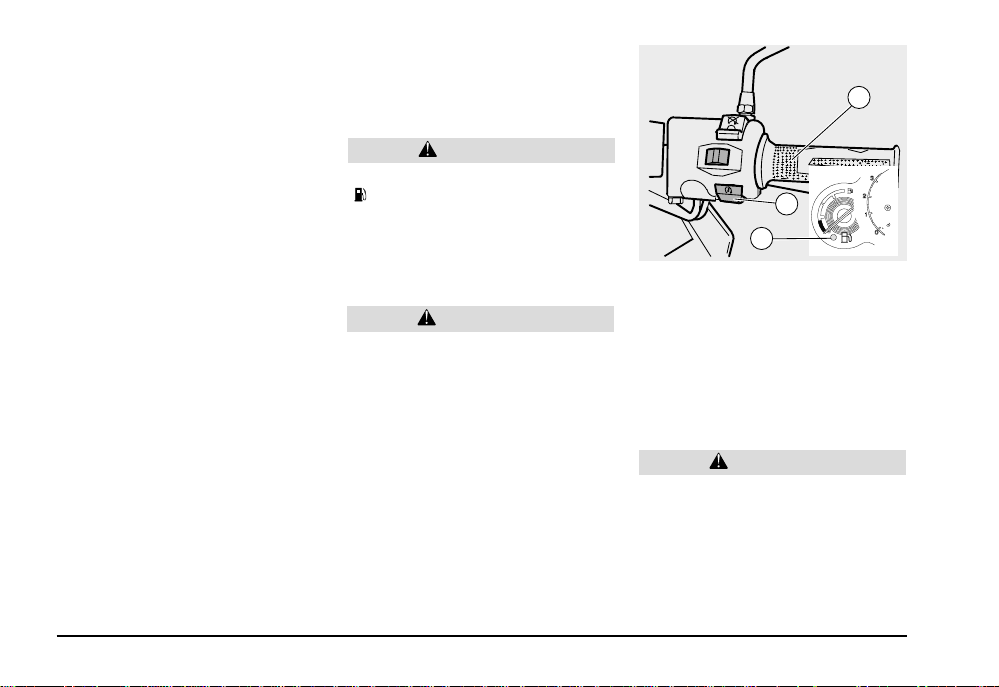
CAUTION
If, while driving, the low fuel warning light
“
” (10), positioned on the dashboard
comes on, this means that the electric
reserve is operating and there are still 4
litres of fuel available. Refuel as soon as
possible, see page 25 (FUEL).
WARNING
If you drive without passenger, make sure
that the passenger footrests are folded.
While driving, keep your hands on the
grips and your feet on the footrests.
NEVER DRIVE IN ANY POSITION DIFFERENT FROM THOSE INDICATED.
If you drive with a passenger, instruct him/
her so as to avoid problems during the
manoeuvres.
Before leaving, make sure that the stand/
stands is/are completely up.
9
8
10
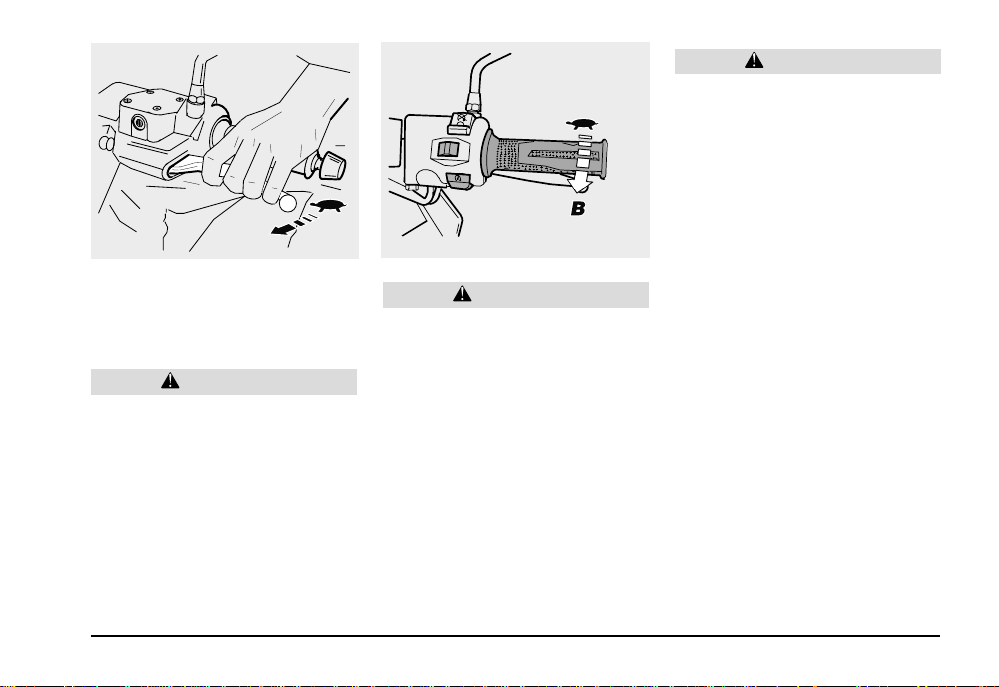
To leave:
♦ Release the accelerator grip (9) (Pos. A),
operate the rear brake and move the vehicle down the stand.
♦ Get on the vehicle and keep one foot at
least on the ground so as to avoid losing
balance.
♦ Correctly adjust the inclination of the rear-
view mirrors.
WARNING
With the vehicle at rest, try to get acquainted with the use of the rear-view
mirrors. The reflecting surface is convex,
therefore the objects seem to be farther
than they really are. These mirrors offer
a “wide-angle” view and only experience
allows you to evaluate the distance of the
following vehicles.
use and maintenance Atlantic 500
36
Page 5
♦ Release the brake lever and accelerate,
by turning the accelerator grip slightly; the
vehicle will start moving.
CAUTION
Do not leave abruptly with cold engine.
To reduce the emission of polluting substances and the fuel consumption, it is
advisable to warm the engine up by driving at slow speed for the first kilometres.
Do not accelerate or decelerate repeat-
WARNING
edly or continuously since you could accidentally lose control of the vehicle.
In case of braking, decelerate and operate both brakes in order to obtain uniform
deceleration, suitably exerting pressure
on the braking parts.
By operating only the front brake or only
the rear brake, you reduce the braking
force notably, thus locking one wheel and
consequently losing grip.
If you stop uphill, decelerate completely
and use only the brakes to keep the vehicle steady.
The use of the engine to keep the vehicle
steady may cause the speed variator
overheating.
WARNING
Before beginning to turn, slow down or
brake driving at moderate and constant
speed or accelerating slightly; do not
brake at the last moment: you could easily skid.
If the brakes are operated continuously
on downhill stretches, the friction material may overheat, thus reducing the braking efficiency. Exploit the engine compression by using both brakes intermittently.
Never drive downhill with the engine off.
In case of wet road or scarce wheel grip
(snow, ice, mud, etc.)drive at moderate
speed, avoiding abrupt braking or manoeuvres that could cause grip loss and
fall.
Pay attention to any obstacle or variation
of the roadbed.
Uneven roads, rails, manhole covers, indications painted on the road surface,
building site metal plates become slippery with rain, therefore it is necessary
to avoid all these obstacles with the utmost care, driving slowly and bending the
vehicle as little as possible.
use and maintenance Atlantic 500
37
Page 6

7
WARNING
Always use the direction indicators in
time when you change lane or direction,
avoiding abrupt and dangerous manoeuvres.
Switch off the direction indicators immediately after changing direction. Be very
careful overtaking other vehicles or when
you are overtaken. In case of rain, the
water cloud produced by big vehicles reduces visibility; air shift may make you
lose control of the vehicle.
RUNNING-IN
WARNING
After the first 1000 km (625 miles), carry
on the checks indicated in the “after running-in” column of the “REGULAR SERVICE INTERVAL CHART”, see pages 41-42,
in order to avoid personal injuries and/or
damages to the vehicle.
use and maintenance Atlantic 500
38
The engine running-in is very important in
order to ensure its working life and its correct functioning.
If possible, drive on roads with many hills and/
or bends, so that the engine, the suspensions
and the brakes undergo to a more effective
running-in.
IMPORTANT Only after the first 1000
running-in kilometres (625 miles) it is possible to obtain the best acceleration and speed
performance from the vehicle.
Keep to the following indications:
♦Do not rotate the accelerator grip com-
pletely at low speed, both during and after
the running-in.
♦0-100 km (0-62 mi)
During the first 100 km (62 miles) use the
brakes smoothly and avoid abrupt and long
braking. This is necessary to ensure a correct bedding-in of the pads on the brake
disk.
♦0-500 km (0-312 mi)
During the first 500 kilometres (312 miles)
do not exceed 80% of the maximum allowed speed.
♦Avoid keeping a constant speed for long
distances.
♦After the first 1000 km (625 miles) progres-
sively increase the speed until you reach
the highest performance levels.
STOP
WARNING
If possible, avoid stopping abruptly, slowing down suddenly and braking at the last
moment.
♦ Release the accelerator grip (pos. A) and
gradually operate the brakes to stop the
vehicle.
♦ During a short stop, keep at least one brake
on.
WARNING
Park the vehicle on a firm and flat ground
to avoid its fall. Do not lean the vehicle
against walls and do not lay it down on the
ground. Make sure that the vehicle, and in
particular its red-hot parts, are not dangerous for people and children. Do not leave
the vehicle unattended with the engine on
or with the key inserted into the ignition
switch. Do not sit on the vehicle when the
stand is down.
♦ Stop the engine, see above (STOP).
Page 7

1
2
3
I
D
A
Z
P
U
S
H
4
5
6
4
5
7
♦ Move the engine stop switch (1) to posi-
tion “
”.
CAUTION
With the engine off and the ignition switch
in position “
down.
♦ Turn the key (2) and move the ignition
switch (3) to position “
♦ Position the vehicle on the stand, see be-
side (POSITIONING THE VEHICLE ON
THE STAND).
”, the battery may run
”.
CAUTION
Do not leave the key in the ignition switch.
♦ Lock the steering, see page 19 (STEER-
ING LOCK) and extract the key.
POSITIONING THE VEHICLE ON
THE STAND
Carefully read page 37 (PARKING).
CENTRAL STAND
♦ Grasp the left grip (4) and the passenger
grab rail (5).
♦ Push down the stand lever (6).
SIDE STAND
♦ Grasp the left grip (4) and the passenger
grab rail (5).
Danger of fall or overturning.
When straightening the vehicle, from the
parking position to the driving position,
the stand goes up automatically.
♦ Push the side stand (7) with your right foot
and extend it completely.
♦ Incline the vehicle until the stand rests on
the ground.
♦ Steer the handlebar completely leftwards.
WARNING
Make sure that the vehicle is stable.
WARNING
use and maintenance Atlantic 500
39
Page 8

SUGGESTIONS TO A VOID THEFT
NEVER leave the ignition key inserted and
always use the steering lock.
Park the vehicle in a safe place, possibly in a
garage or a protected place.
If possible, use the suitable aprilia “BodyGuard” armored cable or an additional
antitheft device.
Make sure that all the documents and the
road taxes are in order.
Write down your personal data and telephone
number in this page so as to facilitate the identification of the owner in case of finding after
theft.
SURNAME: ...............................................
NAME: .......................................................
ADDRESS: ................................................
...................................................................
PHONE NUMBER: ....................................
IMPORTANT In most cases, stolen vehi-
cles are identified through the data written on
the use and maintenance book.
MAINTENANCE
WARNING
Danger of fire
Keep fuel and other inflammable substances away from electric components.
Before starting any maintenance or inspection operation of the vehicle, stop the
engine and extract the key, wait until the
engine and the exhaust system have
cooled down, lift the vehicle by means of
the suitable equipment, on a firm and flat
ground.
Before proceeding, make sure that the
room is properly ventilated.
Pay particular attention to the red-hot
parts of the engine and of the exhaust
system so as to avoid burns.
The vehicle is made up of not edible parts:
some of them are noxious or even toxic.
Never bite any part of the vehicle.
CAUTION
To carry on the reassembly of the groups
it is necessary to repeat the disassembly
operations in reverse order, if not expressly indicated otherwise.
In case of maintenance operations, it is
advisable to use latex gloves.
Normally, routine maintenance operations
can be carried on by the user; however, in
some cases, it may be necessary to use specific tools and technical expertise.
If you need assistance or technical advice,
contact your aprilia Official Dealer, who can
ensure you an accurate and prompt service.
It is advisable to ask the aprilia Official
Dealer to test the vehicle on the road after a
repair or a periodic maintenance operation.
Personally perform the “Preliminary checks”
after any maintenance operation, see page
33 (TABLE OF PRELIMINARY CHECKS)
use and maintenance Atlantic 500
40
Page 9

REGULAR SERVICE INTERVALS CHART
OPERATIONS TO BE CARRIED OUT BY THE aprilia Official Dealer
Components
Accelerator cable (adjustment) C C
Variator belt S
Steering bearings and steering C C
Wheel bearings C
Engine oil filter every 6000 km: S
Clutch shoes CC
Valve clearance R in seguito ogni 18000 Km
Braking systems C C
Cooling system C C
Stoplight switches C
Brake fluid every 6000 km (3750 mi): C/ every 2 years: S
Coolant every 2000 km (1250 mi): C/ every 2 years: S
Engine oil a every 3000 km: C/every 6000 km (3750 mi): S
Fork oil every 30000 km (18750 mi) or every 4 years: S
Transmission oil S C every 24000 km: S
Variator rollers and variator plastic guides C
Wheels/tyres and inflation pressure C
Bolt tightening C C
Brake fluid bleeding C
Fuel pipes C C every 4 years: S
Fuel filter
C = check and clean, adjust, lubricate or replace if necessary. P = clean; S = replace; R = adjust.
Carry on the maintenance operations more frequently if you use the vehicle in rainy and dusty areas or on even ground.
After running-in
[1000 km (625 mi)]
Every 6000 km
(3750 mi) or 8 months
every 24000 km (15000 mi): C every 48000 km (30000 mi): S
After 12000 km
(7500 mi) or 16 months
use and maintenance Atlantic 500
41
Page 10

OPERATIONS TO BE CARRIED OUT BY THE aprilia Official Dealer (WHICH CAN BE CARRIED OUT EVEN BY THE USER)
Components
Battery - Electrolyte level C C
Spark plug CS
Carburettor - idling C C
Air cleaner P every 18000 km: S
Accelerator working C C
Brake locking working C C
Light system C C
Brake fluid C C
Coolant C every 2000 km (1250 mi): C
Engine oil every 1000 km (625 mi): C
Light direction - working C
Wheels/tyres and inflation pressure every month: C
Suspensions C C
Engine oil pressure warning light on every start: C (*)
Front and rear brake pad wear C every 2000 km (1250 mi): C
C = check and clean, adjust, lubricate or replace if necessary. P = clean; S = replace; R = adjust.
Carry on the maintenance operations more frequently if you use the vehicle in rainy and dusty areas or on even ground.
(*) To check these components see pages 15-16: TABLE OF INSTRUMENTS AND INDICATORS.
use and maintenance Atlantic 500
42
After running-in
[1000 km (625 mi)]
Every 6000 km
(3750 mi) or 8 months
After 12000 km
(7500 mi) or 16 months
Page 11

1
IDENTIFICATION DATA
It is a good rule to write down the frame and
engine numbers in the space provided in this
manual.
The frame number can be used for the purchase of spare parts.
NOTE Do not alter the identification num-
bers if you do not want to incur severe penal
and administrative sanctions. In particular,
the alteration of the frame number results in
the immediate invalidity of the guarantee.
FRAME NUMBER
The frame number is stamped on the central tube of the frame. To be able to read it,
remove the cover (1).
Frame no. __________________________
ENGINE NUMBER
The engine number is stamped near the
lower support of the rear shock absorber.
Engine no. __________________________
use and maintenance Atlantic 500
43
Page 12

1
2
4
1
MAX
MIN
3
CHECKING THE OIL LEVEL AND
TOPPING UP
Carefully read page 26 (LUBRICANTS),
page 40 (MAINTENANCE) and page 74
(TABLE OF LUBRICANTS).
CHECKING
IMPORTANT Position the vehicle on firm
and flat ground.
♦ Position the vehicle on the central stand.
WARNING
The engine and the system components get
very hot and remain hot for some time even
after the engine has been stopped. Before
touching such components, wear insulating gloves or wait until the engine and the
exhaust system have cooled down.
♦ Stop the engine and let it cool down so as
to allow the oil to flow into the oil pan and
to cool down.
use and maintenance Atlantic 500
44
IMPORTANT The non-performance of
the operations described above may lead to
an incorrect measurement of the engine oil
level.
♦ Unscrew and extract the plug/dipstick (1).
♦ Clean the part in contact with the oil with a
clean cloth.
♦ Tighten the plug/dipstick (1) completely
screwing it into the filling hole (2).
♦ Extract the plug/dipstick (1) again and read
the oil level on the dipstick:
MAX = maximum level;
MIN = minimum level.
The difference between MAX and MIN is
about:
– 400 cc
♦ The level is correct if the oil reaches about
the MAX mark on the dipstick.
CAUTION
Do not exceed the MAX mark and do not
leave the oil below the MIN mark to avoid
serious damages to the engine.
♦ If necessary, carry on the topping up.
TOPPING UP
♦ Pour a small quantity of oil into the filling
hole (2) and wait about one minute until
the oil flows uniformly inside the oil pan.
♦ Carry on the oil level check and, if neces-
sary, the topping up.
♦ T op up with small quantities of oil, until the
prescribed level is reached.
♦ At the end of the operation screw and
tighten the plug/dipstick (1).
WARNING
Do not use the vehicle with insufficient
lubrication or with improper and contaminated lubricants since they may accelerate the wear of the moving parts and
cause irreversible damages.
Page 13

REPLACING THE OIL AND THE
ENGINE OIL FILTER
Carefully read page 26 (LUBRICANTS),
page 40 (MAINTENANCE) and page 74
(TABLE OF LUBRICANTS).
IMPORT ANT Position the vehicle on firm
and flat ground.
♦ Position the vehicle on the central stand.
WARNING
The engine and the system components
get very hot and remain hot for some time
even after the engine has been stopped.
Before touching such components, wear
insulating gloves or wait until the engine
and the exhaust system have cooled
down.
♦ Stop the engine and let it cool down so as
to allow the oil to flow into the oil pan and
to cool down.
IMPORT ANT
operations described above may lead to an
incorrect measurement of the engine oil level.
To change the oil, contact an aprilia Official Dealer.
♦ Unscrew and extract the plug/dipstick (1).
♦ Unscrew and remove the oil cartridge fil-
ter from the engine (3).
The non-performance of the
WARNING
Do not use the vehicle with insufficient
lubrication or with improper and contaminated lubricants since they may accelerate the wear of the moving parts and
cause irreversible damages.
WARNING
Used oil contains substances that are
very dangerous for the environment: to
change it, contact an aprilia Official
Dealer, who will provide for the disposal
of used oils in accordance with the laws
in force.
♦ Unscrew and remove the oil drain plug (4)
and then empty the reservoir completely.
♦ Install a new oil cartridge filter (3) and lu-
bricate the O-rings of the filter.
♦ Screw and tighten the engine oil drain plug
(4).
♦ Pour about 1700 cc oil into the filling hole
(2).
♦ Screw and tighten the oil dipstick (1).
♦ Start the vehicle and let it run for a few
minutes. Stop it and let it cool down. Check
the engine oil level again by means of the
dipstick (1) and, if necessary, top up without exceeding the MAX mark.
For topping up and replacement operations, use new synthetic oil (SAE 5/W 40
type) with characteristics superior to the
API ST specification.
1
CHECKING THE TRANSMISSION
OIL LEVEL AND TOPPING UP
Carefully read page 26 (LUBRICANTS),
page 40 (MAINTENANCE) and page 74
(TABLE OF LUBRICANTS).
IMPORT ANT Position the vehicle on firm
and flat ground.
♦ Position the vehicle on the central stand.
WARNING
The engine and the system components get
very hot and remain hot for some time even
after the engine has been stopped. Before
touching such components, wear insulating gloves or wait until the engine and the
exhaust system have cooled down.
use and maintenance Atlantic 500
45
Page 14

♦ Unscrew and extract the plug/dipstick (1).
♦ Clean the part in contact with the oil with a
clean cloth.
♦ Tighten the plug/dipstick (1) completely
screwing it into the filling hole (2).
♦ Extract the plug/dipstick (1) again and read
the oil level on the dipstick:
MAX = maximum level
MIN = minimum level
♦ The level is correct if the oil reaches about
the MAX mark on the dipstick.
CAUTION
Do not exceed the MAX mark and do not
leave the oil below the MIN mark to avoid
serious damages to the engine.
♦ If necessary, carry on the topping up.
TOPPING UP
♦ Pour a small quantity of oil into the filling
hole (2) and wait about one minute until
the oil flows uniformly inside the oil pan.
♦ Carry on the oil level check and, if neces-
sary, the topping up.
♦ T op up with small quantities of oil, until the
prescribed level is reached.
♦ At the end of the operation, screw and
tighten the plug/dipstick (1).
USE SAE 80W/90 OIL, SUPERIOR TO API
GL3 SPECIFICATIONS.
WARNING
Do not use the vehicle with insufficient
lubrication or with improper and contaminated lubricants since they may accelerate the wear of the moving parts and cause
irreversible damages.
REPLACING THE TRANSMISSION OIL
Carefully read page 26 (LUBRICANTS),
page 40 (MAINTENANCE) and page 74
(TABLE OF LUBRICANTS).
IMPORT ANT Position the vehicle on firm
and flat ground.
♦ Position the vehicle on the central stand.
WARNING
The engine and the system components get
very hot and remain hot for some time even
after the engine has been stopped. Before
touching such components, wear insulating
gloves or wait until the engine and the exhaust system have cooled down.
♦ Stop the engine and let it cool down so as
to allow the oil to flow into the oil pan and
to cool down.
IMPORT ANT
operations described above may lead to an incorrect measurement of the engine oil level.
The non-performance of the
use and maintenance Atlantic 500
46
Page 15

To replace the oil, contact an aprilia Official Dealer.
WARNING
While changing the transmission oil, prevent it from coming in contact with the
rear brake disk.
♦ Unscrew and extract the plug/dipstick (1).
♦ Unscrew and remove the transmission oil
drain screw (3).
♦ Let the transmission oil flow out completely
and collect it into a container with suitable
capacity.
♦ Screw and tighten the transmission oil drain
screw (3).
♦ Lubricate the transmission with about 250
cc oil in accordance with the Table of Lubricants.
♦ Screw and tighten the plug/dipstick (1).
♦ Check the transmission oil level again by
means of the dipstick (1) and, if necessary,
top up without exceeding the MAX mark.
For topping up and replacement operations, use the new oils given in the TABLE OF LUBRICANTS.
1
2
AIR CLEANER
Carefully read page 40 (MAINTENANCE).
The air cleaner should be cleaned and
checked every 6000 km (3750 miles), depending on the use conditions.
If you use the vehicle on wet or dusty roads,
the cleaning or replacement operations must
be carried on more frequently.
T o clean the filtering element, it is necessary
to remove it from the vehicle.
3
3
4
REMOVAL
♦ Position the vehicle on the central stand.
♦ Raise the saddle (UNLOCKING / LOCK-
ING THE SADDLE).
♦ Remove the safety clip (1).
♦ Remove the pin (2) fastening the piston to
the air cleaner cover.
CAUTION
While removing the pin, hold the saddle
to avoid its fall.
♦ Holding the saddle, remove the six screws
(3) fastening the air cleaner cover to the
plastic material under the saddle.
CAUTION
While lifting the air cleaner cover, avoid
removing the suction sleeve from the filter case.
♦
Carefully lift the air cleaner cover (4).
♦ Remove the air cleaner (5).
use and maintenance Atlantic 500
47
Page 16

4
5
4
4
CHECKING THE WEAR OF THE
BRAKE PADS
Carefully read page 27 (BRAKE FLUID recommendations), (DISK BRAKES) and
page 40 (MAINTENANCE).
IMPORTANT The following information
5
CLEANING
WARNING
Do not use petrol or flammable solvents to
wash the filtering element so as to avoid the
risk of fires or explosions. Do not use any
additive or liquid to clean it in order to avoid
moisture inside the filter case. Use compressed air only.
♦ Clean the filtering element (5) by means
of a pressurised air jet.
refers to one single braking system, but it is
valid for both.
Check the wear of the brake pads after the
first 1000 km (625 miles), then every 2000
km (1250 miles). The brake pad wear depends on the use, on the kind of drive and
on the road.
CAUTION
DO NOT OIL THE FIL TERING ELEMENT to
avoid damaging the filter and the engine.
use and maintenance Atlantic 500
48
While reassembling the filter (1), insert it
CAUTION
into the filter cover (2) (the gasket must
adhere perfectly to its seat) and then screw
the cover on the filter case.
 Loading...