

Page 1

Manual del usuario
•
Manuale Utente
•
Guia do Usuário
•
Gebruikershandleiding
•
Handbok
User’s Guide
User’s Guide
•
•
Manuel de l’utilisateur
•
Benutzerhandbuch
Brukerhåndbok
•
Brugerhåndbog
•
Käsikirja
•
•
•
•
•
Manuel de l’utilisateur
•
Benutzerhandbuch
Manual del usuario
Brukerhåndbok
•
Manuale Utente
•
Brugerhåndbog
•
Guia do Usuário
•
Käsikirja
•
Gebruikershandleiding
•
•
•
•
Handbok
Page 2
Once you’ve set up your iMac and followed the onscreen guide to connect to the Internet,
what’s next? Read on to find out how to get the most out of your iMac:
2 Your iMac at a glance
4 Mac OS X basics
8 What you can do with your iMac
10 Listen to music on your computer or on the go
12 Make your own movie or watch a movie on DVD
14 Make your own Hollywood-style DVDs
16 Search the Internet
18 Get more out of the Internet
20 Send and receive email
22 Organize, plan, and create
24 Keep your iMac’s software up-to-date
26 Learn more and solve problems
32 Install memory and an AirPort Card
34 Work more comfortably
36 Safety, cleaning, and power management
1
Page 3
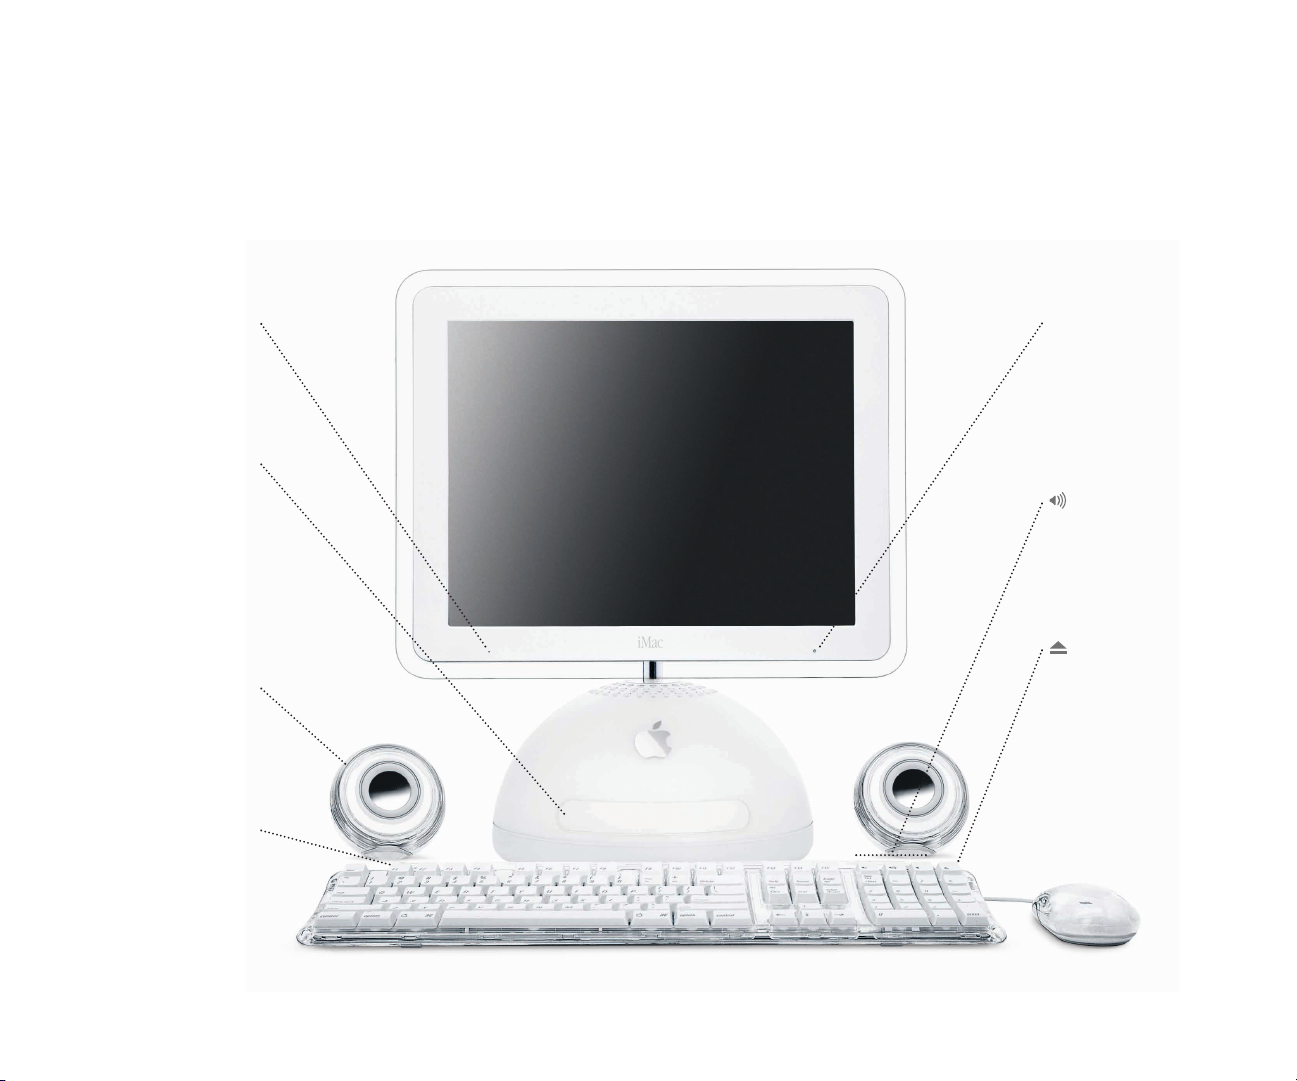
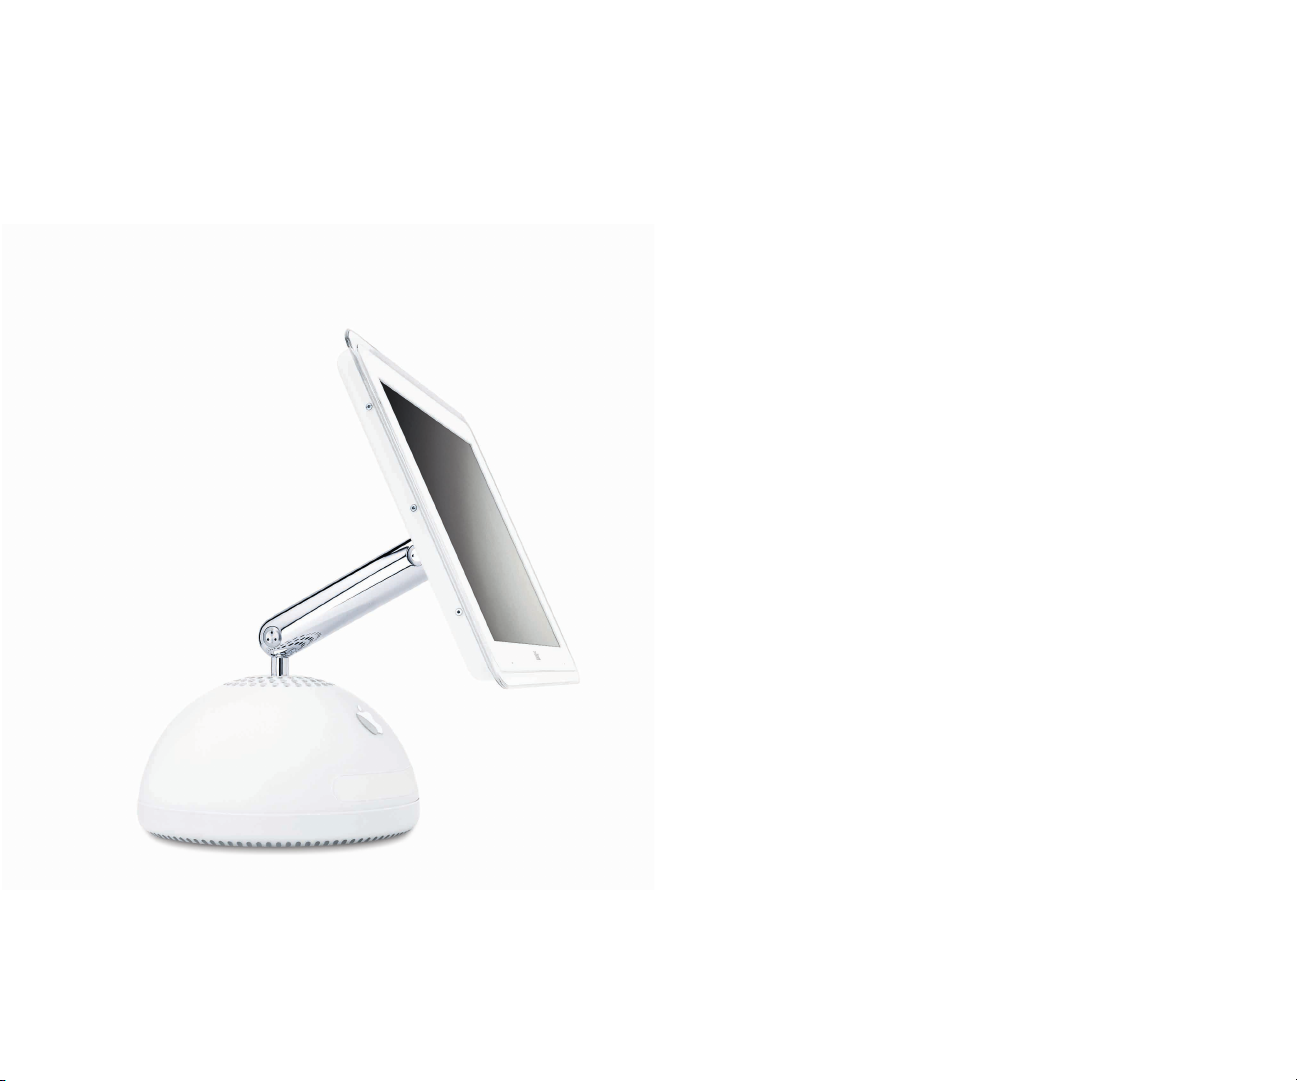
Your iMac at a glance
Yo ur computer has these built-in features:
Built-in microphone
Record sound or control
your computer with
spoken commands.
Optical disc drive
Install software, use
applications, and create
your own music CDs. If
you have the Combo
drive, watch DVD videos.
If you have the
SuperDrive, you can
make them, too.
Apple Pro Speakers
Included with some
models. Available
separately at
www.apple.com/store
USB port
Connect a USB device.
Power indicator light
Pulsing light indicates that
the computer is sleeping.
Volume controls
Use the keyboard to
adjust sound volume.
Media Eject key
Use to open the drive tray
or eject a CD or DVD.
Apple Pro Mouse
A precision optical mouse
you can use on almost
any surface, no mouse
pad required.
2
Page 4
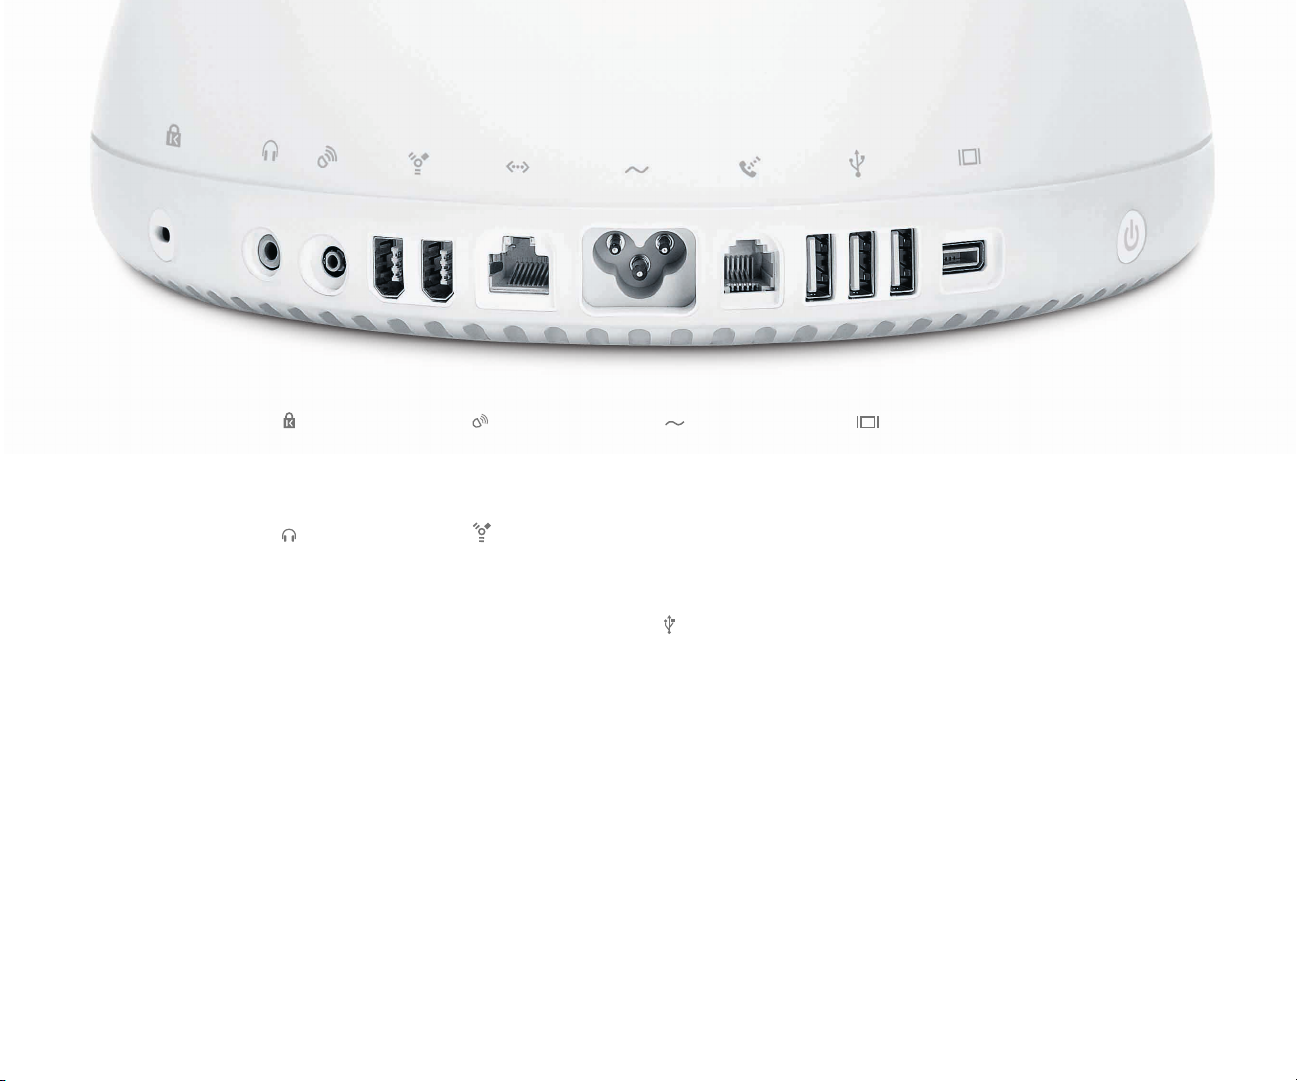
Kensington
Security Lock
Attach a lock and cable
to prevent theft.
Headphones port
Connect headphones
or analog speakers.
Apple Pro
Speaker mini-jack
Connect Apple Pro
Speakers.
FireWire
Transfer video from a
DV camera. Connect
an Apple iPod, external
hard disk, or other
FireWire device.
G
Ethernet
Share files with another
computer. Connect a
DSL or cable modem
to access the Internet.
Power Port
Connect to a standard
electrical outlet.
W
Modem
Connect to the Internet,
browse the World Wide
Web, and send email.
USB
Connect printers, Zip
and other disk drives,
digital cameras, joysticks,
and more.
VGA output
Connect an external
monitor for video
mirroring using the
Apple VGA adapter
(available separately).
®
Power button
Turn your computer on
or put it to sleep.
To learn more about your iMac’s features:
m Choose Mac Help from the Help menu, then click
Go under “Discover my iMac.”
3
Page 5
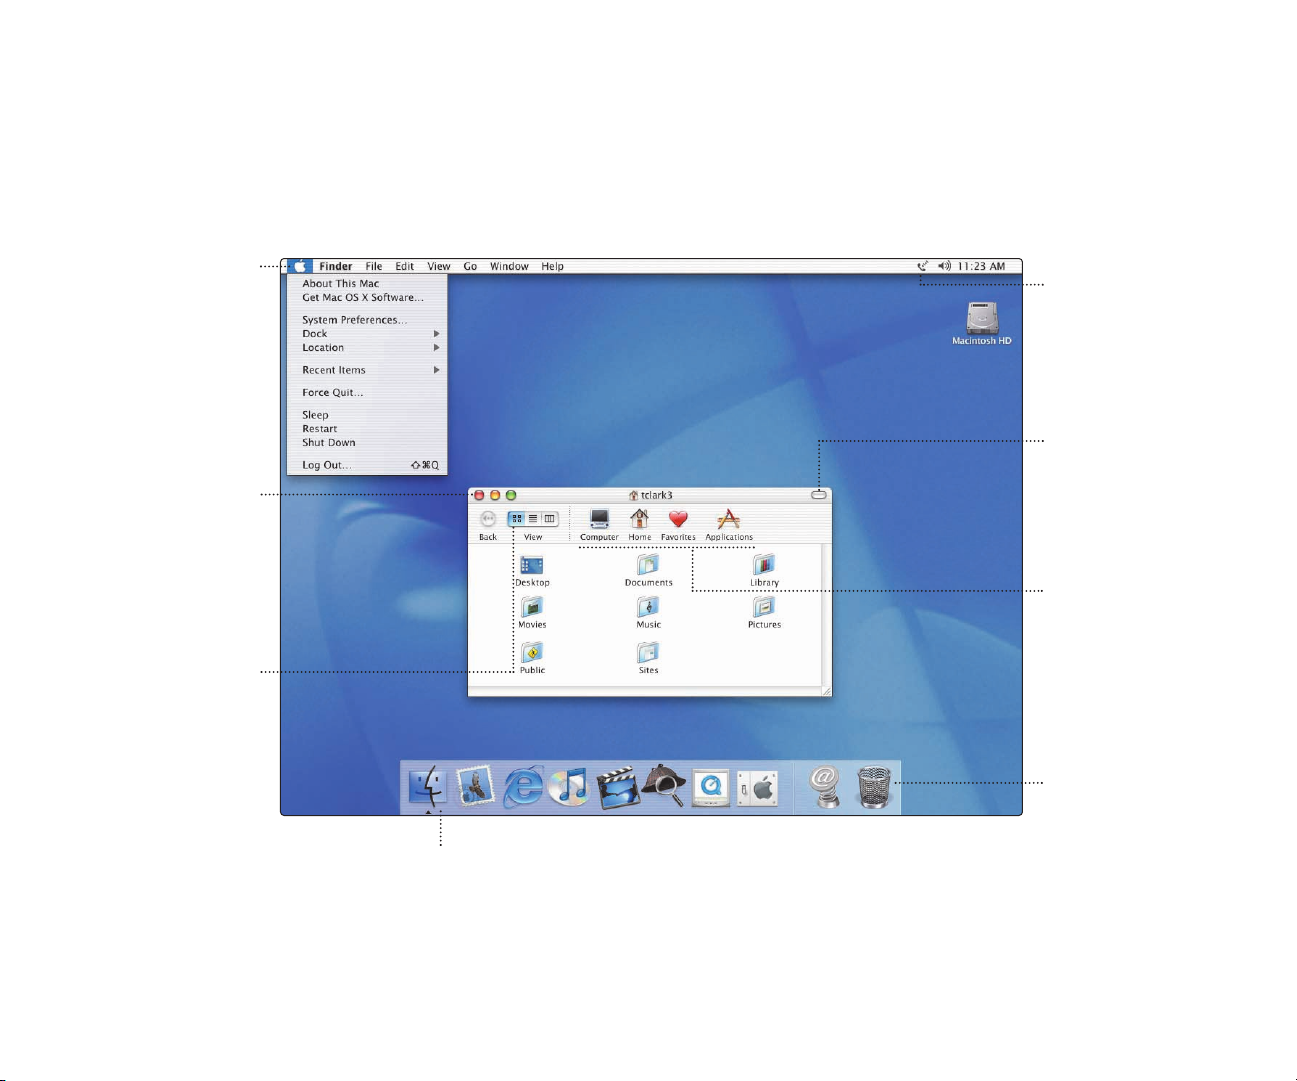
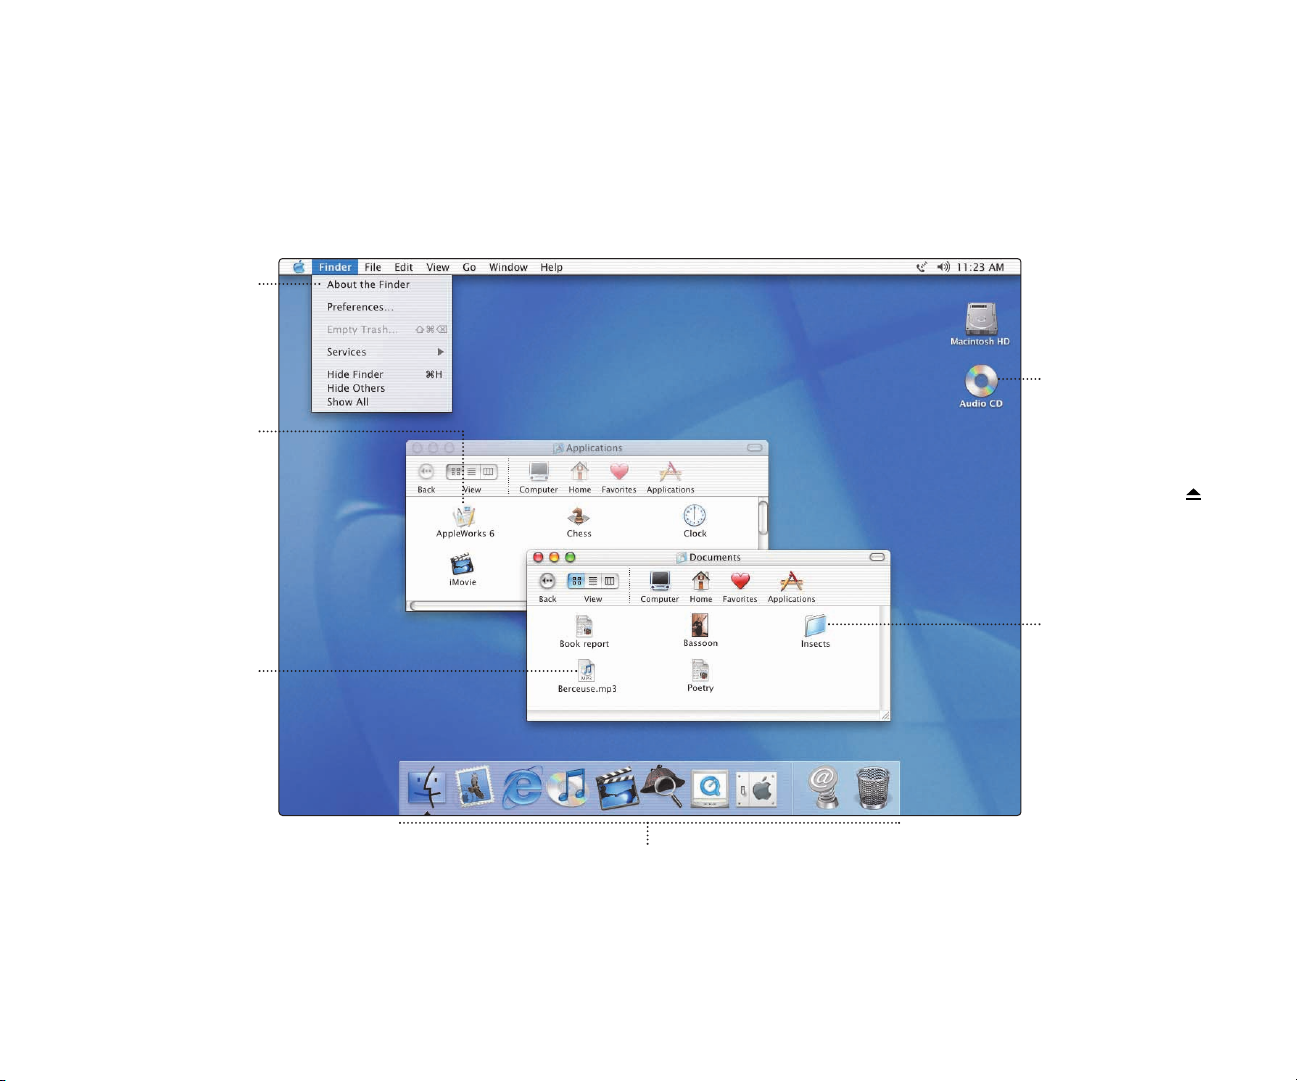
Mac OS X basics
The Macintosh desktop is your starting place.
Apple menu
Use to change
system settings, open
recent items, and restart
or shut down your
computer. To see the
menu, click the apple
() in the menu bar.
Window buttons
Click the red button to
close the window, the
yellow one to minimize it
into the Dock, and the
green one to resize it.
View buttons
Click to see your
files as icons, in lists,
or in columns.
Finder icon
Click to open a
Finder window so
you can see the files
and applications on
your computer.
To learn more about Mac OS X:
m See the Welcome to Mac OS X document in the
Documents folder on your hard disk.
Modem status
Use this menu
to connect to and
disconnect from
the Internet using
a dialup modem.
Toolbar button
Click to show or hide
the toolbar.
Toolbar icons
Click to navigate quickly
to different folders.
Your home folder
contains your personal
documents.
Trash
Drag an item here to
delete it. Items remain
here until you choose
Empty Trash from the
Finder menu.
4
Page 6
Application menu
Shows the name of the
application you’re using.
Use to set preferences
or quit applications
(other than the Finder).
Application
Applications are software
programs (such as a
game or word processor)
that you use with your
computer. Double-click
an application’s icon to
open the application.
Document
Documents are files that
you create with an
application (such as a
letter you create with your
word processor). Double-
click the icon to open the
file in the application used
to create it.
Disc
This appears when a CD
or DVD is in the disc drive.
Double-click the icon to
see what’s on the disc.
To eject a disc, press and
hold the Media Eject ( )
key on the keyboard.
Folder
Folders help organize
your files and
applications. Doubleclick a folder to
see what’s inside.
Dock
Click icons in the Dock
to open applications,
documents, folders,
or minimized windows.
5
Page 7
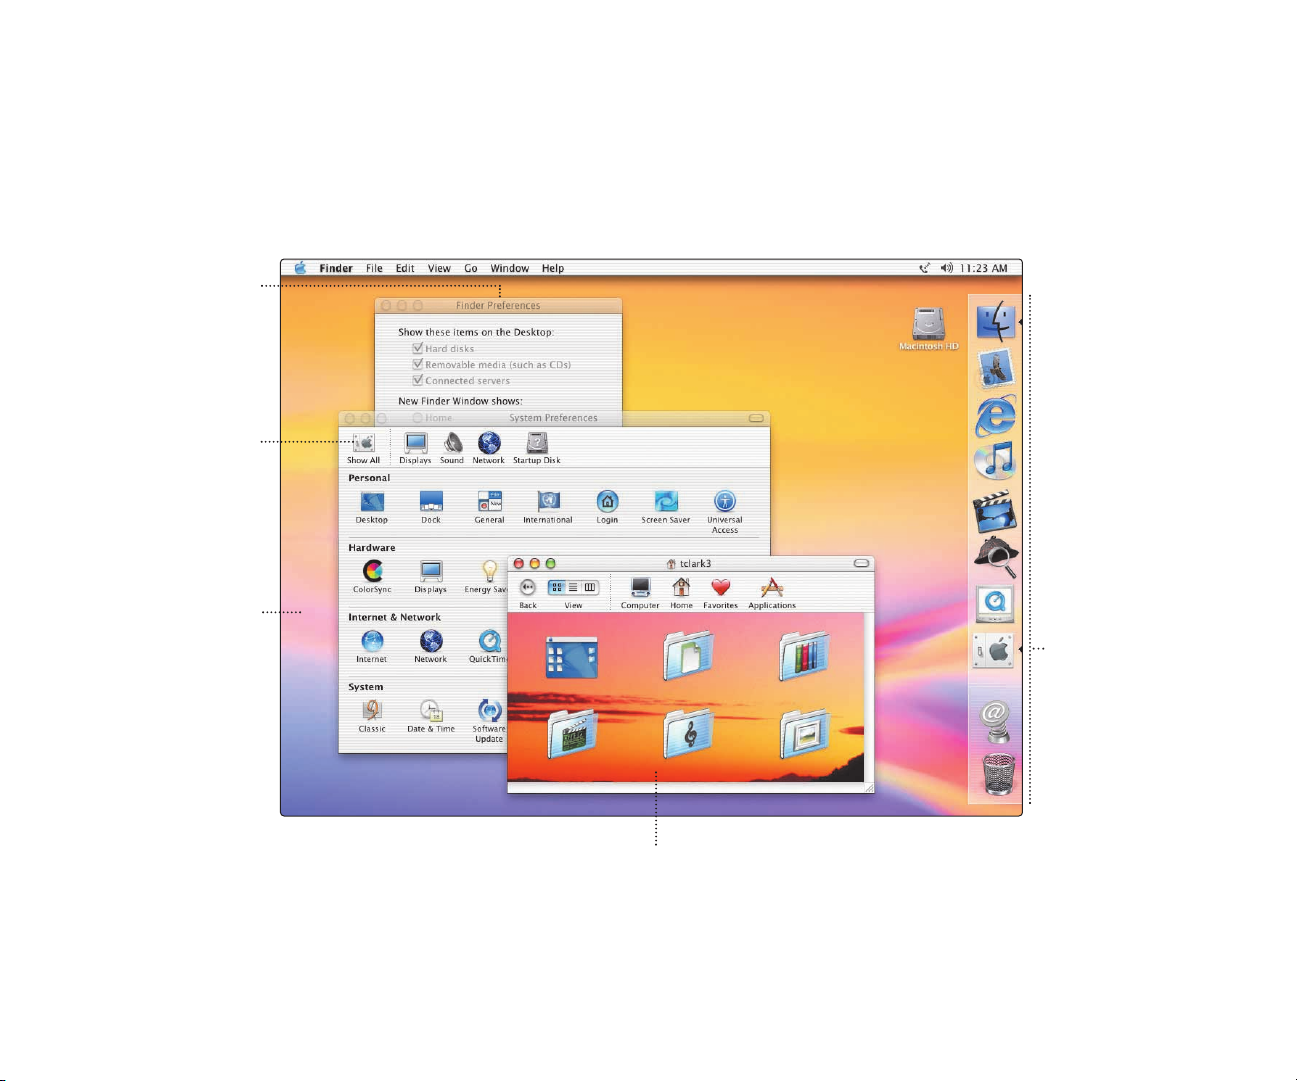
Change the Mac OS to suit your preferences.
There are lots of ways to customize Mac OS X.
To change Finder
settings, choose
Preferences from the
Finder menu.
Choose System
Preferences from
the Apple menu
to change your
computer’s settings.
To select a desktop
background picture, open
System Preferences and
click Desktop.
To change the size of
the Dock or move it to
a different place, open
System Preferences
and click Dock.
To change icon sizes
or the background of a
Finder window, choose
Show View Options from
the View menu.
6
Page 8
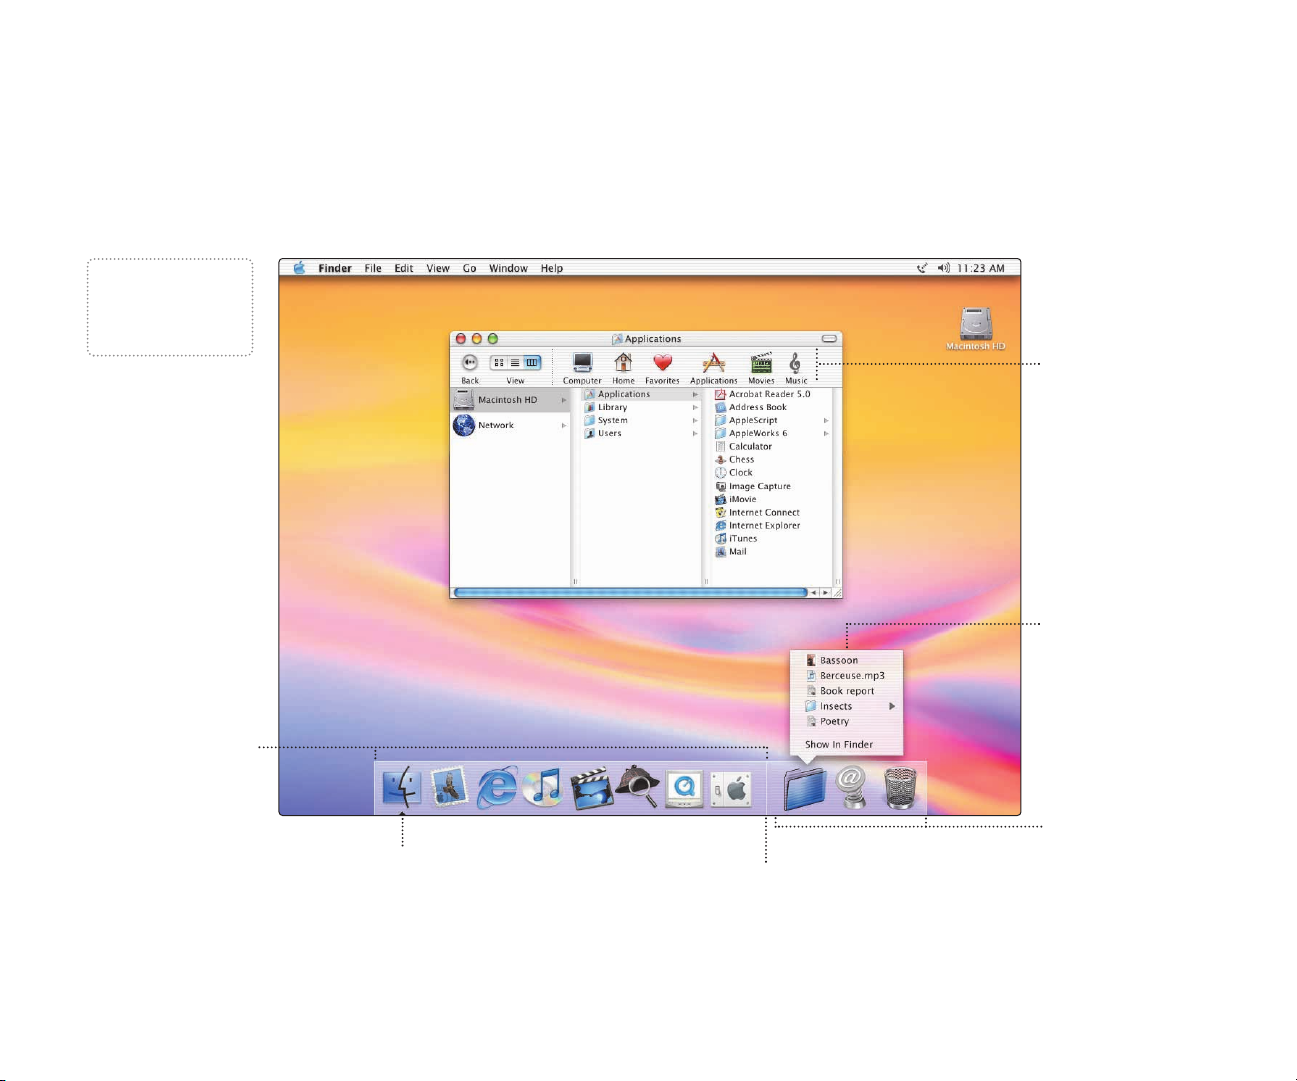
Click the icons in the Dock or toolbar to find and open files and applications.
Drag applications,
.
files, and folders
into the Dock for
one-click access.
This side of the Dock
shows application icons.
To set up the toolbar the
way you want it, choose
Customize Toolbar from
the Finder’s View menu,
then drag items to
the toolbar.
Press a folder icon to
see its contents and open
items in it.
The triangle indicates the
application is open.
Drag this bar up or down to
resize the Dock.
This side of the Dock
shows files, windows,
and folders.
7
Page 9
What you can do with your iMac
Not sure how to get the most out of your new iMac? Read on for a few ideas.
Make your own CDs. Use iTunes to transfer and organize music from your CD collection,
then burn your own custom music CDs. Transfer music to an iPod or other MP3 player to listen on
the go. Make a movie. Shoot video on a DV camcorder and import it into iMovie . Then
rearrange, edit, polish, and add titles and soundtracks. Make a DVD. If your iMac has a
SuperDrive, use iDVD to burn DVDs for viewing in almost any home DVD player. Connect
to the Internet to send email and browse the Web, or use iTools to post digital photos to the
Web for everyone to see.
Browse through the next few pages to find out more.
8
Page 10
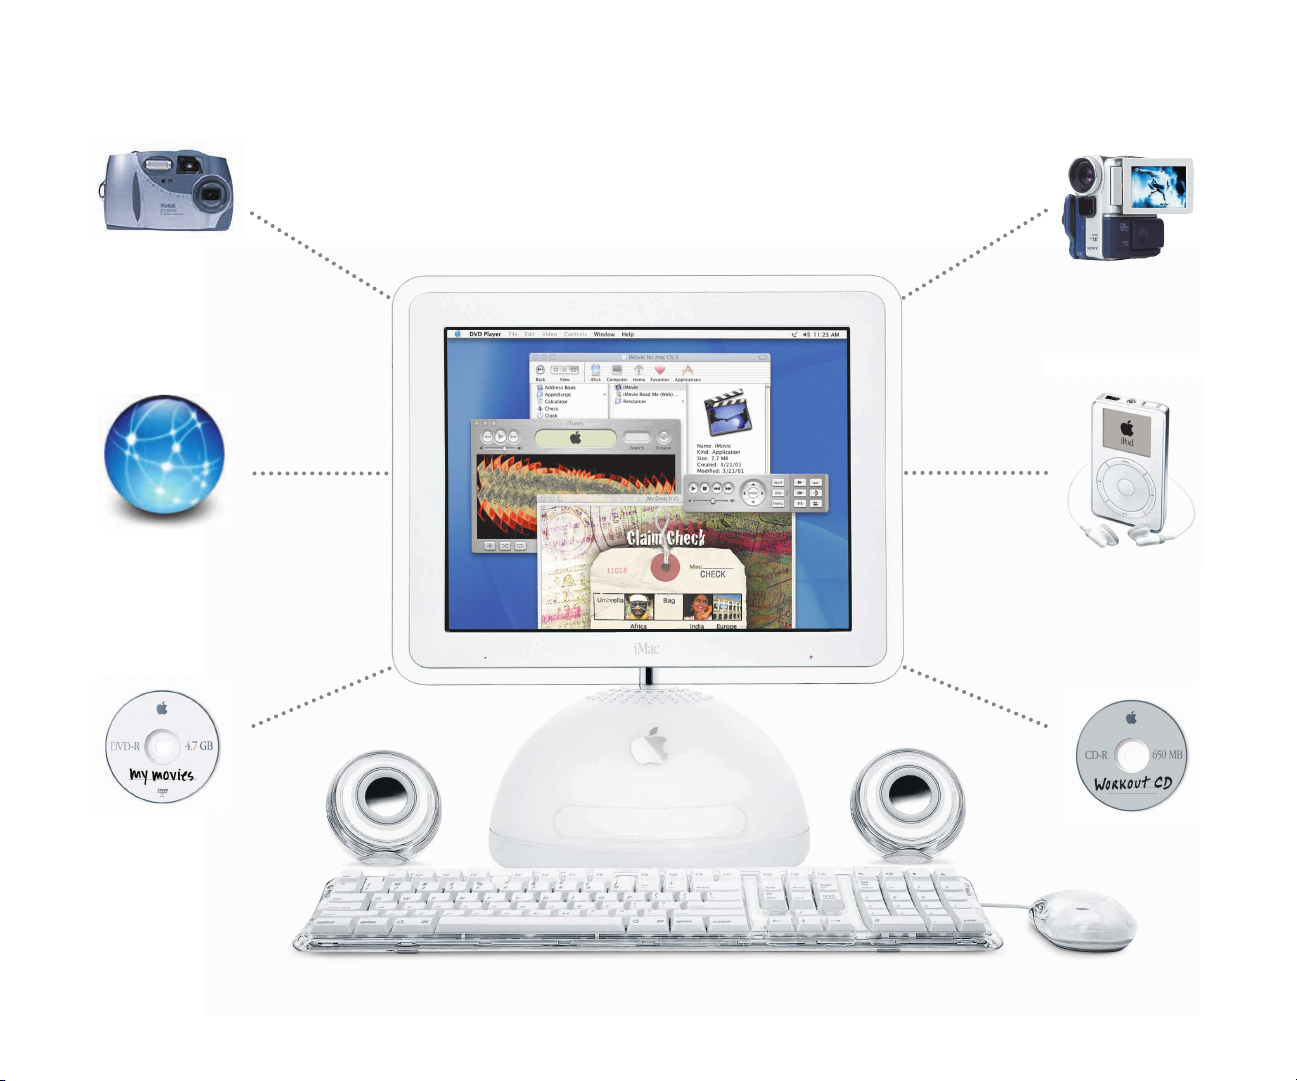
Send digital photos to
friends and family.
Send email and
surf the 'Net.
The iMac is your
digital hub.
Import and edit
home movies.
Put up to 1,000 songs in
your pocket.
Watch a DVD movie or
burn your own DVD.
Listen to music and burn
your own CDs.
9
Page 11
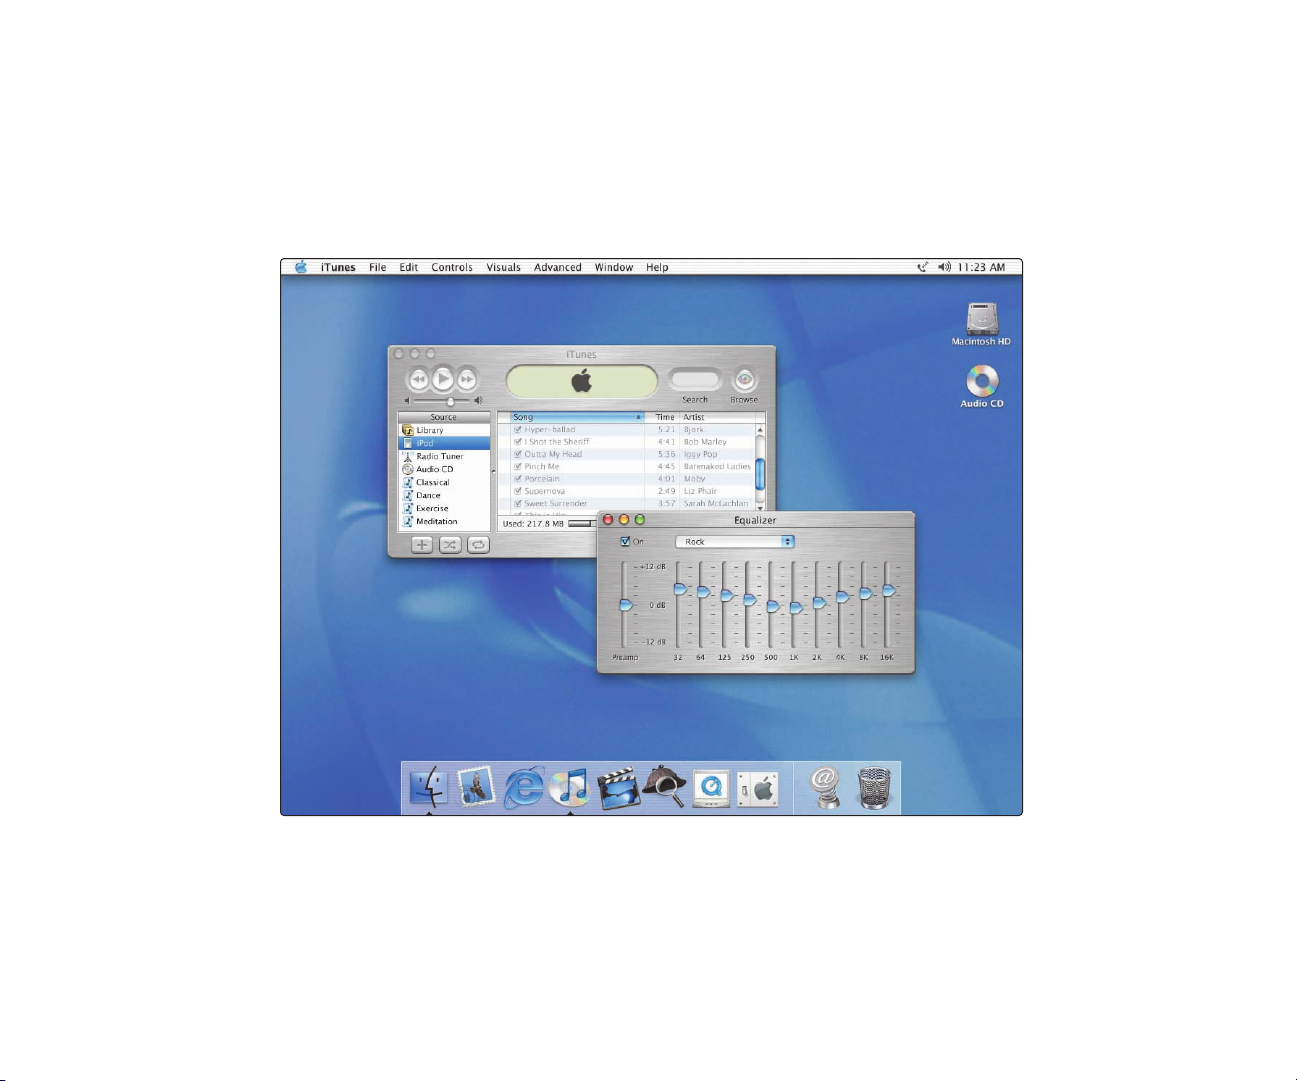
Listen to music on your computer or on the go.
Use iTunes to create a library of music and make your own CDs.
Your collection of
Library
songs, imported from
your own audio CDs or
downloaded from the
Internet. Easily browse
or search for music.
Radio Tuner
Choose from hundreds
of Internet radio
stations – jazz, rock,
talk, and more.
Audio CDs
Play an audio CD on your
computer. Import songs
to your Library to play
them without the CD.
Burn CDs
Make your own audio
CDs that play in standard
CD players.
Playlists
Make personalized
playlists using songs
from your Library.
Arrange your music by
mood, artist, genre, or
however you like.
Equalizer
Adjust the sound to
your tastes using
the 10-band EQ with
22 presets.
To learn more about iTunes:
m See iTunes Help, available in the Help menu.
m Go to www.apple.com/itunes
10
Page 12
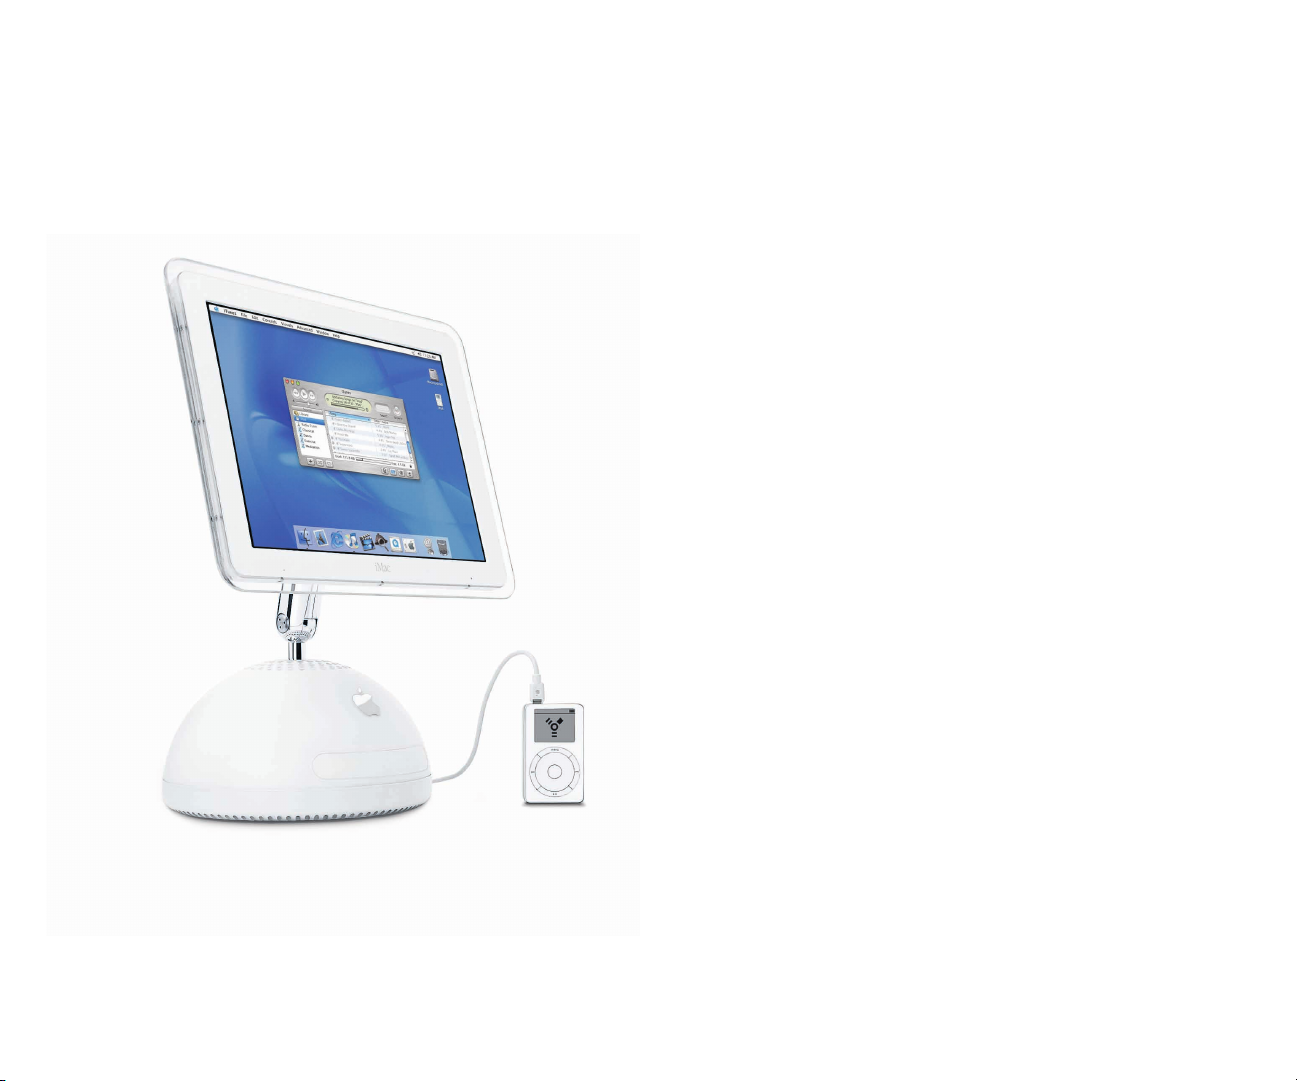
If you have an iPod, you can transfer up to 1,000 songs for listening on the go.
Connect iPod using the FireWire cable included with iPod.
iTunes automatically transfers your music Library to iPod.
1.
Unplug iPod.
2.
Browse for a song on iPod and
press the Play button.
3.
To learn more about iPod:
m See iTunes and choose iPod Help from the Help menu
m Go to www.apple.com/ipod
11
Page 13

Make your own movie or watch a movie on DVD.
Use iMovie to edit video from a digital video camera.
Shoot video
.
with a digital video
camera. Then
connect the
camera using a
6-pin to 4-pin
FireWire cable and
import your clips.
iMovie monitor
Preview your movie or
view video from a
connected DV camera.
Click the clip viewer
(eye tab) to edit and
place clips. Click the
timeline viewer (clock tab)
Viewers
to edit sound.
Use these to play the movie in the
Playback controls
iMovie monitor. Click the Play Full
Screen button to use the
entire screen.
To learn more about iMovie:
m Open iMovie and choose iMovie Help from the
Help menu.
m Go to www.apple.com/store to find compatible
DV cameras or to purchase a FireWire cable.
You can export
.
your finished
movie to a
tape in your DV
camera or to a
QuickTime file.
Shelf
Clips appear here when
you import them. Move
clips to the viewer
to make them part of
your movie.
Editing buttons
Click to open panels for
adjusting and selecting
sounds, video effects,
titles, and transitions.
12
Page 14

If your computer has a Combo drive or SuperDrive, you can watch DVD movies.
To use the whole screen to watch the movie,
.
choose Enter Full Screen from the Video menu.
To learn more about DVD Player:
m Choose DVD Player Help from the Help menu.
Insert a DVD video disc. DVD Player
opens automatically.
1.
Use the controller to play the movie
or see the DVD’s special features.
2.
13
Page 15

Make your own
Hollywood-style
DVDs.
If your computer has a
1
2
SuperDrive, you can create
DVDs using iDVD.
Your finished DVD will play in almost any home
.
DVD player.
Import and edit movies using iMovie.
Then export to an iDVD movie file.
1.
In iDVD, choose a menu theme and
drag your movies to the iDVD window.
2.
3
Customize your menus and buttons to
look the way you want.
3.
Insert a blank DVD-R disc
and click Burn.
4.
4
1414
Page 16

With iDVD you can make your DVD look exactly the way you want.
Choose a background
Themes
for your DVD from
the included themes,
or make your own theme.
Multiple menus
Click the Folder
button to add multiple
DVD menus.
Slideshow
Click Slideshow and
drag still pictures
to iDVD. Your DVD
can hold thousands
of pictures.
Burn
Insert a blank DVD-R disc
and click Burn. You
can work on your
computer while the
DVD is being created
in the background.
Movies
To add a movie, simply
drag it to iDVD. You can
use movies you created
in iMovie.
Preview
Click Preview to see what
your DVD will look like.
To learn more about iDVD:
m Open iDVD and choose iDVD Tutorial from
the Help menu.
m See iDVD Help, available in the Help menu.
m Go to www.apple.com/iDVD to purchase
DVD-R discs.
15
Page 17

Search the
Internet.
If you know the Internet
address, you can go
there directly.
If you have a dialup connection, you can use
.
the modem status icon (W) to connect to and
disconnect from the Internet.
To learn more about Internet Explorer:
m Open Internet Explorer and choose
Internet Explorer Help from the Help menu.
2
1
Click the icon in the Dock to open
Internet Explorer.
1.
2
1
Type the Internet address and press
Return on your keyboard.
2.
16
Page 18

Or you can search the Internet
with Sherlock.
Click the other buttons to find people, read the
.
news, shop, and more.
Click the hard disk icon to search the files on
.
your computer.
2
3
1
Click the icon in the Dock to
open Sherlock.
1.
Click the Internet icon and type
a question in the search field.
2.
Click the Search button ( ). Then
3
double-click an item in
.
the list of sites.
17
Page 19

Get more out of the Internet with iTools.
iTools is a suite of Internet services integrated into Mac OS X.
iDisk
Your own storage space on Apple’s Internet
server. Share photos, movies, and other
files over the Internet. Access your files from
another Macintosh or PC.
HomePage
Build a personal Web site in three easy
steps. Create a photo album, publish
an iMovie, post your résumé, and more.
Anyone can view your site on the World
Wide Web.
iCards
Send an elegant iCard, just right for any
occasion. Choose a ready-made photo, or
create a personalized iCard using a photo
on your iDisk.
Email
Get your own Mac.com email address.
It’s easy and works with your favorite
email application.
To learn more about iTools:
m Go to www.apple.com/itools and click Help on the
iTools menu bar.
18
If you signed up for iTools when you first turned
.
on your computer, you already have an account.
Go to www.apple.com/itools to get started.
To sign up for a new iTools account, open
.
System Preferences and click Internet. Then
click Sign Up.
Page 20

Store pictures, movies, documents, and other files remotely.
1
2
To access your files from another
.
computer, log into your iTools account at
www.apple.com/itools
Anyone can access the files in your Public folder.
.
To find out how to use pictures and other
.
files from your iDisk to create a personal Web
site, go to www.apple.com/itools and click the
HomePage icon.
Choose iDisk from
the Go menu.
1.
Drag files to a folder on your iDisk
to copy them.
2.
19
Page 21

Send and
receive email.
Follow these steps to create
and send a message.
To use email, you must have an account with an
.
Internet service provider.
To check for new messages, click Get Mail.
.
To view a message, click its subject.
If you entered email information or got a
.
Mac.com account when you first turned on your
computer, Mail is already set up. To set up a
new email account, choose Preferences from
the Mail menu, then click Accounts.
1
Click the Mail icon in the Dock
to open the Mail application.
1.
20
Page 22

To learn more about Mail:
m Open Mail, then choose Mail Help from the
Help menu.
2
3
m Go to www.apple.com/macosx/applications/
mail.html
To create a new email message,
click Compose.
2.
Type the email address and a
subject. Then type your message
3.
and click Send.
21
Page 23

Organize, plan, and create using AppleWorks.
Use AppleWorks for writing, drawing, making presentations, and more.
Layout capabilities
Add photos, tables,
charts, and sidebars.
Link text frames, layer
graphics, and wrap text.
Word processing
Write letters, create
brochures, make
greeting cards and
party invitations.
Presentation tool
Create an onscreen
slide presentation.
Add movies, art,
graphs, and charts.
Database
Keep records, save
addresses, make
inventories. Merge
mailing information with
the word processor to
send form letters.
Customizable
templates
Choose from a wide
range of predesigned
documents and modify
them as needed.
Spreadsheet
Compute data easily
using over 100 built-in
functions, then use
formatting options to
make it stand out.
Painting
Create art from scratch
or apply effects to
existing pictures
or scanned photos.
Extensive
clip art libraries
Choose from over
25,000 high-quality
clip art images.
22
Page 24

To get started using AppleWorks:
2
1
Click the Web tab to download more templates
.
from the Internet.
To learn more about AppleWorks:
m See AppleWorks Help, available in the Help menu.
m Go to the AppleWorks Web site at
www.apple.com/appleworks
Click the icon in the Dock
to open AppleWorks.
1.
Click the type of document you want
to create, or click the Templates tab to
2.
modify a ready-made document.
23
Page 25

Keep your iMac’s
software up-to-date.
Use Software Update to
get the latest updates
and drivers.
To use Software Update, you must have an
.
Internet connection.
2
1
24
Click the icon in the Dock
to open System Preferences.
1.
Click
Software Update.
2.
Page 26

Click the name of a software item to learn
.
more about it.
You can schedule your computer to check
.
automatically for software updates.
3
4
3.
Then click
Update Now.
Select the software you want to
update and then click Install.
4.
25
Page 27

Learn more
about using your
computer.
Look in Mac Help for
2
3
more information on using
your computer.
To browse the features of your computer, click
.
Go under “At a glance.”
Click Quick Clicks topics for answers to
.
frequently asked questions.
To look at Help for other applications, click
.
the ? button.
1
Click the Finder icon
in the Dock.
1.
Then choose Mac Help from
the Help menu.
2.
Type a question
and click Ask.
3.
Click an item in the list
of Help topics.
4.
4
26
Page 28

These Apple Web sites will help you get the most out of your computer.
Macintosh Products Guide
www.apple.com/guide
For great hardware and software products
for your Mac, check the Web site or look for
the Mac symbol. Also get contact and
support information for third-party software
manufacturers.
Apple Store
www.apple.com/store
Purchase the latest Apple and third-party hardware,
software, and accessories.
Apple Service and Support
www.apple.com/support
Product support, software updates, and
technical information.
From these Web sites you can quickly link to
.
other Apple Web sites around the world.
27
Page 29

Advice and troubleshooting
If you don’t find the answer to your problem
on the following pages:
Look in Mac Help.
m In Mac Help (see page 26), you can find a great deal of troubleshooting
advice, including information to help you solve problems with
m Connecting to the Internet
m Using software installation and restore discs
m Changing your computer’s settings
m Printing
m And more
m Click the Finder icon in the Dock, then choose Mac Help from the
Help menu. Type a question in the search window (for example,
type “How do I eject a disc?”) and click Ask.
If your Apple Pro Speakers aren’t
working correctly:
Make sure they are connected securely.
m Unplug and then plug in the connector and make sure it is secure. You
should feel two clicks.
Switching between Mac OS X and Mac OS 9
Yo ur iMac is set to use Mac OS X. Most applications made for Mac OS 9 will
work in the Mac OS X Classic environment. Just open the application as
you normally would. You can also start up your computer using Mac OS 9.
To set your computer to use Mac OS 9:
m Choose System Preferences from the Apple (K) menu in Mac OS X.
m Click the Startup Disk icon to open the Startup Disk pane.
m Select the Mac OS 9 folder as your startup disk. If the icons are
dimmed, click the padlock icon and enter the password you chose
when you first set up Mac OS X.
m Click Restart.
To set your computer to use Mac OS X again:
m Choose Control Panels from the Apple (K) menu.
m Open the Startup Disk control panel.
m Click the triangle next to the hard disk that contains your operating
system folders.
m Select the Mac OS X System as your startup disk.
m Click Restart.
28
Page 30

If the computer won’t respond:
First, make sure the mouse and keyboard are connected.
m Unplug and then plug in the connectors and make sure they
are secure.
Then try to cancel what the computer is doing.
m Tr y to force problem applications to quit. Hold down the Option and
Command (x) keys, then press the Esc key. Select the application and
click Force Quit.
If the computer still doesn’t respond, restart it.
m Hold the Power button (®) on the computer for five seconds. When
the computer turns off, press the Power button again to restart it.
m If that doesn’t work, unplug the power cord from the computer.
Then plug the power cord back in and press the Power button on
the computer to turn it on.
Then do this:
If the problem occurs frequently when you use a
particular application:
m Check with the application’s manufacturer to see if it is compatible
with your computer.
m For support and contact information about the software that came
with your computer. Go to www.apple.com/guide
If the problem occurs frequently:
m You may need to reinstall your system software. Choose Mac Help
from the Help menu and type “install system software” for more
information.
If you see a flashing question mark
during startup:
If the computer doesn’t start up after a delay, hold down the
Option key and restart your computer.
m When your computer starts up, click the hard disk icon, then click
the arrow.
Then do this:
After the computer starts up:
m Open System Preferences and click Startup Disk. Select a local
Mac OS X System folder.
If the problem occurs frequently:
m You may need to reinstall your system software. Choose Mac Help
from the Help menu and type “install system software” for more
information.
29
Page 31

If the computer won’t turn on or start up:
First, make sure the power cord is connected.
m Make sure both ends of the power cord are plugged in securely.
Make sure the power cord is plugged into a powered electrical outlet.
m If your computer is plugged into a power strip, make sure the power
strip is turned on.
m See the service and support information that came with your iMac for
information on having your computer serviced.
If you can’t log into your computer:
Make sure you are typing your user name and
password correctly.
m Make sure you are using the same capitalization and punctuation that
you used originally. Check to see if the Caps Lock key has been
pressed.
If that doesn’t work, reset your password.
m Insert the Mac OS X software install CD that came with your computer.
Restart your computer while holding down the C key. When the
Installer appears, choose Reset Password from the Installer menu and
follow the onscreen instructions.
If your printer won’t respond or work correctly:
Check all cables and connections.
m Make sure the printer is plugged into the computer and an electrical
outlet. Make sure the printer is turned on.
Make sure your computer is set up to use your printer.
m Install the software that came with your printer. See the documentation
that came with the printer for instructions.
m Open the Print Center application in the Utilities folder. Then select
your printer.
If you can’t eject a CD or DVD, or open the
drive tray:
Make sure the disc is not in use.
m Quit all applications that are using files on the disc.
m Then press the Media Eject key ( ) at the top-right corner of the
keyboard.
m If that doesn’t work, drag the disc’s icon to the Trash.
m If that doesn’t work, restart the computer, then hold down the mouse
button. To restart, choose Restart from the Apple menu.
30
Page 32

If you have a problem with a third-party
If the Apple Pro Mouse isn’t
software program:
Make sure the software is compatible with your version of
system software.
m See the documentation that came with the software. You can check the
version of system software you have by choosing About This Mac from
the Apple (K) menu.
To resolve other problems with software, contact the
software manufacturer.
m For support and contact information about the software that came
with your computer, go to www.apple.com/guide
If you have a problem with your
Internet connection:
First, make sure the telephone line or Ethernet cable is
properly connected to your computer.
m Wait a while, then try connecting again.
If that doesn’t work, make sure your Internet settings are
configured correctly.
m Open the Internet Connect application in the Applications folder to
check your dialup or AirPort settings. Open System Preferences and
click Network to check your Internet settings.
m If you’re not sure of the correct information for your Internet settings,
contact your Internet service provider.
responding properly:
First, make sure the mouse and keyboard are connected.
m Unplug and then plug in the connectors and make sure they
are secure.
If that doesn’t work, try using the mouse on another surface,
like a mouse pad or a notebook.
m Non-reflective, opaque surfaces without repetitive patterns
work best.
If you run out of room and want to keep the mouse clicked
while you lift it:
m Click the mouse, then squeeze the sides with your thumb and fingers
and lift the mouse.
If the mouse clicks too easily or not easily enough:
m Turn the ring on the bottom of the mouse to adjust the tension
of the click.
For the latest troubleshooting information, go to the
Apple Support Web site at www.apple.com/support
31
Page 33

Install memory and an AirPort Card.
For detailed instructions, refer to Mac Help (see page 26).
Lay the computer down sideways on
a soft cloth. Be careful not to let the
1.
base roll.
Before installing:
m Get a Phillips screwdriver
m Shut down the computer
m Unplug all cables, except the power cord
32
Loosen the four captive screws at the
base of the computer and gently
2.
remove the access panel.
For instructions on using the AirPort software,
.
choose Mac Help from the Help menu. Then
click the question mark and click AirPort Help.
To uch a metal point inside
the computer. Then unplug
3.
the power cord.
Touch this metal before you touch any other
.
parts inside the computer. Don't walk around
the room until you've finished installing memory
or an AirPort Card.
Page 34

To install an AirPort Card, connect the
antenna firmly to the card and insert
4.
the card into the AirPort Card slot.
If the AirPort Card is connected to an adapter,
.
remove the metal clip and pull the card from the
adapter. You don’t need the adapter.
To install memory, insert a memory
module into the memory slot at an
5.
angle. Press down to lock it in place.
For more information on the type of memory
.
to use with your computer, choose Mac Help
from the Help menu. Then type "memory" and
click Ask.
Replace the access panel and tighten
the four screws.
6.
Never turn your computer on unless all of its
.
internal and external parts are in place.
33
Page 35

Work more comfortably
The guidelines in this section can help you work more comfortably with
your computer. For detailed information about ergonomics, see the
Apple Environmental Health and Safety Web site at
www.apple.com/about/ergonomics
Keyboard
m When you use the computer keyboard, your shoulders should be
relaxed. Your upper arm and forearm should form an approximate
right angle, with your wrist and hand in roughly a straight line.
m You may have to raise your chair so your forearms and hands are at the
proper angle to the keyboard. If this makes it impossible to rest your
feet flat on the floor, you can use a footrest with adjustable height and
tilt to make up for any gap between the floor and your feet. Or you may
lower the desktop to eliminate the need for a footrest. Another option
is to use a desk with a keyboard tray that is lower than the regular work
surface.
m Use a light touch when typing and keep your hands and fingers relaxed.
Avoid rolling your thumbs under your palms.
Mouse
m Position the mouse at the same height as your keyboard. Allow
adequate space to use the mouse comfortably.
Chair
m An adjustable chair that provides firm, comfortable support is best.
Adjust the height of the chair so your thighs are horizontal and your
feet flat on the floor.
m The back of the chair should support your lower back (lumbar region).
Follow the manufacturer’s instructions for adjusting the backrest to fit
your body properly.
Computer
m Adjust the angle of the screen so the top of the screen is slightly below
your eye level when you're sitting at the keyboard. The best distance
from your eyes to the screen is up to you, although most people seem
to prefer 18 to 28 inches (45 to 70 cm).
m Position the computer to minimize glare and reflections on the screen
from overhead lights and windows.
34
Page 36

Important
Don’t lift the computer using the display. You could
damage it. To move your computer, grab the display extension with one
hand; with your other hand, hold the bottom of the computer.
Shoulders
relaxed
Forearms
and hands
in a straight
line
Lower back
supported
Forearms
level or tilted
down slightly
Thighs tilted slightly Feet flat on the floor
45–70 cm (18–28 in.)
Top of screen
at or slightly below
eye level. (You may
need to adjust the
height of your
monitor.)
Screen positioned
to avoid reflected
glare
Clearance under
work surface
Avoiding fatigue
m Change your seated position, stand up, or stretch whenever you start
to feel tired. Frequent short breaks are helpful in reducing fatigue.
m Use a light touch when typing or using a mouse and keep your hands
and fingers relaxed.
m Some computer users may develop discomfort in their hands, wrists,
or arms after periods of intensive work without breaks.
If you begin to develop chronic pain or discomfort in your hands,
wrists, or arms, consult a qualified health specialist immediately.
m Allow adequate workspace so that you can use your keyboard and
mouse comfortably. Place papers or other items so you can view them
easily while using your computer. A document stand may make reading
papers more comfortable.
m Eye muscles must work harder to focus on nearby objects.
Occasionally focus your eyes on a distant object, and blink often while
you work.
m Clean your screen regularly. Keeping the screen clean helps reduce
unwanted reflections.
35
Page 37

Safety, cleaning, and power management
Safety
Make sure that you
m keep these instructions handy for reference by you and others who
may use your computer
m follow all instructions and warnings regarding your system
When setting up and using your computer, remember the following:
m Place your computer on a steady, flat surface in a location with
adequate ventilation. Never block the vents on the computer.
m Your computer has a three-wire grounding plug that will only fit a
grounded AC outlet. If you are unable to insert the plug into the outlet,
contact a licensed electrician to replace the outlet with a properly
grounded outlet.
m Make sure you only connect the modem to an analog phone line, the
type commonly used in residences. Do not connect a digital telephone
line to the modem, because it could damage the modem.
m Never turn on your computer unless all of its internal and external
parts are in place. Operating the computer when it is open or missing
parts can be dangerous and damage your computer.
Important The only way to disconnect power completely is to unplug
the power cord. Make sure at least one end of the power cord is within
easy reach so that you can unplug the computer when you need to.
Warning Electrical equipment may be hazardous if misused.
Operation of this product must always be supervised by an adult.
Do not allow children access to the interior of this product and
do not permit them to handle any cables.
For your own safety and that of your equipment, always disconnect the
power plug (by pulling the plug, not the cord) if any of the following
conditions exists:
m you want to remove any parts (leave the cord disconnected as long as
the computer is open)
m the power cord or plug becomes frayed or otherwise damaged
m you spill something into the case
m your computer is exposed to rain or any other excess moisture
m your computer has been dropped or the case has been
otherwise damaged
m you suspect that your computer needs service or repair
m you want to clean the case (use only the recommended procedure
discussed in Mac Help)
Be sure that you always do the following:
m Keep your computer away from sources of liquids, such as drinks,
washbasins, bathtubs, shower stalls, and so on.
m Protect your computer from dampness or wet weather, such as rain,
snow, and so on.
36
Page 38

Cleaning your computer equipment
Power-saving and environmental features
To clean your computer equipment, use only the recommended
procedures discussed in Mac Help. Make sure your computer is
unplugged before cleaning.
Warning Do not clean the screen with a cleaner that contains
alcohol or acetone. Use a cleaner intended for use with an LCD
(liquid crystal display). Never spray cleaner directly onto the
screen. Liquid could drip inside the computer and cause an
electrical shock.
Power supply
The power supply in your computer is a high-voltage component and not
user-serviceable. If you suspect the power supply needs service, contact
your Apple-authorized dealer or service provider.
Warning Do not attempt to access the high-voltage area or
power supply. If you suspect the power supply needs service,
contact your Apple-authorized dealer or service provider.
Yo ur computer is equipped with energy-saving features that allow it to
conserve energy when not in use. For instructions on adjusting the system
and display sleep settings and additional energy-conservation information,
see Mac Help.
TCO
This product has been certified by TCO (the Swedish Confederation of
Professional Employees) to meet the standards for ergonomics, energy
efficiency, emissions, and ecology of the TCO 95 program. For more
information, see the TCO document in the Documents folder on your
computer’s hard disk.
ENERGY STAR
As an ENERGY STAR®partner, Apple has determined that this product
meets the ENERGY STAR
®
STAR
program is a partnership with office product equipment
manufacturers to promote energy efficiency. Reducing energy
consumption of office products saves money and reduces pollution
by eliminating wasted energy.
®
®
guidelines for energy efficiency. The ENERGY
37
Page 39

Where’s the fine print?
Communications, telephone, and modem
regulation information
For information on FCC regulations, radio and television interference, and telephone and
modem information related to this product, see the files in the Documents folder on your
hard disk.
Laser information
Warning Making adjustments or performing procedures other than those specified in
your equipment’s manual may result in hazardous radiation exposure.
Do not attempt to disassemble the cabinet containing the laser. The laser beam
used in this product is harmful to the eyes. The use of optical instruments, such as
magnifying lenses, with this product increases the potential hazard to your eyes.
For your safety, have this equipment serviced only by an Apple-authorized
service provider.
Service warning label
High-risk activities warning
This computer system is not intended for use in the operation of nuclear facilities, aircraft
navigation or communications systems, or air traffic control machines, or for any other
uses where the failure of the computer system could lead to death, personal injury, or
severe environmental damage.
iPod information
The Apple iPod pictured on page 11 of this manual is not included with this product. For
more information on iPod, go to www.apple.com/ipod
Mouse information
This product complies with the requirements of European Directives 72/23/EEC and
89/336/EEC. Complies with the Canadian ICES-003 Class B specification. This mouse is a
Class 1 LED product. (IEC 60825-1:1993+A1:1997+A2:2001)
Caution Use of controls or adjustment or performance of procedures other than those
specified herein may result in hazardous radiation exposure.
Every effort has been made to ensure that the information in this manual is accurate.
Apple is not responsible for printing or clerical errors.
38
Page 40

wwww.apple
.apple
com
.com
AirPort, Apple, the Apple logo, AppleWorks, FireWire, the FireWire logo, iMac, Mac, the Mac logo, Macintosh, QuickTime, and Sherlock are trademarks of Apple Computer, Inc.,
registered in the U.S. and other countries. Finder, iMovie, iPod, iTunes, and SuperDrive are trademarks of Apple Computer, Inc.
ENERGY STAR
© 2002 Apple Computer, Inc. All rights reserved.
®
is a U.S. registered trademark. Digital imagery copyright 1998 PhotoDisc, Inc.
034-2069-A Printed in Taiwan
 Loading...