

Page 1

K
Service Source
iBook
iBook/iBook Special Edition
Page 2

K
Service Source
Basics
iBook/iBook Special Edition
Page 3

Basics Product Overview - 1
Overview
Product Overview
The iBook is designed for
computing on the move. It
features a tough,
polycarbonate body, builtin handle, lithium-ion
battery that runs up to six
hours between charges, and
support for AirPort
wireless networking.
The iBook is based on the
PowerPC G3
microprocessor and features
Page 4

Basics Product Overview - 2
a 12.1-inch TFT display.
The iBook Special Edition was introduced in February, 2000
and features an increased processor speed of 366 MHz, a
6 GB hard drive, and 64 MB of RAM.
Page 5

Basics Service Strategy - 3
Service Strategy
The iBook is serviced exclusively through repair depots
worldwide throughout the life of the product. Carry-in
service to an Apple-authorized service provider is not
available.
Important:
or adding an AirPort Card may void the customer’s
warranty.
For more information about Apple’s service strategy for
iBook, refer to Program News on Service Source Online and
the Service Source CD.
Taking the computer apart beyond upgrading RAM
Page 6

Basics Warranty/AppleCare Protection Plan - 4
Warranty/AppleCare Protection Plan
The iBook is covered under the Apple One-Year Limited
Warranty. The AppleCare Protection Plan is also available
for this product. Refer to the Service Price Pages for repair
facilitation reimbursement rates.
Page 7

Basics System Software—NewWorld ROM - 5
New Technologies
System Software—NewWorld ROM
The iBook is the second Macintosh portable to take advantage
of ROM-in-RAM architecture. This design features a small
ROM that provides hardware initialization functions and
provides a mechanism to load the Mac OS ROM image into
RAM. The new software architecture that is centered around
ROM-in-RAM and its ramifications is named NewWorld.
ROM-in-RAM
Hardware-specific code resides in firmware (ROM) that
fits into one ROM called the boot ROM. The boot ROM includes
the code and tables needed to start up the computer, load an
operating system, and provide common hardware access
Page 8

Basics System Software—NewWorld ROM - 6
services.
All higher-level software resides in what has been
historically known as the Mac OS ROM, but with much of the
old hardware-specific code moved into the boot ROM. As
before, the Mac OS ROM can still be augmented by enablers,
the System file, and extensions.
Prior to the iMac, all Macintosh computers required a ROM
component that contained many components of the Mac OS
software. The NewWorld approach sidesteps this
requirement by copying an image of the Mac OS ROM into
RAM before the Mac OS begins operation. Once the Mac OS
begins operation, a Mac OS ROM image in RAM and an actual
Mac OS ROM behave in the same way. No new or different
software interfaces are directly accessible from the Mac OS.
During the boot process, software contained in the Mac OS
ROM file communicates with Open Firmware to collect
Page 9

Basics System Software—NewWorld ROM - 7
information about the hardware, using the Open Firmware
Client Interface.
RAM Footprint
Because the Mac OS ROM image is stored in RAM,
approximately 3 MB of RAM is available for other uses. In
effect, a system with 64 MB of RAM appears to have only 61
MB available. Some portion of the missing 3 MB is offset by
having fewer patches in RAM.
Data Structures and Files
The Mac OS ROM image is contained in a new file, named Mac
OS ROM, that resides in the System Folder. The Mac OS ROM
image is exactly the same as it would be if it were an actual
Mac OS ROM, containing the high-level software, the kernel
software, and the 68K emulator.
Page 10

Basics System Software—NewWorld ROM - 8
Startup Disk Control Panel
Previous systems stored the user's selected startup device
in Parameter RAM (PRAM) when the user selected a device
in the Startup Disk control panel. The startup disk routine
for the iBook, rather than setting Mac OS PRAM, sets an
Open Firmware config variable called boot-device. Open
Firmware honors this setting unless the selected device is
unavailable or is overridden by the user.
The following keys can be pressed to override the selected
startup device:
• Command-Option-Shift-Delete: ignore the boot-device
setting and scan for alternate devices.
• C: force the internal CD-ROM drive to be the startup
device.
• D: force the internal hard drive to be the startup device.
Page 11

Basics Feature List - 9
Features
Feature List
The features of iBook include:
• PowerPC G3 microprocessor running at a clock speed of
300, 333, or 366 MHz (iBook Special Edition)
• backside L2 cache of 512K
• 32 or 64 MB of SDRAM on the logic board and one
expansion slot for up to 320 MB of SDRAM
• 3.2 or 6 GB built-in hard drive
• 12.1-inch TFT display with SVGA resolution (800 x 600
pixels)
• built-in CD-ROM drive
• 4MB of SDRAM video memory
• built-in 2D and 3D graphics acceleration via the ATI
RAGE Mobility video controller
Page 12

Basics Feature List - 10
• lithium-ion battery with up to six hours of battery life
• one USB port for external keyboard, mouse, and other
USB devices
• built-in Ethernet port with RJ-45 connector for
10BaseT and 100Base-TX operation
• built-in V.90 modem with 56 Kbps data rate
• built-in mono speaker and 16-bit stereo output jack
• keyboard with embedded numeric keypad and
programmable function keys
• trackpad with tap/double tap and drag features
• optional wireless LAN via the AirPort Card
Page 13

Basics Drives - 11
Drives
Hard Disks and HFS Plus
The iBook hard drives use Mac OS Extended format (HFS
Plus). Some disk utility and disk locking programs
manufactured by companies other than Apple are
incompatible with HFS Plus.
Using an incompatible disk utility or disk locking program
could result in hard drive corruption and loss of all data on
the hard disk. Check the documentation that came with the
program or contact the manufacturer or the vendor of the
program before attempting to use it. Apple recommends
using the utility Disk First Aid, which is included on the
system software CD that ships with the iBook.
Page 14

Basics Drives - 12
Norton Utilities
±
Warning:
3.5.3 will not run on any of the iBook computers. Running
versions 3.5.1 and below may cause hard drive corruption
and loss of all data on the hard drive. See the Symantec Web
site at http://www.stfsupport@smithmicro.com for more
information on Norton Utilities and Mac OS Extended format.
Norton Utilities for Macintosh, v3.5.2 and
Page 15

Basics Memory and Power - 13
Memory and Power
Sleep Memory Extension 1.0
Apple has identified a very rare issue that may occur when
putting an iBook to sleep. The computer may be unable to
recognize the hard drive at startup. To prevent this from
happening, Apple strongly recommends that all iBook
customers running systems prior to Mac OS 9.0.4 install
the Sleep Memory Extension 1.0.
After installing the Sleep Memory Extension and restarting
the iBook, the "Preserve memory contents on sleep"
checkbox in the Energy Saver control panel will be dimmed
and unavailable.
Download the Sleep Memory Extension 1.0 from the Apple
Software Updates Web site at http://www.apple.com/
swupdates/.
Page 16

Basics Memory and Power - 14
Battery
The iBook has one lithium-ion (LiIon) battery that will
provide up to six hours of battery life when all power saving
features are implemented. With the power adapter plugged
in, the iBook battery recharges in four hours while the
computer is running, or in two hours when the computer is
shut down or in sleep mode.
The iBook battery is not compatible with any previous
Macintosh portable computer.
No Backup Battery
The iBook has no backup battery. You will lose all data stored
in RAM if you change the battery while the system is in sleep
mode and no power adapter is connected. Therefore, shut the
system down before changing the battery, or make sure a
power adapter is connected.
Page 17

Basics Memory and Power - 15
Battery Handling Guidelines
±
Warning:
hazardous chemicals and should not be thrown out with
household or office trash. Review battery handling and
disposal instructions in Safety Information in Bulletins/
Safety.
The following are guidelines for properly handling
batteries:
• Handle the battery carefully. Do not drop, puncture,
disassemble, mutilate, or incinerate it.
• Do not leave a battery in the computer for longer than a
week without plugging in the power adapter.
• Do not short the battery contacts.
• Do not leave the battery in hot locations (such as the
trunk of a car).
• Do not leave a battery in storage for longer than six
Lithium-ion (LiIon) batteries contain
Page 18

Basics Memory and Power - 16
months without recharging it.
• Never get batteries wet.
• Recharge batteries only as described in the user’s manual
and only in ventilated areas.
Battery V erification
When the power adapter is being used, the ring around the
power adapter port glows green when the battery is fully
charged. The ring glows amber if the battery is being
charged.
You can also check the battery status by looking at the
Battery portion of the control strip or the battery symbol in
the upper right corner of the Finder menu bar.
Page 19

Basics Memory and Power - 17
Power Adapter Verification
Try using a known-good power adapter if the computer
cannot run off the existing one, or try the existing power
adapter with another iBook or G3 Series PowerBook
Under normal operation, the ring around the power adapter
port will glow green or amber if the computer is receiving
adequate power. If the computer is not receiving adequate
power, the ring will not glow green or amber.
Page 20

Basics Sound and Video - 18
Sound and Video
Sound Out
The iBook has one mono speaker located on the bottom case. A
headphone jack located on the left side of the computer
supports stereo headphones or external powered speakers.
When headphones or speakers are plugged into the external
jack, the sound to the internal speaker is turned off.
The iBook has no microphone or sound-input jack.
Page 21

Basics Input/Output - 19
Input/Output
USB
The iBook has one Universal Serial Bus (USB) port that can
be used to connect I/O devices such as a USB mouse,
printers, scanners, and low-speed storage devices. The
ports use USB Type A connectors, which have four pins.
The iBook does not support the power-on key on the Apple
USB keyboard.
Ethernet
The iBook has a built-in 10/100 Mbps Ethernet port using
a RJ-45 connector. When connected to either a 10Base-T or
a 100Base-TX hub, the port will recognize which type of
hub is connected.
Page 22

Basics Input/Output - 20
Keyboard
The iBook keyboard includes an embedded numeric keypad
and controls to adjust display brightness, speaker volume,
and the Num Lock function.
Several of the keys on the keyboard have more than one mode
of operation. These changes are controlled by the Num Lock
key, Fn key, and the Function Keys checkbox in the Keyboard
control panel.
Num Lock Key
Press the Num Lock key to:
• Select the embedded numeric keypad on the right portion
of the alphanumeric keys.
• Make the rest of the alphanumeric keys functionless.
Page 23
Basics Input/Output - 21
Fn Key
Press the Fn key to:
• Toggle the function keys between their normal control
functions and their alternate F1–F12 functions.
• Select the embedded numeric keypad on the right portion
of the alphanumeric keys.
• Change certain control keys, including the cursor control
keys, to page control keys.
Table 1 below shows the operations controlled by function
keys when the Fn key is pressed.
Key Operation
F1 Decrease display brightness
F2 Increase display brightness
F3 Decrease speaker volume
Page 24
Basics Input/Output - 22
Key Operation
F4 Increase speaker volume
F5 Num Lock
F6 Mute speaker
Table 1: Function Key Operation
Function Keys Checkbox
The Fn key lets the user switch the mode of operation of the
function keys. The user selects the default mode of the
function keys in the Function-keys checkbox in the
Keyboard Control Panel. The Function-keys checkbox lets
the user choose whether the function key operations are
primary or secondary.
Function keys primary means the function keys are
Page 25

Basics Input/Output - 23
normally in their F1–F12 mode of operation. Pressing the
Fn key activates their control-button mode.
Function keys secondary means the function keys are
normally in their control-button mode and pressing the Fn
key activates their function-key mode.
Page 26

Basics Boards and Cards - 24
Boards and Cards
The architecture of the iBook is designed around one logic
board that contains the microprocessor and two new custom
ICs. Besides the logic board, the iBook can contain up to five
boards and cards: charging board, DC-in board, RAM card,
modem, inverter board, and AirPort Card.
AirPort Card
The iBook supports the AirPort Card, an internal wireless
LAN module. The AirPort Card is available as a build-toorder option or as a user-installable upgrade through the
Apple Store. The AirPort Card can be used for Internet
access, e-mail access, and file exchange.
For more information, refer to the AirPort service manual
on Service Source CD or Service Source Online.
Page 27

Basics Front View - 25
Views
Front V iew
The front of the iBook
includes the: power button,
sleep indicator, reset
button, volume and
brightness controls,
keyboard release tabs,
keyboard lock, trackpad and
trackpad button, and
speaker.
Page 28

Basics Right Side View - 26
Right Side View
The right side of the iBook
includes the: power adapter
port, CD-ROM drive, and CD
manual eject button.
Page 29

Basics Left Side View - 27
Left Side View
The left side of the iBook
includes the following ports:
sound out, USB, Ethernet,
and internal modem.
Page 30

Basics Back View - 28
Back View
The handle of the iBook is on
the back side.
Page 31

Basics Bottom View - 29
Bottom View
The bottom of the iBook
includes the battery door
with spring-loaded screws,
and the contacts for a thirdparty charging station.
Page 32

Basics Logic Board - 30
Logic Board
Display
Inverter
Connector
Memory Slot
CD Data Connector
Keyboard Connector
Trackpad Connector
Power on Button
Reset Button
DC Power
Connector
Sound Out
Connector
Display Cable
Connector
Modem
Connector
Charging Board
Connector
Hard Drive
Connector
AirPort Card
Slot
Page 33

Basics Internal Hardware Locator - 31
Internal Hardware Locator
The upgradeable RAM slot is
located under the AirPort
Card and RAM access door. To
reach the CD-ROM drive and
modem, remove the
keyboard and top case.
Remove the logic board EMI
shield to access the
remaining components,
including the hard drive.
Modem
Board
Logic Board
Hard Drive
Charging Board
Inverter Board
CD-ROM
Drive
AirPort Card
Page 34

K
Service Source
Specifications
iBook/iBook Special Edition
Page 35

Specifications Introduction - 1
Introduction
Specifications information for this product can be found in the Spec Database, which you can
access at Service Source Online (http://service.info.apple.com) or on Service Source CD.
Spec Database at Service Source Online
From the Service Source Online home page, click Troubleshoot and Repair to access the main
repair procedures page. Then click either Apple Spec in the navigation table in the upper
right corner of the page, or click Apple Spec Database from the list of reference tools below.
Spec Database on Service Source CD
Open the CD and double-click the Apple Spec Database alias located at the top level of the CD.
Page 36

K
Service Source
Troubleshooting
iBook/iBook Special Edition
Page 37

Troubleshooting General/How to Use the Symptom Charts - 1
General
How to Use the Symptom Charts
The Symptom Charts included in this chapter will help you
diagnose specific symptoms related to the product. Because cures
are listed on the charts in the order of most likely solution, try
the cures in the order presented. Verify whether or not the
product continues to exhibit the symptom. If the symptom
persists, try the next cure.
reinstall the original module before you proceed to the next cure.
For additional assistance, contact Apple Technical Support.
Note:
If you have replaced a module,
Page 38

Troubleshooting General/Power-On Self Test - 2
Power-On Self Test
A power-on self test resides in the ROM of the iBook. This test
automatically runs whenever the computer is turned on after
being fully shut down (the power-on self test does not run if the
computer is only restarted). If a problem is detected during the
test, you will not hear a normal startup chime. Instead, the
system will give a series of beeps.
One beep: No RAM is detected.
Two beeps: EDO memory is installed. The iBook ships with SDRAM
SO-DIMMs and does not accept EDO memory.
Three beeps: No RAM banks passed memory testing.
Four beeps: Bad checksum for the remainder of the boot ROM. The
ROM (which is located on the microprocessor module) is bad.
Page 39

Troubleshooting General/Power Issues - 3
Power Issues
±
Warning:
system down before changing the battery, or make sure an AC
power adapter is connected. Changing the battery while the system
is in sleep mode, without a power adapter, will result in a loss of
all data stored in RAM.
Sleep
There is an option in the Energy Saver control panel called
"Preserve memory contents on sleep." When this option is
selected, the system creates a file containing all the information
contained in RAM at that time, and stores it on the hard disk before
going into sleep mode.
The iBook has no backup battery. Therefore, shut the
Page 40

Troubleshooting General/Power Issues - 4
Battery V erification
When the power adapter is being used, the ring around the power
adapter port glows green when the battery is fully charged. The
ring glows amber if the battery is being charged.
You can also check the battery status by looking at the Battery
portion of the control strip or the battery symbol in the upper
right corner of the Finder menu bar.
Power Adapter Verification
Try using a known-good power adapter if the computer cannot run
off the existing one, or try the existing power adapter with
another iBook or G3 Series PowerBook
Under normal operation, the ring around the power adapter port
will glow green or amber if the computer is receiving adequate
power.
Page 41

Troubleshooting General/Power Issues - 5
Power Manager Reset
iBook computers have a reset button on the keyboard above the
power button. Press the button once with a paper clip to reset the
power manager. Make sure the button clears the plastic of the top
case when you release it, and is not stuck in the down position.
PRAM Reset
±
Warning:
if you do not have “Save on Shutdown” selected in the Memory
control panel. Resetting PRAM also restores default settings in
some control panels, so check custom settings after you reset
PRAM.
• Turn on the computer by pressing the power button.
• Immediately hold the Option-Command-P-R keys.
• Hold down the keys until you hear the startup chime at least one
additional time after the initial startup chime.
Resetting PRAM erases the contents of the RAM disk
Page 42

Troubleshooting General/Block Diagram - 6
Block Diagram
This is a simplified block diagram of the iBook. The diagram shows
the main ICs and the buses that connect them.
512 KB
backside
L2 cache
ATI Rage
Mobility-L
graphics IC
Flat-panel
display
Wireless
LAN
(optional)
AGP bus
Power PC
G3
micro-
processor
60x bus
UniNorth
memory
controller
and PCI
bus bridge
PCI
bus
Memory
bus
Boot
ROM
Ultra A T A bus
SDRAM
SO-DIMM
(optional)
32 MB
SDRAM
PHY
Hard
disk
drive
Ethernet
port
CD-ROM
PMU99
power
controller
Trackpad
ATA bus
KeyLargo
I/O device
and disk
controller
Keyboard
Power supply
and charger
Micronas
codec
Modem
Internal
speaker
Headphone
jack
Modem
connector
USB port
Page 43

Troubleshooting Symptom Charts/Startup - 7
Symptom Charts
Startup
Beeps are heard at
startup (one to four
beeps)
Dialog box “Built-in
memory test has
detected an error”
comes up on startup
1 One beep: No RAM is detected.
2 Two beeps: EDO memory is installed. The iBook ships with
SDRAM SO-DIMMs and does not accept EDO memory.
3 Three beeps: No RAM banks passed memory testing.
4 Four beeps: Bad checksum for the remainder of the boot ROM.
The ROM (which is located on the microprocessor module) is
bad.
1 Remove RAM and test again.
2 Replace RAM card.
3 Contact Apple to schedule repair.
Page 44

Troubleshooting Symptom Charts/Power - 8
Power
Computer won’t start up1 Reset the power manager by pressing the reset button above
the power button. Wait five seconds and press the power
button.
is not caught under the plastic of the top case.
2 Try known-good power adapter.
3 Remove battery.
4 Disconnect internal keyboard completely and try starting up
unit. If unit starts up, contact Apple to schedule repair.
5 Remove any additional RAM and AirPort Card.
6 Contact Apple to schedule repair.
Note:
Before continuing, make sure the reset button
Page 45

Troubleshooting Symptom Charts/Power - 9
Computer runs when
plugged into wall
outlet but not on
battery power
Computer runs with
battery, but not with
the power adapter
plugged into wall
outlet
1 Turn off the computer, then Reset the power manager by
pressing the reset button above the power button. Wait five
seconds and press the power button.
make sure the reset button is not caught under the plastic of
the top case.
2 Reseat battery to make sure battery is mating with contacts
on logic board.
3 Try known-good, firmly seated, charged battery. Repeat once.
4 Contact Apple to schedule repair.
1 Reset the power manager by pressing the reset button above
the power button. Wait five seconds and press the power
button.
is not caught under the plastic of the top case.
2 Try a known-good power adapter.
3 Check lights around power port to see if they glow amber or
green.
4 Contact Apple to schedule repair.
Note:
Before continuing, make sure the reset button
Note:
Before continuing,
Page 46

Troubleshooting Symptom Charts/Power - 10
Screen is blank;
backlight isn’t on;
computer doesn’t
respond
1 Reset the computer by holding Command-Control-power
button simultaneously.
2 Reset the power manager by pressing the reset button above
the power button. Wait five seconds and press the power
button.
is not caught under the plastic of the top case.
3 Check power adapter cable.
4 Try known–good, charged battery.
5 Try known-good power adapter.
6 Reset PRAM. Press the power button, then hold down the
Option-Command-P-R keys until you hear the startup chime
at least one additional time after the initial startup chime.
7 Remove keyboard and additional memory (if installed) and
restart computer.
8 Contact Apple to schedule repair.
Note:
Before continuing, make sure the reset button
Page 47

Troubleshooting Symptom Charts/Power - 11
Power adapter is
plugged in, but
Control Strip doesn’t
indicate adapter is
connected
Battery won’t charge 1 Turn off the computer and press the reset button above the
1 Verify that power adapter is connected correctly and the
power cord is plugged solidly in the adapter.
2 Verify that there is power at the outlet.
3 Try known-good power adapter (45 watt).
4 Try known-good power cord.
5 Reset the power manager by pressing the reset button above
the power button. Wait five seconds and press the power
button.
is not caught under the plastic of the top case.
6 Contact Apple to schedule repair.
power button. Wait five seconds and press the power button.
2 Insert battery, leave in 15 seconds, then remove it. Repeat
4–5 times.
3 Try known-good battery. Repeat once.
4 Contact Apple to schedule repair.
Note:
Before continuing, make sure the reset button
Page 48

Troubleshooting Symptom Charts/Power - 12
Battery will not
charge unless unit is
in sleep mode or shut
down
Verify that the appropriate power adapter (45 watt) is being
used.
Page 49

Troubleshooting Symptom Charts/Video - 13
Video
Note:
A certain number of pixel anomalies are inherent in liquid
crystal display technology and vary by many factors, including
type of technology. If you suspect that the display contains an
abnormal number of pixel anomalies, call Apple Technical
Support.
Partial or full row of
pixels is always on or
never comes on
Multiple vertical or
horizontal rows of
pixels are always on
or never come on
Contact Apple to schedule repair.
Contact Apple to schedule repair.
Page 50

Troubleshooting Symptom Charts/Video - 14
No display, but
computer appears to
operate correctly
Backlight doesn’t
operate; screen is
very dim
1 Connect power adapter.
2 Adjust screen brightness setting with Fn key pressed and not
pressed.
3 Restart computer by holding Command-Control-power
button.
4 Reset the power manager by pressing the reset button above
the power button. Wait five seconds and press the power
button.
is not caught under the plastic of the top case.
5 Contact Apple to schedule repair.
1 Adjust screen brightness setting.
2 Contact Apple to schedule repair.
Note:
Before continuing, make sure the reset button
Page 51

Troubleshooting Symptom Charts/Video - 15
Display is very light
or totally white
1 Start up from CD to verify the problem is not software.
2 Verify display cable and inverter board cable connections to
the logic board.
3 Contact Apple to schedule repair.
Page 52

Troubleshooting Symptom Charts/Sound - 16
Sound
No sound from
speaker
Startup sound is
heard, then no sound
from speaker
1 Verify that mute mode is not enabled (F6 on the keyboard).
2 Check the volume setting by pressing F4 on the keyboard
without pressing the function key first.
3 Verify no external speakers or headphones are plugged in.
4 Reset PRAM. Press the power button, then hold down the
Option-Command-P-R keys until you hear the startup chime
at least one additional time after the initial startup chime.
5 Contact Apple to schedule repair.
1 Remove sound preferences from System Folder, reset PRAM,
then restart.
2 Perform clean installation of system software.
Page 53

Troubleshooting Symptom Charts/Sound - 17
Volume control does
not operate correctly
1 Check the Fn keys with the Fn key down.
2 Check Monitors & Sound control panel setting.
3 Verify that mute mode is not enabled.
4 Verify the setting of volume control button.
5 Verify hot keys are enabled in the Keyboard control panel.
6 Reset the power manager by pressing the reset button above
the power button. Wait five seconds and press the power
button.
is not caught under the plastic of the top case.
7 Verify software by booting from the CD.
8 Contact Apple to schedule repair.
Note:
Before continuing, make sure the reset button
Page 54

Troubleshooting Symptom Charts/Hard Drive - 18
Hard Drive
Internal hard drive
does not spin
1 Make sure power adapter is connected.
2 Disconnect external USB devices.
3 Verify Drive Setup does not see the hard drive.
4 Check hard drive connection.
5 Contact Apple to schedule repair.
Page 55

Troubleshooting Symptom Charts/CD-ROM Drive - 19
CD-ROM Drive
Drive does not accept
disc (mechanical
failure)
Disc icon does not
show up on desktop,
or dialog box appears
to initialize disc
1 Verify disc is properly seated in the carrier.
2 Contact Apple to schedule repair.
1 Verify disc is not a DVD-ROM or DVD-RAM disc.
2 Check that the correct software extensions are loaded.
3 Replace disc (if dirty or damaged).
4 Contact Apple to schedule repair.
Page 56

Troubleshooting Symptom Charts/Modem - 20
Modem
No dial tone 1 Verify known-good analog (not digital) telephone line.
2 Verify cable is not plugged into Ethernet port.
3 Verify cable is firmly installed in the modem port.
4 If using Apple Remote Access 3.0, select Ignore Dial Tone in
the Modem control panel. If the modem connects with this
setting selected, try another phone line. If using a terminal
or communications program, enter atx1 to disable tone
detection. To reset the modem back to the factory settings,
enter atz.
5 Contact Apple to schedule repair.
No internal modem
selection available
1 Verify correct modem software is installed and selected.
2 Reset PRAM and perform a clean installation of system
software.
3 Contact Apple to schedule repair.
Page 57

Troubleshooting Symptom Charts/USB Peripherals - 21
USB Peripherals
After you connect
external USB device,
computer does not
start up
1 Verify current driver for the device is installed (check with
the manufacturer of the device).
2 Disconnect all external devices and boot computer. Then plug
in USB peripherals.
3 Eliminate chain by plugging in only one peripheral.
4 If USB device is self-powered, switch on external USB device
before starting computer.
5 Check cable connections.
6 Try known-good USB cable.
7 Try known-good external USB device.
8 Contact Apple to schedule repair.
Page 58

Troubleshooting Symptom Charts/USB Peripherals - 22
USB device not
recognized by
computer
Note:
If you are trying to use a serial device with a USB/Serial
adapter, check with the manufacturer of the adapter for
compatibility.
1 Verify current driver for the device is installed.
2 Turn on camera after initiating download with camera
application.
3 Try different USB device on same port.
4 Eliminate chain by plugging in only one peripheral.
5 Troubleshoot extensions and perform a clean installation of
system software.
6 Contact Apple to schedule repair.
Page 59

Troubleshooting Symptom Charts/USB Peripherals - 23
I/O devices are
unrecognized, or
garbage is
transmitted or
received
Known-good USB
printer does not print
1 Check cables.
2 Check with vendor for current drivers.
3 Test device with known-good computer.
4 Troubleshoot extensions and perform a clean installation of
system software.
5 Contact Apple to schedule repair.
1 Verify that computer has correct driver installed. Check
vendor’s Web site to download current driver.
2 Reset PRAM. Press the power button, then hold down the
Option-Command-P-R keys until you hear the startup chime
at least one additional time after the initial startup chime.
3 Verify that Chooser and Control Panel settings are correct.
4 Run Apple System Profiler to see if it recognizes that a USB
printer is connected. If it does, it is a software issue.
5 Check cables.
6 Contact Apple to schedule repair.
Page 60

Troubleshooting Symptom Charts/USB Peripherals - 24
USB device
experiences a partial
lack of power
Not enough power for
the USB device to
function at all
After sleep, a USB
peripheral is
sometimes not
recognized
1 Plug the device into an electrical outlet if it has a power cord.
2 Unplug the device and plug it into another device plugged into
a power outlet such as a USB hub.
1 Plug the device into an electrical outlet if it has a power cord.
2 Unplug the device and plug it into another device plugged into
a power outlet such as a USB hub.
1 Restart the unit.
2 Contact peripheral manufacturer for latest driver update.
Page 61

Troubleshooting Symptom Charts/Keyboard and Trackpad - 25
Keyboard and Trackpad
No response from any
key on keyboard
1 Verify that computer is on.
2 Reset the power manager by pressing the reset button above
the power button. Wait five seconds and press the power
button.
is not caught under the plastic of the top case.
3 Boot from the system software CD.
4 Check keyboard connection by disconnecting and reconnecting
the keyboard cable.
5 Contact Apple to schedule repair.
Note:
Before continuing, make sure the reset button
Page 62

Troubleshooting Symptom Charts/Keyboard and Trackpad - 26
Cursor does not move
when you are using
trackpad
1 Verify that no USB device is connected.
2 Reset power manager and boot from startup CD. (Reset the
power manager by pressing the reset button above the power
button. Wait five seconds and press the power button.
Before continuing, make sure the reset button is not caught
under the plastic of the top case.)
3 Check trackpad connection to the logic board (remove RAM
access door).
4 Contact Apple to schedule repair.
Note:
Page 63

Troubleshooting Symptom Charts/Keyboard and Trackpad - 27
Cursor moves on
screen with external
mouse connected, but
clicking or doubleclicking the mouse
has no effect
Cursor moves, but
clicking trackpad
button has no effect
1 If the mouse is connected to an external USB keyboard,
connect the mouse to the USB port on the computer.
2 Try an Apple mouse with no other USB devices connected.
3 Boot off the CD that came with the computer. If the mouse
works, perform a clean installation of the system software.
1 Reset the power manager by pressing the reset button above
the power button. Wait five seconds and press the power
button.
is not caught under the plastic of the top case.
2 Contact Apple to schedule repair.
Note:
Before continuing, make sure the reset button
Page 64

Troubleshooting Symptom Charts/Keyboard and Trackpad - 28
Cursor does not move
on the screen with an
external mouse, but
USB external
keyboard works
1 Verify that the mouse is connected securely to the USB
keyboard or port.
2 Check inside mouse for buildup of dirt or other contaminants.
Clean mouse if necessary.
3 Start up from the system software CD to see if the problem is
software.
4 If mouse is connected to the keyboard, connect it to a USB
port.
5 Try another mouse.
6 Contact Apple to schedule repair.
Page 65

Troubleshooting Symptom Charts/Keyboard and Trackpad - 29
Cursor intermittently
does not move or
moves erratically
Note:
User must touch trackpad with the surface of only one finger
at a time and point directly down on the trackpad surface.
1 Clean trackpad surface (with computer off, using a non-
static-inducing material).
2 Reset the power manager by pressing the reset button above
the power button. Wait five seconds and press the power
button.
is not caught under the plastic of the top case.
3 Try unit on battery power. If problem goes away, replace
power adapter.
4 Boot from the system software CD to see if the problem is
software.
5 Check trackpad connection to the logic board (remove RAM
access door).
6 Contact Apple to schedule repair.
Note:
Before continuing, make sure the reset button
Page 66

Troubleshooting Symptom Charts/Miscellaneous - 30
Miscellaneous
iBook goes in and out
of sleep mode with
clamshell shut
Sleep light won’t
come on
1 Check keyboard to see if it is bowed from improper RAM or
AirPort card installation. (Raised keys could make contact
with top case, causing the computer to wake from sleep.)
2 Reseat AirPort Card.
3 Reseat RAM.
4 Contact Apple to schedule repair.
1 Verify that computer is in sleep mode and not turned off.
2 Reset the power manager by pressing the reset button above
the power button. Wait five seconds and press the power
button.
is not caught under the plastic of the top case.
3 Contact Apple to schedule repair.
Note:
Before continuing, make sure the reset button
Page 67

Troubleshooting Symptom Charts/Miscellaneous - 31
Screen goes blank and
computer shuts down
every few minutes
Application seems to
run slower after a few
seconds
1 Computer is going into system sleep to conserve battery
power. Adjust sleep delays in Energy Saver control panel or
connect power adapter.
2 Verify that the appropriate power adapter is being used.
3 Try a known-good power adapter.
Computer is either in processor cycling mode or in reduced
processor speed mode. If this interferes with operation of
application, turn off Allow Processor Cycling in the Energy Saver
control panel and quit any other applications running in the
background.
off battery power.
Note:
These features extend battery life when running
Page 68

Troubleshooting Symptom Charts/Miscellaneous - 32
Hard drive is slow to
respond, or screen
goes blank too often
Known-good Ethernet
network printer does
not print
FAX software is not
working
Adjust sleep delays in Energy Saver control panel or connect
power adapter.
1 Verify that Chooser and Control Panel settings are correct.
2 Reinstall printer drivers.
3 Check cables.
4 Attach computer directly to printer using Ethernet crossover
cable, and retest.
5 Reset PRAM. Press the power button, then hold down the
Option-Command-P-R keys until you hear the startup chime
at least one additional time after the initial startup chime.
6 Contact Apple to schedule repair.
The iBook comes with FAXSTF software installed. Apple does not
provide support for this software. Contact STF Technology (Smith
Micro) at 660-463-2021 or at stfsupport@smithmicro.com.
Page 69

Troubleshooting iBook Startup Problems Flowchart/Miscellaneous - 33
iBook Startup Problems Flowchart
START
Connect known-good
power adapter and
restart with and without
battery.
Reset the power
manager. Make sure
button is not stuck in
down position.
Press power button to
begin boot sequence.
Do you
hear the
startup
tones?
Yes
Are the
startup tones
normal?
Yes
Does a
gray screen
appear with
pointer?
Yes
No
No
No
Does any
video
appear?
Yes
1. Check the volume (F4 on
the keyboard).
2. Try external speakers or
headphones.
3. Contact Apple to schedule
repair.
See Startup in the
Symptom Charts.
Contact Apple to schedule
repair.
1. Press the brightness button
No
on the keyboard (F2).
2. Contact Apple to schedule
repair.
1
Page 70

Troubleshooting iBook Startup Problems Flowchart/iBook Startup Problems
iBook Startup Problems Flowchart (cont.)
1
Does
the
iBook continue
to start up to the
desktop?
Yes
Do the
trackpad and
keyboard
function?
Yes
No
1. Start up from SSW CD and select internal hard drive
in Startup Disk control panel.
2. Reset the PRAM.
3. Start up from the CD that comes with the computer.
4. If the hard drive appears, reinstall system software.
5. If the hard drive doesn't appear, see if Drive Setup
can reformat it.
6. Contact Apple to schedule repair.
No
Does
the flashing
question mark
appear?
Yes
1. Reset the power manager.
2. Check the trackpad and keyboard cables
(under the RAM access door).
3. Verify that num lock is not pressed.
4. Contact Apple to schedule repair.
1. Start up with extensions off.
No
2. Start up with the CD that comes with
the computer (hold the "c" key down).
3. Contact Apple to schedule repair.
Go to
Start
Insert a known-good
CD-ROM disc
and see if it mounts.
Does the
disc
mount?
Yes
END
1. Check for proper software drivers.
No
2. Make sure the CD-ROM cable is
securely connected to the logic board
(under the RAM access door).
3. Contact Apple to schedule repair.
Page 71

K
Service Source
T ak e Apart
iBook/iBook Special Edition
Page 72

Take Apart Introduction - 1
Introduction
Take Apart procedures are not available for iBook. Refer to
the Upgrades chapter of the iBook service manual for
AirPort Card and RAM installation procedures.
Page 73

K
Service Source
Upgrades
iBook/iBook Special Edition
Page 74

Upgrades Overview - 1
Overview
Customers may wish to upgrade iBook with additional RAM
or an AirPort Card. Instructions for performing these
upgrades are contained in the user’s manual. A more detailed
version is included in this chapter to help you if you are
asked to do this for customers.
Important:
or adding an AirPort Card may void the customer’s
warranty.
Taking the computer apart beyond upgrading RAM
Page 75

Upgrades AirPort Card Installation - 2
AirPort Card Installation
Before you begin, unplug the
AC adapter.
1. Use a coin or key to turn
the battery cover screws
a quarter turn to the
left. The screws will pop
up but not come out all
the way.
2. Remove the battery
cover and pull the
battery out of its
compartment.
Page 76

Upgrades AirPort Card Installation - 3
3. Turn the computer over,
open it, and place a cloth
over the palmrest to
protect the surface.
4. If the keyboard is locked,
turn the keyboard lock
(located to the left of the
num lock key) a half
turn in either direction
until the tab clears the
plastic of the top case.
Page 77

Upgrades AirPort Card Installation - 4
5. Press down on the two
keyboard release tabs
(located on the keyboard
between the F1 and F9
keys), and slide them
toward you.
6. When the keyboard pops
up, move it away from
you to release the tabs in
the front.
7. Turn the keyboard over
and lay it on top of the
palmrest.
Page 78

Upgrades AirPort Card Installation - 5
8. Pull the bracket handle
toward you to free the
top edges from the EMI
shield.
9. Remove the tape from
the coaxial cable and
move the cable to the
side.
10.Slide the Airport card
into its connector under
the top case with the
AirPort ID number
facing up.
Page 79

Upgrades AirPort Card Installation - 6
11. Attach the coaxial cable to the AirPort card.
12. Push the bracket down over the coaxial cable and catch
the top edges under the EMI shield.
Important:
you must press Option-S when restarting the computer.
This ensures the customer will see the Setup Assistant (a
movie and setup instructions). If these keys are not pressed
down each time the technician restarts the computer after an
upgrade, the Setup Assistant file will execute, disable itself,
and the customer will never see it.
After installing an AirPort Card into a new iBook
Page 80

Upgrades Memory - 7
Memory
The iBook comes with a minimum of 32 MB of memory
soldered on the logic board. Newer iBooks and iBook Special
Edition have 64 MB soldered on the logic board.
One RAM expansion slot can accommodate a single 1.25-inch
SO-DIMM. iBook Special Edition and iBook models with
64 MB on the logic board can support up to a 1.35-inch,
256 MB SO-DIMM.
Important:
physically fit in the expansion slot, but they are not
compatible.
Use only SO-DIMMs. Other devices may
Page 81

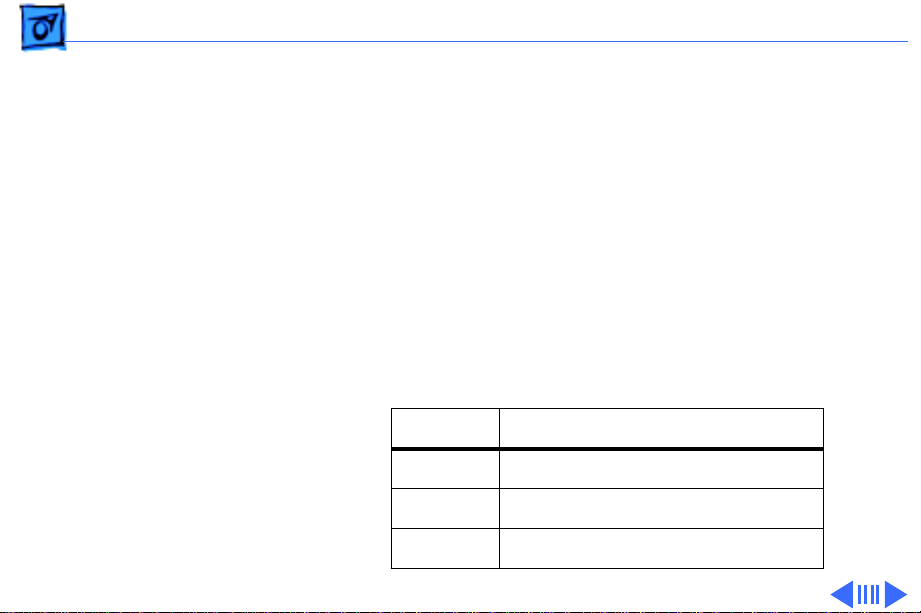
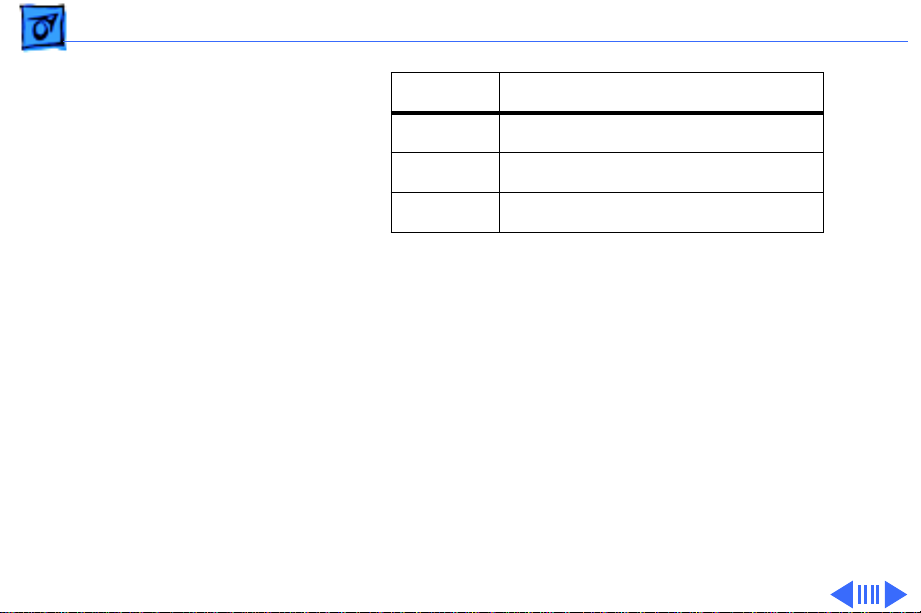
Upgrades Memory - 8
iBook Memory Configurations
iBook
Model
Original
Release
Second
Release
Special Edition
RAM on
Logic
Board
32 MB
64 MB
64 MB
Supported
SO-DIMM
Sizes
32, 64, 96,
or 128 MB
32, 64, 96,
128, or
256 MB
32, 64, 96,
128, or
256 MB
Maximum
Supported
RAM
160 MB
320 MB
320 MB
Page 82

Upgrades Memory - 9
iBook Memory Information
RAM Speed 66 MHz (15 ns)
RAM Type 144-pin SDRAM
RAM Voltage 3.3 volt, PC 66
compliant
Virtual Memory 1 GB
Soldered Video SDRAM 4 MB
Number of VRAM Slots none
Note: Use SO-DIMMs only. EDO or SGRAM devices may fit in
the slots, but several beeps will be heard at startup.
Page 83

Upgrades RAM Installation - 10
RAM Installation
Before you begin, remove
the following:
• AC adapter
• Battery
• AirPort Card (if present)
1. Remove the two Phillips
screws on the right side
of the RAM access door.
2. Lift the RAM access door
out.
3. If a RAM card is in the
slot under the RAM
access door, pull the
snaps on each side of the
RAM connector to the
Page 84

Upgrades RAM Installation - 11
sides until the RAM card pops up.
4. Pull the RAM card straight out to remove it.
5. Position the new RAM card so the notches in the card line
up with the notches in the slot, and insert the card into
the slot at an angle.
6. When the card is firmly seated in the slot, press down on
the card until the snaps lock into place.
Important:
press Option-S when restarting the computer. This ensures
the customer will see the Setup Assistant (a movie and setup
instructions). If these keys are not pressed down each time
the technician restarts the computer after an upgrade, the
Setup Assistant file will execute, disable itself, and the
customer will never see it.
After upgrading memory on a new iBook you must
Page 85

K
Service Source
Exploded V ie w
iBook/iBook Special Edition
Page 86

Exploded View - 1
Introduction
The Exploded View chapter is not available for iBook. Refer
to the Basics chapter of the iBook service manual for an
overview of the internal hardware design and logic board
drawing.
 Loading...