

Page 1

Compressor
User Guide
Page 2

K Apple Inc.
Copyright © 2013 Apple Inc. All rights reserved.
Your rights to the software are governed by the accompanying
software license agreement. The owner or authorized user
of a valid copy of Compressor software may reproduce this
publication for the purpose of learning to use such software.
No part of this publication may be reproduced or transmitted
for commercial purposes, such as selling copies of this
publication or for providing paid for support services.
The Apple logo is a trademark of Apple Inc., registered in
the U.S. and other countries. Use of the “keyboard” Apple
logo (Shift-Option-K) for commercial purposes without the
prior written consent of Apple may constitute trademark
infringement and unfair competition in violation of federal and
state laws.
Every eort has been made to ensure that the information in
this manual is accurate. Apple is not responsible for printing or
clerical errors.
Note: Because Apple frequently releases new versions and
updates to its system software, applications, and Internet sites,
images shown in this manual may be slightly dierent from
what you see on your screen.
Apple
1 Innite Loop
Cupertino, CA 95014
408-996-1010
www.apple.com
Apple, the Apple logo, Apple TV, Final Cut, Final Cut Pro, Finder,
iPad, iPhone, iPod, iTunes, Mac, Mac OS, OS X, QuickTime, and
Xsan are trademarks of Apple Inc., registered in the U.S. and
other countries.
AppleCare is a service mark of Apple Inc., registered in the U.S.
and other countries.
“Dolby,” “Pro Logic,” and the double-D symbol are
trademarks of Dolby Laboratories. Condential Unpublished
Works, © 1992–1997 Dolby Laboratories, Inc. All rights reserved.
IOS is a trademark or registered trademark of Cisco in the U.S.
and other countries and is used under license.
UNIX is a registered trademark of The Open Group.
The YouTube logo is a trademark of Google Inc.
Other company and product names mentioned herein
are trademarks of their respective companies. Mention of
third-party products is for informational purposes only and
constitutes neither an endorsement nor a recommendation.
Apple assumes no responsibility with regard to the
performance or use of these products.
Audi R8 production stills: Closed course with drivers wearing
safety equipment. Do not attempt on public roads; always
obey local trac laws. Audi trademarks are used with
permission of Audi of America, Inc.
019-2560
Page 3

Contents
5 Chapter 1: What’s new in Compressor?
5 What’s new in Compressor 4.1?
6 Chapter 2: Compressor basics
6 What is Compressor?
7 Compressor workow
8 Interface overview
11 Chapter 3: Simple transcoding
11 Simple transcoding overview
12 Transcode les
16 Built-in settings
17 Built-in destinations
18 Built-in locations
19 Chapter 4: Advanced adjustments
19 Advanced adjustments overview
20 Work with settings
20 View and modify a setting’s properties
21 Create custom settings
23 Remove a setting
23 About formats and settings
24 Setting properties
50 Work with destinations
50 View and modify a destination’s properties
51 Create custom destinations
52 Remove a destination
52 Work with locations
54 Work with jobs
54 Overview
54 View and modify job properties
55 Job properties
58 Work with job actions
61 Work with batches
62 Chapter 5: Advanced tasks
62 Advanced tasks overview
62 Work with image sequence les
62 Import image sequence les
64 Work with surround sound les
64 Import and modify surround sound les
67 About audio channels
3
Page 4

69 Modify an output le’s frame size
69 Modify frame size overview
70 Crop or pad the video frame
71 Modify an output le’s frame rate
71 Frame rate options overview
71 Retime video and audio output
72 Modify timing and frame rate
73 About deinterlacing
74 About reverse telecine
76 Add video and audio eects
76 Add and remove eects
77 Video eects
79 Audio eects
80 Add metadata
81 Set a poster frame
82 Add markers
85 Limit time ranges when transcoding
86 Common transcoding workows
86 Example: Create a le with burned-in timecode
87 Example: Convert NTSC or PAL footage to 24p HD
88 Example: Create daily review copies of footage
91 Chapter 6: Work smarter
91 Work smarter overview
91 Compressor preferences
91 Compressor preferences overview
91 General
92 My Computer
92 Shared Computers
93 Advanced
94 Keyboard shortcuts
94 Built-in keyboard shortcuts
95 Customize keyboard shortcuts
98 Create and use droplets
100 Transcode Final Cut Pro and Motion projects using Compressor
100 Enable one or more instances of Compressor
101 Use distributed processing
101 Transcode batches using other computers
103 Manually congure le sharing
104 Use the command line to submit Compressor jobs
107 Glossary
Contents 4
Page 5

What’s new in Compressor?
What’s new in Compressor 4.1?
Compressor 4.1 introduces a new design and various new features, detailed below.
New interface
The interface in Compressor 4.1 has been updated with the following new features:
•
A dark, neutral background—identical to the backgrounds in Final Cut Pro X and Motion 5—to
enhance color perception and put the focus on your media
•
Three dierent interface views:
•
Current view—the default view—where you prepare transcoding jobs and submit
batches. In Current view, you can access the Settings and Locations pane, which contains
precongured transcoding settings, destinations, and save locations that you can assign
to your media les. In Current view, you can also access the inspector pane, which displays
information about your transcoding settings and jobs.
•
Active view, which shows information about jobs currently being transcoded.
•
Completed view, which shows information about jobs that have been
successfully transcoded.
For more information, see Interface overview on page 8.
1
Basic transcoding workow
Compressor 4.1 oers a simplied transcoding workow that speeds up common tasks. For more
information, see Transcode les on page 12.
Destinations
Destinations are transcoding instructions combined with a scripted job action, such as burning
a DVD disc or uploading to a video-sharing website. You can choose from a number of built-in
destinations, or create your own destinations for custom transcoding tasks. In Compressor
4.1, destinations replicate much of the functionality previously available in batch templates
in Compressor 4.0. For more information, see View and modify a destination’s properties on
page 50.
Distributed transcoding
Compressor 4.1 simplies distributed processing—the act of sharing transcoding work among
multiple computers or computer processors.
•
What was previously referred to as a “cluster” in Compressor 4.0 is now called a “group” of
computers. To congure a group of computers and set up distributed processing, you turn
on access to your computer and then create a set of shared computers. If you can’t nd a
computer on your network, you can manually add it to the computer list.
•
Options for turning on access to your computer, as well as setting up a group of shared
computers, are located in Compressor preferences. For more information, see Transcode
batches using other computers on page 101.
For more help and information about new features in Compressor 4.1, see the white paper,
Transition to Compressor 4.1.
5
Page 6

Compressor basics
2
What is Compressor?
Compressor is an application that transcodes media les into a variety of formats. You can use
Compressor to create les for many uses, including:
•
Viewing on Apple devices such as Apple TV, iPad, iPhone, iPod, or iTunes using high-denition
(HD) or standard-denition (SD) formats (including H.264)
•
Publishing to video-sharing websites including Facebook, Vimeo, and YouTube using
QuickTime
•
Burning to DVD or Blu-ray disc using H.264, MPEG-2 for DVD, and Dolby Digital formats
•
Podcasting using H.264, AAC, and MP3 formats
Compressor comes with built-in settings that you can use to transcode les into the most
common media formats. Compressor also provides precongured destinations that transcode
les and then perform actions on the transcoded les. For example, if you transcode a source
le using the built-in “Publish to Vimeo” destination, the destination outputs a high-quality
QuickTime movie le, and then automatically publishes the movie le to your Vimeo account.
In addition to transcoding source les, you can use Compressor to:
•
Create custom settings and destinations: You can use a variety of formats to build custom
settings and destinations tailored to your unique transcoding workows. For example, you can
create a custom setting with specic frame dimensions or with video and audio lters applied.
And when you create a destination, you can apply a job action that is performed after the le
is transcoded—such as sending an email message or running an Automator workow.
•
Create settings to transcode Final Cut Pro X and Motion projects: You can create a custom setting
in Compressor and then use it to transcode Final Cut Pro or Motion projects. For example, you
can create a setting that outputs a le with the bit rate of your choice.
•
Transcode les using a network of shared computers: If you need more processing power and
shorter transcoding times, you can create a group of shared computers to distribute and
speed the transcoding process.
•
Create Compressor droplets: If you need to provide a very simple workow for yourself or other
users, you can create a Compressor droplet, a standalone application that lets you transcode
media les in the Finder, by dragging and dropping.
6
Page 7

Compressor workow
The basic process of transcoding les in Compressor is described below.
Import your media into Compressor
The rst step in the transcoding process is to add one or more media source les to Compressor.
You can add media les from your computer or a connected hard disk. Each media source le
in Compressor is called a job. Each transcoding session, containing one or more jobs, is called
a batch.
Apply transcoding instructions
After you add a source le, apply one or more transcoding instructions to it. Compressor provides
a variety of precongured transcoding instructions called settings, which you can use to convert
les to the most common media formats. If you want, you can modify the setting’s properties to
meet your requirements.
Compressor also provides a number of precongured destinations, which combine settings and a
post-transcoding action, such as uploading your le to YouTube or burning a Blu-ray disc.
Choose an output location
Designate a location on your computer or on a connected hard disk where you want to save the
transcoded media le. You can choose any of several precongured locations, including your
computer desktop, your Movies folder, or the source folder of the original media. You can also
choose a custom location.
Submit your media for transcoding
After you assign settings or a destination and specify an output location, click the Start Batch
button to begin the transcoding process. You can monitor the progress of the transcoding in
the Active view. After transcoding is complete, you can see information about the settings or
destinations you used in the Completed view.
Chapter 2 Compressor basics 7
Page 8
Interface overview
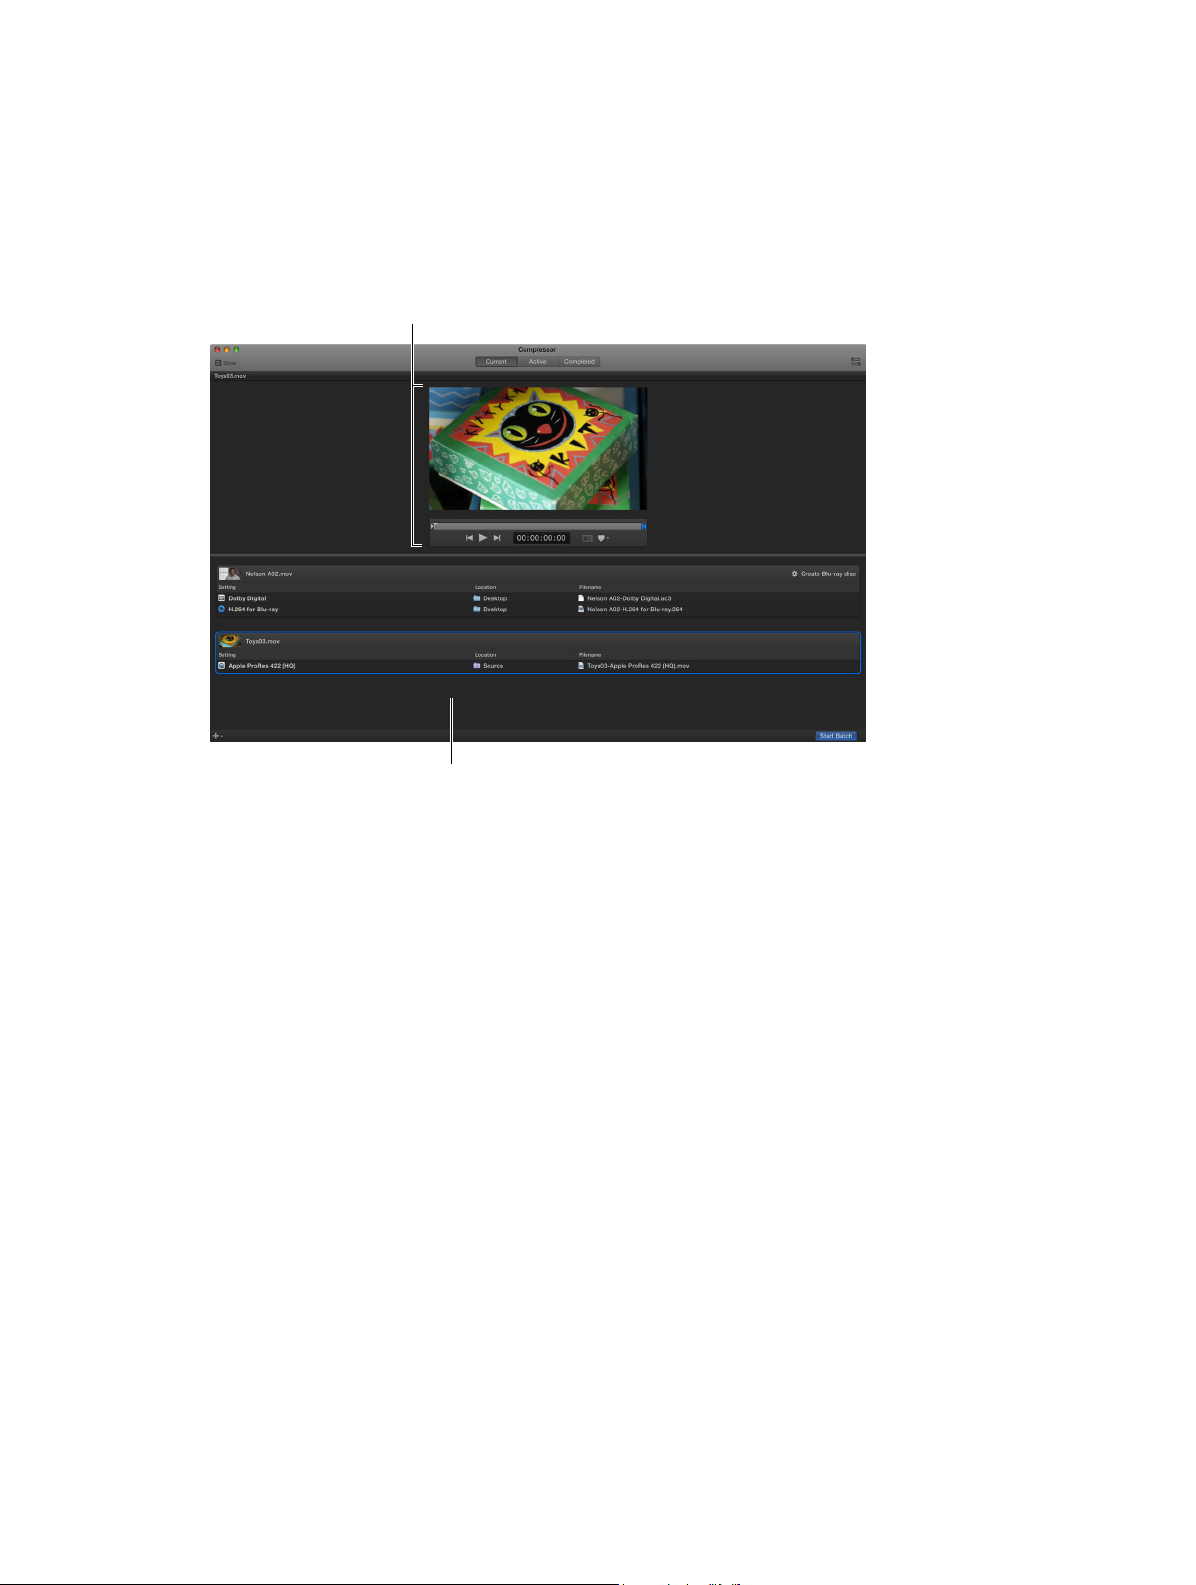
Preview area
The Compressor window has three views: Current, Active, and Completed. You can switch
between these views by clicking a view button at the top of the window.
Current view
Current view is the default view in Compressor. Current view is where you prepare transcoding
jobs and then submit your batch. When you open Compressor for the rst time, Current view
displays two basic areas:
Batch area
•
Batch area: When you add source les to Compressor, they are displayed in jobs in the lower
half of the main window. Each job in the batch area displays information about the source
le, the job’s transcoding instructions (setting, output location, and output lename), and any
post-transcoding actions that have been added (or that are part of the destination assigned to
the job).
•
Preview area: Above the batch area, the preview area shows how your media le will look and
sound after transcoding. Here you can also add metadata and markers to be included in the
transcoded le.
Chapter 2 Compressor basics 8
Page 9
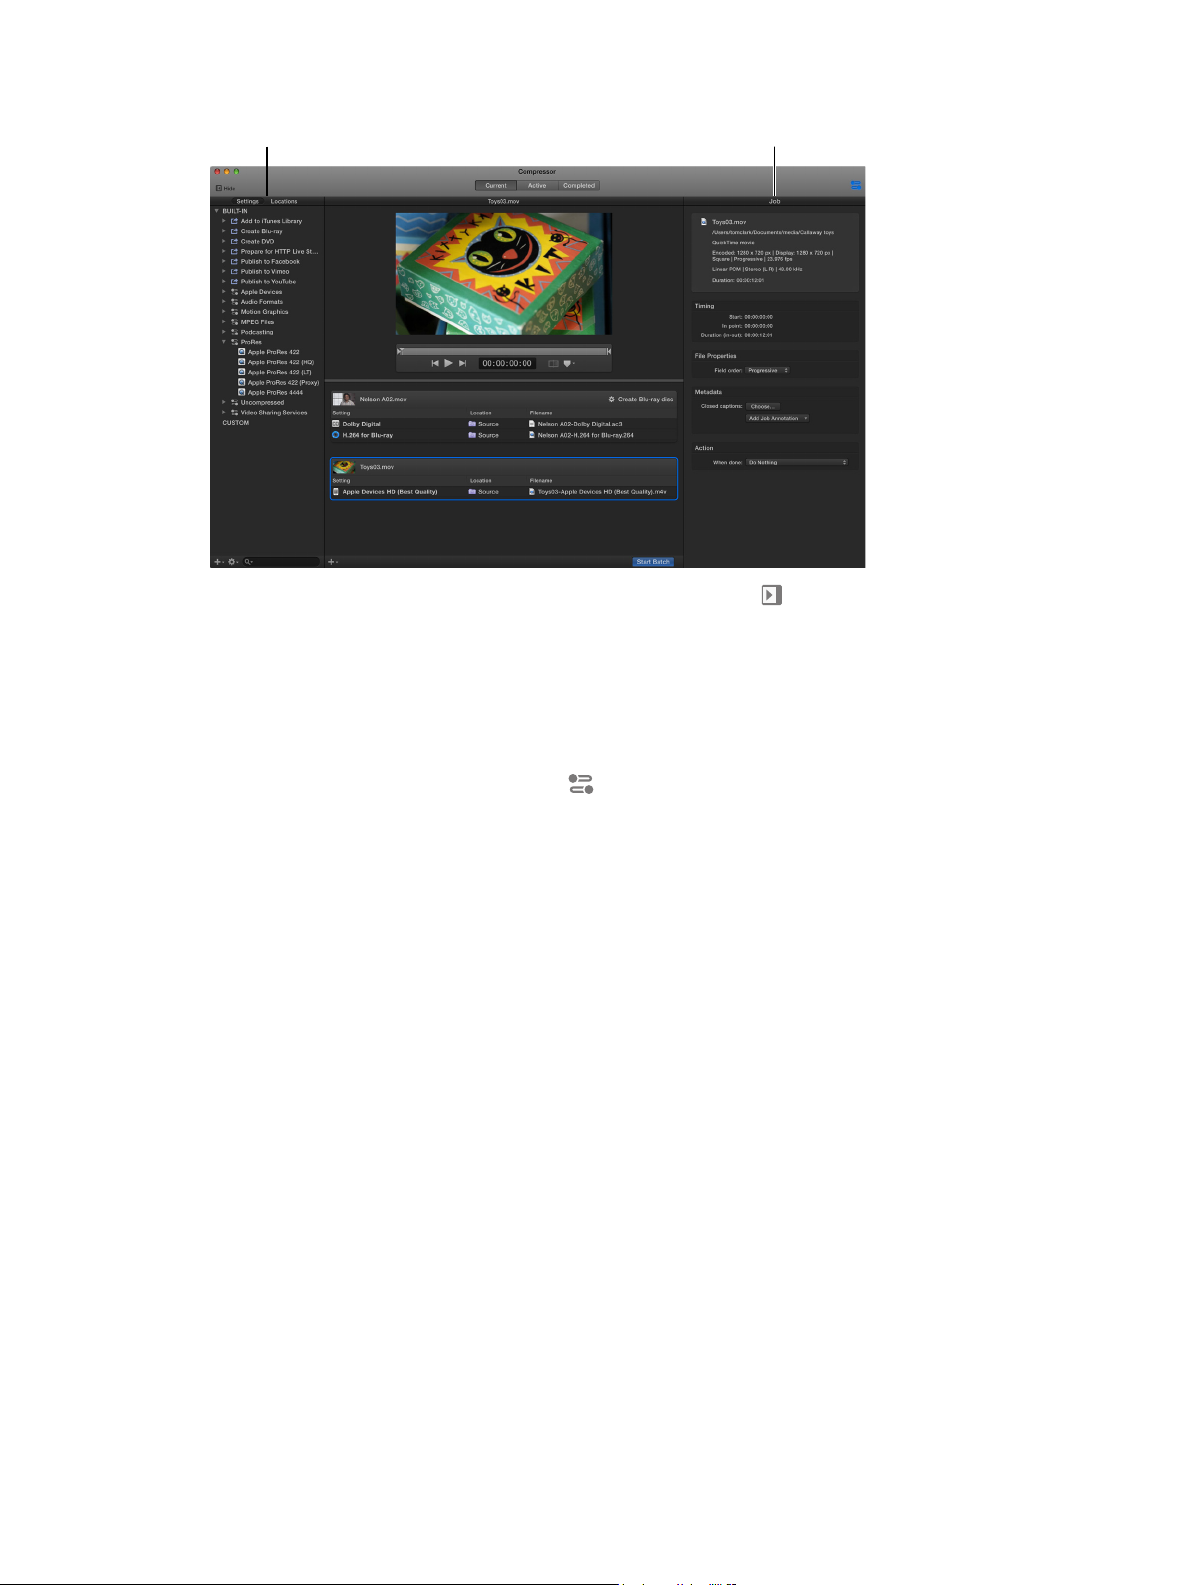
You can expand the Current view to display additional areas:
Settings/Locations pane
Inspector pane
•
Settings and Locations pane: Click the Settings & Locations button at the top-left corner of
the Compressor window to expand this area, and then click Settings or Locations to display
the individual panes. The Settings pane provides quick access to all the built-in destinations
and settings, as well as to any custom destinations or settings that you created. Likewise, the
Locations pane provides quick access to all the built-in save locations, and to any custom
save locations that you created. You can add settings, destinations, and locations to a job by
dragging an item from these panes to the job in the batch area.
•
Inspector pane: Click the Inspector button in the upper-right corner of the Compressor
window to expand this area. The inspector pane has several views that change, depending on
the item that is selected. When you select a batch (by clicking the background of the batch
area), the Batch inspector appears, displaying basic information about the current batch.
When you select a job in the batch area, the Job inspector appears, displaying a summary of
the job’s transcoding instructions as well as controls for adding metadata and modifying job
actions. When you select a specic transcoding instruction in the batch area (one of the rows
under the job), the General, Video, and Audio inspectors appear. These three panes contain
adjustable properties that you can use to customize the setting or destination.
Chapter 2 Compressor basics 9
Page 10
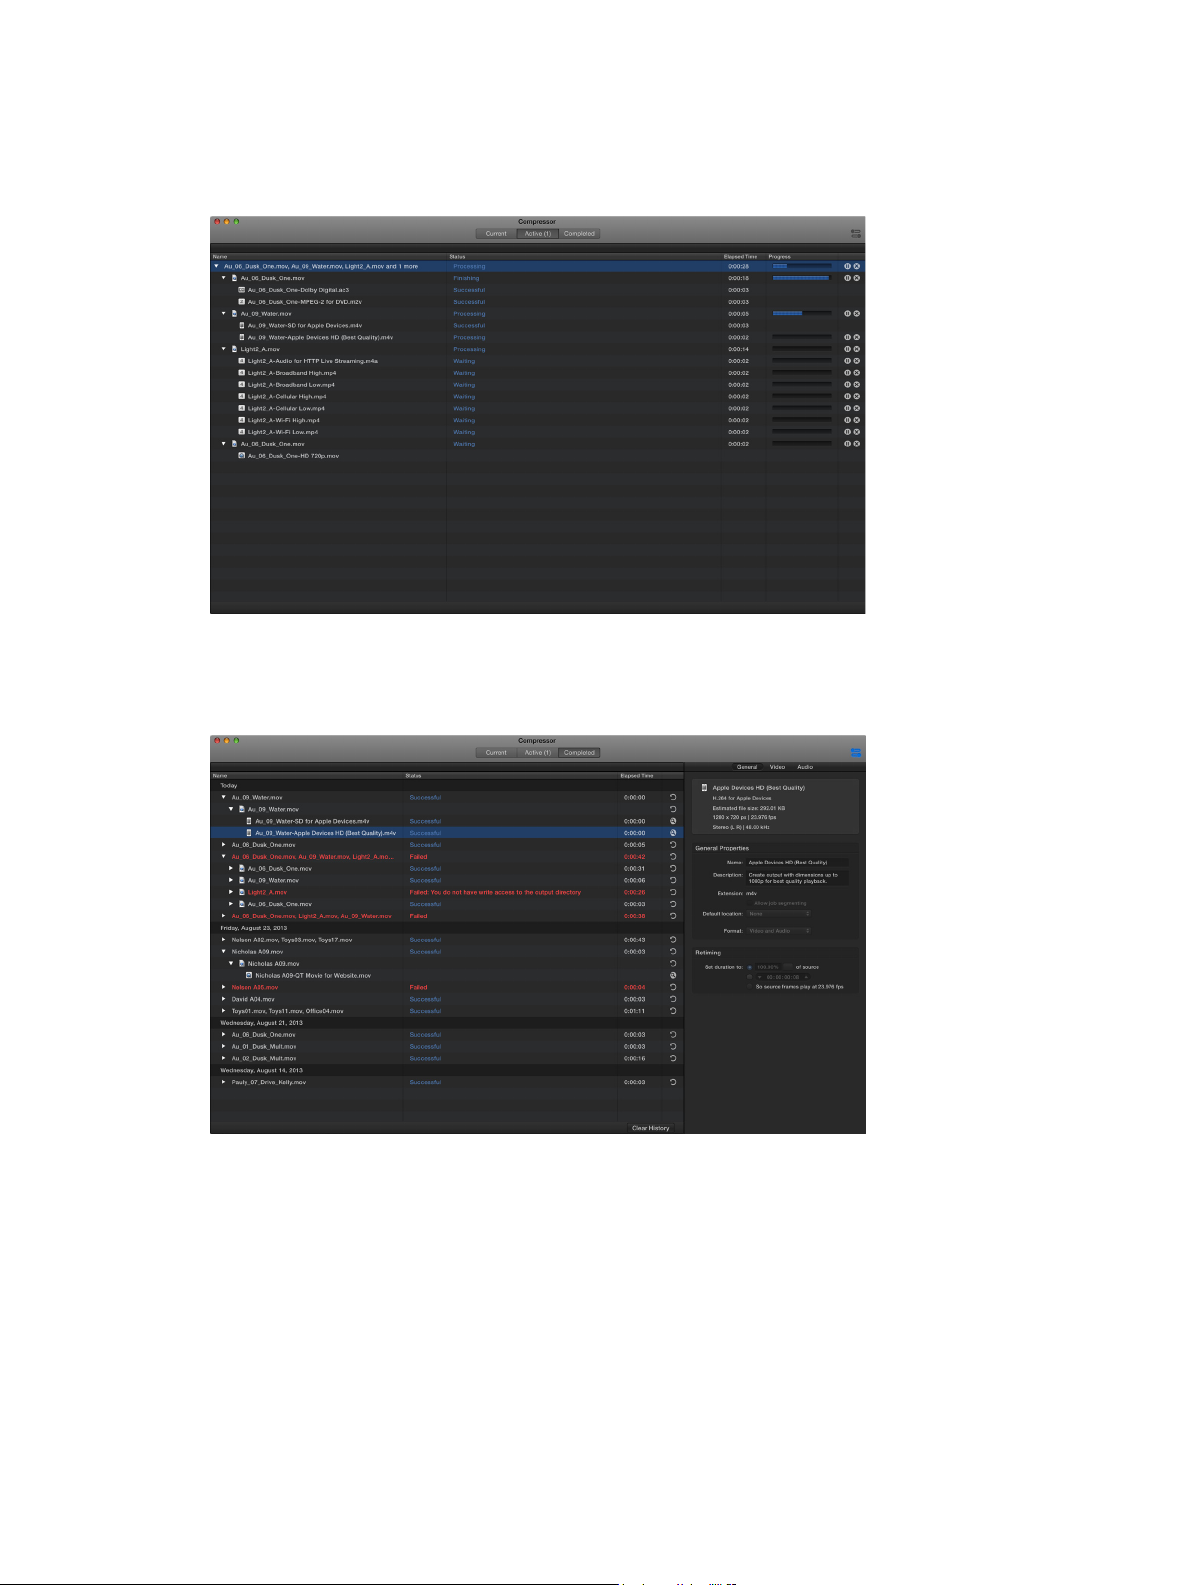
Active view
In Active view, the Compressor window displays status information about batches (and their
constituent jobs) currently being transcoded. In this view, you can monitor progress bars as well
as pause or cancel the transcoding process.
Completed view
In Completed view, you can view information about batches and jobs that have been
successfully transcoded, as well as information about items that failed to transcode.
A list of batches is shown on the left side of the window. Click a disclosure triangle beside a
batch to see its constituent jobs and output les. Select a batch, job, or output le in the list to
see additional information in the inspector pane (on the right).
Chapter 2 Compressor basics 10
Page 11
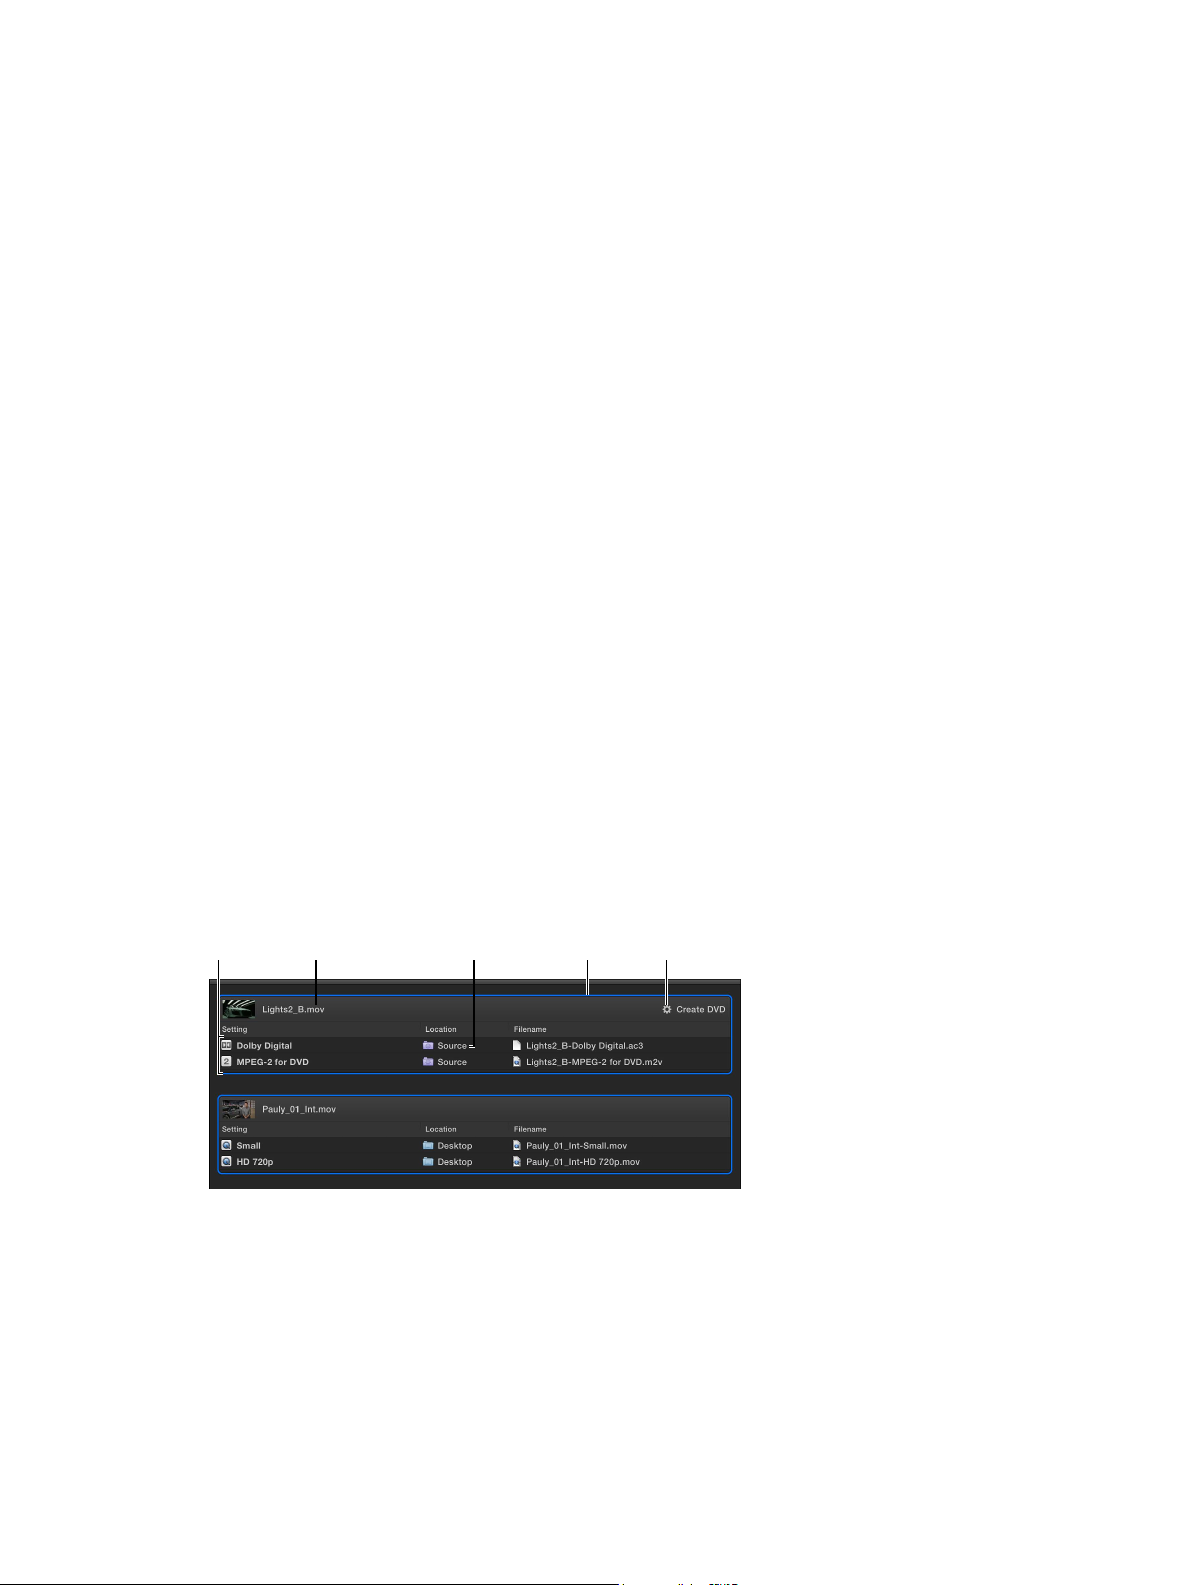
Source file
Location
Settings
Job action
Job
Simple transcoding
3
Simple transcoding overview
When you add a source le to Compressor and apply output instructions (all done in Current
view), you create a transcoding job. You can add more jobs to the batch, and then submit the
batch for transcoding.
Each job in a batch has has several parts:
•
Source le: The media le that you want to transcode.
•
Setting: The transcoding instructions that specify how the le will be processed. Compressor
provides a variety of built-in settings that you can use to output les in common media
formats. Additionally, Compressor provides a number of precongured destinations—one or
more settings combined with an automated action that is performed after transcoding. For
example, if you use the Publish to Facebook destination to transcode a source le, Compressor
outputs a high-quality QuickTime movie le. Then the destination’s job action publishes the
transcoded le to your Facebook account.
•
Location: The place where the transcoded le will be saved. You can use one of the built-in
locations, or specify a new location.
•
Filename: The title of the transcoded le. You can use the default lename (the name of the
source le) or type a custom lename.
•
Job action: Optionally, you can add a post-transcoding action to a job, such as burning a DVD,
uploading to Vimeo or YouTube, and so on. Each of the built-in destinations already contains a
job action.
In the example below, two jobs make up the batch:
The rst job uses the built-in Create DVD destination to output a Dolby Digital audio le and an
MPEG-2 video le. The transcoded les will be saved to the source folder (the folder where the
source media is stored), and after the les are transcoded, they’ll be burned to a DVD (using the
Create DVD job action).
11
The second job uses two built-in settings (Small and HD 720p) to create a small QuickTime le and
a high-denition (HD) QuickTime le. The transcoded les will be saved to the desktop. Because
there’s no job action, the user will have to manually move or otherwise distribute each le.
Page 12

Transcode les
This job will transcode the source
The easiest way to transcode media les in Compressor is to use or one or more built-in settings
or to use a built-in destination (settings that are combined with a post-transcoding job action,
such as uploading to Facebook or burning a Blu-ray disc).
Set up the rst transcoding job in a batch
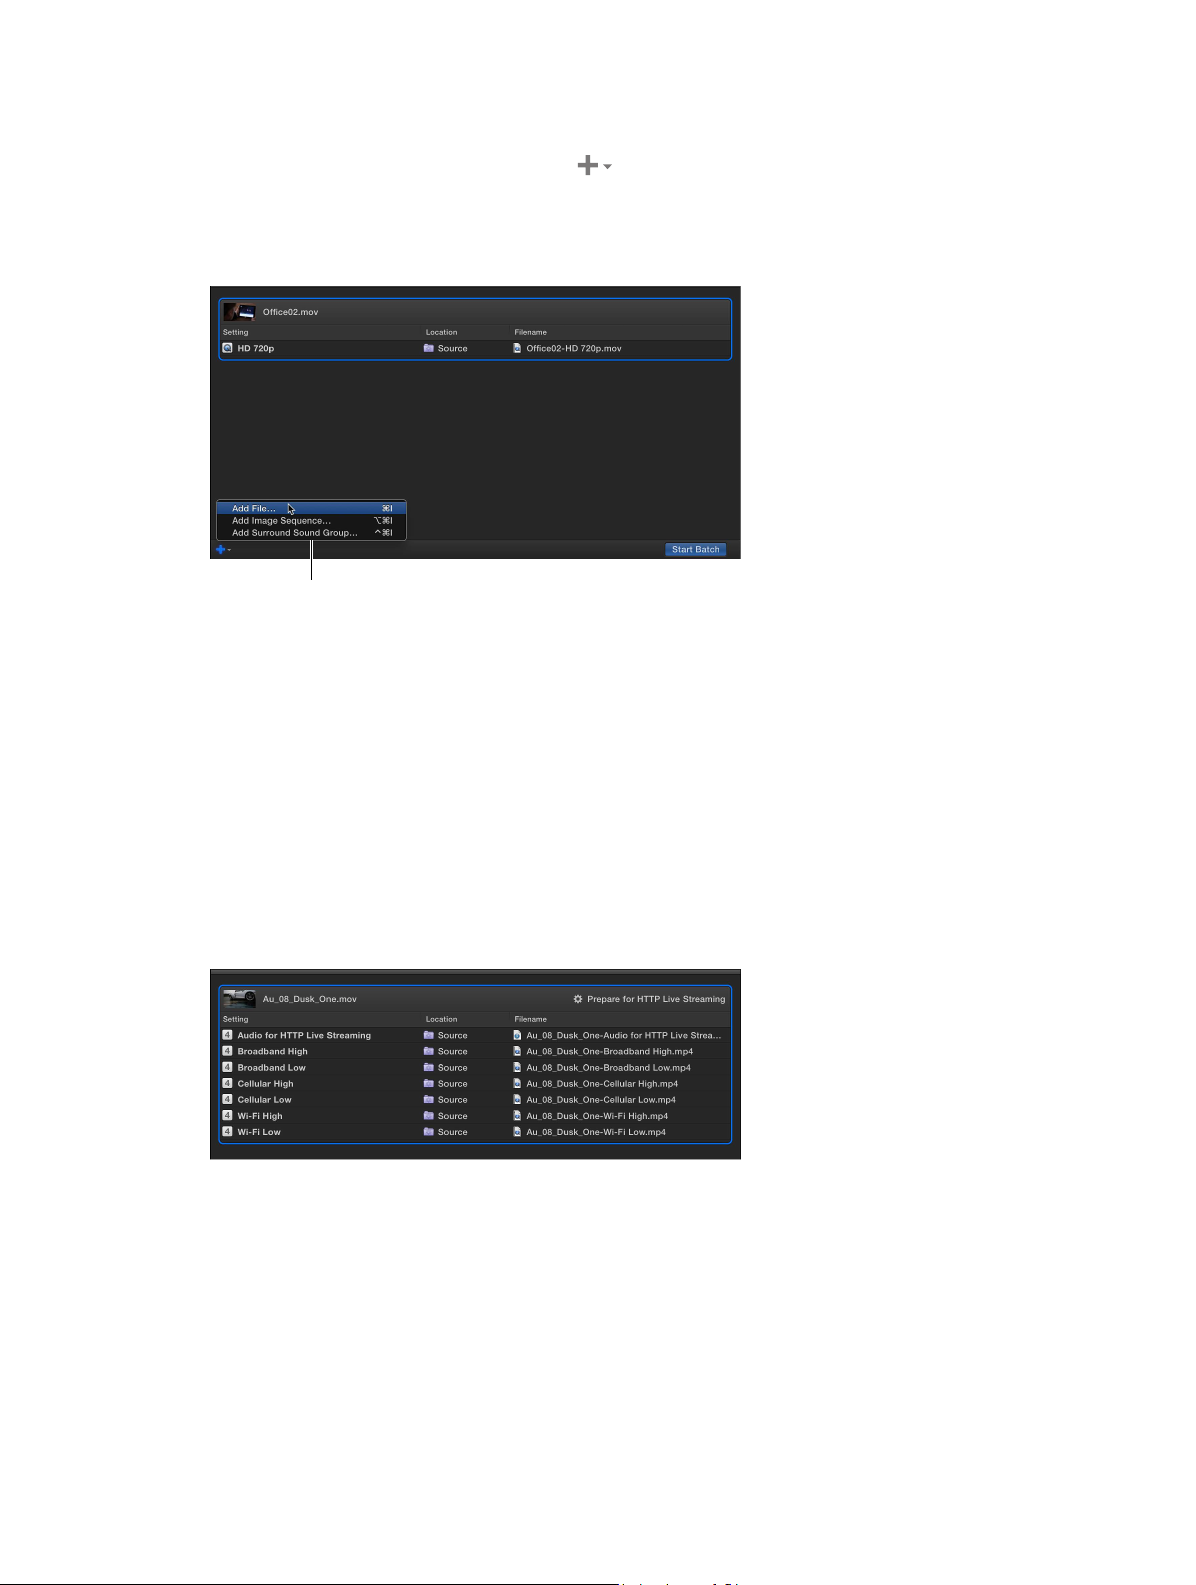
1 Click the Add File button in the batch area.
Batch area
Add File button
2 In the le window that appears, select a media le and then click Add.
3 In the Settings window that appears, do the following:
a Select one or more transcode settings or a destination from the list.
The settings list contains basic settings, as well as destinations, grouped by category. To
choose a specic setting, click the disclosure triangle beside a destination or a setting group
(Podcasting, for example), and then select one or more settings.
Important: For destinations, always select the destination name. If you select a setting that’s in
the destination, the destination’s job action will not be used when processing the job.
b Choose a save location from the pop-up menu.
4 When you’re satised with your setting and location choices, click OK.
The new job is displayed in the batch area. The job includes a thumbnail of the source le and
the transcoding output instructions (setting, location, and lename). If you chose multiple
settings, or a destination with multiple outputs, each output appears in a separate row. If you
chose a destination, its job action appears in the upper-right corner of the job area.
To learn more about the built-in destinations and settings, see Built-in settings on page 16 and
Built-in destinations on page 17.
file “Office02.mov” using the built-in
HD 720p setting.
Chapter 3 Simple transcoding 12
Page 13
Add additional jobs to a batch
If you want to, you can add additional source les to a batch.
1 Choose Add File from the Add pop-up menu under the batch area.
You can also add a set of image sequence les or surround sound les. For more information,
see Import image sequence les on page 62 and Import and modify surround sound les on
page 64.
Add pop-up menu
2 In the le window that appears, select one or more media les, and then click Add.
Shift-click to select consecutive les. Control-click to select nonconsecutive les.
A new job for each of the source les is displayed in the batch area. The job includes a thumbnail
of the source le.
3 Click the Add Outputs button inside the job in the batch area.
4 In the Settings window that appears, select one or more settings or destinations, choose a save
location, and then click OK.
Tip: Shift-click to select consecutive settings; Command-click to select nonconsecutive settings.
The output instructions that you specied appear in the job. If you chose multiple settings
or a destination with multiple outputs, each output appears in a separate row. If you chose a
destination, its job action appears in the upper-right corner of the job area.
Chapter 3 Simple transcoding 13
Page 14
5 To change the name of a le to be output, double-click its name in the Filename column, and
then enter a new name.
The default name assigned to each transcoded le is the source lename appended with the
extension of the format used during transcoding (.mov or .mp4, for example).
Note: If you see an alert icon to the left of the lename, the lename assigned to that output
row has already been used.
6 To view the properties of a setting, select an output row, and then open the inspector by clicking
the Inspector button in the upper-right corner of the Compressor window.
Depending on the setting you're viewing, general, video, and audio properties are displayed in
the inspector. For information about modifying these properties, see View and modify a setting’s
properties on page 20.
Add and remove job outputs
You can add additional transcoding instructions to a job by adding one or more output rows.
You can also remove output rows.
Do one of the following:
m To add an output row: Position your cursor over an output row in the job, and then click the Add
button that appears at the end of the row. Then, in the window that appears, select one or
more settings, choose a location, and click OK.
m To remove an output row: Position your cursor over the output row that you want to remove, and
then click the Remove button that appears at the end of the row.
Chapter 3 Simple transcoding 14
Page 15
Preview how a transcoded le will look and sound
After you’ve set up a job, you can preview how your source le will look and sound after it has
been transcoded.
Note: Retiming and interlacing property adjustments (that you make in the Video tab of the
inspector) are not displayed in the transcoding preview.
1 In a job, select the output row that includes the setting you want to preview.
2 If the Comparison button in the preview area isn’t already selected (highlighted blue), click it
to turn on comparison previewing.
3 Click the Play button .
The source le video plays on the left side of the preview area, and a preview of the transcoded
le plays on the right side. The transcoded audio plays through your computer speakers (or
through connected speakers).
In the preview area, you can also add add markers, set a poster frame, or identify a portion of the
source le to transcode.
Transcode a batch
After you’ve congured the jobs in your batch using the tasks above, you can transcode
the batch.
m Click the Start Batch button in the lower-right corner of the batch area.
The Compressor window switches to Active view, where you can monitor the transcoding process.
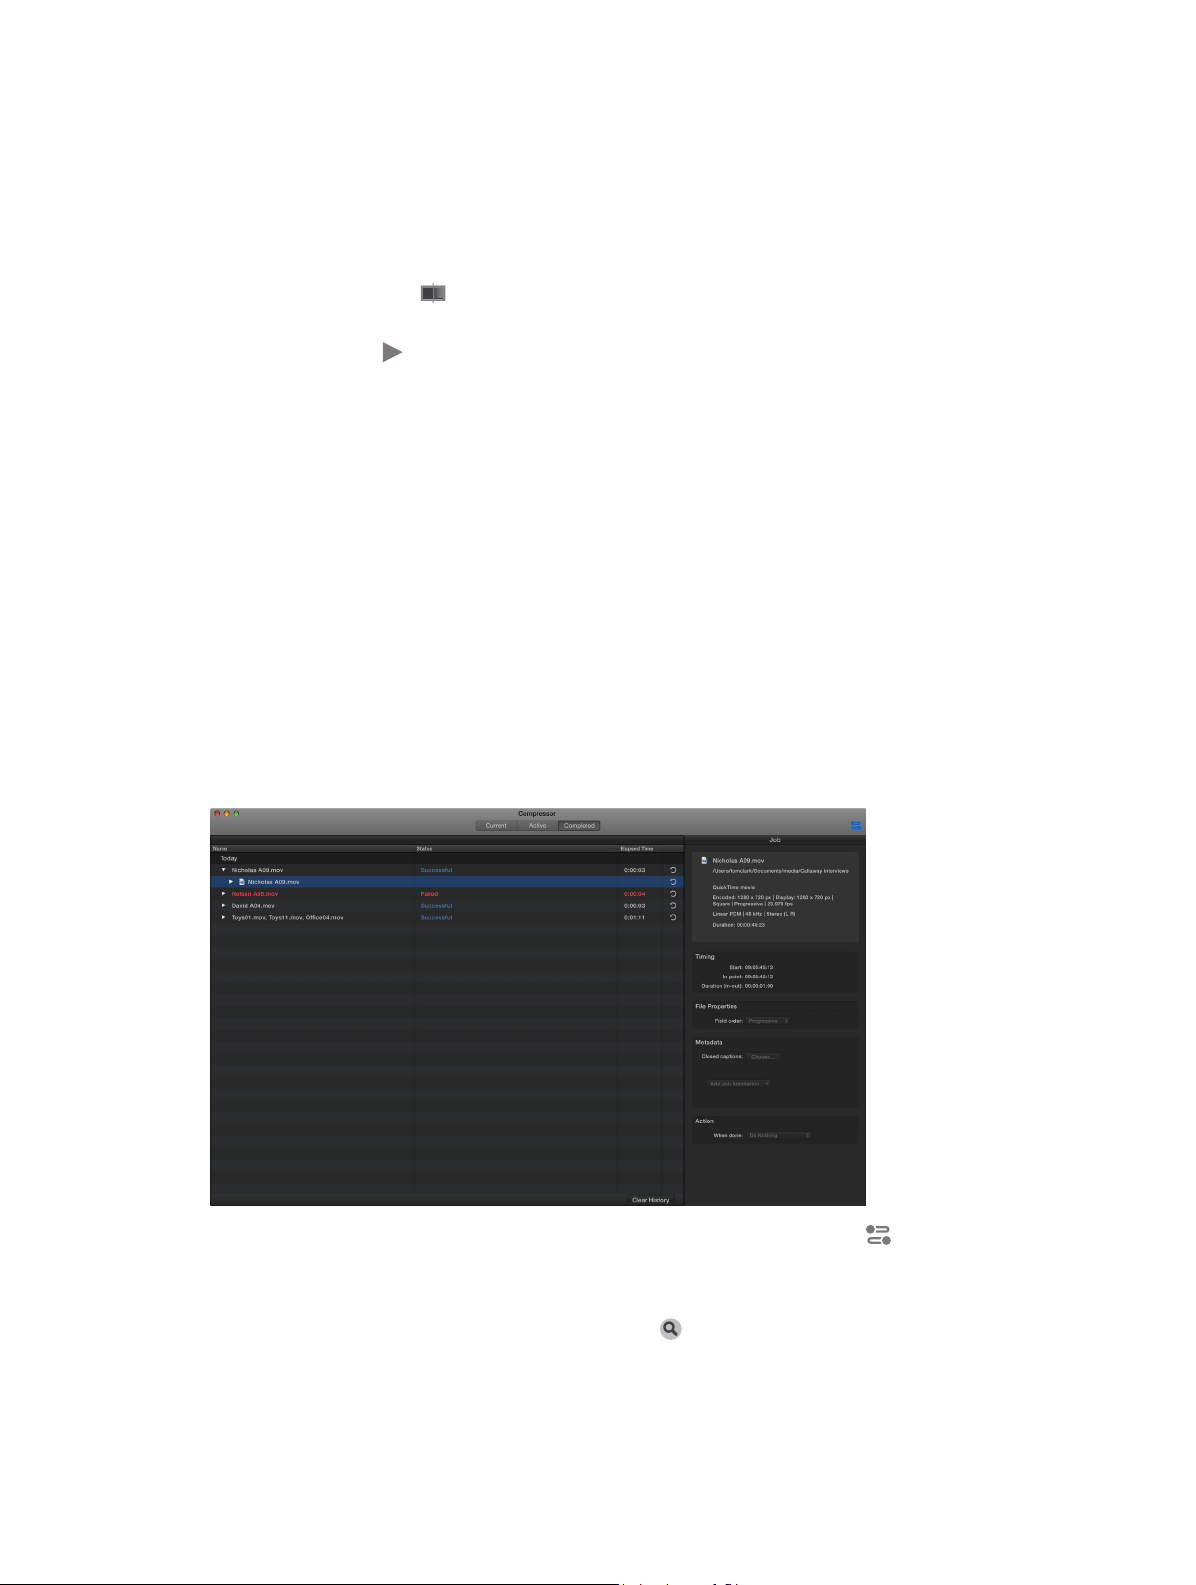
View information about completed jobs
In Completed view, you can see how a le was transcoded.
1 Click the Completed button at the top of the Compressor window.
2 Select a batch, job, or transcoded le and, if necessary, click the Inspector button .
In the inspector (on the right), you can view information about the batch or job, or view the
general, video, or audio properties for the setting used to transcode the le.
3 To view the output le, click the Show in Finder button .
Chapter 3 Simple transcoding 15
Page 16

Create a new job from a completed job
m In Completed view, click a job’s Reuse button .
All of the job’s information is copied to Active view, where you can modify the job’s setting
properties and other information as necessary, and then transcode the new job.
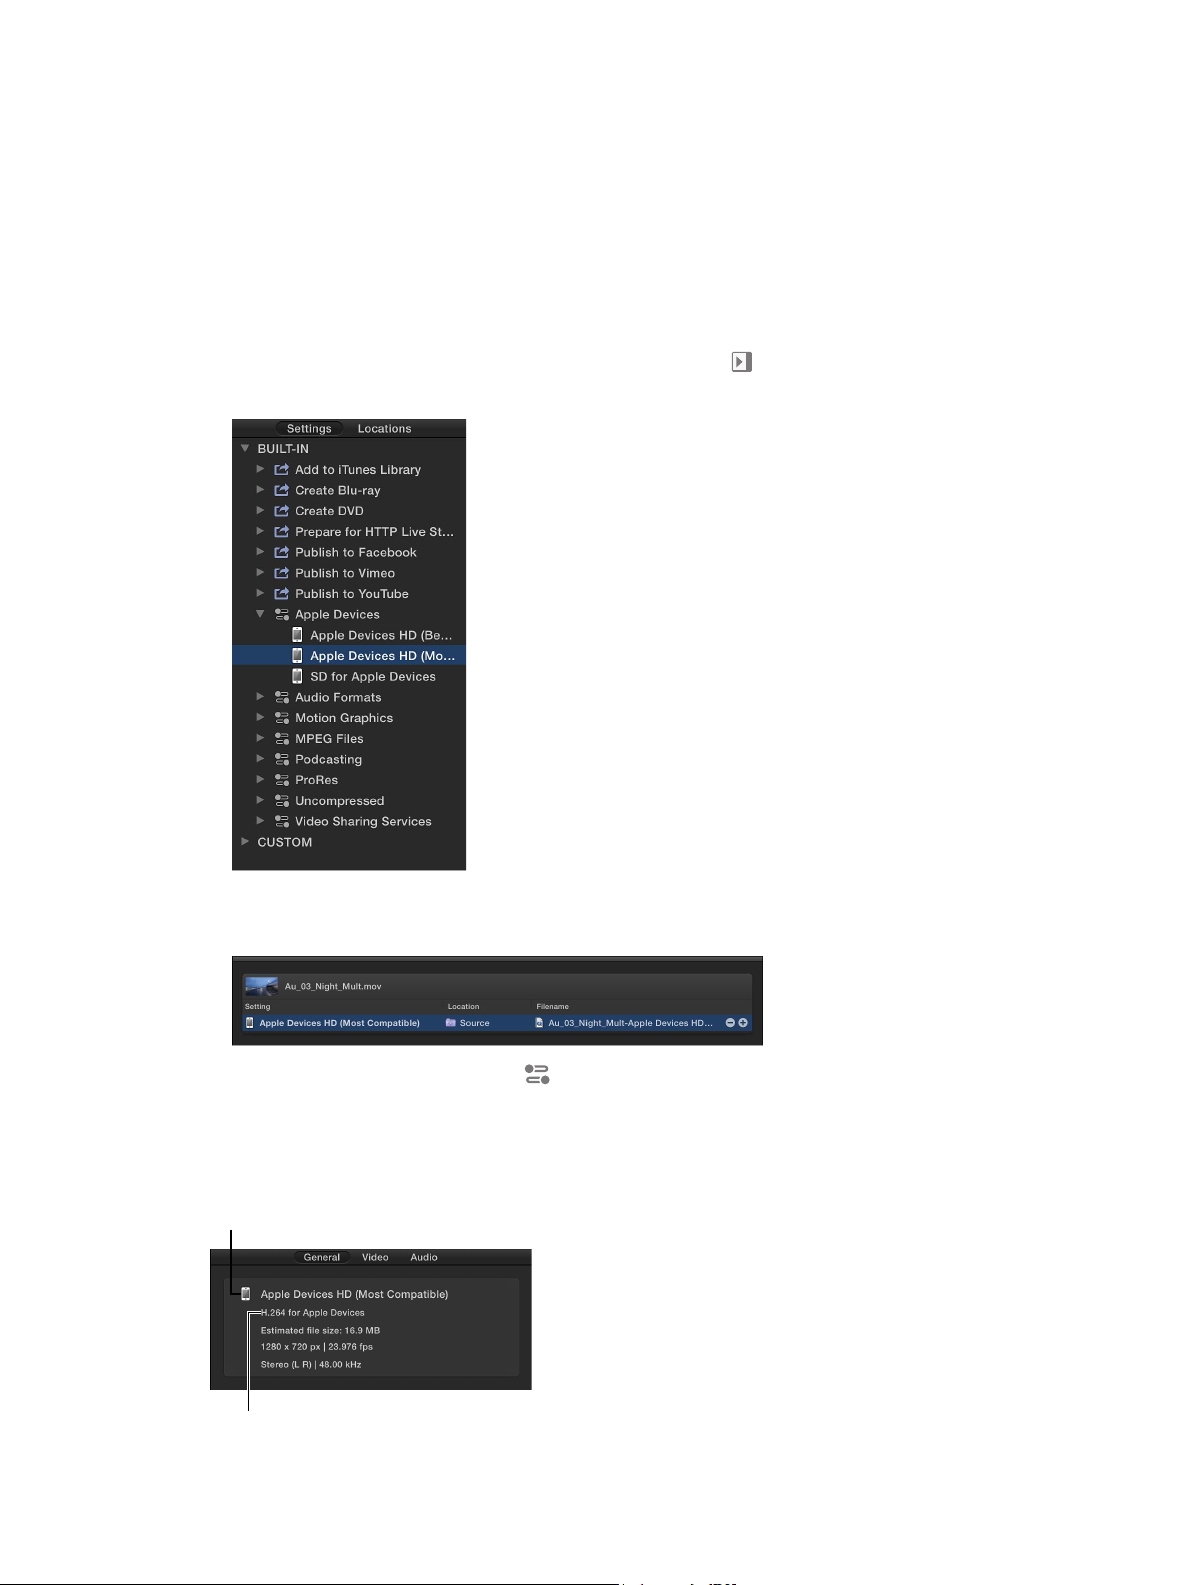
Built-in settings
Use the built-in settings, grouped by category in the Settings pane, to convert any le from its
source format to other commonly used formats.
Built-in setting group Contains Use to
•
Apple Devices
Audio Formats
Motion Graphics
MPEG Files
Podcasting
ProRes
Uncompressed
Video Sharing Services
Apple Devices HD (Best Quality)
•
Apple Devices HD (Most
Compatible)
•
SD for Apple Devices
•
AAC File
•
AC3 File
•
AIFF File
•
CAF File
•
EC3 File
•
MP3 File
•
WAVE File
•
Open EXR Image Sequence
•
QuickTime Animation
•
QuickTime ProRes with Alpha
•
TIFF Image Sequence
•
MPEG-2 422 Program stream,
15 Mbps
•
MPEG-2 Program stream,
15 Mbps
•
MPEG-2 Transport stream,
15 Mbps
•
AAC for Audio Podcasting
•
H.264 for Video Podcasting
•
MP3 for Audio Podcasting
•
Apple ProRes 422
•
Apple ProRes 422 (HQ)
•
Apple ProRes 422 (Proxy)
•
Apple ProRes 4444
•
Uncompressed 10-bit 4:2:2
•
Uncompressed 8-bit 4:2:2
•
4K
•
HD 1080p
•
HD 720p
•
Large 540p
•
SD 480p
•
Small
Create iTunes-compliant H.264
les for distribution, including les
that can be used for streaming
high-denition (HD) video and
standard-denition (SD) video.
Create audio les in the most
commonly used formats.
Create les for use with motion
graphics applications.
Create broadcast-quality, high-
resolution, high bit rate video les.
Create les for audio and video
podcasting.
Create high-quality, high-
performance les for use with
Final Cut Pro and post-production
workows.
Create uncompressed 10-bit and
8-bit 4:2:2 QuickTime movies.
Create QuickTime les for
publishing to video-sharing
websites like YouTube and Vimeo.
Includes large and small HD and
SD settings.
Chapter 3 Simple transcoding 16
Page 17

You can also customize a built-in setting or create your own custom setting from scratch. For
example, you can create a custom setting to convert progressive video to interlaced video,
or to convert 29.97-fps video to 23.98 fps video. Before you create a custom setting, view the
related built-in settings to see if any of those meet your needs. If one does, or if it comes close,
duplicate that setting, and then modify any properties that you need to change. The advantage
of duplicating a setting, rather than creating a new setting from scratch, is that many of the
properties are already congured, and thus, you’ll need to make fewer adjustments to the
setting. For more information, see Create custom settings on page 21.
Built-in destinations
Destinations, available in the Settings pane, combine one or more settings and a post-encode
job action, which automates tasks such as emailing, copying, and moving transcoded les.
Built-in destination Contains Use to
Add to iTunes Library Setting:
•
Apple Devices HD (Best Quality)
Job action:
•
Add to iTunes Library
Create Blu-ray Settings:
•
Dolby Digital
•
H.264 for Blu-ray
Job action:
•
Create Blu-ray disc
Create DVD Settings:
•
Dolby Digital
•
MPEG-2 for DVD
Job action:
•
Create DVD
Prepare for HTTP Live Streaming Settings:
•
Audio for HTTP Live Streaming
•
Broadband High
•
Broadband Low
•
Cellular High
•
Cellular Low
•
Wi-Fi High
•
Wi-Fi Low
Job action:
•
Prepare for HTTP Live Streaming
Publish to Facebook Setting:
•
HD 720p
Job action:
•
Publish to Facebook
Create an Apple device-compatible
H.264 le, and then automatically
add the le to your iTunes library.
Create an H.264 elementary stream
and a Dolby Digital audio le, and
then automatically burn the les to
a Blu-ray disc.
Create an MPEG-2 elementary
stream and a Dolby Digital audio
le, and then automatically burn
the les to a DVD.
Create a set of MPEG-4 les, and
then process your transcoded les
and upload them to the server you
specify. The les are compatible
with a variety of devices, such as
smartphones and media players.
Create an H.264 le, and then
automatically publish it to your
Facebook account.
Chapter 3 Simple transcoding 17
Page 18

Built-in destination Contains Use to
Publish to Vimeo Setting:
•
HD 720p
Job action:
•
Publish to Vimeo
Publish to YouTube Setting:
•
HD 720p
Job action:
•
Publish to YouTube
Create an H.264 le, and then
automatically publish it to your
Vimeo account.
Create an H.264 le, and then
automatically publish it to your
YouTube account.
You can also create a custom destination either by duplicating an existing destination or creating
a new destination. For example, you can modify the built-in Publish to Vimeo destination to
output a larger or smaller frame size. For more information, see Create custom destinations on
page 51.
Built-in locations
Use the following built-in locations, available in the Locations pane, to specify the save location
of a transcoded le.
Built-in location Use to
Desktop Save the transcoded le on the user’s desktop.
Movies Save the transcoded le in the user’s Movies folder.
Source Save the transcoded le in the same location as the
source media le.
You can also create a custom location, either by duplicating an existing location or by creating
a new location. When you create a custom location, you can also specify a lename format for
transcoded les. For more information, see Work with locations on page 52.
Chapter 3 Simple transcoding 18
Page 19

Advanced adjustments
4
Advanced adjustments overview
For basic transcoding jobs, you can use the built-in settings and destinations that come with
Compressor. However, if you have complex or custom transcoding specications, you can make
adjustments to the built-in settings and destinations in a number of ways:
•
For a custom transcoding job that you will use only once, apply a built-in setting or
destination and then modify its properties in the inspector. See View and modify a setting’s
properties on page 20 and View and modify a destination’s properties on page 50.
•
For a custom transcoding job that you will use more than once, create a custom setting or
destination (by duplicating and modifying a built-in setting or destination). See Create custom
settings on page 21 and Create custom destinations on page 51.
You can also customize the various other components of a Compressor batch, including save
locations, job properties, job actions, and batch properties. See Work with locations on page 52,
View and modify job properties on page 54, and Work with batches on page 61.
19
Page 20
Work with settings
Setting name
View and modify a setting’s properties
When you select a built-in setting in the Settings pane, or an applied setting in the batch area, its
properties are shown in the inspector. General properties are displayed in the General inspector,
and video and audio properties are displayed in the Video inspector and the Audio inspector.
View a setting’s general, video, and audio properties
1 Select a setting by doing one of the following:
•
For a setting that has not been applied, click a built-in setting in the Settings pane. (If the
Settings pane is hidden, click the Settings & Locations button at the top-left corner of the
Compressor window, and then click Settings at the top of the pane.)
•
For a setting that has already been applied to a source le, select the output row of a job in
the batch area.
2 If necessary, click the Inspector button in the upper-right corner of the Compressor window
to reveal the inspector pane.
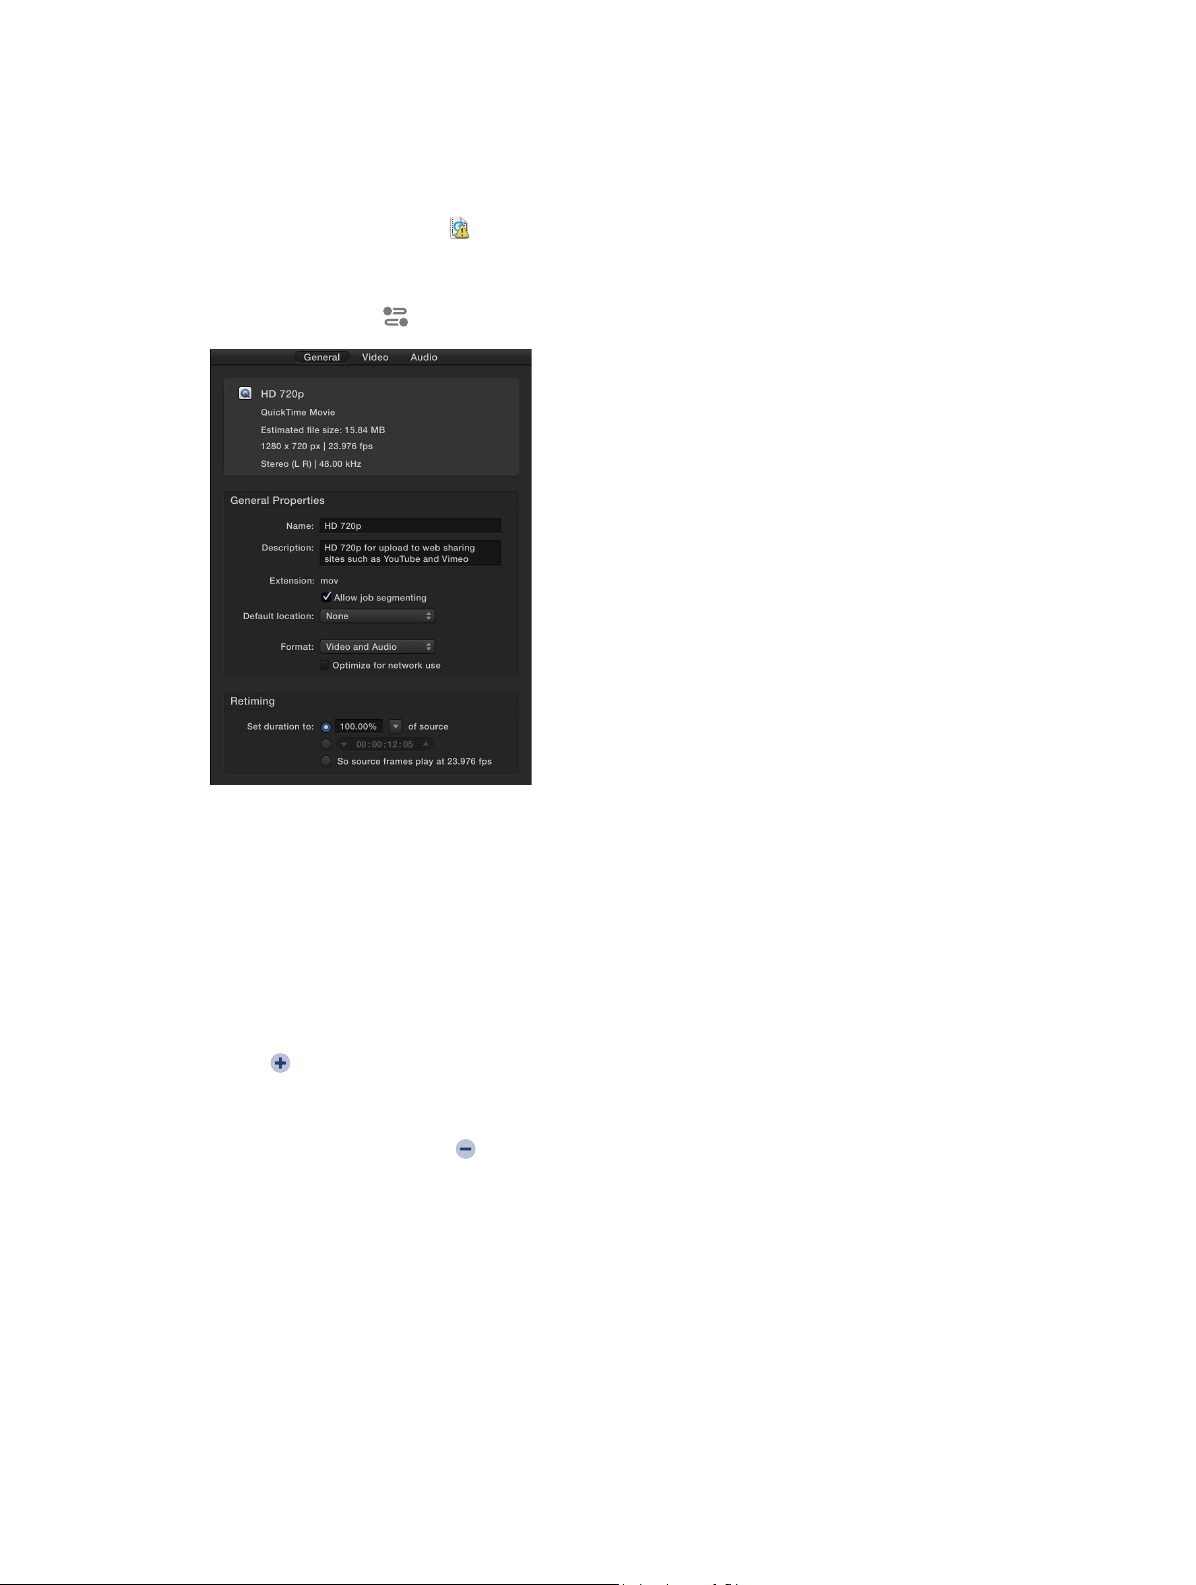
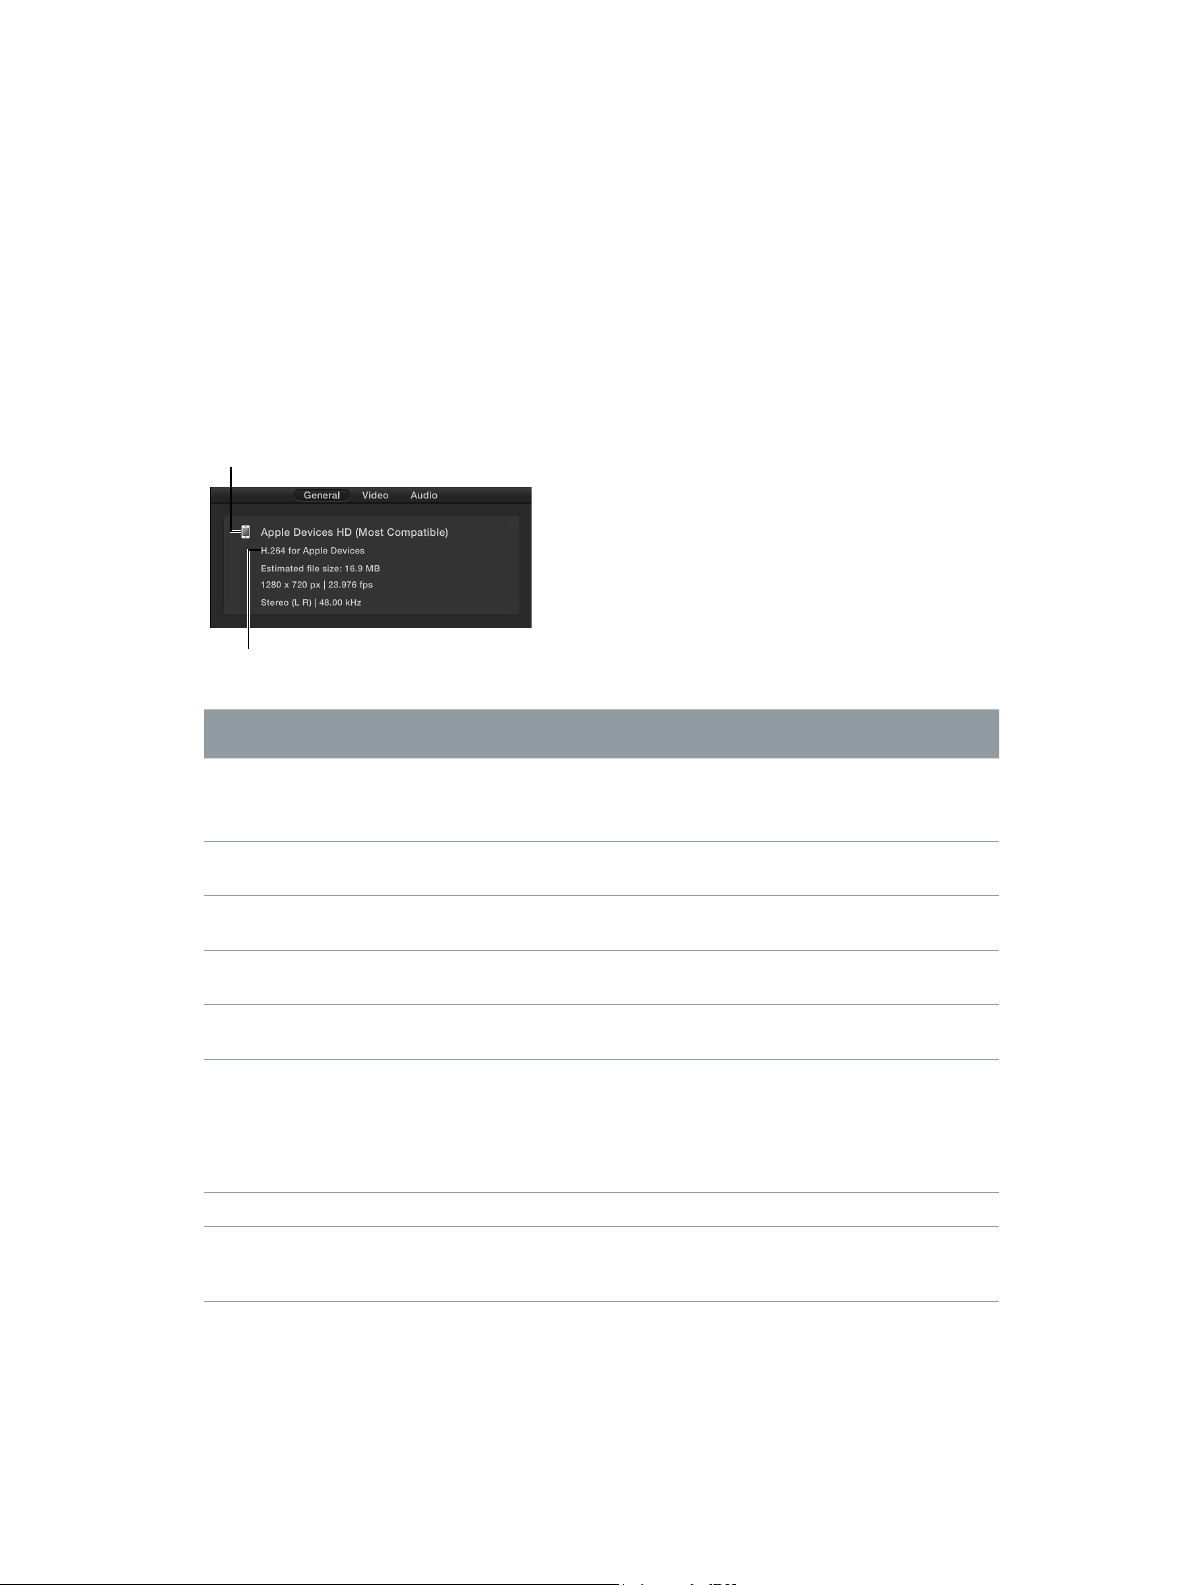
The inspector pane is divided into three subpanes: General, Video, and Audio. At the top of each
subpane is a summary of the transcoding instructions of the selected setting, including the
name of the setting, the transcoding format, and the estimated size of the output le.
The setting is based
on this format.
Chapter 4 Advanced adjustments 20
Page 21

3 To view general, video, or audio properties of the selected setting, click General, Video, or Audio
at the top of the inspector pane.
Every setting has a General inspector that displays basic properties, including setting name,
description, output extension, and so on. Video settings have a Video inspector and, if the
transcoding format encodes audio, an Audio inspector. Audio settings have an Audio inspector,
but no Video inspector.
To learn more about a setting’s properties, see About formats and settings on page 23.
Modify a setting’s properties
After you apply a setting to a source le, you can modify its properties in the inspector.
1 Select the output row of a job in the batch area.
The properties of the selected setting are displayed in the inspector.
2 To view general, video, or audio properties, click General, Video, or Audio in the inspector.
3 To modify a property, adjust its control in the inspector.
To learn more about a setting’s properties, see About formats and settings on page 23.
The type of setting you modify determines whether or not the setting will be saved.
•
If you modify the properties of a custom setting, the changes are saved automatically.
•
If you modify the properties of a built-in setting, the changes are not saved.
In this case, if you want to save your changes, you can create a custom setting. For more
information, see Create custom settings on page 21.
Create custom settings
You can create your own custom settings, either based on an existing built-in or custom setting,
or from scratch. You can also create groups of settings.
Create a custom setting by duplicating an existing setting
To save a modied setting for future use, you must create a custom setting. The easiest way to do
this is to duplicate a built-in setting and then modify its properties in the inspector.
1 In the Settings pane (press Shift-Command-1 if it’s hidden), select the setting that you want to
duplicate.
To reveal individual settings in a setting category, click the disclosure triangle next to the
category name.
2 Choose Duplicate from the Action pop-up menu at the bottom of the pane.
A copy of the setting (appended with the word, “copy”) appears in the Custom area of the
Settings pane.
3 To modify the properties of your new custom setting, adjust the controls in the General, Video,
and Audio inspectors.
If the inspector is hidden, click the Inspector button in the upper-right corner of the
Compressor window.
For example, you can change a setting’s frame controls or add a video or audio eect to the
output le.
To learn more a setting’s properties, see About formats and settings on page 23.
Chapter 4 Advanced adjustments 21
Page 22

Create a custom setting from scratch
You can also create a custom setting without duplicating a built-in setting. Because it’s easy to
accidentally introduce transcoding errors, this method is recommended for advanced users only.
1 In the Settings pane (press Shift-Command-1 if it’s hidden), choose New Setting from the Add
pop-up menu .
2 In the dialog that appears, choose a transcoding format from the pop-up menu, enter a name
and description for the setting, and then click OK.
The new setting appears in the Custom area of the Settings pane.
3 To modify the properties of your new custom setting, adjust the controls in the General, Video,
and Audio inspectors.
If the inspector is hidden, click the Inspector button in the upper-right corner of the
Compressor window. For example, you can change a setting’s frame controls or add a video or
audio eect to the output le.
To learn more a setting’s properties, see About formats and settings on page 23.
Create a group of custom settings
If you want to organize your custom settings, you can create a setting group. For example, if you
want to quickly add several settings at the same time, you can apply a setting group to a job.
1 In the Settings pane (press Shift-Command-1 if it’s hidden), choose New Group from the Add
pop-up menu .
The group appears in the Custom area of the settings pane and is selected by default.
2 In the dialog that appears, type a name for the group and click OK.
3 Drag custom settings into your new group in the Custom area of the Settings pane.
Tip: If you want to add a built-in setting to the group, you must duplicate the setting (as
described in “Create a custom setting by duplicating an existing setting” above) and then add the
duplicated setting to your group.
Rename a custom setting
You cannot rename a built-in setting; however, you can duplicate a built-in setting and name
your new custom setting as you choose.
Do one of the following:
m In the Settings pane, double-click a custom setting and type a new name.
m Select a custom setting in the Settings pane. Then, in the General inspector, type a new name in
the Name eld. (If the inspector is hidden, press Command-4.)
Chapter 4 Advanced adjustments 22
Page 23
Remove a setting
Setting name
You can delete any custom setting.
Delete a custom setting
m Select a custom setting in the Settings pane, and then press Delete.
About formats and settings
Compressor provides a variety of transcoding formats to create les playable on a variety of
media platforms—from Apple devices to Blu-ray discs to websites, and so on. Each of the built-in
settings in the Settings pane uses a specic transcoding format compatible with the following
industry-standard platforms.
You can see which format a setting is based on by looking at the summary information at the
top of the inspector.
The setting is based
on this format.
Platform and/or use Use video settings based on
these formats
Devices like Apple TV, iPad, iPhone,
and iPod touch; and iTunes
Web delivery, including YouTube,
Facebook, and Vimeo
Blu-ray discs H.264 for Blu-ray: See H.264 for
High-denition (HD) DVD MPEG-2: See MPEG-2
Standard-denition (SD) DVD MPEG-2: See MPEG-2
Audio CDs AIFF: See Common Audio
HTTP Live Streaming MPEG-4: See MPEG-4
Motion graphics applications QuickTime Movie, Image Sequence:
H.264 for Apple Devices: See H.264
for Apple Devices
QuickTime Movie: See QuickTime
on page 47.
Movie
on page 31.
Blu-ray
See QuickTime Movie
and Image Sequence
on page 28.
on page 37. AC-3 (Dolby Digital Professional):
on page 37. AC-3 (Dolby Digital Professional):
on page 42.
on page 47
on page 33.
Use audio settings based on
these formats
AAC: See MPEG-4
WAVE: See Common Audio
Formats
on page 24.
QuickTime Movie: See QuickTime
Movie on page 47.
AC-3 (Dolby Digital Professional):
See Dolby Digital on page 25.
See Dolby Digital
See Dolby Digital
on page 24.
Formats
MP3: See MP3
WAVE: See Common Audio
Formats
on page 24.
on page 42.
on page 25.
on page 25.
on page 36.
Chapter 4 Advanced adjustments 23
Page 24

Setting properties
Common Audio Formats
The built-in AIFF File, CAF File, and WAVE File settings use the Common Audio Formats
transcoding format. This format encodes AIFF (Audio Interchange File Format), CAF (Apple Core
Audio Format), or WAVE (Waveform Audio File Format) les. You can also create custom settings
that use the Common Audio Formats transcoding format.
The properties of built-in and custom settings that use this transcoding format are located in the
General inspector and Audio inspector. These properties are described below.
Important: When you add a setting (or a destination that includes settings) to a job, Compressor
analyzes the source media and then automatically assigns the most appropriate setting
properties (based on the setting’s transcoding format and the characteristics of your source
media le). It’s recommended that you use the automatically assigned setting properties.
Setting summary
Displays the setting name and transcoding format, as well as an estimated output le
size. When you add a setting to a job or change the setting’s properties, this summary
automatically updates.
General properties
•
Name: Displays the name of the setting.
•
Description: Displays the description of the setting.
•
Extension: Displays the extension of the output le.
Tip: To output a le with a dierent extension, change the value in the “File type” pop-up
menu, described below.
•
Allow job segmenting: Job segmenting is not available for settings that output only an audio le.
•
Default location: Choose an item from the pop-up menu to set the default save location for
transcoded les.
•
File type: Choose a le type from the pop-up menu—AIFF, CAF, or WAVE.
Retiming
This section contains one property:
•
Set duration to: Sets the processing algorithm used to adjust the frame rate during transcoding.
Select either of the following options:
•
[Percentage] of source: Modies the output clip’s speed by a percentage of the source clip’s
speed. Enter a value in the percentage eld or choose a preset value from the adjacent
pop-up menu (with a downward arrow).
•
[Total duration]: Sets the duration of the clip. Enter a timecode duration in the eld or click
the arrows to increase or decrease the time.
For more information, see Retime video and audio output on page 71.
Chapter 4 Advanced adjustments 24
Page 25

Audio properties
•
Channel layout: Use the pop-up menu to manually set the type of audio channel layout. For
more information about audio channel layouts, including the surround sound channel layout,
see About audio channels on page 67.
•
Sample rate: Use this pop-up menu to set the number of times per second that music
waveforms (samples) are captured digitally. The higher the sample rate, the higher the audio
quality and the larger the le size.
•
Sample size: Use the pop-up menu to manually set the sample size of the audio signal.
Audio eects
For a list of available audio eects and instructions on how to add an audio eect to a setting,
see Add and remove eects on page 76.
Dolby Digital
The built-in Dolby Digital settings (in the Create Blu-ray and Create DVD destinations, as well as
the built-in AC-3 and EC-3 audio settings) use the Dolby Digital transcoding format. This format
encodes Dolby Digital (AC-3) and Dolby Digital Plus (EC-3) audio les that contain multiple audio
channels, including 5.1 surround sound. You can also create custom settings that use the Dolby
Digital transcoding format.
The properties of built-in and custom settings that use this transcoding format are located in the
General inspector and Audio inspector. These properties are described below.
Important: When you add a setting (or a destination that includes settings) to a job, Compressor
analyzes the source media and then automatically assigns the most appropriate setting
properties (based on the setting’s transcoding format and the characteristics of your source
media le). It’s recommended that you use the automatically assigned setting properties.
Setting summary
Displays the setting name and transcoding format, as well as an estimated output le
size. When you add a setting to a job or change the setting’s properties, this summary
automatically updates.
General properties
•
Name: Displays the name of the setting.
•
Description: Displays the description of the setting.
•
Extension: Displays the extension of the output le.
•
Allow job segmenting: Job segmenting is not available for settings that output only an
audio le.
•
Default location: Select an item from the pop-up menu to set the default save location for
transcoded les.
•
File type: Select a le type from the pop-up menu—Dolby Digital or Dolby Digital Plus, an
enhanced version of the Dolby Digital audio compression technology.
Chapter 4 Advanced adjustments 25
Page 26

Retiming
This section contains one property:
•
Set duration to: Sets the processing algorithm used to adjust the frame rate during transcoding.
Select either of the following options:
•
[Percentage] of source: Modies the output clip’s speed by a percentage of the source clip’s
speed. Enter a value in the percentage eld or choose a preset value from the adjacent
pop-up menu (with a downward arrow).
•
[Total duration]: Sets the duration of the clip. Enter a timecode duration in the eld or click
the arrows to increase or decrease the time.
For more information, see Retime video and audio output on page 71.
Audio properties
•
Channel layout: Use the pop-up menu to manually set the type of audio channel layout. For
more information about audio channel layouts, including the surround sound channel layout,
see About audio channels on page 67.
•
Sample rate: Use this pop-up menu to set the number of times per second that music
waveforms (samples) are captured digitally. The higher the sample rate, the higher the audio
quality and the larger the le size.
Note: All les intended for video and audio DVD authoring must have a 48 kHz sample rate as
required by the DVD specication.
•
Target system: Use this pop-up menu to identify the system on which you are going to play the
output le. Compressor limits options in other related properties to those appropriate for the
target system.
•
DVD Video: Choose this option if you’re encoding for use in a DVD video authoring application.
•
DVD Audio: Choose this option if you’re encoding for use in a DVD audio authoring application.
•
Generic AC-3: Choose this option to remove the target system setting limit (the most
generic choice).
•
Data rate: Use this pop-up menu to set the number of kilobits per second (kbps) required to
deliver your audio le. Using a higher rate will produce a higher-quality audio le.
Tip: For stereo encoding, rates of 192 kbps and 224 kbps are typical and will produce good
results. For Dolby Digital 5.1 encoding, a rate of 384 kbps is recommended. For 5.1 Dolby Digital
Plus encoding, a rate of 192 kbps is recommended.
•
Bit stream mode: Use this pop-up menu to dene the audio service contained within the Dolby
Digital or Dolby Digital Plus bitstream.
•
Surround mode: When using a Mono or Stereo (L R) channel layout, this property tells the
playback device whether the two-channel encoded bitstream contains a Dolby Surround (Lt/
Rt) program that requires Dolby Pro Logic decoding. There are three menu options:
•
Not Indicated: Does not send the playback device information about whether the bitstream
was encoded in Dolby Surround.
•
Not Encoded: Tells the playback device that the bitstream contains information not encoded
in Dolby Surround.
•
Surround Encoded: Tells the playback device that the bitstream contains information encoded
in Dolby Surround.
Chapter 4 Advanced adjustments 26
Page 27

•
Surround EX Mode: When using a 5.1 (L R C LFE Ls Rs), 5.0 (L R C Ls Rs), 4.1 (L R LFE Ls Rs), or 4.0
(L R Ls Rs) layout, this property tells the playback device whether the audio has been encoded
in Dolby Digital Surround EX. There are three menu options:
•
Not Indicated: Does not send the playback device information about whether the bitstream
was encoded in Dolby Digital Surround EX.
•
Not Encoded: Tells the playback device that the bitstream was not encoded in Dolby Digital
Surround EX.
•
Surround Encoded: Tells the playback device that the bitstream was encoded in Dolby Digital
Surround EX.
•
Stereo downmix: Use this pop-up menu to set how to downmix a surround signal to a stereo
signal. For more information, see About audio channels on page 67.
Important: The LFE signal may be discarded by the Dolby Digital downmix process.
•
Lo/Ro center, Lo/Ro surround, Lt/Rt center, Lt/Rt surround (for surround sound output): Use
these pop-up menus to set the decibel level at which the surround and center channels are
downmixed. Properties are enabled or disabled based on the channel layout you choose.
•
DRC line mode: Use this pop-up menu to set the dynamic range compression processing mode.
The default setting, Film Standard, is recommended for all use cases.
•
DRC RF mode: Use this pop-up menu to set the dynamic range compression processing mode
for RF (TV sets, cable set top boxes, or other devices that have RF connections).
•
LFE low-pass lter: Select this checkbox to apply a 120 Hz low-pass lter to the low-frequency
eects (LFE) channel during output.
•
DC lter: Select this checkbox to apply a DC (direct current) high-pass lter to all input
channels. Although this lter provides a simple way to remove DC osets, note that most
mixed audio material is already free of DC osets.
•
Surround channels: 90 phase-shift: This property, which applies a 90-degree phase shift to the
surround channels, is selected by default. The shift in phase decorrelates the front and back
channels and prevents the L and Ls signals from canceling each other out if a surround-
compatible downmix is later applied to the decoded signal.
•
Surround channels: 3dB attenuation: Select this checkbox to apply a 3 dB cut to the surround
channels during output. This option is intended for multichannel output (like a lm
soundtrack) that is being transferred to a consumer home theater format. Cinema surround
channels are mixed 3 dB “hot” (higher) relative to the front channels to account for cinema
amplier gains.
•
Dialog normalization: Enter a value in the eld to set the loudness of the program in your
sound les relative to full modulation. The playback device uses this information to maintain
similar loudness among dierent AC-3 streams. The goal is to give all AC-3–encoded audio les
the same listening level, regardless of the source le.
Audio eects
For a list of available audio eects and instructions on how to add an audio eect to a setting,
see Add and remove eects on page 76.
Chapter 4 Advanced adjustments 27
Page 28

H.264 for Apple Devices
The built-in Apple Devices settings use the H.264 for Apple Devices transcoding format. You can
also create custom settings that use the H.264 for Apple Devices transcoding format.
The properties of built-in and custom settings that use this transcoding format are located in the
General, Video, and Audio inspectors. These properties are described below.
Important: When you add a setting (or a destination that includes settings) to a job, Compressor
analyzes the source media and then automatically assigns the most appropriate setting
properties (based on the setting’s transcoding format and the characteristics of your source
media le). It’s recommended that you use the automatically assigned setting properties.
Setting summary
Displays the setting name and transcoding format, as well as an estimated output le
size. When you add a setting to a job or change the setting’s properties, this summary
automatically updates.
General properties
•
Name: Displays the name of the setting.
•
Description: Displays the description of the setting.
•
Extension: Displays the extension of the output le (.m4v).
•
Allow job segmenting: If you’ve set up distributed processing, select this checkbox to have
Compressor process the output le using your shared computer group. For more information,
see Transcode batches using other computers on page 101.
•
Default location: Choose an item from the pop-up menu to set the default save location for
transcoded les.
•
Format: Use this pop-up menu to set whether the output includes video and audio, or
video only.
Retiming
This section contains one property:
•
Set duration to: Sets the processing algorithm used to adjust the frame rate during transcoding.
Select one of the following options:
•
[Percentage] of source: Modies the output clip’s speed by a percentage of the source clip’s
speed. Enter a value in the percentage eld or choose a preset value from the adjacent
pop-up menu (with a downward arrow).
•
[Total duration]: Sets the duration of the clip. Enter a timecode duration in the eld or click
the arrows to increase or decrease the time.
•
So source frames play at [frame rate] fps: Nondestructively changes the playback speed of the
clip, without discarding frames or creating new frames. This setting has no eect unless the
“Frame rate” value in the Video inspector is dierent than the source le’s frame rate. For
example, if you add a 10-second source le with a frame rate of 24 fps to Compressor, set the
“Frame rate” property in the Video inspector to 25 fps, and then select “So source frames play
at 25 fps” in the General inspector, the duration of the transcoded clip (at 25 fps) is 9 seconds
and 15 frames.
For more information, see Retime video and audio output on page 71.
Chapter 4 Advanced adjustments 28
Page 29

Video properties
•
Frame size: Use the pop-up menu to set an automatically calculated frame size (resolution)
range for the output le. For more information, see Modify frame size overview on page 69.
•
Pixel aspect ratio: For settings that use the H.264 format, the pixel aspect ratio is set to Square.
•
Frame rate: Use this pop-up menu to set the playback rate (the number of images displayed
per second) for the output le. For more information, see Frame rate options overview on
page 71.
•
Field order: For settings that use the H.264 format, the eld order is set to Progressive
(complete frames are scanned).
•
Multi-pass: Select this checkbox to turn on multi-pass encoding that uses additional analysis
of video frames to produce a high-quality output le. For faster (single-pass) transcoding, turn
this feature o by deselecting the checkbox.
•
Bit rate: Select the Automatic checkbox to have Compressor calculate the appropriate bit rate
for the output le, based on the frame size of the source le and device compatibility. If the
checkbox is not selected, you can set the bit rate by dragging the slider or entering a value in
the text eld.
•
Frame sync: Select the Automatic checkbox to have Compressor calculate the key frame
interval rate.
Note: When Frame sync is turned on, the value in the seconds eld is zero (.0). However, the
actual value is determined during the encoding process.
If the checkbox is not selected, you can drag the slider or enter a value in the text eld to
set the key frame interval (number of frames) at which you want key frames created in your
output le.
•
Encode for: Select a button to have Compressor transcode the output le at either the best
quality (so that the le will play back on newer devices) or at a lesser quality (so that as many
devices as possible will play the le).
•
Compatible with: This list shows devices that will play the transcoded le (compatible
device types are marked with a green circle that contains a checkmark ). When you
change the setting’s properties (frame size, frame rate, and so on), the compatibility list
automatically updates.
Cropping and padding
Customize the nal cropping, sizing, and aspect ratio using the Cropping & Padding properties.
Cropping removes video content from an image. Padding scales the image to a smaller size while
retaining the output image’s frame size. For more information about these properties, see Modify
frame size overview on page 69.
•
Cropping: Use this pop-up menu to set the dimension of the output image. The custom option
allows you to enter your own image dimensions in the elds; other options use predetermined
sizes. The Letterbox Area of Source menu item detects image edges and automatically enters
crop values to match them. This is useful if you want to crop out the letterbox area (the black
bars above and below a widescreen image) of a source media le.
•
Padding: Use this pop-up menu to set the scaling of the output image while retaining
the output image’s frame size. The custom option allows you to enter your own scaling
dimensions in the elds; other options use predetermined dimensions.
Chapter 4 Advanced adjustments 29
Page 30

Quality
The following properties provide instructions for image analysis, including frame resizing, clip
retiming, and deinterlacing.
•
Resize lter: This pop-up menu sets the resizing method. There are three options:
•
Fast (Nearest Pixel): Provides the fastest processing time.
•
Better (Linear Filter): Provides a medium trade-o between processing time and
output quality.
•
Best (Statistical Prediction): Provides the highest output quality, but takes longer.
•
Retiming Quality: This pop-up menu sets the retiming method. There are four options:
•
Fast (Nearest Frame): Uses a copy of the nearest available frame to ll the new
in-between frames.
•
Better (Motion Adaptive): Uses deinterlacing on areas of the source le that contain
movement to produce good-quality output.
•
Best (Motion Compensated): Uses deinterlacing on areas of the source le that contain
movement to produce high-quality output.
•
Reverse Telecine: Removes the extra elds added during the telecine process to convert the
lm’s 24 fps to NTSC’s 29.97 fps. Choosing this item disables all the other Quality controls. For
more information, see About reverse telecine on page 74.
•
Adaptive details: Select this checkbox to use advanced image analysis to distinguish between
noise and edge areas during output.
•
Anti-aliasing level: Sets the softness level in the output image. Double-click the value and
then manually enter a new value or drag the slider to the right to increase softness. This
property improves the quality of conversions when you’re scaling media up. For example,
when transcoding SD video to HD, anti-aliasing smooths jagged edges that might appear in
the image.
•
Details level: Sets the amount of detail in the output image. Double-click the value and then
manually enter a new value or drag the slider to set the value. This sharpening control lets you
add detail back to an image being enlarged. Unlike other sharpening operations, the “Details
level” property distinguishes between noise and feature details, and generally doesn’t increase
unwanted grain. Increasing this value may introduce jagged edges, however, which can be
eliminated by increasing the “Anti-aliasing level” slider.
Video eects
For a list of available video eects and instructions on how to add a video eect to a setting, see
Add and remove eects on page 76.
Audio properties
•
Channel layout: Use the pop-up menu to set the audio channel layout.
•
Sample rate: Use this pop-up menu to set the number of times per second that music
waveforms (samples) are captured digitally. The higher the sample rate, the higher the audio
quality and the larger the le size.
•
Bit rate: Use the pop-up menu to set the bit rate to use for the output audio.
•
Include Dolby 5.1 Audio Track: Select the checkbox to add surround sound as a Dolby Digital
audio track for playback on Apple TV.
Audio eects
For a list of available audio eects and instructions on how to add an audio eect to a setting,
see Add and remove eects on page 76.
Chapter 4 Advanced adjustments 30
Page 31

H.264 for Blu-ray
The built-in H.264 for Blu-ray setting (in the Create Blu-ray destination) uses the H.264 for Bluray transcoding format. This format encodes H.264 elementary stream les for Blu-ray and
AVCHD DVD authoring. You can also create custom settings that use the H.264 for Blu-ray
transcoding format.
Note: This setting encodes only a video le. Dolby Digital is the recommended audio setting. For
more information, see Dolby Digital on page 25.
The properties of built-in and custom settings that use this transcoding format are located in the
General inspector and Video inspector. These properties are described below.
Important: When you add a setting (or a destination that includes settings) to a job, Compressor
analyzes the source media and then automatically assigns the most appropriate setting
properties (based on the setting’s transcoding format and the characteristics of your source
media le). It’s recommended that you use the automatically assigned setting properties.
Setting summary
Displays the setting name and transcoding format, as well as an estimated output le size. When
you add a setting to a job or change the setting’s properties, this summary automatically updates.
General properties
•
Name: Displays the name of the setting.
•
Description: Displays the description of the setting.
•
Extension: Displays the extension of the output le (.264).
•
Allow job segmenting: If you’ve set up distributed processing, select this checkbox to have
Compressor process the output le using your shared computer group. For more information,
see Transcode batches using other computers on page 101.
•
Default location: Select an item from the pop-up menu to set the default save location for
transcoded les.
•
Stream Usage: Use the pop-up menu to set whether the output le is transcoded for Blu-ray
Disc or AVCHD.
Retiming
This section contains one property:
•
Set duration to: Sets the processing algorithm used to adjust the frame rate during transcoding.
Select one of the following options:
•
[Percentage] of source: Modies the output clip’s speed by a percentage of the source clip’s
speed. Enter a value in the percentage eld or choose a preset value from the adjacent
pop-up menu (with a downward arrow).
•
[Total duration]: Sets the duration of the clip. Enter a timecode duration in the eld or click
the arrows to increase or decrease the time.
•
So source frames play at [frame rate] fps: Nondestructively changes the playback speed of the
clip, without discarding frames or creating new frames. This setting has no eect unless the
“Frame rate” value in the Video inspector is dierent than the source le’s frame rate. For
example, if you add a 10-second source le with a frame rate of 24 fps to Compressor, set the
“Frame rate” property in the Video inspector to 25 fps, and then select “So source frames play
at 25 fps” in the General inspector, the duration of the transcoded clip (at 25 fps) is 9 seconds
and 15 frames.
For more information, see Retime video and audio output on page 71.
Chapter 4 Advanced adjustments 31
Page 32

Video properties
•
Frame size: Use the pop-up menu to set the frame size (resolution) for the output le. For more
information, see Modify frame size overview on page 69.
•
Pixel aspect ratio: For settings that use the H.264 format, the pixel aspect ratio is set to Square.
•
Frame rate: Use this pop-up menu to set the playback rate (the number of images displayed
per second) for the output le. For more information, see Frame rate options overview on
page 71.
•
Field order: For settings that use the H.264 format, the eld order is set to Progressive
(complete frames are scanned).
•
Automatically select bit-rate: Select this checkbox to have Compressor automatically compute
the best bit rate for the output le, based on the duration of the source le. If the checkbox
is not selected, you can set the average and maximum bit rates by dragging the “Average bit
rate” and “Maximum bit rate” sliders or entering values in the text elds.
•
Multi-pass: Select this checkbox to turn on multi-pass encoding that uses additional analysis
of video frames to produce a high-quality output le. For faster (single-pass) transcoding, turn
this feature o by deselecting the checkbox.
Cropping and padding
Customize the nal cropping, sizing, and aspect ratio using the Cropping & Padding properties.
Cropping removes video content from an image. Padding scales the image to a smaller size while
retaining the output image’s frame size. For more information about these properties, see Modify
frame size overview on page 69.
•
Cropping: This pop-up menu sets the dimension of the output image. The custom option
allows you to enter your own image dimensions in the elds; other options use predetermined
sizes. The Letterbox Area of Source option detects image edges and automatically enters crop
values to match them. This is useful if you want to crop out the letterbox area (the black bars
above and below a widescreen image) of a source media le.
•
Padding: This pop-up menu sets the scaling of the output image while retaining the output
image’s frame size. The custom option allows you to enter your own scaling dimensions in the
elds; other options use predetermined dimensions.
Quality
The following properties set the processing algorithm used during the transcoding process. For
more information about using these controls, see Retime video and audio output on page 71,
and Modify timing and frame rate on page 72.
•
Resize lter: This pop-up menu sets the resizing method. There are three options:
•
Fast (Nearest Pixel): Provides the fastest processing time.
•
Better (Linear Filter): Provides a medium trade-o between processing time and output quality.
•
Best (Statistical Prediction): Provides the highest output quality, but takes longer.
•
Retiming Quality: This pop-up menu sets the retiming method. There are four options:
•
Fast (Nearest Frame): Uses a copy of the nearest available frame to ll the new
in-between frames.
•
Better (Motion Adaptive): Uses deinterlacing on areas of the source le that contain
movement to produce good-quality output.
•
Best (Motion Compensated): Uses deinterlacing on areas of the source le that contain
movement to produce high-quality output.
•
Reverse Telecine: Removes the extra elds added during the telecine process to convert the
lm’s 24 fps to NTSC’s 29.97 fps. Choosing this item disables all the other Quality controls. For
more information, see About reverse telecine on page 74.
Chapter 4 Advanced adjustments 32
Page 33

•
Adaptive details: Select this checkbox to use advanced image analysis to distinguish between
noise and edge areas during output.
•
Anti-aliasing level: Sets the softness level in the output image. Double-click the value and
then manually enter a new value or drag the slider to the right to increase softness. This
property improves the quality of conversions when you’re scaling media up. For example,
when transcoding SD video to HD, anti-aliasing smooths jagged edges that might appear in
the image.
•
Details level: Sets the amount of detail in the output image. Double-click the value and then
manually enter a new value or drag the slider to set the value. This sharpening control lets you
add detail back to an image being enlarged. Unlike other sharpening operations, the “Details
level” property distinguishes between noise and feature details, and generally doesn’t increase
unwanted grain. Increasing this value may introduce jagged edges, however, which can be
eliminated by increasing the “Anti-aliasing level” slider.
Video eects
For a list of available video eects and instructions on how to add a video eect to a setting, see
Add and remove eects on page 76.
Image Sequence
The built-in OpenEXR Image Sequence and TIFF Image Sequence settings use the Image
Sequence transcoding format. This format encodes a variety of image sequence le types used
in motion graphics, including TIFF, OpenEXR, JPEG, PNG, and more. You can also create custom
settings that use the Image Sequence transcoding format.
The properties of built-in and custom settings that use this transcoding format are located in the
General inspector and Video inspector. These properties are described below.
Important: When you add a setting (or a destination that includes settings) to a job, Compressor
analyzes the source media and then automatically assigns the most appropriate setting
properties (based on the setting’s transcoding format and the characteristics of your source
media le). It’s recommended that you use the automatically assigned setting properties.
Setting summary
Displays the setting name and transcoding format, as well as an estimated output le
size. When you add a setting to a job or change the setting’s properties, this summary
automatically updates.
General properties
•
Name: Displays the name of the setting.
•
Description: Displays the description of the setting.
•
Extension: Displays the extension of the output le.
Tip: To output a le with a dierent extension, choose a dierent le type from the “Image
type” pop-up menu.
•
Allow job segmenting: If you’ve set up distributed processing, select this checkbox to have
Compressor process the output le using your shared computer group. For more information,
see Transcode batches using other computers on page 101.
•
Default location: Choose an item from the pop-up menu to set the default save location for
transcoded les.
Chapter 4 Advanced adjustments 33
Page 34

•
Image type: Choose an image type from the pop-up menu to set an image type for the
transcoded les:
•
TIFF (Tagged Image File Format)
•
TARGA (Truevision Advanced Raster Graphics Adapter), also referred to as TGA
•
DPX
•
JPEG
•
OpenEXR
•
PSD (Adobe Photoshop)
•
PNG (Portable Network Graphics)
•
Create unique output directory: Select this checkbox to create a folder to hold the output les.
When you choose this option, the les saved to the folder will be named “frame-0,” “frame-1,”
“frame-2,” and so on.
•
Add leading zeros to frame numbers: Select this checkbox to have Compressor add leading
zeros to output lenames (“lename-000000,” “lename-000001,” “lename-000002,” and so on).
Retiming
This section contains one property:
•
Set duration to: Sets the processing algorithm used to adjust the frame rate during transcoding.
Select one of the following options:
•
[Percentage] of source: Modies the output clip’s speed by a percentage of the source clip’s
speed. Enter a value in the percentage eld or choose a preset value from the adjacent
pop-up menu (with a downward arrow).
•
[Total duration]: Sets the duration of the clip. Enter a timecode duration in the eld or click
the arrows to increase or decrease the time.
•
So source frames play at [frame rate] fps: Nondestructively changes the playback speed of the
clip, without discarding frames or creating new frames. This setting has no eect unless the
“Frame rate” value in the Video inspector is dierent than the source le’s frame rate. For
example, if you add a 10-second source le with a frame rate of 24 fps to Compressor, set the
“Frame rate” property in the Video inspector to 25 fps, and then select “So source frames play
at 25 fps” in the General inspector, the duration of the transcoded clip (at 25 fps) is 9 seconds
and 15 frames.
For more information, see Retime video and audio output on page 71.
Video properties
•
Frame size: Use the pop-up menu to set the frame size (resolution) for the output le.
•
Pixel aspect ratio: Use this pop-up menu to set the pixel aspect ratio (the ratio between the
image frame width and height). You can also modify the aspect ratio of the output le using
cropping and padding properties. For more information, see Modify frame size overview on
page 69.
•
Frame rate: Use this pop-up menu to set the playback rate (the number of images displayed
per second) for the output le. For more information, see Frame rate options overview on
page 71.
Chapter 4 Advanced adjustments 34
Page 35

•
Field order: Use the pop-up menu to set the output scanning method (either the eld
dominance or a conversion to progressive scanning). There are four options:
•
Same as Source: Maintains the same scanning method used by the source media le.
•
Progressive: Scans complete frames (not frames divided into interlaced elds).
•
Top First: Scans interlaced elds, giving dominance (eld order) to the top eld, also known
as eld two, the upper eld, or the odd eld.
•
Bottom First: Scans interlaced elds, giving dominance (eld order) to the bottom eld, also
known as eld one, the lower eld, or the even eld.
•
Scale image to preserve aspect ratio: Select this checkbox to scale the output les to use square
pixels and maintain the original aspect ratio (which results in an increase or decrease in the
number of horizontal and vertical pixels).
Cropping and padding
Customize the nal cropping, sizing, and aspect ratio using the Cropping & Padding properties.
Cropping removes video content from an image. Padding scales the image to a smaller size while
retaining the output image’s frame size. For more information about these properties, see Modify
frame size overview on page 69.
•
Cropping: This pop-up menu sets the dimension of the output image. The custom option
allows you to enter your own image dimensions in the elds; other options use predetermined
sizes. The Letterbox Area of Source option detects image edges and automatically enters crop
values to match them. This is useful if you want to crop out the letterbox area (the black bars
above and below a widescreen image) of a source media le.
•
Padding: This pop-up menu sets the scaling of the output image while retaining the output
image’s frame size. The custom option allows you to enter your own scaling dimensions in the
elds; other options use predetermined dimensions.
Quality
The following properties determine how the video will be resized, retimed, and otherwise
adjusted when transcoded.
•
Resize lter: This pop-up menu sets the resizing method. There are three options:
•
Fast (Nearest Pixel): Provides the fastest processing time.
•
Better (Linear Filter): Provides a medium trade-o between processing time and
output quality.
•
Best (Statistical Prediction): Provides the highest output quality, but takes longer.
•
Retiming Quality: This pop-up menu sets the retiming method. There are four options:
•
Fast (Nearest Frame): Uses a copy of the nearest available frame to ll the new
in-between frames.
•
Better (Motion Adaptive): Uses deinterlacing on areas of the source le that contain
movement to produce good-quality output.
•
Best (Motion Compensated): Uses deinterlacing on areas of the source le that contain
movement to produce high-quality output.
•
Reverse Telecine: Removes the extra elds added during the telecine process to convert the
lm’s 24 fps to NTSC’s 29.97 fps. Choosing this item disables all the other Quality controls. For
more information, see About reverse telecine on page 74.
Chapter 4 Advanced adjustments 35
Page 36

•
Adaptive details: Select this checkbox to use advanced image analysis to distinguish between
noise and edge areas during output.
•
Anti-aliasing level: Sets the softness level in the output image. Double-click the value and
then manually enter a new value or drag the slider to the right to increase softness. This
property improves the quality of conversions when you’re scaling media up. For example,
when transcoding SD video to HD, anti-aliasing smooths jagged edges that might appear in
the image.
•
Details level: Sets the amount of detail in the output image. Double-click the value and then
manually enter a new value or drag the slider to set the value. This sharpening control lets you
add detail back to an image being enlarged. Unlike other sharpening operations, the “Details
level” property distinguishes between noise and feature details, and generally doesn’t increase
unwanted grain. Increasing this value may introduce jagged edges, however, which can be
eliminated by increasing the “Anti-aliasing level” slider.
Video eects
For a list of available video eects and instructions on how to add a video eect to a setting, see
Add and remove eects on page 76.
MP3
The built-in MP3 File and MP3 for Audio Podcasting settings use the MP3 transcoding format.
This format encodes MP3 les, which are often used for digital audio players. You can also create
custom settings that use the MP3 transcoding format.
The properties of built-in and custom settings that use this transcoding format are located in the
General inspector and Audio inspector. These properties are described below.
Important: When you add a setting (or a destination that includes settings) to a job, Compressor
analyzes the source media and then automatically assigns the most appropriate setting
properties (based on the setting’s transcoding format and the characteristics of your source
media le). It’s recommended that you use the automatically assigned setting properties.
Setting summary
Displays the setting name and transcoding format, as well as an estimated output le
size. When you add a setting to a job or change the setting’s properties, this summary
automatically updates.
General properties
•
Name: Displays the name of the setting.
•
Description: Displays the description of the setting.
•
Extension: Displays the extension of the output le (.mp3).
•
Allow job segmenting: Job segmenting is not available for settings that output only an
audio le.
•
Default location: Select an item from the pop-up menu to set the default save location for
transcoded les.
Chapter 4 Advanced adjustments 36
Page 37

Retiming
This section contains one property:
•
Set duration to: Sets the processing algorithm used to adjust the frame rate during transcoding.
Select either of the following options:
•
[Percentage] of source: Modies the output clip’s speed by a percentage of the source clip’s
speed. Enter a value in the percentage eld or choose a preset value from the adjacent
pop-up menu (with a downward arrow).
•
[Total duration]: Sets the duration of the clip. Enter a timecode duration in the eld or click
the arrows to increase or decrease the time.
For more information, see Retime video and audio output on page 71.
Audio properties
•
Channel layout: Use the pop-up menu to set the audio channel layout. For more information,
see About audio channels on page 67.
•
Sample rate: Use this pop-up menu to set the number of times per second that music
waveforms (samples) are captured digitally. The higher the sample rate, the higher the audio
quality and the larger the le size.
•
Data rate: Use the slider to set the number of kilobits per second (kbps) required to deliver
your audio le. Using a higher rate will produce a higher-quality audio le.
•
Use variable bit rate encoding: Select the checkbox to vary the number of bits used to store the
music depending on the complexity of the music. Variable bit rate encoding can reduce the
size of the output le.
•
Joint stereo: Select the checkbox to have one channel carry the information that’s identical on
both channels, and another channel carry unique information. At bit rates of 160 kbps and
below, this setting can improve the sound quality of your converted audio.
•
Smart encoding adjustments: Select the checkbox to have Compressor analyze the source le
and the setting’s encoding properties to maximize the quality of the output le.
•
Filter frequencies below 10 Hz: Select the checkbox to have Compressor remove inaudible
frequencies from the source le and output a smaller and more ecient le without
perceptible loss of quality.
Audio eects
For a list of available audio eects and instructions on how to add an audio eect to a setting,
see Add and remove eects on page 76.
MPEG-2
The built-in MPEG Files settings (including the built-in MPEG-2 for DVD setting) use the MPEG-2
transcoding format. This format encodes MPEG-2 stream les for SD DVD and Blu-ray authoring.
Note: This setting encodes only a video le. Dolby Digital is the recommended audio setting. For
more information, see Dolby Digital on page 25.
You can also create custom settings that use the MPEG-2 transcoding format.
The properties of built-in and custom settings that use this transcoding format are located in the
General, Video, and Audio inspectors. These properties are described below.
Important: When you add a setting (or a destination that includes settings) to a job, Compressor
analyzes the source media and then automatically assigns the most appropriate setting
properties (based on the setting’s transcoding format and the characteristics of your source
media le). It’s recommended that you use the automatically assigned setting properties.
Chapter 4 Advanced adjustments 37
Page 38

Setting summary
Displays the setting name and transcoding format, as well as an estimated output le
size. When you add a setting to a job or change the setting’s properties, this summary
automatically updates.
General properties
•
Name: Displays the name of the setting.
•
Description: Displays the description of the setting.
•
Extension: Displays the extension of the output le.
•
Allow job segmenting: If you’ve set up distributed processing, select this checkbox to have
Compressor process the output le using your shared computer group. For more information,
see Transcode batches using other computers on page 101.
•
Default location: Select an item from the pop-up menu to set the default save location for
transcoded les.
•
Format: Use the pop-up menu to set the stream type for the output le. There are three
options:
•
Program Stream: This stream type contains only one MPEG-2 content channel and its
associated audio. Program streams require an error-free delivery method and are primarily
used for storage or processing within a computer.
•
Elementary Stream: This stream type contains only one MPEG-2 content channel and no
audio. When you select this option, you should also set the “Stream usage” property.
•
Transport Stream: This stream type can contain several MPEG-2 content channels and
associated audio. All the channels are multiplexed together, allowing the receiver to choose
which to play back. Compressor supports creating single-channel transport streams that can
also include associated audio. Transport streams can also recover from interruptions during
playback, making them ideally suited for broadcast and streaming applications where noise
or network congestion can lead to interruptions.
•
Stream usage: Use this pop-up menu to specify the MPEG-2 transcoding output. Compressor
modies the available properties based on the option you choose:
•
Generic: This option allows you complete access to all the MPEG-2 properties. This is the
only option that supports the MPEG-2 640 x 480 video format in addition to the standard-
denition (SD) and high-denition (HD) video formats. It’s also the only option that supports
creating transport and program streams. It supports the complete bit rate range of 2.0 Mbps
to 40.0 Mbps.
•
DVD: This option restricts the encoding properties to those allowed by the SD DVD
specication. These include the NTSC and PAL video formats and a bit rate range of 2.0 Mbps
to 9.0 Mbps.
•
Blu-ray: This option restricts the encoding properties to those allowed by Blu-ray video discs.
These include the SD and HD video formats and a bit rate range of 10.0 Mbps to 40.0 Mbps.
•
Add Apple metadata: Select this checkbox to have Compressor parse specic MPEG-2 authoring
information during the transcoding process and provide it in the output le. The resulting le
will be read faster by other applications.
•
Include chapter markers only: Select this checkbox to include chapter markers, but not
unnamed compression markers, in MPEG-2 output. When this checkbox is deselected, all
markers are included in the output le. For more information about chapter markers, see Add
markers on page 82.
Chapter 4 Advanced adjustments 38
Page 39

Retiming
This section contains one property:
•
Set duration to: Sets the processing algorithm used to adjust the frame rate during transcoding.
Select one of the following options:
•
[Percentage] of source: Modies the output clip’s speed by a percentage of the source clip’s
speed. Enter a value in the percentage eld or choose a preset value from the adjacent
pop-up menu (with a downward arrow).
•
[Total duration]: Sets the duration of the clip. Enter a timecode duration in the eld or click
the arrows to increase or decrease the time.
•
So source frames play at [frame rate] fps: Nondestructively changes the playback speed of the
clip, without discarding frames or creating new frames. This setting has no eect unless the
“Frame rate” value in the Video inspector is dierent than the source le’s frame rate. For
example, if you add a 10-second source le with a frame rate of 24 fps to Compressor, set the
“Frame rate” property in the Video inspector to 25 fps, and then select “So source frames play
at 25 fps” in the General inspector, the duration of the transcoded clip (at 25 fps) is 9 seconds
and 15 frames.
For more information, see Retime video and audio output on page 71.
Video properties
•
Frame size: Use the pop-up menu to set the frame size (resolution) for the output le.
•
Pixel aspect ratio: Use the pop-up menu to set the pixel aspect ratio (the ratio between the
image frame width and height). You can also modify the aspect ratio of the output le using
cropping and padding properties. For more information, see Modify frame size overview on
page 69.
•
Frame rate: Use this pop-up menu to set the playback rate (the number of images displayed
per second) for the output le. For more information, see Frame rate options overview on
page 71.
•
Field order: Use the pop-up menu to set the output scanning method (either the eld
dominance or a conversion to progressive scanning). There are four options:
•
Same as Source: Maintains the same scanning method used by the source media le.
•
Progressive: Scans complete frames (not frames divided into interlaced elds).
•
Top First: Scans interlaced elds, giving dominance (eld order) to the top eld, also known
as eld two, the upper eld, or the odd eld.
•
Bottom First: Scans interlaced elds, giving dominance (eld order) to the bottom eld, also
known as eld one, the lower eld, or the even eld.
•
Anamorphic: Set the aspect ratio using this pop-up menu. Choose Automatic to have
Compressor scale the image based on the frame size, or choose 16:9 or 4:3 to set anamorphic
scaling to a standard aspect ratio.
•
Encoding mode: Choose an option from the pop-up menu to set how Compressor encodes the
output le: either faster and lower quality, or slower and better quality. Options include:
•
Single Pass CBR: This is the fastest MPEG-2 encoding mode. It provides good quality,
especially at bit rates between 5 and 9 Mbps.
•
Single Pass VBR: This mode aims to maintain constant quality (at the expense of constant bit
rate) for the transcoded video le. For most standard-denition (SD) media les at bit rates
of 3.5 Mbps and above, this mode provides good to excellent quality and transcodes quickly.
•
Single Pass VBR (Best): This mode provides the best possible quality output for SD video at bit
rates of 3 to 3.5 Mbps and above.
Chapter 4 Advanced adjustments 39
Page 40

•
Two Pass VBR: This mode uses two passes—one pass to analyze the entire source video
stream, and a second pass to compress the le. This mode takes longer and provides a
better-quality le than the one-pass modes, and is recommended for source media les with
a substantial dierence between the most and the least complex scenes.
•
Two Pass VBR (Best): This mode provides the best possible quality output, and outstanding
quality at bit rates of 3 to 3.5 Mbps and above for HD and SD video.
•
Motion estimation: This pop-up menu sets the amount of motion processing that will be
performed on the le. There are three options:
•
Good: The fastest processing setting. Use this setting when there is relatively low motion
between frames. In general, use Good with the one-pass encoding modes.
•
Better: Provides very good results even in the presence of complex interlaced motion. In
general, use Better with Single Pass VBR (Best) and Two Pass VBR (Best).
•
Best: The slowest processing setting. Use for the most complex motion and for interlaced
source les. In general, use the Best mode to maximize quality when using Single Pass VBR
(Best) or Two Pass VBR (Best).
•
GOP structure: This property is available only when the “Frame rate” property is set manually
(does not use Automatic).
Note: Automatically determined properties, including the “Frame rate” property mentioned
above, are assigned by Compressor based on your source media le. Therefore, "Automatic”
properties are strongly recommended.
Compressor provides three methods of grouping frames, or “pictures,” in encoded video: as
I-frames (intra-frames), P-frames (predictive frames), and B-frames (bi-predictive frames). The
“GOP structure” pop-up menu includes several methods of combining frames:
•
IP: Use IP only if your media contains fast motion that isn’t encoded with sucient quality
using an IBBP or IBP structure.
•
IBP: Use IBP only if your media contains fast motion that isn’t encoded with sucient quality
using an IBBP structure.
•
IBBP: Recommended for majority of MPEG-2 encoding situations.
Note: For most MPEG-2 encoding situations intended for use on a DVD, choose IBBP as the
GOP structure setting, and a GOP size of 15 for NTSC, or 12 for PAL.
•
GOP size: This property is available when the “Frame rate” property is set manually (does not
use Automatic).
Note: Automatically determined properties, including the “Frame rate” property mentioned
above, are assigned by Compressor based on your source media le. Therefore, "Automatic”
properties are strongly recommended.
This slider species how many frames are contained within a GOP (group of pictures). The
values available in the slider are are determined by the GOP structure property (described
above). The maximum GOP size you can choose within Compressor is 15 frames (NTSC) or 12
frames (PAL and 720p). The minimum GOP size for all video formats is 6 frames (closed GOP) or
7 frames (open GOP).
•
Automatically select bit rate: Select this checkbox to have Compressor automatically compute
the best bit rate for the output le, based on the duration of the source le. To manually adjust
the bit rate, deselect the checkbox and drag the “Average bit rate” and “Maximum bit rate”
sliders (or enter values in the adjacent elds).
•
YUV 422 color encoding: This property appears in most built-in settings that output MPEG-2
les. Select this checkbox to use YUV 422 color encoding for superior chroma quality.
Chapter 4 Advanced adjustments 40
Page 41

Cropping and padding
Customize the nal cropping, sizing, and aspect ratio using the Cropping & Padding properties.
Cropping removes video content from an image. Padding scales the image to a smaller size while
retaining the output image’s frame size. For more information about these properties, see Modify
frame size overview on page 69.
•
Cropping: This pop-up menu sets the dimension of the output image. The custom option
allows you to enter your own image dimensions in the elds; other options use predetermined
sizes. The Letterbox Area of Source option detects image edges and automatically enters crop
values to match them. This is useful if you want to crop out the letterbox area (the black bars
above and below a widescreen image) of a source media le.
•
Padding: This pop-up menu sets the scaling of the output image while retaining the output
image’s frame size. The custom option allows you to enter your own scaling dimensions in the
elds; other options use predetermined dimensions.
Quality
The following properties determine how the video will be resized, retimed, and otherwise
adjusted when transcoded.
•
Resize lter: This pop-up menu sets the resizing method. There are three options:
•
Fast (Nearest Pixel): Provides the fastest processing time.
•
Better (Linear Filter): Provides a medium trade-o between processing time and output quality.
•
Best (Statistical Prediction): Provides the highest output quality, but takes longer.
•
Retiming Quality: This pop-up menu sets the retiming method. There are four options:
•
Fast (Nearest Frame): Uses a copy of the nearest available frame to ll the new
in-between frames.
•
Better (Motion Adaptive): Uses deinterlacing on areas of the source le that contain
movement to produce good-quality output.
•
Best (Motion Compensated): Uses deinterlacing on areas of the source le that contain
movement to produce high-quality output.
•
Reverse Telecine: Removes the extra elds added during the telecine process to convert the
lm’s 24 fps to NTSC’s 29.97 fps. Choosing this item disables all the other Quality controls. For
more information, see About reverse telecine on page 74.
•
Adaptive details: Select this checkbox to use advanced image analysis to distinguish between
noise and edge areas during output.
•
Anti-aliasing level: Sets the softness level in the output image. Double-click the value and
then manually enter a new value or drag the slider to the right to increase softness. This
property improves the quality of conversions when you’re scaling media up. For example,
when transcoding SD video to HD, anti-aliasing smooths jagged edges that might appear in
the image.
•
Details level: Sets the amount of detail in the output image. Double-click the value and then
manually enter a new value or drag the slider to set the value. This sharpening control lets you
add detail back to an image being enlarged. Unlike other sharpening operations, the “Details
level” property distinguishes between noise and feature details, and generally doesn’t increase
unwanted grain. Increasing this value may introduce jagged edges, however, which can be
eliminated by increasing the “Anti-aliasing level” slider.
Video eects
For a list of available video eects and instructions on how to add a video eect to a setting, see
Add and remove eects on page 76.
Chapter 4 Advanced adjustments 41
Page 42

MPEG-4
The built-in settings included in the Prepare for HTTP Live Streaming destination and the
built-in AAC setting (for audio output) use the MPEG-4 transcoding format, which encodes
les using an H.264 encoder. This format encodes les for HTTP live streaming and for AAC
audio les used in audio podcasting and digital music playback. To learn more about HTTP Live
Streaming, see the HTTP Live Streaming Overview and other related documents available in the
Mac Developer library.
You can also create custom settings that use the MPEG-4 transcoding format.
The properties of built-in and custom settings that use the MPEG-4 transcoding format are listed
below. The list includes properties in the General, Video, and Audio inspectors.
Important: When you add a setting (or a destination that includes settings) to a job, Compressor
analyzes the source media and then automatically assigns the most appropriate setting
properties (based on the setting’s transcoding format and the characteristics of your source
media le). It’s recommended that you use the automatically assigned setting properties.
Setting summary
Displays the setting name and transcoding format, as well as an estimated output le
size. When you add a setting to a job or change the setting’s properties, this summary
automatically updates.
General properties
•
Name: Displays the name of the setting.
•
Description: Displays the description of the setting.
•
Extension: Displays the extension of the output le (.mp4 or .m4a).
•
Allow job segmenting: If you’ve set up distributed processing, select this checkbox to have
Compressor process the output le using your shared computer group. For more information,
see Transcode batches using other computers on page 101.
Note: Job segmenting is not available when outputting an MPEG-4 audio le or when the
Multi-pass checkbox is selected in the Video inspector.
•
Default location: Choose an item from the pop-up menu to set the default save location for
transcoded les.
•
Format: Use this pop-up menu to set whether the output includes video and audio, video only,
or audio only.
•
Optimize for network use: Select this checkbox to create a le that will start playing after only a
small portion of the le has been downloaded from the network.
•
Enhanced podcast: Select this checkbox to have Compressor embed podcasting information
(annotations, markers, and artwork) into the output media le. For more information about
annotations, see Add metadata on page 80. For more information about chapter markers, see
Add markers on page 82.
Chapter 4 Advanced adjustments 42
Page 43

Retiming
This section contains one property:
•
Set duration to: Sets the processing algorithm used to adjust the frame rate during transcoding.
Select one of the following options:
•
[Percentage] of source: Modies the output clip’s speed by a percentage of the source clip’s
speed. Enter a value in the percentage eld or choose a preset value from the adjacent
pop-up menu (with a downward arrow).
•
[Total duration]: Sets the duration of the clip. Enter a timecode duration in the eld or click
the arrows to increase or decrease the time.
•
So source frames play at [frame rate] fps: Nondestructively changes the playback speed of the
clip, without discarding frames or creating new frames. This setting has no eect unless the
“Frame rate” value in the Video inspector is dierent than the source le’s frame rate. For
example, if you add a 10-second source le with a frame rate of 24 fps to Compressor, set the
“Frame rate” property in the Video inspector to 25 fps, and then select “So source frames play
at 25 fps” in the General inspector, the duration of the transcoded clip (at 25 fps) is 9 seconds
and 15 frames.
Note: This option is not available when outputting an MPEG-4 audio le.
For more information, see Retime video and audio output on page 71.
Video properties
•
Frame size: Use the pop-up menu to set the frame size (resolution) for the output le.
•
Pixel aspect ratio: Use the pop-up menu to set the pixel aspect ratio (the ratio between the
image frame width and height). You can also modify the aspect ratio of the output le using
cropping and padding properties. For more information, see Modify frame size overview on
page 69.
•
Frame rate: Use this pop-up menu to set the playback rate (the number of images displayed
per second) for the output le. For more information, see Frame rate options overview on
page 71.
•
Field order: Use the pop-up menu to set the output scanning method (either the eld
dominance or a conversion to progressive scanning). There are four options:
•
Same as Source: Maintains the same scanning method used by the source media le.
•
Progressive: Scans complete frames (not frames divided into interlaced elds).
•
Top First: Scans interlaced elds, giving dominance (eld order) to the top eld, also known
as eld two, the upper eld, or the odd eld.
•
Bottom First: Scans interlaced elds, giving dominance (eld order) to the bottom eld, also
known as eld one, the lower eld, or the even eld.
•
H.264 prole: Use the pop-up menu to set the video compression for the output le. There are
three options:
•
High: Provides high quality output.
Note: This setting is not compatible with older MPEG-4 Part 10 devices.
•
Main: Similar to the Baseline prole, with additional support for standard-denition (SD)
video requirements.
•
Baseline: Primarily for video conferencing and mobile applications.
•
Entropy mode: Use the pop-up menu to set the entropy mode to CABAC, which provides
higher-quality output, or CAVLC, which is faster.
Chapter 4 Advanced adjustments 43
Page 44

•
Key frame interval: Enter a value in the text eld to set the key frame interval (number of
frames) at which you want key frames created in your output le. Alternatively, you can select
Automatic to have Compressor choose the key frame interval rate (the displayed value is 0
with Automatic on; the actual value is determined during the encoding process).
•
Data rate: Sets the number of kilobits per second (kbps) required to deliver your video le.
Drag the slider or enter a value in the eld. This setting is useful if you have a specic bit rate
(such as a DSL connection) or amount of space (on a DVD or CD- ROM).
Important: When you set a data rate, you override other codec quality properties because the
codec compresses the le as much as it needs to based on its data rate limit.
•
Multi-pass: Select this checkbox to turn on multi-pass encoding that uses additional analysis
of video frames to produce a high-quality output le. For faster (single-pass) transcoding, turn
this feature o by deselecting the checkbox.
•
Allow frame reordering: Select this checkbox to potentially provide a better-quality output le
by allowing Compressor to reorder video frames during transcoding.
Cropping and padding
Customize the nal cropping, sizing, and aspect ratio using the Cropping & Padding properties.
Cropping removes video content from an image. Padding scales the image to a smaller size while
retaining the output image’s frame size. For more information about these properties, see Modify
frame size overview on page 69.
•
Cropping: This pop-up menu sets the dimension of the output image. The custom option
allows you to enter your own image dimensions in the elds; other options use predetermined
sizes. The Letterbox Area of Source option detects image edges and automatically enters crop
values to match them. This is useful if you want to crop out the letterbox area (the black bars
above and below a widescreen image) of a source media le.
•
Padding: This pop-up menu sets the scaling of the output image while retaining the output
image’s frame size. The custom option allows you to enter your own scaling dimensions in the
elds; other options use predetermined dimensions.
Quality
The following properties determine how the video will be resized, retimed, and otherwise
adjusted when transcoded.
•
Resize lter: This pop-up menu sets the resizing method. There are three options:
•
Fast (Nearest Pixel): Provides the fastest processing time.
•
Better (Linear Filter): Provides a medium trade-o between processing time and
output quality.
•
Best (Statistical Prediction): Provides the highest output quality, but takes longer.
•
Retiming Quality: This pop-up menu sets the retiming method. There are four options:
•
Fast (Nearest Frame): Uses a copy of the nearest available frame to ll the new
in-between frames.
•
Better (Motion Adaptive): Uses deinterlacing on areas of the source le that contain
movement to produce good-quality output.
•
Best (Motion Compensated): Uses deinterlacing on areas of the source le that contain
movement to produce high-quality output.
•
Reverse Telecine: Removes the extra elds added during the telecine process to convert the
lm’s 24 fps to NTSC’s 29.97 fps. Choosing this item disables all the other Quality controls. For
more information, see About reverse telecine on page 74.
Chapter 4 Advanced adjustments 44
Page 45

•
Adaptive details: Select this checkbox to use advanced image analysis to distinguish between
noise and edge areas during output.
•
Anti-aliasing level: Sets the softness level in the output image. Double-click the value and
then manually enter a new value or drag the slider to the right to increase softness. This
property improves the quality of conversions when you’re scaling media up. For example,
when transcoding SD video to HD, anti-aliasing smooths jagged edges that might appear in
the image.
•
Details level: Sets the amount of detail in the output image. Double-click the value and then
manually enter a new value or drag the slider to set the value. This sharpening control lets you
add detail back to an image being enlarged. Unlike other sharpening operations, the “Details
level” property distinguishes between noise and feature details, and generally doesn’t increase
unwanted grain. Increasing this value may introduce jagged edges, however, which can be
eliminated by increasing the “Anti-aliasing level” slider.
Video eects
For a list of available video eects and instructions on how to add a video eect to a setting, see
Add and remove eects on page 76.
Audio properties
•
Channel layout: Use the pop-up menu to set the audio channel layout.
•
Sample rate: Use this pop-up menu to set the number of times per second that music
waveforms (samples) are captured digitally. The higher the sample rate, the higher the audio
quality and the larger the le size.
•
Data rate: Use the slider to set the number of kilobits per second (kbps) required to deliver
your audio le. Using a higher rate will produce a higher-quality audio le.
Audio eects
For a list of available audio eects and instructions on how to add an audio eect to a setting,
see Add and remove eects on page 76.
QuickTime Export Components
You can use the QuickTime Export Components transcoding format to output les for a variety
of additional formats that can play on third-party devices and operating systems, such as mobile
phones. You can transcode les for 3G, AVI, and Apple iPod, or transcode using third-party plug-
ins that you’ve installed on your system.
The properties of custom settings that use this transcoding format are located in the General
inspector and Video inspector. These properties are described below.
Important: When you add a setting (or a destination that includes settings) to a job, Compressor
analyzes the source media and then automatically assigns the most appropriate setting
properties (based on the setting’s transcoding format and the characteristics of your source
media le). It’s recommended that you use the automatically assigned setting properties.
Setting summary
Displays the setting name and transcoding format, as well as an estimated output le
size. When you add a setting to a job or change the setting’s properties, this summary
automatically updates.
Chapter 4 Advanced adjustments 45
Page 46

General properties
•
Name: Displays the name of the setting.
•
Description: Displays the description of the setting.
•
Extension: Displays the extension of the output le, based on the setting chosen in the
“Encoder type” pop-up menu, described below.
•
Allow job segmenting: This option is not available for the default encoder types that are
included with Compressor. It may be available for other encoders.
•
Default location: Select an item from the pop-up menu to set the default save location for
transcoded les.
•
Encoder type: Use this pop-up menu to choose from the available export component output
formats (plug-ins). For some encoder types, you can customize the plug-in via the Settings
property, described below.
•
Settings: You can modify the export component output format that you selected in the
Encoder type pop-up menu by clicking the Congure button and adjusting the format’s
properties in the window that appears.
Important: Use the third-party export module user interface to explicitly enter the image size
and frame rate for the output le. Do not leave the Image Size and Frame Rate settings in the
third-party user interface at their default values.
Video properties
The properties in this section are set based on the le format assigned to the setting. You can
change the le format in the General pane of the inspector; for more information, see the
"Settings” property in the “General properties” section, above.
•
Frame size: For settings that use the QuickTime Export Component format, this property is set
to Automatic.
•
Pixel aspect ratio: For settings that use the QuickTime Export Component format, this property
is set to Square. You can also modify the aspect ratio of the output le using cropping and
padding properties; for more information, see Modify frame size overview on page 69.
•
Frame rate: Use this pop-up menu to set the playback rate (the number of images displayed
per second) for the output le. For more information, see Frame rate options overview on
page 71.
•
Field order: For settings that use the QuickTime Export Component format, the eld order is
set automatically.
Cropping and Padding
Customize the nal cropping, sizing, and aspect ratio using the Cropping & Padding properties.
Cropping removes video content from an image. Padding scales the image to a smaller size while
retaining the output image’s frame size. For more information about these properties, see Modify
frame size overview on page 69.
•
Cropping: This pop-up menu sets the dimension of the output image. The custom option
allows you to enter your own image dimensions in the elds; other options use predetermined
sizes. The Letterbox Area of Source option detects image edges and automatically enters crop
values to match them. This is useful if you want to crop out the letterbox area (the black bars
above and below a widescreen image) of a source media le.
•
Padding: For settings that use the QuickTime Export Component format, the Padding property
is not available.
Video eects
For a list of available video eects and instructions on how to add a video eect to a setting, see
Add and remove eects on page 76.
Chapter 4 Advanced adjustments 46
Page 47

QuickTime Movie
Many of the built-in settings in the Settings pane use the QuickTime Movie format. This format
encodes video les for many uses. You can also create custom settings that use the QuickTime
Movie transcoding format.
The properties of built-in and custom settings that use this format are located in the General,
Video, and Audio inspectors. These properties are described below.
Important: When you add a setting (or a destination that includes settings) to a job, Compressor
analyzes the source media and then automatically assigns the most appropriate setting
properties (based on the setting’s transcoding format and the characteristics of your source
media le). It’s recommended that you use the automatically assigned setting properties.
Setting summary
Displays the setting name and transcoding format, as well as an estimated output le
size. When you add a setting to a job or change the setting’s properties, this summary
automatically updates.
General properties
•
Name: Displays the name of the setting.
•
Description: Displays the description of the setting.
•
Extension: Displays the extension of the output le (.mov).
•
Allow job segmenting: If you’ve set up distributed processing, select this checkbox to have
Compressor process the output le using your shared computer group. For more information,
see Transcode batches using other computers on page 101.
•
Default location: Select an item from the pop-up menu to set the default save location for
transcoded les.
•
Format: Use the pop-up menu to set whether the output includes video and audio, video only,
or audio only.
•
Optimize for network use: Select this checkbox to create a le that will start playing after only a
small portion of the le has been downloaded from the network.
Retiming
This section contains one property:
•
Set duration to: Sets the processing algorithm used to adjust the frame rate during transcoding.
Select one of the following options:
•
[Percentage] of source: Modies the output clip’s speed by a percentage of the source clip’s
speed. Enter a value in the percentage eld or choose a preset value from the adjacent
pop-up menu (with a downward arrow).
•
[Total duration]: Sets the duration of the clip. Enter a timecode duration in the eld or click
the arrows to increase or decrease the time.
•
So source frames play at [frame rate] fps: Nondestructively changes the playback speed of the
clip, without discarding frames or creating new frames. This setting has no eect unless the
“Frame rate” value in the Video inspector is dierent than the source le’s frame rate. For
example, if you add a 10-second source le with a frame rate of 24 fps to Compressor, set the
“Frame rate” property in the Video inspector to 25 fps, and then select “So source frames play
at 25 fps” in the General inspector, the duration of the transcoded clip (at 25 fps) is 9 seconds
and 15 frames.
For more information, see Retime video and audio output on page 71.
Chapter 4 Advanced adjustments 47
Page 48

Video properties
•
Frame size: Use the pop-up menu to set the frame size (resolution) for the output le. For more
information, see Modify frame size overview on page 69.
•
Pixel aspect ratio: Use this pop-up menu to set the pixel aspect ratio (the ratio between the
image frame width and height). You can also modify the aspect ratio of the output le using
cropping and padding properties; for more information, see Modify frame size overview on
page 69.
Note: This property can be set when the frame size property uses a specic frame size (for
example, 720 x 480).
•
Frame rate: Use this pop-up menu to set the playback rate (the number of images displayed
per second) for the output le. For more information, see Frame rate options overview on
page 71.
•
Field order: Use the pop-up menu to set the output scanning method (either the eld
dominance or a conversion to progressive scanning). There are four options:
•
Same as Source: Maintains the same scanning method used by the source media le.
•
Progressive: Scans complete frames (not frames divided into interlaced elds).
•
Top First: Scans interlaced elds, giving dominance (eld order) to the top eld.
•
Bottom First: Scans interlaced elds, giving dominance (eld order) to the bottom eld.
•
Add clean aperture information: Select this checkbox to dene clean picture edges in the
output le. To do this, information is added to the output le to dene how many pixels to
hide, ensuring that no artifacts appear along the edges. When you play the output le in
QuickTime Player, the pixel aspect ratio will be slightly altered; however, note that this process
does not aect the actual number of pixels in the output le—it only controls whether
information is added to the le that a player can use to hide the edges of the picture.
•
QuickTime settings: You can change the type of video compression by clicking the Change
button and using the controls in the Standard Video Compression Settings window to modify
the compression as appropriate. After you click OK and close the window, the setting’s video
properties update to show your changes.
Cropping and Padding
Customize the nal cropping, sizing, and aspect ratio using the Cropping & Padding properties.
Cropping removes video content from an image. Padding scales the image to a smaller size while
retaining the output image’s frame size. For more information about these properties, see Modify
frame size overview on page 69.
•
Cropping: This pop-up menu sets the dimension of the output image. The custom option
allows you to enter your own image dimensions in the elds; other options use predetermined
sizes. The Letterbox Area of Source option detects image edges and automatically enters crop
values to match them. This is useful if you want to crop out the letterbox area (the black bars
above and below a widescreen image) of a source media le.
•
Padding: This pop-up menu sets the scaling of the output image while retaining the output
image’s frame size. The custom option allows you to enter your own scaling dimensions in the
elds; other options use predetermined dimensions.
Chapter 4 Advanced adjustments 48
Page 49

Quality
The following properties determine how the video will be resized, retimed, and otherwise
adjusted when transcoded.
•
Resize lter: This pop-up menu sets the resizing method. There are three options:
•
Fast (Nearest Pixel): Provides the fastest processing time and with lower-quality output.
•
Better (Linear Filter): Provides a medium trade-o between processing time and
output quality.
•
Best (Statistical Prediction): Provides the highest output quality, but takes longer.
•
Retiming Quality: This pop-up menu sets the retiming method. There are four options:
•
Fast (Nearest Frame): Uses a copy of the nearest available frame to ll the new
in-between frames.
•
Better (Motion Adaptive): Uses deinterlacing on areas of the source le that contain
movement to produce good-quality output.
•
Best (Motion Compensated): Uses deinterlacing on areas of the source le that contain
movement to produce high-quality output.
•
Reverse Telecine: Removes the extra elds added during the telecine process to convert the
lm’s 24 fps to NTSC’s 29.97 fps. Choosing this item disables all the other Quality controls. For
more information, see About reverse telecine on page 74.
•
Adaptive details: Select this checkbox to use advanced image analysis to distinguish between
noise and edge areas during output.
•
Anti-aliasing level: Sets the softness level in the output image. Double-click the value and
then manually enter a new value or drag the slider to the right to increase softness. This
property improves the quality of conversions when you’re scaling media up. For example,
when transcoding SD video to HD, anti-aliasing smooths jagged edges that might appear in
the image.
•
Details level: Sets the amount of detail in the output image. Double-click the value and then
manually enter a new value or drag the slider to set the value. This sharpening control lets you
add detail back to an image being enlarged. Unlike other sharpening operations, the “Details
level” property distinguishes between noise and feature details, and generally doesn’t increase
unwanted grain. Increasing this value may introduce jagged edges, however, which can be
eliminated by increasing the “Anti-aliasing level” slider.
Video eects
For a list of available video eects and instructions on how to add a video eect to a setting, see
Add and remove eects on page 76.
Chapter 4 Advanced adjustments 49
Page 50

Audio properties
•
Channel layout: Use the pop-up menu to set the audio channel layout. For more information,
see About audio channels on page 67.
•
Sample rate: Use this pop-up menu to set the number of times per second that music
waveforms (samples) are captured digitally. The higher the sample rate, the higher the audio
quality and the larger the le size.
•
Sample size: Use the pop-up menu to manually set the sample size of the audio signal.
•
Copy audio tracks from source: Select the checkbox to copy the audio les from the source le
(instead of re-encoding them during the transcoding process).
•
QuickTime settings: You can add an audio codec that you’ve installed on your system to
customize the Compressor setting. To change the codec used in your setting, or to modify
the codec’s properties, click the Change button and use the controls in the Sound Settings
window to modify the codec as appropriate. After you click OK and close the window, the
setting’s audio properties update to show your changes.
Audio eects
For a list of available audio eects and instructions on how to add an audio eect to a setting,
see Add and remove eects on page 76.
Work with destinations
View and modify a destination’s properties
Destinations consist of one or more settings combined with an automated job action that
is performed after transcoding. For example, if you apply the built-in Publish to Facebook
destination to a source le, Compressor uses the setting to create a QuickTime movie le
optimized for viewing on the web and then runs a job action that publishes the le to your
Facebook account.
When you select a destination in the Settings pane, its properties are shown in the
Destination inspector:
•
Name: Displays the name of the destination.
•
Description: Displays a description of the destination.
•
When done: Use this pop-up menu to modify the job action associated with the destination.
For a list of each job action’s properties, see Job action properties on page 59.
View a destination’s properties
1 If the Settings pane or inspector pane is hidden, do the following:
•
To reveal the Settings pane, press Shift-Command-1.
•
To reveal the inspector pane, click the Inspector button in the upper-right corner of the
Compressor window.
2 Select a destination in the Settings pane.
The Destination inspector appears (in the inspector pane on the right side of the Compressor
window), displaying the destination name and description, setting properties, and job properties.
Modify a destination’s properties
m In the Destination inspector, adjust any of the available controls, including its action property.
Chapter 4 Advanced adjustments 50
Page 51

Create custom destinations
Similar to settings, you can create a custom destination from scratch, or by duplicating an
existing destination.
Create a custom destination
1 Choose New Destination from the Add pop-up menu at the bottom of the Settings pane.
2 In the window that appears, do the following:
a Select one or more transcode settings or a destination from the list.
To quickly locate an item, type a few letters of the item’s name in the search eld.
b Choose a job action for the destination from the Job action pop-up menu.
c Optionally, you can enter a name and a description in the relevant elds.
d Click OK.
The new destination appears in the Custom section of the Settings pane and is selected by
default. The Destination inspector is displayed in the inspector pane.
3 Fill in the job action properties in the Action area.
For example, if you choose the Add to iTunes Library job action, you can choose a playlist and
enter a title for the movie.
Because you’re modifying a custom destination, the properties that you provide for the job
action will be saved for future use.
You can also modify the properties of the setting that the destination uses. For more information,
see View and modify a setting’s properties on page 20.
Create a custom destination by duplicating an existing destination
You can also duplicate an existing destination and then modify its setting properties or job
action properties.
1 In the Settings pane, select the destination that you want to duplicate and then choose
Duplicate from the Action pop-up menu at the bottom of the pane.
The new destination appears in the Custom section of the Settings pane and is selected by
default. The Destination inspector is displayed in the inspector pane.
2 To modify the properties of the destination, do any of the following in the Destination inspector:
•
Select text in the Name eld or Description eld, and then type a new name or description.
•
Fill in the job action properties in the Action area. Because you are modifying a custom
destination, the properties that you provide for the job action will be saved for future use.
For information about job action properties, see Job action properties on page 59.
Chapter 4 Advanced adjustments 51
Page 52

Remove a destination
You can delete any custom destination.
Delete a custom destination
m Select a custom destination in the Settings pane, and then press Delete.
Work with locations
A location species where the transcoded le is saved after transcoding. You can use one of the
built-in locations provided in Compressor, or create a custom location. Locations are shown in
the Locations pane.
When you select a location, its properties are shown in the Locations inspector:
•
Name: Displays the location’s name.
•
Filename format: Adjust the naming tokens in this eld to modify the output lename.
•
Sample: Displays the output lename in the chosen in the “Filename format” eld.
•
Location: Displays where the transcoded le is saved.
View a location’s properties
1 In the Locations pane, select a location.
If the Locations pane is hidden, press Shift-Command-2.
2 If necessary, click the Inspector button to reveal the Location inspector.
The selected location’s properties are displayed in the Location inspector.
Chapter 4 Advanced adjustments 52
Page 53

Create a custom location
Drag tokens to reorder.
1 Click the Add button at the bottom of the Locations pane.
If the Locations pane is hidden, press Shift-Command-2.
2 In the window that appears, select a location on your computer or on a connected device, and
then click Choose.
The new location appears in the Custom area of Locations pane and is selected by default. The
Location inspector is displayed in the inspector pane.
3 To modify the properties of the location, do any of the following in the Location inspector:
•
Type a new name in the Name eld.
•
Drag or add naming tokens in the “Filename format” eld. For instructions on how modify the
lename format, see the next task, “Set a custom location’s lename format.”
•
If you decide to change the save location, click the Choose Location button, specify a new
location, and then click Choose.
Set a custom location’s lename format
When you add a setting to a job, Compressor automatically assigns an output lename based
on the lename format provided in the Locations inspector. You can change the lename
that Compressor assigns at any time. You can also modify the lename format that is used for
locations you’ve created. Then, each time you use the custom location, your custom lename
format will be used for the output le’s name.
Note: You cannot modify any part of a built-in location; however, you can duplicate a built-in
location and set its lename format as you choose. See the task above for instructions on
creating a custom location.
1 In the Locations pane, select a location.
If the Locations pane is hidden, press Shift-Command-2.
2 If necessary, click the Inspector button to reveal the Location inspector.
The “Filename format” eld in the Location inspector displays naming tokens that determine the
output lename.
Manually entered text
“Add element” pop-up menu
Sample filename
Chapter 4 Advanced adjustments 53
Page 54

3 To modify the lename format, do any the following:
•
Move existing tokens: Drag tokens to reorder them. Or click a token to select it, press
Command-X to cut the token, click to select a new location in the eld, and then press
Command-V to paste the token in the new location.
•
Add a token: Click a location in the eld to specify where you want to place a new token, and
then then choose a token from the pop-up menu.
•
Add text: Click a location in the eld to specify where you want to place a new token, and then
type the text.
As you change the output lename instructions, the sample lename (shown below the
“Filename format” eld) updates.
Delete a custom location
Note: You cannot delete a built-in location.
m In the Locations pane, select a location and then press Delete.
If the Location’s pane is hidden, press Shift-Command-2.
Work with jobs
Overview
When you add a source le to Compressor and apply settings or destinations, you create a
transcoding job. Jobs are displayed in the batch area of the Compressor window. When you
select a job in the batch area, its properties are shown in the Job inspector. In the Job inspector,
you can:
•
View or modify job properties, including metadata tags
•
Add or modify a job action to be performed after transcoding
The properties that appear in the Job inspector vary depending on the type of source le in the
job. See Standard media job properties on page 55, Image sequence job properties on page 56,
and Surround sound job properties on page 57. In addition, each job action has a set of unique
properties. See Job action properties on page 59.
View and modify job properties
After you select a job in the batch area, the Job inspector displays that job’s properties.
View a job’s properties
1 Select the job in the batch area.
Tip: To select a job, rather than one of its output rows, click the source lename at the top of
the job.
2 If necessary, click the Inspector button to reveal the inspector pane.
The selected job’s properties are displayed in the Job inspector.
Modify a job’s properties
m In the Job inspector, adjust any of the available controls, including eld order type (progressive
or interlaced) and metadata tags.
Additional job properties vary depending on the type of source le in the job. For more
information, see Standard media job properties on page 55, Image sequence job properties on
page 56, and Surround sound job properties on page 57.
Chapter 4 Advanced adjustments 54
Page 55

Add metadata to a job
m You can add metadata to a standard, image sequence, or surround sound job in the form of job
annotations and closed-caption les. For instructions, see Add metadata on page 80.
Delete a job
m Click a job in the batch area to select it, and then press Delete.
Job properties
Standard media job properties
The properties of a job containing a standard media le are described below. The job’s properties
are displayed in the Job inspector.
Job summary
Displays the name, location, video and audio encoding information, and the duration of the
source le.
Timing
Provides the timecode for the Start point, In point, and the duration of the output le.
File properties
The following properties are available in the File Properties section of the Job inspector:
•
Field order: Use the pop-up menu to set the order in which video elds are transcoded. There
are three options:
•
Progressive: Scans complete frames (not frames divided into interlaced elds).
•
Top First: Scans interlaced elds, giving dominance (eld order) to the top eld, also known
as the upper eld. Top rst eld order is often used by 640 x 480 systems.
•
Bottom First: Scans interlaced elds, giving dominance (eld order) to the bottom eld, also
known as the lower eld. Bottom rst eld order is often used in professional 720 x 486 and
DV 720 x 480 systems.
Metadata
The following properties are available in the Metadata section of the Job inspector:
•
Closed captions: Click the Choose button to add closed captions to your output le.
•
Add Job Annotation: Use this pop-up menu to add job annotation metadata to your output le.
For more information about metadata, see Add metadata on page 80.
Action
For information about each job action and the properties it contains, see Job action
properties on page 59.
Chapter 4 Advanced adjustments 55
Page 56

Image sequence job properties
The properties of a job containing an image sequence media le are described below. The job’s
properties are displayed in the Job inspector.
Note: To learn how to import a set of image sequence les, see Import image sequence les on
page 62.
Job summary
Displays the name, location, le information, and the duration of the source le.
Timing
Provides the timecode for the Start point, In point, and duration of the image sequence output le.
Image sequence properties
The following properties are available in the Image Sequence Properties section of the Job
inspector:
•
Field order: Use the pop-up menu to set the order in which video elds are transcoded.
•
Progressive: Scans complete frames (not frames divided into interlaced elds).
•
Top First: Scans interlaced elds, giving dominance (eld order) to the top eld, also known
as the upper eld. Top rst eld order is often used by 640 x 480 systems.
•
Bottom First: Scans interlaced elds, giving dominance (eld order) to the bottom eld, also
known as the lower eld.
•
Frame Rate: Select a frame rate for the image sequence le from the pop-up menu, or type a
custom value in the text eld.
•
Audio File: Add an audio le to the image sequence job le by clicking the Choose button,
selecting a le, and clicking Open.
Image sequence les
The les in the image sequence source le are displayed, in order, in this area of the Job inspector.
Metadata
The following properties are available in the Metadata section of the image Job inspector:
•
Closed captions: Use this pop-up menu to add closed captions to your output le.
•
Add Job Annotation: Use this pop-up menu to add job annotation metadata to your output le.
For more information about metadata, see Add metadata on page 80.
Action
For information about each job action and the properties it contains, see Job action
properties on page 59.
Chapter 4 Advanced adjustments 56
Page 57

Surround sound job properties
The properties of a job containing an image sequence media le are described below. The job’s
properties are displayed in the Job inspector.
Note: To learn how to import a set of surround sound les, see Import and modify surround
sound les on page 64.
Job summary
Displays the name, location, video and audio encoding information, and the duration of the
source le.
Timing
Provides the timecode for the Start point, In point, and duration of the source le.
Surround sound properties
In this area, you can see the name of the le assigned to each surround sound channel.
•
Remove button: Click the Remove button to remove the le assigned to a channel.
•
Channel icon: Click the channel icon (a speaker icon or subwoofer icon) to assign a le to
a channel.
•
Add Video: Click the Add Video button to add a video le to the surround sound source
audio le.
•
Clear All: Click the Clear All button to clear all the audio les assigned to the audio channels
and to remove the video le assigned to the surround sound source le.
Metadata
The following properties are available in the Metadata section of the Job inspector:
•
Closed captions: Click the Choose button to add closed captions to your output le.
•
Add Job Annotation: Use this pop-up menu to add job annotation metadata to your output le.
For more information about metadata, see Add metadata on page 80.
Action
For information about each job action and the properties it contains, see Job action
properties on page 59.
Chapter 4 Advanced adjustments 57
Page 58

Work with job actions
This job uses the
Add and modify job actions
A job action is an automated action performed on a media le after it's transcoded—such as
burning a DVD, uploading to Vimeo or YouTube, and so on. If a job contains a job action, a gear
icon is shown in the top-right corner of the job.
Create DVD job action.
You can add a job action to a job, as well as modify a job action’s properties, in the Job inspector.
Note: A job action is included in each of the built-in destinations provided with Compressor. For
more information, see View and modify a destination’s properties on page 50.
Add a job action to a job
1 Select the job in the batch area.
2 If necessary, click the Inspector button to reveal the inspector pane.
3 In the Action section (at the bottom of the Job inspector), select a job action from the When
done pop-up menu.
Additional properties may appear, depending on the job action you select. Add the appropriate
information to any additional elds.
For information about the properties of each job action, see Job action properties on page 59.
Fix a job action that has an alert icon
If a job action displays an alert icon , there’s an issue with the source le or the action
properties. For example, you may need to provide your Vimeo account name and password in
the job action’s properties; without that information, Compressor cannot upload the transcoded
le to your Vimeo account.
1 Move the pointer over the alert icon.
A help tag appears, displaying further instructions.
2 Select the job, and then, if necessary, click the Inspector button to reveal the inspector pane.
3 In the Action section of the Job inspector, modify the job action properties.
When the icon disappears, the issue is xed.
If you can’t remove the alert icon by modifying the action’s properties, there may be an issue
with the setting you’re using or the requirements of the action. For example, the media might be
too large for a website or disc, or the setting might not be compatible with the job action. For
more information, research the limitations of the setting and the requirements of the action.
Remove a job action
1 Select the job in the batch area.
2 If necessary, click the Inspector button to reveal the inspector pane.
3 In the Action section of the Job inspector, choose Do Nothing from the “When done” pop-up menu.
Chapter 4 Advanced adjustments 58
Page 59

Job action properties
Compressor comes with a set of job actions that are used in destinations as well as in jobs. The
job action assigned to a destination or job performs an automated action after transcoding—
usually copying the transcoded le to a new location.
For more information about adding or modifying a job action in a job, see View and modify job
properties on page 54. For information about choosing a job action that’s part of a destination,
see View and modify a destination’s properties on page 50.
The properties of job actions available in Compressor are described below.
Add to iTunes Library
•
Playlist: This pop-up menu sets a playlist for the output le to be added to. The choices in the
menu are automatically populated from your iTunes library. If necessary, you can click the
Refresh button to update the playlist choices.
•
Title: Displays the title of the le as you want it to appear in your iTunes library. You can type a
title in the text eld.
Disc-burning job actions
The “Create Blu-ray disc” and Create DVD job actions include the following properties:
•
Output device: This pop-up menu species the device that the output les will be formatted
for. You can choose Hard Drive to create a disk image (.img) le that you can burn to DVD
media at a later time using the Disk Utility application (available in the OS X Utilities folder).
Note: The items in this menu are determined by your system’s available options. For example,
when no Blu-ray or DVD drive is detected, only the Hard Drive option is available.
•
Layers: This pop-up menu sets the type of disc that will be created. There are three options:
•
Automatic: Detects the inserted disc’s type. For Automatic to work, you must insert the disc
before clicking Burn. Additionally, Automatic always creates a single-layer disk image when
Hard Drive is selected as the output device.
•
Single-layer: Creates output for a single-layer disc. You can use this option to treat a duallayer disc as a single-layer disc.
•
Dual-layer: Creates output for a dual-layer disc. When you choose Hard Drive as your output
device, the “Dual-layer” option creates a disk image in dual-layer disc format. Choosing
“Dual-layer” when using a single-layer disc may result in an error while burning the disc,
depending on the project’s length.
Chapter 4 Advanced adjustments 59
Page 60

•
Disc template: This pop-up menu sets the menu template.
•
Title: Type the disc name in the text eld.
•
When disc loads: This pop-up menu sets what happens when you play the disc: Show Menu or
Play Movie.
•
Use chapter marker text as subtitle: Select this checkbox to include chapter marker text as
subtitles on the output disc. For more information about chapter markers, see Add markers on
page 82.
•
Background: Click the Add button to select a graphic for the disc’s background.
•
Main Menu and Chapter Menu buttons: Click the Main Menu and Chapter Menu buttons to
display previews of the menus.
•
Include Loop Movie button: This property is available for a subset of Blu-ray disc templates.
Select this checkbox to add a Loop Movie button to the menu.
•
Logo: This property is available for Blu-ray disc only. Click the Add button to select a graphic for
the disc’s logo.
•
Title: This property is available for Blu-ray disc only. Click the Add button to select a title
graphic for the disc’s title.
Open with Application
•
Open with: This pop-up menu sets the default application for opening the transcoded le (for
example, iTunes or QuickTime Player).
Prepare for HTTP Live Streaming
This job action processes the transcoded les using the instructions you provide via the
properties below and then uploads the processed les to the server you specify.
•
Destination for Live Stream assets: Click the Choose button you want the live streaming assets
to be saved.
•
Segment duration: Enter a minimum number of seconds per segment for the segment duration.
Because the segment’s length determines when the web server can switch between the
various video formats while streaming to a device with varying network connection speeds, a
shorter segment duration allows the server to respond more quickly to changing connection
speeds. In most situations, it’s recommended that you leave the segment duration at
10 seconds.
•
Create Read Me le with sample HTML: Select this checkbox to create a sample HTML le for
hosting the HTTP live-streaming content.
Run Automator Workow
This job action applies an Automator workow to an output le after transcoding.
•
Workow: Click the Choose button to set the Automator workow that the job action triggers.
Send Email
This job action sends an email with an attachment of the transcoded le from Mail (the email
application that comes with Mac OS X).
•
To: Enter recipient’s email addresses in this eld.
•
Subject and Message: Enter relevant text in these elds.
Chapter 4 Advanced adjustments 60
Page 61

Web publishing job actions
The Publish to CNN iReport, Publish to Facebook, Publish to Tudou, Publish to Vimeo, Publish to
YouTube, and Publish to Youku job actions include the following properties:
Different fields are displayed
based on the selected
video-sharing service.
•
Category: Choose a category for the published le from the pop-up menu.
•
Copyright: Choose an item from the pop-up menu to set copyright information associated with
the le being published.
•
Description: Enter the description of the le that’s being published.
•
Email: Enter the email account name that’s used to log into the website.
•
Password: Enter the password that’s used to log into the website.
•
Privacy and Password: Choose a privacy option from the pop-up menu and then enter a
password to control who can view the published video.
•
Subject, Body: Enter descriptions of the published le.
•
Tags: Enter metadata that you want to be associated with the published le.
•
Title: Enter the title of the published le.
•
Viewable by: Choose an option from the pop-up menu to set viewing limitations for the
published le.
•
Username: Enter the username that’s used to log into the website.
Work with batches
A batch contains of one or more jobs to be submitted to Compressor for transcoding.
When you select a batch (by clicking the background of the Batch area), its properties are shown
in the Batch inspector:
•
Name: Identies the batch in Active and Completed views.
•
Jobs: Displays the number of jobs in the batch.
•
Outputs: Displays the number of les that will be output when transcoding the batch.
View batch properties
m Click the background of the batch area. If necessary, click the Inspector button to reveal the
inspector pane.
The batch properties are displayed in the Batch inspector.
Change the batch name
m In the Batch inspector, type a new name in the Name eld, then press Return.
Chapter 4 Advanced adjustments 61
Page 62

Advanced tasks
Advanced tasks overview
You can customize your workow by making specic adjustments to applied settings. This
chapter covers practical information and techniques you can use to do the following:
•
Create a source le that contains a set of image sequence les
•
Create a source le that contains surround sound les
•
Modiy an ouput le’s frame size
•
Modify an output le’s frame rate
•
Learn about audio channels
•
Add eects to video or audio
•
Add metadata to an ouput le
•
Set a poster frame or add markers
•
Transcode a portion of a source le
This chapter also provides examples of three common transcoding workows:
•
How to create a le with burned-in timecode
•
How to convert NTSC or PAL footage to 24p HD
•
How to create daily review copies of footage
5
Work with image sequence les
Import image sequence les
You can import a sequence of still images into Compressor as an image sequence source le.
Each image in the image sequence represents a single video frame.
Import a set of image sequence les
1 Do one of the following:
•
At the bottom of the batch area, choose Add Image Sequence from the Add pop-up menu
, select a folder of image sequence les, and then click Add.
•
Drag all of the image sequence les (not a folder that contains the les) from the Finder into
the batch area.
A new source media le appears in a job in the batch area.
62
Page 63

2 Click the Add Outputs button under the source media le, and then choose a transcode setting
and save location in the window that appears.
The job now contains a source le made of sequential images and output instructions (a setting,
a save location, and an output lename).
3 To view additional information about the job in the Job inspector, select the job in the
batch area.
The Job inspector appears on the right side of the Compressor window. (If the inspector pane is
hidden, click the Inspector button in the upper-right corner of the Compressor window.)
The Job Inspector displays information about the image sequence source le, including the
location of the les, size and frame information, and the duration of the sequence. Further down
in the Job inspector, you can view a list of the individual image les that make up the sequence.
4 If necessary, you can specify eld order and frame rate for the source le, or click the Choose
button to add an audio le to the image sequence source le.
You can work with the image sequence source le as you would any other source le, adding
additional settings or a destination to the job before transcoding. For more information, see
Simple transcoding overview on page 11.
You can also use Compressor to output an image sequence. For more information, see Image
Sequence on page 33.
Chapter 5 Advanced tasks 63
Page 64

Work with surround sound les
Import and modify surround sound les
There are two methods you can use to add audio les to a batch to create a surround sound job:
•
Manually assign audio les to surround sound channels.
•
Append audio lenames with channel identier codes and have Compressor automatically
map the lenames to the correct surround sound channels.
Each method creates a source le in a job to which you can add a setting that supports surround
sound audio outputs, such as a Dolby Digital setting or an AIFF setting.
After creating the surround sound source le, you assign output information to the job (one or
more settings or a destination and a location and name for the transcoded le) and transcode
the batch that contains the job.
Create a surround sound source le by manually assigning channels
1 Do one of the following:
•
At the bottom of the batch area, choose Add Surround Sound Group from the Add pop-up
menu .
•
Choose File > Add Surround Sound Group.
The channel assignment window opens.
2 To assign a source audio le to each channel, do one of the following:
•
Drag the source audio le from the Finder to the icon for a specic channel.
•
Click the icon for a specic channel, select a source audio le intended for that channel, and
then click Open.
3 To include a video le, click the Add Video button, select a video le, and then click Open.
Chapter 5 Advanced tasks 64
Page 65

4 When you’re done setting up the surround sound group, click Add.
A new surround sound source media le appears in a job in the batch area.
5 To view additional information about the surround sound source le in the Job inspector, select
the job in the batch area.
The Job inspector appears on the right side of the Compressor window. (If the inspector pane is
hidden, click the Inspector button in the upper-right corner of the Compressor window.)
Chapter 5 Advanced tasks 65
Page 66

Create a surround sound source le using channel identier codes
You can add channel identier codes to the lenames of surround sound les in the Finder and
then add the les in Compressor.
1 In the Finder, append the lename of each audio le with the appropriate channel identier code:
•
-L: Left front channel
•
-R: Right front channel
•
-C: Center front channel
•
-Ls: Left surround channel
•
-Rs: Right surround channel
•
-S: Center surround channel
•
-LFE: Low-frequency eects channel (subwoofer, LFE)
For example, if the audio le for your left front channel is named “nal audio_left.ai,” you would
name the le “nal audio_left-L.ai.”
Note: Compressor will recognize source les with or without a le extension (.ai or .wav,
for example).
2 Drag all of the renamed source audio les (not the folder of les) to the batch area.
A new job appears in the batch area, and the Job inspector displays the audio channels that
have been assigned based on their channel codes. (If the Job inspector is not visible, make sure
the job is selected in batch area and the Inspector button is highlighted blue. If you need to
reassign a channel, you can do so by clicking the channel’s icon in the Job inspector.
You can optionally include a video le in the surround sound source le by clicking the Add
Video button in the Job inspector, selecting a video le, and clicking Open.
Modify a surround sound source le
1 In the batch area, select a job that contains a surround sound source le.
2 In the Surround Sound Properties area of the Job inspector, do either of the following:
•
To assign a dierent le to a channel: Click the channel’s icon, select a dierent le, and
click Open.
•
To remove a le from a channel: Click the Remove button .
Chapter 5 Advanced tasks 66
Page 67

About audio channels
5.1 channels5.0 channels
Most of the audio settings in Compressor provide mono and stereo (left and right) channel
conguration; some provide additional channel output options, including surround (5.1) channel
conguration. Several of Compressor’s settings oer multiple audio channel congurations:
•
QuickTime Movie settings: QuickTime Movie settings include additional audio channel layouts,
including 3.0, 4.0, and 5.1.
•
Dolby Digital audio settings: Dolby Digital (AC-3) settings include even more audio channel
layouts, including 3.0, 3.1, 4.0, 4.1, and 5.1.
The illustration below shows the available audio channel layouts.
Cs
Cs
R
L R
LFE
Cs
C
R
C
L
Cs
C
Mono Stereo
L
C
3.0 channels 3.0 channels3.1 channels 3.1 channels
L R
Ls
4.0 channels
R
Rs
L
C
LFE
L R
LFE LFE
Ls
4.1 channels
R
Rs
L
L R
L
4.0 channels 4.1 channels
R
C
L
Ls
R L
Rs
C
R
LFE
Ls
Rs
Chapter 5 Advanced tasks 67
Page 68

The channel codes describe the location of the channel:
•
L: Left front channel
•
R: Right front channel
•
C: Center front channel
•
Ls: Left surround channel
•
Rs: Right surround channel
•
Cs: Center surround channel
•
LFE: Low-frequency eects channel (subwoofer, LFE)
Note: It’s important to understand that Compressor cannot convert stereo audio les into 5.1
surround sound channels. If you want to output a 5.1 surround sound audio le, you must rst
create the six channels of audio required and then import those surround sound les into
Compressor. Then you can use Compressor to output the surround sound source media le. For
more information, see Import and modify surround sound les on page 64.
After you import a surround sound source le, you can transcode that le into any of the channel
layouts above.
Compressor analyzes audio les during import to determine the source le’s channels. When
you apply a transcode setting to the source le, Compressor automatically adjusts the channel
layout of the setting to provide logical results. For many settings, you can choose Automatic from
the “Channel layout” pop-up menu (in the Audio inspector) to have Compressor determine the
logical channel layout based on the source le.
Compressor also maps channels intelligently during output. For example:
•
If you assign a mono channel layout to a stereo source le: The output le will be
automatically downmixed.
•
If you assign a surround channel layout to a stereo source le: The output le will have only left
and right channels—mapped to the left front (L) and right front (R) channels of the source
le—while the other channels are unassigned.
•
If you assign a left front or left rear surround channel to a stereo source le: Compressor maps the
source le to the left channel (and ignores the right channel).
Chapter 5 Advanced tasks 68
Page 69

Modify an output le’s frame size
Modify frame size overview
Although many of the built-in settings in Compressor contain properties that set the frame size
and aspect ratio of your output video le, you can customize the nal frame dimensions using
the cropping and padding properties in the Video inspector.
Cropping removes video content from an image. If the output le has a dierent aspect ratio than
the output frame size, black borders appear along the top and bottom or left and right sides of
the transcoded le. If the cropped image matches the output frame size, the image will still be
cropped, but no black borders will be seen.
Padding scales the image to a smaller size while retaining the output image’s frame size. Unlike
cropping, padding does not remove any of the source image. Instead, padding squeezes or
shrinks the image to force it to t into a dierent-sized frame. This can be useful for transcoding
les that are stored with incorrect pixel aspect ratios, such as widescreen DV les that are
incorrectly appearing in a non-widescreen format. You can also use the padding controls to
shrink an image and deliberately add black borders around the outside of the image.
Chapter 5 Advanced tasks 69
Page 70

Crop or pad the video frame
There are multiple ways you can customize the frame size of a source clip during transcoding.
The cropping and padding controls allow you a great degree of exibility and versatility.
Remove part of the source image
To remove part of the original source image, use the cropping controls in the Video inspector.
Depending on the “Frame size” setting (in the Video Properties section of the Video inspector),
cropping may or may not reveal black borders around the edges of your clips.
1 Do one of the following:
•
In the batch area, click an output row to select a setting that’s been applied to a job. With this
method, the modications you make will be used for outputting only that job.
•
In the Settings pane, select a custom setting from the Custom group. (If the Settings pane is
hidden, press Shift-Command-1.) With this method, the modications you make will be saved
to the custom setting for future use.
2 In the inspector pane, click Video to open the Video inspector.
If the inspector pane is not visible, click the Inspector button in the upper-right corner of the
Compressor window.
3 In the Cropping & Padding section of the Video inspector, do one of the following:
•
In the Cropping property, manually type a number in the Top, Bottom, Left, and Right elds to
crop the source image by that many pixels.
•
Choose a preset aspect ratio from the Cropping pop-up menu.
Note: If the aspect ratio you choose does not match the aspect ratio selected in the “Frame
size” pop-up menu (in the Video Properties section), you may see black bars around the edges
of your picture after the le is transcoded.
•
Choose Letterbox Area of Source from the Cropping pop-up menu. This instructs Compressor
to detect the black edges around the image in your source le and automatically enter crop
values to match them. This option is useful if you want to remove the letterbox area (the black
bars above and below a widescreen image) of a source media le.
•
In the preview area, click the Comparison button and position the pointer over the edges
of the frame until the pointer changes to a Crop pointer, then drag inward from the edge to
crop the image.
Note: Cropped edges are visible only on the preview side of the preview area (the right side);
the side of the preview area showing the Source media (the left side) does not display the
crop eect.
Chapter 5 Advanced tasks 70
Page 71

Force the source image to a dierent aspect ratio
1 Do one of the following:
•
In the batch area, click an output row to select a setting that’s been applied to a job. With this
method, the modications you make will be used for outputting only that job.
•
In the Settings pane, select a custom setting from the Custom group. (If the Settings pane is
hidden, press Shift-Command-1.) With this method, the modications you make will be saved
to the custom setting for future use.
2 In the inspector pane, click Video to open the Video inspector.
If the inspector pane is not visible, click the Inspector button in the upper-right corner of the
Compressor window.
3 In the Cropping & Padding section of the Video inspector, do one of the following:
•
In the Padding property, manually type a number in the Top, Bottom, Left, and Right elds to
pad the source image by that many pixels.
•
Choose a preset aspect ratio from the Padding pop-up menu.
Note: If the aspect ratio you choose does not match the aspect ratio selected in the “Frame
size” pop-up menu (in the Video Properties section), the image may appear squished or
squeezed after the le is transcoded.
•
Choose Preserve Source Aspect Ratio from the Padding pop-up menu. This ensures that
the source clip remains at its native aspect ratio. If the “Frame size” pop-up menu (in the
Video Properties section) is set to a dierent aspect ratio, black borders will be added to the
transcoded output le.
Modify an output le’s frame rate
Frame rate options overview
There are two ways to modify the rate at which a transcoded le plays back. You can apply speed
eects to slow down or speed up playback, or you can change the frame rate of the transcoded
le (which may or may not have an eect on playback speed). If you do change the frame
rate, there are special options for working with interlaced footage, including deinterlacing and
reverse telecine.
The controls that make speed modications are located in the General inspector and in the
Video inspector.
Retime video and audio output
To retime video, you make changes to properties in both the General inspector and the Video
inspector. (You can create some eects by modifying properties in only one of the inspectors.)
The Retiming section in the General inspector allows you to dene a new speed setting for the
clip. You can specify a percentage, such as 50% to create a slow-motion eect or 200% to create
a fast-motion eect; you can identify a precise number of frames and allow the software to
calculate the percentage for you; or you can instruct Compressor to renumber the current frames
into a dierent frame rate in order to convert a le from one frame rate to another without
adding or deleting any frames.
Those settings in the Retiming section are controlled by the settings In the Video Inspector. In
the Video Properties section, you can set a specic frame rate for the transcoded le. By default
this property is set to “Automatic,” which applies the frame rate of the source le to the output
le. Change this setting to create a le with a dierent frame rate from the source.
Chapter 5 Advanced tasks 71
Page 72

If the source media le contains audio, retiming modies the audio speed as well, thereby
keeping audio and video in sync. Compressor also automatically corrects the pitch so the audio
does not sound articially high or low.
Important: If you modify retiming properties in a setting that uses the QuickTime Movie format
and choose “Copy audio tracks from source” in the Audio inspector, the audio speed is not
changed. Consequently, audio in the output le will not maintain sync with the video.
In the Quality section of the Video inspector you can set the retiming quality. The “Retiming
quality” control species the processing method used when you make changes to any of the
other settings that modify the speed or frame rate of the clip.
Modify timing and frame rate
You can modify the duration of a transcoded le by adjusting controls in the General inspector.
You can modify the frame rate of a transcoded le by adjusting controls in the Video inspector.
Choose a new duration for a transcoded le
1 Do one of the following:
•
In the batch area, click an output row to select a setting in a job. With this method, the
modications you make will be used for outputting only that job.
•
In the Settings pane, select a custom setting from the Custom group. (If the Settings pane is
hidden, press Shift-Command-1.) With this method, the modications you make will be saved
to the custom setting for future use.
2 In the inspector pane, click General to open the General inspector.
If the inspector pane is not visible, click the Inspector button in the upper-right corner of the
Compressor window.
3 In the Retiming section, modify the “Set duration to” property in one of the following ways:
•
Enter a specic percentage of the source footage in the percentage eld, or choose a preset
percentage from the pop-up menu (with a downward arrow).
Note: Selecting a setting from this pop-up menu does not change the frame rate of the
output le. If you want to create a le at a frame rate other than the source’s original rate, you
must change the setting in the Video inspector.
•
Click to select the button next to the timecode eld and enter a specic duration for the
outgoing le. (The percentage eld above will automatically update.)
Note: This option is available only when you are modifying a setting that is part of a job.
•
Click to select the “So source frames play at [frame rate] fps” button.
Note: The frame rate used in this option is the value set in the “Frame rate” property in the
Video inspector.
Chapter 5 Advanced tasks 72
Page 73

Change the frame rate for a transcoded le
1 Select a setting that is part of a job in the batch area, or select a custom setting in the
Settings pane.
2 In the Video inspector, do one of the following:
•
Choose an item from the “Frame rate” pop-up menu.
Automatic, the default setting, matches the frame rate of the transcoded le to that of
the source le. You can also choose any of several commonly used frame rates, including
23.976 fps, 24 fps, and so on.
•
Type a custom frame rate into the eld to the right of the pop-up menu.
Note: Frame rate conversion can have a subtle or dramatic eect depending on how big a
dierence there is between the original and new frame rates, and also depending on the specic
nature of the footage being converted. Footage with a lot of movement yields a much more
visible change than footage with little movement in the frame. Frame rate conversion may also
add visible artifacts in the transcoded le; from stuttering (sometimes called “juddery”) playback,
to repeated frames, ghost images, or other unnatural-looking elements. These eects can be
somewhat mitigated by adjusting the “Retiming quality” property in the Quality section of the
Video inspector.
3 Select a value from the “Field order” pop-up menu to choose a progressive or interlaced frame rate.
If the current setting does not allow eld order modication, this control remains dimmed.
If you want to convert a le with an interlaced format into a progressive format, see About
deinterlacing on page 73.
Note: The properties in the Retiming section of the General inspector are always aected by the
“Frame rate” property, as well as the “Retiming quality” property in the Video inspector.
About deinterlacing
Video to be played on traditional NTSC or PAL televisions is encoded using an interlaced frame rate.
Each frame is actually made up of two half-frames called elds. Each eld contains half the frame
lines; the odd (or upper) eld contains lines 1, 3, 5, 7, 9 and so on, and the even (or lower) eld
contains lines 2, 4, 6, 8, 10, and so on. When the video is played back, the TV displays the elds in
an alternating pattern, which creates an eective illusion of smooth movement. Viewing interlaced
video on a computer screen that displays both elds simultaneously may reveal a combing eect.
Interlacing creates
a “comb” effect
when viewed on
a computer screen.
Chapter 5 Advanced tasks 73
Page 74

You can deinterlace, or remove the elds from an interlaced video clip, by converting it to a
A
D
D
3:2 Pull-Down Removal
D
D
progressive frame rate. The video settings provided in Compressor contain a “Field order” pop-up
menu in the Video inspector that you can use to turn interlacing on or o for the transcoded
le. For more information, see the topic that covers the format you’re using for transcoding, for
example, QuickTime Movie on page 47 or MPEG-2 on page 37.
About reverse telecine
Telecine is the process of converting motion picture lm to the NTSC video format used in
broadcast television. The most common telecine approach to converting lm’s standard 24 fps
frame rate to NTSC video’s 29.97 fps frame rate is to perform a 3:2 pulldown (also known as a
2:3:2:3 pulldown). If you alternate recording two elds of one lm frame and then three elds of
the next, the 24 frames in 1 second of lm end up lling the 30 frames in 1 second of video.
A B C D
A A B B B C C D D D
Field1Field2Field1Field
2
Field1Field
2
Field1Field
2
Field1Field
2
Before (23.98 fps)
3:2 Pull-Down
A B C D A D A B C D A B C D A B C D A B C D
B C
After (29.97 fps)
BA B B CC D DA A B B B C C D D D A A B B B C C D D D A A B B C C D D D A A B BB CC D D D A BA B B CC D DB
One second
As shown above, the 3:2 pattern repeats after four lm frames.
For editing and eects purposes, it’s often desirable to remove the extra elds and restore the
video to its original 24 fps rate. This process is known as reverse telecine. An additional benet of
restoring the original is that it’s easier to convert this to PAL, the European broadcast standard,
which uses a 25 fps frame rate.
The lower frame rate also has the advantage of requiring fewer frames per second of video, leading
to smaller le sizes. The reverse telecine feature in Compressor makes it easy to do this conversion.
One second
Before (29.97 fps)
BA B B CC D DA A B B B C C D D D A A B B B C C D D D A A B B C C D D D A A B BB CC D D D A BA B B CC D DB A
After (23.98 fps)
A B C D A D A B C D A B C D A B C D A B C D
B C
A A B B B C C D D D
Field1Field2Field1Field
2
Field1Field
2
Field1Field
2
Field1Field
2
A B C D
Chapter 5 Advanced tasks 74
Page 75

When using the reverse telecine feature in Compressor, consider these issues:
•
Because of the unpredictable nature of the processing when reversing the telecine,
segmented encoding does not work as eciently as it does when reverse telecine is not
being used.
•
If you pause the transcoding process, the transcode must start from the beginning when you
restart it.
When lm is telecined to NTSC video, it has a constant cadence. This means that the 3:2 pattern
is consistent and uninterrupted. It’s relatively easy to remove the telecine from a constantcadence clip because you need only determine the pattern once.
If you take these telecined clips and edit them as NTSC video, the result is a nal video le that
has a broken cadence with an inconsistent 3:2 pattern. It’s much more dicult to remove the
telecine from such a clip because you have to constantly verify the cadence to make sure you
don’t inadvertently choose incorrect elds when creating the 23.98 fps video.
The reverse telecine feature in Compressor automatically detects broken cadences and adjusts
processing as needed.
Perform a reverse telecine frame rate conversion
1 Do one of the following:
•
In the batch area, click an output row to select a setting in a job. With this method, the
modications you make will be used for outputting only that job.
•
In the Settings pane, select a custom setting from the Custom area. (If the Settings pane is
hidden, press Shift-Command-1.) With this method, the modications you make will be saved
to the custom setting for future use.
2 In the inspector pane, click Video to open the Video inspector.
If the inspector pane is not visible, click the Inspector button in the upper-right corner of the
Compressor window.
3 In the Video Properties section of the Video inspector, choose 29.97 from the “Frame rate”
pop-up menu.
4 In the Quality section of the Video Inspector, choose Reverse Telecine from the “Retiming quality”
pop-up menu.
5 If you’re modifying the setting of a specic job, click Start Batch to begin transcoding.
If you’re modifying a custom setting, there are no additional steps to take.
Chapter 5 Advanced tasks 75
Page 76

Add video and audio eects
Add and remove eects
Compressor provides a variety of video and audio eects that you can use to improve the quality
of the video and audio in the transcoded le. Video eects modify specic visual aspects of your
source media, such as brightness and contrast, color, noise levels, and interlacing. Audio eects
modify sound aspects in your source media, such as dynamic range, peaking, and equalizer eects.
To add an eect to an output le, you add the eect to a setting and then use that setting to
output your source le. You can view both the source le and a preview of the transcoded le in
the preview area.
Important: As with other properties you add to a setting, eects you add to a built-in setting are
not saved for future use. If you want to save the eects you apply to a setting, you must create a
custom setting by duplicating the built-in setting that contains the eects. For more information,
see Create custom settings on page 21.
Add a video or audio eect
1 Do one of the following:
•
In the batch area, click an output row to select a setting that is part of a job.
•
In the Settings pane, select a custom setting from the Custom area. (If the Settings pane is
hidden, press Shift-Command-1.)
2 In the Video inspector or Audio inspector, choose an item from the Add Video Eect pop-up
menu or from the Add Audio Eect pop-up menu.
If the inspector pane is not visible, click the Inspector button in the upper-right corner of the
Compressor window.
After you choose an eect from the pop-up menu, its adjustable properties appear at the
bottom of the inspector. For detailed information about these properties, see Video eects on
page 77 and Audio eects on page 79. You can apply multiple video and audio eects. When you
add an eect, a checkmark appears beside the eect name in the pop-up menu.
3 Preview eects that you’ve added to a setting by clicking the Play button in the preview area.
Because eects may interact in unexpected ways, be sure to preview the transcoded le each
time you add an eect.
Note: Depending on your system, the source media le type, and the number of eects in the
job, the preview area showing the lter settings may update at a lower frame rate than the
source frame rate.
Change the order in which eects are applied to a source le
Because eects are processed one by one during transcoding—starting with the rst item in the
list—it’s important that you order the eects appropriately. For example, it’s sensible to place a
text overlay eect last in your list of eects so that its text color isn’t modied by other eects.
If you preview the transcoded le and don’t like the results of an eect, you can try reordering
the eects in the eects list to improve the results of the transcoded le.
m Select an eect and drag it to new location in the list of eects at the bottom of the Video or
Audio inspector.
Chapter 5 Advanced tasks 76
Page 77

Turn an eect o or on
After adding an eect to a setting, you can turn its properties o or on. This can be useful when
previewing an eect.
m Click the blue activation checkbox next to the eect properties. When the checkbox is blue, the
eect is turned on. When the checkbox is black, the eect is turned o.
Remove an eect from a setting
m Choose a checkmarked item from the Add Video Eect pop-up menu (at the bottom of the
Video inspector) or the Add Audio Eect pop-up menu (at the bottom of the Audio Inspector).
The eect’s properties are removed from the list below the pop-up menu.
Video eects
Choose a video eect from the Add Video Eect pop-up menu in the Video inspector:
•
Black/White Restore: Compresses the solid black and white areas (luminance) in the video, such
as backgrounds. This eect can restore nearly black colors to pure black and restore nearly
white colors to pure white without aecting colors in the rest of the image. Drag the sliders to
set the black and white values between 0 and 100. (You can also double-click the values and
type new values.)
•
Brightness and Contrast: Brightens or darkens the overall color and luminance of the video. For
example, use this eect to counteract the darkening to video that some QuickTime codecs can
cause. It’s recommended that you avoid extreme settings, because they can make colors look
washed-out. Drag the sliders to set brightness and contrast values between –100 and 100. (You
can also double-click the values and type new values.)
•
Color Correct Highlights, Color Correct Midtowns, Color Correct Shadows: Correct white balance
inaccuracies and create color eects on the bright, midtone, or dark areas of the video. Drag
the sliders to set red, green, and blue values between –100 and 100. (You can also double-click
the values and type new values.)
•
Fade In/Out: Adds a dissolve and a matte color at the beginning and end of the clip. This eect
has the following properties:
•
Fade in duration/Fade out duration: Enter a time (use a decimal to specify tenths of seconds)
in the text eld to set the duration of the fade-in and fade-out eects.
•
Fade in opacity/Fade out opacity: Drag the sliders to set the opacity of the clip’s video at the
rst and last frames. (You can also double-click the values and type new values.) A value of
0.0 sets the clip video to be completely covered by the matte color; a value of 0.5 sets the
clip to be 50 percent covered by the matte color; and so on.
•
Fade color: Click the color well to set the fade-in and fade-out color.
•
Gamma Correction: Controls the range of brightness in an image. This eect can be used to
remove detail from an underexposed clip or to reduce the saturation of an overexposed clip.
Drag the slider to set gamma values between 0.1 and 4.0. (You can also double-click the value
and type a new value.)
Note: Computers using dierent operating systems have dierent monitor settings. For cross-
platform viewing, correcting the gamma will improve the image for all platforms.
Chapter 5 Advanced tasks 77
Page 78

•
Noise Removal: Reduces random ecks of noise in the video le, including noise introduced by
codecs. This eect allows you to blur areas of low contrast while leaving high-contrast edges
sharp, creating results that are imperceptible to the human eye but that improve the nal
compression of the transcoded le. The eect’s properties include:
•
Apply to: This pop-up menu sets the channels from which noise is ltered. Choose “All
channels” to lter noise from all channels including the alpha channel. Choose “Chroma
channels” to lter noise from the two chroma channels (U and V) in the YUV color space.
•
Iterations: Choose the number of noise-smoothing passes (between 1 and 4) from this
pop-up menu. For instance, if you choose 2 passes, the noise-removal algorithm is applied to
the media le twice. The le resulting from the of rst pass is used for the second pass, and
so on, so that the more times a pass is performed, the fuzzier the image becomes.
•
Algorithm: Choose a noise-smoothing algorithm from this pop-up menu. Choose Average
to modify each pixel’s color by taking an average of pixels around it, including its own color
value. Choose Replace to modify each pixel’s color by taking an average of pixels around
it, while ignoring its own color value. Choose Merge to modify each pixel’s color by taking
a weighted average of surrounding pixels and itself (with the pixel’s own color value given
greater weight).
•
Sharpen Edge: Sets the contrast around object edges. This eect can counteract the softening
caused by noise removal or blurred source material and increase the perception of sharpness
in the video. However, note that too much of this eect can make video look grainy. Drag the
slider to set sharpening between 0.0 and 100.0. (You can also double-click the value and type
a new value.)
•
Text Overlay: Superimposes text onto the image. The Text Overlay eect contains the
following properties:
•
Position: Choose a position for the text overlay from the pop-up menu, such as Center, Lower
Left, Lower Left–Title Safe, and so on.
•
Alpha: Drag the slider to set the text opacity between 0 (completely transparent) and 1
(completely opaque). (You can also double-click the value and type a new value.)
•
Overlay text: Type text in this eld.
•
Text color: Click the color well to set the text color.
•
Font: Click the Select button to set the font, style, and size.
•
Timecode Generator: Superimposes the clip’s timecode onto the video. The Timecode Generator
eect contains the following properties:
•
Position: Choose a position for the timecode overlay from the pop-up menu, such as Center,
Lower Left, Lower Left–Title Safe, and so on.
•
Alpha: Drag the slider to set the text opacity between 0 (completely transparent) and 1
(completely opaque). (You can also double-click the value and type a new value.)
•
Label: Optionally, type text that you want to appear to the left of the timecode number.
•
Start timecode at 00:00:00:00: Select this checkbox to have the timecode start at zero. When
the checkbox is not selected, the timecode starts at the video’s timecode.
•
Text color: Click the color well to set the text color.
•
Font: Click the Select button to set the font, style, and size.
Chapter 5 Advanced tasks 78
Page 79

•
Watermark: Superimposes a still image or a movie le onto the video. This eect contains the
following properties:
•
Position: Choose a position for the watermark from the pop-up menu, such as Center, Lower
Left, Lower Left–Title Safe, and so on.
•
Scale by: Drag the slider to set the watermark image’s scaling between 1 (actual size) and 10
(10 times the actual size). (You can also double-click the value and type a new value.)
•
Alpha: Drag the slider between 0 (completely transparent) and 1 (completely opaque) to
adjust the watermark’s opacity. (You can also double-click the value and type a new value.)
•
Repeat: If you are using a video clip for the watermark image, select this checkbox to loop
the playback of the watermark clip throughout the duration of the source le.
•
Watermark: Click the Select button specify a still image or video le to use for the watermark.
Audio eects
Choose an audio eect from the Add Audio Eect pop-up menu in the Audio inspector:
Note: Audio eects are not available in some settings when the “Copy audio tracks from source”
checkbox is selected in the Audio inspector.
•
Apple: AUGraphicEQ: Congures a wide variety of frequencies throughout the audible
frequency range. Click the Options button to open the graphic equalizer window, and then
choose either a 31-band version or a 10-band version from the pop-up menu at the bottom.
Adjust frequencies by doing any of the following:
•
Drag a slider to adjust the level of a frequency band.
•
Select a frequency slider and then type a number in the dB eld (in the lower-right corner of
the graphic equalizer window).
•
Click the Flatten EQ button to set all bands to a 0.0 dB value.
•
Drag to select multiple bands and then adjust the group.
•
Hold down the Control key while dragging across the bands to “draw” an equalization curve.
Chapter 5 Advanced tasks 79
Page 80

•
Dynamic Range: Controls a clip’s audio levels by enhancing the quieter parts and lowering
the louder parts. This is also referred to as audio level compression. The Dynamic Range eect
contains the following properties:
•
Soften above: Drag the slider to set the level at which audio is reduced (softened) to the level
set by the “Master gain” control (described below). (You can also double-click the value and
type a new value.)
•
Noise threshold: Drag the slider to set the level at which the eect is applied. (You can also
double-click the value and type a new value.) Audio at and above the noise threshold is
dynamically boosted to the level set by the “Master gain” control (described below), and
audio below the noise threshold is not modied.
•
Master gain: Drag the slider to set the average level of the dynamically compressed audio.
(You can also double-click the value and type a new value.)
•
Fade In/Out: Adds an audio fade-in eect at the beginning of the clip and a fade-out at the end
of the clip. The Fade In/Fade Out lter contains the following properties:
•
Fade in duration: Enter a value in the text eld or move the slider to set the length of the
fade in seconds.
•
Fade out duration: Enter a value in the text eld or move the slider to set the length of the
fade out in seconds.
•
Fade in gain: Drag the slider to set the value between –100.0 (silence) and 0.0 (the audio’s
volume) to dene the audio volume at which to start the fade in. (You can also double-click
the value and type a new value.)
•
Fade out gain: Drag the slider to set the value between –100.0 (silence) and 0.0 (the audio’s
volume) to dene the audio volume at which to start the fade out. (You can also double-
click the value and type a new value.)
•
Peak Limiter: Sets the level of the loudest audio allowed in the clip. Drag the Gain slider to set
the level above which louder peaks are reduced. (You can also double-click the value and type
a new value.)
Add metadata
You can add metadata to your transcoded le in the form of job annotations and
closed-caption les.
Add annotations to a media le
Annotations are output with les transcoded using Apple Devices, MP3, and QuickTime settings.
You can annotate a source media le with information that is important for your workow or
for the person viewing your output le. You can add any of the annotation elds provided in
Compressor, or import metadata that’s used in another media le (like a QuickTime movie).
1 In the batch area, select the job that contains the source le to which you want to add metadata.
Tip: To select the job, rather than an output row under the job, click the source lename at the
top of the job area.
2 In the Metadata area of the Job inspector, do one of the following:
•
Choose an annotation type from the Add Job Annotation pop-up menu.
•
Choose Import from the Add Job Annotation pop-up menu, select a media le that contains
annotations that you want to add to your source le, and then click Open.
3 Type a description in the text eld (or in multiple text elds) for the annotation type you chose.
Chapter 5 Advanced tasks 80
Page 81

Associate a closed caption le with a source le
Compressor can include a closed caption le (using the Scenarist closed caption format le)
when encoding les with the following formats:
•
QuickTime les: Compressor adds the closed caption le as a closed caption track to the
QuickTime output le. You can view the closed captions using QuickTime Player (version 7.2
or later).
•
MPEG-2 elementary stream les: Compressor embeds the closed caption data in an elementary
MPEG-2 video stream so that it can be used for DVD authoring.
•
MPEG-2 program and transport stream les: Compressor embeds the closed caption data in
program and transport MPEG-2 streams using the EIA-608 ATSC protocol.
Note: The timecode values in the closed caption le must directly relate to the timecode of the
source media le. If you need to see the timecode values in a Scenarist le, try opening it in the
TextEdit application that comes with OS X.
1 In the batch area, select the job that contains the source le to which you want to add closed
captioning information.
Tip: To select the job, rather than an output row under the job, click the source lename at the
top of the job area.
2 In the Metadata area of the Job inspector, click the Choose button in the “Closed captions”
property, select a Scenarist closed caption le in the window that appears, and then click Open.
Set a poster frame
The poster frame is a still image that represents a video or audio media le or a podcast chapter
in applications such as iTunes and in the Finder.
Note: When viewing the output le in iTunes, if no poster frame is set, iTunes automatically uses
the frame 10 seconds from the movie’s rst frame as the poster frame.
Set the poster frame for a job
1 In the batch area, select the job that contains the source le to which you want to set a
poster frame.
Tip: To select the job, rather than an output row under the job, click the source lename at the
top of the job area.
2 In the preview area, position the timeline playhead at the frame you want to be the
poster frame.
3 In the preview area, choose Set Poster Frame from the Marker pop-up menu .
Chapter 5 Advanced tasks 81
Page 82

A poster frame marker appears in the timeline.
Go to the poster frame
m In the preview area, choose Go to Poster Frame from the Marker pop-up menu .
Remove the poster frame
m In the preview area, choose Clear Poster Frame from the Marker pop-up menu .
Add markers
Compressor can import and create the following types of markers:
•
Chapter markers: These markers allow easy access to index points throughout a DVD,
QuickTime movie, or video podcast. QuickTime Player can interpret any text track containing
time stamps as a chapter track. Chapter markers can also be linked to artwork and a URL,
which are displayed when a podcast is played.
•
Compression markers: Used for MPEG-2 encoding. These markers identify where Compressor
should generate an I-frame, one type of frame used in a GOP (group of pictures). For more
information, see MPEG-2 on page 37.
•
Edit/cut markers: These markers are used during transcoding to mark frames where MPEG
I-frames should be generated. The I-frames help improve compression quality. Edit/cut markers
are also known as automatic compression markers.
•
Podcast markers: Like chapter markers, these markers can be linked to artwork and a URL.
Podcast markers are usually used to provide a slideshow (with URLs) for users to view when
playing audio podcasts. However, podcast marker names do not appear in the slideshow, and
users cannot navigate to a podcast marker in the transcoded le.
Markers can be output when using settings based on the following formats:
•
H.264 for Apple Devices (For more information, see H.264 for Apple Devices on page 28.)
•
MPEG-2 (For more information, see MPEG-2 on page 37.)
•
MPEG-4, when congured for audio podcasting (For more information, see MPEG-4 on page 42.)
•
QuickTime Movie (For more information, see QuickTime Movie on page 47.)
Important: Although you can set and congure markers for all jobs, only jobs that use the
output le formats listed above will output a le that includes markers.
Chapter 5 Advanced tasks 82
Page 83

Add a marker to a media le
1 In the batch area, select the job that contains the source le to which you want to add markers.
Tip: To select the job, rather than an output row under the job, click the source lename at the
top of the job area.
2 In the preview area, identify where to place the marker by doing one of the following:
•
Drag the playhead to where you want to add a marker.
•
Enter a timecode value in the playhead timecode eld.
3 To add a marker, choose Add marker from the Marker pop-up menu (or press M).
An orange chapter marker appears in the source le’s timeline in the preview area.
4 To change the marker type, choose a dierent marker type from the Type pop-up menu in the
Marker inspector.
Note: If the Marker inspector is not visible, make sure the marker is selected in the preview
area and the Inspector button in the upper-right corner of the Compressor window is
highlighted blue.
Specify properties for chapter and podcast markers
You can specify the properties of a chapter or podcast marker in the Marker inspector.
Note: A podcast can have both chapter and podcast markers. The only dierence is that the
viewer can navigate directly to a chapter marker but cannot navigate to a podcast marker.
1 Select a job in the batch area, and then select a marker in preview area.
2 In Marker inspector, choose either Chapter or Podcast from the Type pop-up menu.
3 Enter a name for the marker in the Name eld.
When viewing the transcoded le, the name of the marker will be displayed on Apple playback
devices and in QuickTime Player.
4 Enter a web address in the URL eld.
When viewing the transcoded le, you can click the URL to open a web browser and view
a website.
5 Select an image to be displayed at the marker point by choosing an option from the Image
pop-up menu:
•
Frame: Uses the frame on which the marker is placed as the display image. To use a dierent
frame in the source le, enter a dierent timecode value in the viewer that appears at the
bottom of the Marker inspector.
•
File: Uses an image le that you select via the window that appears. To change the image le
after you’ve already added it to the Marker inspector, click Choose, and then select a dierent
image le.
Chapter 5 Advanced tasks 83
Page 84

Add markers using a chapter marker list
You can create a list of timecode points (using values that match the timecode on the track’s
video clip) and then use that list to create chapter markers.
The le containing the list of timecode points must follow these rules:
•
The list of timecode values must be a plain text le. For best results, create the list with
TextEdit and save the les using the .chp or .txt extension.
•
Each marker must be on a new line that starts with a timecode value in the format 00:00:00:00.
•
After the timecode value, you can include a name for the marker. You can use a space or tab
character to separate the timecode value from the marker name.
•
Any lines that do not begin with a timecode value are ignored. This makes it easy for you to
add comments to the list.
•
The timecode values do not have to be listed in chronological order.
After creating the list, you import it into Compressor:
1 In the batch area, select the job that you want to add markers to.
2 In the preview area, choose Import Chapter List from the Marker pop-up menu .
3 In the window that appears, select the chapter marker le and click Open.
The markers are added to the source le as chapter markers. You can view them in the
preview area.
You can manually change the markers to podcast or compression markers. You can also add
URLs and artwork to them as needed. For more information, see the previous tasks.
Hide markers
You can set Compressor to show or hide the dierent types of markers.
m In the Marker pop-up menu , choose Hide Chapter/Podcast Markers, Hide Compression
Markers, or Hide Edit/Cut Markers.
To reveal a type of markers, select the same item in the pop-up menu.
Remove markers
1 Select a job in the batch area and then select a marker in the preview area.
You can also select markers by clicking the Next button or Previous button in the
preview area.
2 Do one of the following:
•
Remove all markers in the source le: Choose Remove All Markers from the Marker pop-up
menu
•
Remove one marker: Select a marker by clicking it or clicking the Next button or Previous
button in the preview area. Then choose Remove Marker from the Marker pop-up menu
(or press M).
Chapter 5 Advanced tasks 84
Page 85

Limit time ranges when transcoding
You can limit transcoding to specic time ranges in a media le by setting In and Out points.
Transcode a portion of a source le
1 In the batch area, select the job that contains the source le that you want to transcode.
2 In the preview area, do one of the following to mark In and Out points:
•
Drag the In point to where you want the transcoding to begin, and then drag the Out point
to where you want the transcoding to end.
•
Press the play button (or click the space bar) to preview the media le. When the playhead
reaches the location where you want to place an In point, press I. When the playhead reaches
the location where you want to place an Out point, press O.
Note: You can view the duration of the portion of the source le in the Job inspector.
Only the portion of the source le that you identied will be transcoded when you submit
the batch.
Transcode multiple portions of a source le
To transcode multiple portions of the same clip, you create a job for each portion of the source
le you want to transcode.
1 In the batch area, select the job that contains the source le that you want to transcode.
2 In the preview area, set a portion of the source le to be transcoded by doing the following:
•
Drag the In point to where you want the transcoding to begin, and the drag the Out point
to where you want the transcoding to end.
•
Press the play button (or click the Space bar) to play the source le. When the playhead
reaches the location where you want to place an In point, press I. When the playhead reaches
the location where you want to place an Out point, press O.
3 Duplicate the job by doing the following:
a Control-click the job you used in step 1, and then choose Edit > Copy from the shortcut menu).
b Select an empty part of the batch area to deselect the job you just copied, then Control-click
the batch area and choose Edit > Paste from the shortcut menu.
The duplicate job is pasted into the batch area.
4 Designate a dierent portion of the source le to be transcoded by following the instructions in
steps 1 and 2.
Chapter 5 Advanced tasks 85
Page 86

Common transcoding workows
Example: Create a le with burned-in timecode
This example describes how to create custom settings, as well as how to add video eects to
your settings through the example of creating a “window dub.” The general idea presented here
can be extrapolated to create custom settings for a wide variety of other workows.
When sending copies of an edited movie to colleagues such as composers, sound mixers, visual
eects artists, and other creative collaborators, it's often useful to add a timecode window visible
in the frame (traditionally called a window dub), so your colleagues can easily reference specic
frames and ensure accurate timing for the work they are completing.
This eect can be created within Final Cut Pro, but Compressor allows you to add the timecode
window at the transcoding stage as well. In Compressor, burned-in timecode (BITC) is added as a
video eect.
Add a timecode window to transcoded video
Because a window dub is not intended to be consumed as nal output, this task will create a
small le suitable for sharing, rather than a high-quality le intended for mastering.
1 In the Settings pane, choose New Setting from the Add pop-up menu .
2 In the dialog that appears, choose QuickTime Movie from the Format pop-up menu, type
“Window Dub” in the Name eld, type “Small H.264 with BITC” in the Description eld, then
click OK.
The new Window Dub setting appears in the Custom area of the Settings pane, and the General
inspector displays the basic properties for the setting. (If the inspector pane is not showing, click
the Inspector button in the upper-right corner of the Compressor window.)
3 In the inspector pane, click Video to switch to the Video inspector.
4 In the Video Properties area, choose “Up to 854 x 480” from the “Frame size” pop-up menu.
5 Click the Change button in the “QuickTime settings” property, and then make the following
changes in the Standard Video Compression Settings window:
a Choose H.264 from the Compression Type pop-up menu.
b In the Motion section, set the Key Frames setting to Automatic.
c In the Data Rate section, click “Restrict to” and enter 1000 kbits/sec in text eld.
Note: If you’re familiar with customizing compression settings, you can modify the setting’s
properties in this window to your liking. Otherwise, leave the rest at their default settings.
6 Click OK.
Chapter 5 Advanced tasks 86
Page 87

7 In the Video inspector, choose Timecode Generator from the Add Video Eect pop-up menu.
The Timecode Generator controls are added to the bottom of the Video inspector.
8 In the Timecode Generator controls, do the following:
a Choose Lower Right–Title Safe from Position pop-up menu.
b Type “TCR” in the Label eld.
c Control-click the “Text color” well, and select a bright yellow color.
Tip: TCR is the Industry-standard abbreviation for “Timecode Reader,” and bright yellow is a good
choice because it will show against both dark and light backgrounds. Feel free to experiment
with other settings to suit your particular needs.
The custom setting is saved with the timecode eect applied.
When you apply the Window Dub setting to a media source le, the transcoded output le will
have a timecode stamp burned in.
After you apply this custom setting to a job, you can select the output row in the job and then
further customize the settings for that job by changing the values in the Video inspector. For
example, you can change the location of the timecode numbers, color, font, or other properties
of the job. Changes made to the setting for an individual job will not modify the saved
custom setting.
Tip: This is a great setting to save as a droplet. For more on creating droplets, see Create and use
droplets on page 98.
Example: Convert NTSC or PAL footage to 24p HD
Compressor is capable of extremely high-quality frame rate and frame size conversions that
are superior to the processing that occurs when simply combining dierent footage in a single
project in Final Cut Pro X. Use Compressor to convert your source les to ensure the highest
possible quality.
Create a setting that converts footage from multiple rates and frame sizes to a uniform rate
and size
1 In the Settings pane, choose New Setting from the Add pop-up menu .
2 In the dialog that appears, choose QuickTime Movie from the Format pop-up menu, type
“Convert to 24p HD” in the Name eld, type “Converts any le to 1080/24p” in the Description
eld, then click OK.
The new “Convert to 24p HD” setting appears in the Custom area of the Settings pane, and
the General inspector displays the basic properties for the setting. (If the inspector pane is not
showing, click the Inspector button in the upper-right corner of the Compressor window.)
3 In the inspector pane, click Video to switch to the Video inspector.
4 In the Video Properties area, set the following values:
•
Frame size: 1920 x 1080
•
Pixel aspect ratio: Square
•
Frame rate: 23.976
•
Field order: Progressive
Chapter 5 Advanced tasks 87
Page 88

5 In the Cropping & Padding area, choose Preserve Source Aspect Ratio from the Padding
pop-up menu.
6 In the Quality area, set the following values:
•
Resize lter: Best (Statistical Prediction)
•
Retiming quality: Best (Motion Compensated)
•
Adaptive details: Select this checkbox.
Note: By setting these properties to the values described, transcoding may take signicantly
longer than if you use the “Better” settings. You might choose to experiment with some
sample les and judge for yourself if you think the quality improvement is worth the extra
transcoding time.
You can apply this custom setting to any type of source footage (any frame rate or size), and the
output will always be a 1080p HD le.
Note: The ultimate quality of the resulting les will be highly dependent on the format and
quality of your source footage.
Example: Create daily review copies of footage
Many multi-day video productions create copies of each day’s footage for distribution to
producers, clients, executives, and others. These clips are called “dailies” or “rushes.” The priority is
to rush to get them done quickly and then notify the recipients that they are available to watch.
This example will show how to use Compressor to generate such review copies for a variety of
distribution methods. The concepts presented here can be applied to creating destinations for
many other workows.
Note: The steps in the tasks below assume you are working with HD source footage.
Create dailies to be hosted on a private server
To create les to be stored on an internal server, or to be uploaded to a web server, follow the
steps below.
1 In the Settings pane, choose New Destination from the Add pop-up menu .
2 In the dialog that appears, do the following:
a Expand the Video Sharing Services group and select Large 540p.
Note: Alternatively, you can choose one of the other settings in this group based on the
bandwidth of the server where you will be hosting the video.
b Choose Send Email from the “Job action” pop-up menu.
c In the Name eld, type “Dailies output.”
d In the Description eld, type “540p output for daily review.”
e Click OK.
The custom destination is added to the Settings pane.
3 Click Locations to open the Locations pane, and then click the Add button .
Chapter 5 Advanced tasks 88
Page 89

4 In the window that appears, select the folder where you want the video les to be saved, and
then click Choose.
Tip: To avoid unnecessary copying or duplicating of les, select the folder directly on the server
where the videos can be accessed by the intended recipients as soon as transcoding is complete.
The new location is added to the Custom section of the Locations pane.
Note: If you’re uploading to a folder on a web server, you may need to perform additional steps
(such as setting up a script or building an HTML page) to make the videos accessible in a web
browser. Consult your webmaster if you have questions.
5 When you’re ready to generate your dailies, Choose File > Add File (or press Command-I).
6 In the window that appears, navigate to the folder containing the day’s footage, select the le or
les you want to transcode, and then click Add.
Each clip is added as a separate job to the batch area.
Tip: You can also drag les from the Finder into the batch area.
7 Select all the jobs in the batch area, and from the Settings pane, drag the Dailies Output
destination onto any of the jobs.
Dragging to any one of the jobs applies the destination to all selected jobs in the batch area.
8 Switch to the Locations pane and drag the custom location you created in step 4 onto any of the
selected jobs in the batch area.
The location is added to all selected jobs.
9 Select the rst job in the batch area and, in the Action area of the Job inspector, ll in the email
To, Subject, and Message elds.
If the inspector pane is not showing, click the Inspector button in the upper-right corner of
the Compressor window. You can enter multiple email addresses in the To eld, as long as each
address is separated by a comma. Also, be sure to include a link to the location of the saved les
in the Message eld.
10 Select each of the subsequent jobs and repeat step 9, until each job’s Action section in the Job
inspector is lled out completely.
11 Click Start Batch (or press Command-B).
Tip: If you’re transcoding many les to be saved in one location, consider only sending an
email when the last le is completed. That way your recipients won’t receive an email for each
completed le. To prevent emails from being sent, set the Job Action pop-up menu to Do
Nothing for all but the last job in the batch area.
Chapter 5 Advanced tasks 89
Page 90

Create dailies to be hosted on a third-party website
Some productions may prefer to use a public video-sharing service like YouTube, Vimeo, or
others to host their dailies.
The built-in destinations in Compressor are designed to automatically upload to some of
these sites. However, other sites require creating a custom destination. This example uses a
popular Chinese video-sharing service called Youku. The steps are nearly identical for other
video-sharing services.
1 In the Settings pane, choose New Destination from the Add pop-up menu
2 In the dialog that appears, do the following:
a Expand the Video Sharing Services group and select HD 720p.
b Choose Publish to Youku from the “Job action” pop-up menu.
c In the Name eld, type “Publish to Youku.”
d In the Description eld, type “720p dailies for Youku.”
e Click OK.
The custom destination is added to the Settings pane.
3 When you’re ready to generate your dailies, Choose File > Add File (or press Command-I).
4 In the window that appears, navigate to the folder containing the day’s footage, select the le or
les you want to transcode, then click Add.
Each clip is added as a separate job to the batch area.
Tip: You can also drag les from the Finder into the batch area.
5 Select all the jobs in the batch area, and from the Settings pane, drag the Publish to Youku
destination onto any of the jobs.
Dragging to any one of the jobs applies the destination to all selected jobs in the batch area.
Because Compressor automatically uploads the transcoded les to the video-sharing website
(Youku, in this example), the save location specied in the output row of each job is not
important. For this reason, you can leave the Location set to its default (Source) and then
manually delete the transcoded les on your computer after the jobs are completed.
6 Select the rst job in the batch area, and, in the Action area of the Job inspector, enter your
account information for the video-sharing service, as well as other details about the video clip
(such as title, description, and whether the uploaded le should be stored as private or public).
7 Select each of the subsequent jobs and repeat step 6, until each job’s Action section in the Job
inspector is lled out.
8 Click Start Batch (or press Command-B) to begin transcoding.
Note: In this workow, Compressor can’t automatically send an email to notify the recipients that
the les are available, so you’ll have to do that manually after the jobs are completed.
Chapter 5 Advanced tasks 90
Page 91

Work smarter
Work smarter overview
This chapter covers information and techniques that will help you work more eciently in
Compressor, including how to:
•
Customize application preferences
•
Use keyboard shortcuts
•
Create and use droplets—standalone applications that let you transcode media les in the
Finder, by dragging and dropping.
•
Use Compressor with Final Cut Pro X and Motion
•
Use distributed processing to transcode les with a network of shared computers
•
Enable one or more instances of Compressor to increase processing power on a single computer
Compressor preferences
Compressor preferences overview
You can modify Compressor preference settings to customize your workow.
6
Open Compressor preferences
m Choose Compressor > Preferences (or press Command-Comma), and then click a button at the
top of the window to open a pane.
There are four panes in the preferences window: General, My Computer, Shared Computers,
and Advanced.
General
Use the controls in the General pane to set basic application preferences.
•
Setting: Use this pop-up menu to specify a default setting for new jobs.
•
Location: Use this pop-up menu to specify a default location for new jobs.
•
After starting a new batch: This section of the General pane has two controls:
•
Clear batch in the Current tab: Select this checkbox to automatically remove batch
information from the Current tab after a batch is transcoded.
•
Switch to the Active tab: Select this checkbox to have Compressor switch to Active view when
a batch is transcoding.
91
Page 92

My Computer
Use the controls in the My Computer pane to allow other computers to use your computer to
process batches:
•
Allow other computers to process batches on my computer: Click the switch to On to make
your computer available to other computers for distributed processing. Switching this on
automatically enables the “When sharing my computer” controls in the Advanced pane. For
more information, see Advanced on page 93.
•
Require Password: Select this checkbox and then type a password in the text eld to prevent
other people from using your computer for encoding.
Shared Computers
Use the controls in the Shared Computers pane to create groups of shared computers for
distributed processing. For more information about how to set up a shared computer group and
add computers to it, see Transcode batches using other computers on page 101.
Chapter 6 Work smarter 92
Page 93

Advanced
Use the controls in the Advanced pane to adjust additional distributed processing settings.
These advanced controls are intended for network administrators and other users with
networking experience.
For more information about distributed processing, see Transcode batches using other
computers on page 101.
•
Enable Compressor instances: This property activates additional instances of the Compressor
application, which can potentially speed transcoding. After selecting the checkbox, you can
choose the number of instances from the pop-up menu. For more information, see Enable one
or more instances of Compressor on page 100 .
•
Use network interfaces: When you’ve allowed others to share your computer, you can restrict
distributed processing activity to the network interface that you specify in the pop-up menu.
•
Enable Port Range: When you’ve allowed others to share your computer, you can select this
checkbox to set the ports on which distributed processing is run. After selecting the checkbox,
enter the number at which you want to start the port range and the number of ports you
want the range to contain.
•
Reset Queue: Click to reset the queue of Compressor jobs. After you click this button, you can
choose to reset the queue and cancel all pending jobs, or reset the queue and then restart any
pending jobs.
Chapter 6 Work smarter 93
Page 94

Keyboard shortcuts
Built-in keyboard shortcuts
You can use keyboard shortcuts to quickly accomplish many tasks in Compressor. To use a
keyboard shortcut, press all the keys in the shortcut at the same time. Shortcuts for common
commands are listed in the table below.
Compressor general keyboard shortcuts
Action Shortcut
Add a le Command-I
Add a set of image sequence les Option-Command-I
Add a set of surround sound les Control-Command-I
Navigate up the list of jobs (in the batch area) Up Arrow
Navigate down the list of jobs (in the batch area) Down Arrow
Play/Pause the video Space Bar
Play the video in reverse J
Stop playback K
Play the video L
Set the In point I
Set the Out point O
Add a marker M
Go to the previous marker or In/Out point Control-Semicolon (;)
Go to the next marker or In/Out point Control-Apostrophe (‘)
Start transcoding the batch Command-B
Compressor window keyboard shortcuts
Action Shortcut
Show the Current view Command-1
Show the Active view Command-2
Show the Completed view Command-3
Show or hide the inspector pane Command-4
Show or hide the Settings and Locations pane Command-5
Show Settings Shift-Command-1
Show Locations Shift-Command-2
Show the Network Encoding Monitor Command-E
Show the Compressor preferences window Command-Comma (,)
Minimize the Compressor window Command-M
Close the Compressor window Command-W
Quit Compressor Command-Q
Chapter 6 Work smarter 94
Page 95

Customize keyboard shortcuts
View keyboard shortcuts in the Command Editor
Compressor provides a wide variety of menu commands and keyboard shortcuts that let you
control almost every aspect of your transcoding workow. You can use the Command Editor to
modify existing shortcuts, create new shortcuts, and save multiple sets of keyboard shortcuts
that you can export for others to use. You can also import a set of shortcuts that someone else
created. And if you’re more familiar with keyboard shortcuts from other applications, you can use
the Command Editor to substitute those shortcuts in place of the default set for Compressor.
The Command Editor provides a set of keyboard shortcuts for Compressor in English, Japanese,
French, and German. The language that is shown is determined by your computer’s operating
system. To learn how to change the language used by Compressor, see OS X Help, available from
the Help menu when the Finder is active.
View keyboard shortcuts
1 Choose Compressor > Commands > Customize.
The Command Editor appears.
2 Do any of the following:
•
To view keyboard shortcuts by command group: Select one of the command groups in the
lower-left corner of the Command Editor.
The commands in the selected group (and their keyboard shortcuts) appear in the center list.
When you select a command in the center list, a description appears in the Command Detail
list in the lower-right corner of the Command Editor.
•
To view commands associated with a specic key: Click a key on the virtual keyboard.
The commands mapped to that key appear (along with the necessary modier keys, if any—
Control, Option, Shift, and Command) in the Key Detail list in the lower-right corner of the
Command Editor.
When you hold down any modier buttons on the keyboard, the key colors update. Key colors
correspond with command classications; for example, playback commands, such as Play/
Pause (Space bar), are purple. The Command Groups window on the left side of the Command
List contains a clickable color key for reference.
Chapter 6 Work smarter 95
Page 96

•
To search for a keyboard shortcut: Enter a command name, key name, or descriptive keywords in
the search eld in the upper-right corner of the Command Editor.
As you type, commands that match the search term appear in Command List at the bottom of
the Command Editor.
Tip: To show the keys that correspond with the items in the Command List, click the Keyboard
Highlight button to the left of the search eld.
Modify keyboard shortcuts in the Command Editor
You can quickly and easily customize keyboard shortcuts in the Command Editor. If you want to
add a few custom commands to the default set in Compressor, you can duplicate the default set
and assign keyboard shortcuts to some of the unassigned commands. You can also create a new
set that contains only your commands.
Duplicate a command set
1 Choose Compressor > Commands > Customize.
The Command Editor appears.
2 Choose the command set that you want to duplicate from the pop-up menu in the top-left
corner of the Command Editor.
The command set you selected should have a checkmark to the left of its name in the pop-up menu.
3 In the same pop-up menu, choose Duplicate.
4 In the dialog that appears, type a name for the command set, and then click OK.
The duplicate set is added to the Commands submenu of the Compressor menu and to the
pop-up menu in the Command Editor.
Delete a command set
1 Choose Compressor > Commands > Customize.
The Command Editor appears.
2 Choose the command set that you want to delete from the pop-up menu in the top-left corner
of the Command Editor.
The command set you selected should have a checkmark to the left of its name in the pop-up menu.
3 In the same pop-up menu, choose Delete.
4 In the dialog that appears, click Delete.
The command set is removed.
Chapter 6 Work smarter 96
Page 97

Export and import command sets in the Command Editor
You can export a command set to create a backup or to share the set with another user.
Exported command sets are saved in a le that can be imported back into Compressor at a later
time. You can also import a command set.
Export a command set
1 Choose Compressor > Commands > Customize.
The Command Editor appears.
2 Select the command set that you want to export from the pop-up menu in the top-left corner of
the Command Editor.
The command set you selected should have a checkmark to the left of its name in the pop-up menu.
3 In the same pop-up menu, choose Export.
4 Type a name for the command set in the Save As eld, navigate to the location where you want
to save the exported set, and then click Save.
The le is saved in the location you chose, with the lename extension .commandset.
Import a command set
1 Choose Compressor > Commands > Import.
2 In the window that appears, navigate to the location where you’ve stored a command set le,
select it, and click Open.
If you’re already using a command set with the same name, a window appears and prompts you
to rename the command set.
The new command set is added to the Commands submenu of the Compressor menu and to
the pop-up menu in the Command Editor.
View shortcuts for a dierent command set
If your system has multiple command sets, you can easily switch between them.
Do one of the following:
m Choose Compressor > Commands, and then choose a command set from the submenu.
The Command Editor window appears, showing the command set you chose.
m If you’ve already opened the Command Editor, choose a command set from the pop-up menu at
the top-left corner of the window.
Chapter 6 Work smarter 97
Page 98

Create and use droplets
You can save one or more settings or a destination as a standalone application called a droplet.
Using the droplet, you can easily transcode les by dragging them to the droplet icon in
the Finder.
Create a droplet
1 In the Settings tab, select one or more settings, setting groups, or a destination that you want to
save as a droplet.
Note: You can Shift-click or Command-click to add multiple settings or setting groups.
If you selected more than one setting, a destination that contains two or more settings, or a
group of settings, every setting in your selection will be included in the droplet. For example, if
you submit two source media les to a Droplet containing three settings, Compressor creates six
dierent output media les.
2 Choose Save as Droplet from the Action pop-up menu .
3 In the window that appears, do the following:
•
Enter a name for the droplet in the Save As eld.
•
Specify a location for the droplet using the Where pop-up menu.
•
In the Location pop-up menu, choose where you want the droplet to save transcoded les.
4 Click Save.
Your newly created droplet appears as an icon in the location you chose in the Where menu.
Chapter 6 Work smarter 98
Page 99

Transcode les using a droplet
1 In the Finder, drag one or more media les onto the droplet.
When you release the mouse button, the Droplet window opens.
2 In the Droplet window, do either or both of the following:
•
Choose a new save location from the Location pop-up menu.
•
Specify a computer or group of computers from the Process On pop-up menu.
3 Click Start Batch.
The transcoded le appears in the location you specied.
If you want to view the processing status of your source media les, open Share Monitor
from the droplet by choosing Droplet > Open Share Monitor. For more information, see
Share Monitor Help.
Chapter 6 Work smarter 99
Page 100

Transcode Final Cut Pro and Motion projects using Compressor
If you have Final Cut Pro X or Motion 5 installed on the same computer as Compressor 4.1, you
can send sequences or clips from Final Cut Pro or Motion directly to Compressor for transcoding.
Transcode a Final Cut Pro or Motion project using Compressor
Do one of the following:
m Send a project from Final Cut Pro to Compressor: Select the project and choose File > Send
to Compressor.
m Send a project from Motion to Compressor: Open the project and choose Share > Send to Compressor.
Note: You can also drag a Motion project le to the batch area in Compressor.
For more information about using Compressor settings in Final Cut Pro, see Final Cut Pro Help.
For more information about using Compressor settings in Motion, see Motion Help.
After the Final Cut Pro or Motion le appears in Compressor as a source le in a job, you can add
a setting and other information to the job’s output rows and then transcode the batch.
Enable one or more instances of Compressor
You can increase the processing power of a single computer, and thus reduce the time it takes to
process batches, by enabling one or more additional instances of the Compressor application.
Enable instances of Compressor
1 Choose Compressor > Preferences (or press Command-Comma).
2 Click Advanced.
3 Select the “Enable additional Compressor instances” checkbox, then choose a number of
instances from the pop-up menu.
The number of instances available in the pop-up menu changes automatically based on the
amount or RAM and number of CPU cores in your computer. It’s recommended that you rst
enable all the additional instances, transcode several test batches, and then, if performance is
slow, decrease the number of instances to use fewer of your computer’s resources. You can use
the Activity Monitor application in OS X to determine how of your CPU is being used.
Note: If the computer has a hardware encoder, and if you enable multiple instances of
Compressor, the time it takes to process a batch can potentially increase, because the hardware
encoder can only be used with single-pass, nonsegmented jobs. If you nd that processing time
has increased signicantly, turn o additional Compressor instances by deselecting the “Enable
additional Compressor instances” checkbox.
Chapter 6 Work smarter 100
 Loading...