

Page 1

Compressor
User Guide
Page 2

K Apple Inc.
Copyright © 2012 Apple Inc. All rights reserved.
Your rights to the software are governed by the accompanying
software license agreement. The owner or authorized user
of a valid copy of Compressor software may reproduce this
publication for the purpose of learning to use such software.
No part of this publication may be reproduced or transmitted
for commercial purposes, such as selling copies of this
publication or for providing paid for support services.
The Apple logo is a trademark of Apple Inc., registered in
the U.S. and other countries. Use of the “keyboard” Apple
logo (Shift-Option-K) for commercial purposes without the
prior written consent of Apple may constitute trademark
infringement and unfair competition in violation of federal and
state laws.
Every eort has been made to ensure that the information in
this manual is accurate. Apple is not responsible for printing or
clerical errors.
Note: Because Apple frequently releases new versions and
updates to its system software, applications, and Internet sites,
images shown in this manual may be slightly dierent from
what you see on your screen.
Apple
1 Innite Loop
Cupertino, CA 95014
408-996-1010
www.apple.com
Apple, the Apple logo, AppleScript, Apple TV, Bonjour, DVD
Studio Pro, Final Cut, Final Cut Pro, Finder, FireWire, iPad, iPhone,
iPod, iTunes, Mac, Mac OS, OS X, QuickTime, Shake, Xsan, and
Xserve are trademarks of Apple Inc., registered in the U.S. and
other countries.
NetInfo is a trademark of Apple Inc.
AppleCare is a service mark of Apple Inc., registered in the U.S.
and other countries.
“Dolby,” “Pro Logic,” and the double-D symbol are
trademarks of Dolby Laboratories. Condential Unpublished
Works, © 1992–1997 Dolby Laboratories, Inc. All rights reserved.
IOS is a trademark or registered trademark of Cisco in the U.S.
and other countries and is used under license.
UNIX is a registered trademark of The Open Group.
The YouTube logo is a trademark of Google Inc.
Other company and product names mentioned herein
are trademarks of their respective companies. Mention of
third-party products is for informational purposes only and
constitutes neither an endorsement nor a recommendation.
Apple assumes no responsibility with regard to the
performance or use of these products.
Production stills from the lm “Koee House Mayhem”
provided courtesy of Jean-Paul Bonjour. “Koee House
Mayhem” © 2004 Jean-Paul Bonjour. All rights reserved.
http://www.jeanpaulbonjour.com
Production stills from the lm “A Sus Ordenes” provided
courtesy of Eric Escobar. “A Sus Ordenes” © 2004 Eric Escobar.
All rights reserved. http://www.kontentlms.com
019-2428
Page 3

Contents
8 Chapter 1: Compressor basics
8 What is Compressor?
9 Compressor workow overview
10 Compressor window overview
11 Manage Compressor windows
12 Compressor terms
14 Chapter 2: Compressor workows
14 Quick and easy batch template workow
15 Manual batch processing workow
16 Custom transcoding workow
17 Chapter 3: Import source media
17 Importing overview
18 Create a batch
20 Add source media les
20 Add standard source media les to batches
22 Add surround sound source media les to batches
25 Add image sequences to batches
26 Add metadata to source media les
27 Inspector window
29 Batch window
31 Chapter 4: Assign settings and preview media
31 Settings overview
32 Assign settings
32 Assign settings to source media
34 Replace an assigned setting with a dierent setting
35 Modify an assigned setting
35 Create custom settings
35 Create and modify settings
39 Share settings
40 About the Automatic settings
41 Example: Create custom groups and settings for DVD
42 Inspector panes
46 Use markers and poster frames
46 Markers and poster frames overview
47 Manually add and remove markers
49 Add compression or podcast markers
51 Plain text chapter marker lists
51 Set the poster frame
3
Page 4

52 Preview media
52 Previewing overview
52 Preview media as source or with settings applied
57 Transcode a portion of a clip
59 Preview window
64 Chapter 5: Custom settings and output formats
64 Custom settings and output formats overview
65 iTunes and Apple device output
65 iTunes and Apple device output overview
66 Create H.264 settings
70 Create Blu-ray discs
72 Dolby Digital Professional les
72 Dolby Digital overview
74 Convert stereo audio to Dolby Digital Professional format
74 Assign les to surround sound channels
78 Dolby Digital Professional Encoder pane
83 Spatial mixing options
84 MPEG-2 les
84 MPEG-2 overview
86 Create MPEG-2 les
89 MPEG-2 Encoder pane
97 MPEG-2 bit rates and formats
99 About GOPs (groups of pictures)
100 AIFF les
100 AIFF overview
101 Create AIFF settings
102 Common Audio Formats les
102 Common Audio Formats overview
103 Create Common Audio Formats settings
104 MP3 les
104 MP3 overview
104 MP3 transcoding workow
105 Create MP3 settings
106 MPEG-1 les
106 MPEG-1 overview
107 About system and elementary streams
107 MPEG-1 specications
108 Create MPEG-1 les for the web
109 Create MPEG-1 video for DVD
110 Create MPEG-1 audio for DVD
112 MPEG-1 Encoder pane
114 MPEG-4 les
114 MPEG-4 Part 2 overview
115 MPEG-4 Part 2 default settings
116 Create MPEG-4 Part 2 settings
119 Create settings for an audio podcast
Contents 4
Page 5

121 QuickTime movie les
121 QuickTime movie overview
122 QuickTime video codecs
123 QuickTime audio codecs
124 Create QuickTime media les
130 QuickTime Export Components les
130 QuickTime Export Components overview
130 Create QuickTime Export Components settings
132 DV Stream les
132 DV overview
133 Create DV Stream settings
134 Create image sequence les
137 Chapter 6: Assign destinations and submit batches
137 Jobs, targets, and batches overview
137 Work with destinations
137 Destinations overview
138 Assign destinations
140 Create and modify destinations
142 If a warning triangle appears
143 Destinations tab and Inspector
145 Set up targets and jobs
145 Set up targets
146 Add and copy jobs
146 Chain jobs
147 Submit batches
147 Submit a batch
151 View batch information in the History window
153 Chapter 7: Advanced functions
153 Add lters
153 Filters overview
154 Add and adjust lters
156 Video lters
163 Audio lters
165 Color output
166 Work with frame controls
166 Frame controls overview
167 Apply frame controls to a setting
168 Frame Controls pane
172 About deinterlacing
173 About reverse telecine
175 About retiming
176 Modify geometry settings
176 Geometry overview
177 Crop, scale, and change frame dimensions
179 Geometry pane
Contents 5
Page 6

184 Add post-transcoding actions
184 Post-transcoding actions overview
184 Add setting actions
186 Add job actions
187 Job Action tab
198 Use Droplets
198 Create Droplets
201 Use Droplets for transcoding media
204 Droplet window
205 Use Final Cut Pro X and Motion 5 with Compressor
207 Use the command line to submit Compressor jobs
207 Shell commands overview
207 Synopsis
207 Command options
208 Example: Compressor commands
211 Compressor preferences
211 Set Compressor preferences
212 Preferences window
214 Chapter 8: Use Apple Qmaster to set up a distributed processing system
214 What is Apple Qmaster?
215 Distributed processing systems
215 Distributed processing overview
217 Distributed processing basics
218 Distributed processing setup guidelines
219 Examples of distributed processing systems
220 Additional components of a distributed processing network
221 How the Apple Qmaster system distributes batches
222 Create service nodes and cluster controllers
222 Creating service nodes and cluster controllers overview
223 Quickly set up a service node using This Computer Plus
224 Set up a cluster controller using QuickClusters
225 Advanced service node and cluster controller information
225 Use nodes without Compressor installed
228 Enable managed and unmanaged services
229 Schedule service availability
230 Use virtual clusters to make the most of multicore computers
231 Turn cluster controller services on or o
231 Set a service password for including a computer in a cluster
232 Use cluster storage
234 Rendering services and shared storage setup
234 Use distributed processing with Shake
235 Recovery and failure notications
236 Process a batch
236 Batch processing overview
237 Submit a batch of les from Compressor
238 Submit a batch of Shake les using Apple Qmaster
240 Submit a batch of Maya les using Apple Qmaster
242 Submit a batch of les using the Generic Render command in Apple Qmaster
Contents 6
Page 7

244 Advanced rendering information
244 Set environment variables in Apple Qmaster
245 Manage Shake media les on a shared volume
245 Shake plug-in dialog
246 Generic Render dialog
247 Use Mental Ray for Maya
247 Use Apple Qmaster to submit UNIX commands
249 Job segmenting and two-pass or multi-pass encoding
249 Example: Submit After Eects batches with the Generic Render command
250 Apple Qmaster window
250 Apple Qmaster window
253 Apple Qmaster Sharing window
253 Setup pane of the Apple Qmaster Sharing window
254 Advanced pane of the Apple Qmaster Sharing window
256 Set Apple Qmaster preferences
257 Chapter 9: Use Apple Qadministrator to create and modify clusters
257 What is Apple Qadministrator?
257 Open Apple Qadministrator
258 Create and modify a cluster
262 Monitor cluster activity
262 Set Apple Qadministrator preferences
265 Chapter 10: Keyboard shortcuts
265 Compressor keyboard shortcuts
Contents 7
Page 8
Compressor basics
1
What is Compressor?
Compressor is an application for converting audio and video les into professional media formats
for disc, device, or web delivery. The process of converting from one le format to another is
called transcoding. You can use Compressor on its own or with Final Cut Pro X and Motion to
transcode audio and video les directly from those applications.
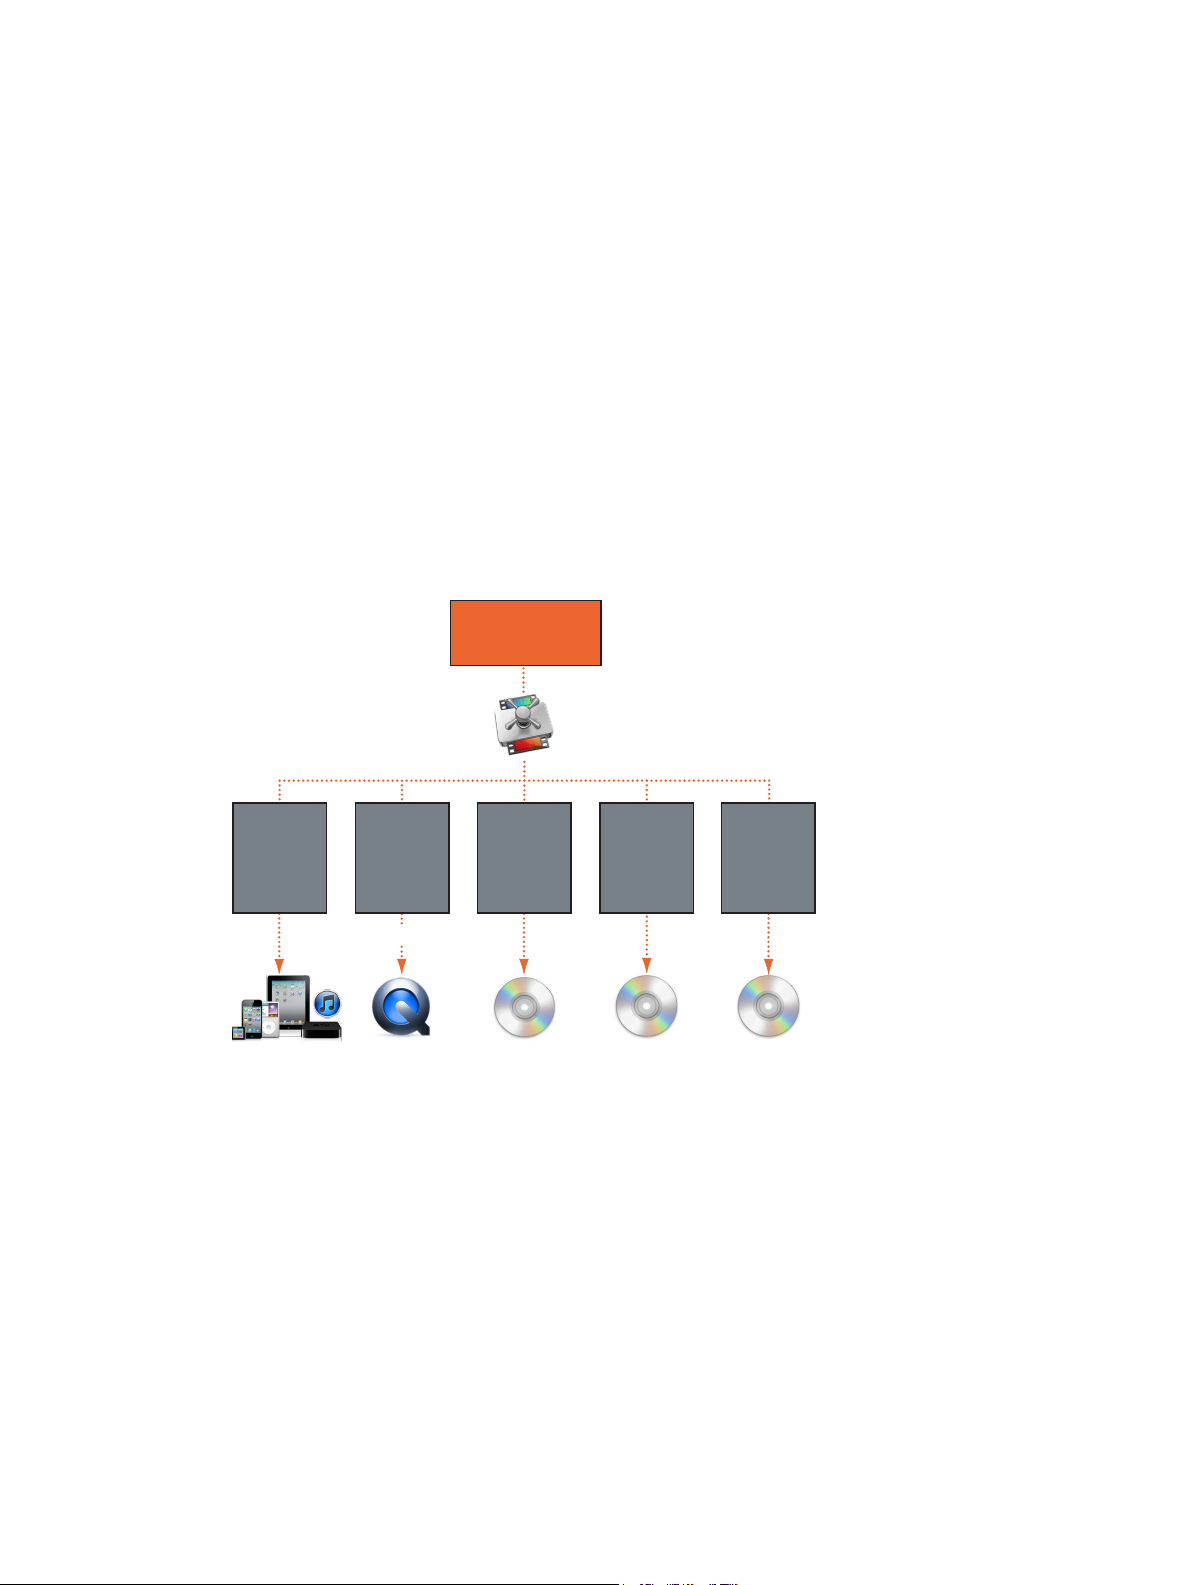
In Compressor, you can:
•
Convert source media to high-denition (HD) or standard-denition (SD) formats (including
H.264) for Apple devices such as Apple TV, iPhone, iPad, iPod, or iTunes; for streaming or
podcasting on the web; for DVD, CD-ROM, or Blu-ray Disc; or for hando to post-production.
Source media or
Final Cut Pro project
H.264
MP3
AC-3
iPhone
iPad
iPod
iTunes
•
Use batch processing to create multiple output les from single-source media les.
•
Create standalone applications called Droplets for drag-and-drop transcoding operations on
MP3
MPEG-1
MPEG-4
QuickTime
To web
QuickTime
movie
(for broadband
and lowband)
AC-3
AIFF
H.264
MPEG-1
MPEG-2
AIFF
MP3
QuickTime
CD-ROMDVD videoApple TV
H.264
AC-3
Blu-ray Disc
your desktop. Simply drag a media le onto a Droplet to launch a customized transcoding
session, without opening Compressor.
•
Use Apple-supplied encoding settings or create your own settings to build a library of
specialized settings that can be reused.
•
Apply video lters to add fade-in/fade-out eects, timecode overlays, gamma correction, noise
removal, letterbox framing, watermarks, color adjustments, and more.
8
Page 9

•
Apply audio lters to control dynamic range, peak levels, equalization, and audio fade-in/
fade-out eects.
•
Use the Preview window to view the results of your lter settings in real time.
•
Create and save output destinations, including your desktop, local disks, remote disks, and FTP
locations. You can even use destination presets to specify lenaming conventions.
•
Control video le image quality during MPEG-2 DVD transcoding by applying single- or dualpass variable bit rate (VBR) to your output les.
•
Customize your frame dimensions using geometry controls. You can resize your image to common
aspect ratios, including 4:3, 16:9, and 2.35:1, or reduce le size by cropping unwanted image areas.
•
Publish your media les to a QuickTime Streaming Server or other locations for DVD authoring.
•
Customize post-transcoding operations by applying AppleScript automation to your output les.
•
Export sequences directly from Final Cut Pro X or Motion into Compressor for transcoding,
leveraging the powerful video-processing technology of those applications.
•
Encode media les in the background so that you can perform other tasks at the same time.
•
Automatically send an email notication to any location to notify you or your colleagues when
a transcoding job is complete.
•
Use distributed processing to divide the transcoding work among multiple computers, thereby
increasing your processing power. The distributed processing feature is limited to computers
that have Compressor installed.
•
Enable and disable distributed processing services and monitor batches using
command-line options.
Compressor workow overview
Compressor oers several ways to convert (transcode) media les into any of numerous
professional le formats. For basic transcoding jobs to common output formats (Blu-ray Disc,
DVD, Apple TV, YouTube, and so on), choose a precongured template to have Compressor
automatically apply all required settings. For more advanced transcoding jobs, apply an output
setting from a list of more than 30 le formats.
Whether basic or advanced, all transcoding workows in Compressor follow the same
essential steps:
•
Import your source media into Compressor.
•
Apply and modify your preferred output settings.
•
Specify a save destination (the location where the output les are saved).
•
Submit your le or batch of les for transcoding.
Chapter 1 Compressor basics 9
Page 10
Each transcoding session in Compressor is known as a batch. A transcoding batch can contain
Batch window
Preview window
multiple source media les, referred to as jobs. Each job can be transcoded into multiple formats.
The following diagram represents a batch containing two jobs:
Batch
Job 1
Source
media file
1
Job 2
Source
media file
2
Target 1
DestinationSetting
Target 2
DestinationSetting
Target 1
DestinationSetting
Target 2
Setting Destination
Output media file
(Job 1, Target 1)
Output media file
(Job 1, Target 2)
Output media file
(Job 2, Target 1)
Output media file
(Job 2, Target 2)
In the diagram above, each job is converted to two output les. The settings and save
destinations of these les are known as the targets. One output media le is created for each
target assigned to a source media le. The total number of output les created by transcoding
this batch will be four: Job 1 will create two output media les, as will Job 2.
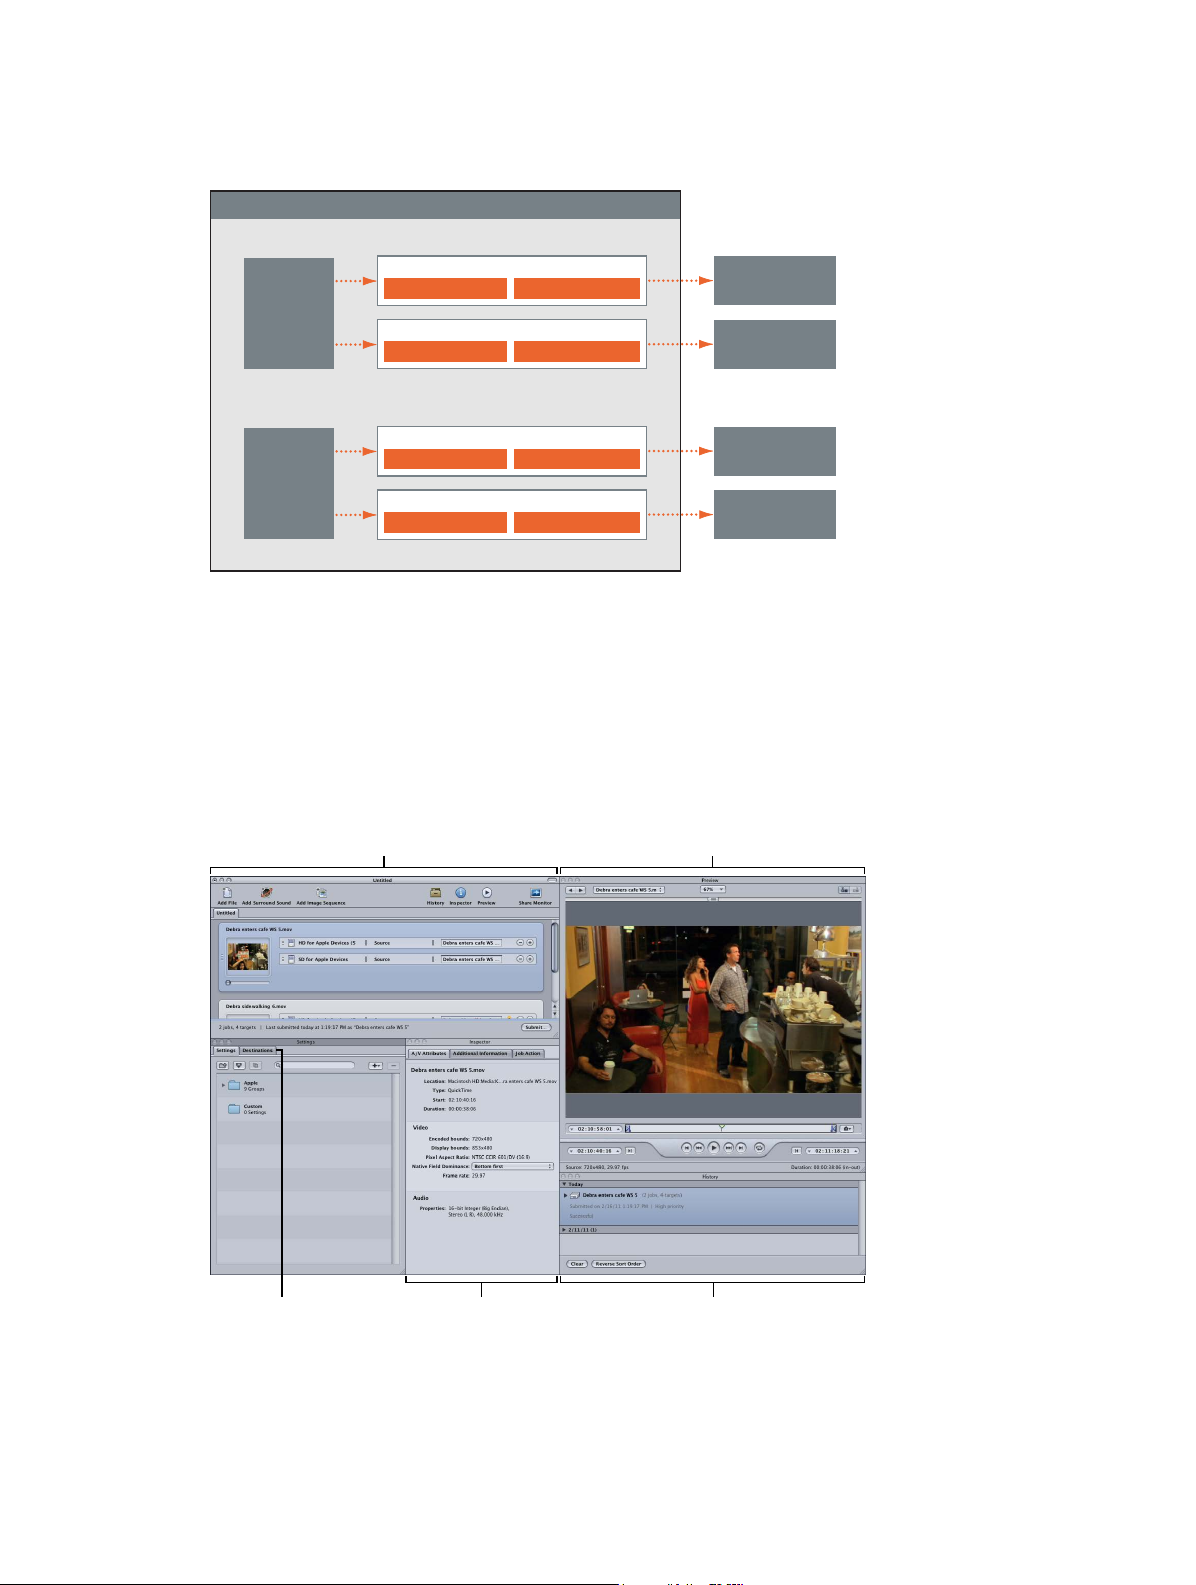
Compressor window overview
The main Compressor workspace has ve windows, each of which represents a part of the
transcoding workow:
Settings and
Destinations tabs
Inspector
window
History
window
Chapter 1 Compressor basics 10
Page 11

•
Batch window: Import source media les and add transcoding settings and save destinations
in this window.
•
Settings and Destinations window: Choose settings and output destinations from the two tabs
in this window. The Settings tab contains more than 30 Apple-provided settings for common
media formats (for Apple devices, Blu-ray and DVD discs, web streaming, video-sharing
services such as YouTube, and so on). You can add your own custom settings to this list. The
Destinations tab contains common save locations (Desktop, User’s Movies Folder, and so on).
You can add your own custom save destinations to this list.
•
Inspector window: Adjust common transcoding controls and view a summary table listing the
details of each setting. You can also use the Inspector window to gather information about
source clips.
•
Preview window: Preview the results of your transcoding settings in this window. A split-screen
feature lets you compare the original media to the modied version, before you output. Here
you can see the eects of applied lters and frame resizing, and you can make adjustments to
these attributes while previewing the results in real time. You can also use the Preview window
to add and view various kinds of markers.
•
History window: See a complete log of all batches submitted from your computer, including
progress bars of batches still being transcoded. You can pause or resubmit any batches listed
in the log.
You can display the Compressor workspace in either of two basic default layouts. The standard
layout displays all the Compressor windows, with the Settings and Destinations tabs sharing a
window; this layout is optimized for those times when you’re transcoding a single-source media
le. The batch layout places the emphasis on the Batch window and is optimized for those times
when you’re transcoding multiple source media les. As you work, you can switch between these
layouts. You can also create a custom layout and save it for future use.
Manage Compressor windows
The ve windows of the Compressor workspace can be moved and resized independently of one
another, allowing you to customize your work environment.
View a specic window
m Choose Window > window name.
Bring all Compressor windows to the front
Do one of the following:
m Choose Window > Bring All to Front.
m Click the Compressor application icon in the Dock.
Choose a layout
m Choose Window > Layouts, and choose a layout from the list that appears.
The Compressor interface changes to match the new layout.
Save a layout
1 Arrange the Compressor windows.
2 Choose Window > Save Layout.
3 In the dialog that appears, enter a name for the layout and click Save.
The layout is saved and appears in the layouts list when you choose Window > Layouts.
Chapter 1 Compressor basics 11
Page 12
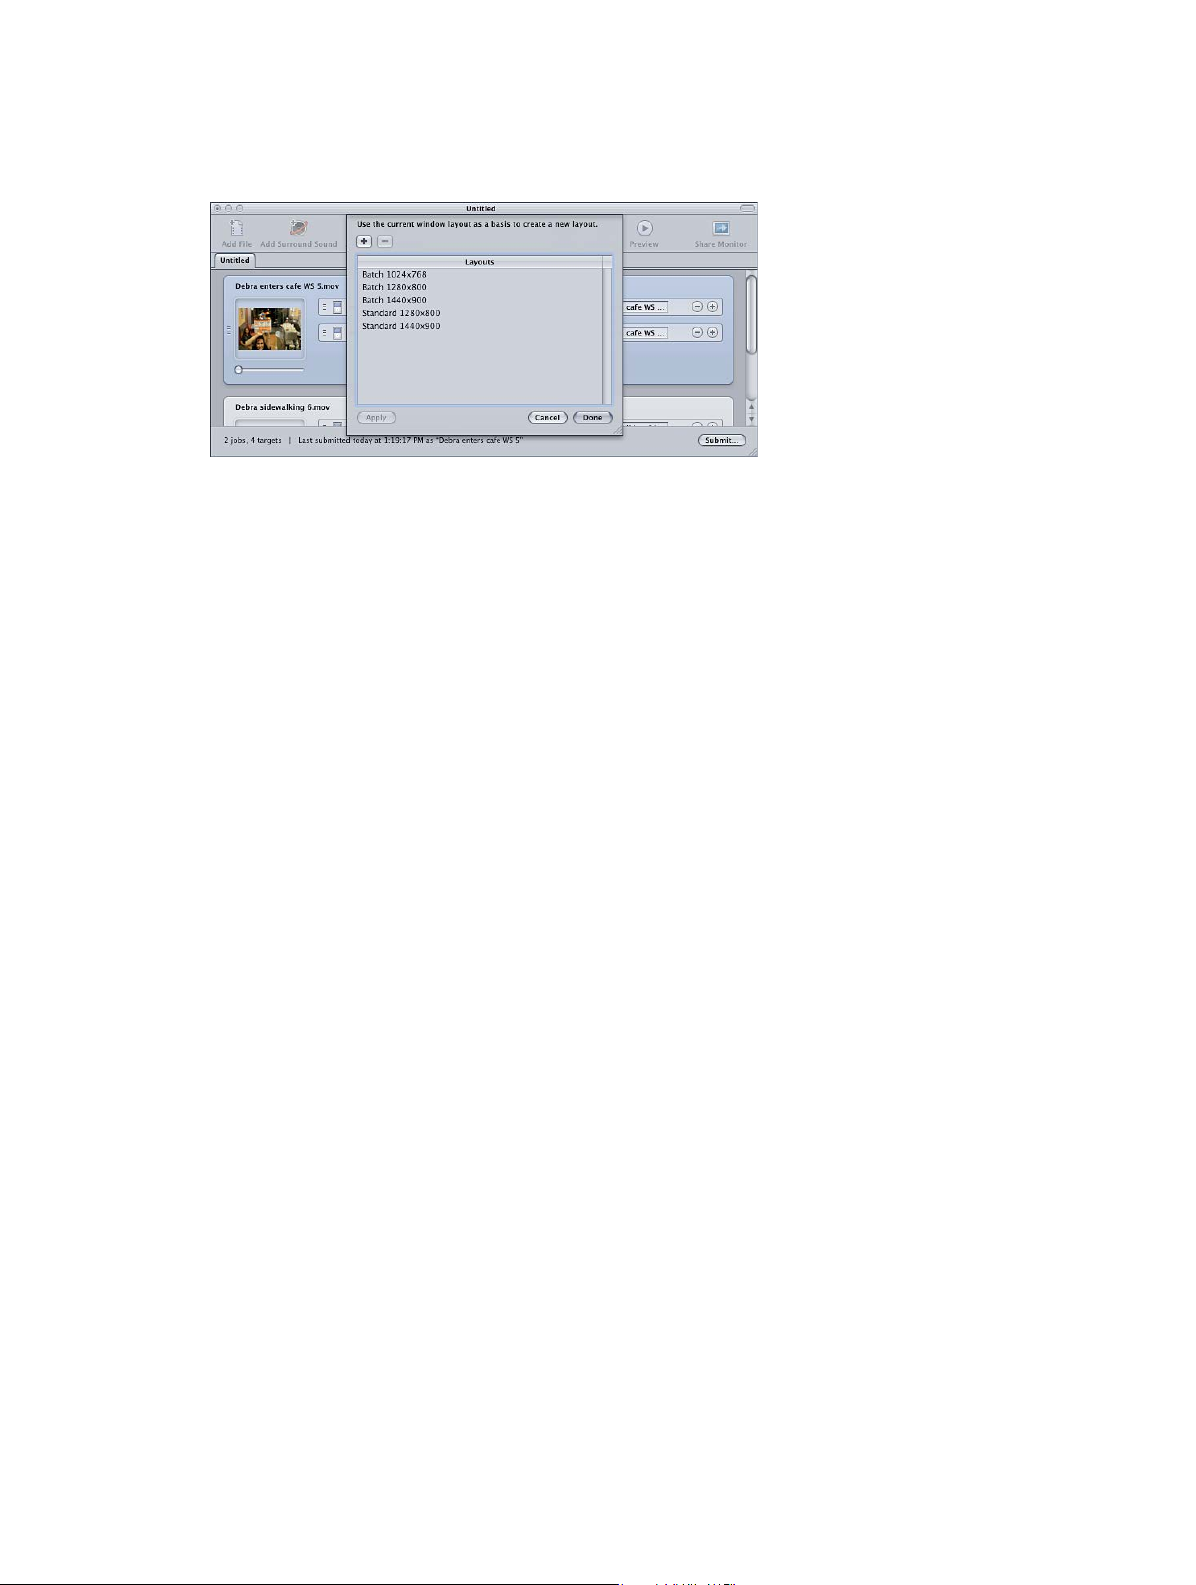
Manage layouts
1 Choose Window > Manage Layouts.
A dialog for managing layouts appears.
2 Do any of the following:
•
To rename a layout: Double-click it and type the new name.
•
To remove a layout: Select it and click the Delete (–) button.
•
To save the current interface conguration as a new layout: Click the Add (+) button and enter a
name for the layout.
•
To choose a layout and apply it to the current Compressor interface: Choose the layout and click
the Apply button.
3 When you’ve nished managing your layouts, click Done.
The dialog closes and the Compressor interface changes to match the chosen layout setting.
Note: The layouts list is actually divided into two sections—the ones supplied by Apple and the
ones that you create. You cannot rename or delete the Apple-supplied layouts. The ones that you
create are listed in alphabetical order. Use care when naming your layouts so that you can easily
locate them in the list.
Compressor terms
This section covers common terms that you’ll encounter as you use Compressor.
•
Codec: Short for COmpression/DECompression. A mathematical model for reducing the data of
a source media le.
•
File format: The output format used to transcode your source media le.
•
Transcoding: The process of converting les from their original format to output les ready for
distribution in another format. Closely related terms include compression, which specically
refers to data reduction, and encoding, a term that is essentially synonymous with transcoding,
but doesn’t emphasize the conversion aspect.
•
Source media le: The original media le to be converted to a new le format.
•
QuickTime: The cross-platform multimedia technology that allows OS X and Windows
applications to capture and play back video, audio, and still-image les. QuickTime les can
contain many dierent kinds of media and codecs. Codecs give instructions to QuickTime on
how to play back the media.
Chapter 1 Compressor basics 12
Page 13

•
Setting: A group of attributes applied to a source media le during the transcoding process.
Each setting contains the following attributes (which you can modify in the Inspector window):
•
Output (le) format: The encoder you choose to convert your source media le. Choose one
of the following output formats based on the intended playback method: AIFF, Dolby Digital
Professional, DV Stream, H.264 for Apple Devices (which contains settings for use with
iPhone, iPad, iPod, and Apple TV), Image Sequence (which supports TIFF and TARGA images),
MPEG-1, MPEG-2, MPEG-4, QuickTime Movie, or QuickTime Export Components.
•
Filters: Special eects that adjust dierent characteristics of your video (such as color,
brightness, and sharpness) to maximize your video quality as the le is converted.
•
Geometry: Controls to crop the image and adjust its frame size.
•
Actions: Controls to create actions that are automatically applied to output les after
transcoding. Use this feature to send email notications and execute tasks using Automator.
•
Destination: The location where your transcoded media le is saved. You can either use the
default destination (the same folder the source media le is in) or choose a custom destination
that you created. The destination also controls how the transcoded media le is named.
•
Target: The area of the Compressor workspace (in the Batch window) where you designate the
setting, destination, and output lename. Think of it as the blueprint for creating an output
media le.
•
Job: The source media le and the target (setting and destination) you apply to it, ready to
be transcoded.
•
Batch: One or more jobs that are processed at one time. All jobs contained within the batch
are submitted collectively when you begin the transcoding process.
•
Output media les: The transcoded media le (or les) created after the batch is submitted and
processed. You can create as many output media les as there are dierent settings applied to
the various source media les in the batch.
Chapter 1 Compressor basics 13
Page 14
Compressor workows
2
Quick and easy batch template workow
If you want to transcode your source media les immediately and don’t need to create your own
settings, you can use the batch template settings that are precongured in Compressor. The
following workow shows you a quick and easy way to use Compressor with batch templates.
Stage 1: Choose a template
In the Batch Template Chooser, you’ll select a template to transcode your media. For more
information, see Batch window on page 29.
Note: The default set of templates is shown below. If you’ve created other templates, they will
also appear in the Batch Template Chooser.
Stage 2: Import source media les
Although there are many ways to import source media into Compressor, the easiest method is to
drag a source le from the Finder or the desktop to the placeholder job in the Batch window. For
more information, see Importing overview on page 17.
Stage 3: Submit your batch for processing
After you’ve chosen a template and provided a le to transcode, you can submit the batch that
contains your job. By default, the batch templates use Source (the same folder that the source
media les originated from) as the destination for the encoded les. For information about
choosing other destinations, see Destinations overview on page 137.
You can view the progress of your transcode in the History window in Compressor. It contains a
progress bar and tells you if a submission was successfully transcoded.
14
Page 15
Manual batch processing workow
If none of the precongured batch settings work for your transcode but you want to use the settings
and destinations that come with Compressor, you can manually build and process your batch. The
following workow shows you an easy way to manually build and process a batch in Compressor,
summarizing each stage in the process and providing links to the instructions you’ll need.
Stage 1: Manually import source media les
You’ll need to manually import each source media le into Compressor, either by dragging les
into the batch or by clicking the Add File button. After you import les, you’ll see that new jobs
are created for each source le you added to the batch.
Each source
file creates
a job in the
batch.
Target area (empty
in this case) of a job
For more information, see Importing overview on page 17.
Stage 2: Assign settings and destinations
You’ll need to assign at least one setting and destination to each source media le job before
you can submit the batch for processing. You can also add multiple settings to the same job
to transcode multiple versions of the media le. Each setting-destination pair is known in
Compressor as a target.
For instructions on how to assign settings and destinations, see Assign settings to source
media on page 32 and Destinations overview on page 13 7.
Stage 3: Submit your batch for processing
When each media le has at least one setting and destination associated with it, you can submit
your batch for processing. For more information, see Submit a batch on page 147.
You can view the progress of your transcode in Share Monitor. This is a good way to monitor
when your batch has nished transcoding and if any problems occurred during the transcoding
process. For more information about Share Monitor, see Share Monitor Help.
Chapter 2 Compressor workows 15
Page 16

Alternatively, you can view the progress of your transcode in the History window in
Compressor. It contains a progress bar and, like Share Monitor, it can tell you if a submission was
successfully transcoded.
Custom transcoding workow
You can create your own settings and destinations, and customize other attributes such as
lters, cropping, frame resizing, and actions settings to create your own custom transcoding
process. The workow below summarizes each stage in the process and provides links to the
instructions you’ll need.
Stage 1: Import source media les
You can import source media les into a batch, either by dragging the les from the Finder to the
Compressor Batch window or by clicking the Add File button. You can import source media les
from any folder that you have access to. For more information, see Importing overview on page 17.
Stage 2: Create and assign one or more settings
Compressor has many output formats you can use to create a setting. For more information
about the various output formats available in Compressor, see Custom settings and output
formats overview on page 64. For instructions for creating your own customized settings, see
Settings overview on page 31.
You can also add lters, geometry settings, and post-transcoding actions to your settings. For
more information, see Filters overview on page 153, About deinterlacing on page 172, Geometry
overview on page 176, and Post-transcoding actions overview on page 18 4.
You can streamline your workow by putting your settings into groups. For more information,
see Create and modify settings on page 35.
After creating a setting, you can preview it to check your work. For more information, see
Previewing overview on page 52.
Note: Frame Controls settings cannot be previewed in the Preview window. To preview Frame
Controls settings, you can do a test transcode using a small section of your source media le. For
more information, see Transcode a portion of a clip on page 57.
Stage 3: Create one or more destinations
By default, your transcoded le is saved in the same folder that the source media le originated
from. If you want to store your transcoded les in a dierent location, you can create a new
destination. For more information, see Destinations overview on page 13 7.
Stage 4: Submit your batch for transcoding
After you’ve created and previewed all the jobs you want in the batch, you submit the batch. For
more information, see Jobs, targets, and batches overview on page 137.
You can view the progress of your transcode in Share Monitor. This is a good way to monitor
when your batch has nished transcoding and if any problems occurred during the transcoding
process. For more information about Share Monitor, see Share Monitor Help.
Alternatively, you can view the progress of your transcode in the History window in
Compressor. It contains a progress bar and, like Share Monitor, it can tell you if a submission was
successfully transcoded.
Chapter 2 Compressor workows 16
Page 17

Import source media
3
Importing overview
The rst step in the traditional Compressor transcoding process is to import at least one source
media le into the Batch window, thus creating a batch.
If you’re using the batch template workow, the rst step is to choose a batch template. For more
information, see Quick and easy batch template workow on page 14.
Here are some tips for importing source media:
•
About highly compressed source les: It’s strongly recommended that you do not use highly
compressed les, such as MPEG les, as your source les, because they can cause artifacts in
the encoded video.
•
When importing QuickTime reference movies: If you submit a reference movie for distributed
processing, the Apple Qmaster distributed processing system automatically copies the
appropriate media les to the processing cluster. For the best performance, you can avoid
this le transfer step by making sure that the media les specied in the reference movie are
available to each node of the Apple Qmaster cluster. For more information, see How the Apple
Qmaster system distributes batches on page 221.
•
When importing MPEG-2 les: When you import an MPEG-2 le, Compressor must parse the
le before you can play it in the Preview window. Parsing the le involves determining its
frame structure and other necessary information about the le. Because the frame structure
can change throughout the le, Compressor must scan the entire le, which can take several
minutes for longer les.
This doesn’t happen with MPEG-2 elementary les encoded using Compressor that had the
“Add DVD Studio Pro metadata” checkbox selected. For more information, see MPEG-2 Encoder
pane on page 89.
•
When importing Dolby Digital Professional source media: You can use Dolby Digital Professional
AC-3 audio les as source media les for your jobs. There are two common reasons to do this:
•
To test a le you just encoded: Because you cannot preview the Dolby Digital Professional output
settings, importing an encoded le into a job allows you to play it and verify the settings.
•
To convert a Dolby Digital audio le to another format: Because not all media players include
Dolby Digital decoders, you may nd that you need to transcode the le to another format.
17
Page 18
Compressor includes a Dolby Digital decoder that it uses to play or transcode Dolby Digital
The new batch’s tab
audio les. This means you can verify the Dolby Digital Professional output settings of a
previously encoded le on your system without using an external Dolby Digital decoder. To
hear surround sound you must have an external surround sound device connected to your
computer’s USB or FireWire output. The audio is mixed down to two channels if you play the
audio using your system’s stereo speakers.
Important: Because the audio output is already decoded and not in the Dolby Digital format,
the optical output cannot be used when playing Dolby Digital les from Compressor.
Tip: If Compressor doesn’t allow you to add a Dolby Digital le to a job, add the extension .ac3
to the lename.
•
About automatic values and nonstandard QuickTime: Compressor uses a variety of tactics
to determine the proper values for any settings that are set to Automatic. In most cases,
QuickTime les contain metadata specifying the various attributes of the le, such as frame
rate and frame size. In some cases, this metadata is not present, forcing Compressor to try to
determine this information, or it’s incorrect, causing Compressor to generate incorrect values
for the Automatic settings. Additionally, some QuickTime les use nonstandard settings that
require Compressor to choose an automatic value that may not be suitable. For these reasons,
it’s a good idea to verify that the Inspector values are set to Automatic. For more information,
see About the Automatic settings on page 40.
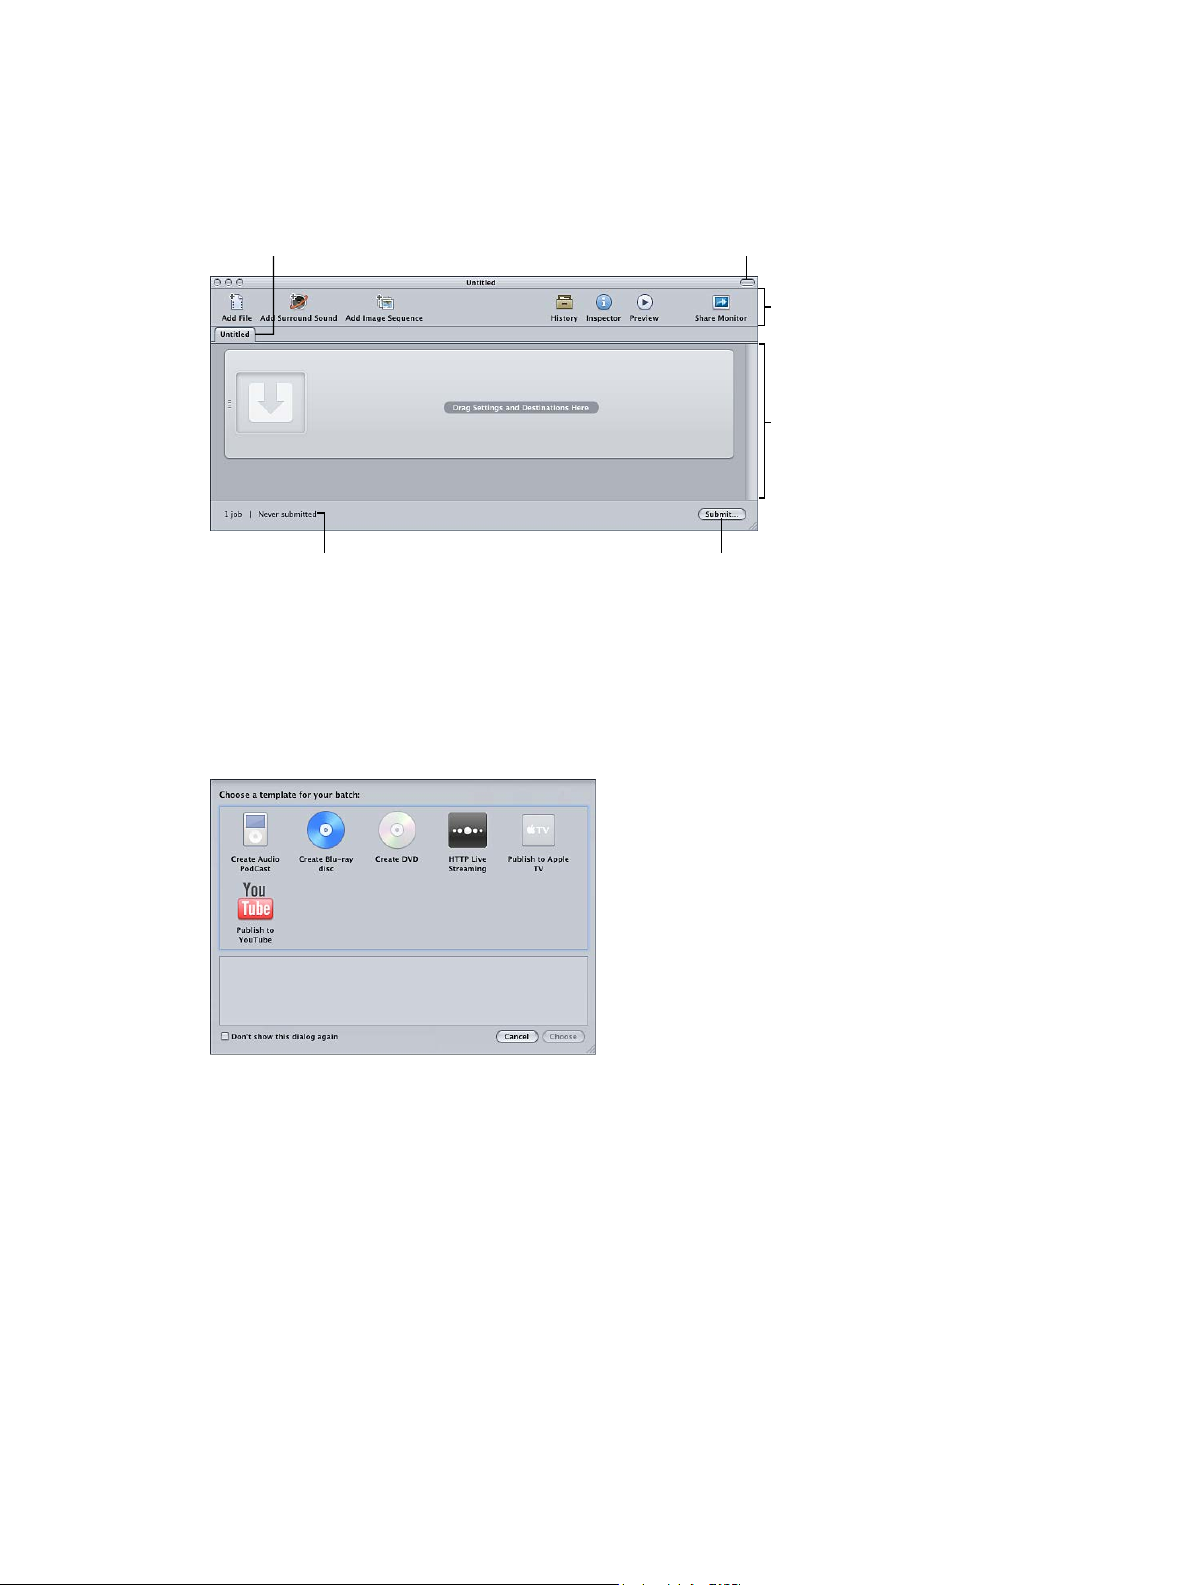
Create a batch
Batches—groups of one or more jobs—are the heart of your Compressor workow, and the
Batch window is where you work with the batches. The Batch window provides a central location
for organizing your transcoding tasks and quickly assigning settings.
When you rst open Compressor, the Batch window appears, and as you open more baches,
each appears as a tab at the top of the window. Batches can be saved, closed, and opened again.
For more information, see Batch window on page 29.
Create a batch using default settings
m Choose File > New Batch.
A new, untitled batch is added to the Batch window.
Each tab is for
a different batch.
The Batch window has a Submit button, located in the lower-right corner, that you can use to
begin transcoding the currently selected batch. The lower-left corner shows the status of the
current batch (how many jobs it contains and whether it has been submitted).
Chapter 3 Import source media 18
Page 19
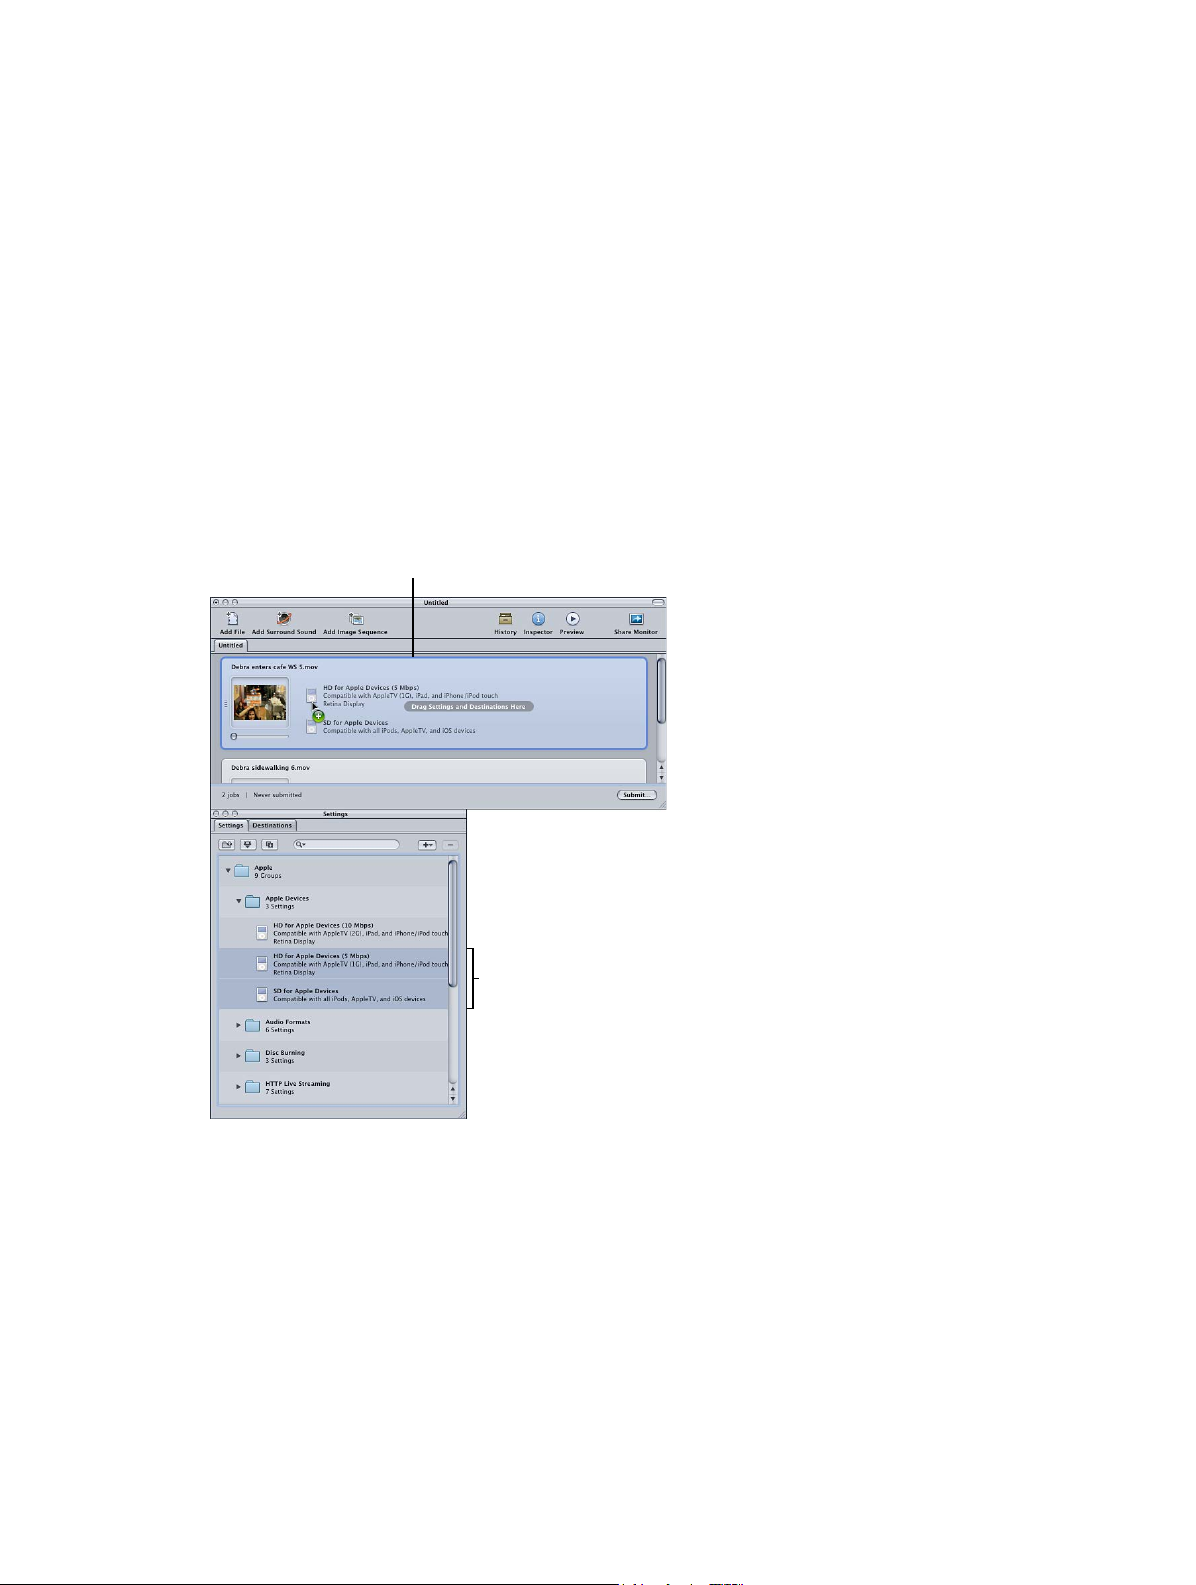
Create a new batch using a batch template
The new batch’s tab
1 Choose File > New Batch from Template.
The Batch Template Chooser appears, containing precongured templates and any templates
you’ve created.
For information about the templates in the Batch Template Chooser, see Batch window on page 29.
2 Select a batch template and click Choose.
A new, untitled batch is added to the Batch window.
Each tab is for
a different batch.
The Batch window has a Submit button, located in the lower-right corner, that you can use to
begin transcoding the currently selected batch. The lower-left corner shows the status of the
current batch (how many jobs it contains and whether it has been submitted).
Create a custom batch template
You can save any batch as a custom batch template. Custom batch templates appear as options
in the Batch Template Chooser, alongside the default Apple batch templates. Custom batch
templates can save you time, particularly with workows that you repeat often.
1 In the Batch window, create a new batch.
Tip: Alternatively, open a saved batch with the characteristics that you want in the batch template.
2 Adjust the batch settings as appropriate. For more information, see Assign settings to source
media on page 32 and Destinations overview on page 13 7.
3 Choose File > Save as Template.
4 In the dialog that appears, enter a name and description, and click OK.
The custom batch template is saved and appears in the Batch Template Chooser.
Chapter 3 Import source media 19
Page 20

Add source media les
Untitled batch tab
Add standard source media les to batches
Before you add any transcoding settings to a batch, you need to import the source media les
into the batch. Importing the source media les into the batch automatically creates a job.
Following are the details for adding standard (not surround sound or image sequence) source
media les to a batch.
Add source media les to a batch
1 Open Compressor.
The Batch window opens with an empty batch tab named Untitled.
Note: If the Batch Template Chooser opens automatically, click Cancel to close it. To prevent
the Batch Template Chooser from opening when you open Compressor, select the “Don’t show
this dialog again” checkbox, or, in Set Compressor preferences, select For New Batches: Use
Blank Template.
2 Do one of the following:
•
Choose Job > New Job With File (or press Command-I), navigate to the folder that contains
your source media, select one or more source media les, and click Open.
•
Click the Add File button (in the Batch window toolbar, if visible), navigate to the folder that
contains your source media, select one or more source media les, and click Open.
•
Control-click a job and choose Source > File from the shortcut menu.
Empty batch area
with a placeholder job
Chapter 3 Import source media 20
Page 21
•
The targets for this job
Control-click an empty area of the batch and choose New Job With File from the shortcut
menu. You can then navigate to the folder that contains your source media, select one or more
source media les, and click Open.
•
Open your source media le folder and drag one or more source media les into the batch.
Note: You can combine the above steps by selecting all the source media les you want to
transcode before opening Compressor and then dragging them to the Compressor application icon.
This opens Compressor and adds the media les to the default untitled batch at the same time.
3 To save the batch, choose File > Save As (or press Command-Shift-S).
4 In the dialog that appears, enter a name for the batch and choose the location where you want
to save it.
5 Click Save.
The tab in the Batch window changes to match the name of the le.
Note: If your Finder preferences are set to show le extensions, the extension .compressor
appears in the tab along with the name.
You’re not required to name and save your batches, and for quick jobs you might decide not to.
However, naming and saving a batch makes it easy to go back and resubmit it later if you nd
that the output les were not as expected or if your needs change. It also makes it easier to
gure out what’s in the History window and in Share Monitor if you submit multiple batches in a
short period of time.
The batch now contains your selected media les, each in its own job. Source media les with video
content also include a thumbnail image and a scroller that you can use to scroll through the video.
will appear in this area.
Each source
media file
creates a job.
Drag the slider to scroll
through video files.
Chapter 3 Import source media 21
Click anywhere in the job
to see this file’s attributes
in the Inspector window.
Page 22

Change the source media le assigned to a job
1 In the Batch window, select the job whose source media le you want to change.
2 Do one of the following:
•
Choose Job > Source > File, navigate to the folder that contains your source media, select one
or more source media les, and click Open.
•
Control-click the job and choose Source > File from the shortcut menu. You can then navigate
to your source media, select one or more source media les, and click Open.
•
Drag a new source media le to the job.
Any targets you had already congured remain and are now applied to the new source media le.
Remove a source media le from a job
m Control-click the job and choose Clear Source from the shortcut menu.
Remove jobs from a batch
Do one of the following:
m To remove a single job: Select the job and press Delete.
m To remove all jobs: Control-click in an empty part of the batch and choose Remove All Jobs from
the shortcut menu.
You can now add targets to your jobs.
Add surround sound source media les to batches
There are two methods you can use to add audio les to a batch to create a surround sound job:
an automatic method that relies on lenaming to map the audio les to the proper channels and
a manual method that allows you to manually assign the audio les to the channels.
Each method results in a job to which you can add a setting that supports surround sound audio
outputs, such as Dolby Digital Professional, AIFF, and several audio codecs in the QuickTime
Movie output format.
Important: Some of the output formats have multiple congurations for the surround sound
audio channels. Be sure you know which conguration your intended playback device requires.
For example, the AIFF output format provides four dierent congurations for 5.1 (six-channel)
audio outputs, with the dierence being the order of the channels.
Assign les to surround channels with channel identier codes
1 In the Finder, append the channel identier code of the target surround channel to the lename
of each source audio le using these codes:
•
-L: Left front channel
•
-R: Right front channel
•
-C: Center front channel
•
-Ls: Left surround channel
•
-Rs: Right surround channel
•
-S: Center surround channel
•
-LFE: Low-frequency eects channel (Subwoofer, LFE)
Chapter 3 Import source media 22
Page 23

For example, to assign an AIFF le to the left surround channel, rename the le lename-Ls.ai (where
lename is the name of your le). The channel identier codes must include the hyphen, as shown.
Note: OS X may add a le extension like .ai. This will not interfere with this channel
assignment method.
This procedure works only when you drag les into the Batch window. If you drag the les onto
the Compressor application icon, they’ll appear as separate source les, each in its own job.
Note: If you’re creating Dolby Digital Professional (AC-3) surround sound streams, you won’t use
all the channels listed in the table at once. For a diagram of the Dolby audio coding modes, see
Dolby Digital Professional Encoder pane on page 78.
2 Drag the renamed source audio les to the Batch window.
If the les in the group are named correctly (see step 1) and the group has fewer than seven les,
Compressor collapses the entire group of les into what appears as a single surround source
media le in the Batch window
Manually assign source audio les to channels of a surround sound stream
1 To import the source audio les, do one of the following:
•
Choose Job > New Job With Surround Sound Group (or press Command-Control-I).
•
Click the Add Surround Sound button in the Batch window.
•
Control-click in the batch and choose New Job With Surround Sound Group from the
shortcut menu.
The channel assignment interface opens.
2 To assign a source audio le to a channel, do one of the following:
•
Drag the source audio le from the Finder to the icon for a specic channel (for example, L).
•
Click the icon for a specic channel (for example, L) and use the Open dialog to locate the
source audio le intended for that channel.
The le is now assigned to the L (left front) channel.
3 Repeat step 2 for each of the source audio les that you intend to include in the surround stream.
Note: If you’re creating Dolby Digital Professional (AC-3) surround sound streams, you won’t use
all the channels listed in the table at once. For a diagram of the Dolby audio coding modes, see
Dolby Digital Professional Encoder pane on page 78.
Chapter 3 Import source media 23
Page 24
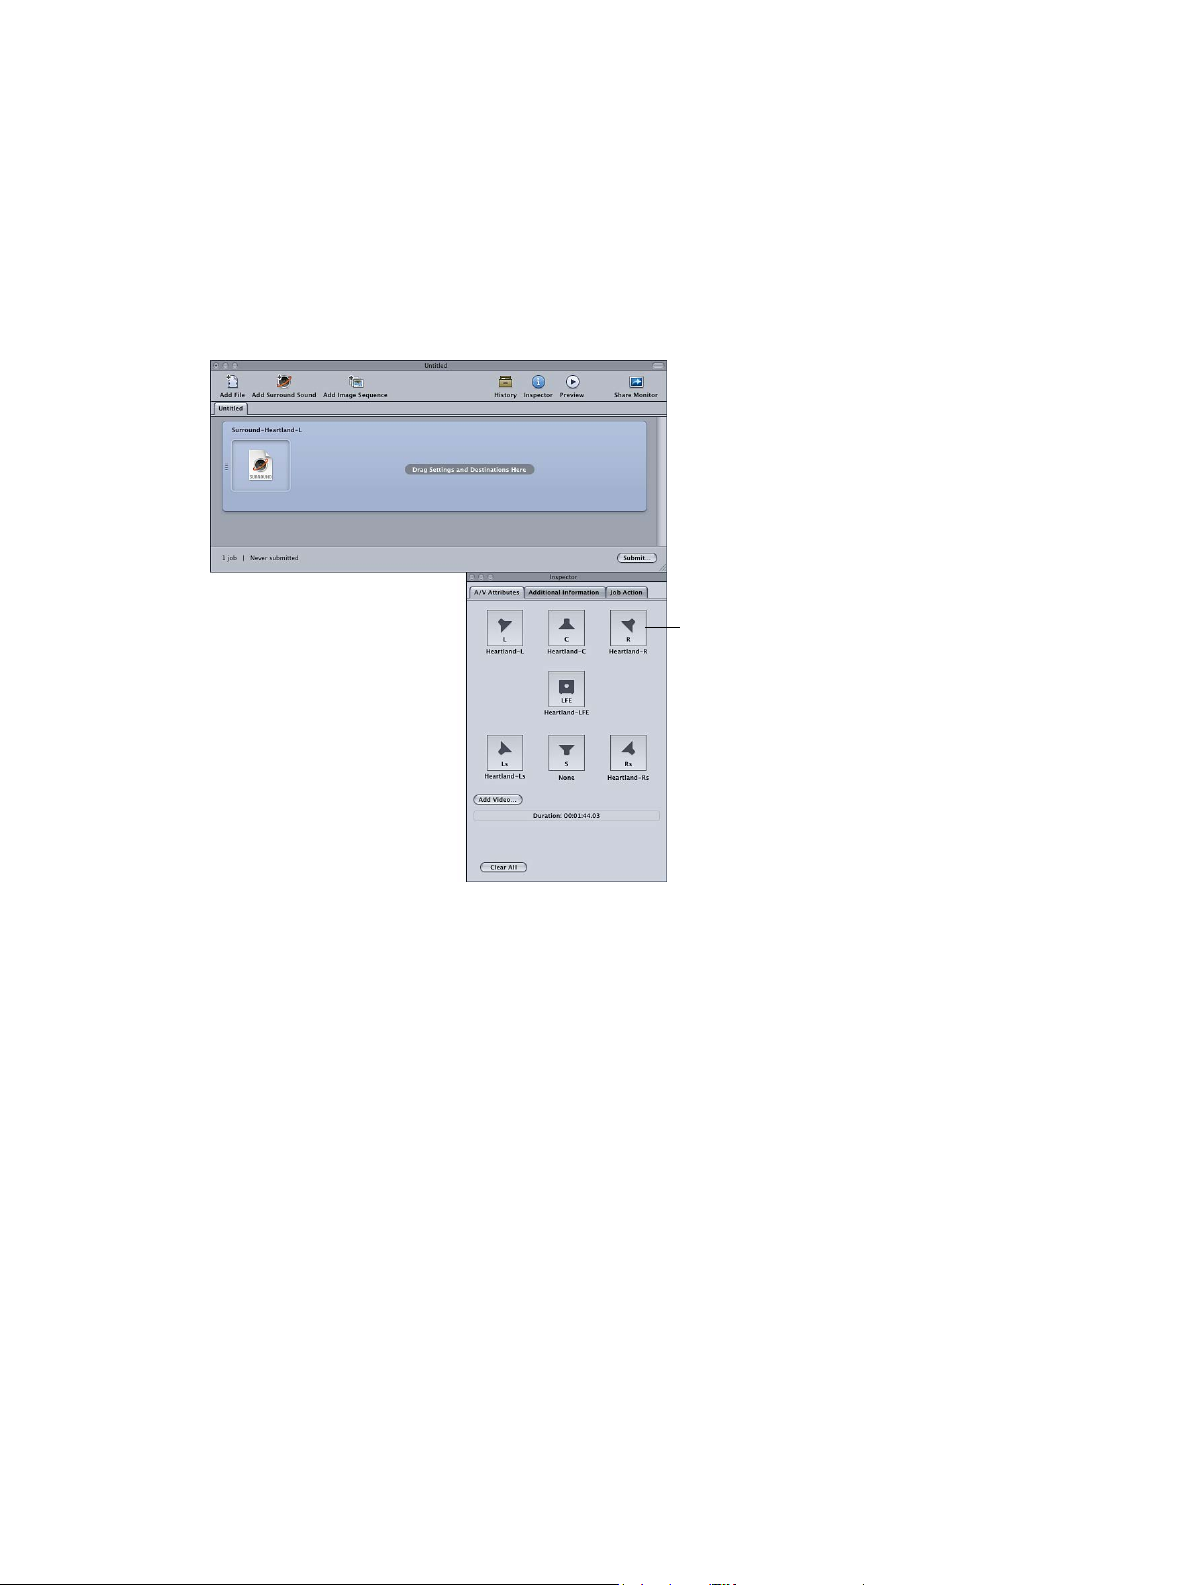
4 To include a video le, click the Add Video button and select a video le.
5 When you’ve nished adding source audio and video les to the channel assignment
interface, click OK.
The group of surround les appears as a single surround source media le job in the Batch window.
Change a surround sound le assignment
After you create a surround sound job, the Batch window shows the surround sound icon in the
source media le thumbnail (unless a video le was added to the job), and the Inspector window
shows the channels and their assigned les.
Click a channel’s icon to
change the file assigned
to that channel.
You can change any of the le assignments in the Inspector window.
1 Click the speaker icon of the channel you want to change.
2 In the dialog that appears, locate the le to assign to that channel and click Open.
3 To add a video le, click Add Video and select a video le.
You can replace a video le that is already assigned by deleting it and clicking Add Video to
choose a dierent video le.
For information about creating Dolby Digital Professional output les, see Dolby Digital
overview on page 72.
Chapter 3 Import source media 24
Page 25
Add image sequences to batches
You can import a sequence of still images into Compressor as a single image sequence job and
then apply an output frame rate and an audio le to the job. From that point, you treat the job
as you do any other Compressor source media le, adding settings, destinations, lters, and
post-transcoding actions to create an output media le with the video and audio formats and
characteristics you want.
Add a still image sequence job to a batch
1 Do one of the following:
•
Click the Add Image Sequence button and navigate to the folder containing the image
sequence les you want to import.
•
Choose Job > New Job With Image Sequence (or press Command-Option-I) and navigate to
the folder containing the image sequence les you want to import.
2 Click Open.
The new job appears in the Batch window.
3 Select the job in the Batch window.
The Inspector window displays the A/V Attributes tab containing information and controls for
the new image sequence job.
Chapter 3 Import source media 25
Page 26
4 Do any of the following:
•
Conrm the selected image sequence les.
To view the complete list of les, click the Info (i) button.
•
Conrm the video format information in the Video section.
•
Adjust the eld dominance for the source les by choosing an option from the Native Field
Dominance pop-up menu.
•
Adjust the frame rate for the source les by choosing a standard frame rate from the Frame
Rate pop-up menu.
•
If you want to add an audio le to the image sequence job, click Choose Audio and select an
audio le.
Note: Compressor supports the following audio le types for image sequences: AIFF, MP3,
MPEG-4 audio-only (.m4a), and QuickTime movie (.mov).
You can also use Compressor to output an image sequence. For more information, see Create
image sequence les on page 134.
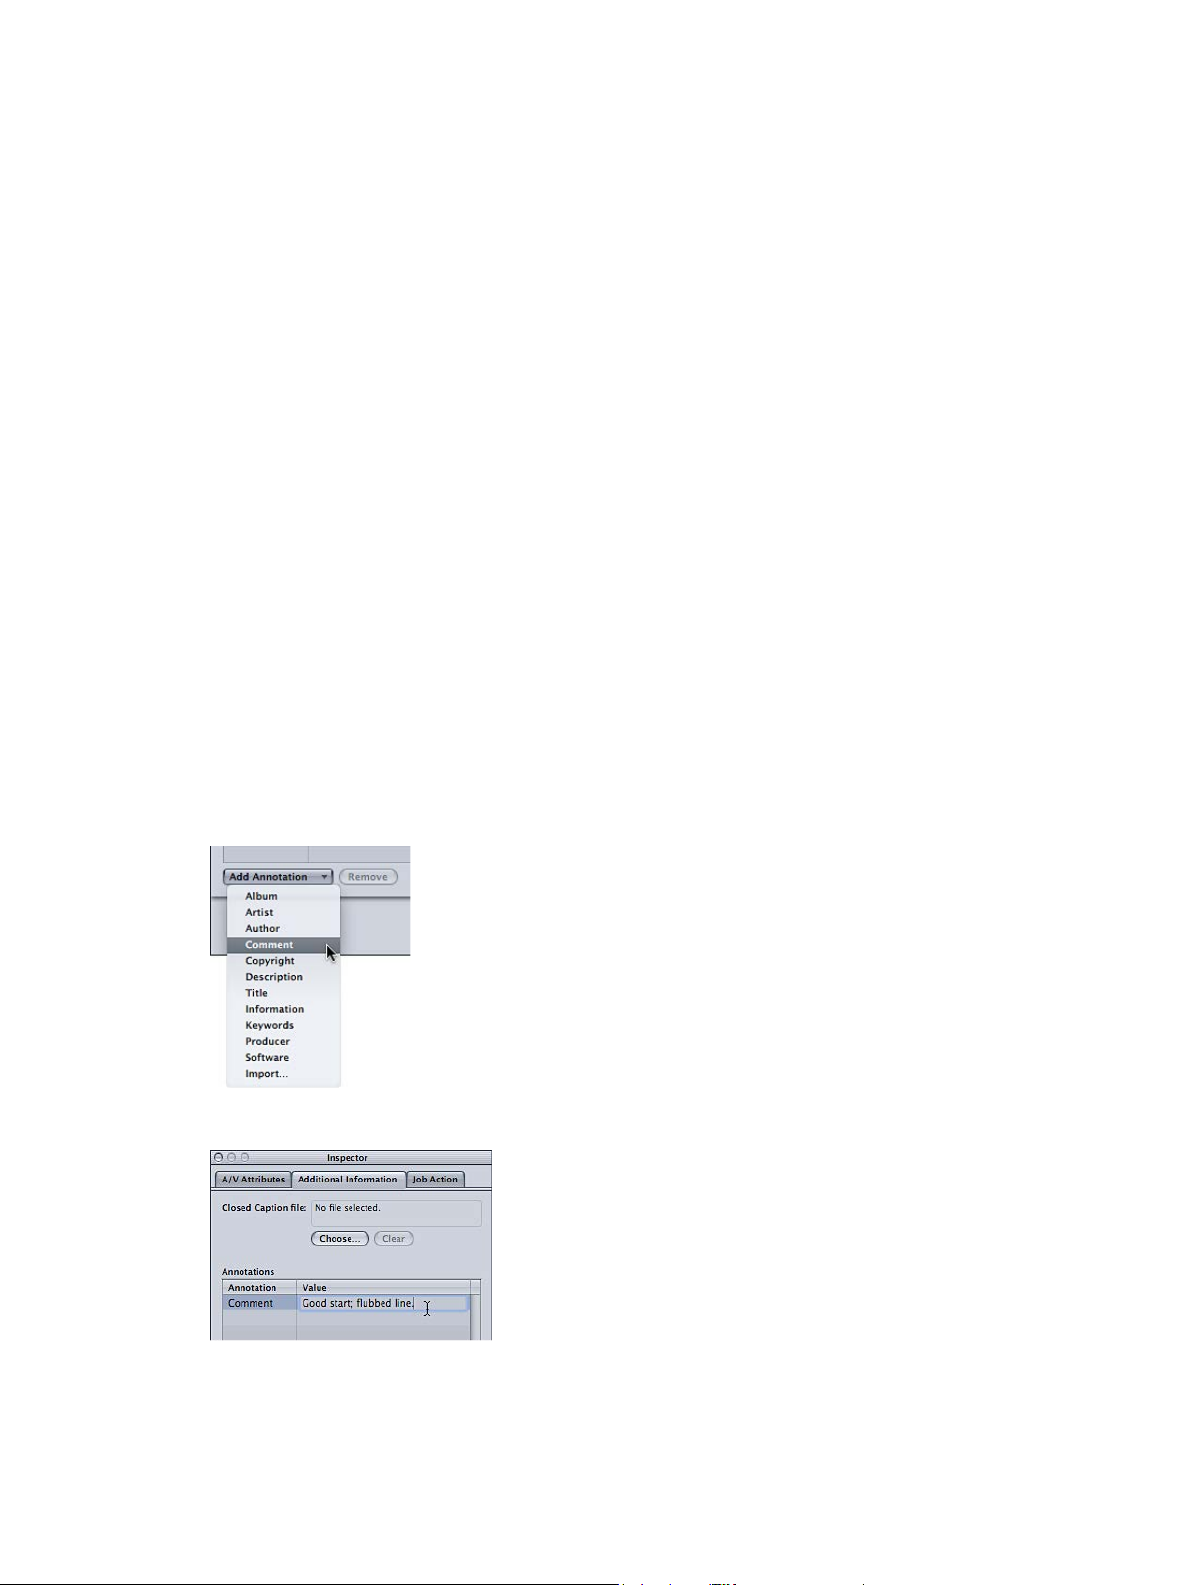
Add metadata to source media les
You can annotate a source media le with information that is important for your workow.
Additionally, some types of source media need to be identied before a job can be processed.
Note: The Add Annotation feature is supported by the H.264 for Apple Devices, MP3, and
QuickTime Movie output formats.
Add an annotation to a source media le
1 Click the job to show the source media le’s attributes in the Inspector window.
2 Click the Additional Information tab.
3 Choose the type of annotation from the Add Annotation pop-up menu.
4 Double-click the corresponding Value eld and enter the annotation text.
5 To save the annotation, press Return or click in the next eld.
Chapter 3 Import source media 26
Page 27
Associate a closed caption le with a job’s source media le
1 Click the job to show the source media le’s attributes in the Inspector window.
2 Click the Additional Information tab.
3 Click Choose, locate the closed caption le (must be a Scenarist closed caption format le, usually
with the le extension .scc), and click Open.
Note: Closed caption data is supported by the H.264 for Apple Devices, MPEG-2, and QuickTime
Movie output formats.
Depending on the output format of the job’s target, Compressor applies the closed caption le
to the output media les.
•
For QuickTime outputs: Compressor adds the closed caption le as a closed caption track to
the QuickTime output le. You can view the closed captions using QuickTime Player (version
7.2 or later).
•
For MPEG-2 elementary stream outputs: Compressor embeds the closed caption data in an
elementary MPEG-2 video stream so that it can be used for DVD authoring.
•
For MPEG-2 program and transport stream outputs: Compressor embeds the closed caption data
in program and transport MPEG-2 streams using the EIA-708 ATSC protocol.
Important: The timecode values in the closed caption le must directly relate to the timecode of
the source media le. You can open a closed caption le in TextEdit to see the timecode values it
contains (the actual text is encoded and cannot be read this way).
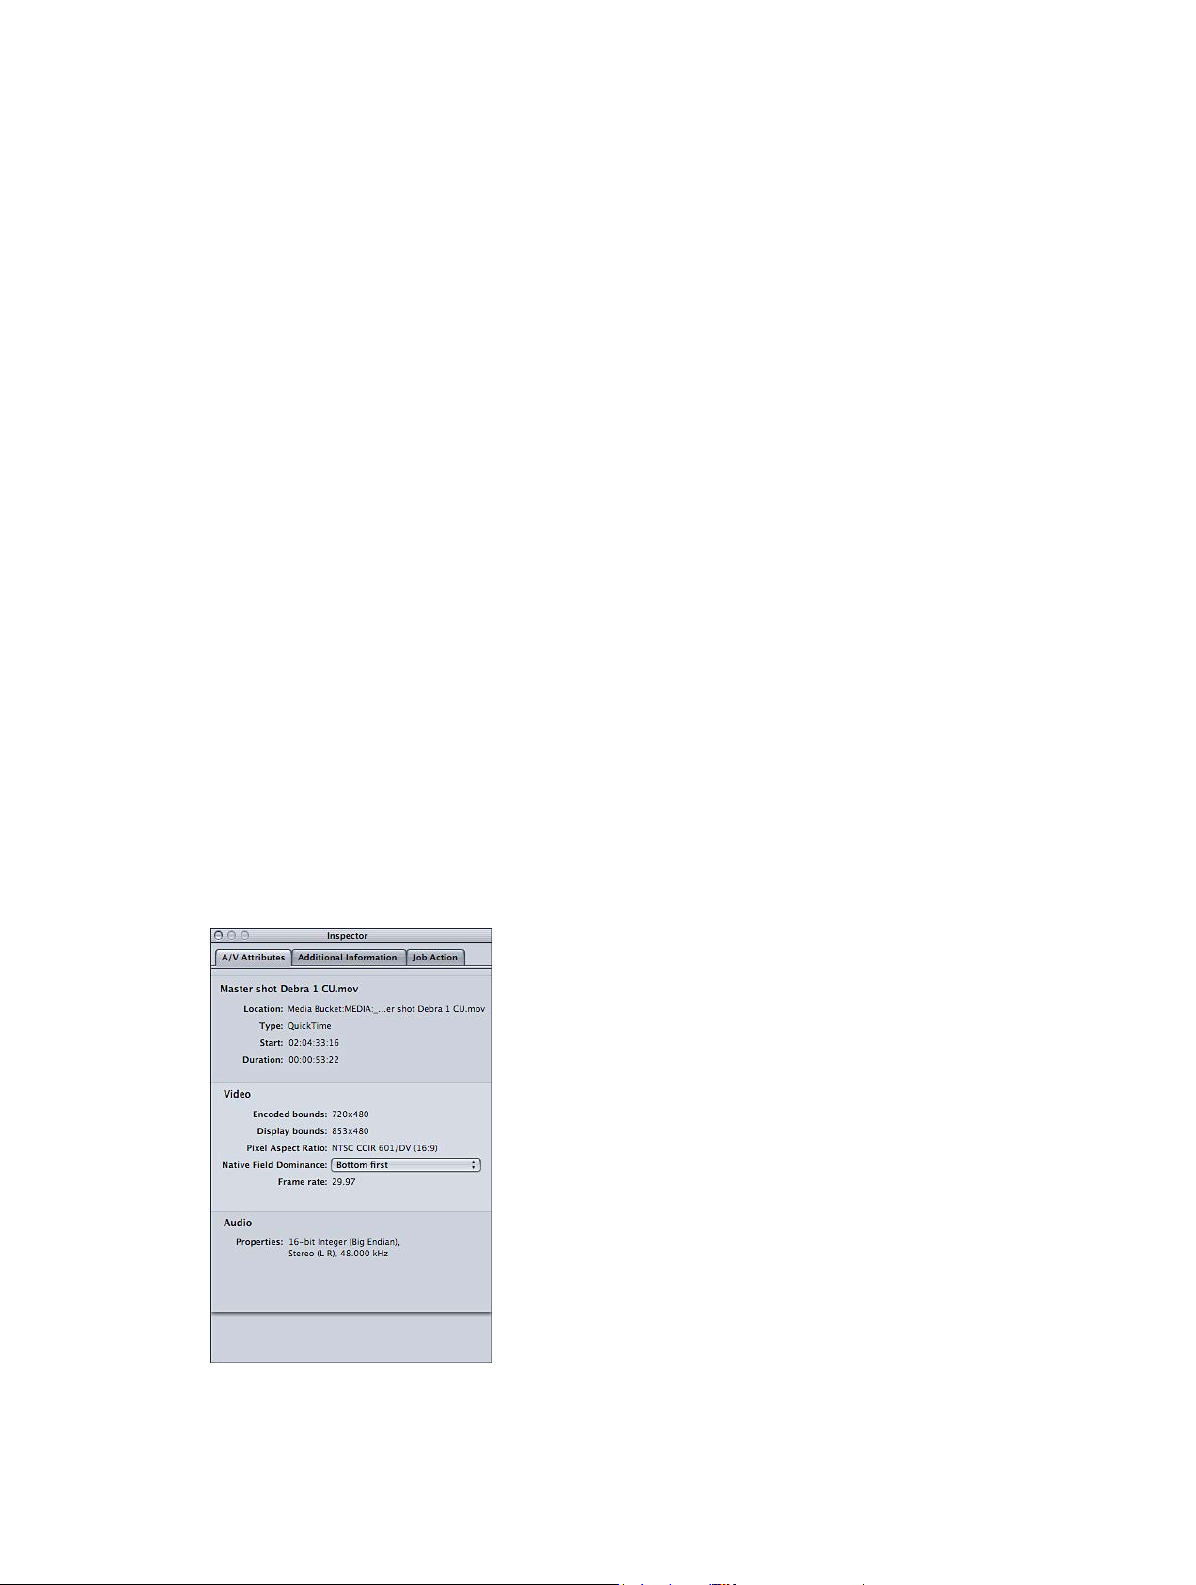
Inspector window
When you select a batch’s job, the Inspector window shows you information about the job’s
source media le.
The Inspector window contains three tabs: A/V Attributes, Additional Information, and Job Action.
A/V Attributes tab
The A/V Attributes tab contains general information about the source media le and is divided
into three sections.
Chapter 3 Import source media 27
Page 28

•
File information: This section shows the lename, location, and type of le.
•
Video information: This section, when applicable, shows all video-related information about the
le. This includes its frame size, frame rate, and timecode information.
•
Audio information: This section, when applicable, shows all audio-related information about the
le. This includes its sample size and sample rate.
Additional Information tab
The Additional Information tab allows you to see and modify a variety of metadata items that
might have been added in other applications such as Final Cut Pro or QuickTime. You can also
add metadata to the output media le, or associate a closed caption le with the output le.
•
Closed Caption le eld: Displays the name of the closed caption le currently associated with
the source media le.
•
Choose (closed caption) button: Use this button to open a dialog and navigate to the closed
caption le you want to associate with the source media le.
•
Clear button: Use this button to remove the associated closed caption le.
•
Annotations table: Displays the current annotation types and the corresponding
annotation text.
•
Add Annotation pop-up menu: Choose the type of annotation you want to add to the source
media le.
•
Remove (annotation) button: Use this button to remove the selected annotation.
Job Action tab
The Job Action tab allows you to apply and adjust post-transcoding actions for entire jobs. For
information about using the Job Action tab, see Post-transcoding actions overview on page 184.
Chapter 3 Import source media 28
Page 29
Batch window
Batch tabs
Show/hide toolbar button
The Batch window provides a central location for organizing your transcoding tasks and quickly
assigning settings. When you rst open Compressor, the Batch window appears with an empty,
untitled batch. Think of batches as documents that can be saved, closed, and opened again. You
use the toolbar at the top of the Batch window to open all other Compressor windows.
Toolbar
Job area
Batch status
Batch submission button
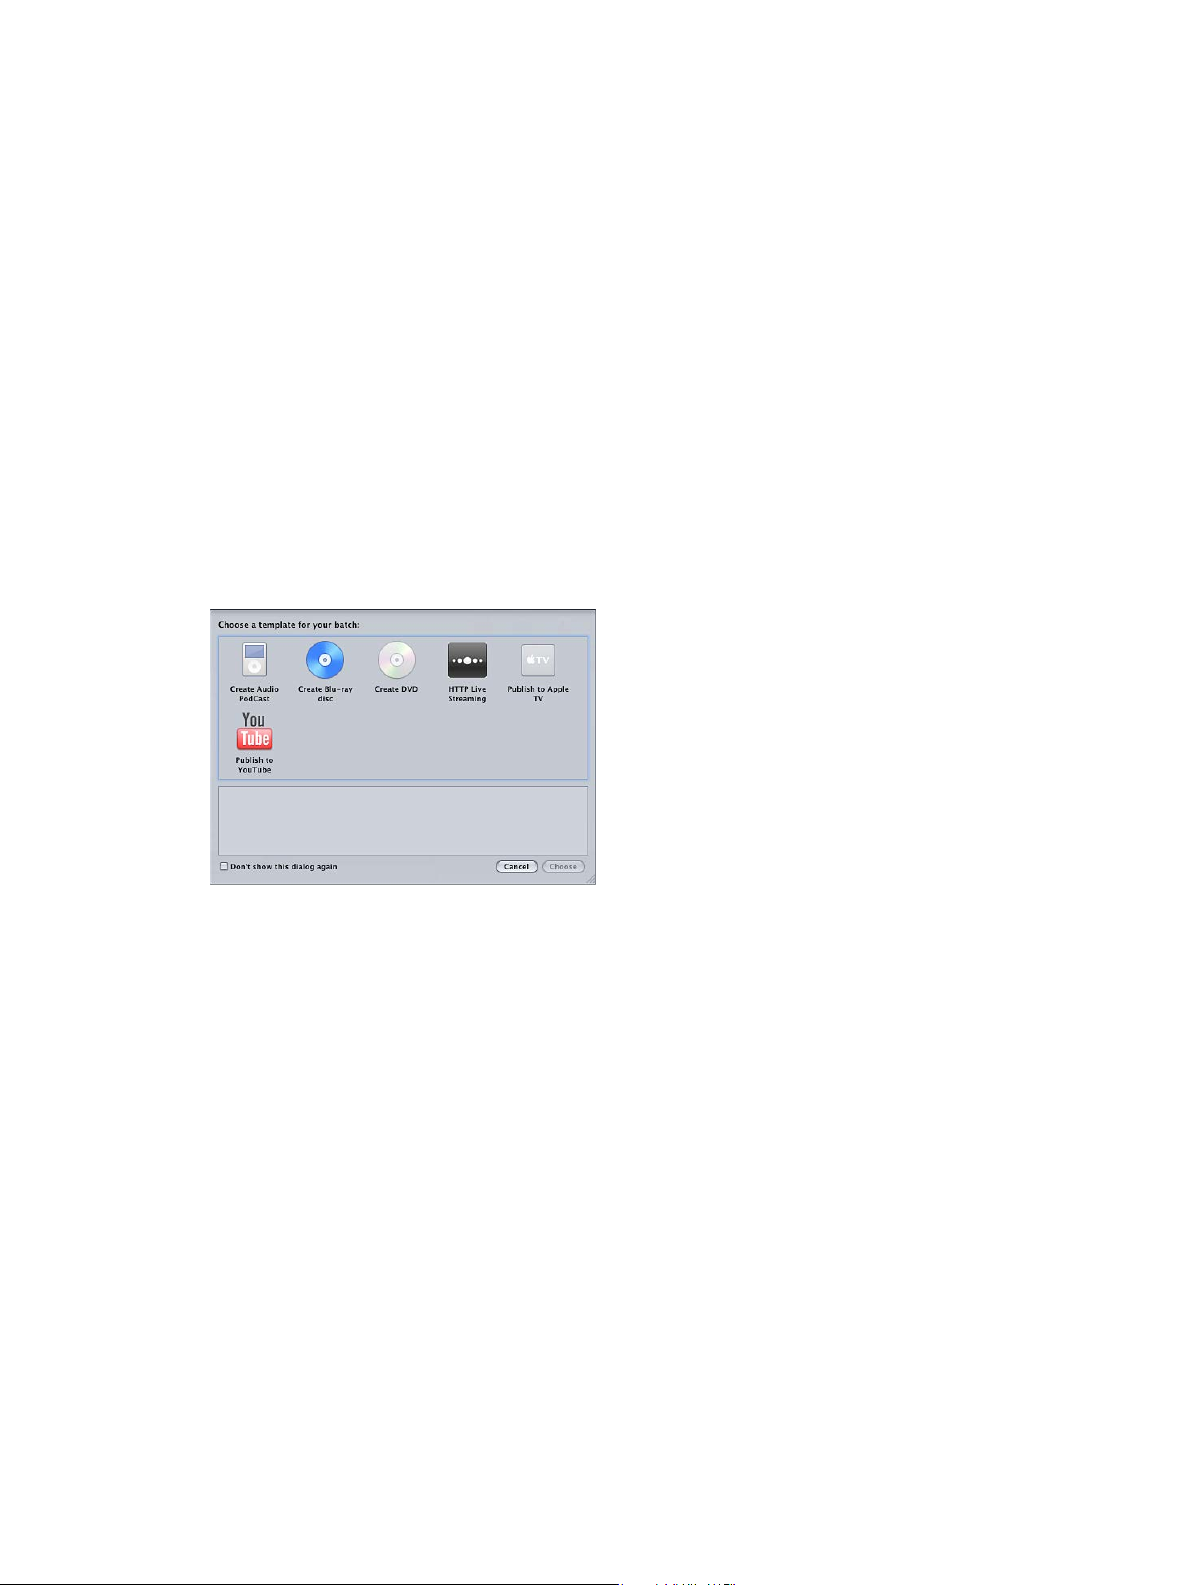
To simplify common workows, Compressor includes a Batch Template Chooser that can appear
anytime you create a new batch. The For New Batches setting in Compressor preferences
controls whether the Batch Template Chooser appears. For details, see Set Compressor
preferences on page 211 .
The Batch Template Chooser contains a variety of options you can choose from to congure a
new batch.
Choosing a template adds one or more settings to the batch, as well as a job action to be
executed when the batch output is nished.
Chapter 3 Import source media 29
Page 30

Compressor includes the following batch templates:
•
Create Audio Podcast: Use this template to create an AAC audio le suitable for podcasting and
add it to the iTunes library.
•
Create Blu-ray disc: Use this template to create BD H.264 video and Dolby Digital Professional
(.ac3) audio les and automatically burn them to a Blu-ray disc or an AVCHD disc (AVCHD discs
can be played in Blu-ray Disc players that are compatible with the AVCHD format).
•
Create DVD: Use this template to create a standard-denition DVD using MPEG-2 (.m2v) video
and Dolby Digital Professional (.ac3) audio and automatically burn it to a disc.
•
HTTP Live Streaming: Use this template to create a set of les you can use to stream a movie to
iPhone, iPad, iPod touch, and Mac, using an ordinary server.
•
Publish to Apple TV: Use this template to create a video le suitable for viewing on Apple TV
and add it to the iTunes library.
•
Publish to YouTube: Use this template to create a video le suitable for viewing on YouTube and
upload it to a YouTube account.
Note: Choose a template based on the intended use of the output media le you’re creating.
If there is no obvious template for your intended workow, you can create your own batch or
transcoding workow.
Chapter 3 Import source media 30
Page 31

Create a New Setting
Assign settings and preview media
4
Settings overview
A setting is a combination of transcoding attributes, such as output format, lter, and geometry
settings, that you apply to the source media le as a part of the transcoding process. You need
to assign at least one setting to a source media le before you can transcode it. Once you have
a source media le in the current batch in the Batch window, you can either select a preexisting
setting or create a customized one using the Settings tab.
The Settings tab allows you to manage your settings. In conjunction with the Inspector window,
the Settings tab also provides details of all the settings and includes easy access to common
transcoding controls.
The Settings tab contains a list of the existing settings and the necessary buttons to add, remove,
or duplicate a setting and create groups and Droplets.
Group button
Duplicate Selected
Setting button
Create a New Setting
pop-up menu
Delete Selected
Setting button
Save Selection
as Droplet button
Click the disclosure
triangles to show
or hide a setting
group’s contents.
An example setting
Settings list
The Inspector window contains the panes that let you create and modify all the settings related
to your output media le, such as lters, geometry, and output format. The Inspector window is
also where you name your settings, as well as add descriptions to make it easier to remember
later what you customized. For more information, see Inspector panes on page 42.
31
Page 32
Assign settings
A job with a source media
Assign settings to source media
You can use a variety of methods to assign settings to a job. Some methods, such as dragging
the setting from the Settings tab, are better suited to working with one job. Other methods, such
as using the shortcut menu, are better for assigning the same settings to a group of jobs. You can
even assign settings by dragging settings or Droplets from the Finder.
Note: The following steps assume you have already added source media les to a batch, creating
the jobs to which you are adding the settings. For information about importing source media
les, see Importing overview on page 17.
Assign a setting to a job by dragging
1 In the Settings tab, select one or more settings or groups of settings.
Tip: You can Option-click a setting group’s disclosure triangle to expand that group (and all
subgroups) and show all the settings it contains.
2 Drag the settings to the job in the Batch window.
file in the Batch window
Select one or more
(two in this case) settings
Chapter 4 Assign settings and preview media 32
to apply to the job.
Page 33

A new target is created for each setting that you added to the batch’s job.
Select the jobs in
Note: You can only apply the settings to a single job when you assign them by dragging.
Assign a setting to a job using the Target menu
1 Select one or more jobs in the Batch window’s current batch.
2 Choose Target > New Target With Setting.
The settings selection dialog appears over the Batch window.
the Batch window.
New targets
are added for
each setting
you drag to
the job.
Select the settings
to apply to the
selected jobs.
Click Add to assign
the settings to the
selected jobs.
3 Choose one or more settings or groups of settings to assign to the jobs, and click Add.
The settings are assigned to each selected job.
Chapter 4 Assign settings and preview media 33
Page 34

Assign a setting to a job using the shortcut menu
1 Select one or more jobs in the Batch window’s current batch.
2 Control-click one of the selected jobs and choose New Target With Setting from the
shortcut menu.
The shortcut menu lists the settings based on their groups. You cannot directly choose a group
to be assigned, but each group contains an “All” item that selects all the group’s settings.
Note: You cannot select multiple individual settings with this method.
3 Choose a setting, or choose All to choose all settings in a group.
The settings are applied to all selected jobs.
Assign a setting from the Finder
Do one of the following:
m Drag one or more settings from the Finder to an empty space in the Batch window.
A new job appears with one or more target rows populated with the settings.
m Drag one or more settings from the Finder to an empty space on a job tile in the Batch window.
One or more new target rows appear on the job, populated with the settings.
Replace an assigned setting with a dierent setting
After you’ve assigned a setting to a job, you might nd a more suitable setting and decide to
change the target’s setting to the new one. You can use several methods to change a target’s
setting. All of these methods leave the destination and output lename settings as they are.
Replace a setting already assigned to a target with a dierent setting
Do one of the following:
m Select the target and choose Target > Change Setting.
This opens the setting selection dialog, where you can choose a new setting and click Add to
assign it to the selected target.
m Control-click the target and choose Change Setting from the shortcut menu.
This opens the setting selection dialog, where you can choose a new setting and click Add to
assign it to the selected target.
m Select the new setting in the Settings tab and drag it to the target.
Note: With all the above methods, if you select multiple settings, only the top one is assigned
to the target.
Chapter 4 Assign settings and preview media 34
Page 35

Modify an assigned setting
You can edit or change any component of a setting that has already been assigned to a source
media le in the Batch window (identied as Selected Target in the Inspector window).
Modify a setting already assigned to a source media le in the Batch window
1 Select the target in the batch with the setting that you want to change.
The setting appears in the Inspector window with Selected Target in the Name eld. This
is a temporary copy of the setting and not the setting itself, so you can make temporary
modications to the setting for just that one batch submission.
Select a target in the Batch
window to see its settings
in the Inspector window.
The setting’s name appears
as Selected Target.
Click the Save As button
to save this as a new setting
with any changes you make.
2 Make the changes to the setting.
When you modify the setting, the Save As button at the bottom of the Inspector window
becomes active.
3 To save the modied setting with a new name, click Save As.
The saved copy appears in the Settings tab as Setting Name-Copy and immediately becomes the
selected setting in the Settings tab.
Note: You don’t have to save the modied setting, but it’s a good idea to save it in case you need
to use it again later.
Create custom settings
Create and modify settings
If the settings that come with Compressor aren’t sucient for your transcoding needs or if you
simply want additional settings, you can create your own. You can also create a group of settings
so that you can quickly assign multiple settings to a source media le.
The easiest way to create a custom setting is to duplicate an existing setting and then adjust the
copy to suit your needs.
Chapter 4 Assign settings and preview media 35
Page 36

Create a custom setting
1 In the Settings tab, choose an output format from the Create a New Setting (+) pop-up menu.
Choose an output format
for the new setting.
A new setting called Untitled appears in the Custom folder of the Settings tab, appended with
the selected output le format (for example, Untitled H.264 for Apple Devices).
New Untitled setting
The Inspector window also changes to show this setting’s parameters.
Note: You can always change the output le format for that setting in the Encoder pane of the
Inspector, but be sure to change the setting name to reect its output le format.
2 At the top of the Inspector, change the name and description to make it easy to remember why
you created this custom setting.
3 Click the Encoder button in the Inspector, and change the output format and video and audio
codecs and their associated attributes.
Dierent options are provided in the Encoder pane for each le format.
You can also change options in any of the other panes in the Inspector. For more information,
see Inspector panes on page 42.
4 To Save the setting, click Save.
Search for a setting
The Settings tab in the Settings and Destinations window includes a search eld that you can
use to quickly locate the setting you need. For example, you can type “iPhone” to see a list of
settings that mention iPhone.
m In the Settings tab, click the search eld and enter the text to search for.
Both the names and descriptions of the settings are searched to determine if any contain the
text you entered. To clear the text entry and return to a normal settings display, click the search
eld reset button (with an X).
Chapter 4 Assign settings and preview media 36
Page 37

Duplicate a setting
Click this button to duplicate
If there is a setting that contains some attributes that you want to use in another setting, you can
duplicate the existing setting and make the necessary modications to the duplicate rather than
creating a new setting from scratch. Duplicating a stock Apple setting and then adjusting the
duplicate to suit your needs is the most convenient way to create a custom setting.
1 In the Settings tab, select the setting that you want to duplicate.
2 Click the Duplicate Selected Setting button.
the selected setting.
Select the setting
to be duplicated.
A new setting appears in the Custom folder with the word Untitled appended before the
original name.
3 Select the new setting in the Custom folder.
4 At the top of the Inspector, name the duplicate setting and provide a description.
5 Click the Encoder button in the Inspector, and change the output format and video and audio
codecs and their associated attributes.
Dierent options are provided in the Encoder pane for each le format.
You can also change options in any of the other panes in the Inspector. For more information,
see Inspector panes on page 42.
6 If you’ve modied the setting in any way, you can do one of the following to save the changes:
•
Click the Save button at the bottom of the Inspector window.
•
Select any other setting.
A dialog asks if you want to save the changed attributes.
7 Click OK to save the changes, or click Revert to cancel the changes and return to the Inspector.
For information about assigning settings, see Assign settings to source media on page 32.
Chapter 4 Assign settings and preview media 37
Page 38
Create a group of settings
Enter a name
1 Click the Group button in the Settings tab.
A folder called Untitled appears in the Settings tab with “0 Settings” in the Summary area. You
cannot modify this eld. It displays the number of settings the group contains.
Click the Group button.
A new, untitled group
with 0 settings is created.
for the new group.
2 In the Inspector, enter a name for the group in the Name eld.
3 In the Settings tab, drag the settings you want to group into the group folder.
You can also create hierarchies of groups (groups within groups). Just drag a group folder into
another group folder.
This custom group
contains three other
custom groups, each
with its own settings.
The Summary area displays the number of settings your group contains. Once you have at least
one setting inside the group folder, you can click the disclosure triangle next to the group folder
to show or hide the setting group details. You can also see full details of the settings in any
group by selecting the group and then looking at the Summary pane in the Inspector window.
Chapter 4 Assign settings and preview media 38
Page 39

Add the same setting to more than one group
1 Select the setting in the Settings tab.
2 To create a copy, click the Duplicate Selected Setting button.
3 Drag the duplicated setting to another group folder.
You can choose to rename the setting—for example, removing the word “copy” from it.
Delete a setting
1 In the Settings tab, select the setting that you want to delete.
2 Click the Delete Selected Settings (–) button, or press the Delete key on your keyboard.
WARNING: There is no warning when you delete a setting, and you cannot undo the deletion
to restore the setting.
Share settings
Newly created settings are stored as XML les in the home folder at /Users/username/Library/
Application Support/Compressor/Settings/, with the le extension .setting. You can distribute
and share any of your custom settings by placing them in the same location within the home
folder of whatever computer you distributed the settings to. You can also transfer these les the
same way that you would distribute any other le, by emailing them as an attachment or placing
them on a server.
Note: Settings created using Compressor 4 or later are not compatible with earlier versions
of Compressor.
Copy a setting directly from Compressor
m Drag one or more settings from the Settings tab to the Finder (to the desktop, for example).
Apply or add a setting to Compressor from the Finder
Do one of the following:
m Drag one or more settings from the Finder to the Custom folder in the Settings tab.
m Drag one or more settings from the Finder to an empty space in the Batch window.
A new job appears with one or more target rows populated with the settings.
m Drag one or more settings from the Finder to an empty space on a job tile in the Batch window.
One or more new target rows appear on the job, populated with the settings.
Chapter 4 Assign settings and preview media 39
Page 40

About the Automatic settings
Several items in the settings panes have an optional automatic mode. When the automatic mode
is on, Compressor determines the optimal value for the setting.
The Automatic button
is dark when active,
and its item is dimmed.
The Automatic button
is dimmed when inactive,
and its item is selectable.
In general, when the automatic mode is on, its item is dimmed and cannot be changed.
•
If the setting has not been assigned to a source media le: The item says “Automatic.” An
exception is in the Frame Controls pane of the Inspector window, whose state is undetermined
until you have applied the setting to a source media le.
•
If the setting has been assigned to a source media le: The item remains dimmed but shows the
value that will be used.
You can click the Automatic button to turn the automatic mode on (the button darkens) or o
(the button lightens). When the automatic mode is o, you can choose values for an item as usual.
Tip: It’s a good idea to verify the values for those Inspector settings that are set to Automatic.
Compressor can usually correctly determine the appropriate values; however, there may be
instances where there is not enough information in the source media le to determine the correct
value. For example, some QuickTime clips might not have proper metadata or the metadata might
be incorrect. Additionally, if the source media le uses nonstandard settings (such as the video
frame size or frame rate), Compressor chooses the nearest standard value to use.
Chapter 4 Assign settings and preview media 40
Page 41

Example: Create custom groups and settings for DVD
For this example, suppose you’re working on an HD project that will eventually end up on both an
HD and an SD DVD. Before that happens, though, you also need to supply SD DVDs of the dailies.
An easy way to handle this is to create two groups of settings:
•
Settings for the dailies: These settings would include an AIFF audio encoder (because you want
it done fast and disc space will not likely be an issue) and an MPEG-2 encoder with an SD
frame size using the fastest settings (because quality isn’t the highest priority). This could also
be an HD encoder if you have an easy way to play an HD DVD.
•
Settings for the nal disc: These settings would include an AC-3 audio encoder, an H.264 HD
for DVD video encoder, and an MPEG-2 encoder using the Frame Controls to ensure a highquality SD output video.
You would most likely create a third settings group that would be named after this project and
would contain the above two groups.
Create the groups for dailies and nal outputs
1 In the Settings tab, click the Create a New Setting Group button three times to create three new,
untitled groups.
2 Select the rst of the new groups and, using the Inspector window, name it after the project.
3 Select the second of the new groups and name it Dailies.
4 Select the third of the new groups and name it Final Discs.
5 In the Settings tab, drag the Dailies and Final Discs groups up until a black box surrounds the
group named after the project, and then release them.
Note: You can select multiple groups or settings by holding down Shift while selecting them.
6 Locate the Apple settings that come closest to matching what you need each setting to do in
these new groups.
7 Make a copy of each setting by clicking the Duplicate Selected Setting button.
8 Select each copied setting, rename it, and then drag it to the proper folder.
This custom group
contains the other
custom groups, each
with its own settings.
This custom group
contains the settings
used to create the dailies.
This custom group
contains the settings
used to create the
final disc.
You can then select each setting and make any necessary changes to it.
When you’ve imported the source media les and created their jobs, you can just assign the
appropriate group (Dailies or Final Disc) and all the proper settings are applied to the targets.
Chapter 4 Assign settings and preview media 41
Page 42

Inspector panes
When you select a setting in the Settings tab or a target in a batch’s job, the Inspector shows one
of six panes.
Summary pane
The Summary pane contains the Summary table, which describes all the settings (video and audio
settings, geometry, and lter settings) associated with the setting selected in the Settings tab.
Information in the Summary table is updated automatically whenever any setting is modied.
The Summary table includes the following details:
•
Name: The name of the setting selected in the Settings tab.
•
Description: A description of the setting selected in the Settings tab.
•
File Extension: The extension assigned to the transcoded media le. This identies which format
your source media le is being converted to.
•
Estimated le size: When a source media le is assigned to the setting, the estimated total le
size is displayed here. When a source media le is not assigned to the setting, this eld shows
an estimated size per hour of source length for the source media.
Note: The estimated total le size is not available for all output formats.
•
Audio Encoder: Details of the audio output le format and other transcoding settings, such as
sample rate, channels, bits per sample, and codec type.
•
Video Encoder: Details of the video output le format and other transcoding settings such as
frame width and height, crop amount (in pixels), frame rate, aspect ratio, codec type, pixel
depth, spatial quality, minimum spatial quality, key frame interval, temporal quality, minimum
temporal quality, and data rate (in bits per second).
•
Filter: Details of all, some, or none (depending on how many lters you selected in the Filters
pane) of the available Compressor lters.
Chapter 4 Assign settings and preview media 42
Page 43

Encoder pane
You use the Encoder pane to select and congure the output le format and other settings. The
le format options and attributes are dierent for each format.
•
File Format: Use this pop-up menu to choose an output le format.
•
Extension: The following le extensions automatically appear in this eld based on the format
you choose from the File Format pop-up menu, and if video and audio tracks are enabled.
Don’t alter this eld without good reason, because your le may not be recognized if you do.
•
ai: Represents AIFF.
•
ac3: Represents Dolby Digital Professional.
•
caf: Represents Apple CAF les.
•
dv: Represents Digital Video (DV) format video.
•
mpg: Represents MPEG-1 multiplexed (video and audio) stream.
•
m1v: Represents MPEG-1 video elementary stream.
•
m1a: Represents MPEG-1 audio elementary stream.
•
m2v: Represents MPEG-2 video elementary stream.
•
m2t: Represents MPEG-2 transport stream.
•
mpeg: Represents MPEG-2 program stream.
•
m4v: Represents H.264 for Apple Devices.
•
mp4: Represents MPEG-4.
•
mov: Represents QuickTime.
•
tga: Represents TARGA.
•
ti: Represents TIFF.
•
Allow Job Segmenting: This checkbox allows you to turn o job segmenting. It’s relevant only if
you’re using Compressor with distributed processing and with two-pass or multi-pass encoding.
For more information, see Job segmenting and two-pass or multi-pass encoding on page 249.
Chapter 4 Assign settings and preview media 43
Page 44

Frame Controls pane
This pane of the Inspector oers automatic and customized settings for advanced image analysis,
including frame resizing, clip retiming, and deinterlacing.
Frame resizing would be necessary when transcoding between a high-denition (HD) format
such as 1080i and a standard-denition (SD) format such as DV-NTSC. An example of frame
retiming would be when transcoding between video formats with dierent frame rates such as
NTSC (29.97 frames per second) and PAL (25 frames per second).
Filters pane
You use the Filters pane to add lters to your setting. You can use lters to perform tasks such as
gamma correction and noise removal.
Select the checkbox next to any of the lters you want to include in a particular setting. Use each
lter’s sliders or arrow controls to adjust your lter settings as necessary.
Chapter 4 Assign settings and preview media 44
Page 45

Filters are applied to the source media le according to their order in the lters list. You can
reorder lters by dragging them up or down in this list.
Geometry pane
You use the options in the Geometry pane to crop and resize the media le being compressed
and set its aspect ratio.
The Geometry pane has three sections:
•
Source Inset (Cropping): Use any of the four elds to enter the number of pixels by which you
want to reduce the source media le size, or choose a setting from the “Crop to” pop-up menu
to have Compressor enter crop values based on the source media le video content.
•
Dimensions (encoded pixels): Use the Frame Size pop-up menu or these elds to create an
appropriate output frame size and aspect ratio for your output media le. Use the Pixel Aspect
pop-up menu to set width and height values to conform to a designated pixel aspect ratio.
•
Output Image Inset (Padding): Use the Padding pop-up menu to calculate the output height or
width values. With Custom selected, you can enter values in the elds.
For more information about the Geometry pane, see Geometry overview on page 17 6.
Chapter 4 Assign settings and preview media 45
Page 46

Actions pane
You use the Actions pane to turn on email notications about completed transcodes and assign
a default destination to the selected setting.
•
Email Notication to: Select the checkbox to turn on email notications, and enter the address
where you want the email to go.
•
Default Destination: Choose a destination from the pop-up menu that you want this setting to
use as its default.
For more information, see Add setting actions on page 184.
Use markers and poster frames
Markers and poster frames overview
Compressor can import and create several dierent kinds of markers. In addition, Compressor can
import entire lists of chapter markers. Compressor also supports setting a poster frame for a clip.
Compressor can import and create the following types of markers:
•
Chapter markers: Chapter markers allow easy access to index points throughout a DVD,
QuickTime movie, or video podcast. QuickTime Player can interpret any text track containing
time stamps as a chapter track. Chapter markers can also have artwork and a URL assigned to
them that appear when a podcast is played.
These markers appear as purple in the Preview window timeline and are the type created
when you manually add markers using Compressor.
•
Podcast markers: Like chapter markers, podcast markers can have artwork and a URL assigned
to them. However, podcast markers cannot be used to access frames within the clip, and they
don’t appear as chapter markers in QuickTime.
You can use podcast markers to provide a slideshow (with URLs) for users to view when
playing audio podcasts.
These markers appear as red in the Preview window timeline.
Chapter 4 Assign settings and preview media 46
Page 47

•
Compression markers: Compression markers are also known as manual compression markers.
These are markers you can add in the Compressor Preview window to indicate when
Compressor should generate an MPEG I-frame during compression. For more information
about I-frames, see About GOPs (groups of pictures) on page 99.
These markers appear as blue in the Preview window timeline.
•
Edit/cut markers: Edit/cut markers are also known as automatic compression markers. These
markers are intended to be at each cut or transition point in a sequence. During transcoding,
Compressor uses edit/cut markers to generate MPEG I-frames at these points, improving
compression quality.
These markers appear as green in the Preview window timeline.
Markers are supported in the following output le formats:
•
MPEG-2
•
MPEG-4 when congured for podcasting (audio-only with the Enhanced Podcast checkbox
selected)
•
QuickTime Movie
•
H.264 for Apple Devices
Important: You can set and congure markers for other output le formats, but they are not
included in the encoded output le.
Manually add and remove markers
The Preview window includes comprehensive marker support, including the ability to manage
markers already added to the source media le, manually add or remove markers, and import
chapter marker lists. When you add a marker to a clip, it appears as a chapter marker by default.
You can then change the marker to a compression or podcast marker if you wish (see Add
compression or podcast markers on page 49).
Add a chapter marker to your clip
1 In the Preview window, choose Show Chapter/Podcast Markers from the Marker pop-up menu,
so that there’s a checkmark by it.
2 Choose a clip from the Batch Item pop-up menu or click the Batch Item selection button until
the clip you want appears in the pop-up menu.
Chapter 4 Assign settings and preview media 47
Page 48

3 To determine where the marker is to be placed, do one of the following:
•
Drag the playhead to where you want to add a marker.
•
Enter a timecode value in the playhead timecode eld.
4 To add a marker, choose Add marker from the Marker pop-up menu (or press M).
A purple chapter marker appears in the timeline.
A purple marker appears
under the playhead after
the marker is added.
5 Choose Edit from the Marker pop-up menu (or press Command-E).
A dialog for editing the marker appears.
6 Enter a name for the chapter marker in the Name eld.
For chapter markers, this name appears in the output media le, where it can be seen with
QuickTime Player and in playback devices.
7 If you want to assign an image to the chapter marker, choose one of the following from the
Image pop-up menu:
•
Frame in source: By default, the frame displayed is the frame on which the marker is placed. To
use a dierent frame as the image, enter a dierent timecode value.
•
From File: Drag an image to the image well. You can also click Choose to open a le-selection
dialog and select a still-image le to assign to the marker.
8 Click OK.
Chapter 4 Assign settings and preview media 48
Page 49

Remove a marker from your clip
1 To move the playhead to the marker you want to remove, click either the Move to Previous
Marker or Move to Next Marker control.
2 To remove the marker, choose "Remove marker" from the Marker pop-up menu (or press M).
Import a chapter marker list
1 In the Preview window, choose a clip from the Batch Item pop-up menu or click the Batch Item
selection button until the clip you want appears in the pop-up menu.
2 Choose Import Chapter List from the Marker pop-up menu.
A le-selection dialog opens so that you can locate and select the chapter marker le for that
source media le.
3 Select the chapter marker le and click Open.
The markers are imported and added to the Preview window timeline.
Note: Although all markers imported by using a chapter marker list are congured as chapter
markers, you can change them to podcast or compression markers. You can also add URLs and
artwork to them as needed.
Important: The timecode values in the list must be based on the source media le’s timecode.
Add compression or podcast markers
To manually add a compression or podcast marker to a clip, you rst add a chapter marker and
then you edit the marker.
Note: A podcast can have both chapter and podcast markers. The only dierence is that the
viewer can navigate directly to a chapter marker but cannot navigate to a podcast marker. For
more information, see Markers and poster frames overview on page 46.
Manually add a compression or podcast marker to a clip
1 In the Preview window, choose the Show Chapter/Podcast Markers and Show Compression
Markers items from the Marker pop-up menu, so that there is a checkmark by them.
2 To determine where the marker is to be placed, do one of the following:
•
Drag the playhead to where you want to add a marker.
•
Enter a timecode value in the playhead timecode eld.
3 To add a marker, choose “Add marker” from the Marker pop-up menu (or press M).
A purple chapter marker appears in the timeline.
Chapter 4 Assign settings and preview media 49
Page 50

4 Choose Edit from the Marker pop-up menu (or press Command-E).
A dialog for editing the marker appears.
5 Choose Compression or Podcast from the Type pop-up menu.
6 in the Name eld, enter a name for the marker.
Note: Podcast marker names do not appear in the output.
7 To add a link, enter an Internet address in the URL eld.
When viewing the output, you can click the URL to open a web browser and view the URL’s
website.
8 To assign an image to the chapter marker, choose one of the following from the Image
pop-up menu:
•
Frame in source: By default, the frame displayed is the frame on which the marker is placed. To
use a dierent frame as the image, enter a dierent timecode value.
•
From File: Drag an image to the image well. You can also click Choose to open a le-selection
dialog and select a still-image le to assign to the marker.
9 Click OK.
The marker in the timeline changes to blue if it’s a compression marker, or red if it’s a podcast
marker. You can use the Move to Previous Marker and Move to Next Marker buttons to select
other markers in the timeline to edit.
You can also import a chapter marker list. These lists can be in either the QuickTime TeXML format
(an XML-based format for constructing 3GPP-compliant timed text tracks in a QuickTime movie le)
or a plain text chapter list le. For information, see Plain text chapter marker lists on page 51.
Chapter 4 Assign settings and preview media 50
Page 51

Plain text chapter marker lists
You can create a list of timecode points that Compressor can import to create markers. The
timecode values need to match the timecode of the track’s video clip. The list of timecode values
must be a plain text le; you can create it with TextEdit (as long as you save the le as plain text).
If you create the list with a more advanced word-processing application, be sure to save the le
as a plain ASCII text le with no formatting.
The le must follow these rules:
•
Each marker must be on a new line that starts with a timecode value in the format 00:00:00:00.
These values identify the marker positions.
•
After the timecode value, you can include a name for the marker. You can use a comma, space,
or tab character to separate the timecode value from the marker name.
•
Any lines that do not begin with a timecode value are ignored. This makes it easy for you to
add comments to the list.
•
The timecode values do not have to be listed in chronological order.
Set the poster frame
You can use Compressor to set the poster frame for a movie. This is the frame that appears in
iTunes to represent the movie. If you don’t set the poster frame, iTunes uses the frame 10 seconds
from the movie’s rst frame.
Set the poster frame
1 In the Preview window, position the timeline playhead at the frame you want to be the poster frame.
2 Choose “Set poster frame” from the Marker pop-up menu.
A vertical line with a center dot appears in the timeline.
Move the playhead to the poster frame
m In the Preview window, choose “Go to poster frame” from the Marker pop-up menu.
Note: This setting is not available if the poster frame has not been set.
Remove the poster frame setting
m In the Preview window, choose “Clear poster frame” from the Marker pop-up menu.
Note: This setting is not available if the poster frame has not been set.
Chapter 4 Assign settings and preview media 51
Page 52

Preview media
Previewing overview
The Preview window has two main roles. It allows you to play batch items before submitting
them for transcoding and to compare versions of your clip to ensure that the quality of the
output media le is acceptable.
When you use the Preview window to compare the original version of the clip with the version
that will be output, you can make and view real-time changes. This comparison lets you check
the eects of settings on your le before spending time and resources transcoding it. Do this to
check the quality of the output media le.
Original version of the clip
Scaled, cropped, and
filtered version of the clip
You can also use the Preview window to enlarge the preview area, manually add I-frames
(MPEG-1 and MPEG-2 only), and designate a portion of your media le for transcoding using the
In and Out markers.
Preview media as source or with settings applied
You can use the Preview window to play back either the original source media le or the le with
a setting applied to it. Source media les appear as a list of lenames. Any settings that have been
applied to the source media le are listed immediately below the le’s name and are indented to
make it easier to identify them. You see dierent options in the Preview window depending on
whether you choose to view the original source media le or the le with a setting applied.
Important: Settings you make in the Encoder pane and the Frame Controls pane of the Inspector
cannot be previewed. Only the settings made in the Filters pane and Geometry pane can be
previewed. For an alternative method of previewing Encoder pane and Frame Controls pane
settings, see Transcode a portion of a clip on page 57.
Chapter 4 Assign settings and preview media 52
Page 53

Preview a source media le
1 If the Preview window is not shown by default, open it by choosing Window > Preview.
Tip: To open your le in the Preview window in one step, double-click the source media le in its
job in the Batch window.
2 Do one of the following:
•
Choose a source media le from the Batch Item pop-up menu (identied by its lename).
Selects the default
color bars image.
The original source
media file “Nancy
at table CU 5”
A setting applied to the source
media file “Nancy at table CU
5.” The checkmark indicates
that this is currently being
viewed in the Preview window.
•
Click the Batch Item selection buttons until the source media le appears in the pop-up menu.
•
Select the source media le in its job in the Batch window.
Only the Source View button is active (the Setting View button is dimmed). This is because you
selected a regular source media le, so you can only see the unadulterated clip—without the
split-screen divider or cropping bars.
3 Choose a preview screen size from the Preview Scale pop-up menu, or drag the Preview window
handle to a size you like.
This doesn’t aect the display frame size of the actual output media le. That can be set only in
the Geometry pane of the Inspector window.
4 To preview the selected source media le, click the Play button.
Source media les with markers already added, such as les from Final Cut Pro, show the markers
in the timeline. You can manage the markers if needed. For more information, see Markers and
poster frames overview on page 46.
You can use the Preview window to play back Dolby Digital Professional (AC-3) les. Compressor
includes a Dolby Digital decoder so that when you add an AC-3 source media le to a batch and
play it, you can to hear it using your computer’s current speakers. This includes everything from
the built-in stereo speakers, which play a mixed-down version of the AC-3 le if it contains more
than two channels, to a set of external surround speakers connected to a USB or FireWire output.
Important: Because Compressor is decoding the Dolby Digital audio le, you cannot use your
computer’s optical output to preview Dolby Digital audio.
Chapter 4 Assign settings and preview media 53
Page 54

This feature is important if you’re using the Dolby Digital Professional encoder because you
Batch Item pop-up menu
cannot preview the encoder’s settings in real time in the Preview window. Instead, you can add
the encoded AC-3 les to a batch and play them to verify that the encoder’s settings produced
good results. For information about creating a short test clip for this purpose, see Transcode a
portion of a clip on page 57.
Preview a clip with an assigned setting
The Compressor Preview window lets you see the eects of your setting—such as lters and frame
resizing—and make adjustments to these attributes while previewing the media le in real time.
1 If the Preview window is not shown, open it by choosing Window > Preview.
Tip: To open the clip in the Preview window in one step, double-click the target (that contains
the setting) of a job in Batch window.
2 Do one of the following:
•
Choose a setting from the Batch Item pop-up menu (the indented setting names, not the
source lenames).
•
Click the Batch Item selection buttons until the clip with a setting appears in the pop-up menu.
•
Select the clip’s setting in its job in the Batch window.
Both Source View and Setting View buttons are active, so you can switch between these two
views. Because you selected a setting, you can use the split-screen slider and cropping boundary
in the Preview window.
The opening frame of the selected source media le appears in the Preview window, and the title
of the selected setting appears in the Batch Item pop-up menu. The left half of the screen displays
the source media le in its original form (Source view) and the right half displays what the output
image will look like with selected lters and other setting attributes applied to it (Output view).
Batch Item
selection buttons
Output view
Source view
Chapter 4 Assign settings and preview media 54
Page 55

3 Click the Setting View button in the upper-right corner of the Preview window, and do any of the
Batch Item
Preview Scale
following to assign settings:
pop-up menu
•
Choose a screen size from the Preview Scale pop-up menu, or drag the Preview window to a
pop-up menu
Source View and
Setting View buttons
Split-screen slider
Cropping boundary
and handles
Cropping dimensions
(also seen in Source
Inset fields in the
Geometry pane)
Split-screen divider
size you like.
This doesn’t aect the display frame size of the actual output media le. That can be set only in
the Geometry pane of the Inspector window.
Note: When you adjust the frame size of a setting (in the Geometry pane) while viewing it
in the Preview window, the frame size may not be resized accordingly. If this occurs, choose
Sample Movie or a dierent target from the Batch Item pop-up menu and then choose this
target again. It will display the correct frame size.
•
Drag the split-screen slider left or right across the top of the screen to move the split-screen
divider over more or less of the transcoded portion of the clip.
•
Use the cropping boundary to adjust the display frame size of your output media le.
You can check the results of your cropping by clicking the Source View and Setting View buttons.
Note: The more you reduce the clip image by cropping it, the larger the scale factor of the
output image will be (as the framing geometry conforms to the settings of the output aspect
ratio rather than to the source le settings). This eect is similar to zooming in on an image,
which results in larger pixels and overall image degradation. So make sure that you don’t crop in
so far that the image is enlarged past its original size relative to the original size of the frame.
Chapter 4 Assign settings and preview media 55
Page 56

•
Click the Setting View button to see
In the Inspector, click the Filters button to view the lters list. Select the lter that you want to
adjust and make changes as necessary.
the effect of the selected filter.
Selected filter settings
are displayed in the
Preview window.
Note: To preview the eect of a lter on your media le, make sure that the checkbox for that
particular lter is selected in the lters list. Otherwise, the Preview window won’t recognize
that lter, and it won’t be part of the transcoding settings for that job. A selected lter has a
checkmark next to it in the lters list.
Chapter 4 Assign settings and preview media 56
Page 57

•
If you want to make the display frame size of your output media le dierent from that of your
source media le, open the Geometry pane of the Inspector window and choose a preexisting
value from the Frame Size pop-up menu or enter dierent output size values in the Frame
Size elds.
Cropping dimensions
(also displayed in the
Inspector window when
you drag cropping bars)
Note: MPEG-2 is limited to preestablished display frame sizes based on MPEG-2 specications.
In this instance, all output size items are unavailable.
4 To view the clip, click the Play button in the Preview window.
For more information about these settings, see Previewing overview on page 52.
Transcode a portion of a clip
Although Geometry (cropping and scaling) and Filters adjustments are displayed instantly in the
Preview window, Encoder pane and Frame Controls pane settings are not. To preview Encoder pane
and Frame Controls pane settings, do a test transcode of a small section of your source media le.
You can use the Preview window to set In and Out points to transcode a portion of your media
le rather than all of it.
Chapter 4 Assign settings and preview media 57
Page 58

Designate a portion of your media le for transcoding
1 If the Preview window is not shown by default, open it by choosing Window > Preview.
2 To set an In point, do one of the following:
•
Drag the In point to the appropriate location.
•
Drag the playhead to where you want transcoding to begin and click the Set In Point button.
In point
Playhead
Out point
Set In Point button
Set Out Point button
3 To set an Out point, do one of the following:
•
Drag the Out point to the appropriate location.
•
Drag the playhead to where you want transcoding to end and click the Set Out Point button.
Note: When you use In and Out points to specify a segment of the source media le to transcode,
they apply to all targets assigned to the le’s job. You can add a source media le multiple times to
a batch, creating multiple jobs, and set the In and Out points dierently in each job.
The only segment of the media le that will be transcoded is between the two points that you
set. The rest of the clip will not be transcoded.
For information about how to transcode the media le, see Jobs, targets, and batches
overview on page 137.
Chapter 4 Assign settings and preview media 58
Page 59

Preview window
Preview Scale pop-up menu
Batch Item
The Preview window contains the following controls:
Source View and
Setting View buttons
Preview area
Timeline controls
In and Out controls
Transport controls
Selection and view controls
You can use the Batch Item selection controls to choose specic items from the Batch window
to show in the Preview window. You can also resize the Preview window and switch between
Source view and Setting view.
•
Batch Item selection buttons: Use these buttons to click backward or forward through the list of
source media les and clips with settings available for previewing. As you click through the list,
the selected batch item appears in the Batch Item pop-up menu.
selection buttons
Batch Item pop-up menu
•
Batch Item pop-up menu: Choose the source media le you want to preview, with or without its
assigned settings.
•
Preview scale pop-up menu: Adjusts the Preview screen size. The three settings are 100%, 75%,
and 50%, but you can also drag the Preview window resize control to any size you like.
•
Source View and Setting View buttons: Use these buttons to preview the selected batch item
using either the source’s aspect ratio and size or the setting’s aspect ratio and size. Source view
also provides a cropping boundary that you can use to dene one or more edges to be cropped.
Setting view shows the cropped version of the media scaled to its aspect and size setting.
Chapter 4 Assign settings and preview media 59
Page 60
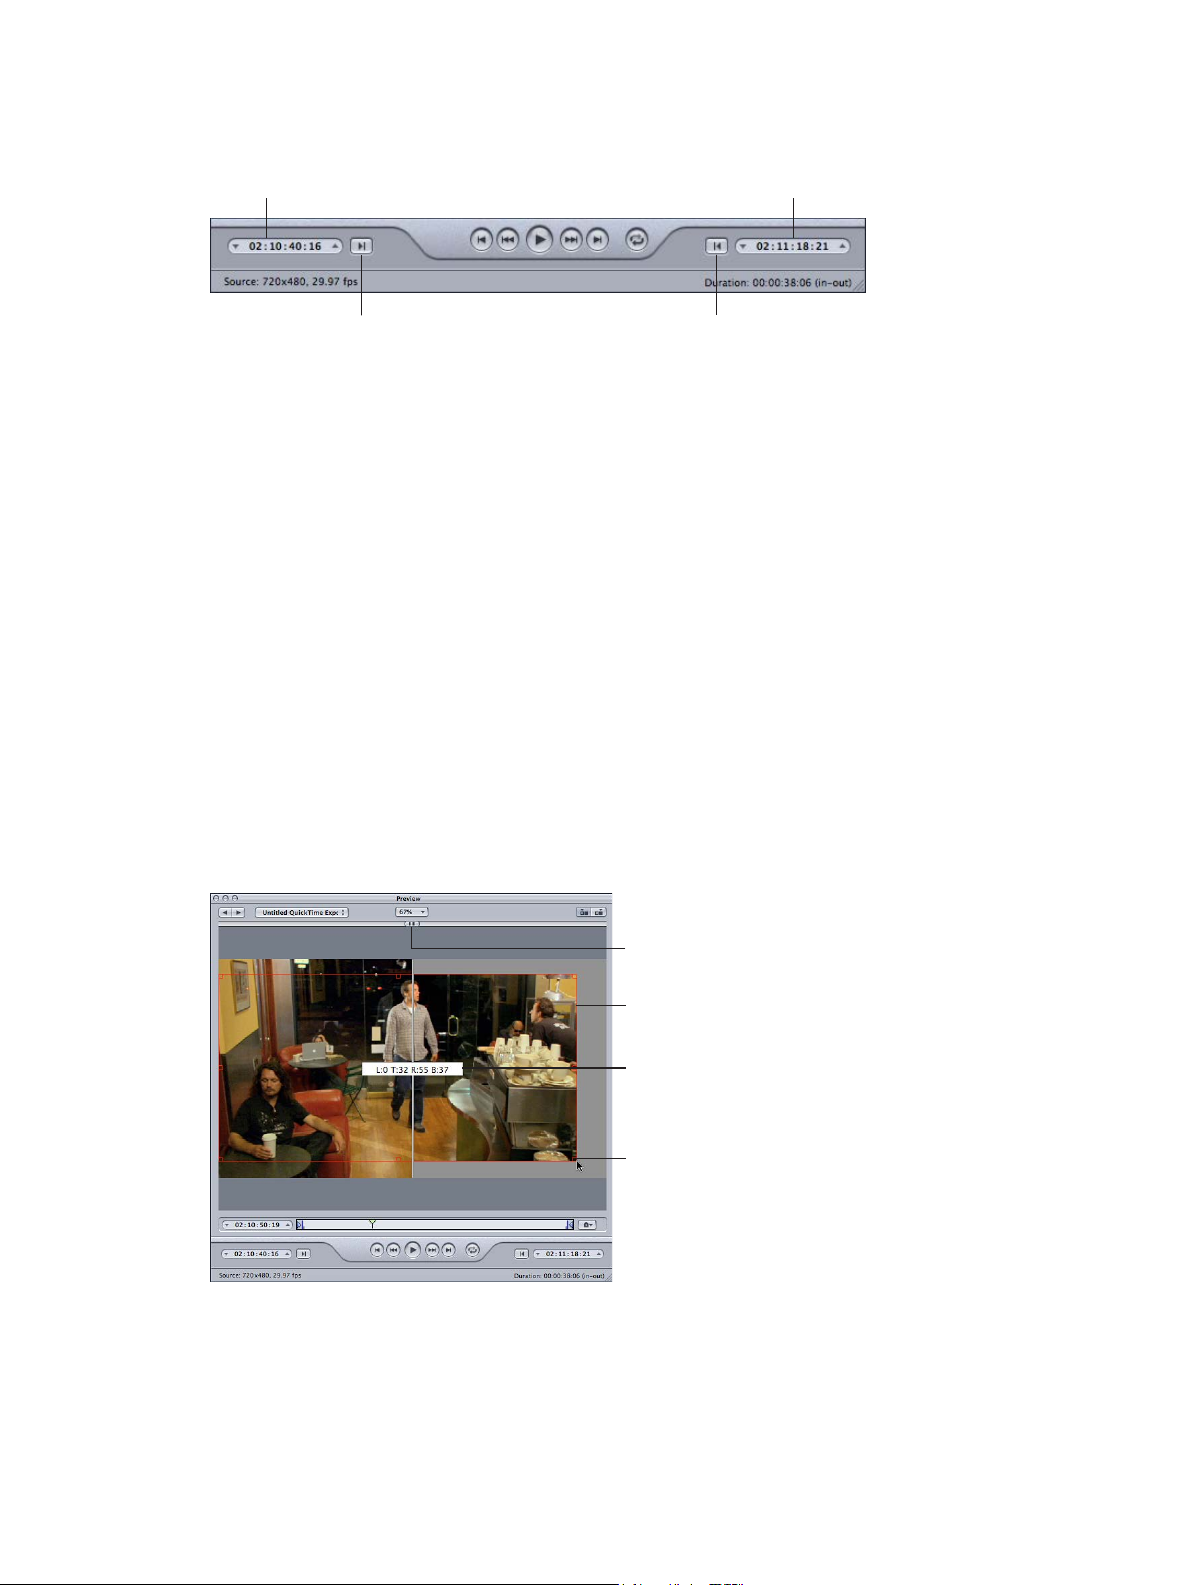
In and Out controls
In point timecode
Out point timecode
After you select the batch item, you can use the In and Out controls to see and adjust the In and
Out point timecode information.
Sets In point to current
playhead position.
•
In and Out point timecode elds: The exact locations of the In and Out points are displayed
Sets Out point to current
playhead position.
here using the standard timecode format of hh:mm:ss:. You can manually edit these elds by
selecting the eld and entering new values. If a new value is entered, the timeline’s In or Out
point moves to the specied point in the current batch item.
Note: If your source media le has a timecode track, the Start and End timecode values of the
clip appear in the In and Out point timecode elds. Otherwise, the timecode starts at 00:00:00:00.
•
In and Out point buttons: You can use the Set In Point and Set Out Point buttons (next to the
timecode elds) to set In and Out points. (You can also set In and Out points by dragging; see
the “Timeline controls” section, below.)
•
Source/output information: The clip’s frame size and frame rate are shown in the lower-left
corner of the Preview window. The clip’s duration (from the In point to the Out point) is shown
in the lower-right corner. With the Source View button active, the frame size and frame rate
represent the source media le. With the Settings View button active, the frame size and frame
rate represent the setting for this batch item.
Note: To see the total duration of the clip (without In and Out points), select the source le in
the Batch window and open the Inspector window (choose Window > Show Inspector).
Preview area controls
The preview area displays the currently selected batch item.
Split-screen slider
Cropping boundary
Cropping dimensions
(also seen in Source
Inset fields in the
Geometry pane)
Cropping handle for
the lower-right corner
Chapter 4 Assign settings and preview media 60
Page 61

•
Playhead
In point
Out point
Split-screen slider: Drag the split-screen slider any distance across the top of the preview area
to get a comparison view between the source media le (left side) and output media le (right
side). In addition to the location of the slider at the top, the screen division is indicated by a
vertical white line bisecting the image.
•
Cropping boundary: The cropping boundary is available only in Source view. Use the handles to
drag the red boundary edges and corners in the direction you want to crop your output media
le. Use the center handle to drag the entire frame in any direction while still maintaining its
dimensions. The new values (for left, top, right, and bottom) appear dynamically in the preview
area as you crop the frame. If you also have the Inspector window open with the batch’s target
selected, you can see the same values changing in the cropping elds of the Geometry pane.
To show the results of the crop boundary settings, select the Setting view.
Timeline controls
The timeline controls provide information about the clip, including any markers it has and the
current In and Out point settings. You can also use the timeline to position the playhead at a
specic frame and set the In and Out points.
Playhead timecode
•
Playhead timecode: Shows the playhead’s position in the timeline using the standard timecode
Marker
format of hh:mm:ss:. You can enter a new value to precisely position the playhead in
the timeline.
Note: If your source media le has a timecode track, the clip timecode appears in the playhead
timecode eld. For everything else, the timecode starts with 00:00:00:00.
•
In and Out points: You can set new In and Out points by dragging the In or Out point to a
dierent location. As you change the In and Out points, the In and Out timecode elds at the
bottom of the Preview window update. (You can also set new In and Out points using the Set
In Point and Set Out Points buttons. See the “In and Out controls section” above.
Important: In and Out points are not preserved after a transcode has been completed, so if
you want to resubmit a batch from the History window, you need to reapply these points to
your clip. For more information, see View batch information in the History window on page 151.
In and Out points are assigned to the source media le rather than the setting, so whatever In
and Out points you create will be the same for all other settings related to that source media
le in the current batch.
•
Playhead: Shows where the displayed frame is located within the clip. You can drag the
playhead to navigate quickly to a specic location within the clip.
•
Marker: Shows where a marker has been placed in the clip. The color of the marker
indicates its type:
•
Blue: Compression markers that you add manually
•
Purple: Chapter markers (named markers that are intended to be navigational chapter stops
or visual artwork in the output media le)
Chapter 4 Assign settings and preview media 61
Page 62

•
Play/Pause
Move to Next Marker
Red: Podcast markers (named markers that are intended to be navigational chapter stops or
visual artwork in the output media le)
•
Green: Edit/cut markers (compression markers that are added automatically at edit points in
the Final Cut Pro sequence)
•
Gray bar with center dot: Poster frame (the bar indicates the frame chosen as the poster
frame for this le)
For more information, see Markers and poster frames overview on page 46.
Transport controls
These move the playhead backward or forward to the exact position of the next marker or In or
Out point, making it easy to navigate quickly between existing markers. You can also use these
buttons to quickly move the playhead to the start or end of the clip.
Move to Previous Marker
Fast Backward
•
Play/Pause button: Starts or stops playback of the clip. If you stop playback, the playhead
Fast Forward
Playback Loop Mode
remains at its current position. To return to the start of the clip, you need to drag the playhead
back to the beginning or click the Move to Previous Marker button.
•
Move to Previous Marker and Move to Next Marker buttons: Move the playhead to the previous or
next marker, the In or Out point, or the start or end of the clip if no more markers are present.
•
Fast Backward and Fast Forward buttons: Allow you to play your clip in either direction at twice
the normal speed. If one of these buttons is clicked during playback, clicking it a second time
returns playback to normal speed.
•
Playback Loop Mode button: Plays the media in a continuous loop.
Marker pop-up menu
Use the Marker pop-up menu to manage the clip’s markers. Although you can use markers
with all settings, they appear in the output le only when the setting uses the MPEG-1, MPEG-2,
MPEG-4 (when congured for podcasting), H.264 for Apple Devices, or QuickTime Movie output
le format. For more information, see Markers and poster frames overview on page 46.
Chapter 4 Assign settings and preview media 62
Page 63

Choose items from the Marker pop-up menu to add, remove, show, hide, and edit markers and
poster frames.
•
Import Chapter List: Opens a le import dialog that allows you to import a le containing a list
of chapter marker times for the source media le. For more information, see Add compression
or podcast markers on page 49.
•
Add/Remove marker: The option you see changes depending on whether or not the playhead
is positioned on a marker.
•
If the playhead is not positioned on a marker: Choosing “Add marker” places a new marker in
the timeline at the playhead’s current position.
•
If the playhead is positioned on a marker: Choosing “Remove marker” deletes the current marker.
•
Edit: Available only when the playhead is positioned on a marker. Choosing Edit opens a
dialog that allows you to set the marker type and assign a URL and an image to it. For more
information, see Add compression or podcast markers on page 49.
•
Show Chapter/Podcast Markers: Controls whether chapter and podcast markers (those with
names) are shown in the timeline. A checkmark indicates they are shown.
•
Show Compression Markers: Controls whether compression markers (those without names) are
shown in the timeline. A checkmark indicates they are shown.
•
Show Edit/Cut Markers: Controls whether markers automatically placed at each edit point by
another application, such as Final Cut Pro, are shown in the timeline. A checkmark indicates
they are shown.
•
Set poster frame: Makes the current frame the poster frame, which is a still image that
represents a video or audio media le or a podcast chapter in applications such as iTunes and
the Finder. By default, the rst frame in a video le is the poster frame.
•
Clear poster frame: Deletes the poster frame marker.
•
Go to poster frame: Moves the playhead to the poster frame.
Chapter 4 Assign settings and preview media 63
Page 64

Custom settings
and output formats
5
Custom settings and output formats overview
Selecting a playback platform (Apple devices, DVD, web, CD, and kiosk) is the rst choice you
need to make before you compress a source media le into a dierent output format. After you
decide on the platform, you can choose the appropriate output format for that platform.
Whatever the digital video format of your source media le, you can use one of the many
encoders supplied with Compressor to transcode the source le to the following industry-
standard formats, all of which have their own particular attributes.
Platform Available video formats Available audio formats
iTunes and Apple devices H.264: See iTunes and Apple device
output overview on page 65.
Web delivery, including YouTube,
Facebook, and Vimeo
Blu-ray discs H.264: See Create Blu-ray discs
High-denition (HD) DVD MPEG-2: See MPEG-2 overview
Standard-denition (SD) DVD MPEG-1: See Create MPEG-1 video
Audio CD AIFF: See AIFF overview
DV Stream See Create DV Stream settings
QuickTime Export Components les See QuickTime Export
Image sequence les See Create image sequence
H.264: See Create QuickTime media
on page 124.
les
MPEG-1: See Create MPEG-1 les
for the web
page 70.
page 84.
for DVD
MPEG-2: See MPEG-2 overview
page 84.
page 133.
Components overview
page 130.
les
on page 108.
on page 109.
on
on page 134.
AIFF: See AIFF overview
page 100.
MP3: See MP3 overview
page 104.
H.264: See Create QuickTime media
on page 124.
les
MPEG-1: See Create MPEG-1 les
for the web
on
AC-3 (Dolby Digital Professional): See
Dolby Digital overview on page 72.
on
AC-3 (Dolby Digital Professional): See
Dolby Digital overview on page 72.
MPEG-1: See Create MPEG-1 audio
for DVD
on
AC-3 (Dolby Digital Professional): See
Dolby Digital overview
page 100.
CAF: See Create Common Audio
Formats settings
MP3: See MP3 overview
page 104.
AC-3 (Dolby Digital Professional): See
Dolby Digital overview
on
on page 108.
on page 110 .
on
on
on page 72.
on
on page 103.
on
on page 72.
64
Page 65

Before you can convert your existing media les to a DVD project, you must convert the video
to MPEG-1 (SD projects only), MPEG-2 (SD and HD projects), or H.264 (HD projects only) les.
Compressor can encode audio in the Dolby Digital Professional format (also known as AC-3).
Dolby Digital Professional is a very common compressed audio format for DVD-Video discs.
Compressor also supports two specialized situations:
•
For those situations in which you’re editing HD sources in Final Cut Pro and want to create
an SD DVD from them, Compressor includes a high-quality downconversion capability. HD
sources using 1080i or 720p resolutions use a high-quality transcoding process to create SD
MPEG-2 video output les.
•
For those situations in which you must t the maximum video onto a DVD and don’t require
broadcast quality, Compressor includes the ability to export DVD-Video-compatible MPEG-1
format les.
iTunes and Apple device output
iTunes and Apple device output overview
Using Compressor, you can create iTunes-compliant H.264 les. These can be played in iTunes; on
an iPhone, iPad, or iPod; or with Apple TV.
Compressor includes precongured settings that use the H.264 for Apple Devices Encoder pane
to make it easy for you to create suitable media les.
For information about creating H.264 les for other uses (such as web video), see QuickTime
movie overview on page 121. For information about creating H.264 les for DVDs, see Custom
settings and output formats overview on page 64.
H.264 workows
The eciency and quality of H.264 provide a number of options for iPhone, iPad, iPod, and Apple
TV video producers. When choosing a device option, you can choose to create a le that plays on
a wide variety of devices or a le targeted to a specic device, such as an iPhone 4.
•
Options that are compatible with all devices don’t produce optimal results when played on
higher-resolution devices, such as Apple TV. However, these options produce smaller les,
which can be an advantage.
•
Options that are targeted at higher-resolution devices produce great results on those devices;
however, they result in larger les.
When choosing options, make sure to take into account the devices on which you want to play
the video, the video content, and how you intend to deliver the le.
Additionally, you can assign a clip’s poster frame using the Preview window. For more
information, see Apply frame controls to a setting on page 167. You can change the poster frame
in iTunes if necessary. For more information, see iTunes Help.
Chapter 5 Custom settings and output formats 65
Page 66

Chapter and podcast markers
Chapter markers created in Final Cut Pro are passed through (transferred) to other output les
that can be recognized by QuickTime Player, iTunes (.m4v les), and Final Cut Pro.
You can also add podcast markers to the output le. Podcast markers are similar to chapter
markers (they can have a URL and artwork assigned to them); however, viewers cannot navigate
to them. They are intended to provide a slideshow function to audio podcasts. For information
about adding chapter and podcast markers, see Markers and poster frames overview on page 46.
Aspect ratios
The choice you make in the Device pop-up menu denes the width of the encoded le. The
choice you make in the Aspect Ratio pop-up menu denes the height of the encoded le.
Compressor scales the source video vertically to make it t the height. This means that the
source video must be anamorphic (things look tall and skinny) in anticipation of being scaled to
t the intended aspect ratio. Non-anamorphic video set to an aspect ratio other than its native
aspect ratio appears distorted in the encoded le.
Important: If your source video is letterboxed, use the aspect ratio that matches the whole
video frame, including the black bars, or you will end up with distorted output les. You can use
the automatic crop feature to crop o the letterbox bars. For more information, see Geometry
overview on page 176.
The following choices are available in the Aspect Ratio pop-up menu for each device option:
•
4:3
•
16:9
•
1.85:1
•
2.35:1
Each choice results in a dierent height for the output media le. For example, with the iPod/
iPhone (VGA) setting, the 4:3 option results in a 640 x 480 le, whereas the 16:9 option results in
a 640 x 360 le.
If the source media le is either DV NTSC or HDV, but you’re unsure of your source media le’s
aspect ratio, click the Automatic button. This option analyzes the source media le’s aspect ratio
to determine the appropriate pixel dimensions.
Create H.264 settings
To ensure that your output media les are compatible with iPhone, iPad, iPod, and Apple TV, it’s
recommended that you use the standard settings provided in the Apple Devices group in the
Settings tab. For information about applying settings, see Assign settings to source media on
page 32.
You can also create media les compatible with iPhone, iPad, iPod, and Apple TV using batch
templates. For more information, see Quick and easy batch template workow on page 14.
Note: Files created using iPhone and iPod settings can also play on Apple TV.
Chapter 5 Custom settings and output formats 66
Page 67

Create H.264 for Apple Devices settings
1 In the Settings tab, select a setting or create a new setting by choosing H.264 for Apple Devices
from the Create a New Setting (+) pop-up menu.
2 In the Encoder pane of the Inspector window, choose H.264 for Apple Devices from the File
Format pop-up menu.
3 Choose from the following Encoder pane options:
•
Extension: This eld displays the H.264 for Apple Devices le extension (.m4v) automatically
after the H.264 for Apple Devices output format is chosen from the File Format pop-up menu
or the Create a New Setting (+) pop-up menu in the Settings tab.
•
Allow Job Segmenting: This checkbox allows you to turn o job segmenting. It’s relevant only if
you’re using Compressor with distributed processing and with multi-pass encoding. For more
information, see Job segmenting and two-pass or multi-pass encoding on page 249.
•
Device: Choose one of the following device options from this pop-up menu:
•
iPod/iPhone (VGA): This option creates video output les with a frame width of 640 pixels.
•
iPod/iPhone (Anamorphic): This option creates video output les with a frame width of 640
(anamorphic) pixels.
•
iPod/iPhone (QVGA): This option creates video output les with a frame width of 320 pixels.
•
Apple TV SD: This option creates video output les with a frame width of 640 pixels and a
higher bit rate range than those created using the iPod/iPhone (VGA) option.
•
Apple TV SD (Anamorphic): This option creates video output les with a frame width of 720
(anamorphic) pixels.
•
Apple TV HD: This option creates video output les with a frame width of 1280 pixels, except
when the aspect ratio is set to 4:3. In that case, the video output les have frame dimensions
of 960 x 720 (anamorphic) pixels for frame rates above 24 fps and 1280 x 720 (square) pixels
for lower frame rates.
•
Apple TV 3rd Generation: This option, intended for the third-generation Apple TV and iPad
models, creates video output les with a frame width of 1920 pixels.
Chapter 5 Custom settings and output formats 67
Page 68

•
iPhone (Local/WiFi): This option creates video output les with a frame width of 854 pixels.
•
iPhone (Cellular): This option creates video output les with a frame width of 176 pixels.
•
iPad/iPhone with Retina display: This option creates video output les with a frame width of
1280 pixels.
•
Aspect Ratio: Use this pop-up menu to choose the exact pixel dimensions of the output media
le. The available options depend on which device option you chose. For more information,
see iTunes and Apple device output overview on page 65.
The Aspect Ratio setting also has an Automatic button. Clicking the Automatic button causes
the encoder to choose the aspect ratio that matches the source video le.
Important: When the Aspect Ratio setting is in automatic mode, Compressor can choose from
a wider variety of values to better match the source video (with the values determined and
displayed when this output format is applied to a source media le). For the best results, it’s
recommended that you use the automatic mode for the Aspect Ratio setting.
Aspect Ratio
Automatic button
Note: By default, the Frame Controls feature is set to Automatic. The Frame Controls retiming
controls are engaged only if the source le is interlaced. For more information, see Frame
controls overview on page 166.
•
Frame Rate: Use this pop-up menu to choose from the options listed below.
The Frame Rate setting also has an Automatic button. Clicking the Automatic button causes
the encoder to choose the frame rate that matches the source video le.
Frame Rate
Automatic button
•
29.97: Used for NTSC-based video
•
25: Used for PAL-based video
•
24: Used for standard video
•
23.98: Used for NTSC-based video
•
15: Used for web-based video
Chapter 5 Custom settings and output formats 68
Page 69

•
Bit Rate: Use this slider to choose the bit rate to use for the output video, or enter a number
in the text eld. The available ranges depend on the Device setting. The setting you should
choose depends on how the output is to be used. Higher bit rates produce better picture
quality, but they also produce larger output les.
•
Audio: Use this pop-up menu to choose from the four audio bit rate options listed below.
•
None: Use this option to exclude audio from the output media le.
•
24 Kbps: Creates an audio bitstream at 24 kbps for the iPhone (Cellular) device option.
•
128 Kbps: Creates an audio bitstream at 128 kbps.
•
256 Kbps: Creates an audio bitstream at 256 kbps.
•
Frame Sync: Also known as the key frame interval, the Frame Sync value represents how often a
key frame is inserted in the H.264 stream. The lower the number, the more smoothly the video
can be manipulated (scrubbed) during playback (more frequent key frames). The higher the
number, the more ecient the compression (less frequent key frames). The available range is
from 2 to 10 seconds; the default is 5 seconds.
The Frame Sync setting also has an Automatic checkbox. Selecting the Automatic checkbox
causes the encoder to choose a frame sync rate that matches the source video le.
•
Multi-pass: Similar to two-pass MPEG-2 encoding, multi-pass oers the best possible quality.
For faster (single-pass) encoding, turn this feature o by deselecting the checkbox.
Note: If you’re also using distributed processing, you may want to turn o job segmenting. For
more information, see Job segmenting and two-pass or multi-pass encoding on page 249.
•
Include Dolby 5.1: Use this checkbox to add a Dolby Digital Professional 5.1 surround sound
audio track, in addition to the standard AAC audio track, to the output movie. This feature is
intended to be used when creating output les from source les that include surround sound
audio. The Dolby Digital Professional audio track is played by Apple TV only when connected
to a system with a suitable Dolby Digital decoder. The AAC audio track plays in all other cases.
Note: Selecting the Include Dolby 5.1 checkbox creates a true Dolby Digital Professional 5.1
surround sound audio track only if your source audio includes 5.1 surround sound audio.
If your source audio includes only stereo audio, the Dolby Digital Professional 5.1 surround
sound audio track has only two channels of actual audio.
4 Click Save.
Chapter 5 Custom settings and output formats 69
Page 70

Create Blu-ray discs
Compressor includes the ability to easily create H.264 settings specically congured for Blu-ray
and AVCHD discs.
Blu-ray, also known as Blu-ray Disc (BD), is a format that was developed to enable recording,
rewriting, and playback of high-denition (HD) video. The format oers more than ve times the
storage capacity of traditional DVDs and can hold up to 25 GB on a single-layer disc and 50 GB
on a dual-layer disc.
An AVCHD disc can be thought of as a simpler HD disc that is burned to red laser media. The
resulting disc plays in Blu-ray Disc players that are compatible with the AVCHD format.
The eciency and quality of H.264 creates a number of options for optical disc producers:
•
Video resolutions supported by standard-denition (SD) DVDs are also supported by Blu-ray
Disc. This means that a Blu-ray disc can use an HD video resolution le for its main content,
such as a feature lm, and then use SD video resolution les for additional features like trailers
and a “making of” documentary.
•
The Create Blu-ray Disc job action can be used to burn an AVCHD disc using red laser media.
An AVCHD disc provides a way to play H.264 video in Blu-ray Disc players that are compatible
with the AVCHD format.
•
Because H.264 can deliver HD video at SD bit rates, you can get more HD content on a regular
DVD-5 disc than you might expect for an AVCHD disc.
Create H.264 for optical disc
1 In the Settings tab, select a setting or create a new setting by choosing H.264 for Blu-ray from
the Create a New Setting (+) pop-up menu.
2 Choose the H.264 for Blu-ray format from the File Format pop-up menu in the Inspector.
Chapter 5 Custom settings and output formats 70
Page 71

3 To congure settings, choose from the following options:
•
Extension: Displays the H.264 for Blu-ray le extension (.264) automatically after the H.264
for Blu-ray output format is chosen from the File Format pop-up menu or the Create a New
Setting (+) pop-up menu in the Settings tab.
•
Allow Job Segmenting: This checkbox allows you to turn o job segmenting. It’s relevant only if
you’re using Compressor with distributed processing and with multi-pass encoding. For more
information, see Job segmenting and two-pass or multi-pass encoding on page 249.
•
Stream Usage: Use this pop-up menu to choose how you intend to use the H.264 stream.
Compressor modies the bit rate range settings based on the usage you choose.
•
Blu-ray: Choose this option if you intend to use the stream to create a standard Blu-ray disc.
•
AVCHD: Choose this option if you intend to use the stream and the Create Blu-ray Disc job
action to burn an AVCHD disc using a standard DVD burner. This disc can be played in Bluray Disc players that are compatible with the AVCHD format. AVCHD discs can have up to a
maximum of 50 chapter markers.
•
Video Format: Use this pop-up menu to choose from the four options listed below. All of them
are HD progressive formats.
The Video Format setting also has an Automatic button. Clicking the Automatic button causes
the encoder to choose the video format that matches the source video le.
Video Format
Automatic button
•
NTSC: This format is referred to as 480p. It uses a 720 x 480 frame size with an anamorphic 16
x 9 format at 59.94 fps.
•
PAL: This format is referred to as 576p. It uses a 720 x 576 frame size with an anamorphic 16 x
9 format at 50 fps.
•
720p: This format uses a 1280 x 720 frame size with a 16 x 9 format at either 59.94 fps for
NTSC or 50 fps for PAL.
•
1920x1080: This format is referred to as 1080p. It uses a 1920 x 1080 frame size with a 16 x 9
format at either 59.94 fps for NTSC or 50 fps for PAL.
•
Frame Rate: Use this pop-up menu to choose a frame rate for the output media le.
The Frame Rate setting also has an Automatic button. Clicking the Automatic button causes
the encoder to choose the frame rate that matches the source video le.
Frame Rate
Automatic button
Note: If you choose a format from the Video Format pop-up menu, the Frame Rate pop-up
menu is lled in automatically.
Chapter 5 Custom settings and output formats 71
Page 72

Use the Frame Rate pop-up menu to choose from the following options:
•
23.98: Used for NTSC-based video
•
25: Used for PAL-based video
•
29.97: Used for NTSC-based video
•
50: Used for PAL-based video
•
59.94: Used for NTSC-based video
•
Average Bit Rate: Use the slider to choose an average bit rate to use for the output video,
or enter a value in the eld. Although the available range for a Blu-ray disc is between 5
Mbps and 30 Mbps, typical video bit rates with H.264 might range from 7 Mbps to 15 Mbps,
depending on your DVD bit budget and the nature of your source media les. The available
range for AVCHD discs is 5 Mbps to 15 Mbps.
•
Maximum Bit Rate: Choose a maximum bit rate between 6 Mbps and 35 Mbps for a Blu-ray
disc, or between 6 Mbps and 17 Mbps for an AVCHD disc. You can also enter any number
within these ranges in the accompanying eld. The Maximum Bit Rate setting cannot be
lower than the Average Bit Rate setting. As a general rule, set your maximum bit rate at least 1
Mbps higher than your average bit rate, to allow for bit rate variability in achieving the goal of
constant quality.
•
Multi-pass: Select this checkbox to turn on multi-pass encoding. Similar to two-pass MPEG-2
encoding, multi-pass oers the best possible quality. For faster (single-pass) encodes, turn this
feature o by deselecting the checkbox. For more information, see Job segmenting and two-
pass or multi-pass encoding on page 249.
4 Click Save As.
Dolby Digital Professional les
Dolby Digital overview
Compressor provides the tools you need to encode and batch-encode Dolby Digital Professional
(AC-3) audio les.
Dolby Digital Professional format (also known as AC-3) is a very common compressed audio
format for DVD-Video discs. Compressor accepts multichannel sound les in a variety of formats
and gives you complete control over the AC-3 encoding process. Dolby Digital programs can
deliver 5.1-channel surround sound with ve discrete full-range channels (left, center, right, left
surround, and right surround) plus a sixth channel for low-frequency eects (LFE), sometimes
known as “the subwoofer.” Another surround option is Dolby Surround, with four channels
(left, center, right, and surround). But not all AC-3 audio is 5.1 surround sound. Dolby Digital
Professional is commonly used to encode stereo les to greatly reduce their le size.
Chapter 5 Custom settings and output formats 72
Page 73

For more information about creating surround sound audio les using other output formats, see
Assign les to surround sound channels on page 74.
Note: It’s important to understand that Compressor cannot take stereo audio les and create
5.1 surround sound from them. If you want to create a 5.1 surround sound AC-3 audio le, you
must rst create the six channels of audio it requires. This must be done using other applications
outside Compressor.
Following are some things to keep in mind as you congure and encode Dolby Digital
Professional AC-3 les.
Source media les
There are a few guidelines to be aware of when encoding Dolby Digital Professional output les
from your source media les.
Depending on the format, a le can contain a single channel (mono), dual channels (stereo), or
multiple channels. Compressor supports Dolby Digital Professional in all these congurations.
Sound les intended for Dolby Digital Professional encoding must conform to the following rules:
•
All source les should be the same duration. (If they aren’t, Compressor sets the duration of
the AC-3 stream to match the duration of the longest le.)
•
All les must have a 48 kHz sample rate (as required for DVD).
•
AC-3 streams must have a multiple of 1536 samples. If the selected input les do not,
Compressor adds digital silence to the end of the les.
Note: Compressor can support any kind of source les that contain surround sound and highresolution audio up to 64 bits per sample (oating point) and sample rates up to 192 kHz.
Previewing the encoder settings
The settings made in the Dolby Digital Professional Encoder pane cannot be previewed. If you
have an external surround sound device connected to the USB, FireWire, or other output from
the computer, you will be able to hear the audio assigned to the dierent channels, but it won’t
include any settings, such as the Dialog Normalization or Compression Preset settings.
Important: Because the audio output is not Dolby Digital, the optical output cannot be used to
verify the audio assigned to each channel.
The only way to verify the settings is to submit the batch and listen to the results. If you’re unsure
of the settings, use the Preview window to encode a short portion of the source as a test. For
more information, see Transcode a portion of a clip on page 57.
You can import an AC-3 le as a source media le into a Compressor batch. Compressor includes
a built-in Dolby Digital decoder that it uses to decode the AC-3 les. This decoder properly
applies any settings you made in the Dolby Digital Professional Encoder pane, allowing you to
hear their eects without having an external Dolby Digital decoder. You can also transcode the
AC-3 les to a dierent format.
Note: Surround sound AC-3 les are downmixed to stereo if you don’t have an external surround
sound system connected to the computer.
Chapter 5 Custom settings and output formats 73
Page 74

Convert stereo audio to Dolby Digital Professional format
Follow these steps to encode a stereo (2/0 L,R) Dolby Digital Professional (AC-3) stream from a
stereo source media le.
Encode an AC-3 stream
1 Add source audio les to the Batch window.
For details, see Importing overview on page 17.
2 Save the batch by choosing File > Save As (or pressing Command-Shift-S), entering a name for
the batch, selecting a location, and clicking Save.
3 To apply the appropriate Apple setting from the Dolby Digital Professional category to the
source audio le, do one of the following:
•
Choose Target > New Target With Setting, choose a setting, and click Add.
•
In the Batch window, Control-click in an empty part of the job, choose New Target With Setting
from the shortcut menu, choose a setting, and click Add.
•
Drag a setting from the Settings tab to the source audio le’s job in the Batch window.
4 Make any adjustments to the setting in the Encoder pane of the Inspector window.
For more information, see Dolby Digital Professional Encoder pane on page 78.
Note: Compressor maps channels intelligently. Here are some examples:
•
If you import a stereo source le and apply a mono 1/0 (C) audio coding mode to it: The le
is downmixed.
•
If you apply a surround audio coding mode to the stereo le: The left and right channels are
mapped to the left front (L) and right front (R) channels, leaving the other channels of the
coding mode silent.
•
If you assign a stereo le to the left front or left (rear) surround channel: Compressor picks the left
channel and ignores the right channel.
5 Click Submit.
For information about encoding surround sound les, see Assign les to surround sound
channels on page 74. For information about playing your AC-3 audio les with Compressor, see
Preview media as source or with settings applied on page 52.
Assign les to surround sound channels
Compressor oers a streamlined channel assignment technique that can save you time. You can
also use the manual method for assigning individual audio les to surround sound channels.
You can also combine surround audio source les with a video le to make a single Compressor
job. This is useful in audio post-production workows in which surround audio stems (submixes)
are created separately from the nal picture edit. Compressor treats the video and up to six
audio les as a single asset. For example, you could apply the Create DVD job action to make a
DVD with 5.1-channel surround sound.
Chapter 5 Custom settings and output formats 74
Page 75

Assign les automatically to surround channels using channel identier codes
1 In the Finder, append the channel identier code of the target surround channel to the lename
of each source audio le using these codes:
•
-L: Left front channel
•
-R: Right front channel
•
-C: Center front channel
•
-Ls: Left surround channel
•
-Rs: Right surround channel
•
-S: Center surround channel
•
-LFE: Low-frequency eects channel (subwoofer, LFE)
For example, to assign an AIFF le to the left surround channel, rename the le lename-Ls.ai (where
lename is the name of your le). The channel identier codes must include the hyphen, as shown.
Note: OS X may add a le extension like .ai. This will not interfere with this channel
assignment method.
This procedure works only when you drag les into the Batch window. If you drag the les onto
the Compressor application icon, they’ll appear as separate source les, each in its own job.
Note: If you’re creating Dolby Digital Professional (AC-3) surround sound streams, you won’t
use all the channels at once. For a diagram of the Dolby audio coding modes, see Dolby Digital
Professional Encoder pane on page 78.
2 Drag the renamed source audio les to the Batch window.
If the following conditions are met, Compressor automatically collapses the entire group of les
into what appears as a single surround source media le in the Batch window:
•
The les in the group must be named correctly. (See the channel identier codes listed above.)
•
The total number of les in the group must be fewer than seven.
The Inspector window shows the audio les assigned to each channel.
Click a channel’s icon to
change the file assigned
to that channel.
Chapter 5 Custom settings and output formats 75
Page 76

Note: You can click a channel icon in the Inspector window to change the le assigned to it.
3 To apply the appropriate Apple setting from the Dolby Digital Professional category to the
source audio le’s job, do one of the following:
•
Choose Target > New Target With Setting, choose a setting, and click Add.
•
In the Batch window, Control-click in an empty part of the job, choose New Target With Setting
from the shortcut menu, choose a setting, and click Add.
•
Drag a setting from the Settings tab to the source audio le’s job in the Batch window.
4 Make any necessary adjustments in the Inspector window and click Submit.
Compressor creates an AC-3 surround audio stream. For information about playing your AC-3
audio les with Compressor, see Dolby Digital overview on page 72.
Manually assign source audio les to channels of a surround sound stream
1 To import the source audio les, do one of the following:
•
Choose Job > New Job With Surround Group (or press Command-Control-I).
•
Click the Add Surround Sound button in the Batch window.
•
Control-click the batch and choose New Job With Surround Group from the shortcut menu.
The channel assignment interface opens.
2 To assign a source audio le to a particular channel, do one of the following:
•
Drag the source audio le from the Finder to the icon for a specic channel (for example, L).
•
Click the icon for a specic channel (for example, L) and use the Open dialog to locate the
source audio le intended for that channel.
The le is now assigned to the L (left front) channel.
3 Repeat step 2 for each source audio le that you intend to include in the surround stream.
Note: If you’re creating Dolby Digital Professional (AC-3) surround sound streams, you won’t
use all the channels at once. For a diagram of the Dolby audio coding modes, see Dolby Digital
Professional Encoder pane on page 78.
Chapter 5 Custom settings and output formats 76
Page 77

4 When you’ve nished adding source audio les to the channel assignment interface, click OK.
The group of surround les appears as a single surround source media le job in the Batch
window, and the icons are also shown in the Inspector window.
Click a channel’s icon to
change the file assigned
to that channel.
Note: You can click a channel icon in the Inspector window to change the le assigned to it.
5 To apply the appropriate Apple setting from the Dolby Digital Professional category to the
source audio le, do one of the following:
•
Choose Target > New Target With Setting, choose a setting, and click Add.
•
In the Batch window, Control-click in an empty part of the job, choose New Target With Setting
from the shortcut menu, choose a setting, and click Add.
•
Drag a setting from the Settings tab to the source audio le’s job in the Batch window.
6 Make any necessary adjustments in the Inspector window and click Submit.
Compressor creates an AC-3 surround audio stream. For information about playing your AC-3
audio les with Compressor, see Dolby Digital overview on page 72.
Combine a video le with surround audio les to make a single source media le
1 To manually assign source audio les to channels of a surround sound stream, follow steps 1
through 5 above.
2 Click the Add Video button and use the resulting Open dialog to choose the video le.
Note: This feature supports QuickTime source media les only. Image sequences are
not supported.
3 Make any necessary adjustments in the Inspector window and click Submit.
You can further streamline the channel assignment process by encapsulating the automatic
method described above in a Droplet. For more information about Droplets, see Create
Droplets on page 198.
Chapter 5 Custom settings and output formats 77
Page 78

Dolby Digital Professional Encoder pane
This section contains detailed information about the various tabs within the Dolby Digital
Professional (AC-3) Encoder pane of the Inspector window.
You make your Dolby Digital Professional settings using the tabs described below, by either
modifying an existing setting or creating a new setting in the Settings tab. The Dolby Digital
Professional pane opens with the Audio tab on top.
Basic settings
Use the following basic settings to set up a Dolby Digital Professional (AC-3) job or batch:
•
Extension: This eld displays the Dolby Digital Professional le extension (.ac3) automatically
after the Dolby Digital Professional output format is chosen from the File Format pop-up
menu or the Create a New Setting (+) pop-up menu in the Settings tab.
•
Allow Job Segmenting: This checkbox allows you to turn o job segmenting. Because job
segmenting isn’t used for audio-only encodes, this checkbox is dimmed when you choose the
Dolby Digital Professional le format. For more information, see Job segmenting and two-pass
or multi-pass encoding on page 249.
•
Audio, Bitstream, and Preprocessing: These buttons open the Audio, Bitstream, and
Preprocessing tabs described next.
Audio tab
All the most important Dolby Digital Professional settings are accessible in the Audio tab.
Chapter 5 Custom settings and output formats 78
Page 79

•
Target System: Compressor limits available settings to those appropriate for the target system.
If you’re encoding for use with DVD Studio Pro, choose DVD Video. Choose DVD Audio only
if you’re encoding for use in a DVD Audio authoring application. To remove the setting limits,
choose Generic AC-3.
•
Audio Coding Mode: Species the audio channels of the encoded stream. This setting also has
an Automatic button.
Audio Coding Mode
Automatic button
For example, “3/2 (L, C, R, Ls, Rs)” means three front channels (left, center, right), and two rear
channels (surround). “2/0 (L, R)” is essentially a standard stereo le. The audio coding mode
aects settings such as the available bandwidth and surround channel preprocessing. If you
click the Automatic button (next to the Audio Coding Mode pop-up menu), Compressor
makes its best guess at the intended audio coding mode, based on available source audio les.
L
C R
LFE
Ls
3/2 channels
L
Ls Rs
2/2 channels
R
LFE LFE
Rs
L
2/1 channels
L
C R
LFE LFE
S
3/1 channels 3/0 channels
R
S
L
LFE
2/0 channels
(LFE option not available)
L
C R
R
(LFE option not available)
C
LFE
1/0 channels
Note: In the Audio Coding Mode pop-up menu, “S” stands for a single rear surround channel,
and in this illustration, “LFE” stands for low-frequency eects (also known as the subwoofer). For
more information, see Assign les to surround sound channels on page 74.
•
Enable Low Frequency Eects: Select this checkbox to include the LFE channel in the encoded
stream (not available for 1/0 mono or 2/0 stereo).
•
Sample Rate: Species the sample rate. All les intended for video and audio DVD authoring
must have a 48 kHz sample rate as required by the DVD specication. The 32 kHz and 44.1 kHz
sample rates are available only when Generic AC-3 is the target system.
Chapter 5 Custom settings and output formats 79
Page 80

•
Data Rate: The choices depend on the coding mode and target system. The higher the rate, the
better the quality. AC-3 streams have a constant data rate. At 448 kbps, which is the default
for 5.1 encoding, one minute of AC-3 audio takes about 3.3 MB of storage space. For stereo
encoding, rates of 192 kbps and 224 kbps are typical and will produce good results.
•
Bit Stream Mode: Denes the purpose of the encoded audio material. The information is
included in the nished stream and can be read by some decoding systems.
•
Dialog Normalization: Species the average volume of the dialogue, using decibels of full
scale (dBFS), in your sound les relative to full modulation. The playback device uses this
information to maintain similar volume among dierent AC-3 streams. The goal is to make all
AC-3 encoded audio les have the same listening level, regardless of the source le.
It’s especially important to properly use the Dialog Normalization feature if you have dierent
audio les (with dierent volume levels) going on to a DVD. If you know the average level for
each le, enter that number in the Dialog Normalization eld for each le. For example, if the
dialogue in your Final Cut Pro project averages around –12 dB on the audio meter, enter “–12”
in the Dialog Normalization eld.
Note: This normalization is between the audio streams on the DVD, not within an individual
audio stream itself. For that type of normalization, use an audio editing tool. You can enter
values from –1 dBFS to –31 dBFS. The dierence between the value you enter and 31 dBFS
(which represents the normal dialogue listening level) is the amount that the source audio will
be attenuated.
•
If you enter –31 dBFS: The attenuation is 0 dB (31 dBFS–31 dBFS), and the source audio levels
are not aected at all.
•
If you enter –27 dBFS: The attenuation is 4 dB (31 dBFS–27 dBFS).
•
If you enter –12 dBFS: The attenuation is 19 dB (31 dBFS–12 dBFS).
The louder the source le, the smaller the value you enter, and the more the audio in the
encoded le is attenuated during playback.
If you don’t know the sound level of the source le or for some other reason want to ensure
the Dolby Digital Professional encoder does not aect your sound levels, enter “–31” for the
Dialog Normalization and choose None from the Compression Preset pop-up menu (located in
the Preprocessing tab).
Important: It’s critical that you set Dialog Normalization correctly if you intend to use any of
the Compression Preset settings. The Compression Preset settings assume that the audio, after
the dialogue has been normalized, is at the normal listening level of 31 dBFS. Levels that are
consistently louder than that result in distorted sound and erratic levels.
Chapter 5 Custom settings and output formats 80
Page 81

Bitstream tab
These settings are stored in the nished stream for use by the playback device. Leave them at
their default values unless you have a specic technical reason for changing them.
•
Center Downmix, Surround Downmix: If your encoded audio has these channels, but the player
does not, the channels are mixed into the stereo output at the specied level.
•
Dolby Surround Mode: When encoding in 2/0 (stereo) mode, this setting species whether the
signal uses Dolby Surround (Pro Logic).
•
Copyright Exists: Select this checkbox to specify that a copyright exists for this audio.
•
Content is Original: Select this checkbox to specify that this audio is from the original source
and not a copy.
•
Audio Production Information: Select this checkbox and ll in the elds below to specify how
the encoded audio content was mixed. Playback devices may use this information to adjust
output settings.
•
Peak Mixing Level: Species peak sound pressure level (SPL) (between 80 dB and 111 dB) in
the production environment when this mix was mastered.
•
Room Type: Species information about the mixing studio.
Preprocessing tab
Preprocessing options are applied to the audio data before encoding. With the exception of the
Compression Preset setting, leave these settings at their default values unless you have a specic
technical reason for changing them.
Chapter 5 Custom settings and output formats 81
Page 82

•
Compression Preset: Species one of the dynamic range processing modes built into the AC-3
format. The default setting of Film Standard Compression should be used only when you’re
encoding an original mix intended for cinema. In almost all cases, you should choose None.
Important: It’s critical that you set Dialog Normalization correctly in the Audio tab if you intend
to use any of these Compression Preset settings. The Compression Preset settings assume that
the audio, after the dialogue has been normalized, is at the normal listening level of 31 dBFS.
Levels that are consistently louder than that result in distorted sound and erratic levels.
Note: If you’re building a Dolby Digital Professional 5.1-channel surround sound DVD, choose
Film Standard Compression.
•
General Digital Deemphasis: Species whether input audio data is preemphasized and needs to
be deemphasized before encoding.
•
LFE Channel Low-Pass Filter: Select this checkbox to apply a 120 Hz low-pass lter to the lowfrequency eects (LFE) channel. Turn o this lter if the digital signal fed to the LFE’s input
doesn’t contain information above 120 Hz.
•
Full Bandwidth Chan. Low-Pass Filter: Select this checkbox to turn on a low-pass lter with a
cuto near the available audio bandwidth that is applied to the main input channels. If the
digital signal fed to the main input channels doesn’t contain information above the available
audio bandwidth, you can turn o this lter, and Compressor automatically determines the
available bandwidth.
•
Full Bandwidth Chan. DC Filter: Select this checkbox to turn on a DC high-pass lter for all input
channels as a simple way to remove DC osets. Most mixed audio material is already free of
DC osets.
•
Surround Channels 90º Phase Shift: Select this checkbox to generate multichannel AC-3 streams
that can be downmixed in an external two-channel decoder to create true Dolby Surround–
compatible output.
•
Surround Channels 3 dB Attenuation: Select this checkbox to apply a 3 dB cut to the surround
channels of a multichannel lm soundtrack being transferred to a consumer home theater
format. Cinema surround channels are mixed 3 dB “hot” (higher) relative to the front channels
to account for cinema amplier gains.
Chapter 5 Custom settings and output formats 82
Page 83

Spatial mixing options
Below are additional suggestions for using the channels in a Dolby Digital Professional program.
Center channel
In a multichannel system, there are three ways to achieve a centrally placed sound image:
•
Create a “phantom center” (mix sound to the left and right equally, as with stereo): This method
is commonly used, but assumes the listener is seated exactly between the speakers (which is
not possible in automobiles and not always the case in homes). The timbre of sound is not the
same as from a direct speaker because of cross-cancelation eects.
•
Use the center channel alone: This creates a stable center image for listeners in any location. (To
prevent the audio from sounding too focused or narrow, its reverb can be spread to the left
and right channels.)
•
Use all three front channels equally or in various proportions: This method allows for greater
control of the range of spatial depth and width. The phantom center can be reinforced by
additional signals in the center channel, which can be enhanced by signals spread into the
left/right pair. The disadvantage is that sound from all three speakers may not blend well or
may not arrive at the listener at the same time, causing side eects such as comb ltering,
shifts in tone color, or smearing. To counteract these side eects, you can rst process the
additional signals to change their spatial character, timbre, or prominence relative to the main
center signal.
Surround channels
Subtle surround eects can greatly enhance the listener’s sense of depth compared to
conventional stereo. Popular music often benets from creative use of surround. But don’t
overdo it. The lm industry guideline—don’t use surround eects to distract the listeners from
the story—also works well for music.
LFE channel limitations
The low-frequency eects (LFE) channel is a separate signal with a limited frequency range and
is created by the mixing engineer and delivered alongside the main channels in the mix. A “brick
wall” lter at 120 Hz in the Dolby Digital Professional encoder limits use of the LFE channel to
the bottom two audible octaves. Dolby recommends limiting the signal to 80 Hz when mixing
your sound.
In most music productions (with exceptions such as the famous cannon shots in Tchaikovsky’s
1812 Overture), the LFE channel isn’t necessary. The LFE signal is also discarded in the Dolby
Digital Professional downmix process, so that intense bass signals don’t stress small stereo
systems. Be sure not to include vital information in the LFE channel that would be missed in
mono, stereo, or Pro Logic playback.
Because LFE is separate from other channels, its ability to blend with higher frequencies can be
aected by lters used to generate the LFE signal. To ensure a cohesive audio signal, keep the
entire signal together in the main channel or channels.
Avoid creating an LFE channel for material originally produced without one. Dolby Digital
Professional’s ve main channels are all full range, and the LFE channel doesn’t increase the
frequency response. Dolby Digital Professional decoders oer bass management, directing
low frequencies to a subwoofer or other suitable speakers. An LFE track may interfere with
bass management.
Chapter 5 Custom settings and output formats 83
Page 84

Stereo playback
Even with the popularity of 5.1 systems, you should always address stereo reproduction. There
are three basic ways to do this:
•
Prepare a new stereo mix from the original multitrack elements (using conventional stereomixing sessions).
•
Prepare a studio-adjusted downmix from the multichannel mix. This method takes advantage
of the work that has gone into mixing the 5.1 version. It retains exibility in the exact
proportions of each channel represented in the nal stereo mix.
•
Let the decoder derive a stereo downmix, based on preset formulas in the decoder. Downmix
options and dynamic range control eects can be previewed and adjusted in the production
studio, and a range of adjustments are possible.
Always check the mix on an inexpensive surround system to evaluate how well it sounds on
modest playback systems.
Note: For more information about Dolby Digital Professional, visit the Dolby Laboratories Inc.
website at http://www.dolby.com.
MPEG-2 les
MPEG-2 overview
MPEG-2 is an internationally accepted compression standard developed by the Motion Picture
Experts Group (MPEG). MPEG-2 allows you to create broadcast-quality video les and was
designed to support high-resolution, high-bit-rate video. It’s the video compression format used
for high-quality video titles on DVD, high-denition (HD) broadcast, and home satellite dish
systems. All DVD players contain the hardware required for MPEG-2 playback.
The Compressor MPEG-2 encoder can create MPEG-2 video streams for the DVD-Video format.
To create DVD-Video discs, you can use a DVD authoring application in conjunction with
Compressor, or you can use the Create DVD job action, which is part of the Create DVD template.
For more information, see Post-transcoding actions overview on page 184 and Create a batch on
page 18.
Standard-denition (SD) MPEG-2
Standard MPEG-2 is full frame rate (23.98 to 29.97 fps) and full-screen resolution (720 x 480 for
NTSC and 720 x 576 for PAL). SD MPEG-2 has the following characteristics:
•
Support for interlaced video: MPEG-2 can support either interlaced or progressive video.
Because MPEG-2 streams are generally played from a local DVD drive rather than over a
network with variable bandwidth, video frame rate usually stays constant, and the video
normally looks completely smooth.
•
No streaming support: MPEG-2 is not suitable for streaming video les over the web because it
requires a high bit rate (2 to 9 Mbps) to maintain acceptable image quality.
Chapter 5 Custom settings and output formats 84
Page 85

HD sources and MPEG-2
Compressor has several dierent options and workows for transcoding HD video source les
into MPEG-2 les.
•
HD on Blu-ray: Compressor can output MPEG-2 les for creating HD-resolution Blu-ray discs
from either HD or SD source media. Compressor can retain the various frame sizes and frame
rates of HD video when transcoding to MPEG-2. Compressor also supports the higher bit rates
required by the Blu-ray format. For more information about creating output for Blu-ray discs,
see Create Blu-ray discs on page 70. For information about adding the Blu-ray job action to a
job, see Post-transcoding actions overview on page 184.
Note: The other output le format option for Blu-ray discs is H.264, also known as MPEG-4 Part 10.
•
HD to SD downconversion: For those situations in which you’re editing HD sources in Final
Cut Pro and want to create an SD DVD from them, Compressor provides high-quality
downconversion. Compressor retains as much detail as possible during scaling and correctly
preserves progressive or interlaced formats when encoding to MPEG-2 for DVD.
When you import source media into the Batch window, you can click the source’s name in the
Batch window to see resolution, frame rate, and duration information in the lower-left corner
of the Preview window.
Elementary, transport, and program streams
There are three common MPEG-2 stream types that are used to deliver MPEG-2-encoded video:
•
Elementary streams: These streams contain only one MPEG-2 content channel and no audio.
•
Transport streams: These streams can contain several MPEG-2 content channels and associated
audio. All the channels are multiplexed together, allowing the receiver to choose which to play
back. Compressor supports creating single-channel transport streams that can also include
associated audio.
Transport streams can also recover from interruptions during playback, making them ideally
suited for broadcast and streaming applications where noise or network congestion can lead
to interruptions.
•
Program streams: These streams contain only one MPEG-2 content channel and its associated
audio. Program streams require an error-free delivery method and are primarily used for
storage or processing within a computer.
By default, the Compressor MPEG-2 encoder creates elementary MPEG-2 streams. In the Extras
tab of the MPEG-2 Encoder Pane, you can congure the MPEG-2 encoder to create transport
or program streams and choose whether they should include audio. For more information, see
MPEG-2 Encoder pane on page 89.
Note: The SD DVD and Blu-ray options in the Stream Usage pop-up menu output only
elementary streams. If you choose either of these and then congure the output to be either
a transport or program stream, the Stream Usage setting changes to Generic. For more
information, see MPEG-2 Encoder pane on page 89.
Chapter 5 Custom settings and output formats 85
Page 86

Create MPEG-2 les
This section includes step-by-step instructions for setting your MPEG-2 attributes prior to
creating MPEG-2 output les with Compressor. Make your MPEG-2 settings from the MPEG-2
Encoder pane by either modifying an existing setting or creating a new one in the Settings tab.
Stage 1: Open the MPEG-2 Encoder pane and choose video format settings
It’s important to match the video format, aspect ratio, and eld dominance to those of your
source media le. For a more detailed description of each of these settings, see MPEG-2 Encoder
pane on page 89.
1 In the Settings tab, select a setting or create a new setting by choosing MPEG-2 from the Create
a New Setting (+) pop-up menu.
The MPEG-2 Encoder pane opens in the Inspector window with the Video Format tab displayed.
Choose the type
of MPEG-2 stream
to create.
Click the Automatic
buttons to have the
encoder match the
source media file.
Manually configure these
settings if you don’t intend
to match the source media file.
2 In the Stream Usage pop-up menu, choose the setting (Generic, SD DVD, or Blu-ray) that matches
how you intend to use the encoded video.
This ensures that the MPEG-2 encoding options are restricted to those that are supported by
your intended usage.
3 Choose a format from the Video Format pop-up menu or click its Automatic button.
4 Choose a frame rate from the Frame Rate pop-up menu or click its Automatic button.
5 Choose an aspect ratio from the Aspect Ratio pop-up menu or click its Automatic button.
Before you can choose your aspect ratio, you must determine whether the intended shape of
your source video is 4:3 (normal) or 16:9 (widescreen).
6 In the Field Dominance pop-up menu, choose a eld dominance setting based on your source
media type.
For example, for DV choose Bottom First. Or click the Field Dominance Automatic button to let
Compressor determine the correct setting.
Chapter 5 Custom settings and output formats 86
Page 87

7 If you want to use the timecode from your source video, leave the “Choose start timecode”
checkbox unselected.
Otherwise, select this checkbox and enter a new timecode value.
8 If you selected the “Choose start timecode” checkbox, and your video format is NTSC, select the
“Drop frame” checkbox if you want to use drop frame (rather than non-drop frame) timecode.
Stage 2: Open the Quality tab and choose quality settings
In the Quality tab, you set the MPEG-2 encoding attributes that have the greatest inuence on
the resulting quality of your MPEG-2 video output le: encoding mode, average and maximum
bit rate, and type of motion estimation.
1 To open the Quality tab, click the Quality button in the MPEG-2 Encoder pane of the Inspector.
Choose a mode that
fits your time and
quality requirements.
Choose bit rates that
fit your file size and
quality requirements.
Choose a Motion
Estimation setting.
2 Make a selection from the Mode pop-up menu.
For best image quality, choose “One pass VBR Best” or “Two pass VBR Best.” For faster encoding
with excellent image quality, choose “One pass VBR” or “Two pass VBR.” For HD sources, choose
either “One pass VBR Best” or “Two pass VBR Best.”
With two-pass modes, the source media le is examined on the rst pass and transcoded
on the second pass, with bit rates tailored to the video content. In contrast, one-pass modes
transcode the material more quickly, but allocate bits less optimally than do the corresponding
two-pass modes.
3 Choose an average bit rate using the Average Bit Rate slider or eld, or click the Automatic button.
Note: Your choice of bit rate may be inuenced by several factors, including the complexity of
your source video, the format and number of your audio streams, and the total duration of all
video clips to t on your DVD.
Choose an appropriate bit rate based on the content and length of your source video and the
intended size (in bytes) of your output le. In DVD authoring, the entire video must t on the
DVD disc—the lower the bit rate, the more data you can store. However, the higher the bit rate,
the better the image quality is.
As you change the Average Bit Rate value (with the slider or the eld), the bit rate calculator
at the bottom of the Quality tab dynamically shows the maximum number of minutes of
video on a DVD-5 disc. The calculator assumes 1.5 Mbps for audio (two-channel AIFF). For more
information, see MPEG-2 bit rates and formats on page 97.
Chapter 5 Custom settings and output formats 87
Page 88

4 If available, use the Maximum Bit Rate slider or eld to set a maximum bit rate.
Choose a GOP structure
Because SD DVD players support peak bit rates of up to 10.08 Mbps for video plus audio, you
should set the maximum video bit rate between 8.0 and 8.5 Mbps if you’re using a 1.5 Mbps
(two-channel AIFF) audio track.
Note: For best results, make sure the maximum bit rate is at least 1 Mbps higher than the
average setting. Larger dierences can produce better results.
5 Choose one of the following settings from the Motion Estimation pop-up menu:
•
Good: The fastest motion estimation setting—sucient when there is relatively low motion
between frames
•
Better: A good general-purpose motion estimation setting—provides very good results even in
the presence of complex interlaced motion
•
Best: The highest-quality setting to handle the most demanding and complex motion for
interlaced sources—somewhat slower than the Better mode
Stage 3: Open the GOP tab and choose GOP settings
Select a suitable GOP structure and size and decide whether you want the GOPs to be open or
closed. For more information about GOPs, see About GOPs (groups of pictures) on page 99.
Note: These settings are not adjustable if you chose an HD video format in the Video Format tab.
1 To open the GOP tab, click the GOP button in the MPEG-2 Encoder pane of the Inspector.
to control how many
B-frames are used.
Choose open
or closed GOPs.
Choose a GOP size.
2 Choose a GOP structure from the GOP Structure pop-up menu.
For the majority of MPEG-2 encoding jobs for DVD authoring, choose the IBBP GOP structure.
3 Choose a GOP size from the GOP Size pop-up menu.
For the majority of MPEG-2 encoding jobs for DVD authoring, choose a GOP size of 15 for NTSC
and a GOP size of 12 for PAL and 24p.
The options available in the pop-up menu vary depending on the GOP structure you choose and
whether the GOP is open or closed.
4 Decide whether you want the GOP pattern to be open or closed, and click the appropriate button.
Chapter 5 Custom settings and output formats 88
Page 89

Stage 4: Choose Extras settings
You can control the inclusion or exclusion of specic MPEG-2 authoring information in the
Extras tab.
1 To open the Extras tab, click the Extras button in the MPEG-2 Encoder pane of the Inspector.
2 If you want Compressor to parse specic MPEG-2 authoring information rather than parse the
information later in DVD Studio Pro, select the “Add DVD Studio Pro metadata” checkbox.
Important: Selecting this checkbox may make your MPEG-2 les incompatible with any DVD
authoring tools other than DVD Studio Pro 2 (or later).
3 If you want to exclude automatic compression markers from the stream but still retain the
chapter markers, select the “Include Chapter Markers only” checkbox.
4 To create transport or program streams, select the Multiplexed MPEG-1/Layer 2 Audio checkbox.
For more information about settings in the Extras tab, see MPEG-2 Encoder pane on page 89.
MPEG-2 Encoder pane
This section contains detailed information about the various tabs within the MPEG-2 Encoder
pane in the Inspector window. You make your MPEG-2 settings using these tabs, by either
modifying an existing setting or creating a new setting in the Settings tab.
The MPEG-2 Encoder pane opens with the Video Format tab on top.
Chapter 5 Custom settings and output formats 89
Page 90

Basic settings
•
Extension: Displays the MPEG-2 le extension (.m2v) automatically after the MPEG-2 output
format is chosen from the File Format pop-up menu.
•
Allow Job Segmenting: This checkbox allows you to turn o job segmenting. It’s relevant only if
you’re using Compressor with distributed processing and with multi-pass encoding. For more
information, see Job segmenting and two-pass or multi-pass encoding on page 249.
•
Stream Usage: This pop-up menu allows you to choose how you intend to use the MPEG-2
stream. Compressor modies the available options and bit rate ranges based on the option
you choose.
•
Generic: This option allows you complete access to all the MPEG-2 settings. This is the only option
that supports the MPEG-2 640 x 480 video format in addition to the standard-denition (SD) and
high-denition (HD) video formats. It’s also the only option that supports creating transport and
program streams. It supports the complete bitrate range of 2.0 Mbps to 40.0 Mbps.
•
SD DVD: This option restricts the encoding options to those allowed by the SD DVD
specication. These include the NTSC and PAL video formats and a bitrate range of 2.0 Mbps
to 9.0 Mbps.
•
Blu-ray: This option restricts the encoding options to those allowed by Blu-ray video discs.
These include the SD and HD video formats and a bit rate range of 10.0 Mbps to 40.0 Mbps.
•
Video Format, Quality, GOP, and Extras: These buttons open the Video Format, Quality, GOP, and
Extras tabs. Their settings are explained in the following sections.
Video Format tab
You use the Video Format tab to make settings related to video formats, frame rates, aspect
ratio, eld dominance, and timecode. All of these, except the timecode setting, can be set to
automatically congure themselves based on the video being encoded.
The Video Format tab contains the following controls:
•
Video Format: Choose your output video le format as NTSC, PAL, 720p, HD 1440x1080, HD
1920x1080, or a variety of versions of 640-width formats. The Stream Usage setting determines
which of these formats are actually available. When you choose a Video Format setting, the
other settings in this tab are lled in with default values, or they are dimmed, indicating that
there are no options for that setting. The NTSC and PAL items refer to SD settings for the NTSC
and PAL TV standards. Of the major-market DVD regions, NTSC is used in North America and
Japan, and PAL is used throughout Europe.
Generally, the output video format should match the source video format. For interlaced video
originating from traditional NTSC or PAL camcorders, choose NTSC or PAL from this pop-up
menu. If you’re unsure of your source media le’s video format, you can choose Automatic. This
setting analyzes your source media le’s frame rate to determine the correct video format.
Chapter 5 Custom settings and output formats 90
Page 91
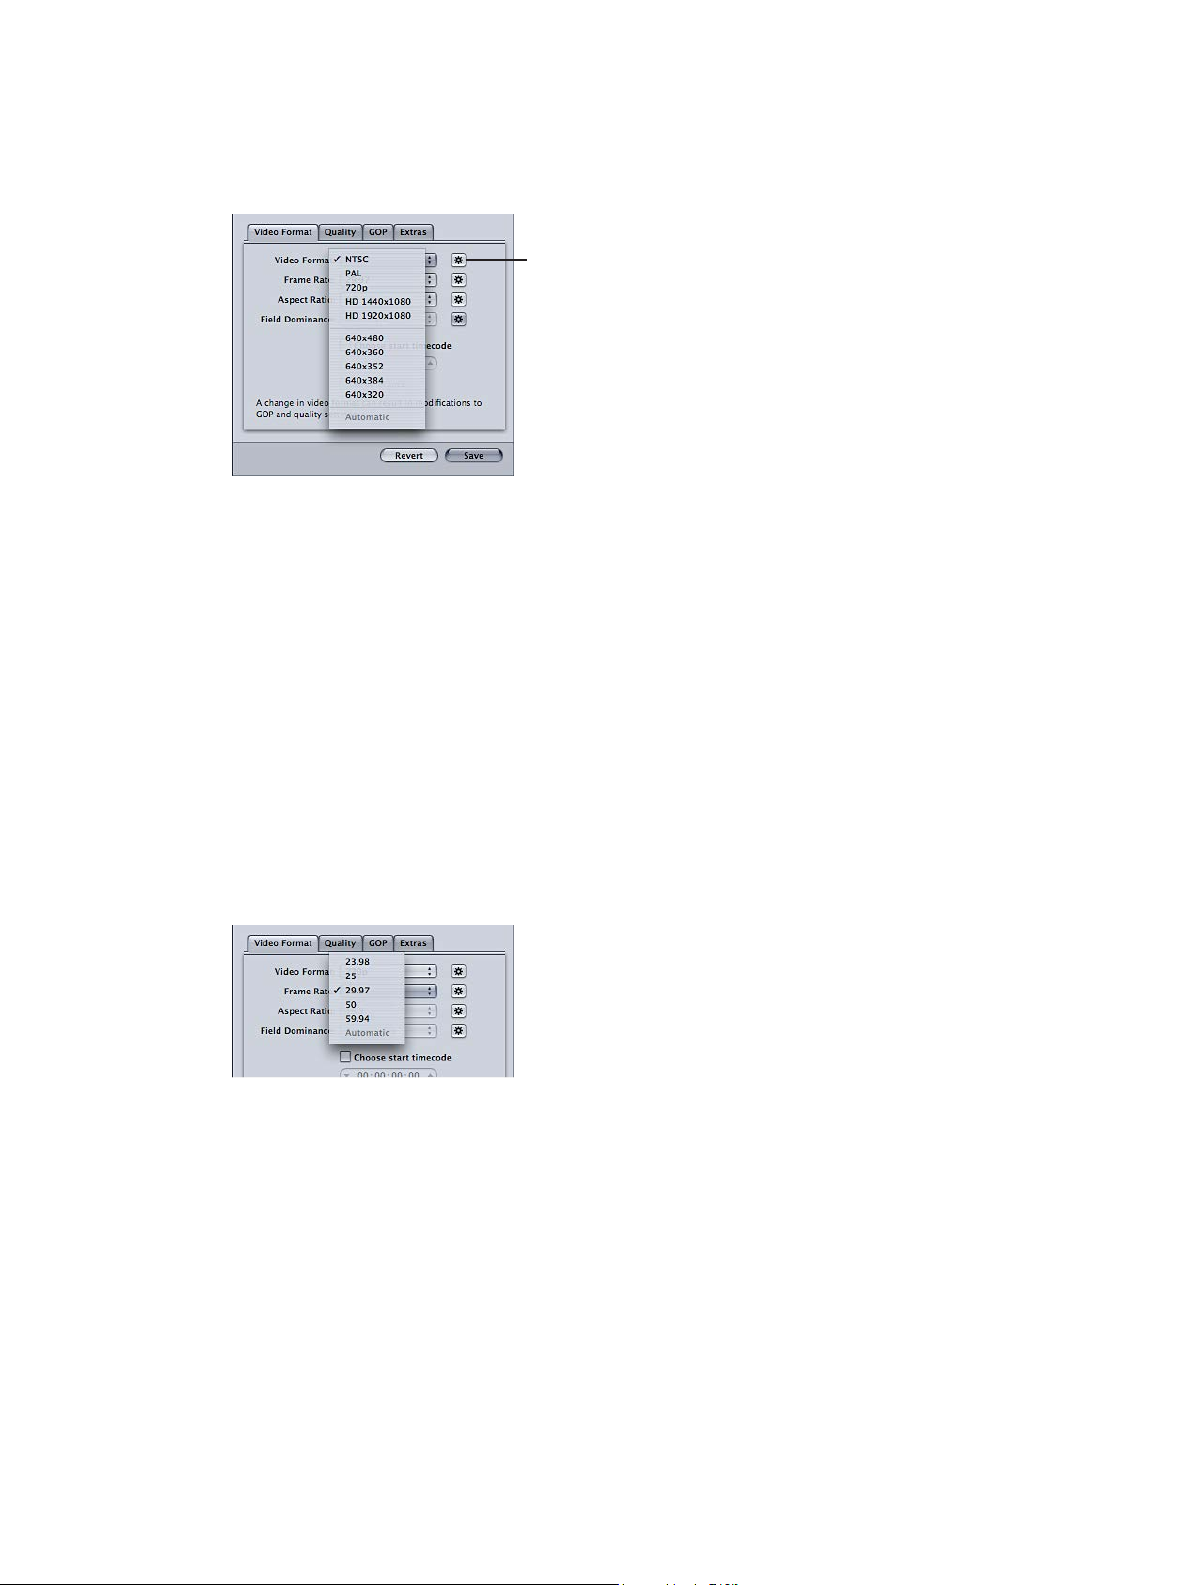
If you click the Video Format Automatic button, the GOP size is limited to 12 or 15 (based on
whether the video is PAL or NTSC), with a closed IBBP pattern. With Automatic selected, you
cannot change the frame rate setting in this tab, or the GOP settings in the GOP tab. For more
information about GOPs, see About GOPs (groups of pictures) on page 99.
Video Format
Automatic button
Note: Because MPEG-2 uses xed video frame sizes, Compressor enters the output frame size
in the elds in the Geometry pane based on your video format selection.
The video format you choose determines the options for the associated characteristics such as
frame size and rate, aspect ratio, and eld dominance.
Note: The normal frame dimensions of SD NTSC digital video are 720 x 486. If you want
to transcode a source le using the NTSC setting, Compressor crops the le to achieve the
required MPEG-2 frame size of 720 x 480, unless you’ve already specied cropping attributes
for your setting. If not, Compressor crops two rows of pixels from the top and four from the
bottom. This crop attribute is only temporary and is not saved in the setting. You can see the
eects of the crop by double-clicking the setting in the job to open the Preview window.
•
Frame Rate: Choose the intended frame rate for the MPEG-2 output le. Film and some video
camcorders create progressive material at 24 fps (or the NTSC variant 23.98 fps). Although the
term “24p” implies video with a frame rate of 24 fps, the frame rate is usually 23.976 fps (rounded
to 23.98 fps). To transcode these sources for DVD playback on NTSC-related TVs, choose the 23.98
setting. For more information, see About GOPs (groups of pictures) on page 99.
Note: The NTSC frame rate is frequently referred to as 29.97 fps. Similarly, the “NTSC version”
of 24 fps is referred to as 23.98 fps. Both these numbers are actually approximations of the
true values of 30/1.001 and 24/1.001, or 29.97003 and 23.97602 shown to more decimal places.
These numbers show that 29.97 is a pretty good approximation of 30/1.001 (only 3 frames drift
in 100,000 seconds), but that 23.976 would be much better than 23.98. In fact, even though
23.98 is used as shorthand in Compressor Help and in the Compressor user interface, accuracy
of 23.976 or better is maintained internally in Compressor, and generally within QuickTime as
well. For more information, see About GOPs (groups of pictures) on page 99.
Chapter 5 Custom settings and output formats 91
Page 92

•
Aspect Ratio: Choose the aspect ratio of your video le. The default is 4:3. The other option
of 16:9 is used for anamorphic DVD. The aspect ratio determines how the picture lls the
television screen. A 16:9 (widescreen) DVD viewed on a typical 4:3 television appears in
letterbox format (black bars at the top and bottom of the screen). However, a widescreen DVD
displayed on a 16:9 (widescreen) TV lls the screen.
•
Field Dominance: Choose whether the top eld or the bottom eld of your interlaced source
media le will be the dominant (rst) eld in the output MPEG-2 video le. If you choose
Automatic (the default), Compressor analyzes the source video and attempts to determine
eld dominance automatically. The bottom eld is dominant for DV source video. This setting
does not pertain to the 720p video format, because that format must be progressive.
Note: For interlaced video, the top eld is also known as the upper or odd eld, and the
bottom eld is also known as the lower or even eld.
•
Choose start timecode: If you leave the checkbox unselected (the default), Compressor embeds
the source media le’s existing timecode in the output media le. Selecting this checkbox
allows you to override the source media le’s timecode and enter a new timecode value in the
timecode eld. This eld is dimmed unless the checkbox is selected, and if it’s left blank, the
output media le uses the default starting timecode value of 00:00:00:00.
•
Drop Frame: If you select the “Choose start timecode” checkbox, and you want your timecode
to be drop frame (rather than non-drop frame), you must also select this checkbox.
Timecode is a numbering system for labeling the frames in a video sequence. The type of
timecode designed for 30 fps video has a frame counter that counts from 0 to 29 and then
increments the seconds counter and returns to 0. This type of timecode, also known as non-
drop frame timecode, maintains an accurate measure of elapsed time for true 30 fps video.
However, the NTSC frame rate is 29.97 fps, so drop frame timecode was dened to provide
a more accurate measure of elapsed time for NTSC. Drop frame timecode skips frame
numbers 0 and 1 once a minute on the minute, except for every 10 minutes. For example,
drop frame timecode 01:08:59;29 is followed by 01:09:00;02, skipping timecode numbers
01:09:00;00 and 01:09:00;01.
Note: Drop frame timecode applies only if you’re using interlaced NTSC video.
Chapter 5 Custom settings and output formats 92
Page 93

Quality tab
The Quality tab allows you to set the bit rate for your video so that it can be transcoded to a
suitable data size and quality.
In addition to the controls, the lower-right corner shows an estimate of how many minutes of
video would t on a 4.7 GB DVD using the current settings. This time assumes a single AIFF audio
stream to be used with the MPEG-2 stream.
Mode pop-up menu
Motion Estimation
pop-up menu
Time estimate for a 4.7
GB disc with a stereo
AIFF audio stream
•
Mode: Choose one of the following MPEG-2 encoding modes. (HD-quality modes are “One pass
VBR Best” and “Two pass VBR Best.”)
•
One pass CBR: Using this mode, the output MPEG-2 video stream’s bit rate is held approximately
constant from one GOP to the next. This is the fastest Compressor MPEG-2 encoding mode,
and it provides good to very good quality, especially at bit rates between 5 and 9 Mbps.
•
One pass VBR: This VBR (variable bit rate) encoding mode aims to maintain constant quality
(at the expense of constant bit rate) for the transcoded video le. This means that in scenes
with much detail or fast motion, Compressor allows a higher bit rate than it allows in less
detailed or still parts of the stream. In spite of this bit rate variability, Compressor ensures
that your specied average bit rate is achieved accurately and that the maximum bit rate is
not exceeded. Unlike the two-pass modes, “One pass VBR” doesn’t have a “bird’s-eye” view of
the source media prior to encoding, so its bit allocation is less optimized than that of “Two
pass VBR.” Nonetheless, for most standard-denition (SD) media les at bit rates of 3.5 Mbps
and above, this mode provides good to excellent quality and transcodes quickly.
•
One pass VBR Best: This is similar to “One pass VBR,” but Compressor applies greater eort
to its internal decision-making process. Although “One pass VBR Best” transcodes slower
than “One pass VBR,” it provides excellent to outstanding SD video quality at bit rates of 3
to 3.5 Mbps and above. Bit rates for high-denition (HD) MPEG-2 can range from 10 to 29
Mbps average, 12 to 29 Mbps maximum. Compared to “One pass VBR,” “One pass VBR Best”
provides higher quality, especially for dicult material at low bit rates. For short streams of
1 to 2 minutes or less, if you’re using “One pass VBR” or “One pass VBR Best,” the average bit
rate accuracy may be compromised by as much as 10 to 30 percent.
Chapter 5 Custom settings and output formats 93
Page 94

•
Two pass VBR: In this mode, Compressor reads through the entire source video le twice.
In the rst of these passes, Compressor analyzes the entire source video stream prior to
transcoding it to determine the degree of encoding diculty of each scene. It then creates
a bit rate allocation plan that gives a higher bit rate to complex scenes and a lower bit rate
to easy scenes, in order to achieve the specied average bit rate without exceeding the
specied maximum bit rate. In the second pass, Compressor does the actual compression,
creating the MPEG-2 output video le according to its bit rate allocation plan. As with “One
pass VBR,” the goal of “Two pass VBR” is constant quality rather than constant bit rate. Unlike
“One pass VBR,” “Two pass VBR” is able to establish an overview of where best to spend its
bits across the entire source media le, before beginning the actual encoding. The result of
this process is that transcoding time is almost twice that of “One pass VBR.” Although the
benet is not twice the quality, “Two pass VBR” provides more consistent overall quality than
“One pass VBR,” especially in source media les with a substantial dierence between the
most and the least complex scenes.
•
Two pass VBR Best: In this mode, Compressor devotes more eort to its internal decision-
making process than it does for “Two pass VBR.” Encoding time for “Two pass VBR Best” is
slower than for “Two pass VBR,” but it provides the best possible quality that the Compressor
MPEG-2 encoder has to oer. This mode provides outstanding quality at bit rates of 3 to 3.5
Mbps and above for SD video. For information about using the two-pass modes with job
segmenting, see Job segmenting and two-pass or multi-pass encoding on page 249.
•
Average Bit Rate: Set the average bit rate by dragging the slider or entering a number in the
accompanying eld. The available range depends on the Stream Usage setting. You can
also click the Automatic button to the right of the eld to have Compressor determine the
appropriate average and maximum bit rates.
Note: The average bit rate setting directly controls the size of the encoded le. The maximum
bit rate setting does not aect the encoded le’s size.
•
Maximum Bit Rate: Set the maximum bit rate by dragging the slider or entering a number in
the accompanying eld. The available range depends on the Stream Usage setting.
Note: This slider is available only with the VBR modes and cannot be set lower than the
average bit rate. The slider is also not available if the Automatic button is active.
•
Motion Estimation: The items in this pop-up menu provide trade-os between image quality
and processing time, especially if there is a lot of motion in the source le.
•
Good: The fastest motion estimation setting. This mode does well even with signicant
amounts of motion between frames, if the motion has minimal intereld motion within
frames. For example, footage that has been exposed to frame rate conversion or other
eects processes tends to have little intereld motion. In general, use Good with the one-
pass encoding modes.
•
Better: A good general-purpose motion estimation setting. The Better mode provides
good results even with complex interlaced motion. Better works well for almost all types
of interlaced video sources, even shaky footage from handheld consumer camcorders. In
general, use Better with “One pass VBR” and “Two pass VBR.” If you’re using a progressive
video format, the Better mode does only frame-based motion estimation, and not eldbased motion-vector searching, which isn’t relevant for progressive source les. In this case
the Better mode will run somewhat faster.
•
Best: This is the highest-quality motion estimation setting and should be used for the most
demanding and complex motion for interlaced sources. It’s slower than the Better mode.
In general, use the Best mode to maximize quality when using “One pass VBR Best” or “Two
pass VBR Best.”
Chapter 5 Custom settings and output formats 94
Page 95

GOP tab
You use the GOP (group of pictures) tab to select a GOP format, structure, and size. For more
information, see About GOPs (groups of pictures) on page 99.
Note: If you choose any of the HD video formats in the Video Format tab, the settings in the GOP
tab cannot be changed and default to a closed IBBP GOP structure with a size of 12 (for PAL) or
15 (for NTSC).
•
GOP Structure: Choose an option from this pop-up menu to specify whether there will be two,
one, or no B-frames between the reference frames within a GOP. GOP structure, along with
GOP size, determines the number of I-frames, P-frames, and B-frames that are used within a
GOP during encoding.
Note: For most MPEG-2 encoding situations intended for use on a DVD, choose IBBP as the GOP
structure setting, and a GOP size of 15 for NTSC, or 12 for PAL. These selections give the best
results in most situations. For more information, see About GOPs (groups of pictures) on page 99.
•
IP: No B-frames are used with this setting. Choose IP only if your media contains fast motion
that isn’t encoded with sucient quality using an IBBP or IBP structure.
•
IBP: One B-frame is used between reference frames (I-frames and P-frames). Choose this
setting only if your media contains fast motion that isn’t encoded with sucient quality
using an IBBP structure.
•
IBBP: Use IBBP for the majority of MPEG-2 encoding situations, along with a GOP size of 15
for NTSC, or 12 for PAL. Two B-frames are used between reference frames with this setting.
•
Open and Closed: Closed GOPs don’t contain any frame that refers to a frame in the previous
or next GOP, whereas open GOPs begin with one or more B-frames that reference the last
P-frame of the previous GOP. Closed GOPs created by the Compressor MPEG-2 encoder begin
with an I-frame. Select your GOP type (open or closed) based on whether and how you create
chapter markers for DVD authoring and whether you intend to use multiple video angles in
your title. For more information, see About GOPs (groups of pictures) on page 99.
•
Open: Select this option to create open GOPs.
•
Closed: Select this option to create closed GOPs.
Chapter 5 Custom settings and output formats 95
Page 96

•
GOP Size: Choose how many frames are contained within your GOP, following the format of the
chosen GOP structure. The maximum GOP size you can choose within Compressor is 15 frames
(NTSC) or 12 frames (PAL and 720p). The minimum GOP size for all video formats is 6 frames
(closed GOP) or 7 frames (open GOP). The relationship between GOP structure and GOP size
gives you GOP patterns. For more information, see About GOPs (groups of pictures) on page 99.
•
Pattern: This eld cannot be edited but displays the actual GOP pattern based on your chosen
GOP structure and size.
Extras tab
You use the Extras tab to include or exclude specic MPEG-2 authoring information.
•
Add DVD Studio Pro metadata: Selecting this checkbox allows Compressor to parse specic
MPEG-2 authoring information during the transcoding process to accelerate the import
process into DVD Studio Pro. However, these MPEG-2 les will be incompatible with versions of
DVD Studio Pro 1.5 or earlier. Leaving the checkbox unselected means the information will be
parsed later in DVD Studio Pro.
Note: MPEG-2 streams with additional DVD Studio Pro metadata are compatible only
with DVD Studio Pro 2 (or later). MPEG-2 streams created with this checkbox selected are
incompatible with versions earlier than DVD Studio Pro 2 or with other DVD authoring
tools. All Apple settings have this checkbox selected by default. To make your MPEG-2 les
compatible with other DVD authoring tools, deselect this checkbox, and then save the setting.
•
Include Chapter Markers only: Selecting this checkbox excludes unnamed compression markers
from the stream but still retains the chapter markers. Leaving the checkbox unselected allows
all markers to be recognized in the output media le. For more information about chapter
markers, see Add compression or podcast markers on page 49.
Chapter 5 Custom settings and output formats 96
Page 97

•
YUV 4:2:2 Color encoding (Not for DVD use): Select this checkbox to enable 4:2:2 color encoding.
This option is supported in the creation of MPEG-2 elementary, program, and transport
streams, but it’s available only when the Stream Usage pop-up menu is set to Generic.
•
Multiplexed MPEG-1/Layer 2 Audio: Select this checkbox to create a multiplexed stream (rather
than an elementary stream). You can make the output le either a transport stream or a program
stream. For information about the dierent stream types, see MPEG-2 overview on page 84.
The audio in this stream is MPEG-1 Layer 2, with a sample rate of 44.1 kHz or 48 kHz
(depending on the source) and a bit rate of 384 kbps. To create an audio-only (MPEG-1/Layer 2
Audio) elementary stream, see Create MPEG-1 audio for DVD on page 110 .
Important: Generic is the only Stream Usage setting that supports transport and program
streams. Selecting the Multiplexed MPEG-1/Layer 2 Audio checkbox changes your Stream
Usage setting to Generic if it’s currently anything else.
MPEG-2 bit rates and formats
The following sections contain useful information for creating MPEG-2 output media les.
Bit rates
When determining average and maximum bit rates for standard DVD playback, remember to
consider the bit rate of your audio track as well as the MPEG-2 bit rate.
You must keep the total of both average and maximum audio and video bit rates under 10.08
Mbps, the maximum guaranteed transfer rate from standard DVD players. Because DVDcompatible audio formats are constant bit rate (CBR), there is no maximum audio bit rate to
worry about.
For example, if you’re using AIFF audio at 1.5 Mbps, you should keep both the average and
maximum video bit rates under 8.5 Mbps. Typically, your average bit rate is lower than this (for
example, 3.5 Mbps for 2 hours of footage on your DVD). However, your maximum bit rate must
also stay below this number. A maximum bit rate of 8.0 Mbps is recommended to provide an
extra margin for error (for example, to accommodate subtitle streams). If you’re using one of
the DVD-compatible compressed audio formats such as Dolby Digital or MPEG-1/Layer-2, your
audio bit rate may be as low as 0.2 to 0.4 Mbps, in which case you can set your maximum bit rate
about 1 Mbps higher.
Also, as a general rule, set your maximum bit rate at least 1 Mbps higher than your average bit
rate, to allow for bit rate variability in achieving the goal of constant quality.
The following table shows some average bit rates and corresponding footage times for a 4.7 GB DVD:
Average bit rate Approximate duration for 4.7 GB DVD
3.5 Mbps 121 minutes
5.0 Mbps 94 minutes
6.0 Mbps 82 minutes
7.5 Mbps 68 minutes
8.0 Mbps 65 minutes
Note: When “One pass VBR” or “One Pass VBR Best” is chosen for very short clips (less than a
minute or two in length), the resulting MPEG-2 output le size may not accurately reect the
average bit rate you specied. If the MPEG-2 output media le is larger than you want, you can
try transcoding it again at a lower average bit rate.
Chapter 5 Custom settings and output formats 97
Page 98

MPEG-2 video frame sizes and formats
Because MPEG-2 uses xed video frame sizes, Compressor enters the output frame size in the
elds in the Geometry pane based on your video format selection.
The video format you choose in the Video Format pop-up menu determines the options for the
associated characteristics such as frame size and rate, aspect ratio, and eld dominance. For more
information, see MPEG-2 Encoder pane on page 89.
Video format Frame size (pixels) Frame rate (fps) Aspect ratio Scanning method
NTSC 720 x 480 23.98 (progressive
only), 29.97
PAL 720 x 576 25 4:3 or 16:9 Interlaced,
720p 1280 x 720 23.98, 25, 29.97, 50,
59.94
HD 1440 x 1080 1440 x 1080 23.98 (progressive
only), 25, 29.97
HD 1920 x 1080 1920 x 1080 23.98 (progressive
only), 25, 29.97
640 x 480 (1.33) 640 x 480 23.98, 25, 29.97 4:3 or 16:9 Interlaced,
640 x 360 (1.78) 640 x 360 23.98, 25, 29.97 4:3 or 16:9 Interlaced,
640 x 352 (1.82) 640 x 352 23.98, 25, 29.97 4:3 or 16:9 Interlaced,
640 x 384 (1.67) 640 x 384 23.98, 25, 29.97 4:3 or 16:9 Interlaced,
640 x 320 (2.00) 640 x 320 23.98, 25, 29.97 4:3 or 16:9 Interlaced,
4:3 or 16:9 Interlaced,
progressive
progressive
16:9 Progressive
16:9 Interlaced,
progressive
16:9 Interlaced,
progressive
progressive
progressive
progressive
progressive
progressive
About 24p (23.98p)
For DVD authoring and encoding, 24p refers to a video sequence that contains 24 progressive
(non-interlaced) frames per second, with NTSC-related standard-denition (SD) frame dimensions
(720 x 480 for MPEG-2). Film-based movies have a native frame rate of 24 fps, and because the
MPEG-2 format is able to represent 24 fps video internally, many commercial movie DVDs are
encoded in this way. But any time you use NTSC video in your project, the frame rate of lm-
transferred material is slowed down from 24 fps to 23.976 fps (rounded to 23.98) and a 2:3:2:3
pulldown is added. So, the more accurate term is actually 23.98p.
Compressor can also do this for 24p source video les. For such material, the 23.98 frame
rate option (in the Video Format tab) compresses each source frame one-for-one, without
compressing repeated frames or elds in order to achieve a 29.97 fps display rate. This results in
higher quality at a lower compressed bit rate than would be possible if the 24p material were
converted to 29.97 fps prior to transcoding. Compressor also sets internal MPEG-2 frame ags
correctly, so that DVD players will properly apply the 3:2 pulldown process for display on 29.97
fps interlaced NTSC TV sets.
Note: If your source video has a frame rate of 24.00 fps rather than 23.98 fps, Compressor skips
one out of every 1000 source frames. If the 24p source video is 23.98 fps, Compressor transcodes
all source frames, without skipping (or repeating) any of them.
Chapter 5 Custom settings and output formats 98
Page 99

About GOPs (groups of pictures)
A major feature of MPEG-2 encoding is its ability to remove redundancy, not only within a frame
but also among a group of frames. MPEG-2 uses three frame types (I, P, and B) to represent the
video. A group of pictures (GOP) setting denes the pattern of the three frame types used. These
three frame types are dened in the following ways:
•
Intra (I): Also known as the key frame. Every GOP contains one I-frame. The I-frame is the only
MPEG-2 frame that can be fully decompressed without any reference to frames that precede
or follow it. It’s also the most data-heavy, requiring the most disk space. If you want to place an
I-frame at a scene change or some other specic frame location, you need to manually set it
using the Preview window. This is known as a forced I-frame. For more information, see Markers
and poster frames overview on page 46.
•
Predicted (P): Encoded from a “predicted” picture based on the closest preceding I- or P-frame.
P-frames typically require much less disk space than do I-frames because they reference a
preceding I- or P-frame in the GOP.
Note: Both I-frames and P-frames are also known as reference frames, because a B-frame may
refer to either one or both frame types.
•
Bi-directional (B): Encoded from an interpolation of succeeding and preceding reference
frames, either I-frame or P-frame. B-frames are the most storage-ecient MPEG-2 frame type,
requiring the least amount of disk space.
The use of B- and P-frames is what allows MPEG-2 to remove temporal redundancy, contributing
to its ability to compress video eciently.
You need to consider the following factors when choosing a GOP setting.
GOP structure
This setting species whether there will be two, one, or no B-frames between the reference
frames within a GOP. GOP structure, along with GOP size, determines the number of I-, P-, and
B-frames that are used during transcoding.
The GOP structure you choose depends on how far apart P-frames should be spaced. Because a
P-frame is predicted from the previous reference frame (either an I-frame or a P-frame), if there
are one or two B-frames in between, the prediction must cover the distance objects can move
over the duration of two to three frames.
In principle, the less average motion there is from one frame to the next, the farther apart
P-frames can be spaced, and the greater the compression can be. For most video material,
the IBBP structure is a good choice. Material with unusually fast motion throughout the entire
sequence may benet from an IBP or IP structure, but in such cases a relatively high bit rate (6 to
8 Mbps for SD video) may be required for good quality.
GOP size
This setting species the number of frames within a GOP. Because exactly one I-frame exists
per GOP, longer GOP sizes generally provide greater compression, because B- and P-frames are
smaller than I-frames.
For most media, spacing I-frames about 1/2 second apart gives good results. This equates to a
GOP size of 15 frames for NTSC and 12 frames for PAL. The DVD-Video specication prohibits GOP
lengths from being much longer than this. Generally, only material with scene changes occurring
less than 1/2 second apart frequently throughout the video benets from shorter GOP sizes.
Chapter 5 Custom settings and output formats 99
Page 100

Open and closed GOPs
Open GOP
Open GOPs are most ecient because they allow an extra B-frame in the GOP pattern. Open
GOPs start with a B-frame that is able to look at the last P-frame from the preceding GOP as well
as the rst I-frame of its own GOP.
(IBBP, 15 frames)
I B B P B B P B B P B B P B B IB BP
:06 :07 :08 :09 :10 :11 :12 :13 :14 :15 :16 :17 :18 :19 :20 :21:04 :05:03
Closed GOP
(IBBP, 15 frames)
P B B P B P B P B PI B BBB
:06 :07 :08 :10 : 11 :12 :13 :14 :15 :16 :17 :18:04 :05
:09
By denition, closed GOPs cannot contain any frame that refers to a frame in the previous or next
GOP. In contrast, open GOPs begin with one or more B-frames that reference the last P-frame of
the previous GOP. Closed GOPs created by Compressor always begin with an I-frame.
Open GOPs generally provide slightly better compression than do closed GOPs of the same
structure and size. The illustration above shows that a closed GOP contains one more P-frame
than does an open GOP of the same length. Because P-frames generally require more bits than
do B-frames, the open GOP achieves slightly better compression.
There are limitations to using open GOPs for DVD-Video discs that are created using a DVD
authoring application. One limitation is that only closed GOPs are permitted within MPEG-2
streams that will be used for mixed-angle or multi-angle DVDs.
The other limitation is that DVD chapter markers can be set only at the beginning of a closed
GOP. The best time to dene chapter markers is before doing MPEG-2 transcoding. For example,
if you specify your chapter markers in Final Cut Pro, you can set Compressor to do MPEG-2
transcoding with open GOPs. Compressor then forces a closed GOP to begin only at the specied
chapter markers and makes all other GOPs open. You can also accomplish this by specifying
“forced I-frames” in the Compressor Preview window and giving them a chapter name to be used
by a DVD authoring application.
However, if you want to specify chapter markers at any GOP boundary after your video has been
transcoded in the MPEG-2 format, you should use only closed GOPs. This freedom is limited, as it
allows you to set chapter markers only at GOP boundaries, rather than at any video frame.
AIFF les
AIFF overview
The Audio Interchange File Format (AIFF) was developed by Apple for storing high-quality audio.
The format was intended for DVD or CD authoring and is now one of the most commonly used
audio le formats for the Mac OS.
Note: Choose the AIFF option from the File Format pop-up menu only if you need to create
a specialized AIFF le. If you’re creating a standard AIFF le, choose the Common Audio
Formats option.
Chapter 5 Custom settings and output formats 100
 Loading...