

Page 1

User’s manual
Apple
ColorSync Display
Page 2

K Apple Computer, Inc.
© 1997 Apple Computer, Inc. All rights reserved.
Under the copyright laws, this manual may not be copied, in whole or in part, without the
written consent of Apple. Your rights to the software are governed by the accompanying
software license agreement.
The Apple logo is a trademark of Apple Computer, Inc., registered in the U.S. and other
countries. Use of the “keyboard” Apple logo (Option-Shift-K) for commercial purposes without
the prior written consent of Apple may constitute trademark infringement and unfair
competition in violation of federal and state laws.
Every effort has been made to ensure that the information in this manual is accurate. Apple is
not responsible for printing or clerical errors.
Apple Computer, Inc.
1 Infinite Loop
Cupertino, CA 95014-2084
408-996-1010
http://www.apple.com
Apple, the Apple logo, AppleCD, ColorSync, the ColorSync logo, LaserWriter, Mac,
Macintosh, Macintosh Quadra, PlainTalk, and PowerBook are trademarks of Apple Computer,
Inc., registered in the U.S. and other countries.
Finder and OneScanner are trademarks of Apple Computer, Inc.
Adobe, Acrobat, Adobe Illustrator, Photoshop, and PostScript are trademarks of Adobe Systems
Incorporated or its subsidiaries and may be registered in certain jurisdictions.
Helvetica and Times are registered trademarks of Linotype-Hell AG and/or its subsidiaries.
NuBus is a trademark of Texas Instruments.
®
PANTONE
Pantone, Inc. trademarks are the property of Pantone, Inc. Portions © Pantone, Inc. 1995.
PowerPC is a trademark of International Business Machines Corporation, used under license
therefrom.
Trinitron is a trademark of Sony Corporation, registered in the U.S. and other countries.
Simultaneously published in the United States and Canada.
Other products and company names mentioned herein may be trademarks of their respective
companies. Mention of third-party products is for informational purposes only and constitutes
neither an endorsement nor a recommendation. Apple assumes no responsibility with regard to
the performance or use of these products.
, PANTONE MATCHING SYSTEM®, PANTONE Process Color System®, and other
Page 3

Con tents
Communications re g u l at i on inf ormat i on for ColorSync Display 17" (16.1" VIS) vi
Communications re g ul at i on informati on f or ColorS ync Di sp l a y 20" (19" VIS) viii
1Setting Up Your Monitor 1
Important safety and cleaning instructions 1
What about electromagnetic emissions? 3
Getting ready to set up your ColorSync Display 4
Your ColorSync Display at a glance 5
Do you need to install a video card? 6
Mac OS–based computers 7
Windows-based computers 7
Choosing a good location for your monitor 7
Positioning the monitor 8
Connecting the monitor to your computer 9
Connecting the power cord 10
Connecting the monitor cable to a Mac OS–based computer 10
Connecting the monitor cable to a Windows-based computer 13
Connecting a Mac OS–based computer keyboard and mouse to
your monitor 14
Usi ng more than one monitor 15
Turning the monitor on 16
Usi ng th e m onitor with Windows-based computers 17
iii
Page 4

Findi ng answers 18
Obtaining online support and updated Apple software 18
What to do next 19
Mac OS–based computers 19
Windows-based computers 19
2Installing and Using Apple Displays Software 21
Installing Apple Displays software 21
Learning about Apple Displays software with System 7.5 or later 24
Tips for using Monitors & Sound Guide 25
Screen controls at a glance 26
About the Monitors & Sound control panel 27
Opening Monitors & Sound 27
Monitors & Sound buttons at a glance 28
Tips for using Apple Displays software 29
Usi n g the Control Strip 30
Usi ng DigitalColor Meter 31
Opening DigitalColor Meter 31
Specifying colors using the PANTONE MATCHING SYSTEM
®
32
Conserving energy 33
Setting up Energy Saver 33
What happens after you turn on the energy-saving feature? 34
Usi ng Energy Saver with a screen saver 34
3Using Your Monitor With Windows-Based Computers 35
Installing ColorSync Display setup information for Windows 36
Screen controls at a glance 37
Using onscreen controls 38
Adjusting screen geometry 39
Width 39
Height 39
iv
Contents
Page 5

Pincushion 39
Vertical Shift 39
Horizontal Shift 40
Rotate 40
Default 40
Adjusting color settings and other features 40
Color Temperature 41
Overscan 41
Scan Rate 41
Degauss 41
Adjusting co n vergence 42
Vertical 42
Horizontal 42
4Tips and Troubleshooting 43
Care and cleaning 43
Protecting your monitor from theft 44
Troubleshooting common problems 44
Monitor power and screen appeara nce 45
Monitors & Sound control panel for Mac OS–based computers 50
Appendix A Using ColorSync Software 55
The problem that ColorSync software solves 55
How ColorSync software works 56
Setting up ColorSync software 58
Setting the ColorSync System Profile 59
Setting other ColorSync profiles 60
Tips for best results 60
Appendix B Technical Information 63
Contents
v
Page 6

Communications regulation information
for ColorSync Display 17" (16.1" VIS)
FCC declaration of conformity
This device complies with part 15 of the FCC rules. Operation is subject to the following two
conditions: (1) This device may not cause harmful interference, and (2) this device must accept
any interference received, including interference that may cause undesired operation. See
instructions if interference to radio or television reception is suspected.
Radio and television interference
The equipment described in this manual generates, uses, and can radiate radio-frequency
energy. If it is not installed and used properly—that is, in strict accordance with Apple’s
instructions—it may cause interference with radio and television reception.
This equipment has been tested and found to comply with the limits for a Class B digital device
in accordance with the specifications in Part 15 of FCC rules. These specifications are designed
to provide reasonable protection against such interference in a residential installation. However,
there is no guarantee that interference will not occur in a particular installation.
You can determine whether your computer system is causing interference by turning it off. If
the interference stops, it was probably caused by the computer or one of the peripheral devices.
If your computer system does cause interference to radio or television reception, try to correct
the interference by using one or more of the following measures:
m Turn the television or radio antenna until the interference stops.
m Move the computer to one side or the other of the television or radio.
m Move the computer farther away from the television or radio.
m Plug the computer into an outlet that is on a different circuit from the television or radio.
(That is, make certain the computer and the television or radio are on circuits controlled by
different circuit breakers or fuses.)
If necessary, consult an Apple-authorized service provider or Apple. See the service and support
information that came with your Apple product. Or, consult an experienced radio/television
technician for additional suggestions.
IMPORTANT
could void the FCC Certification and negate your authority to operate the product.
This product was tested for FCC compliance under conditions that included the use of Apple
peripheral devices and Apple shielded cables and connectors between system components. It is
important that you use Apple peripheral devices and shielded cables and connectors between
system components to reduce the possibility of causing interference to radios, television sets,
and other electronic devices. You can obtain Apple peripheral devices and the proper shielded
cables and connectors through an Apple-authorized dealer. For non-Apple peripheral devices,
contact the manufacturer or dealer for assistance.
Responsible party: Robert Steinfeld, Apple Computer, Inc., 1 Infinite Loop, Cupertino, CA
95014-2084, 408-974-2618.
Changes or modifications to this product not authorized by Apple Computer, Inc.,
vi
Communications Regulation Information for ColorSync Display 17" (16.1" VIS)
Page 7
Communications regulation information
for ColorSync Display 17" (16.1" VIS)
Industry Canada statement
This Class B device meets all requirements of the Canadian interference-causing equipment
regulations.
Cet appareil numérique de la Class B respecte toutes les exigences du Règlement sur le matériel
brouilleur du Canada.
VCCI Class 2 statement
(continued)
Communications Regulation Information for ColorSync Display 17" (16.1" VIS)
vii
Page 8

Communications regulation information
for ColorSync Display 20" (19" VIS)
FCC statement
This equipment has been tested and found to comply with the limits for a Class A digital device,
pursuant to Part 15 of FCC rules. These limits are designed to provide reasonable protection
against radio interference when the equipment is operated in a commercial environment. This
equipment generates, uses, and can radiate radio-frequency energy, and if not installed and used
in accordance with Apple’s instructions, may cause interference to radio communications.
Operation of this equipment in a residential area is likely to cause such interference, in which
case the user will be required to correct the interference at his or her own expense.
IMPORTANT
could void the FCC verification and negate your authority to operate the product.
This product was tested for FCC compliance under conditions that included the use of Apple
peripheral devices and Apple shielded cables and connectors between system components. It is
important that you use Apple peripheral devices and shielded cables and connectors between
system components to reduce the possibility of causing interference to radios, television sets,
and other electronic devices. You can obtain Apple peripheral devices and the proper shielded
cables and connectors through an Apple-authorized dealer. For non-Apple peripheral devices,
contact the manufacturer or dealer for assistance.
Industry Canada statement
This Class A device meets all requirements of the Canadian Interference-Causing equipment
regulations.
Cet appareil numérique de la Class A respecte toutes les exigences du Règlement sur le matériel
brouilleur du Canada.
Changes or modifications to this product not authorized by Apple Computer, Inc.,
viii
CISPR 22 statement
IMPORTANT
interference, in which case the user may be required to take adequate measures.
This is a Class A product. In a domestic environment this product may cause radio
VCCI Class 1 statement
Communications Regulation Information for ColorSync Display 20" (19" VIS)
Page 9

The ColorSync Display is a Tri nitron®color monitor that supports a variety of
resolutions and features advanced controls for accurate color rendering. The
monitor works with Mac OS–based and Windows-based computers.
This chapter reviews important safety information and explains how to
set up and connect your monitor to your computer. If you purchased a new
computer along with your monitor, refer to the setup instructions that came
with your computer in addition to the instructions in this manual.
Important safety and cleaning instructions
WARNING
Do not clean your monitor screen with a cleaner that contains
alcohol or acetone. You might damage the screen. For more information
about cleaning your monitor, see “Care and Cleaning” in Chapter 4.
1
1
Setting Up Your Monitor
Page 10

For your own safety and that of your equipment, always take the
following precautions.
Disconnect the monitor’s power plug (by pulling the plug, not the cord) if any
of the following conditions exists:
m the power cord or plug becomes frayed or otherwise damaged
m you spill something into the case
m your monitor is exposed to rain or any other excess moisture
m your monitor has been dropped or the case has been otherwise damaged
m you suspect that your monitor needs service or repair
m you want to clean the case (use only the recommended procedure
described in “Care and Cleaning” in Chapter 4)
IMPORTANT
The only way to disconnect power completely is to unplug the
monitor’s power cord. Make sure at least one end of the power cord is within
easy reach so that you can unplug the monitor when you need to.
Be sure that you always:
m Keep your monitor away from sources of liquids, such as washbasins,
bathtubs, shower stalls, beverages, and so on.
m Avoid setting anything on top of the monitor (such as a book or cup). The
monitor could overheat and be damaged.
m Keep the monitor’s vents free from obstruction.
m Protect your monitor from dampness or wet weather, such as rain, snow,
and so on.
m Read all the installation instructions carefully before you plug your
monitor into a power source.
m Keep these instructions handy for reference by you and others.
m Follow all instructions and warni ngs dealing with your system.
WARNING
Never remove the cover from the monitor or you may come in
contact with hazardous voltage levels capable of causing serious injury
and possibly death.
2
Chapter 1
Page 11

What a bout e lectr o magnetic emissions?
There has been recent public discussion of the possible health effects of
prolonged exposure to extremely low frequency (ELF) and very low
frequency (VLF) electromagnetic fields. Such fields are associated with
electromagnetic sources such as television sets, electrical wiring, and some
household appliances—as well as computer monitors.
Apple has reviewed scientific reports and sought the counsel of gover nment
regulatory agencies and respected health organizations. Based on the
prevailing evidence and opinions, Apple believes that the electric and
magnetic fields produced by computer monitors do not pose a health risk.
In response to those customers who wish to reduce their exposure to
electromagnetic fields, Apple has lowered the emission levels of Apple
monitors. We are also actively encouraging further scientific research so we
can continue to promote the health and safety of our customers and employees.
WARNING
Electrical equipment may be hazardous if misused. Operation
of this product, or similar products, must always be supervised by an
adult. Do not allow children access to the interior of any electrical
product, and do not permit them to handle any cables.
3
Setting Up Your MonitorSetting Up Your Monitor
Page 12
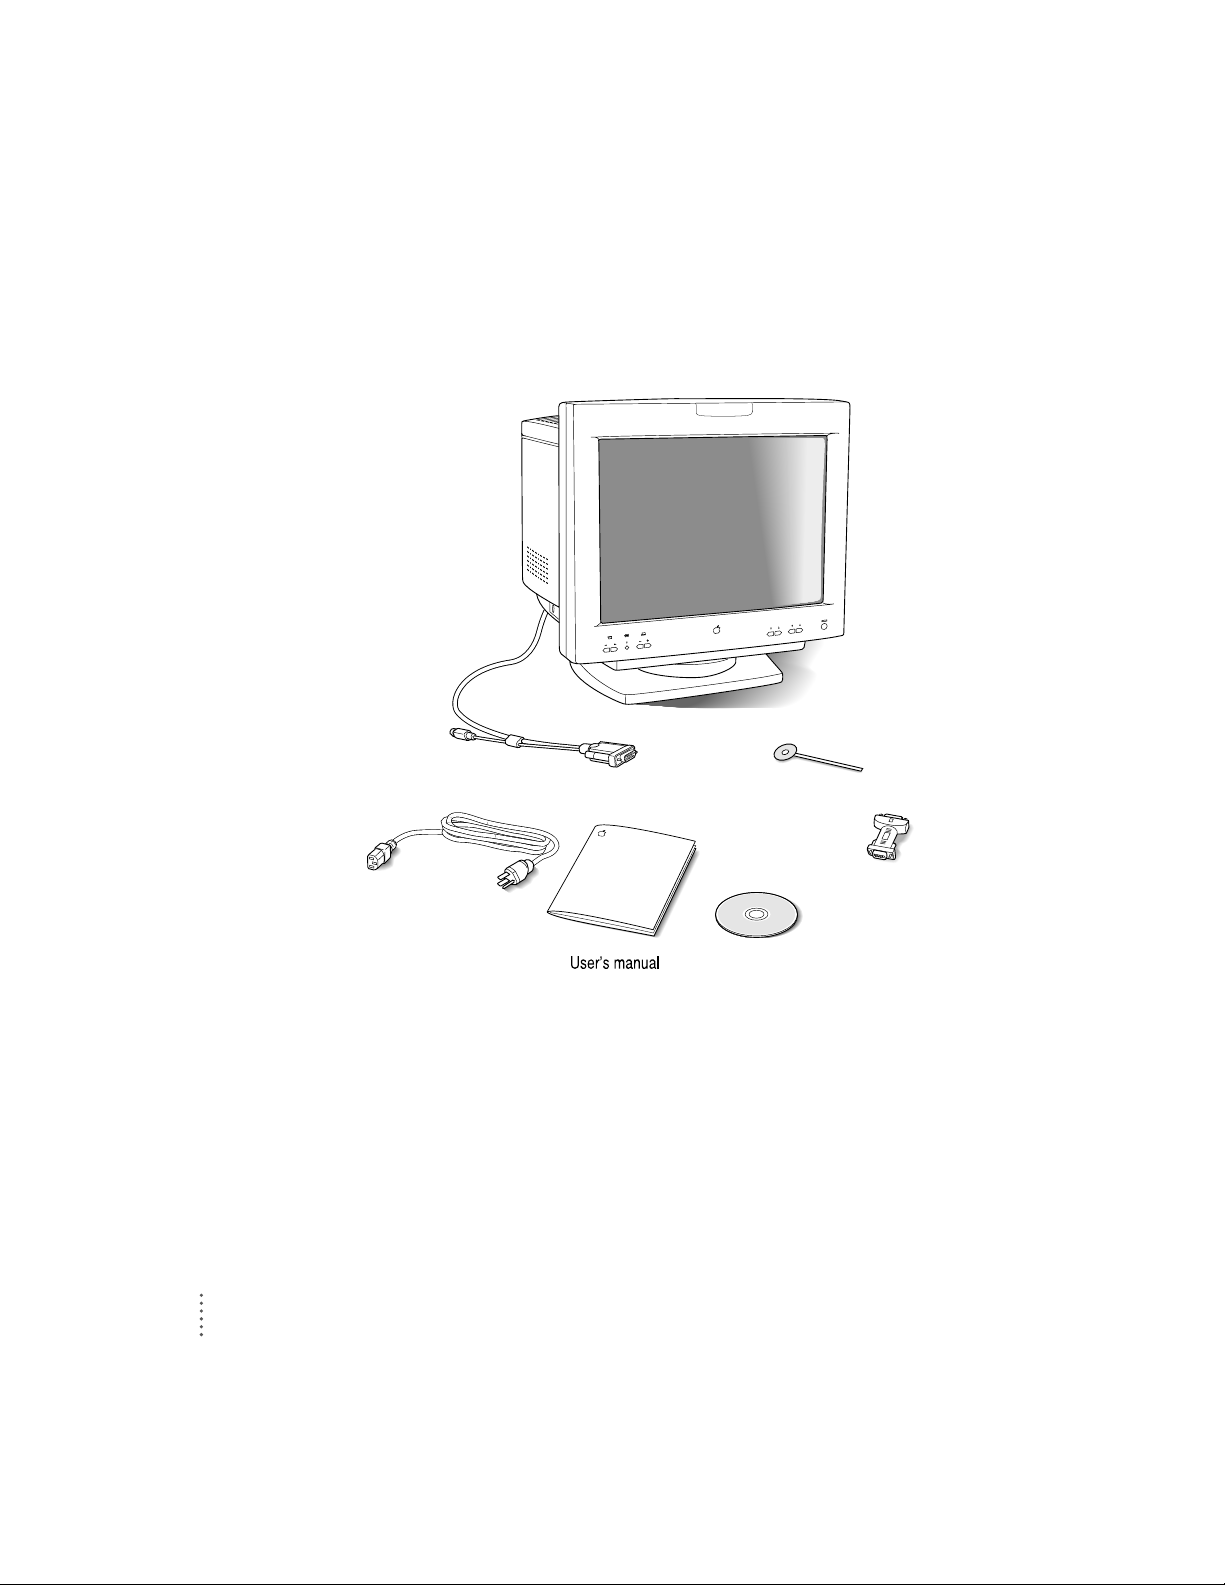
Getting ready to set up your ColorSync Display
Before you set up your monitor, make sure you have easy access to the
following items that came with your monitor:
Note: Your power cord may look different from the one pictured.
Ambient light tool
Monitor cable
®
O
¤
Software
Power cord
VGA adapter
4
Chapter 1
Page 13
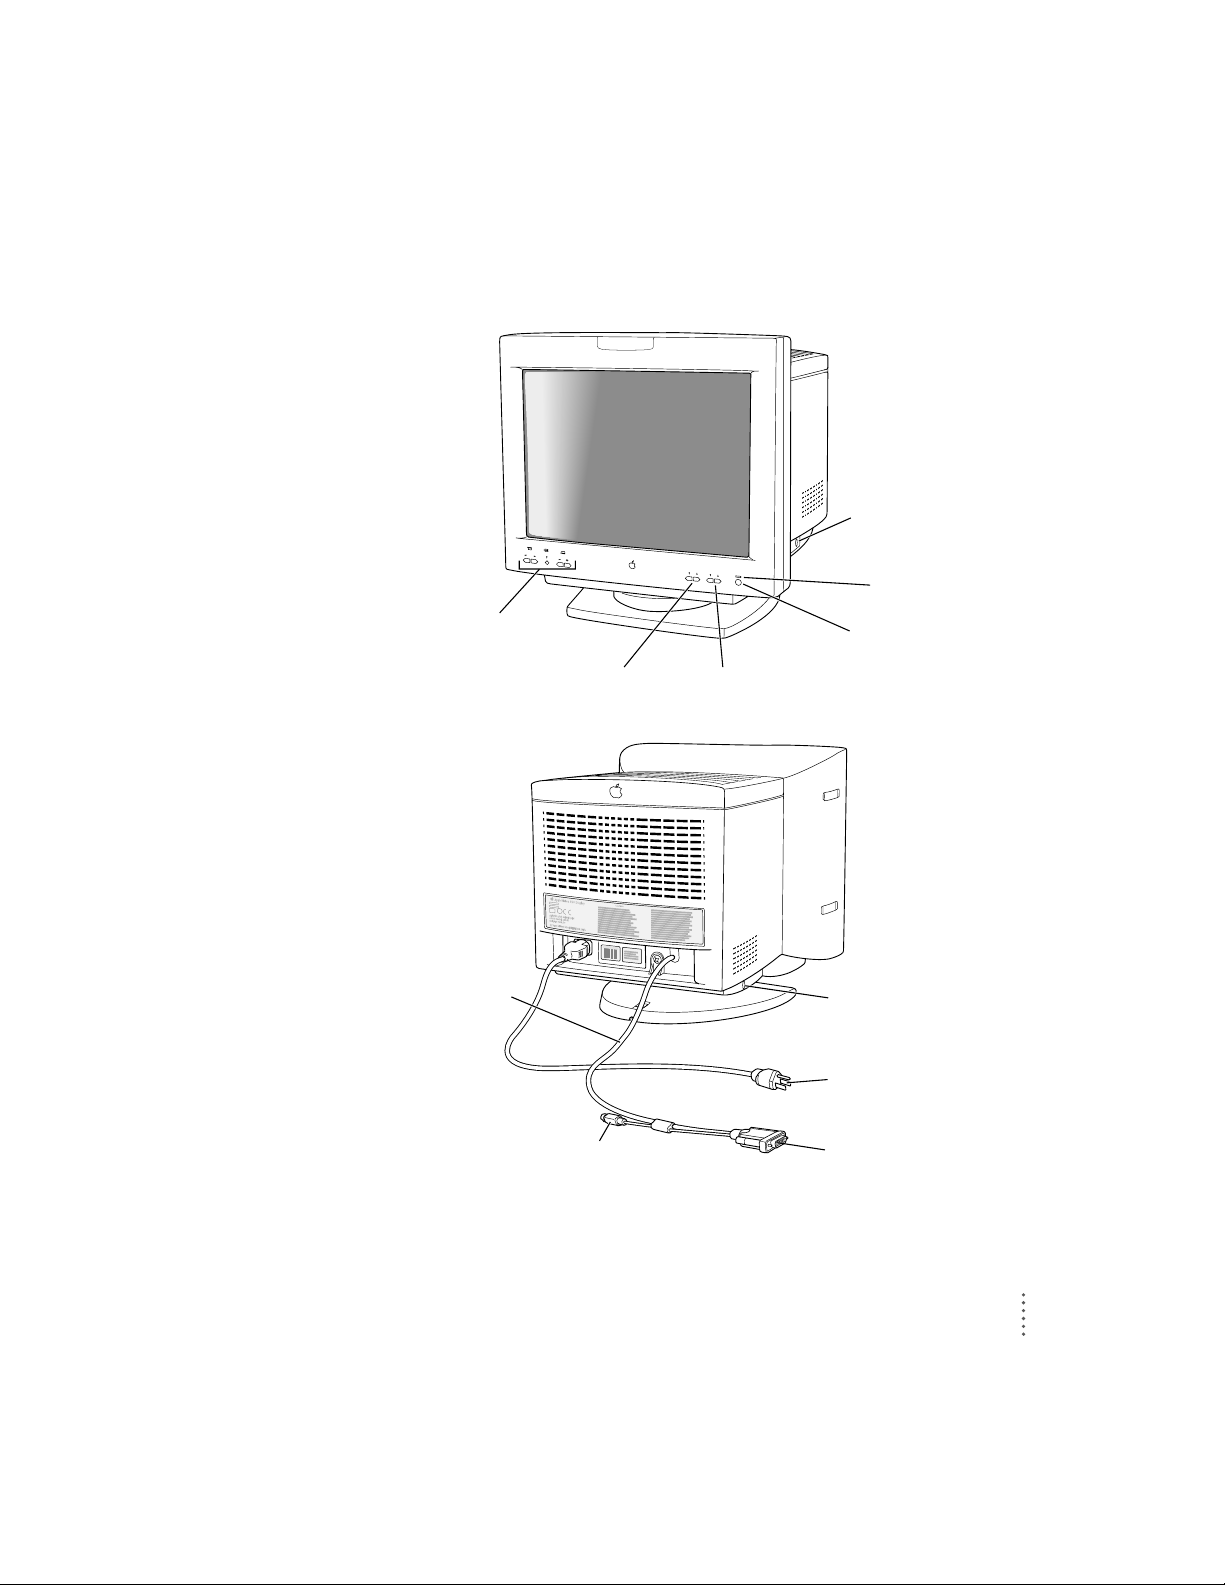
Your ColorSync Display at a glance
5
Setting Up Your Monitor
®
O
¤
Control buttons
¤
Brightness controls
O
Contrast controls
®
Power button
Power
indicator light
V
ADB port
(for mouse
or keyboard)
Power cord
Monitor cable
(includes monitor
connector and
ADB connector)
V
ADB port
(for mouse
or keyboard)
V
ADB connector
™
Monitor connector
Page 14

Do you need to install a video card?
The monitor is preadjusted and supports the following scan ranges:
m horizontal scan rate of 30–80 kilohertz (ColorSync Display 17" [16.1" VIS]);
30–94 kilohertz (C o l orSync Display 20" [19" VIS])
m vertical refresh rate of 40–120 hertz (ColorSync Display 17" [16.1" VIS]);
48–1 20 hertz (ColorS y nc Di splay 20" [ 19" VIS] )
In addition, the monitor works at the following VESA (Video Electronics
Standards Association) standard modes:
Vertical refresh rate (hertz)
Resolution 17" (16.1" VIS) 20" (19" VIS)
640 x 480 60–85 60–85
800 x 600 56–85 56–85
1024 x 768 60–85 60–85
1152 x 870 60–75 —
1280 x 1024 60–75 75–85
1600 x 1200 60 75
The ColorSync Display 20" (19" VIS) monitor also works at the following
Macintosh standard modes:
Resolution Vertical refresh rate (hertz)
832 x 624 75
1152 x 870 75
These are preassigned resolutions; your computer may support other
resolutions within this range. See the manual that came with your computer
or video card to determine which resolutions are supported.
For more information on factory-preadjusted settings and other technical
information about your monitor, see Appendix B, “Technical Information.”
To use your monitor, you need compatible video circuitry built into your
computer or a compatible video card installed in your computer.
6
Chapter 1
Page 15

Note: The Apple 8•24, Apple 8•24GC, and most NuBus™video cards are not
compatible with your monitor. In addition, some third-party PCI cards are not
fully compatible with your monitor.
Mac OS–based computers
If you are not sure whether your computer has appropriate built-in video
capability, check with an Apple-authorized dealer or service provider. If your
computer does not have the video capability necessary to use your monitor,
you need to purchase a video card. (Video cards for Mac OS–based computers
are available from an Apple-authorized dealer or service provider.)
Install the video card before you connect the monitor to your computer. To
install a video card in one of the expansion slots inside your computer, see
the manual that came with your computer or video card.
Windows-based computers
Your monitor works with most Windows-based computers equipped with
VGA (Video Graphics Array) or greater capability. You may need to install a
video card to use the monitor with your computer. For more information, see
the manuals that came with your computer.
If you don’t use a preassigned resolution, you’ll n eed to adjust screen
geometry to match the new resolution. For more information, see “Adjusting
Screen Geometry” in Chapter 3.
Choosing a go od location for your monitor
Here are some key factors to consider when determining where to place
your monitor:
m Be sure that the desk or table can suppor t the monitor’s weight—
approximately 50 pounds (23 kilograms) for the 17" display (16.1" VIS);
approximately 67 pounds (30 kilograms) for the 20" display (19" VIS).
m Make sure that the power cord and monitor cable will easily reach from the
back of the monitor to your computer and wall outlet.
m The monitor cable should be unobstructed when you swivel and tilt the
monitor, so allow at least 7 inches (17.5 cm) of clearance in the back. If you
don’t allow enough clearance, the monitor connector might be damaged
whe n the cable hits an obstruction.
7
Setting Up Your Monitor
Page 16
Positionin g th e monitor
IMPORTANT
When you unpack or move the monitor, don’t set the monitor
down at an angle; you might damage the monitor stand.
Once your monitor is in place on a desk or table, follow these steps:
1Place the monitor so the screen faces the user.
2 To slide the monitor, lift the front up slightly and push or pull in the direction you want.
3Adjust the viewing angle of the monitor by tilting it up or down and turning it left or right
on its stand.
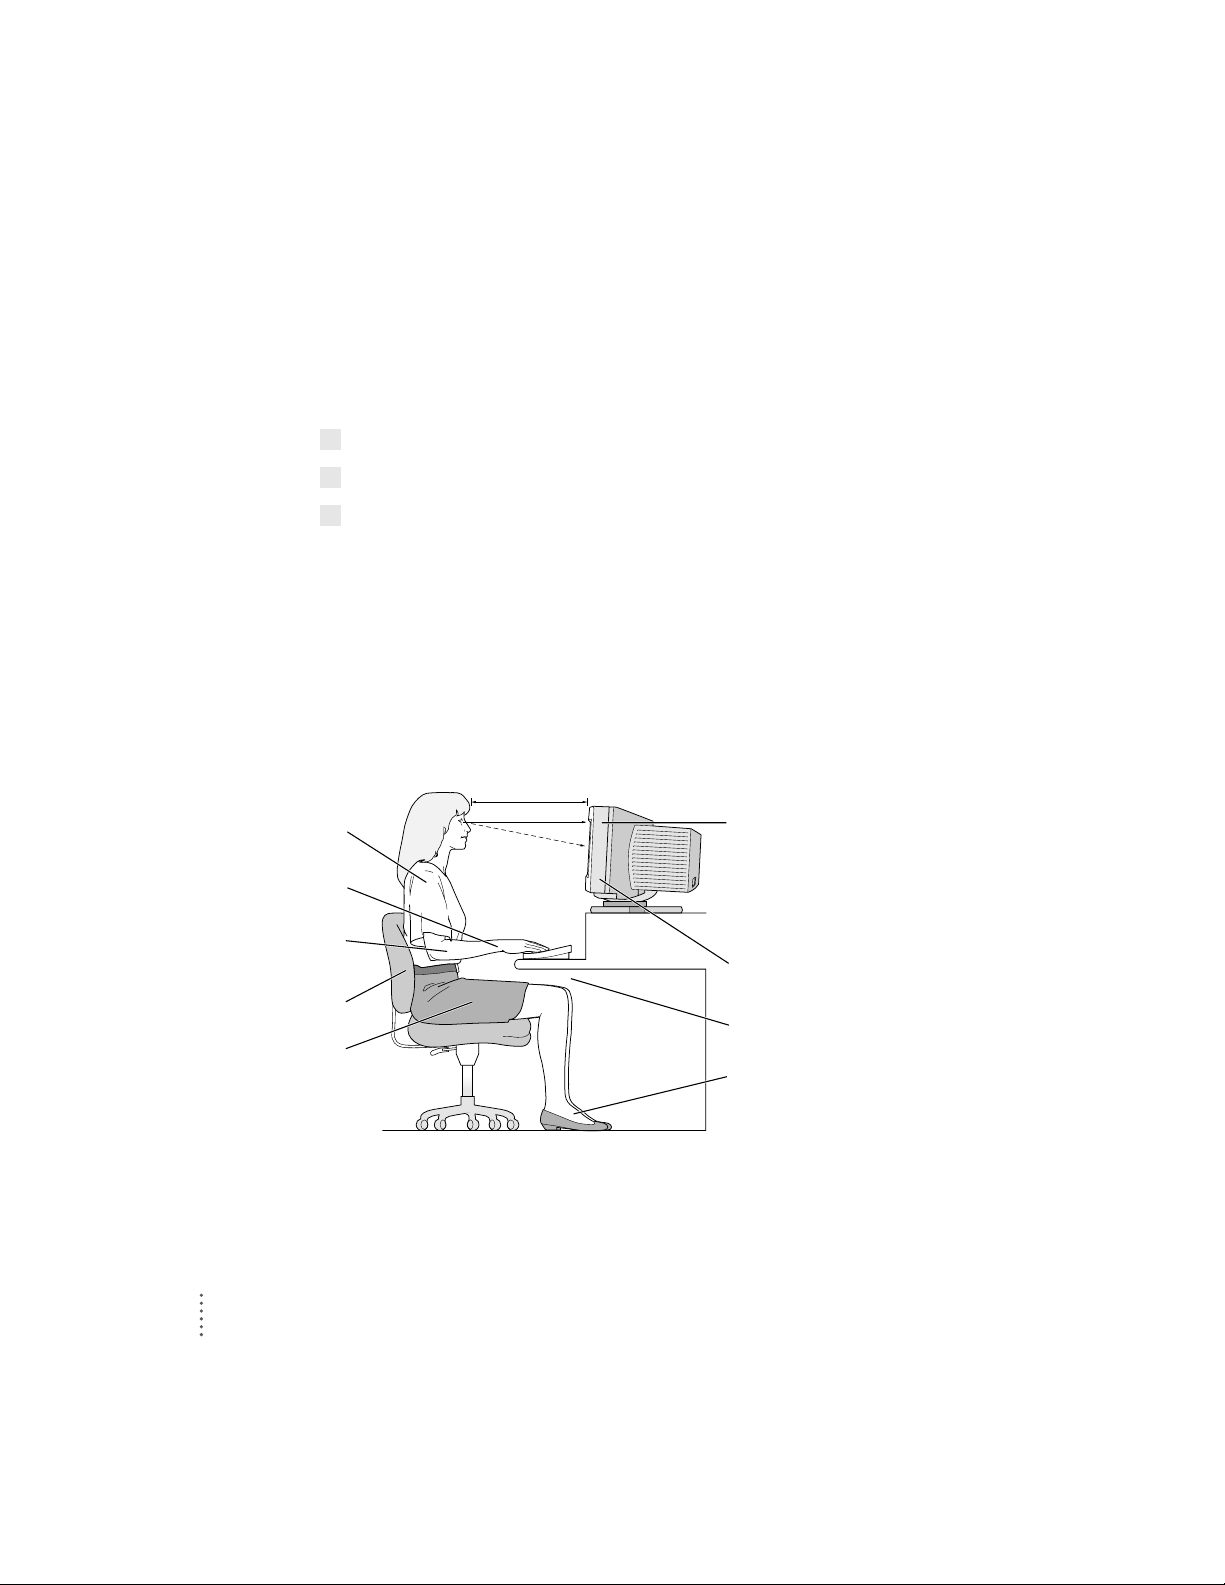
Position the monitor so that when you use it, no bright light is behind the
monitor or reflected on the screen. Your eyes should be about level with the
top edge of the screen and between 18 and 28 inches (45 to 70 cm) away. Take
occasional breaks when using your computer to focus your eyes on a
distant object.
For your greatest comfort, use the following illustration to help you in
positioning your monitor.
Thighs horizontal
Shoulders relaxed
Screen positioned to avoid
reflected glare
Forearms and hands
in a straight line
Forearms level
or tilted up slightly
Lower back supported
Feet flat on the floor
Top of the screen at or slightly
below eye level (You may need
to adjust the height of your
monitor by placing something
under it or by raising your
work surface.)
Clearance under work surface
45–70 cm (18–28 in.)
8
Chapter 1
Page 17

Note: After you set up and configure the monitor, adjust the image and
colors on the screen to match your environ ment. For example, in a bright
room, contrast is usually best set at maximum; in a dim room, lower
contrast is usually more comfortable. See Chapter 2, “Installing and Using
Apple Displays Software,” for more information about making screen and
color adjustments using Apple Displays software for Mac OS–based
computers. See Chapter 3, “Using Your Monitor With Windows-Based
Computers,” for information about onscreen controls for adjusting screen
image and color for Windows-based computers.
Connecting the monitor to your computer
Follow these steps to connect your monitor to your computer.
IMPORTANT
Before you connect any cords or cables, make sure your computer
is turned off.
WARNING
This equipment is intended to be electrically grounded. Your
monitor may be equipped with a three-wire grounding plug—a plug
that has a third (grounding) pin. This plug will fit only a grounded AC
outlet. This is a safety feature. If you are unable to insert the plug into
the outlet because the outlet is not grounded, contact a licensed
electrician to replace the outlet with a properly grounded outlet. Do not
defeat the purpose of the grounding plug!
9
Setting Up Your Monitor
Page 18
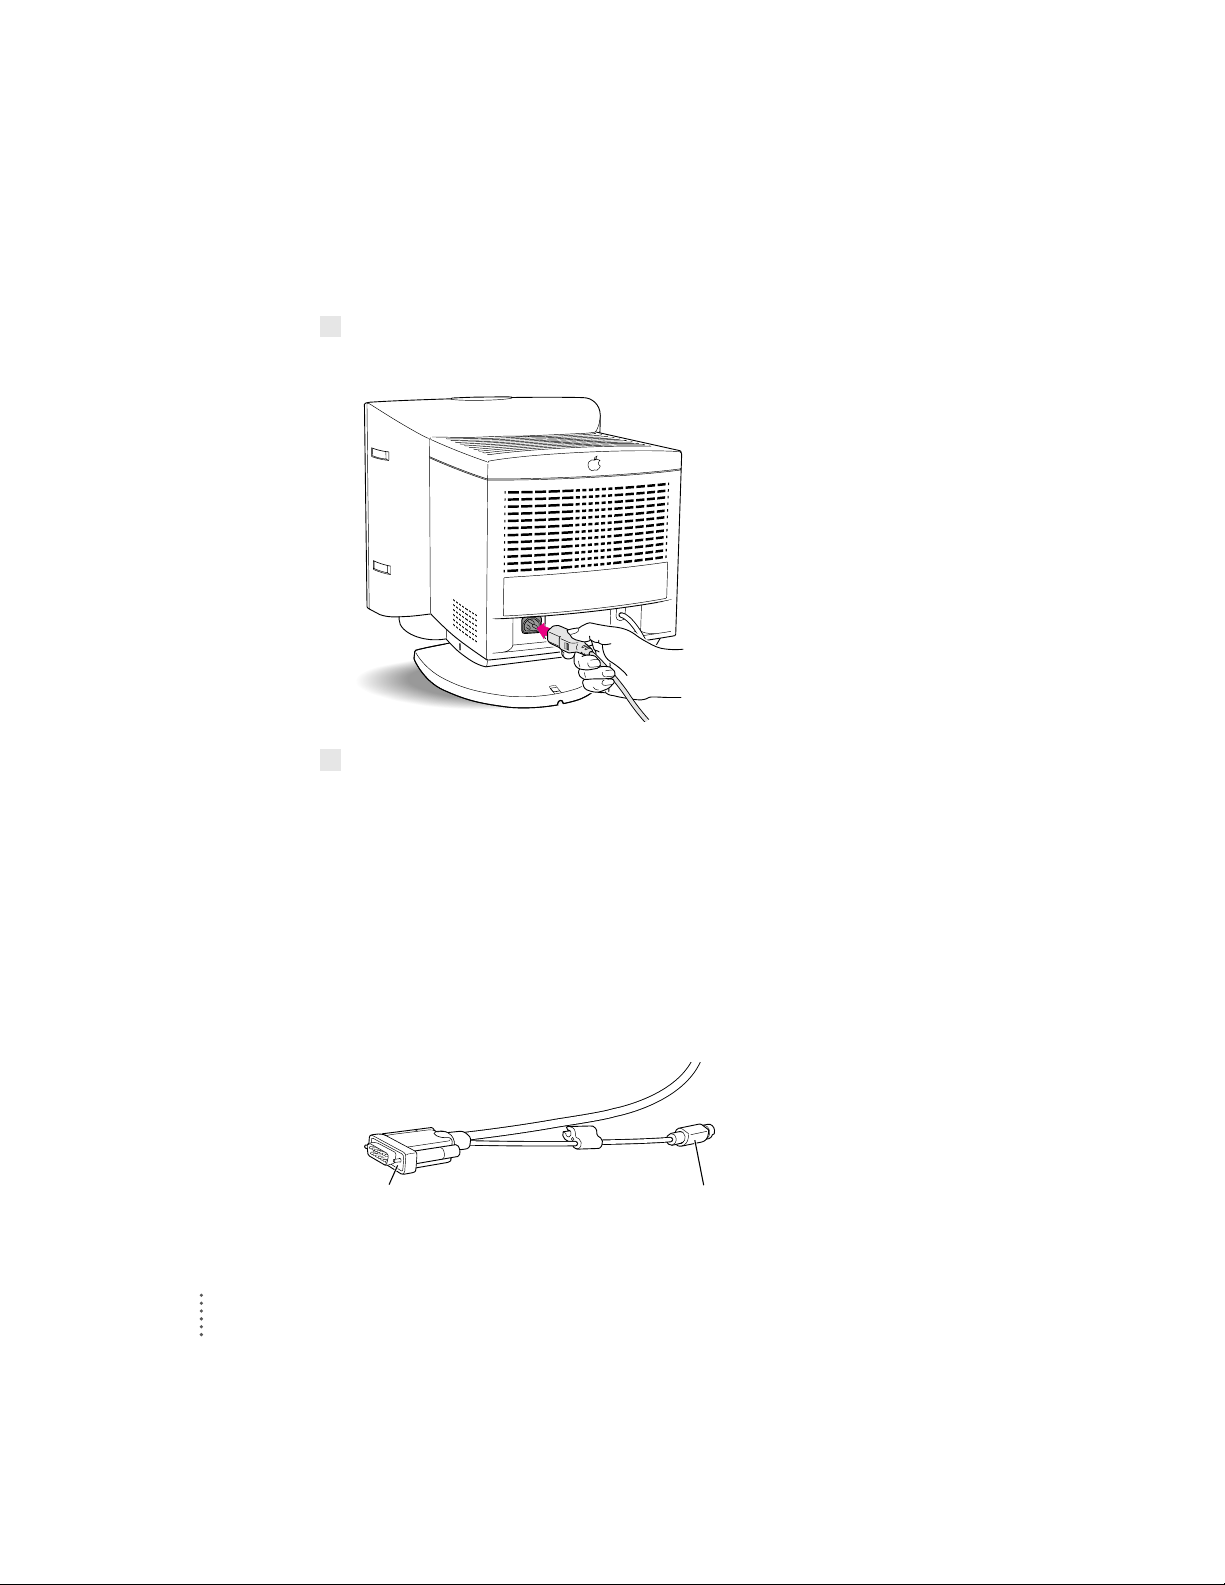
Connecting the power cord
1Connect the socket end of the power cord to the power cord receptacle on the back of
the monitor.
2Plug the other end of the power cord into a grounded outlet or power strip.
Note: You may have a power jumper cord instead of a power wall cord. In
this case, plug the power jumper cord into the power socket on the back of
your computer.
Connecting the monitor cable to a Mac OS–based computer
Connecting to a standard monitor port
To realize the full capability of your monitor, you must connect it to the video
and ADB ports on your computer. The monitor cable is a split cable with two
connectors, one for video and one for the Apple Desktop Bus (ADB).
ADB connector
Monitor cable
Monitor connector
10
Chapter 1
Page 19

1Plug the monitor connector on the monitor cable into the monitor port (marked by
™
)
on the back of your computer.
If your computer has more than one monitor port, see the manual that came
with your computer for information on choosing the correct port.
If you installed a video card in your computer, connect the monitor connector
on the monitor cable to the video card’s por t. For more information about
installing video cards, see the manual that came with your computer or
video card.
2 Tighten the thumbscrews on the connection.
You can prevent bad connections and accidental damage by tightening
the thu mbscrews. Do not overtighten the thumbscrews; you might
strip the threads.
3Plug the ADB connector on the monitor cable into an ADB port (marked by
V
) on the
back of your computer.
Make sure the ADB connector is attached firmly.
IMPORTANT
The ADB connector is not optional; it’s needed for your
Mac OS–based computer to work cor rectly with your monitor. If not
connected properly, extended resolutions and ColorSync software controls
will not be available.
If you have only one ADB port on the back of your computer and you’re
already using it for your keyboard and mouse, unplug the keyboard and
mouse and connect them directly to your monitor. For more information, see
“Connecting a Mac OS–Based Computer Keyboard and Mouse to Your
Monitor” later in this chapter.
IMPORTANT
When connecting ADB cables, be sure to align the symbol V on
the connector with the same symbol on the port. If you force a connector the
wrong way, you will damage it.
WARNING
Make sure you don’t plug the ADB connector into an S-video
port (marked by æ or Æ) by mistake. The ports are the same size, and
it’s easy to mistake one for the other. It may cause electrical damage to
your computer or monitor.
11
Setting Up Your Monitor
Page 20
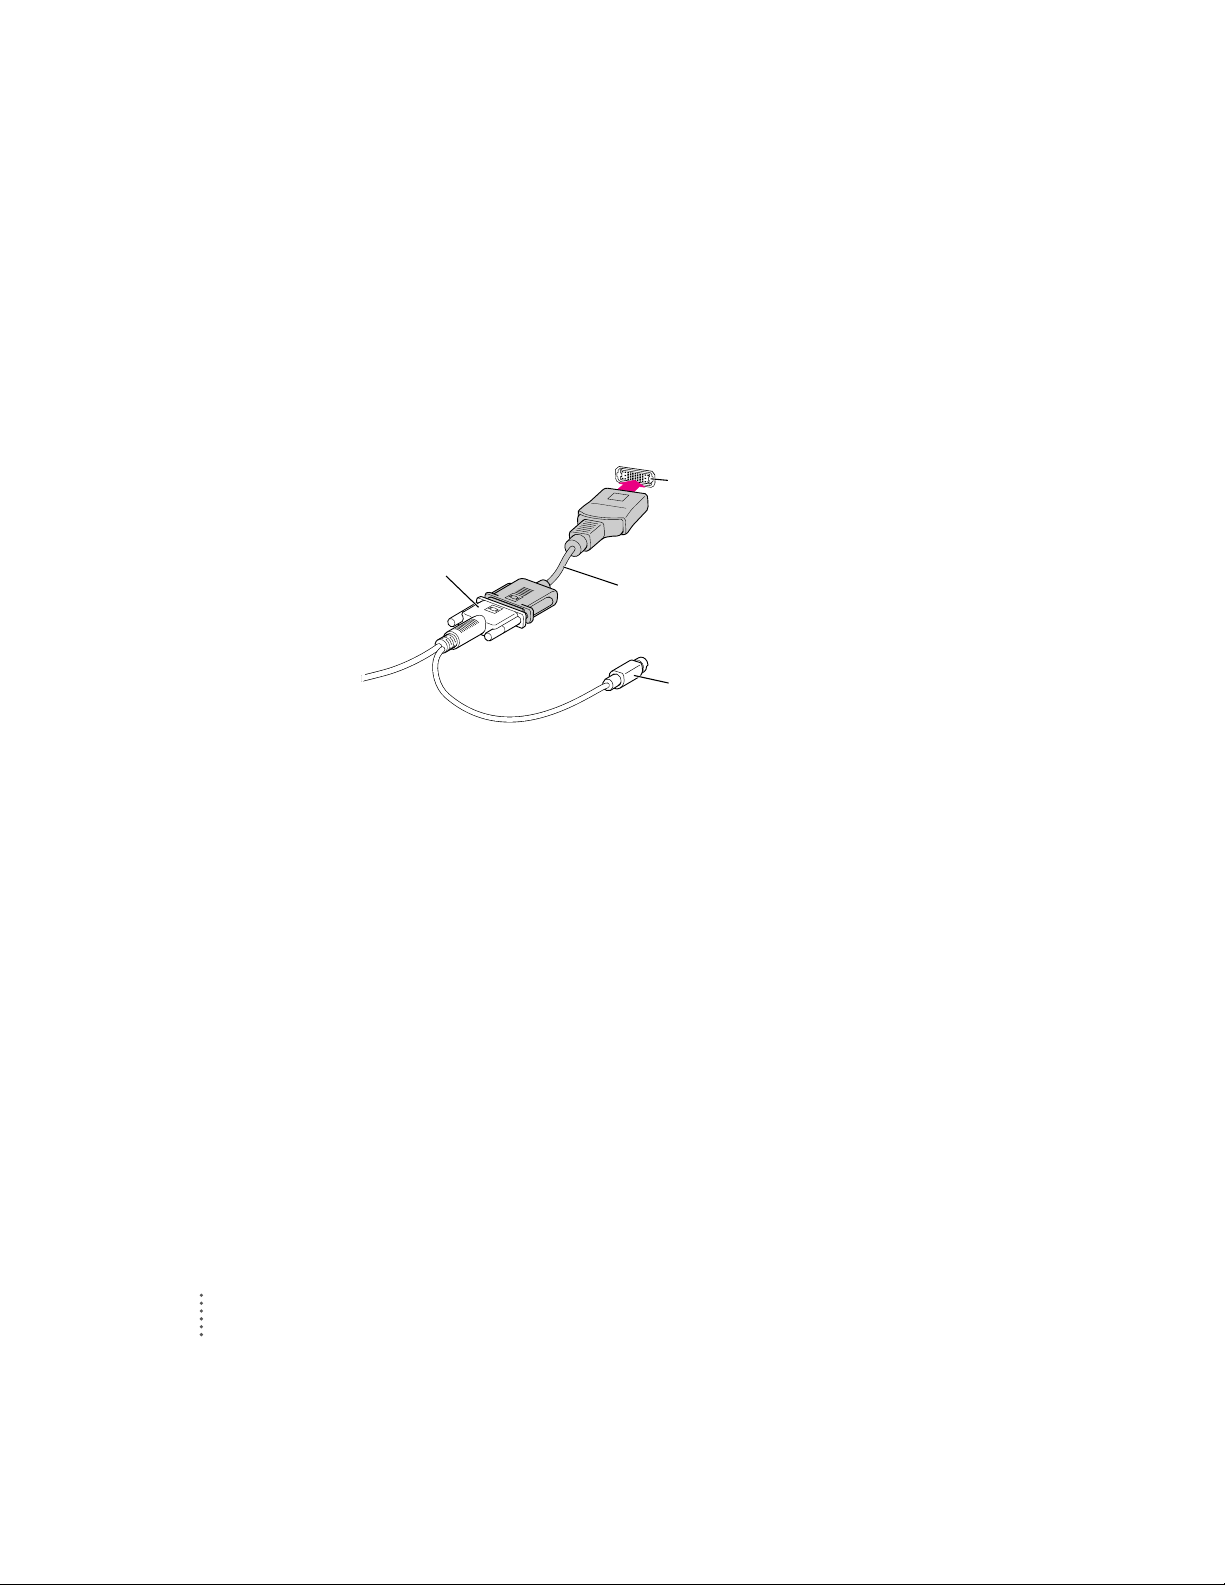
Connecting the monitor cable to various video connectors
To connect the monitor to a high-density port (45-pin port) instead of a
standard monitor port (15-pin port), you need to use an adapter. This adapter
is usually provided with your computer. If you don’t have one, you can
purchase an adapter (Apple part number M2681LL/A) from an Appleauthorized dealer.
Other video connectors, such as PowerBook adapters, can also connect to
your monitor por t with special adapters. For more information, see the
manual that came with your computer.
Note: If your Mac OS–based computer came with a VGA adapter for
connecting monitors, use it instead of the one shipped with your
ColorSync monitor.
Monitor connector
Monitor cable ADB connector
Adapter
(converts 45-pin
port to 15-pin port)
45-pin high-density port
12
Chapter 1
Page 21
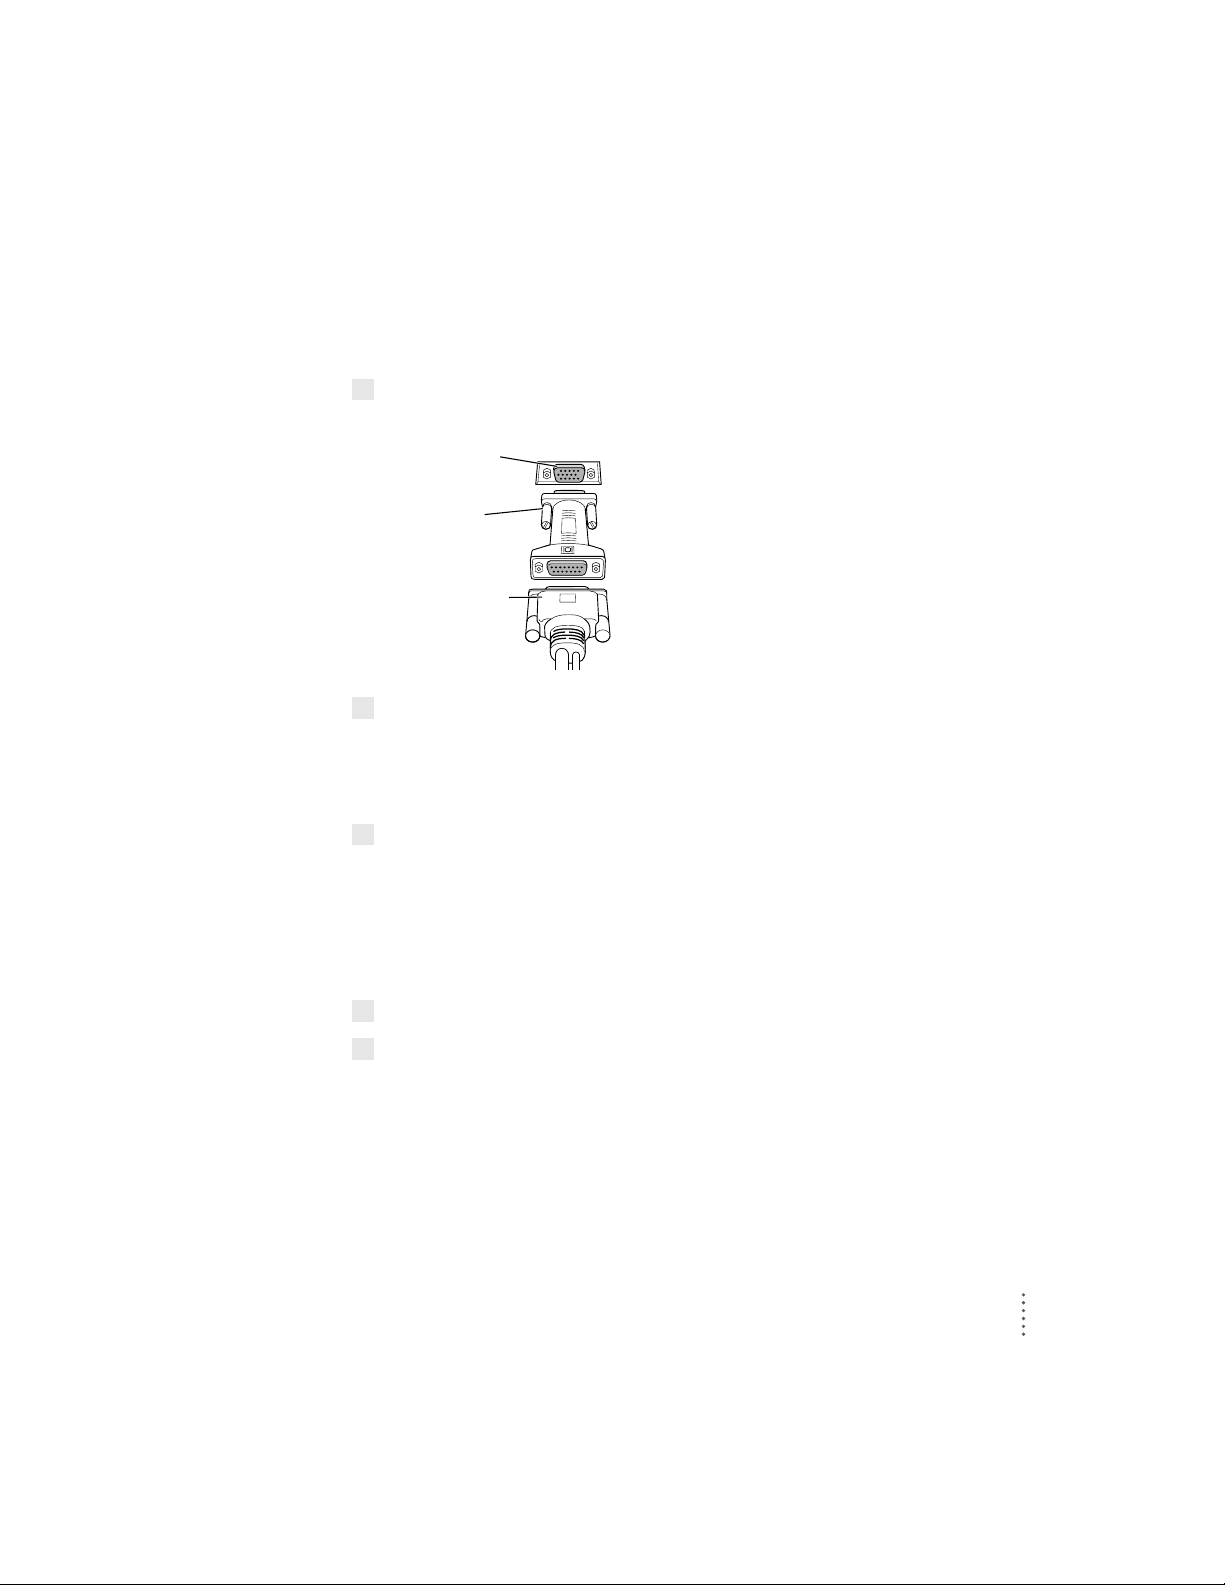
Connecting the monitor cable to a Windows-based computer
Although the monitor cable is a split cable with two connectors, you will use
only the monitor connector with your computer.
1Connect the VGA adapter to the monitor connector (marked by
™
) on the monitor cable.
2 Tighten the thumbscrews on the connection.
You can prevent bad connections and accidental damage by tightening
the thu mbscrews. Do not overtighten the thumbscrews; you might
strip the threads.
3Connect the VGA adapter end of the monitor cable to the monitor port on the back of
your computer.
If you installed a video card in your computer, connect the monitor cable
(with the VGA adapter attached to it) to the video card’s port. For more
information about installing video cards, see the manual that came with your
computer or video card.
4 Tighten the thumbscrews on the connection.
5Leave the ADB connector on the monitor cable unplugged.
The ADB connector is for Mac OS–based computers only. Use the clip on the
monitor cable to move the ADB connector out of the way.
VGA adapter
Monitor port on
Windows-based
computer
Monitor connector
∆
13
Setting Up Your Monitor
Page 22

Connecting a Mac OS–based computer keyboard and mouse
to you r m o n i tor
If you wish, you can plug your keyboard and mouse directly into the monitor,
rather than into the back of your computer. There is one ADB port on each
side of the monitor for your keyboard and mouse (or any other ADB device).
IMPORTANT
Always be sure your computer is shut down before you plug in or
disconnect ADB cables.
1Make sure the ADB connector on the monitor cable is plugged into an ADB port (marked
by
V
) on the back of your computer.
IMPORTANT
The ADB connector is not optional; it’s needed for your
Mac OS–based computer to work cor rectly with your monitor. If not
connected properly, extended resolutions and Apple Displays software
controls will not be available.
For more information, see “Connecting the Monitor Cable to a
Mac OS–Based Computer” earlier in this chapter.
2If necessary, unplug the keyboard or mouse cable from the ADB connector on the back
of your computer.
3 Decide how you want to connect the keyboard and mouse.
For example, you can connect your mouse cable to your keyboard and then
connect the keyboard to one of the ADB ports (marked by V) on either side
of the monitor stand. Or, if you prefer, you can plug your keyboard and mouse
cables into the ADB ports (marked by V) on either side of the monitor stand.
4Connect your keyboard and mouse cables to the monitor’s ADB ports (marked by
V
)
according to your preference.
14
Chapter 1
Page 23

Using more than one monitor
If your computer has expansion slots, you can use your monitor with one or
more additional monitors connected to your computer. You may need a video
card for each additional monitor you are using. See the ma nual that came with
your computer for more information.
If your Mac OS–based computer has one ADB por t, you can still connect two
ColorSync monitors. You’ll need a special cable to split the ADB connector
cable into two par ts.
IMPORTANT
Make sure you use an Apple shielded connector cable. Most thi rdparty ADB splitter cables are not shielded and will not work properly with
your ColorSync monitor. (You may experience more radio interference with
an unshielded connector cable.)
Shielded connector
cable (Apple part
number M5556LL/A)
Monitor cable
(includes monitor
connector and
ADB connector)
Monitor cable
(includes monitor
connector and
ADB connector)
15
Setting Up Your Monitor
Page 24

Turning the monitor on
To tur n on the monitor for the first time:
1Plug in the computer’s power cord.
2Press the power button on the monitor.
If you plug your monitor directly into your computer, no power indicator light
goes on until you start up your computer. If you plug your monitor into a wall
outlet, the monitor’s amber power indicator light goes on. When you start up
your computer, the indicator light turns green.
3 Start up your computer and wait a few seconds.
The green power indicator light goes on. If the power indicator light
does not go on, press the monitor’s power button again. If this doesn’t work,
make sure you’ve connected the monitor cable and power cord properly.
(See “Connecting the Monitor to Your Computer” earlier in this chapter.)
Also, make sure your computer is turned on and no energy-saving or screensaving features are active. The power indicator light on the 20-inch (19-inch
VIS) monitor is amber when a n energy-saving program is on; it is off on the
17-inch (16.1-inch VIS) monitor in energy-saving mode.
For Mac OS–based computers, you must install the Apple Displays software
that came with your monitor befor e adjusting the screen with the front panel
buttons and using other monitor features. For more information on Apple
Displays software installation and Energy Saver, see Chapter 2, “Installing
and Using Apple Displays Software.”
®
O
¤
Power indicator light
Power button
16
Chapter 1
Page 25

Using the monitor with Windows-based computers
In most cases, once you turn on the monitor, you will not have to make any
adjustments to the screen image. If n ecessary, you can adjust or fine-tun e the
image to suit your personal preference. For more information about adjusting
the screen image, see Chapter 3, “Using Your Monitor With Windows-Based
Computers.”
To change resolutions on your monitor, see the manuals that came with your
operating software or video card.
Note: The Apple Displays Software CD-ROM disc includes a ColorSync
Display setup file for Windows-based users. See Chapter 3, “Using Your
Monitor With Windows-Based Computers,” for installation instructions.
WARNING
Before making any screen or sound adjustments, install the
Apple Displays software on your Mac OS–based computer. Using
software other than the new Apple Displays software that came with
your monitor could damage your monitor.
17
Setting Up Your Monitor
Page 26

Finding answe rs
When you have questions about using your monitor, there are several places
you can look for answers.
This manual
Use this manual to set up your monitor, install Apple Displays
software for Mac OS–based computers, install ColorSync Display
setup information and use onscreen controls for Windows-based
computers, and find solutions to common problems.
Apple Guide for Mac OS–based computers
If you need help or experience a problem while using the Apple
Displays software, open the Guide (
h
) menu and choose
Macintosh (or Mac OS) Guide or Monitors & Sound Guide. The
Guide menu is the main source for information about the Apple
Displays software and your Mac OS–based computer. See Chapter
2 for more information.
Obtaining online support and updated Apple software
Apple technical support information and software updates are available from
many online services. You can get troubleshooting and other important
information by using these services. You can also get the latest versions of
Apple software, including most printer drivers, system enablers, and updates
to utilities and networking and communications software.
Support information and Apple software updates are available via Apple’s
World Wide Web sites:
m http://www.i nfo.apple.com
m http://www.support.apple.com
18
Chapter 1
Page 27

What to do next
Mac OS–based computers
Go to the next chapter for information about installing and using
Apple Displays software.
Windows-based computers
Go to Chapter 3, “Using Your Monitor With Windows-Based Computers,” for
information on installing ColorSync Display setup information and using the
control buttons to open onscreen menus for screen image adjustments.
19
Setting Up Your Monitor
Page 28

21
This chapter explains how to install Apple Displays software on your
Mac OS–based computer and provides an overview of software features.
If you’re using the monitor with a Windows-based computer, see Chapter 3,
“Using Your Monitor With Windows-Based Computers.”
Installin g Apple D isplays software
To install Apple Displays software on a Mac OS–based computer, follow
these steps:
1Make sure you have System 7.5 or later installed.
You need a Mac OS–based computer running System 7.5 or later to use the
software. If you don’t have System 7.5 or later, contact an Apple-authorized
dealer or service provider.
Note: You must connect your monitor to a computer with a 68040 pro cessor
or PowerPC
™
. The monitor does not work with computers that have been
upgraded to a 68040 processor from earlier processors, such as a 68030
processor.
2 Insert the
Apple Displays Software
CD-ROM disc into the computer’s CD-ROM drive.
The CD icon appears on the desktop.
Note: If you don’t have a CD-ROM disc drive, you can order a set of floppy
disks of the Apple Displays software. See the service and suppor t information
that came with your monitor for more information.
2
Installi ng and Using Apple Displays Software
Page 29

3Double-click the CD icon to see what’s on the CD-ROM disc.
The Apple Displays Software CD window opens.
4Double-click the folder that contains your language preference.
For example, if you’d like to install Apple Displays software in English,
double-click the English folder.
5Double-click the Apple Displays Software folder.
6Double-click the Apple Displays Read Me file and read the document.
The Apple Displays Read Me file contains important information about the
applications included with your Apple Displays software. It also provides a list
of installed software for your reference.
7Choose Quit from the File menu when you’re finished reading.
8Double-click the Apple Displays Installer icon to start the Installer program.
A welcome screen appears.
9Click Continue.
The software license agreement dialog box appears.
Note: Be sure you’re acting within the terms of the software license
agreement before you agree to install this software on your computer. The
license agreement specifies how many copies of the program you can make
for yourself and others.
22
Chapter 2
Page 30
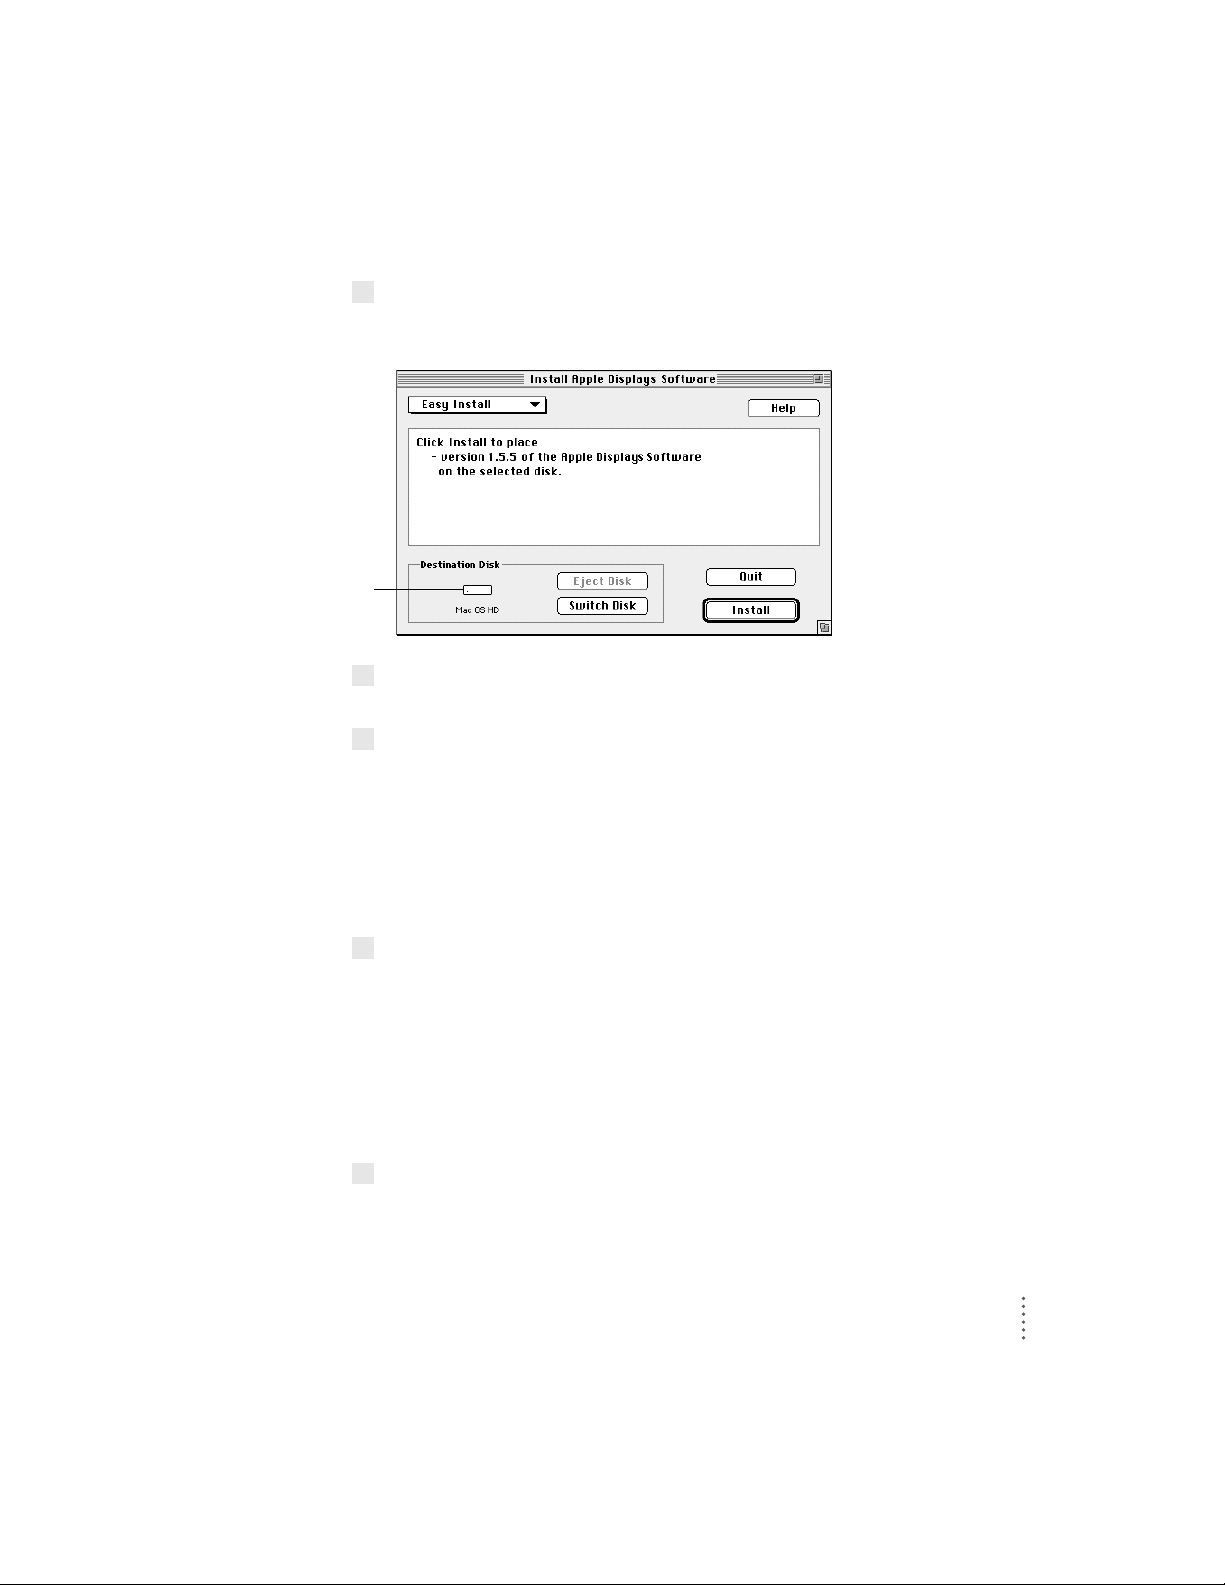
10 Click Agree once you’ve read and agreed to the terms in the document.
The Install Apple Displays Software dialog box appears.
11 Make sure the destination disk named is the startup disk of your computer. If it isn’t,
click Switch Disk until you see the right name.
12 Select Easy Install; then, click Install.
The Installer takes a few moments to calculate what needs to be done and
then begins to copy files. If you are running other applications, a message
appears telling you to quit any open applications. Click Continue to quit the
applications and continue with the installation.
Note: Make sure you use the Installer to install the software. Do not install
the software by dragging files.
13 Follow the instructions on the screen until the installation is complete.
IMPORTANT
The Installer checks to make sure you have the system software
you need to use the monitor. If you’re missing anything, a message tells you
what you need. You won’t be able to install the software until you cor rect the
problem. If a dialog box says you don’t have the correct system software, you
can purchase a new version from an Apple-authorized dealer.
After the installation, the Installer tells you to restar t your computer.
14 Click Restart.
The software is now installed and the monitor is ready for use.
23
Installing and Using Apple Displays Software
Destination disk
Page 31

IMPORTANT
If you reinstall system software on your computer, you must
reinstall the Apple Displays software.
Note: If you press a control button under the screen on the left front of your
monitor and do not see the Monitors & Sound control panel, you probably
haven’t set up your monitor cor rectly. Make sure the ADB connector on the
monitor cable is connected directly to your computer’s ADB port. See
Chapter 1, “Setting Up Your Monitor,” for more information.
Learning about Apple Displays software with System 7.5 or later
This section explains how to open Monitors & Sound Guide for information
about using Apple Displays software with your monitor.
The Monitors & Sound Guide is your main source of information about
Apple Displays software. The Guide menu is identified by a question mark
(
h) in the upper-right corner of the screen.
To open Monitors & Sound Guide, make sure your Monitors & Sound control
panel is active. Then, click the Guide (h) icon on the top-right corn er of the
control panel to open Monitors & Sound Guide or choose Monitors & Sound
Guide in the Guid e (h) menu at the top of your screen.
Macintosh (or Mac OS) Guide also contains the same information about the
Apple Displays software as well as other information about using your
computer. Macintosh Guide is available while you’re in the Finder.
24
Chapter 2
Open Monitors & Sound Guide when the
Monitors & Sound control panel is active to
get onscreen help on Apple Displays software.
Page 32

Monitors & Sound Guide provides onscreen help on how to use Apple
Displays software.
Monitors & Sound Guide provides information about the following topics:
sound, monitors (Apple Displays extras), monitors (standard settings), a nd
troubleshooting. Click the Topics button to open these topic areas and choose
a topic. Then, select a question in the list and click OK to open detailed
instructions.
Tips for using Monitors & Soun d Guide
When you can’t find the information you need
m In searching for help topics, use all three buttons at the top of the Guide’s
initial window: Topics, Index, and Look For.
m If you’re in a series of steps and want to return to the list of help topics,
click the button marked Topics in the Guide window.
When you can’t see what’s behind the Guide window
Guide windows stay in front of other windows on the screen so that your
instructions are never covered.
m Drag a Guide window by its title bar to move it out of the way.
m Click the zoom box once to shrink a Guide window. (To expand the
window, click the zoom box a second time.)
25
Installing and Using Apple Displays Software
Page 33

When you need more information about an instruction or term
m Click the “Huh?” button if it is available.
m If an unfamiliar word is underlined, click it to get a definition.
Screen controls at a glance
The buttons on the front of your monitor provide a quick way to adjust the
screen image. In most cases, you won’t need to adjust the screen image unless
you make changes to screen resolution.
®
O
¤
Control buttons
Press any button to open the
Monitors & Sound control panel.
Contrast controls
Press
¿
to increase
contrast; press
÷
to
decrease contrast.
Brightness controls
Press
¿
to increase
brightness; press
÷
to
decrease brightness.
Power button
Press to turn
power on or off.
26
Chapter 2
Title bar
Zoom box
“Huh?” button
Topics button
Navigation buttons
Page 34

The Contrast and Brightness controls have an onscreen indicator that appears
when you press a button on the front of your monitor. For example, pressing a
Brightness control displays the Brightness indicator.
When you make an adjustment, the indicator bar moves to show the
current setting. When you’ve finished making adjustments, the indicator
disappears automatically.
About th e Monitors & Sound control p anel
The Monitors & Sound control panel allows you to control the way your
computer displays images and processes sound. Because different computers
have different capabilities, Monitors & Sound automatically adjusts itself
based on the video and sound capabilities of the computer and monitor you’re
using. That’s why the Monitors & Sound control panel shown in this manual
may appear slightly different on your computer.
If you have more than one monitor attached to your computer, a separate
Monitors & Sound control panel will appear on each one, allowing you to
customize your settings for each monitor separately.
Opening Monitors & Sound
There are two ways to open the Monitors & Sound control panel:
m Choose Control Panels from the Apple (K) menu; then select Monitors
& Sound.
m Press one of the control buttons under the screen on the left front of
your monitor.
27
Installing and Using Apple Displays Software
Highest
setting
Current
setting
Lowest
setting
Page 35

After a moment, the Monitors & Sound control panel appears on your screen.
Monitors & Sound buttons at a glance
The large buttons across the top of the Monitors & Sound control panel are
used to select different options.
Button Description
Use the Monitor button to adjust color depth, resolution, contrast, and
brightness settings.
Use the Arrange button to configure more than one monitor. This button appears on
your screen if you have more than one video port on your computer.
Use the Sound button to adjust your computer system’s sound. You can also set the
volume and balance for speakers attached to your computer, choose sound input
devices such as a microphone or CD player, and select sound output quality.
28
Chapter 2
Page 36

Button Description
Use the Alerts button to change your computer’s alert sound.
Use the Geometry button to change the image options for your monitor. You can
change the size and shape of the screen image, adjust convergence, and turn
overscan on and off.
Use the Color button to change color calibration, gamma curve, white point, and
ambient light settings, and to import or export a ColorSync profile. (For more
information on ColorSync software, see Appendix A.)
Tips for using Apple Displays software
m For best results, recalibrate your monitor after changing the color settings.
For example, color adjustment changes don’t take effect until you click
Recalibrate. You can choose to have your monitor recalibrate automatically
whenever you change the settings. Click the Color button. Then click
Preferences. After selecting your recalibration preferences, click Save.
m To use the default settings shipped with your monitor, click the Geometry
button. When the Geometry window opens, click the Factory Settings option.
To us e th e col or default settings, click the Color button. When the Color
window opens, double-click F actory Defau lts in the Sav ed Settings menu.
m Red, green, a nd blue signals in your monitor overlay, or converge, to create
the colors you see on your screen. If the convergence is not set properly,
images or text on your screen may appear blurred, or you may get a
“rainbow” effect in which several colors form the edges of images on the
screen. If you move your monitor to another location, you may need to
cha nge the conve rge nce to get a clear, distinct screen image. To adjust
convergence, click the Convergence button in the Geometry window.
m When overscan is on, you may not be able to choose commands from the
menus at the top of your monitor. If this occurs, you can’t use a menu to
open the Monitors & Sound control panel and turn overscan off. Instead,
open Monitors & Sound by pressing a Control button on the front of
your monitor.
29
Installing and Using Apple Displays Software
Page 37

m The ColorSync profile included with your monitor works with other device
profiles to ensure the closest match possible between monitor color and
printed color. See Appendix A, “Using ColorSync Software” for more
information. To refine the color profile, you can use the Color window in
the Monitors & Sound control pan el to further adjust for your specific
monitor and lighting conditions.
m To correct for ambient light conditions, the color depth on your monitor
must be set to “Millions of Colors.” If you can’t set color depth to “Millions
of Colors,” try changing to a lower screen resolution. Use the Color button
to open color depth and resolution settings.
Note: References to AppleVision also apply to your ColorSync Display.
Using the Contr o l Strip
When you turn on your monitor, a small pull tab appears in the lower-left
cor ner of the screen. Click once on the pull tab to open it. This is called the
Control Strip.
The Control Strip is a quick and easy way to make changes to the features you
use most on your computer, such as screen resolution and color depth.
The Control Strip may look slightly different depending on the options on
your computer. Move the pointer over the item you want to use and hold
down the mouse button. A pop-up menu appears with a selection of choices.
Hold down the Option key and drag the Control Strip up or down the left or
right side of the desktop. Release the Option key and mouse button when the
Control Strip is located where you want it.
30
Chapter 2
Close Box
Scroll arrows let you view Control Strip
items that are not visible.
For changing
color depth
For changing
screen resolution
Pull tab
Page 38

Using DigitalColor Meter
DigitalColor Meter and your monitor work together to identify colors on your
screen based on the standard color gamuts defined by the Commission on
Illumination (CIE).
DigitalColor Meter can also identify colors using the PA NTONE
®
system.
PANTONE is a color-simulation system used to specify ink colors for highend printers. Colors are described using their printing in k formulation, which
is iden tified by a specific PANTONE number. DigitalColor Meter performs
color sim u lation and provides PANTONE numbers for coated (CVC),
uncoated (UVC), and process (CVP) color samples. Use the PANTONE
numbers when you have your work professionally printed to ensure that the
printer will use colors similar to those displayed on your screen.
Finally , you can use DigitalColor Meter to identify the RGB (red, green, blue)
values your computer uses to create colors.
Opening DigitalColor Meter
Choose DigitalColor Meter from the Apple (K) menu. (It was installed with
your Apple Displays software.)
When you launch DigitalColor Meter, its window opens on your monitor.
See DigitalColor Meter Guide (located in the Guide [h]menu when the
DigitalColor Meter application is active) for more information on how to use
DigitalColor Meter.
31
Installing and Using Apple Displays Software
Page 39

32
Specifying colors using the PANTONE MATCHING SYSTEM
®
In some application programs, you can use Apple’s Color Picker in
conjunction with the PAN TONE
®
Color Picker to specify PANTONE®colors.
The PANTONE Color Picker extension is automatically installed along with
the rest of the Apple Displays software.
For example, in a variety of applications, Apple’s Color Picker is automatically
launched when a new color needs to be specified. Often, a menu of several
different color systems is available to choose from. When you select
PANTONE, a dialog box appears.
By selecting PAN TONE matching colors, you are assured of a close match
between what you see on your monitor and the printed version. PANTONE
®
Color Picker may look different on your computer.
If PA NTONE colors are not available in the Color Picker menu, click the
More Choices button; then select PANTONE.
Chapter 2
Page 40

Conserving energy
Use the Energy Saver control panel to tell the monitor whether to conserve
energy after a specified period of inactivity.
You can use the control panel with your monitor or any other Apple monitor
that complies with the United States Environmental Protection Agency’s
Energy Star program. (Look for the EPA Energy Star logo on the monitor box.)
Note: When you save energy, you save natural resources and reduce pollution.
Although the ColorSync Display includes features that automatically save
energy, you can i ncrease the energy savings by turning the monitor off if you
won’t be using it for awhile—for example, overnight or over the weekend.
Setting up Energy Saver
To us e th e Energy Saver control panel, follow these steps:
1 Open the Apple (K) menu and choose Energy Saver from the Control Panels folder.
The Energy Saver control panel appears.
2Make the following choices in the control panel:
The Energy Saver control panel on your system may look slightly different
from the one shown here. If you see a Show Details button, you can click it to
specify separate timings for Display Sleep and Hard Disk Sleep. (Hard Disk
Sleep saves energy by stopping the spin of the hard disk.)
3Close the control panel.
33
Installing and Using Apple Displays Software
Click to turn Energy
Saver on or off.
When there’s an X
in this box, Energy
Saver is on.
If Energy Saver is on, slide this control to determine
how long Energy Saver will wait without activity before
darkening the screen.
Page 41

34
Chapter 2
IMPORTANT
If you use Energy Saver, make sure you tur n it off when
you’ re doing disk-intensive tasks such as copying a large number of files,
downloading large files from an online service, or printing a very large file.
If Energy Saver is activated during a disk-intensive task, the task may be
terminated prematurely and you may need to recopy or reprint a file.
What happens af t er you tu rn on the energy-saving feature?
When Energy Saver detects that you’re not using the computer, it darkens the
monitor screen and reduces the amount of energy it consumes. While the
monitor is darkened, your computer is still working, but to avoid accidental
cha nges, Energy Saver won’t let a nything you type or do with the mouse
affect any of your work.
To “wake up” the monitor, press any key on the keyboard. Your computer
beeps while the monitor is waking up—about 10 seconds—and you can begin
work as soon as the computer stops beeping. (The beep volume cannot be
adjusted; it is indep endent of all system sound controls.)
Using En ergy Saver with a scr een saver
Screen savers are applications you can purchase that put moving patterns on
your monitor. Screen saver and Energy Saver applications prevent screen
“burn-in.” En ergy Saver also conserves energy.
If you wish, you can use Energy Saver and a screen saver program. Set the
screen saver to come on before Energy Saver. If your screen saver program
includes its own energy-saving feature, you can turn off Energy Saver.
Page 42

This chapter describes how to install the ColorSync Display setup file and
adjust the screen image on the ColorSync Display. In most cases, you won’t
need to adjust the image unless you make changes to screen resolution.
Note: If you’re using the monitor with a Mac OS–based computer, refer to
Chapter 2, “Installing and Using Apple Displays Software.”
35
3
Using Your Monitor
With Windows-Based Computers
Page 43

Installing C olo rSync Display setup information for Windows
On Windows systems, new devices are automatically detected when they
are connected to your computer (if it is VESA DDC compliant). If you are
not using Windows, see the manual that came with your video card for
setup information.
To determine that Windows has correctly identified your monitor, check
Monitor Type in the Display Properties dialog box. Performing this check
will ensure that the ColorSync Display setup information has been installed.
Not installing the setup information may limit the resolution and refresh rates
on your monitor.
To correctly identify the monitor type in your computer, follow these steps:
1 Open the Start menu and choose Settings.
2 Open the Control Panel and double-click the Display icon.
The Display Properties dialog box appears.
3Click the Settings tab at the top of the dialog box.
The Settings property sheet appears.
4Click the Change Display Type button in the lower-right corner to display the current
Monitor Type.
If the Monitor Type shown is the ColorSync Display, your computer has
correctly identified your monitor. Go to the next section, “Screen Controls at
a Glance.”
If the Monitor Type shown is not the ColorSync Display, continue with step 5.
5Click the Change button next to the Monitor Type field; then select ColorSync Display
and click OK.
If the ColorSync Display is not one of the devices displayed, then the setup
information file needs to be installed.
36
Chapter 3
Page 44

6 Insert the
Apple Displays Software
CD-ROM disc into your CD-ROM disc drive.
If you do not have a CD-ROM disc drive, see the service and support
information that came with your monitor for information on how to order
floppy disks.
7Click the Have Disk button.
8Choose the CD-ROM disc drive and click OK.
If an error occurs, make sure you’ve selected the correct disc drive.
9Choose the ColorSync Display in the Monitor Type field and click OK.
Yo u’re now ready to use your monitor with your computer.
Screen controls at a glance
The buttons on the front of your monitor provide a quick way to adjust the
screen image. In most cases, you won’t need to adjust the screen image unless
you make changes to screen resolution.
Use the following buttons to make screen image adjustments:
The contrast and brightness controls have an onscreen indicator that appears
whe n you press the contrast and brightness control buttons on the front of
your monitor. When you make an adjustment, the indicator bar moves to show
the current setting. When you’ve finished making adjustments, the indicator
disappears automatically.
®
O
¤
Control buttons
Use these buttons to make screen
image adjustments. See “Using
Onscreen Controls” later in this chapter.
Contrast controls
Press
¿
to increase
contrast; press
÷
to
decrease contrast.
Brightness controls
Press
¿
to increase
brightness; press
÷
to
decrease brightness.
Power button
Press to turn
power on or off.
37
Using Your Monitor With Windows-Based Computers
Page 45
Using onscr een controls
Your monitor comes with a set of onscreen controls you use to adjust the
screen image.
Use the buttons on the front of your monitor to open the Monitor Controls
window and select topics from the menus.
-+
38
Chapter 3
Icon is highlighted to show
the menu you’ve selected
Shows the current value of
the topic you’ve selected
Indicates the topic
you’ve selected
Press to choose a
topic from a menu.
An arrow appears
next to the topic
you’ve selected.
Click any button to
open the Monitor
Controls window.
Press
oorø
to
select a menu. Icons
on screen are
highlighted to show
the menu you’ve
selected.
Sets a value for the selected
topic. Press – to decrease value.
Press + to increase value.
Page 46

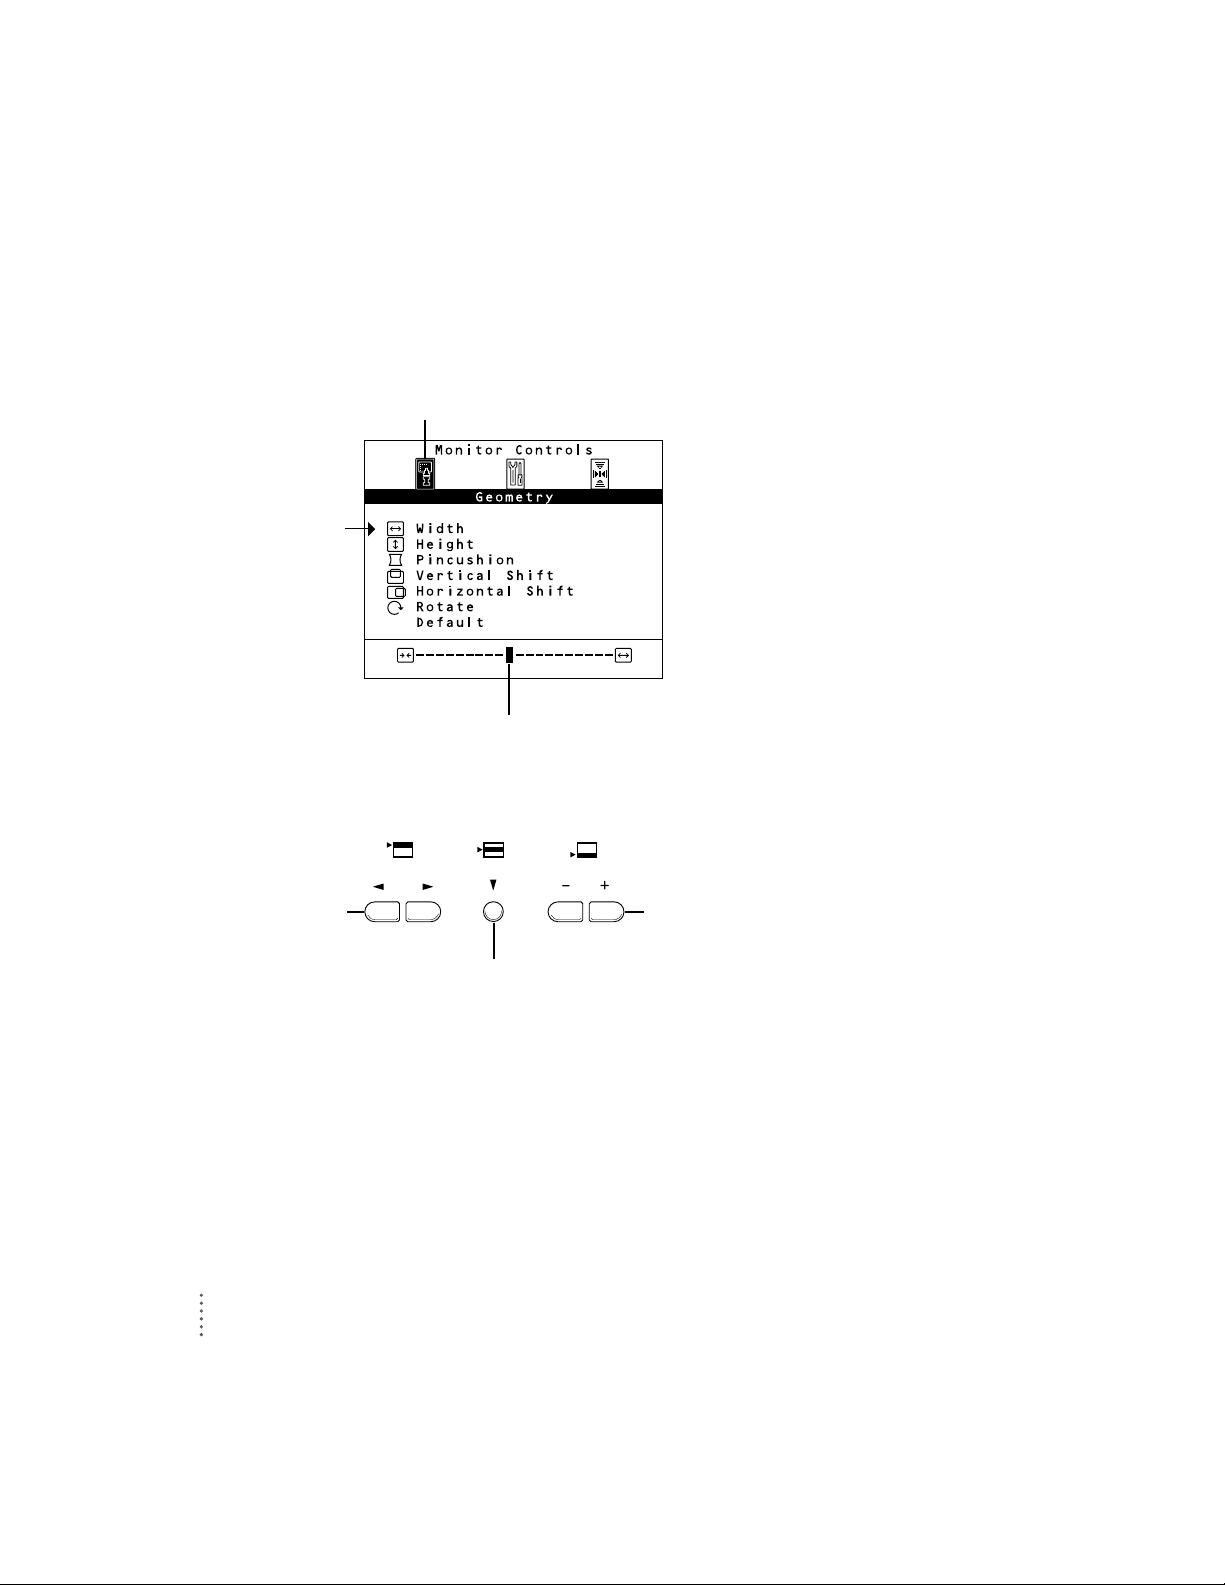
Adjusting screen g eometry
Use the Geometry menu to adjust the height and width of the screen image,
center the image on the screen, and so on.
Width
Adjusts the width of the screen image. Press – to decrease width. Press + to
increase width. When the width and height of the screen image are set
properly, you can see the entire image on the screen.
Height
Adjusts the height of the screen image. Press – to decrease height. Press + to
increase height. When the height and width of the screen image are set
properly, you can see the entire image on the screen.
Pincushion
Adjusts the shap e of the screen image. Press – to bring in the sides of the
image, changing the shape from convex to concave. Press + to expand the
sides of the image, changing the shape from concave to convex. When the
shape of the image is set properly, the left and right sides are straight and the
image is rectangular.
Vertical Shift
Adjusts the vertical position of the screen image. Press – to move the image
down. Press + to move the image up. When the screen image is centered
properly, there is an equal border around all edges of the image.
-+
39
Using Your Monitor With Windows-Based Computers
Select to show the
Geometry menu.
Page 47
Horizontal Shift
Adjusts the horizontal position of the screen image. Press – to move the image
to the left. Press + to move the image to the right. When the screen image is
centered properly, there is an equal border around all edges of the image.
Rotate
Rotates the screen image. Press – to rotate counterclockwise. Press + to
rotate clockwise. When the rotation of the screen image is set properly, all
four sides of the image are parallel to the edges of the screen and the image
is rectangular.
Default
Returns screen adjustments to the preset factory values. Press the + button to
turn defaults on.
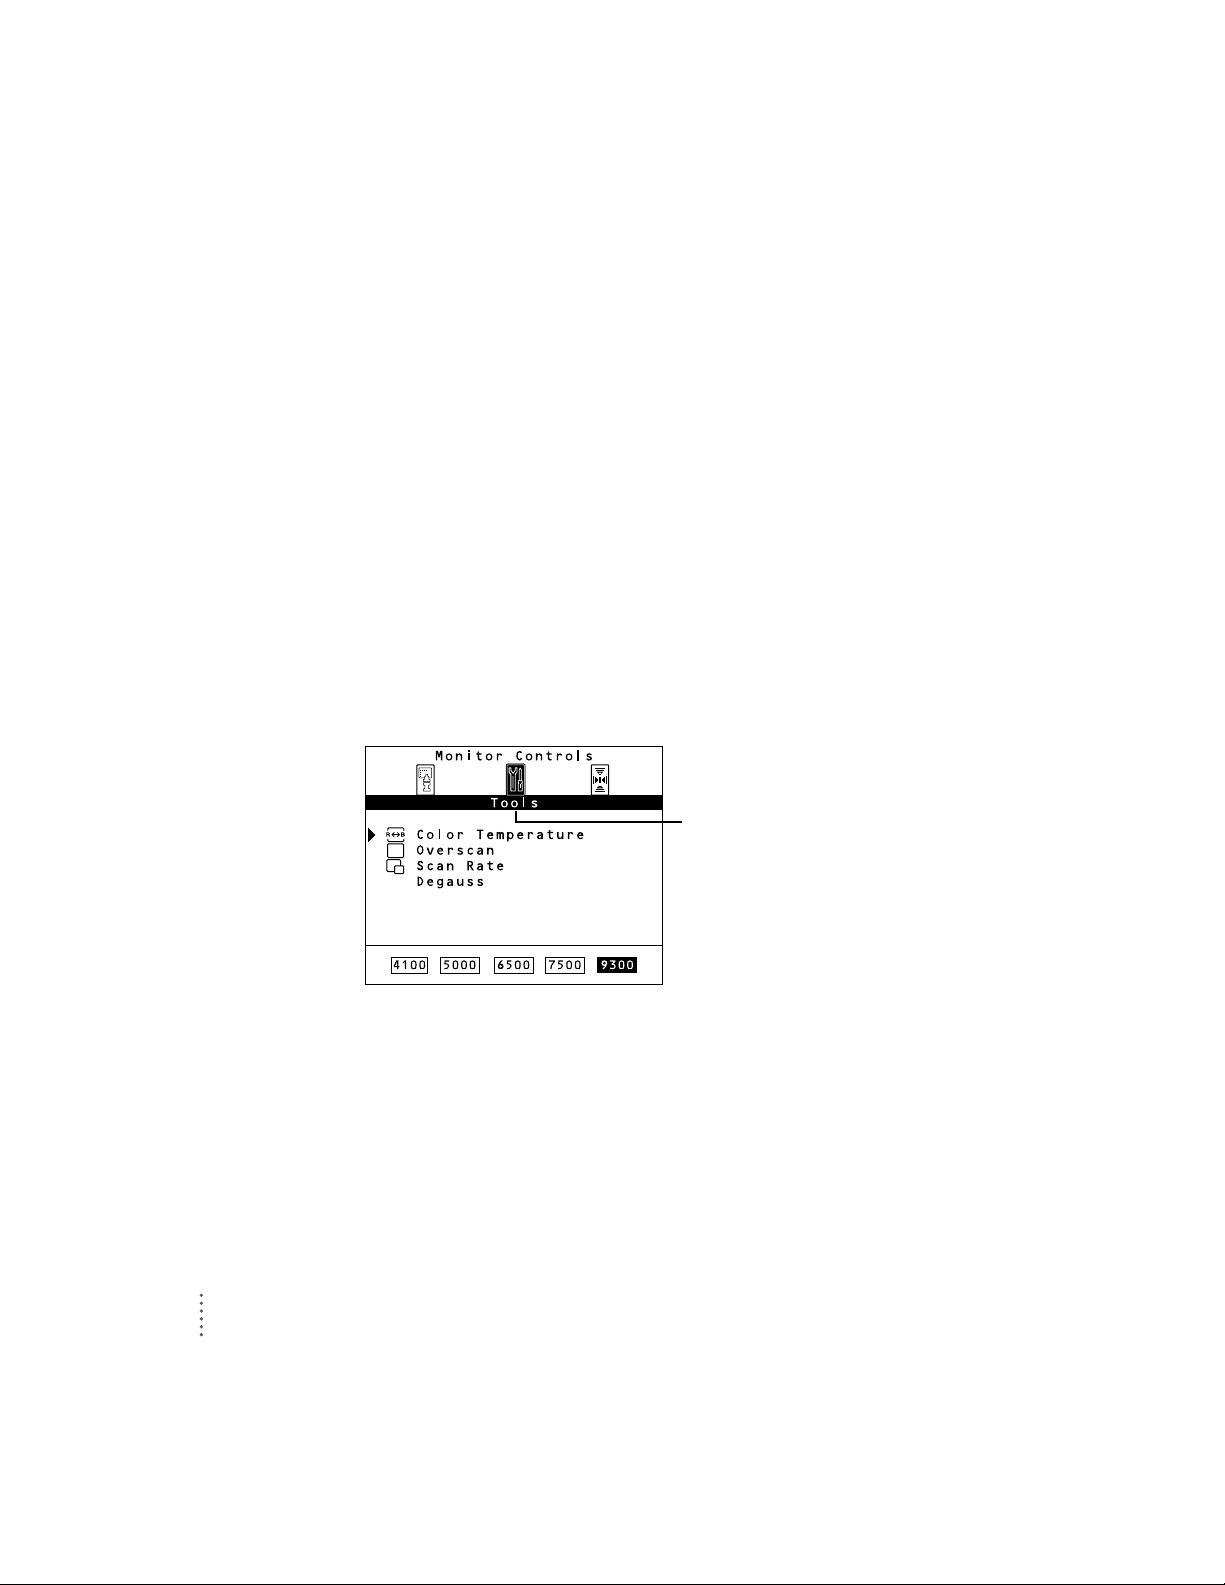
Adjusting color settings and other features
Use the Tools menu to set color temperature, turn overscan on and off, display
the scan rate of your monitor, and manually degauss.
-+
40
Chapter 3
Select to show the
Tools menu.
Page 48

Color Temperature
Adjusts the color temperature of your monitor. T he color temperature (or
white point) you select for your monitor sets the mix of red, green, and blue
light that makes the color white. This color temperature sets the foundation
for other colors on your monitor.
The color temperature of your monitor can b e changed to one of the
following Kelvin temperatures: 410 0 K, 500 0 K, 6500 K, 7500 K, or 9300 K.
(Kelvin is a temp erature scale used in scientific applications.)
Press – to decrease color temperature. Press + to increase color temperature.
Changing the color temperature changes the appearance of colors on the
screen. Lower temperature settings create reddish whites, and higher
temperature settings create bluer whites.
Overscan
Tur ns overscan on and off. Overscan moves the screen image as far to the
edges of the screen as possible without distorting the image. Press – to turn
over scan of f. Press + to turn overscan on.
When overscan is on, you cannot make screen geometry adjustments such as
horizontal shift, rotation, and so on.
Scan Rate
Shows the scan rate of the monitor. This setting is for informational purposes
only; it’s not for adjusting the scan rate.
Degauss
Manually degausses the monitor. Press + to degauss the monitor.
41
Using Your Monitor With Windows-Based Computers
Page 49
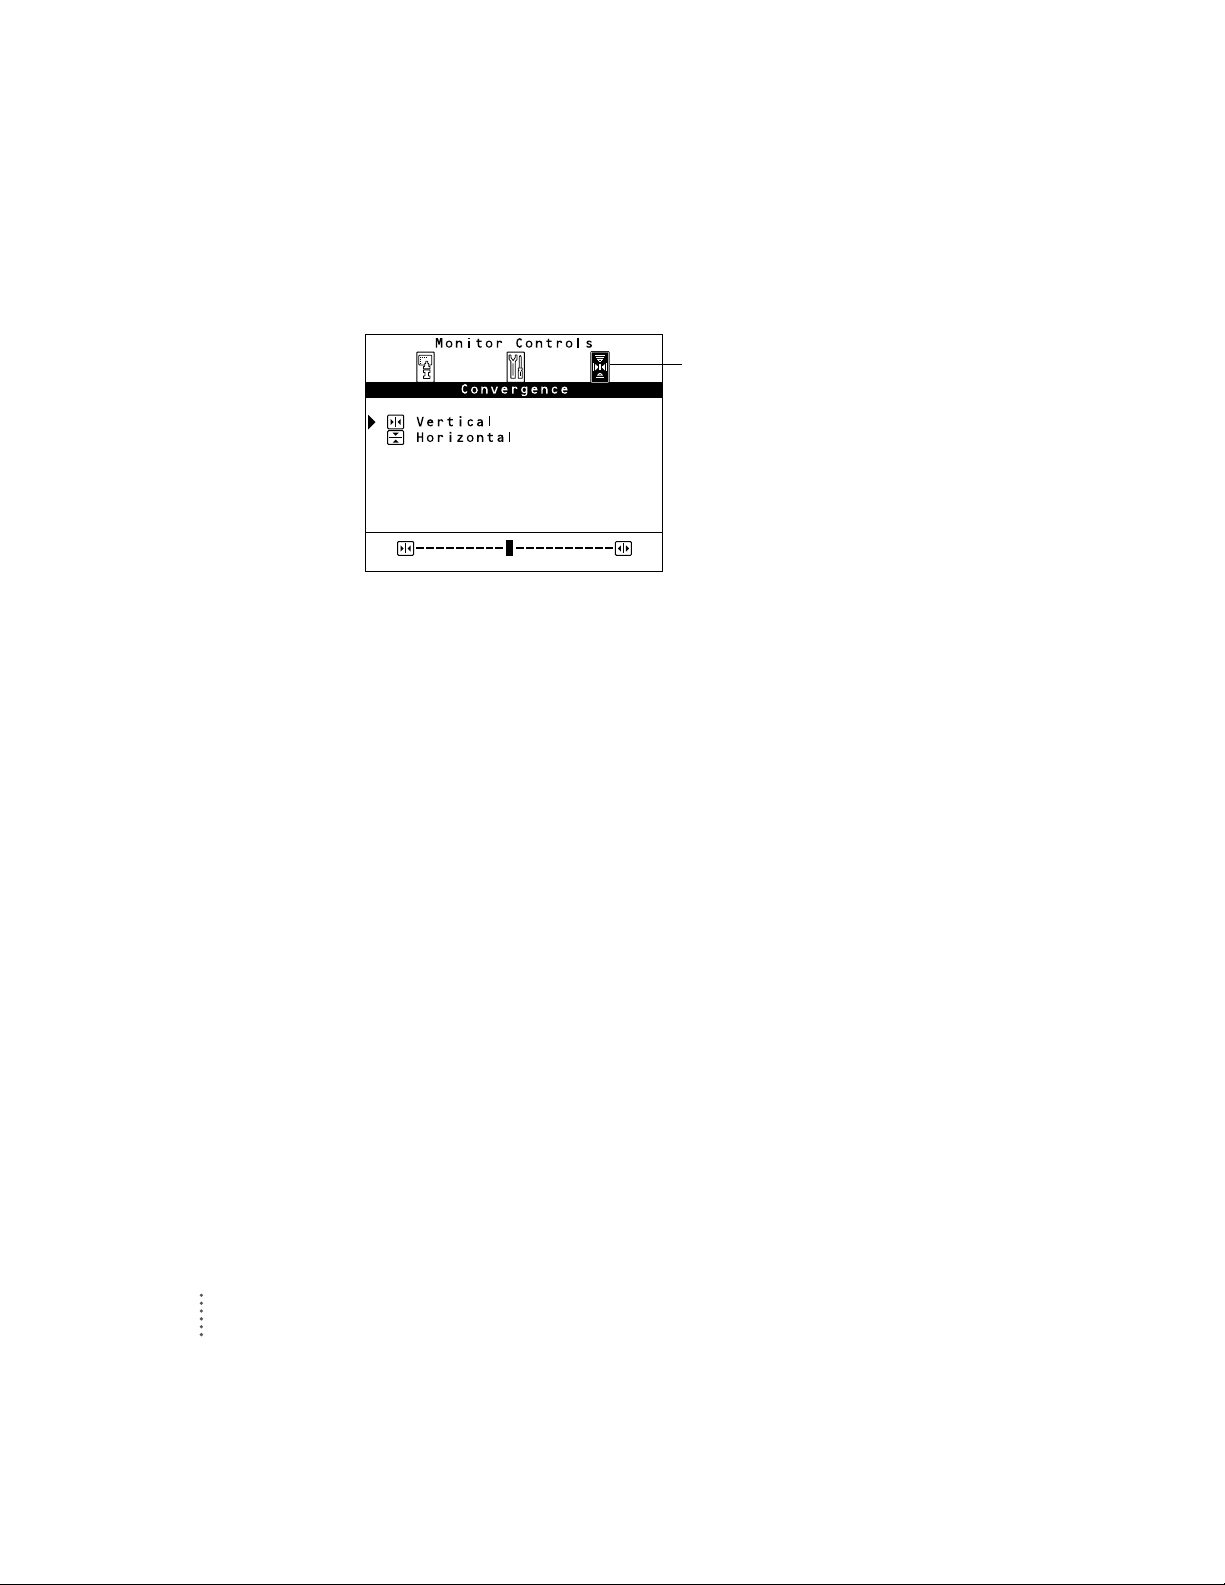
Adjusting converg ence
Red, green, a nd blue signals in your monitor converge to create the colors you
see on your screen. If the convergence is not set properly, images or text on
your screen may appear blurred, or you may get a “rainbow” effect with
several colors forming the edges of images on the screen.
If your monitor is exposed to an external electromagnetic field (for example,
from another monitor) over a period of time, you may need to change the
convergence to get a clear, distinct screen image.
Use the Convergence menu to adjust screen convergence. When convergence
is set properly, the image is clear and distinct.
Vertical
Adjusts the vertical convergence. Press – to move the red signal down and the
blue signal up. Press + to move the red signal up and the blue signal down.
Horizontal
Adjusts the horizontal convergence. Press – to move the red signal to the right
and the blue signal to the left. Press + to move the red signal to the left and
the blu e signal to the right.
-+
42
Chapter 3
Select to show the
Convergence menu.
Page 50

43
This chapter includes information on the care and cleani ng of your monitor,
protecting your monitor from theft, and troubleshooting.
Care and cleaning
m Do not block the monitor’s vents.
m Do not let liquid get on or into the monitor.
m If you will not be using your monitor and computer for a long period of
time (a day or more), make sure you turn off the computer (and your
monitor, if necessary).
To clean the case and screen of the monitor:
1 Turn your computer and monitor off.
2Disconnect the monitor’s power cord.
If the monitor’s power cord is connected to a grounded wall outlet, disconnect
the power plug from the outlet.
If the monitor’s power cord is connected to the back of your computer,
disconnect the monitor’s power plug from the back of the computer.
3Wipe the case surfaces lightly with a clean, soft cloth dampened with water.
Don’t use aerosol sprays, solvents, or abrasives that might damage the finish
on the case.
4
Tips and Troubleshooting
Page 51

4 Use a mild, non-abrasive cleaner on a soft cloth and wipe the screen. Don’t spray the
cleaner onto the screen, because the liquid may drip inside the monitor.
Protecting you r m o ni to r fro m t heft
The slot at the base of the monitor in the back is for connecting a security
lock. It lets you attach a narrow, flexible cable that you can use to secure your
monitor (and the rest of your computer system) to prevent theft. Security
locks are available from an Apple-authorized dealer or service provider.
Troubleshooting common proble m s
This section contains descriptions of problems you might experience with
your monitor as well as solutions to try. Problems related to the computer
itself are covered in the manuals that came with your computer.
WARNING
If you have a problem with your monitor and nothing
presented in this manual or in Apple Guide solves it, consult the service
and support information that came with your monitor for instructions on
how to contact an Apple-authorized service provider or Apple for
assistance. If you attempt to repair the monitor yourself, any damage
you may cause to the monitor will not be covered by the limited
warranty on your monitor. Contact an Apple-authorized dealer or
service provider for additional information about this or any other
warranty question.
WARNING
Never remove the cover from the monitor or you may come in
contact with hazardous voltage levels capable of causing serious injury
and possibly death.
WARNING
Do not use a cleaner that contains alcohol or acetone. You
might damage the screen.
44
Chapter 4
Page 52

Monitor power and screen appearance
IMPORTANT
Detailed instructions for Apple Displays software are provided in
Macintosh Guide (called Mac OS Guide on some computers) and in Monitors
& Sound Guide. For Windows users, detailed instructions about onscreen
controls are provided in Chapter 3, “Using Your Monitor With WindowsBased Co mputers.”
The monitor’s power indicator light doesn’t come on.
m Make sure the monitor power button is turned on.
m Make sure the computer is turned on.
The monitor’s power indicator light won’t tur n green unless your computer
is on.
m Make sure an energy saver program isn’t active on the computer.
For the 20-inch monitor (19-inch VIS), the monitor’s indicator light is
amber when an energy saver program is on. Als o, it may take some t im e to
wake up your computer af ter you use an energy s aver. For the 17-inch monitor
(16 .1-inch VIS) , t he monitor’s indicator light is off in energy-saving mode.
m Make sure the power cord is plugged in properly.
If the monitor power cord is plugged into your computer, make sure your
computer is on and the cord is firmly plugged in.
If the monitor power cord is plugged into a grounded wall outlet, make sure
the cord is fi rmly pl ugged in. Check to see whether power to the outlet has
been interrupted. You can test the outlet by plugging in something that you
know works—like a desk lamp or radio. If the test appliance works, but the
monitor doesn’t, contact an Apple-authorized dealer or service provider.
m Make sure the monitor cable is connected to your computer properly.
m Make sure the thumbscrews on the monitor cable are tightened securely.
45
Tips and Troubleshooting
Page 53

No image appears on the screen and the monitor’s power indicator light is on.
m Make sure the monitor cable is connected correctly to the computer.
m Make sure the thumbscrews on the monitor cable are tightened securely.
m Make sure the contrast (O) and brightness (¤) controls are set correctly.
The contrast and brightness controls are on the front of your monitor.
m Restart your computer, holding down x-Option AV. This resets the monitor
to factory default settings.
The screen is dark or appears dim.
m Make sure that your computer and monitor are turned on.
m Make sure that the power cord and the monitor cable are securely
connected at both ends.
m Increase the contrast and brightness of the screen image. The contrast (O)
and brightness (¤) controls are on the front of your monitor.
m A screen saver that darkens your screen may be activated. Press any key on
the keyboard to reactivate the monitor.
m On Mac OS–based computers, the Energy Saver option may be activated.
Press any key on the keyboard to reactivate the monitor. In approximately
10 seconds, the monitor is reactivated.
Over time, you experience eyestrain.
m Adjust t he screen contrast. In a bright room, contrast is usually best set at
maximum; in a dim room, lower contrast is usually more comfortable. The
contrast (O) controls are on the front of your monitor. Also, be sure to take
occasional breaks to focus your eyes on a distant object.
m Adjust t he color temp erature or white point of the screen image. For most
application programs, a white point of 9300 K is best. For Mac OS–based
computers, click the Color button in the Monitors & Sound control panel
and set a new white point. For Windows-based computers, open the Tools
menu, select Color Temperature, and set a new white point.
46
Chapter 4
Page 54

Contrast (O) and brightness (¤) controls on the front of the monitor don’t appear
to work.
m For Mac OS–based computers, your monitor may have the contrast (O)
and brightness (¤) controls disabled. Click the Color button in the
Monitors & Sound control panel and select Preferences. Under Calibration
Protection, make sure that the checkbox to disable contrast and brightness
controls is not marked; then, click OK.
The screen doesn’t dim when Energy Saver or other energy-saving software is on.
m Make sure the energy-saving software is installed prop erly and the amount
of tim e you’ve se t up to trigger it has passed. For Mac OS–based
computers, see “Conserving Energy” in Chapter 2 for more information.
For Windows-based computers, see the manual that came with your
energy-saving computer.
The screen flickers.
m Make sure the monitor cable is connected firmly to the correct por t on the
back of the computer.
m The flickering could be caused by interference from a nearby power line
or electrical equipment—for example, a radio, a microwave oven, or
another computer. Try relocating nearby electrical equipment, or moving
your computer and monitor.
m If you have more than one monitor attached to your computer, the monitors
might be interfering with one another. Make sure you’re using a shielded
ADB connector cable. Move the monitors farther apart or set the monitors
at an angle, so their screens are close and their back pan els are farther
apart. If, after moving the monitors more than 16 inches apart, you still see
flickering, contact an Apple-authorized dealer or service provider.
m If you are using a video card that has a very low refresh rate (below 67 Hz),
the monitor may flicker. You may be able to change the refresh rate for the
card. If possible, use a 75 Hz setting. See the manual that came with your
video card for more information.
47
Tips and Troubleshooting
Page 55

There are one or two very thin gray lines across the screen, one near the top and the
other near the bottom.
m This is a normal characteristic of the Trinitron color picture tube design.
The lines do not appear in any documents you print.
The screen image is off-center.
m Adjust t he center of the image. For Mac OS–based computers, click the
Geometry button in the Monitors & Sound control panel and modify the
Position setting. For Windows-based computers, select the Geometry
menu; then, click Vertical Shift. Press – to move the screen down and + to
move the screen up. Repeat the process for Horizontal Shift.
The screen image is tilted slightly to the left or right.
m Adjust t he rotation of the screen image. For Mac OS–based computers,
click the Geometry button in the Monitors & Sound control panel and
modify the Rotate settings. For Windows-based computers, select the
Geometry menu; then, click Rotate. Press – to rotate counterclockwise and
+ to rotate clockwise.
The screen image is too large or too small.
m Adjust the horizontal or vertical size of the screen image. For
Mac OS–based computers, click the Geometry button in the Monitors &
Sound control panel and modify the height/width settings. For Windowsbased computers, select the Geometry menu; then, click Width. Press – to
decrease width and + to increase width. Repeat the process for Height.
m Make sure overscan is off. For Mac OS–based computers, click the
Geometry button in the Monitors & Sound control panel and select Off
for Overscan. For Windows-based computers, select the Tools menu; then,
cli ck Overscan. Press – to turn off overscan.
m Try changing to another resolution. For Mac OS–based computers, click
the Monitor button in the Monitors & Sound control panel and select
another resolution. For Windows-based computers, see the manual that
came with your computer or video card.
48
Chapter 4
Page 56

Images or text on your screen appear fuzzy or blurred.
m Adjust the horizontal or vertical convergence of the screen image. For
Mac OS–based computers, click the Geometry button in the Monitors &
Sound control panel and select Convergence to change settings. For
Windows-based computers, select the Convergence menu; then, click
Vertica l. Press – to move the red signal down and the blue signal up. Press
+ to move the red signal up and the blue signal down. Then, click
Horizontal. Press – to move the red signal to the right and the blue signal
to the left. Press + to move the red signal to the left and the blue signal to
the right.
The colors on your screen appear too blue, too yellow, or too red.
m Adjust t he color settings, recalibrate the monitor, set a new white point, or
reset the monitor to the default factory color settings. For Mac OS–based
computers, click the Color button in the Monitors & Sound control panel
to open color controls. For Windows-based computers, see “Adjusting
Color Settings and Other Features” in Chapter 3 for more information.
The screen appears greenish, the screen image is blank or unreadable, or there is
“snow” on the screen.
m Make sure the monitor cable is connected firmly to the correct por t on the
back of the computer.
There are wavy lines on the screen, creating an optical effect or moiré pattern.
m You may see a moiré pattern while in some resolutions, depending on the
desktop pattern displayed on the screen (the black-and-white checkerboard
pattern frequently causes moiré). For Mac OS–based computers, click the
Monitor button in the Monitors & Sound control panel and change to
another resolution. For Windows-based computers, see the manuals that
came with your computer. To change the desktop pattern, see the manuals
that came with your computer or, for Mac OS–based computers, also see
Macintosh (or Mac OS) Guide for more information.
Your application program doesn’t recognize changes you make in resolution settings.
m Some application programs do not properly support resolution changes you
make to your monitor. You may have to close and restart your program for
it to recognize the resolution changes.
49
Tips and Troubleshooting
Page 57

Monitors & Sound control panel for Mac OS–based computers
IMPORTANT
Detailed instructions for Apple Displays software are provided in
Macintosh Guide (called Mac OS Guide on some computers) and Monitors &
Sound Guide.
The name of your monitor doesn’t appear in the Monitors & Sound control panel.
m After you set up your monitor, make sure the monitor power is on and
restart your computer.
m Make sure the ADB connector on the monitor cable is plugged directly into
your computer’s ADB port.
m Make sure you’ve installed the Apple Displays software that came with
your monitor. See “Installing Apple Displays Software” in Chapter 2 for
more information.
m You may be using a video card that’s not compatible with your monitor.
Contact the manufacturer of the video card for information.
A message appears, “This version of system software is not supported by the
Apple Displays software.”
m Make sure you’re using System 7.5 or later.
m If this message appears in the Apple Displays Software Installer, make sure
you select the startup hard disk in the Installation dialog box.
A message appears, “The AppleVision preferences are invalid and may have
become corrupted.”
m Delete the AppleVision preferences folder on your hard disk and restart
your computer.
A message appears, “An error has occurred reading from or writing to a file.”
m Make sure you are not starting up from a non-writable disk, such as a CD,
a locked hard drive, or a floppy disk.
50
Chapter 4
Page 58

A message appears, “This monitor is not supported by this version of the
Apple Displays software.”
m Make sure you have installed the Apple Displays software that came with
your monitor. See Chapter 2, “Installing and Using Apple Displays
Software,” for more information.
A message appears, “AppleVision failed to load,” followed by an error code.
m Make sure you’ve plugged the monitor connector and ADB connector on
the monitor cable into the correct ports. You may have plugged them into
the wro ng ports by mistake. See “Connecting the Monitor Cable to a Mac
OS–Based Computer” in Chapter 1 for more information.
m Make sure your video card supports the ColorSync Display. See the manual
that came with your video card or computer.
m Some viruses can cause problems with the Apple Displays software. Make
sure you regularly scan your computer for viruses.
m If Apple Displays software is installed and you start up your computer
holding the Shift key down, the Display Enabler extension will not load
and the software will not run. Restart your computer without disabling
extensions to use the Apple Displays software.
m If none of the suggestions solves the problem, reinstall the Apple Displays
software.
The Monitors & Sound control panel opens, but does not include the Geometry or
Color button.
m Make sure the ADB connector on the monitor cable is plugged directly into
your computer’s ADB port.
m Reinstall the software that came with your monitor. See Chapter 2,
“Installing and Using Apple Displays Software,” for more information.
ColorSync Profile files are not updated when ColorSync software is installed.
m Out-of-date profiles in the ColorSync Profiles folder are not removed
automatically. If you want to remove a ColorSync profile, you must do so
manually. See Appendix A, “Using ColorSync Software,” for more
information about ColorSync software.
51
Tips and Troubleshooting
Page 59

Your ColorSync monitor appears as a VGA monitor in the Control Strip pop-up menus.
m Make sure the ADB connector on the monitor cable is plugged directly into
your computer’s ADB port.
m Reinstall the software that came with your monitor. See Chapter 2,
“Installing and Using Apple Displays Software,” for more information.
You hear no alert sound.
m Make sure the alert volume control is set correctly. Click the Alerts button
in the Monitors & Sound control panel and reset the System Alert Volume.
Your third-party driver no longer shows up in your Monitors & Sound control panel.
m Some Mac OS–based sound drivers require the Sound control panel, an
older control panel that has been replaced on your computer by the
Monitors & Sound control panel. You can reinstall the Sound control
panel. Open the Apple Extras folder on your hard disk and double-click the
Apple Displays Extras folder. Double-click the Sound control panel icon.
Changes in the Monitors & Sound control panel don’t work for the monitor.
m Make sure you have installed the software that came with your monitor.
m Because each monitor connected to your computer has its own Monitors &
Sound window, use the window that displays the name of your monitor in
the top-left corner.
When you open the Monitors & Sound control panel, only one resolution is available.
m Make sure you have connected the ADB connector to your computer. You
cannot use many of the features of the Apple Displays software without an
ADB connection. See “Connecting the Monitor Cable to a Mac OS–Based
Computer” in Chapter 1 for more information.
m If Apple Displays software is installed and you start up your computer
holding the Shift key down, the Display Enabler extension will not load
and the software will not run. Restart your computer without disabling
extensions to use the software.
m Reinstall the software that came with your monitor. See Chapter 2,
“Installing and Using Apple Displays Software,” for more information.
52
Chapter 4
Page 60

When you turn on overscan, it stays on even when you change resolutions.
m This is a new feature of the ColorSync Display 20" (19" VIS). In other
ColorSync monitors, overscan automatically turns off when you change
resolution settings.
No colors appear on the screen.
m Check to make sure that the number of colors is set correctly in the Control
Strip or in the Monitors & Sound control panel.
No colors appear when you create a custom white point.
m Make sure the color depth on your monitor is set to “Thousands of Colors”
or “Millions of Colors.” Click the Monitor button in the Monitors & Sound
control panel and reset the color depth, or use the Control Strip to
change se tti ngs.
You do not have a CD-ROM disc drive for installing the Apple Displays software.
m You can order a set of floppy disks of the Apple Displays software. See the
service and support information that came with your monitor for more
information. Support information and Apple software updates are also
available via Apple’s World Wide Web sites: http://www.info.apple.com and
http://www.support.apple.com.
53
Tips and Troubleshooting
Page 61

Picture tube
m ColorSync Display 17": 17-i nch (1 6.1-inch diagonal vie wable imag e size)
Tri nitron CRT
m ColorSync Display 20": 20-inc h (19.0-inch di agonal v ie wable image size)
Tri nitron CRT
Screen
m 0.26 millimeter (mm) stripe pitch
Input signals
m Red, green, a nd blue video signals
m Multiple scan
m Separate Horizontal and Vertical Sync (DDC 1/2B)
m DDC clock and data signals
m Vertical Re f res h : 40 hertz (H z ) to 120 Hz (ColorSync Displ ay 17" [16.1" VIS]);
48 Hz to 120 Hz (Col orSync Display 20" [19" VIS])
m Horizontal Scan: 30 kilohertz (kHz) to 80 kHz (ColorSync Display 17"
[16.1" VIS]); 30 kHz to 94 kHz (ColorSync Display 20" [19" VIS])
63
Appendix B
Technical Information
Page 62

Power-saving and environmental features
m NUTEK compliant
ColorSync monitors are equipped with energy-saving features that allow
the monitors to conserve energy when the computer is not in use.
DPMS mode Mac OS Energy Power consumption* Power indicator*
Saver mode
On Normal <125 W (17") Green (17")
<150 W (20") Green (20")
Standby Display sleep <60 W (17") Green (17")
<30 W (20") Orange (20")
Suspend — <30 W (17") Green (17")
<15 W (20") Orange (20")
Off System sleep 0 W (17") Off (17")
<5W (20") Orange (20")
*The 17-inch monitor has a 16.1-inch diagonal viewable image size; the 20-inch monitor has a 19-inch diagonal
viewable image size.
For instructions on adjusting the system and monitor sleep settings, and
additional energy-conservation information, see “Conserving Energy” in
Chapter 2.
m TCO 95 co mpliant
This product has been certified by TCO (the Swedish Confederation of
Professional Employees) to have met global safety standards and powersaving features, such as automatic monitor power-down and reduced
electromagnetic fields.
m MPR II compliant
This product has reduced electromagnetic and electrostatic emissions.
m Energy Star compliant
This product complies with the United States Environmental Protection
Agency’s (E PA) En ergy Star criteria for energy-efficient office products.
The EPA Energy Star Office Equipment program is a partnership program
to promote energy-efficient personal computers, monitors, printers, fax
machines, and copiers. Reducing the energy consumption from this
equipment can help combat smog, acid rain, and climate change by
decreasing emissions from electricity generation.
m DPMS compliant
64
Appendix B
Page 63

This product’s power-saving features comply with the Video Electronics
Standards Association (VESA) Display Power Management Signaling
(DPMS). (Connected CPU must also be VESA DPMS compliant to use
DPMS features.)
User controls
m Power-on button
m Automatic degauss at power-up; manual degauss by turning power switch
off, then on
m Control buttons: Contrast, brightness, and five buttons for onscreen controls
m Additional screen contro ls available using the Monitors & Sound contro l panel
(Mac OS–b ased computers) or onscreen control s (Windows-based computers)
Factory preset timings (ColorSync Display 17" [16.1" VIS])
m Adjusted at the factory for the following standard modes:
Mode Resolution Vertical refresh rate Horizontal scan rate
(hertz) (kilohertz)
VGA 640 x 480 60 31.5
Macintosh 640 x 480 66.67 34.97
VESA 800 x 600 60.31 37.9
VESA 800 x 600 75 46.9
Macintosh 832 x 624 74.55 49.7
Macintosh 1024 x 768 74.93 60.24
Macintosh 1152 x 870 75 68.7
VESA 1024 x 768 60 48.4
VESA 1280 x 1024 60 64.3
VESA 1280 x 1024 75.03 79.98
65
Technical Information
Page 64

Factory preset timings (ColorSync 20" [19" VIS])
m Adjusted at the factory for the following standard modes:
Mode Resolution Vertical refresh rate Horizontal scan rate
(hertz) (kilohertz)
VGA 640 x 480 60 31.469
Macintosh 640 x 480 67 35.036
VESA 640 x 480 72 37.861
VESA 640 x 480 75 37.500
VESA 640 x 480 85 43.269
VESA 800 x 600 56 35.160
VESA 800 x 600 60 37.879
VESA 800 x 600 72 48.077
VESA 800 x 600 75 46.875
VESA 800 x 600 85 53.674
Macintosh 832 x 624 75 49.700
IBM 1024 x 768 87 interlaced 35.522 interlaced
VESA 1024 x 768 60 48.363
VESA 1024 x 768 70 56.476
VESA 1024 x 768 75 60.023
VESA 1024 x 768 85 68.677
Macintosh 1152 x 870 75 68.700
VESA 1280 x 1024 75 79.976
VESA 1280 x 1024 85 91.146
VESA 1600 x 1200 75 93.750
Input electrical requirements
m Voltage: 100–240 V
m Frequency: 50–60 Hz
m Power: 130 W maximum (ColorSync Display 17" [16.1" VIS]);
150 W maximum (ColorSync Display 20" [19" VIS])
66
Appendix B
Page 65

Weight
m ColorSync Display 17" (16.1" VIS): Approximately 50 pounds (23 kilograms)
m ColorSync Display 20" (19" VIS): Approximately 67 pounds (30 kilograms)
Dimensions
m Height: 425 millimeters (mm) ± 3 mm (ColorSync Display 17" [16 .1" VIS]);
474 millimeters (mm) ± 3 mm (ColorS ync Display 20" [19" VIS])
m Width: 410 mm ± 3 mm (ColorSync Display 17" [1 6. 1" VIS]); 484 mm ± 3
mm (ColorSync Display 20" [19" VIS])
m Depth: 45 5 mm ± 3 mm (ColorSync Display 17" [16.1" VIS]); 515 mm ± 3
mm (ColorSync Display 20" [19" VIS]) (not including cables)
Interfaces
m Apple Desktop Bus (ADB): Two ADB pass-through output ports
Color compatibility
m Works with ColorSync software version 2.1 or higher. ColorSync profiles
are compatible with the profile specifications of the International Color
Consortium (ICC).
Temperature
Celsius (C) and Fahrenheit (F)
m Operating 10˚ to 40˚ C (50˚ to 104˚ F)
m Storage 0˚ to 60˚ C (32˚ to 140˚ F)
m Shipping –40˚ to 6 0˚ C (–4˚ to 140˚ F)
Humidity (noncondensing) 17" (16.1" VIS) 20" (19" VIS)
Operating 10% to 80% 20% to 95%
Storage 5% to 90% 5% to 95%
Shipping 5% to 90% 5% to 95%
Altitude
m Operating 0 to 10,000 feet (ft.)
0 to 3048 meters (m)
m Shipping 0 to 35,000 ft.
0 to 10,670 m
67
Technical Information
Page 66

Display cable specifications
m 15-pin miniature D-type connector
Pin Signal
1 Red video ground
2 Red video
3 Not used
4ID 1/DDC RTN
5Green video
6Green video ground
7ID 2/DDC SCL
8 DDC 5V (not used for 17")
9Blue video
10 ID 3/DDC SDA
11 Vertical Sync return
12 Vertical Sync
13 Blue video ground
14 Horizontal Sync return
15 Horizontal Sync
Shell Shield ground
8 7 6 5 4 3 2 1
15 14 13 12 11 10 9
68
Appendix B
Page 67

VGA adapter specifications
m Standard 15-pin VGA connector
Pin Signal
1 Red video
2Green video
3Blue video
4Monitor ID 2
5 DDC return
6 Red return
7Green return
8Blue return
9 DDC 5V (not used for 17")
10 Sync return
11 Monitor ID 0
12 SDA (ID 1)
13 Horizontal Sync
14 Vertical Sync
15 SCL (ID 3)
Shell Shield ground
12345
678910
11 12 13 14 15
69
Technical Information
 Loading...