


E2770SD/E2770SHE/E2770PQU
Q2770PQU
M2770V/ M2870V/M2870VHE/M2870VQ
I2770V/I2770VHE
(LED Backlight)
Safety........................................................................................................................................................................ |
4 |
National Conventions......................................................................................................................................... |
4 |
Power ................................................................................................................................................................ |
5 |
Installation.......................................................................................................................................................... |
6 |
Cleaning............................................................................................................................................................. |
7 |
Other.................................................................................................................................................................. |
8 |
Setup ........................................................................................................................................................................ |
9 |
Content of the Box ............................................................................................................................................. |
9 |
Setup Stand ..................................................................................................................................................... |
10 |
Adjusting Viewing Angle................................................................................................................................... |
11 |
Connecting the Monitor.................................................................................................................................... |
12 |
Wall Mounting .................................................................................................................................................. |
15 |
Adjusting ................................................................................................................................................................. |
16 |
Setting Optimal Resolution .............................................................................................................................. |
16 |
Windows Vista .......................................................................................................................................... |
16 |
Windows XP ............................................................................................................................................. |
18 |
Windows ME/2000.................................................................................................................................... |
19 |
Windows 8 ................................................................................................................................................ |
20 |
Hotkeys............................................................................................................................................................ |
22 |
Clear Vision ..................................................................................................................................................... |
23 |
Using "MHL(Mobile High-Definition Link)" Optional ................................................................................... |
24 |
OSD Setting..................................................................................................................................................... |
25 |
Luminance ................................................................................................................................................ |
26 |
Image Setup ............................................................................................................................................. |
27 |
Color Setup............................................................................................................................................... |
28 |
Picture Boost ............................................................................................................................................ |
29 |
OSD Setup ............................................................................................................................................... |
30 |
Extra ......................................................................................................................................................... |
31 |
Exit............................................................................................................................................................ |
32 |
LED Indicator ................................................................................................................................................... |
33 |
Driver ...................................................................................................................................................................... |
34 |
Monitor Driver .................................................................................................................................................. |
34 |
Windows 2000 .......................................................................................................................................... |
34 |
Windows ME............................................................................................................................................. |
34 |
Windows XP ............................................................................................................................................. |
35 |
Windows Vista .......................................................................................................................................... |
38 |
Windows 7 ................................................................................................................................................ |
40 |
Windows 8 ................................................................................................................................................ |
44 |
i-Menu.............................................................................................................................................................. |
48 |
e-Saver ............................................................................................................................................................ |
49 |
Screen+ ........................................................................................................................................................... |
50 |
Troubleshoot ........................................................................................................................................................... |
51 |
Specification............................................................................................................................................................ |
53 |
General Specification....................................................................................................................................... |
53 |
Preset Display Modes ...................................................................................................................................... |
57 |
Pin Assignments .............................................................................................................................................. |
59 |
2 |
|
Plug and Play................................................................................................................................................... |
61 |
Regulation............................................................................................................................................................... |
62 |
FCC Notice ...................................................................................................................................................... |
62 |
WEEE Declaration Optional ....................................................................................................................... |
63 |
WEEE Declaration for India Optional ......................................................................................................... |
63 |
EPA Energy Star Optional .......................................................................................................................... |
63 |
EPEAT Declaration Optional ...................................................................................................................... |
64 |
TCO DOCUMENT ........................................................................................................................................... |
65 |
Warranty Statement for Europe ....................................................................................................................... |
66 |
Warranty Statement for Middle East and Africa (MEA) .................................................................................... |
68 |
AOC Pixel Policy ISO 9241-307 Class 1 ......................................................................................................... |
70 |
Warranty Statement for North & South America (excluding Brazil) .................................................................. |
71 |
3

Safety
National Conventions
The following subsections describe notational conventions used in this document.
Notes, Cautions, and Warnings
Throughout this guide, blocks of text may be accompanied by an icon and printed in bold type or in italic type. These blocks are notes, cautions, and warnings, and they are used as follows:
NOTE: A NOTE indicates important information that helps you make better use of your computer system.
CAUTION: A CAUTION indicates either potential damage to hardware or loss of data and tells you how to avoid the
problem.
WARNING: A WARNING indicates the potential for bodily harm and tells you how to avoid the problem. Some warnings may appear in alternate formats and may be unaccompanied by an icon. In such cases, the specific presentation of the warning is mandated by regulatory authority.
4
Power
 The monitor should be operated only from the type of power source indicated on the label. If you are not sure of the type of power supplied to your home, consult your dealer or local power company.
 The monitor is equipped with a three-pronged grounded plug, a plug with a third (grounding) pin. This plug will fit only into a grounded power outlet as a safety feature. If your outlet does not accommodate the three-wire plug, have an electrician install the correct outlet, or use an adapter to ground the appliance safely. Do not defeat the safety purpose of the grounded plug.
 Unplug the unit during a lightning storm or when it will not be used for long periods of time. This will protect the monitor from damage due to power surges.
 Do not overload power strips and extension cords. Overloading can result in fire or electric shock.
 The wall socket shall be installed near the equipment and shall be easily accessible.
5

Installation
 Do not place the monitor on an unstable cart, stand, tripod, bracket, or table. If the monitor falls, it can injure a person and cause serious damage to this product. Use only a cart, stand, tripod, bracket, or table recommended by the manufacturer or sold with this product. Follow the manufacturer’s instructions when installing the product and use mounting accessories recommended by the manufacturer. A product and cart combination should be moved with care.
 Never push any object into the slot on the monitor cabinet. It could damage circuit parts causing a fire or electric shock. Never spill liquids on the monitor.
 Do not place the front of the product on the floor.
 If you mount the monitor on a wall or shelf, use a mounting kit approved by the manufacturer and follow the kit instructions.
 Leave some space around the monitor as shown below. Otherwise, air-circulation may be inadequate hence overheating may cause a fire or damage to the monitor.
See below the recommended ventilation areas around the monitor when the monitor is installed on the wall or on the stand:
6
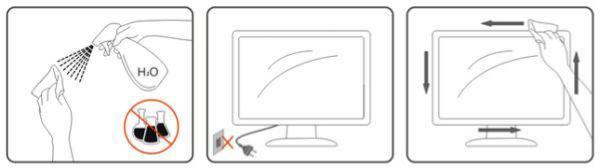
Cleaning
 Clean the cabinet regularly with cloth. You can use soft-detergent to wipe out the stain, instead of strong-detergent which will cauterize the product cabinet.
 When cleaning, make sure no detergent is leaked into the product. The cleaning cloth should not be too rough as it will scratch the screen surface.
 Please disconnect the power cord before cleaning the product.
7
Other
 If the product is emitting a strange smell, sound or smoke, disconnect the power plug IMMEDIATELY and contact a Service Center.
 Make sure that the ventilating openings are not blocked by a table or curtain.
 Do not engage the LCD monitor in severe vibration or high impact conditions during operation.
 Do not knock or drop the monitor during operation or transportation.
 For display with glossy bezel the user should consider the placement of the display as the bezel may cause disturbing reflections from surrounding light and bright surfaces.
8
Setup
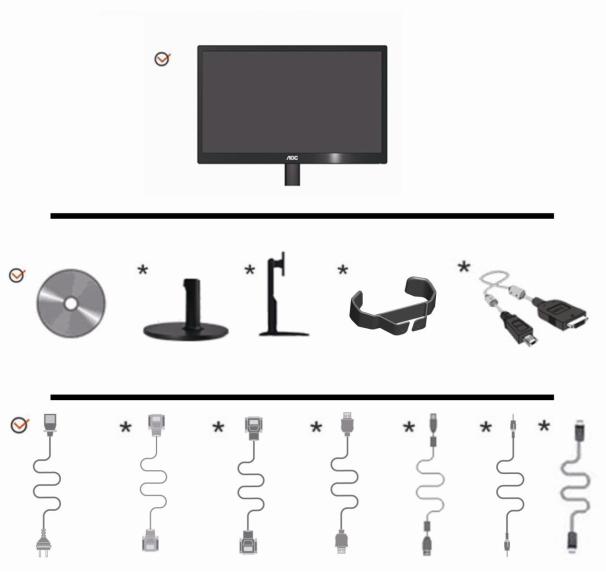
Content of the Box
Monitor
CD Manual Monitor Base /Stand |
Wire holder |
MHL cable |
Power Cable DVI Cable Analog Cable HDMI Cable USB Cable Audio Cable DP Cable
 Not all signal cables (Analog , Audio, DVI, USB, DP, MHLand HDMI cables) will be provided for all countries and regions. Please check with the local dealer or AOC branch office for confirmation.
9
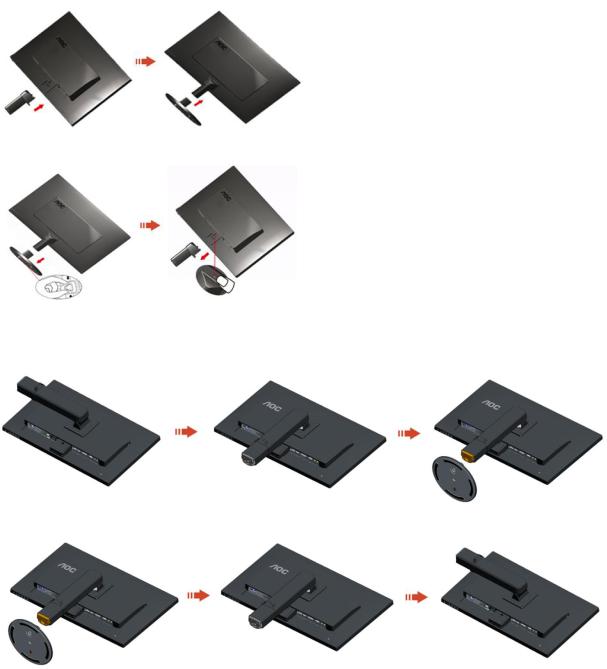
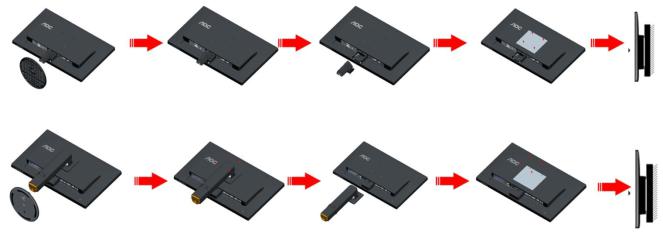
Setup Stand
Please setup or remove the Stand following the steps as below.
70S/70V Setup
Remove:
70P
Setup:
Remove:
10
Adjusting Viewing Angle
For optimal viewing it is recommended to look at the full face of the monitor, then adjust the monitor's angle to your own preference.
Hold the stand so you will not topple the monitor when you change the monitor's angle. You are able to adjust the monitor's angle from -5°to 25 °.
NOTE:Do not adjust the viewing angle over 25 degrees in order to avoid damage.
 NOTE:
NOTE:
Do not touch the LCD screen when you change the angle. It may cause damage or break the LCD screen.
Do not put your hand close to the gap between the monitor and the base to avoid the injury when adjusting the viewing angle.
11
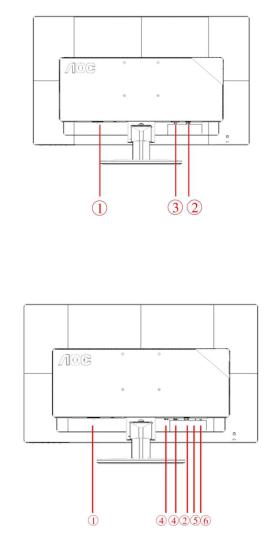
Connecting the Monitor
Cable Connections In Back of Monitor and Computer:
1.E2770SD/M2770V/M2870V/I2770V
2.E2770SHE
12
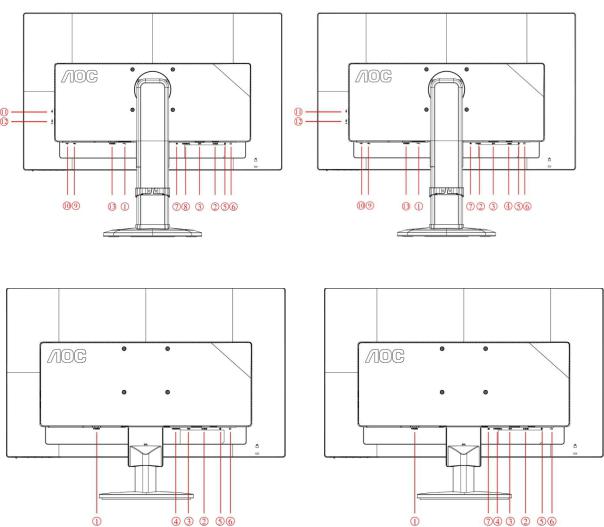
3 .E2770PQU |
4 .Q2770PQU |
5. M2870VHE / I2770VHE |
6. M2870VQ |
1.Power
2.Analog (D-Sub 15-Pin VGA cable)
3.DVI
4.HDMI
5.Audio in
6.Earphone out
7.Display port
8.HDMI/MHL
9.USB input
10.USB 2.0x2
11.USB 3.0
12.USB 3.0+ fast charging
13.AC power switch
To protect equipment, always turn off the PC and LCD monitor before connecting.
1.Connect the power cable to the AC port on the back of the monitor.
2.Connect one end of the 15-pin D-Sub cable to the back of the monitor and connect the other end to the computer's D-Sub port.
13
3.(Optional –Requires a video card with DVI port)Connect one end of the DVI cable to the back of the monitor and connect the other end to the computer’s DVI port.
4.(Optional – Requires a video card with HDMI port) - Connect one end of the HDMI cable to the back of the monitor and connect the other end to the computer’s HDMI port.
5.(Optional – Requires a video card with DP port) - Connect one end of the DP cable to the back of the monitor and connect the other end to the computer’s DP port.
6.(Optional – Requires a video card with MHL port) - Connect one end of the MHL cable to the back of the monitor and connect the other end to the computer’s MHL port.
7.(Optional)Connect the audio cable to audio in port on the back of the monitor
8.Turn on your monitor and computer.
If your monitor displays an image, installation is complete. If it does not display an image, please refer Troubleshooting.
14
Wall Mounting
Preparing to Install An Optional Wall Mounting Arm.
70S/70V
70P
This monitor can be attached to a wall mounting arm you purchase separately. Disconnect power before this procedure. Follow these steps:
1.Remove the base.
2.Follow the manufacturer's instructions to assemble the wall mounting arm.
3.Place the wall mounting arm onto the back of the monitor. Line up the holes of the arm with the holes in the back of the monitor.
4.Insert the 4 screws into the holes and tighten.
5.Reconnect the cables. Refer to the user's manual that came with the optional wall mounting arm for instructions on attaching it to the wall.
Noted : VESA mounting screw holes are not available for all models, please check with the dealer or official department of AOC.
15
Adjusting
Setting Optimal Resolution
Windows Vista
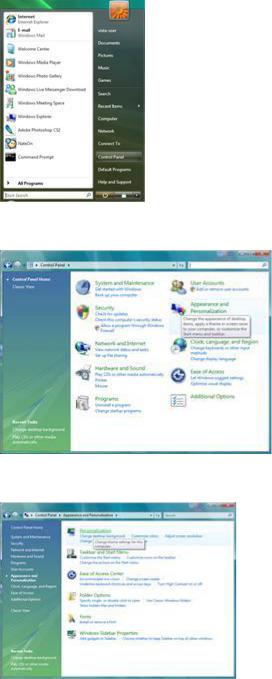
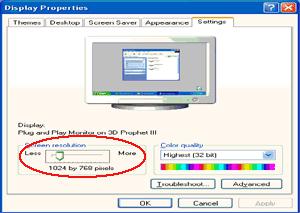
For Windows Vista:
1 Click START.
2 Click CONTROL PANEL.
3 Click Appearance and Personalization.
4 Click Personalization
16
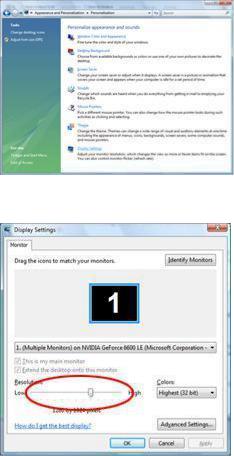
5 Click Display Settings.
6 Set the resolution SLIDE-BAR to Optimal preset resolution
17

Windows XP
For Windows XP:
1 Click START.
2 Click SETTINGS.
3 Click CONTROL PANEL.
4 Click Appearance and Themes.
5 Double click DISPLAY.
18
6 Click SETTINGS.
7 Set the resolution SLIDE-BAR to Optimal preset resolution
Windows ME/2000
For Windows ME/2000:
1 Click START.
2 Click SETTINGS.
3 Click CONTROL PANEL.
4 Double click DISPLAY.
5 Click SETTINGS.
6 Set the resolution SLIDE-BAR to Optimal preset resolution
19

Windows 8
For Windows 8:
1.Right click and click All apps at the bottom-right of the screen.
2.Set the “View by” to “Category”.
3.Click Appearance and Personalization.
20
4.Click DISPLAY.
5.Set the resolution SLIDE-BAR to Optimal preset resolution.
21
Hotkeys
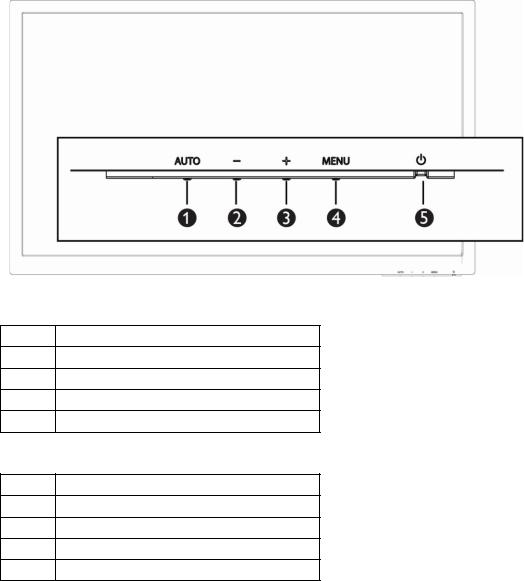
E2770SD/M2770V/M2870V/I2770V
1Source/Auto/Exit
2Clear Vision/-
34:3 or Wide/+
4Menu/Enter
5Power
E2770SHE/ E2770PQU/Q2770PQU/M2870VQ/M2870VHE/I2770VHE
1Source/Auto/Exit
2Clear Vision/-
3Volume/+
4Menu/Enter
5Power
Power
Press the Power button to turn on/off the monitor.
Auto / Exit
When there is no OSD, press Auto/Source button continuously about 3 second to do auto configure .
Source hot key
When the OSD is closed, press Source button will be Source hot key function. Press Source button continuously to select the input source showed in the message bar , press Menu/Enter button to change to the source selecte
22
 Loading...