


416V User’s Manual
About This Guide
This guide describes the monitor's features, setup, and operation. lnformation in this document is subject to change without notice.
The sections are as follows:
Safety Instructions: lists safety information.
Setup: describes the initial setup process.
Using the Monitor: gives an overview of how to use the monitor.
Drivers: provides driver installation instructions for Windows.
Technical Support : provides tips and solutions for common problems.
Product Information: lists the technical specifications of the monitor.
Warranty Statement: Warranty Statement used in Europe.
National Conventions
The following subsections describe notational conventions used in this document.
Notes, Cautions, and Warnings
Throughout this guide, blocks of text may be accompanied by an icon and printed in bold type or in italic type. These blocks are notes, cautions, and warnings, and they are used as follows:
 NOTE: A NOTE indicates important information that helps you make better use of your computer system.
CAUTION: A CAUTION indicates either potential damage to hardware or loss of data and tells you how to avoid the problem.
 WARNING: A WARNING indicates the potential for bodily harm and tells you how to avoid the problem.
Some warnings may appear in alternate formats and may be unaccompanied by an icon. In such cases, the specific presentation of the warning is mandated by regulatory authority.
Product Registration
Please link www.aoc.com, select your country or region, log in Product Registration to register.

FCC Notice
FCC Class B Radio Frequency Interference Statement WARNING: (FOR FCC CERTIFIED MODELS)
NOTE: This equipment has been tested and found to comply with the limits for a Class B digital device, pursuant to Part 15 of the FCC Rules. These limits are designed to provide reasonable protection against harmful interference in a residential installation. This equipment generates, uses and can radiate radio frequency energy, and if not installed and used in accordance with the instructions, may cause harmful interference to radio communications. However, there is no guarantee that interference will not occur in a particular installation. If this equipment does cause harmful interference to radio or television reception, which can be determined by turning the equipment off and on, the user is encouraged to try to correct the interference by one or more of the following measures:
1.Reorient or relocate the receiving antenna.
2.Increase the separation between the equipment and receiver.
3.Connect the equipment into an outlet on a circuit different from that to which the receiver is connected.
4.Consult the dealer or an experienced radio/TV technician for help.
NOTICE :
1.The changes or modifications not expressly approved by the party responsible for compliance could void the user's authority to operate the equipment.
2.Shielded interface cables and AC power cord, if any, must be used in order to comply with the emission limits.
3.The manufacturer is not responsible for any radio or TV interference caused by unauthorized modification to this equipment. It is theresponsibilities of the user to correct such interference.
WEEE Declaration
Disposal of Waste Equipment by Users in Private Household in the European Union.
This symbol on the product or on its packaging indicates that this product must not be disposed of with your other household waste.Instead, it is your responsibility to dispose of your waste equipment by handing it over to a designated collection point for the recycling of waste electrical and electronic equipment.The separate collection and recycling of your waste equipment at the time of disposal will help to conserve natural resources and ensure that it is recycled in a manner that protects human health and the environment. For more information about where you can drop off your waste equipment for recycling, please contact your local city office, your household waste disposal service or the shop where you purchased the product .
HG Declaration
 SAFETY: Lamp Disposal
LAMP(S) INSIDE THIS PRODUCT CONTAIN MERCURY AND MUST BE RECYCLED OR DISPOSED OF ACCORDING TO LOCAL, STATE OR FEDERAL LAWS. FOR MORE INFORMATION, CONTACT THE ELECTRONIC INDUSTRIES ALLIANCE AT
WWW.EIAE.ORG.
Precautions
WARNING: Use of controls, adjustments, or procedures other than those specified in this documentation may result in exposure to shock, electrical hazards, and/or mechanical hazards.
Read and follow these precautions when connecting and using your computer monitor:
PRECAUTIONS
Do not use the monitor near water, e.g. near a bathtub, washbowl, kitchen sink, laundry tub, swimming pool or in a wet basement.
Do not place the monitor on an unstable cart, stand, or table. If the monitor falls, it can injure a person and cause serious damage to the appliance. Use only a cart or stand recommended by the manufacturer or sold with the monitor. If you mount the monitor on a wall or shelf, use a mounting kit approved by the manufacturer and follow the kit instructions.
Slots and openings in the back and bottom of the cabinet are provided for ventilation. To ensure reliable operation of the monitor and to protect it from overheating, be sure these openings are not blocked or covered. Do not place the monitor on a bed, sofa, rug, or similar surface. Do not place the monitor near or over a radiator or heat register. Do not place the monitor in a bookcase or cabinet unless proper ventilation is provided.
The monitor should be operated only from the type of power source indicated on the label. If you are not sure of the type of power supplied to your home, consult your dealer or local power company.
The monitor is equipped with a three-pronged grounded plug, a plug with a third (grounding) pin. This plug will fit only into a grounded power outlet as a safety feature. If your outlet does not accommodate the three-wire plug, have an electrician install the correct outlet, or use an adapter to ground the appliance safely. Do not defeat the safety purpose of the grounded plug.
Unplug the unit during a lightning storm or when it will not be used for long periods of time. This will protect the monitor from damage due to power surges.
Do not overload power strips and extension cords. Overloading can result in fire or electric shock.
Never push any object into the slot on the monitor cabinet. It could short circuit parts causing a fire or electric shock. Never spill liquids on the monitor.
Do not attempt to service the monitor yourself; opening or removing covers can expose you to dangerous voltages and other hazards. Please refer all servicing to qualified service personnel.
To ensure satisfactory operation, use the monitor only with UL listed computers which have appropriate configured receptacles marked between 100 - 240V AC, Min. 5A.
The wall socket shall be installed near the equipment and shall be easily accessible.
For use only with the attached power adapter (Output 12Vdc) which have UL,CSA listed license(Only for monitors with power adapter).
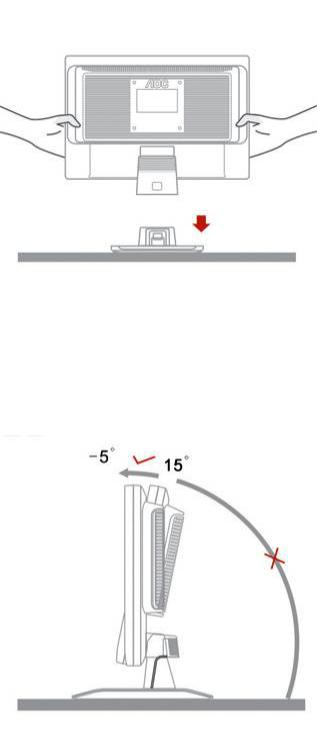
Setup the stand and base
Please setup or remove the base following below steps.
Adjusting Viewing Angle
For optimal viewing it is recommended to look at the full face of the monitor, then adjust the monitor's angle to your own preference.
Hold the stand so you do not topple the monitor when you change the monitor's angle.
You are able to adjust the monitor's angle from -5°to 15¡ã.
 NOTE:
NOTE:
Do not touch the LCD screen when you change the angle. It may cause damage or break the LCD screen.
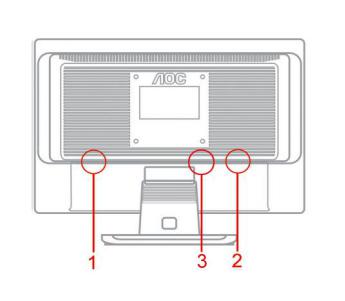
Attaching the Cables
Cable Connections On Back of Monitor and Computer
1.Power
2.Analog 3. DVI
Turn off your computer before performing the procedure below.
1.Connect the power cable to the AC port on the back of the monitor.
2.Connect one end of the 15-pin D-Sub cable to the back of the monitor and connect the other end to the computer's D-Sub port.
3.Turn on your monitor and computer.
If your monitor displays an image, installation is complete. If it does not display an image, see Troubleshooting.

Attaching Wall Mounting Arm
Preparing to Install An Optional Wall Mounting Arm
This monitor can be attached to a wall mounting arm you purchase separately. Disconnect power before this procedure. Follow these steps:
1.Remove the base.
2.Follow the manufacturer's instructions to assemble the wall mounting arm.
3.Place the wall mounting arm onto the back of the monitor. Line up the holes of the arm with the holes in the back of the monitor.
4.Insert the 4 screws into the holes and tighten.
5.Reconnect the cables. Refer to the user's manual that came with the optional wall mounting arm for instructions on attaching it to the wall.
Noted : VESA mounting screw holes are not available for all models, please check with the dealer or official department of AOC.
 Loading...