

Page 1
User Guide
English ( 3 – 5 )
Guía del usuario
Español ( 6 – 8 )
Guide d’utilisation
Français ( 9 – 11 )
Guida per l’uso
Italiano ( 12 – 14 )
Benutzerhandbuch
Deutsch ( 15 – 17 )
Appendix
English ( 18 )
Page 2

Page 3

User Guide (English)
Introduction
Features
• MIDI mixer to control virtually any DAW
• 8 individual line faders, 1 master fader
• 24 knobs, arranged 3 per channel
• 16 buttons arranged in 2 banks provide mute, solo, and record-arm
• Send all mixer settings to your DAW with a single button press
• 1-to-1 mapping with Ableton Live (Ableton Live Lite included)
Box Contents
MIDImix
USB Cable
Software Download Card
User Guide
Safety & Warranty Manual
Important: Visit akaipro.com and find the webpage for MIDImix to download the
MIDImix Editor Software.
Support
For the latest information about this product (system requirements, compatibility information,
etc.) and product registration, visit akaipro.com.
For additional product support, visit akaipro.com/support.
3
Page 4

Quick Start
Items not listed under Introduction > Box Contents are sold separately.
1. Use the included USB cable to connect MIDImix’s USB port to an available USB port on
your computer (powered on).
2. On your computer, open your digital audio workstation (DAW).
3. Select MIDImix as the controller in the Preferences, Device Setup, or Options of your DAW.
Important: Most of MIDImix’s controls may be automatically mapped to control various trackspecific parameters in your DAW. If your DAW lets you assign its parameters to a hardware
MIDI controller (“MIDI learn”), you can further customize MIDImix’s control mapping.
To set up MIDImix with Ableton Live:
1. Use the included USB cable to connect MIDImix’s USB port to an available USB port on
your computer (powered on).
2. On your computer, open Ableton Live.
3. Click the Options menu (Windows) or Live menu (Mac OS X), and then select Preferences.
4. Click the MIDI/Sync tab.
5. In the Control Surface column, click one of the drop-down menus and select MIDI Mix.
(Make sure the adjacent Input and Output drop-down menus are set to MIDI Mix, as well. If
they’re not, click each one to set it.)
6. Under MIDI Ports, next to the Input for MIDI Mix, make sure the Track button is set to On. If
it’s set to Off, click it once. (If you want to assign new mappings for MIDImix’s controls in
Ableton Live, make sure the Remote button is set to On, as well.)
7. Close the Preferences window.
4
Page 5
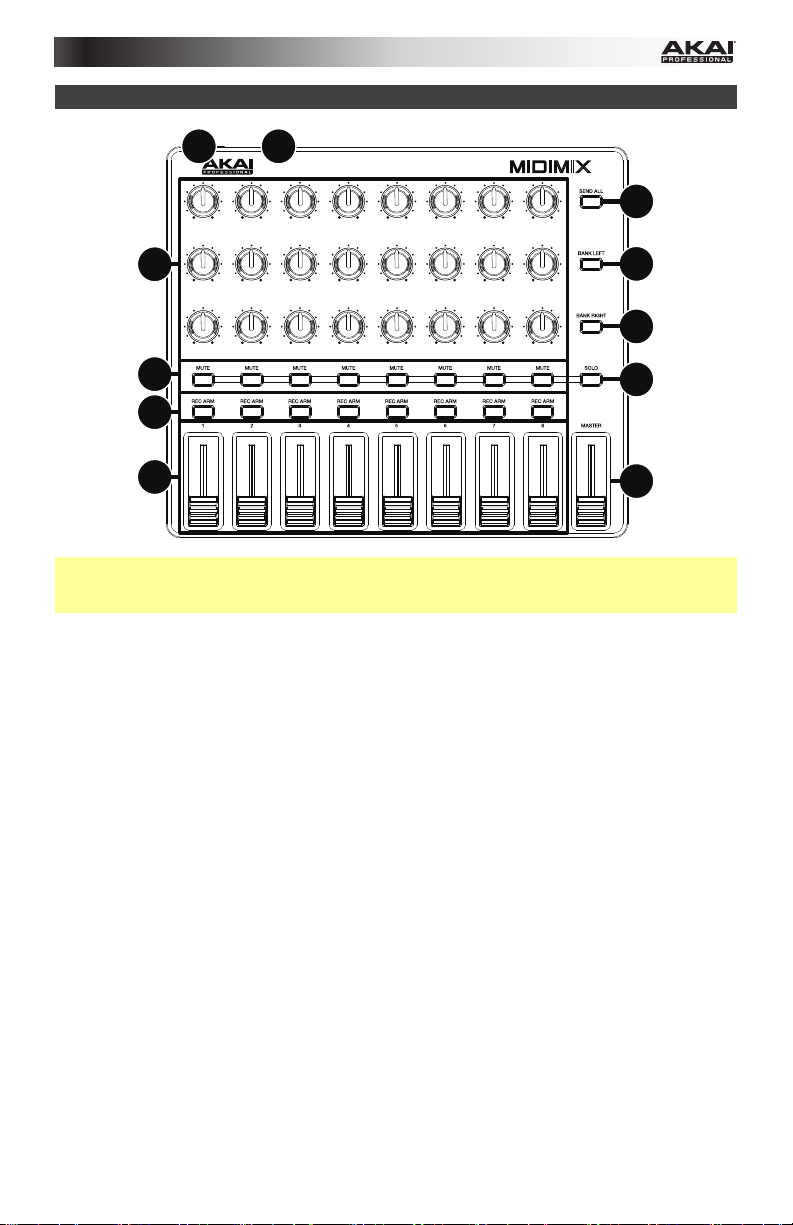
Features
1
2
10
3
9
9
4
5
6
7
Important: Most of MIDImix’s controls may be automatically mapped to control various trackspecific parameters in your DAW. If your DAW lets you assign its parameters to a hardware
MIDI controller (“MIDI learn”), you can further customize MIDImix’s control mapping.
1. USB Port: Use a standard USB cable to connect this USB port to your computer. This
connection is used to send and receive MIDI data to and from your computer. The
computer’s USB port also provides ample power to MIDImix. If you connect it to a USB
hub, make sure it is a powered hub.
2. Kensington
table or other surface.
3. Knobs: Use these 270º knobs to send continuous controller messages to your software.
4. Mute Buttons: Press these buttons to mute or unmute their tracks in your software.
Press and hold the Solo button, and then press these buttons to solo or unsolo their
tracks in your software.
5. Solo Button: Press and hold this button to activate or deactivate the solo feature for the
Mute buttons. While you hold this button, press the Mute buttons to solo or unsolo their
tracks in your software.
6. Record-Arm Buttons: Press these buttons to record-arm their tracks in your software.
7. Channel Faders: Move these faders to send continuous controller messages to your
software.
8. Master Fader: Move this fader to send a continuous controller message to your software.
By default, this will control the level of your software’s master volume.
9. Bank Left/Right: Press either of these buttons to shift the 8 channels controlled by
MIDImix left or right.
10. Send All: Press this button to send all of MIDImix’s current controller settings to your
software. Keep in mind that if you are using a “pickup” or “takeover” mode in your
software, this button may not do anything.
®
Lock: You may use this Kensington lock slot to secure the MIDImix to a
8
5
Page 6
Guía del usuario (Español)
Introducción
Características
• Mezclador MIDI que controla virtualmente cualquier DAW
• 8 faders de línea individuales, 1 fader maestro
• 24 perillas, agrupadas de a 3 por canal
• 16 botones agrupados en 2 bancos que brindan controles de silenciamiento, solo y
armado de grabación
• Envíe todos los ajustes de su mezclador a su DAW con solo pulsar un botón
• Mapeo 1 a 1 con Ableton Live (se incluye Ableton Live Lite)
Contenido de la caja
MIDImix
Cable USB
Tarjeta de descarga de software
Guía del usuario
Manual sobre la seguridad y garantía
Importante: Visite en akaipro.com la página correspondiente al MIDImix para descargar el
software de edición del MIDImix.
Soporte
Para obtener la información más completa acerca de este product (los requisitos del sistema,
compatibilidad, etc) y registro del producto, visite akaipro.com.
Para soporte adicional del producto, visite akaipro.com/support.
6
Page 7

Instalación rápida
Los elementos que no se enumeran en Introducción > Contenido de la caja se venden por separado.
1. Use el cable USB incluido para conectar el puerto USB del MIDImix a un puerto USB
disponible en su ordenador (encendido).
2. En su ordenador, abra su estación de trabajo de audio digital (DAW).
3. Seleccione MIDImix como controlador en Preferences, Device Setup o Options
(Preferencias, Instalación de dispositivos u Opciones) en su DAW.
Importante: La mayoría de los controles del MIDImix pueden mapearse automáticamente
para controlar diversos parámetros específicos de la pista en su DAW. Si su DAW le permite
asignar sus parámetros a un controlador MIDI de hardware ("aprendizaje MIDI"), usted podrá
personalizar aún más el control de mapeo del MIDIMix.
Instalación del MIDImix con Ableton Live:
1. Utilice el cable USB incluido para conectar el puerto USB del MIDImix a un puerto USB
disponible en su ordenador (encendido).
2. En su ordenador, abra Ableton Live.
3. Haga clic en el menú Options (Opciones) (en Windows) o Live (Vivo) (en Mac OS X) y a
continuación seleccionePreferences (Preferencias).
4. Haga clic en la pestaña MIDI/Sync (MIDI/Sincronismo).
5. En la columna Control Surface (Superficie de control), haga clic en uno de los menús
desplegables y seleccioneMIDI Mix (Mezcla MIDI). (Asegúrese de que los menús
adyacentes de Input (Entrada) y Output (Salida) también estén ajustados a MIDI Mix. Si
no lo están, haga clic en cada uno para ajustarlos).
6. En los puertos MIDI, junto a la entrada MIDI Mix, asegúrese de que el botón Track (Pista)
esté en la posición On (Encendido). Si se encuentra en Off (Apagado), haga clic sobre él
una vez. (Si desea asignar nuevos mapeos a los controles del MIDImix en Ableton Live,
asegúrese de que el botónRemote (Remoto) también esté en posición On.
7. Cierre la ventana Preferences (Preferencias).
7
Page 8

Características
1
2
10
3
9
9
4
5
6
7
Importante: La mayoría de los controles del MIDImix pueden mapearse automáticamente
para controlar diversos parámetros específicos de la pista en su DAW. Si su DAW le permite
asignar sus parámetros a un controlador MIDI de hardware ("aprendizaje MIDI"), usted podrá
personalizar aún más el control de mapeo del MIDIMix.
1. Puerto USB: Utilice un cable USB estándar para conectar este puerto USB a su
ordenador. Esta conexión se usa para enviar y recibir datos MIDI hacia y desde el
ordenador. El puerto USB del ordenador también suministra suficiente alimentación al
MIDImix. Si lo conecta a un concentrador (hub) USB, asegúrese de que sea un
concentrador alimentado.
2. Bloqueo Kensington
MIDImix a una mesa u otra superficie.
3. Perillas: Utilice estas perillas de 270º para mandar mensajes de controlador continuos a
su software.
4. Botones de silenciamiento: Pulse estos botones para silenciar o anular el silenciamiento
de sus pistas en su software.
Mantenga pulsado el botón Solo y a continuación pulse estos botones para aplicar o no
un solo a sus pistas en su software.
5. Botón de solo: Mantenga pulsado este botón para activar o desactivar la función de solo
para los botones Mute. Mientras mantiene pulsado este botón, pulse los botones Mute
para aplicar o no un solo en sus pistas en su software.
6. Botones preparar grabación: Pulse estos botones para preparar la grabación de sus
pistas en su software.
7. Faders de los canales: Mueva estos faders para mandar mensajes de controlador
continuos a su software.
8. Fader maestro: Mueva este fader para mandar un mensaje de controlador continuo a su
software. Por defecto, esto controlará el nivel del volumen maestro de su software.
9. Desplazamiento a izquierda/derecha: Pulse cualquiera de estos botones para desplazar
los 8 canales controlados por el MIDImix a la izquierda o a la derecha.
10. Enviar todo: Pulse este botón para enviar todos los ajustes actuales del controlador del
MIDImix a su software. Tenga en cuenta que si está utilizando un modo de "captura" o
"toma de control" en su software, puede que este botón no haga nada.
8
®
: Puede utilizar esta ranura de bloqueo Kensington a fin de sujetar el
8
Page 9

Guide d’utilisation (Français)
Présentation
Caractéristiques
• Console de mixage MIDI permet de commander pratiquement tout logiciel audionumérique
• 8 potentiomètres rectilignes individuels et 1 potentiomètre principal
• 24 boutons, disposés 3 par canal
• 16 touches disposées en deux banques permettent la mise en sourdine, en solo et en
préparation pour d’enregistrement
• Envoie des réglages de mixage vers un logiciel audionumérique avec une seule touche
• Préconfiguration pour Ableton Live (Ableton Live Lite inclus)
Contenu de la boîte
MIDImix
Câble USB
Carte de téléchargement de logiciel
Guide d’utilisation
Consignes de sécurité et informations concernant la garantie
Important : Visitez akaipro.com pour trouver la page Web du MIDImix afin de télécharger la
documentation pour le logiciel d’édition MIDImix.
Assistance
Pour les dernières informations concernant ce produit (la configuration système minimale
requise, la compatibilité, etc) et l’enregistrement du produit, veuillez visitez le site akaipro.com.
Pour toute assistance supplémentaire, veuillez visiter le site akaipro.com/support.
9
Page 10

Démarrage rapide
Les éléments qui ne figurent pas dans Présentation > Contenu de la boîte sont vendus séparément.
1. Branchez le câble USB au port USB du MIDImix, et ensuite au port de votre ordinateur
lorsque ce dernier est sous tension.
2. Lancez votre logiciel audionumérique (DAW) sur votre ordinateur.
3. Sélectionnez MIDImix comme interface dans le menu préférences, configuration des
périphériques ou options dans votre logiciel audionumérique (DAW).
Important : La plupart des contrôles du MIDImix peuvent être mappés automatiquement afin
de commander divers paramètres spécifiques aux pistes dans votre logiciel audionumérique.
Si votre logiciel vous permet d'assigner ses paramètres à un contrôleur de matériel MIDI (MIDI
learn), il est possible de personnaliser davantage le mappage du MIDImix.
Pour configurer MIDImix pour Ableton Live :
1. Utilisez le câble USB inclus pour relier le port USB du MIDImix au port USB de votre
ordinateur sous tension.
2. Sur votre ordinateur, lancez Ableton Live.
3. Cliquez sur le menu Options (Windows) ou sur le menu Live (Mac OS X) et sélectionnez
Preferences.
4. Cliquez sur l’onglet MIDI/Sync.
5. Cliquez sur un des menus déroulants de la colonne Control Surface et sélectionnez MIDI
Mix. (Assurez-vous que les menus déroulants Input et Output ci-adjacents soient également
réglés sur MIDI Mix. S'ils ne le sont pas, cliquez sur chacun pour les régler.)
6. Sous MIDI Ports, à côté du menu Input pour MIDI Mix, assurez-vous que le bouton Track
est réglé sur On. S'il est réglé sur Off, cliquez-le une fois. (Si vous souhaitez affecter de
nouveaux mappages pour les contrôles de MIDImix dans Ableton Live, assurez-vous que le
bouton Remote soit également réglé sur On.)
7. Fermez la fenêtre Preferences.
10
Page 11

Caractéristiques
1
2
10
3
9
9
4
5
6
7
Important : La plupart des contrôles du MIDImix peuvent être mappés automatiquement afin
de commander divers paramètres spécifiques aux pistes dans votre logiciel audionumérique.
Si votre logiciel vous permet d'assigner ses paramètres à un contrôleur de matériel MIDI (MIDI
learn), il est possible de personnaliser davantage le mappage du MIDImix.
1. Port USB : Utilisez un câble USB afin de relier ce port USB au port USB d’un ordinateur.
Cette connexion permet d’envoyer et de recevoir des données MIDI depuis et vers un
ordinateur. Le port USB de l'ordinateur permet également d’alimenter le MIDImix. Si vous
utilisez un multiport USB, assurez-vous qu’il est alimenté.
2. Verrou Kensington
sécuriser le MIDImix sur une table ou autre surface.
3. Boutons : Ces boutons rotatifs 270° permettent de transmettre des messages de
contrôleur en continu à votre logiciel.
4. Touches Mute : Appuyez sur ces touches afin d’activer ou de désactiver la mise en
sourdine des pistes qui leur sont assignées dans votre logiciel.
Maintenez la touche Solo enfoncée et appuyez sur une de ces touches afin d’activer ou de
désactiver la mise en solo des pistes qui leur sont assignées dans votre logiciel.
5. Touche Solo : Maintenez cette touche enfoncée puis appuyez sur cette touche afin
d’activer ou de désactiver la mise en solo des touches de mise en sourdine. En maintenant
cette touche enfoncée, appuyez sur une des touches Mute afin d’activer ou de désactiver
la mise en solo des pistes qui leur sont assignées dans votre logiciel.
6. Touches Record-Arm : Appuyez sur ces touches afin de préparer les pistes qui leur sont
assignées dans votre logiciel pour l’enregistrement.
7. Curseurs des canaux : Déplacez ces curseurs afin de transmettre des messages de
contrôleur en continu à votre logiciel.
8. Curseur Master : Déplacez ce curseur afin de transmettre un message de contrôleur en
continu à votre logiciel. Par défaut, ce curseur contrôle le volume général de votre logiciel.
9. Touches Bank Left/Right : Appuyez sur une de ces touches afin de commuter vers la
gauche ou la droite les 8 canaux contrôlés par le MIDImix.
10. Touche Send All : Cette touche permet de transmettre tous les paramètres contrôleur
actuels du MIDImix à votre logiciel. Gardez en tête que si vous utilisez un mode micro ou
de reprise dans votre logiciel, cette touche peut ne pas avoir d’effet.
®
: Cet emplacement permet d’utiliser un verrou Kensington pour
8
11
Page 12

Guida per l’uso (Italiano)
Introduzione
Caratteristiche
• Mixer MIDI per controllare praticamente qualsiasi DAW
• 8 fader linea individuali, 1 fader master
• 24 manopole, 3 per canale
• 16 pulsanti, in 2 banchi garantiscono il controllo di silenziamento, assolo e armare per la
registrazione
• Possibilità di inviare tutti le impostazioni mixer al proprio DAW con la sola pressione di un
pulsante
• Mappatura 1 a 1 con Ableton Live (Ableton Live Lite in dotazione)
Contenuti della confezione
MIDImix
Cavo USB
Scheda di download del software
Guida per l’uso
Istruzioni di sicurezza e garanzia
Importante: recarsi su akaipro.com e trovare la pagina web dedicata alla MIDImix per
scaricare il software del MIDImix Editor.
Assistenza
Per conoscere le ultime informazioni in merito a questo prodotto (i requisiti di sistema complete,
compatibilità, ecc) e per la registrazione del prodotto, recarsi alla pagina akaipro.com.
Per ulteriore assistenza, recarsi alla pagina akaipro.com/support.
12
Page 13

Inizio rapido
Elementi non elencati sotto Introduzione > Contenuti della confezione sono venduti separatamente.
1. Servirsi del cavo USB in dotazione per collegare la porta USB del MIDImix ad una porta
USB libera del computer (acceso).
2. Sul computer, aprire il workstation audio digitale (DAW).
3. Selezionare il MIDImix come controller nella Preferences, Device Setup o Options
(preferenze, configurazione dispositivo o opzioni) del workstation audio digitale (DAW).
Importante: la maggior parte dei comandi del MIDImix può essere mappata automaticamente
per controllare vari parametri specifici per traccia nel DAW. Se il DAW consente di assegnare i
suoi parametri a un controller MIDI hardware (“MIDI learn”), è possibile ulteriormente
personalizzare la mappatura dei comandi del MIDImix.
Per configurare il MIDImix con Ableton Live:
1. Servirsi del cavo USB in dotazione per collegare la porta USB del MIDImix ad una porta
USB libera del computer (acceso).
2. Sul computer, aprire Ableton Live.
3. Cliccare sul menu Options (Windows) o Live (Mac OS X) e selezionare Preferences.
4. Cliccare sulla scheda MIDI/Sync .
5. Nella colonna Control Surface (superficie di controllo), cliccare su uno dei menu a cascata
e selezionare MIDI Mix. (Assicurarsi che i menu a cascata adiacenti Input e Output siano
impostati su MIDI Mix a loro volta. Qualora non lo fossero, cliccare su ciascuno di essi per
impostarlo).
6. Sotto a MIDI Ports (porte MIDI), accanto a Input per MIDI Mix, assicurarsi che il pulsante
Track sia su On. Se è su Off, cliccare una volta sul pulsante stesso. (Se si desidera
assegnare nuove mappature per i comandi di MIDImix in Ableton Live, assicurarsi che il
pulsante Remote sia a sua volta impostato su On.)
7. Chiudere la finestra Preferiti (Preferences).
13
Page 14

Caratteristiche
1
2
10
3
9
9
4
5
6
7
Importante: la maggior parte dei comandi del MIDImix può essere mappata automaticamente
per controllare vari parametri specifici per traccia nel DAW. Se il DAW consente di assegnare i
suoi parametri a un controller MIDI hardware (“MIDI learn”), è possibile ulteriormente
personalizzare la mappatura dei comandi del MIDImix.
1. Porta USB: servirsi di un cavo USB standard per collegare questa porta USB al computer.
Questo collegamento serve a inviare e ricevere dati MIDI da e verso il computer. La porta
USB del computer fornirà l’alimentazione al MIDImix. Se lo si collega a un hub USB,
assicurarsi che quest'ultimo sia alimentato.
2. Lucchetto Kensington
MIDImix a un tavolo o ad altre superfici.
3. Manopole: servirsi di queste manopole a 270º per inviare messaggi controller continui al
software.
4. Tasti Mute: premere questi tasti per silenziare o annullare il silenziamento delle rispettive
tracce nel software.
Tenere premuto il tasto Solo, quindi premere questi pulsanti per effettuare o annullare
l'assolo delle tracce nel software.
5. Tasto Solo: tenere premuto questo tasto per attivare o disattivare la funzione di assolo dei
tasti Mute. Tenendo premuto questo tasto, premere i tasti Mute per effettuare o annullare
l'assolo delle rispettive tracce nel software.
6. Tasti Record-Arm (arma registrazione): premere questi tasti per armare la registrazione
delle rispettive tracce nel software.
7. Fader canale: spostare questi fader per inviare messaggi controller continui al software.
8. Fader Master: spostare questo fader per inviare un messaggio controller continuo al
software. In via predefinita, questo controllerà il livello del volume master del software.
9. Bank Left/Right (banco sx/dx): premere uno di questi tasti per far spostare gli 8 canali
controllati dal MIDImix a sinistra o a destra.
10. Send All (invia tutte): premere questo tasto per inviare tutte le impostazioni correnti da
controller del MIDImix al software. Non va dimenticato che se si utilizza una modalità
“pickup” o “takeover” nel software, questo tasto potrebbe non fare niente.
14
®
: servirsi di questa apertura per lucchetto Kensington per fissare il
8
Page 15

Benutzerhandbuch (Deutsch)
Einführung
Features
• MIDI-Mixer für die Steuerung von praktisch jeder DAW
• 8 Kanalfader, 1 Masterfader
• 24 Regler, 3 pro Kanal
• 16 in 2 Reihen angeordnete Tasten bieten Mute, Solo und Aufnahme-Aktivierung
• Senden Sie alle Mixer-Einstellungen mit einem einzigen Tastendruck an Ihre DAW
• 1-zu-1-Mapping für Ableton Live (Ableton Live Lite im Lieferumfang enthalten)
Lieferumfang
MIDImix
USB-Kabel
Software-Download-Karte
Benutzerhandbuch
Sicherheitshinweise und Garantieinformationen
Wichtig: Besuchen Sie akaipro.com und navigieren Sie zur MIDImix-Webseite, um die
MIDImix Editor Software herunterzuladen.
Kundendienst
Für aktuelle Informationen zu diesem Produkt (Systemanforderungen, Informationen zur
Kompatibilität etc.) und zur Produktregistrierung besuchen Sie akaipro.com.
Um weitere Unterstützung zu Ihrem Produkt zu erhalten, besuchen Sie akaipro.com/support.
15
Page 16

Schnelles Einrichten
Teile, die nicht unter Einführung > Lieferumfang angegeben sind, sind separat erhältlich.
1. Verwenden Sie das mitgelieferte USB-Kabel, um den USB-Port des MIDImix mit einem
freien USB-Port Ihres (eingeschalteten) Computers zu verbinden.
2. Öffnen Sie Ihre DAW (Digitale Audio-Workstation) auf Ihrem Computer.
3. Denken Sie daran, das MIDImix in den Einstellungen, der Gerätekonfiguration oder
unter Optionen in Ihrer digitalen Audio-Workstation (DAW) als Controller auszuwählen.
Wichtig: Die meisten Bedienelemente des MIDImix können automatisch zugewiesen werden,
um verschiedene Track-spezifische Parameter in Ihrer DAW zu steuern. Wenn die Parameter
Ihrer DAW einem Hardware-MIDI-Controller zugewiesen werden können („MIDI-Learn“),
können Sie die Zuweisung der MIDImix-Steuerelemente noch weiter anpassen.
So richten Sie MIDImix mit Ableton Live ein:
1. Verwenden Sie das mitgelieferte USB-Kabel, um den USB-Anschluss des MIDImix mit
einem freien USB-Anschluss Ihres (eingeschalteten) Computers zu verbinden.
2. Öffnen Sie Ableton Live auf Ihrem Computer.
3. Klicken Sie auf das Options-Menü (Windows) oder das Live-Menü (Mac OS X) und wählen
Einstellungen.
4. Klicken Sie auf die Registerkarte MIDI/Sync.
5. In der Spalte Bedienoberfläche klicken Sie auf eine der Dropdown-Menüs und wählen
MIDI Mix. (Achten Sie darauf, dass die angrenzenden Eingangs- und Ausgangs-
Dropdown-Menüs auch auf MIDI Mix gesetzt wurden. Ist dies nicht der Fall, klicken Sie
auf jedes Menü, um dies einzustellen.)
6. Unter MIDI-Ports neben dem Eingang für MIDI Mix, achten Sie darauf, dass die Taste
Track auf Ein gesetzt ist. Wenn die Taste auf Aus eingestellt ist, genügt ein einfacher
Klick. (Wenn Sie den Bedienelementen des MIDImix in Ableton Live neue Mappings
zuweisen möchten, sorgen Sie dafür, dass auch die Remote-Taste auf Ein gesetzt ist).
7. Schließen Sie das Eigenschaften-Fenster.
16
Page 17

Funktionen
1
2
10
3
9
9
4
5
6
7
Wichtig: Die meisten Bedienelemente des MIDImix können automatisch zugewiesen werden,
um verschiedene Track-spezifische Parameter in Ihrer DAW zu steuern. Wenn die Parameter
Ihrer DAW einem Hardware-MIDI-Controller zugewiesen werden können („MIDI-Learn“),
können Sie die Zuweisung der MIDImix-Steuerelemente noch weiter anpassen.
1. USB-Port: Verwenden Sie ein handelsübliches USB-Kabel, um diesen USB-Port mit Ihrem
Computer zu verbinden. Diese Verbindung wird verwendet, um MIDI-Daten vom und zum
Computer zu senden und zu empfangen. Der USB-Anschluss des Computers versorgt
MIDImix außerdem mit Strom. Wenn Sie das Gerät mit einem USB-Hub verbinden, sorgen
Sie dafür, dass der Hub mit Strom versorgt wird.
2. Kensington
MIDImix an einem Tisch oder einer anderen Oberfläche zu befestigen.
3. Regler: Benutzen Sie diese 270º Drehregler, um Continuous Controller-Nachrichten an
Ihre Software zu senden.
4. Stummschalte-Tasten: Drücken Sie diese Tasten, um die Spuren in Ihrer Software stumm
zu schalten oder die Stummschaltung aufzuheben.
Halten Sie die Solo-Taste gedrückt und drücken anschließend diese Tasten, um ihre
Spuren in der Software solo zu schalten oder die Soloschaltung aufzuheben.
5. Solo-Taste: Halten Sie diese Taste zum Aktivieren oder Deaktivieren der Solo-Funktion für
die Stummschalte-Tasten. Während Sie diese Taste gedrückt halten, drücken Sie die
Stummschalte-Tasten, um die Spuren in ihrer Software solo zu schalten oder die
Soloschaltung aufzuheben.
6. Scharfstellen-Tasten: Drücken Sie diese Tasten, um die Spuren in Ihrer Software scharf
zu stellen.
7. Kanal-Fader: Mit diesen Fadern können Sie Continuous Controller-Nachrichten an Ihre
Software senden.
8. Master-Fader: Mit diesem Fader können Sie Continuous Controller-Nachrichten an Ihre
Software senden. Standardmäßig steuert dies den Pegel der Master-Lautstärke in Ihrer
Software.
9. Bank Links/Rechts: Drücken Sie eine dieser Tasten, um die 8 von MIDImix gesteuerten
Kanäle nach links oder rechts zu verschieben.
10. Alle senden: Drücken Sie diese Taste, um alle aktuellen Controller-Einstellungen des
MIDImix an Ihre Software zu senden. Beachten Sie, dass diese Taste bei der Verwendung
eines „Pickup“- oder „Übernahme“-Modus in der Software keinen Effekt hat.
®
Lock: Sie können diesen Kensington Lock Sicherheits-Slot verwenden, um
8
17
Page 18

Appendix (English)
Technical Specifications
Knobs 24 270° assignable knobs
Banks accessible via Bank Left/Right buttons
Faders 8 30mm assignable faders
1 30mm assignable master fader
Banks accessible via Bank Left/Right buttons
Buttons 8 assignable mute buttons, amber-backlit with solo functionality
1 assignable solo button to change functionality of 8 Mute buttons
8 assignable record-arm buttons, red-backlit
2 assignable bank buttons: left, right
1 Send All button
Connections 1 USB port
1 Kensington lock slot
Power
Dimensions
(width x depth x height)
Weight
Trademarks and Licenses
Akai Professional is a trademark of inMusic Brands, Inc., registered in the U.S. and other
countries.
Ableton is a trademark of Ableton AG.
Kensington and the K & Lock logo are registered trademarks of ACCO Brands.
All other product or company names are trademarks or registered trademarks of their
respective owners.
USB-bus-powered
9.4” x 7.9” x 1.2”
23.9 cm x 20.1 cm x 3.0 cm
1.5 lbs.
0.7 kg
Specifications are subject to change without notice.
18
Page 19

Page 20

akaipro.com
Manual Version 1.0
 Loading...