


POCKET DV M1
Table of contents
 Loading...
English

FCC Compliance Statement:
This device complies with Part 15 of the FCC Rules. Operation is
subjected to the following two conditions: (1) this device may not cause
harmful interference, and (2) this device must accept any interference
received, including interference that may cause undesired operation.
This equipment has been tested and found to comply with limits for a Class B digital device,
pursuant to Part 15 of the FCC rules. These limits are designed to provide reasonable
protection against harmful interference in residential installations. This equipment generates,
uses, and can radiate radio frequency energy, and if not installed and used in accordance with
the instructions, may cause harmful interference to radio communications.
However, there is no guarantee that interference will not occur in a particular installation. If this
equipment does cause interference to radio or television equipment reception, which can be
determined by turning the equipment off and on, the user is encouraged to try to correct the
interference by one or more of the following measures:
-Reorient or relocate the receiving antenna.
-Move the equipment away from the receiver.
-Plug the equipment into an outlet on a circuit different from that to which the receiver is
connected.
-Consult the dealer or an experienced radio/television technician for additional suggestions.
You are cautioned that any change or modifications to the equipment not expressly approved
by the party responsible for compliance could void Your authority to operate such equipment.

1
Welcome
Dear user, thanks for purchasing this product.
Much investment in time and effort has gone into its development,
and it is our hope that it will give you many years of trouble-free service.
Safety Notice
1. Do not drop, puncture or disassemble the
camcorder; otherwise the warranty will be
voided.
2. Avoid all contact with water, and dry hands
before using.
3. Do not expose the camcorder to high
temperature or leave it in direct sunlight. Doing
so may damage the camcorder.
4. Use the camcorder with care. Avoid pressing
hard on the camcorder body.
5. For your own safety, avoid using the camcorder
when there is a storm or lightning.
6. Do not use batteries of different specifications.
Doing so may lead to the potential for serious
damage.
7. Remove the battery during long periods between
usage, as a deteriorated battery may affect the
functionality of the camcorder.
8. Remove the battery if it shows signs of leaking
or distortion.
9. Use only the accessories supplied by the
manufacturer.
10. Keep the camcorder out of the reach of infants.

2
Table of Contents
Welcome .......................................................................... 1
Safety Notice ................................................................... 1
Table of Contents ........................................................... 2
Getting Started ................................................................4
Knowing the camcorder parts ...............................................................4
Loading the battery (1) ......................................................................... 5
Loading the battery (2) ......................................................................... 6
Charging the battery - using the AC adapter ........................................ 7
Charging the battery - USB charging .................................................... 8
Inserting a memory card (optional) .......................................................9
Using the strap (optional) ..................................................................... 10
How to hold your camcorder ................................................................. 10
Basic Operations ............................................................ 11
Turning on/off your camcorder .............................................................. 11
Reading LCD indicators (1) ..................................................................12
Reading LCD indicators (2) ..................................................................13
Reading LCD indicators (3) ..................................................................14
Reading LCD indicators (4) ..................................................................15
Setting clock and language .................................................................. 16
Recording a video clip ..........................................................................17
Taking a still picture ..............................................................................
18
Recording a voice clip .......................................................................... 19
Playing back your recordings ............................................................... 20
Playing MP3 music (1) .......................................................................... 21
Playing MP3 music (2) .......................................................................... 22
Playing MP3 music (3) .......................................................................... 23
Viewing the display on a TV .................................................................24
Advanced Operations ....................................................25
Menu operation ..................................................................................... 25
Menu illustration ................................................................................... 25
Menu items in DV/DSC mode (1) .........................................................26
Menu items in DV/DSC mode (2) .........................................................27
Menu items in DV/DSC mode (3) .........................................................28
Menu items in DV/DSC mode (4) .........................................................29
Menu items in Playback mode .............................................................. 30

3
Table of Contents
Menu items in MP3 mode .....................................................................31
Menu items in Voice Recorder mode .................................................... 32
Menu items in Settings mode (1) ..........................................................33
Menu items in Settings mode (2) ..........................................................34
Menu items in Settings mode (3) ..........................................................35
Copying Files to Your PC ............................................... 36
Installing the driver to your PC (1) ........................................................ 36
Installing the driver to your PC (2) ........................................................ 37
Connecting the camcorder to your PC ................................................. 38
Copying files to the PC (1) ....................................................................
39
Copying files to the PC (2) .................................................................... 40
Viewing/Playing files on your PC ..........................................................41
File location .......................................................................................... 42
Using PC Camera ...........................................................43
Installing the driver and PC Camera software ...................................... 43
Starting the application (1) .................................................................... 43
Starting the application (2) .................................................................... 44
Appendix:A .....................................................................45
Troubleshooting ....................................................................................45
Flicker Settings ..................................................................................... 48
System Message .................................................................................. 48
Storage Capacity .................................................................................. 49
Battery Life Indicator ............................................................................. 50
Battery Life ........................................................................................... 50
Appendix:B .....................................................................51
Instruction for ArcSoft MediaConverter™ .............................................51
Appendix:C .....................................................................59
Specifications ....................................................................................... 59
Appendix:D .....................................................................60
System Requirements ..........................................................................60

4
getting started
getting started
Getting Started
Knowing the camcorder parts
Power button (
)
Zoom button (
)
Record button (
)
Joystick (
)
Menu/OK button (
)
Mode/Return button (
)
USB cover
USB connector
Strap hook
AV/Earphone connector
LED indicator
Shutter button (
)
LCD display
Help button (
)
Bottom View
Tripod socket
Battery slot
SD/MMC card slot
Drop prevention lever
Compartment cover
Speaker
Lens
Microphone
Flash strobe
Slide cover

getting started
5
getting started
Loading the battery (1)
1 Lift the LCD panel upwards.
Gently open the LCD panel.
2 Push the tip of the drop
prevention lever upwards.
Use your fingertip to push the drop
prevention lever upwards to unclinch the
battery compartment cover.
3 Slide the cover open.
After the battery compartment cover is
unclinched, use your fingertip to slide the
cover open.
1
2
3

6
getting started
getting started
4 Install the battery.
Align the metallic contacts on the battery
with those in the compartment (the metallic
contacts should be on the side of the tripod
socket). Then push the drop prevention
lever upwards and install the battery into the
compartment.
5 Replace the cover after
installing the battery.
Make sure the battery clicks into place and
that the drop prevention lever has clinched
the battery tightly. Then close the cover for
the drop prevention lever to clinch the cover
as well.
Loading the battery (2)
Treat the Li-ion battery with care:
• Keep the battery away from fire or high-temperature environment
(over 140º F or 60º C).
• Do not drop the battery or try to disassemble it.
• If the battery is not used for long periods, fully discharge and
charge the battery at least once a year to maintain its life cycle.
Upon using the battery for the first time, you are recommended to
fully charge the battery prior to using the camera.
Purchasing additional batteries:
This camcorder uses one 3.7 volt, 700mAh Li-ion battery as power
source. You can purchase batteries of the same specifications
(compatible with Nokia-6108 battery) at your local shop.
4
Metallic
contacts
5
Drop prevention
lever
getting started
7
getting started
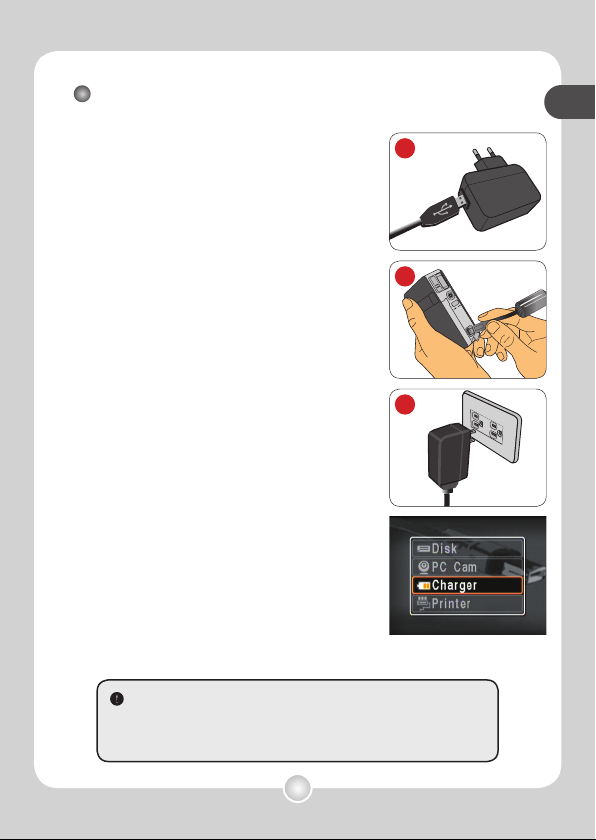
Charging the battery - using the AC adapter
1 Install one battery into the
camcorder.
Make sure the battery is correctly installed and well
clinched by the drop prevention lever.
2 Connect one end of the USB cable
to the AC adapter
.
Align the connector with the USB port on the AC
adapter, and then firmly insert the connector into
the port.
3 Connect the other end of the USB
cable to the camcorder.
Connect the other end of the USB cable to the
camcorder.
4 Plug the AC adapter to a wall outlet.
Select [Charger] in the pop-up menu, and the
charge will start to take place. The LED light will
flash rapidly. As the battery is gradually getting
power, the flash will get more and more slowly.
Note: If the [USB Mode] setting is changed, the
menu will not show up. See page 33 for more
details.
5 Unplug the AC adapter when the
charge is done.
When the battery is fully charged, the LED will emit
steady light.
When using the AC adapter to charge the battery for the first time,
it takes about eight hours to fully charge the battery. Afterwards
each time the recharge will take approximately two hours to
complete.
3
2
4
Select [Charger] to start
charging
8
getting started
getting started
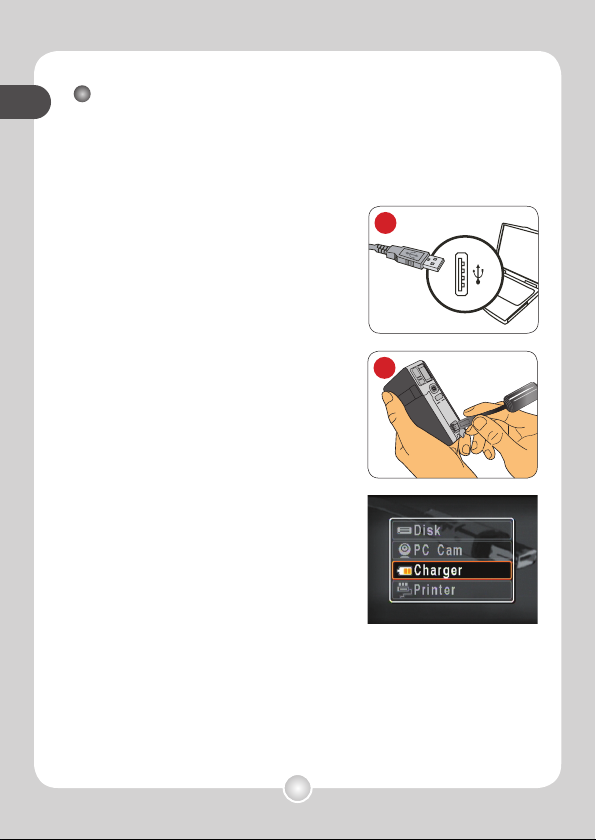
1 Install one battery into the camcorder.
Make sure the battery is correctly installed and well clinched by the drop
prevention lever.
2 Power on your computer and
connect one end of the USB
cable into the computer.
Make sure the connector and the USB port are
correctly aligned.
3 Connect the other end of the
USB cable to the camcorder.
Connect the other end of the USB cable to
the camcorder. Select [Charger] in the pop-up
menu, and the charge will start to take place.
Note: If the [USB Mode] setting is changed,
the menu will not show up. See page 33 for
more details.
4 The battery is being charged.
The LED light will flash rapidly. As the battery is
gradually getting power, the flash will get more
and more slowly.
5 Unplug the USB cable when the
charge is done.
When the battery is fully charged, the LED will
emit steady light.
Charging the battery - USB charging
3
Select [Charger] to start
charging
2
getting started
9
getting started
In addition to the internal fl ash memory,
your camcorder can also store data
on a Secure Digital (SD) card or a
MultiMedia card (MMC).
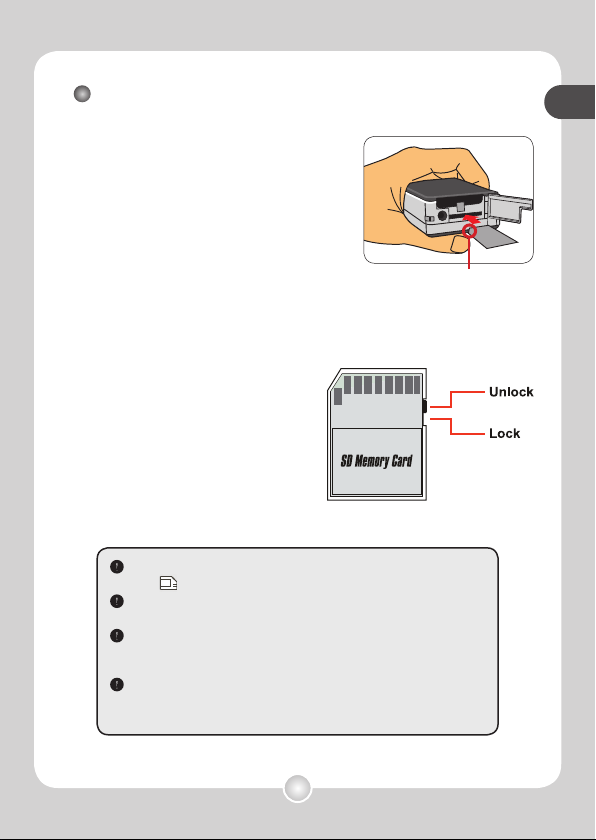
Insert a memory card:
To insert a memory card, fi rst open the
cover on the bottom of the camcorder,
and then gently push the card into the
card slot as indicated until the card
reaches the end of the slot.
Remove a memory card:
To remove the memory card, gently
push the memory card for the card to pop up. Then pull the card
out of the slot.
Note: The SD card comes with a
write-protect switch. When the
write-protect switch is set to the
Lock position, the card will become
non-writable. To ensure that the
camcorder can operate normally, you
should set the write-protect switch to
the Unlock position before inserting
the SD card.
Inserting a memory card (optional)
When a memory card is correctly inserted and detected, the card
icon ( ) will display on the LCD screen.
Do not insert or remove the memory card while the camcorder is
reading or writing data.
When a memory card is inserted, the camcorder will use the card
as the main storage medium. Files stored in the built-in memory
will become inaccessible until the memory card is removed.
If you purchase a new memory card, you are recommended to
format the card with this camcorder before storing data into the
card.
Beveled corner

10
getting started
Using the strap (optional)
1 Thread the thin strap loop
through the hook.
Thread the thinner part of the strap loop
through the strap hook as indicated.
2 Thread the strap body through
the loop.
Thread the other end of the strap through
the loop, and you are ready to carry your
camcorder around with ease.
1
2
How to hold your camcorder
Please hold the camcorder as indicated
and avoid blocking the strobe when
shooting.
When threading the strap loop for the
first time, it may need a little time to
get used to. Using a small tool, such
as a pin or needle, can be handy for
completing the task.

11
basic operations
Turning on/off your camcorder
Press the power ( ) button for 1 second to turn on the
camcorder.
Turning off the camcorder
Press the power ( ) button for 1.5 second to turn off the
camcorder.
Note: If the camcorder stays inactive for a long period of time, it may
automatically shut down due to the [Power Off] setting. See page 33
for more details.
Flipping the LCD panel
The LCD panel can be fl ipped up to 270
degrees as indicated. You can position
the panel at any angle to serve your
fi lming purpose.
Note: When the LCD panel is fl ipped over,
the previewed image on the LCD will be
automatically adjusted.
If the camcorder is not powered on after pressing the power button,
please check:
1. The battery is correctly installed into the camcorder.
2. The battery has enough power left.
Basic Operations
After power on, pressing the Help
button can provide instant button tip
for your operation.
Power button

12
basic operations
basic operations
Reading LCD indicators (1)
DV/DSC mode
To enter the DV/DSC mode, press the Mode/Return ( ) button and use
the Joystick ( ) to highlight the DV/DSC mode. Then move the Joystick
toward right ( ) to confi rm.
Note: The camcorder automatically enters DV/DSC mode when it is
powered on.
1
2 3 4 5 6 7
8
9
111213
15
14
1
2
3
4
5
6
7
Mode icon
Strobe mode
Selftimer mode
Effect mode
Voice memo
mode
Storage medium icon
: internal memory
: memory card
Remaining shots
8
9
10
11
12
14
13
Battery power
Zoom ratio
Night scene
White balance mode
Focus mode
Image size
Movie size
10
15
Focus frame
basic operations
13
basic operations
1
2 3 4
5
6
7
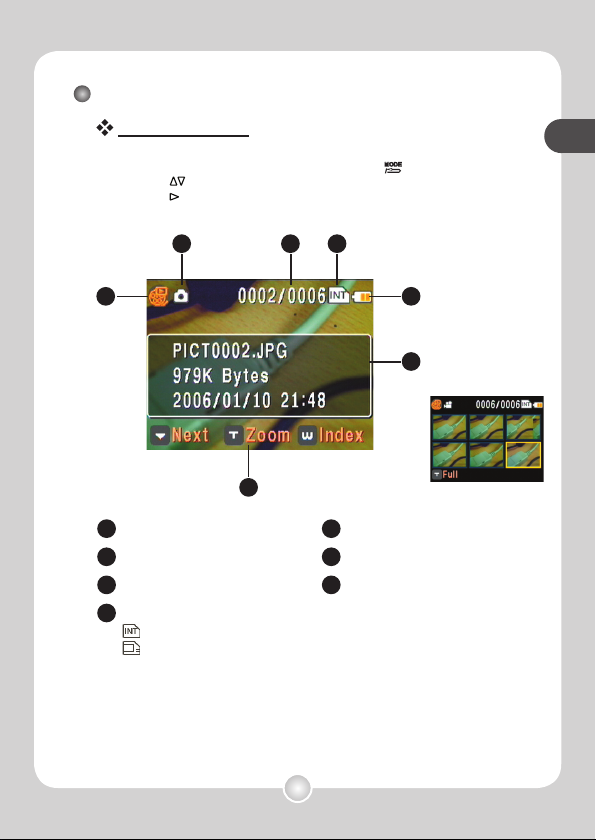
1
2
3
4
Mode icon
File type icon
Current fi le/All fi les
Storage medium icon
: internal memory
: memory card
5
6
7
Battery power
File information
Button tip
Reading LCD indicators (2)
Playback mode
To enter the Playback mode, press the Mode/Return ( ) button and use
the Joystick ( ) to highlight the Playback mode. Then move the Joystick
toward right ( ) to confi rm.
Index view
14
basic operations
basic operations
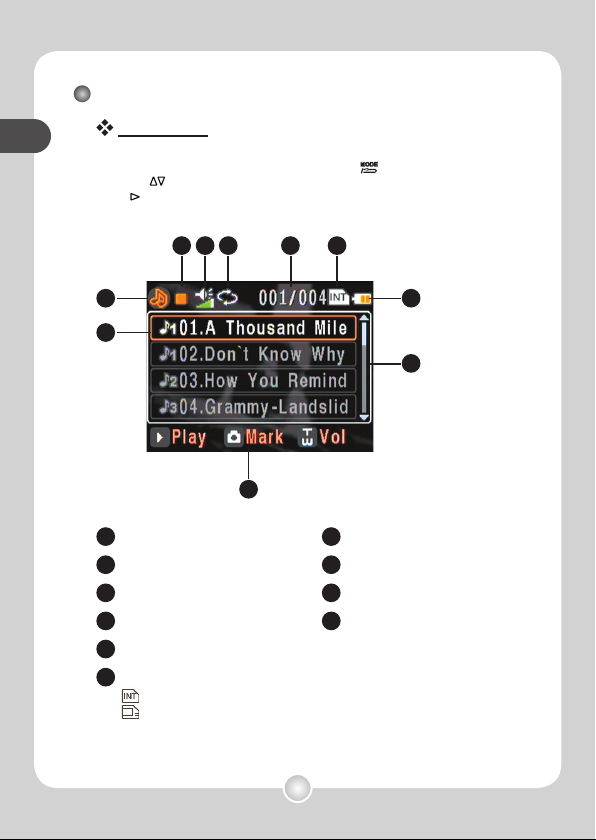
Reading LCD indicators (3)
MP3 mode
To enter the MP3 mode, press the Mode/Return ( ) button and use the
Joystick ( ) to highlight the MP3 mode. Then move the Joystick toward
right ( ) to confi rm.
1
2 3 4 5 6
7
8
9
10
1
2
3
4
5
6
Mode icon
Play/Pause/Stop icon
Sound volume
Repeat mode
Current song/All songs
Storage medium icon
: internal memory
: memory card
7
8
9
10
Battery power
Song list
Button tip
Highlight box
basic operations
15
basic operations
1
2 3 4
5
6
7
8
1
2
3
4
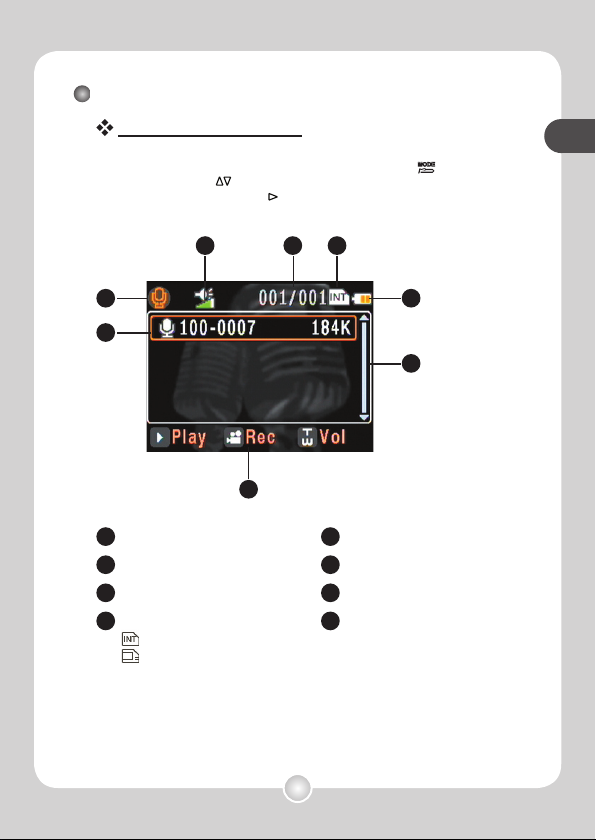
Mode icon
Sound volume
Current fi le/All fi les
Storage medium icon
: internal memory
: memory card
5
6
7
8
Battery power
Voice clip list
Button tip
Highlight box
Reading LCD indicators (4)
Voice Recorder mode
To enter the Voice Recorder mode, press the Mode/Return ( ) button
and use the Joystick ( ) to highlight the Voice Recorder mode. Then
move the Joystick toward right ( ) to confi rm.
16
basic operations
basic operations
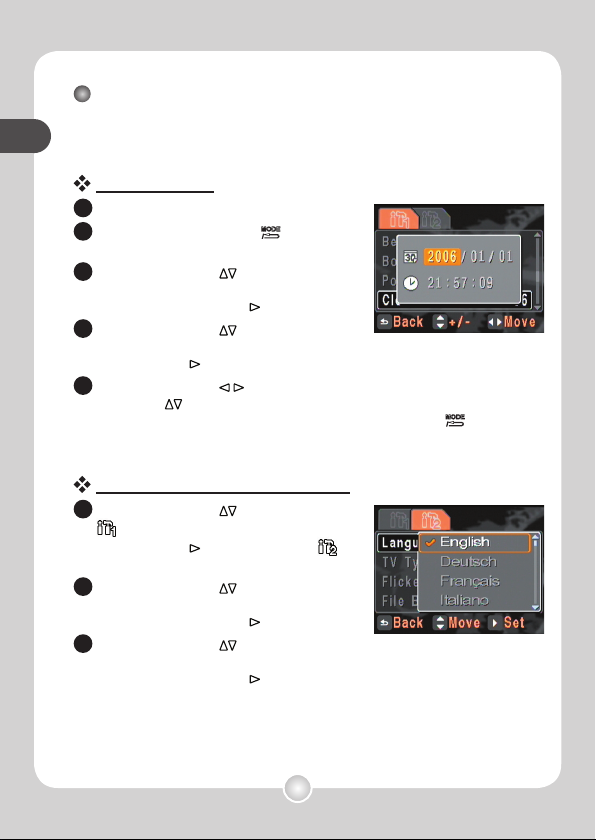
Setting clock and language
When you power on the camcorder for the fi rst time, you are
recommended to adjust the clock and language settings.
Setting clock:
1
Power on the camcorder.
2
Press the Mode/Return ( ) button to
enter mode selection scenario.
3
Use the Joystick (
) to select
the [Settings] mode, and move the
Joystick toward right (
) to confi rm.
4
Use the Joystick (
) to select the
[Clock] item, and move the Joystick
toward right (
) to confi rm.
5
Use the Joystick (
) to move the highlight box. Use the
Joystick (
) to change the value in the highlight box.
When all settings are done, press the Mode/Return ( )
button to exit the menu.
Setting language (continued):
6
Use the Joystick (
) to highlight the
Use the Joystick (
tab and then move the Joystick
toward right (
) to highlight the
tab.
7
Use the Joystick (
) to select
the [Language] item, and move the
Joystick toward right (
) to confi rm.
8
Use the Joystick (
) to select
your desired language, and move the
Joystick toward right (
) to confi rm.
basic operations
17
basic operations
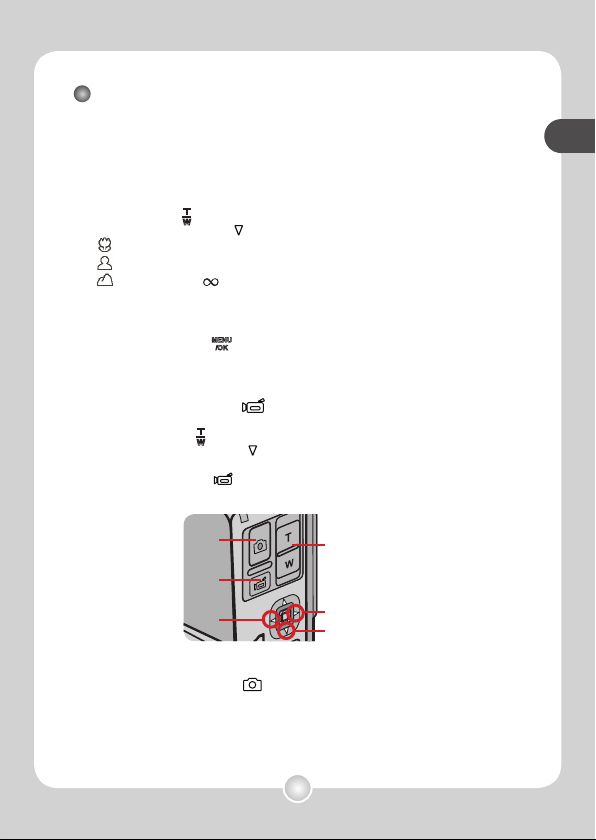
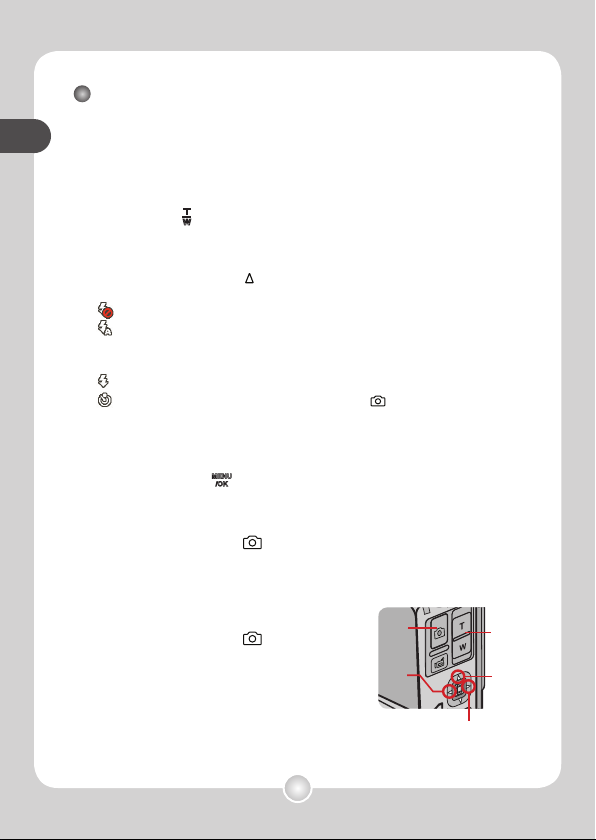
Recording a video clip
1 Power on the camcorder.
The camcorder automatically enters DV/DSC mode.
2 Set the focus and zoom as appropriate.
Use the Zoom (
) button to zoom in or zoom out.
Move the Joystick down (
) to cycle through different focus modes:
Move the Joystick down (
: about 20cm ~ 40cm
: about 80cm ~ 120cm
: about 200cm ~
3 Set other advanced items if necessary.
Press the Menu/OK ( ) button to open the settings menu and fi ne-tune
your camcorder.
See page 26 for more details.
4 Press the Record ( ) button to start recording.
While recording, you can do any of followings:
1) Use the Zoom (
) button to zoom in or zoom out.
2) Move the Joystick down (
) to change the focus mode as appropriate.
Note: Changing focus will produce some noise.
3) Press the Record ( ) button to pause/resume the recording.
Zoom in/out
View last recording
Start/Pause/
Resume recording
Stop recording
Change focus
Toggle OSD mode
5 Press the Shutter ( ) button to stop recording.
The video clip will be saved in MPEG4 (ASF) format.
18
basic operations
basic operations
Taking a still picture
1 Power on the camcorder.
The camcorder automatically enters DV/DSC mode.
2 Set the zoom as appropriate.
Use the Zoom (
) button to compose the picture as you like it.
3 Set the strobe and selftimer if necessary.
Move the Joystick upward (
) to cycle through different strobe and
selftimer modes:
: The strobe is off. It will not fi re even in dark surroundings.
: The strobe is set to auto. If the lighting is not enough, the icon will turn
yellow when you press the shutter halfway, and then the strobe will fi re
when you fully press the shutter down.
: The strobe is on. It will fi re in every shot.
: The selftimer is on. After pressing the Shutter ( ) button, the
camcorder will have ten seconds delay before taking a picture.
4 Set other advanced items if necessary.
Press the Menu/OK ( ) button to open the settings menu and fi ne-tune
your camcorder. See page 27 for more details.
5 Press the Shutter ( ) button halfway down and
hold the button for the camcorder to auto-focus.
When the auto-focus process is done, the color of the focus frame will turn
green.
6 Press the Shutter ( ) button
fully down to take a still
picture.
The picture will be saved in JPEG format.
Zoom
in/out
Change
strobe and
selftimer
modes
Auto-focus/
Take a picture
View last recording
Toggle OSD
mode
basic operations
19
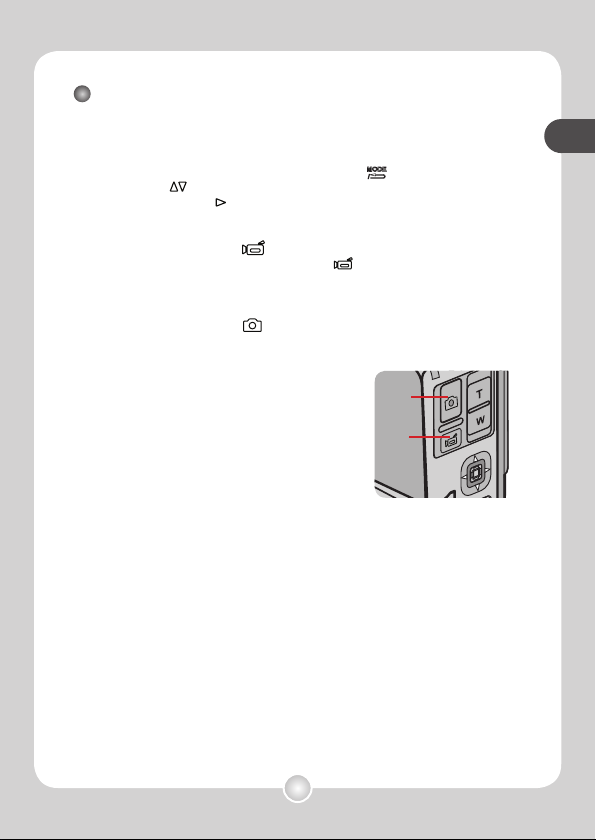
basic operations
Recording a voice clip
1 Power on the camcorder and switch to Voice
Recorder mode.
Power on the camcorder. Press the Mode/Return ( ) button and use
the Joystick (
) to highlight the Voice Recorder mode. Then move the
Joystick toward right ( ) to confirm.
2 Press the Record ( ) button to start recording
While recording, you can press the Record ( ) button to pause/resume
the recording.
3 Press the Shutter ( ) button to stop recording.
The voice clip will be saved in WAV format.
Start/Pause/
Resume recording
Stop recording
20
basic operations
basic operations
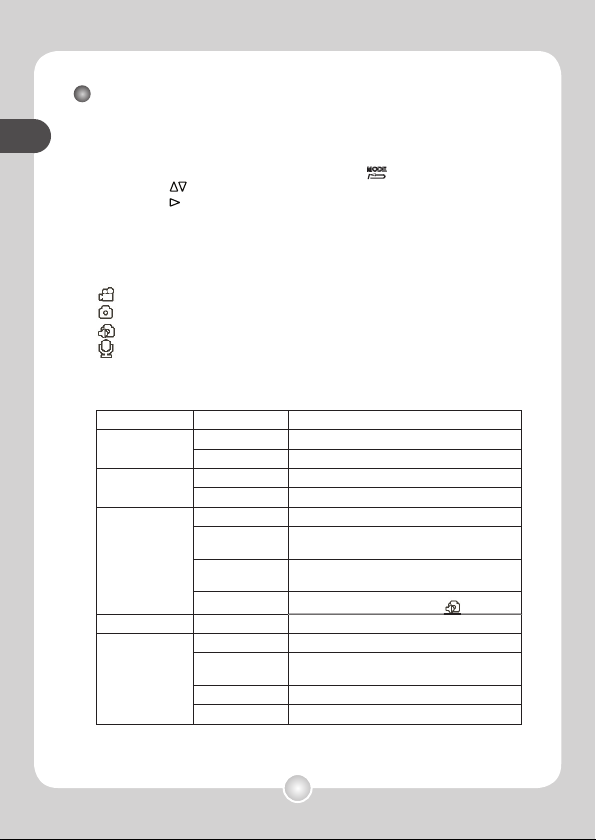
Playing back your recordings
1 Power on the camcorder and switch to Playback
mode.
Power on the camcorder. Press the Mode/Return ( ) button and use
the Joystick ( ) to highlight the Playback mode. Then move the Joystick
toward right ( ) to confi rm.
2 Identify fi le type.
You can tell what kind of fi le you are browsing by looking at the fi le type
icon on the upper left side of the screen.
: Video clips (in ASF format).
: Still pictures (in JPEG format).
: Still picture with voice note.
: Audio clips (in WAV format).
3 Operations in playback mode:
File Type / View Button Function
All (preview)
Zoom-W Switch to fi le Index view.
Joystick Move up or down to shift between fi les.
File index view
(cannot play fi le)
Zoom-T Switch to full screen view.
Joystick Move the fi le highlight box.
Still picture
Zoom-T Zoom in the picture
Zoom-W
Zoom out the picture (when zoom ratio is
greater than 1.0).
Joystick
When zoom ratio is greater than 1.0, use the
Joystick to browse the enlarged picture.
Record/Shutter
Start/Stop playing voice note. ( only)
Audio & Video
Record Start playing the fi le.
Audio & Video
(when playing)
Record Pause/Resume playing.
Joystick
Move left or right to fast-backward or fast-
forward playing.
Shutter Stop playing.
Zoom-T/W Turn sound volume up/down.
basic operations
21
basic operations
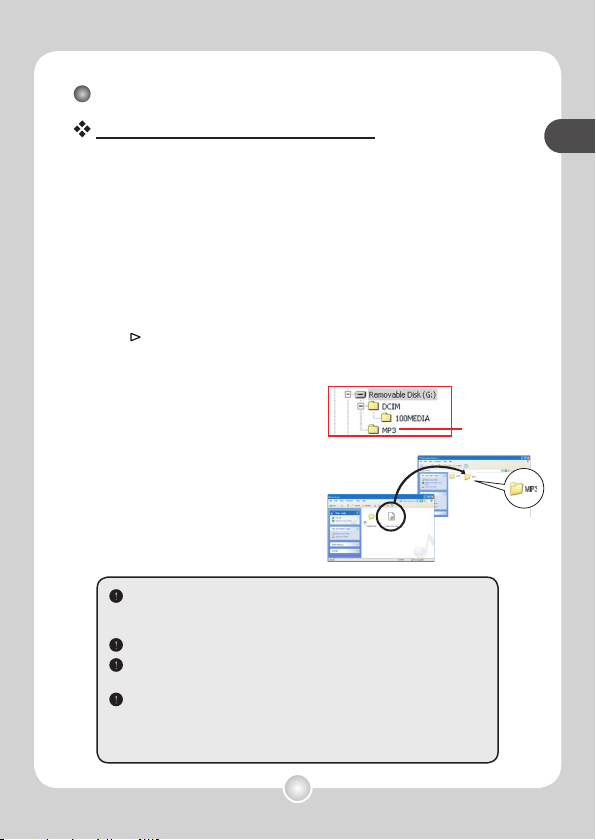
Playing MP3 music (1)
Copy MP3 files to the camcorder
Before playing MP3 music, you need to connect the camcorder
to a computer and save MP3 files into the camcorder.
1 Connect the camcorder to your PC.
Connect the camcorder to a PC using the USB cable. For details on how to
connect the camcorder to your PC, see page 38.
2 Switch the camcorder to [Disk] mode.
After the camcorder is connected to the PC, the camcorder will be powered
on. Select [Disk] item from the pop-up menu and move the Joystick toward
right ( ) to confirm.
Note: If the [USB Mode] setting is changed, the menu will not show up.
See page 33 for more details.
3 Copy files to the camcorder.
Double-click on [My Computer] and you
will find a removable disk. Create one
[MP3] folder in the removable disk if
you do not see one, and then you are
ready to copy MP3 files into the folder
for playing.
If you are a Windows 98SE user and your computer cannot
correctly detect the camcorder, you may need to install the driver
first. See page 36~37 for more details.
MP3 files must be placed in the [MP3] folder for playing.
You can delete unwanted MP3 files using the [File Browse] function
under Settings mode. See page 34 for more details.
The length of MP3 file name cannot be greater than 54 English
(single-byte, including space) characters or 27 Chinese (double-
byte) characters. MP3 files exceeding the above regulation may
cause the camcorder to malfunction.
For MP3 files
22
basic operations
basic operations
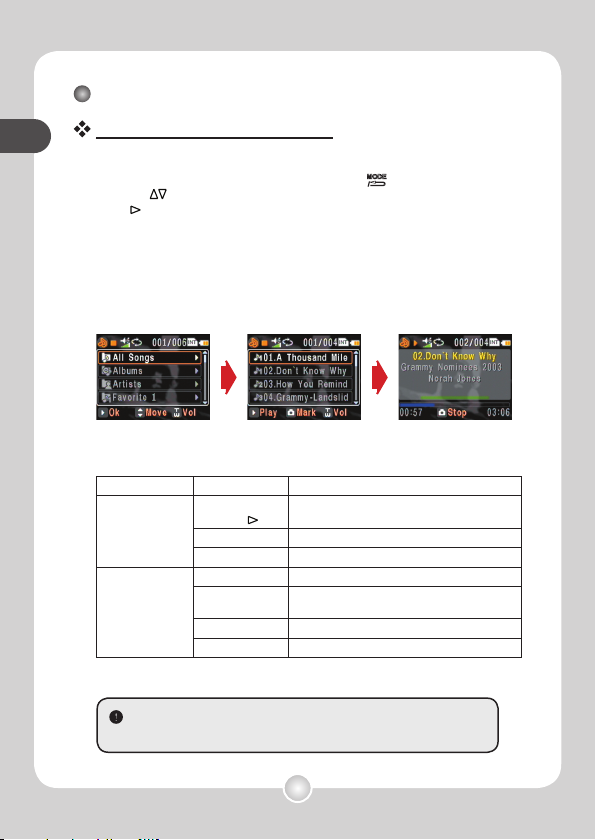
Playing MP3 music (2)
Playing music in MP3 mode
1 Power on the camcorder and switch to MP3 mode.
Power on the camcorder. Press the Mode/Return ( ) button and use the
Joystick (
) to highlight the MP3 mode. Then move the Joystick toward
right ( ) to confirm.
2 Sorting MP3 files.
The MP3 files are sorted by albums, artists, or favorite group 1~3. The
album and artist attributes are constituted by the ID3 tag stored along with
the specific MP3 file. The favorite groups can be defined manually, and
therefore you can sort your songs into different favorite groups.
3 Operations in MP3 mode:
File Type Button Function
MP3
(not playing)
Record or
Joystick ( )
Start playing the title.
Shutter Mark the song as Favorite group 1~3.
Zoom-T/W Turn sound volume up/down.
MP3
(when playing)
Record Pause/Resume playing.
Joystick
Move left or right to fast-backward or fast-
forward playing.
Shutter Stop playing.
Zoom-T/W Turn sound volume up/down.
When playing MP3 music, you may close the LCD panel, thus
turning off the display to save power.

basic operations
23
basic operations
Playing MP3 music (3)
Displaying lyrics
You can play MP3 songs with lyrics displayed. To enable the
function, you need to copy LRC format files into the [MP3] folder,
and name the LRC files after their matched songs. For example,
if a song is named A.MP3, then the LRC file should be named
A.LRC. You can search the Internet for your desired lyrics files.
The LRC file contains both lyrics as text and time tags, so that
the music and lyrics can be synchronized. This camcorder
supports LRC files with “line time tags”. The following is a brief
sample of LRC file contents:
[00:01.16]Album:Voices (2005/10)
[00:03.16]Title:Always be my baby
[00:05.16]Written:
[00:06.16]Music:
[00:07.16]Arranged:
[00:08.16]Sing:Mariah Carey
[00:10.16]LRC Edit:
[00:49.71]We were as one,babe
[00:52.74]For a moment in time
[00:55.68]And it seemed everlasting
[00:58.31]That you would always be mine
[01:01.89]Now you want to be free
[01:04.77]So I\’ll let you fly
[01:08.08]\’Cause I known in my heart, babe
[01:10.43]Our love will never die, no
[01:14.07][02:15.24][03:04.02][03:28.51]You\’ll always be a part of me
[01:17.03][02:18.24][03:07.17][03:31.54]I\’am part of you indefinitely
Note:
1. The format of time tag denotes [minutes]:[seconds]:[milliseconds].
2. More than one time tags can be applied to one line of lyrics.
3. Normally the file is a text file with .LRC extension.
4. Time tags are not displayed during playing.

24
basic operations
Viewing the display on a TV
Connect your camcorder and TV via the accessory AV cable for
real-time display. You can display your video clips, still pictures,
and audio recordings directly on your TV, sharing them with your
friends and family.
1 Turn on your TV and switch the TV to AV mode.
2 Connect the audio and video ends of the AV cable to the
[Video/Audio In] ports on the TV.
3 Power on the camcorder.
4 Connect the other end of the AV cable to your camcorder.
5 Select the [AV Out] item on the pop-up menu. Move the
Joystick toward right ( ) to confirm.
Note: If the [AV Mode] setting is changed, the menu will not show up.
See page 33 for more details.
Video Audio
AV-Out
AV Mode
1
5
2
3
4

25
advanced operations
Menu operation
The menu items provide several options for you to fine-tune your
camcorder functions. The following table gives details on menu
operations.
How to... Action
Bring up the menu
Press the Menu/OK ( ) button.
Move the highlight box Use the Joystick to move up or down.
Enter sub-menu/
Confirm an item
Press the Menu/OK ( ) button or move the
Joystick toward right ( ).
Exit menu/Go back to
upper menu
Press the Mode/Return ( ) button
Advanced Operations
Menu illustration
Shaded tab*
Menu items
Highlight box
Button tip
Working tab
Note: If the shaded tab is present, it indicates there are more items
can be selected and adjusted in the tab. To access those items, move
the highlight box to the tab row and switch to the shaded tab.
26
advanced operations
advanced operations
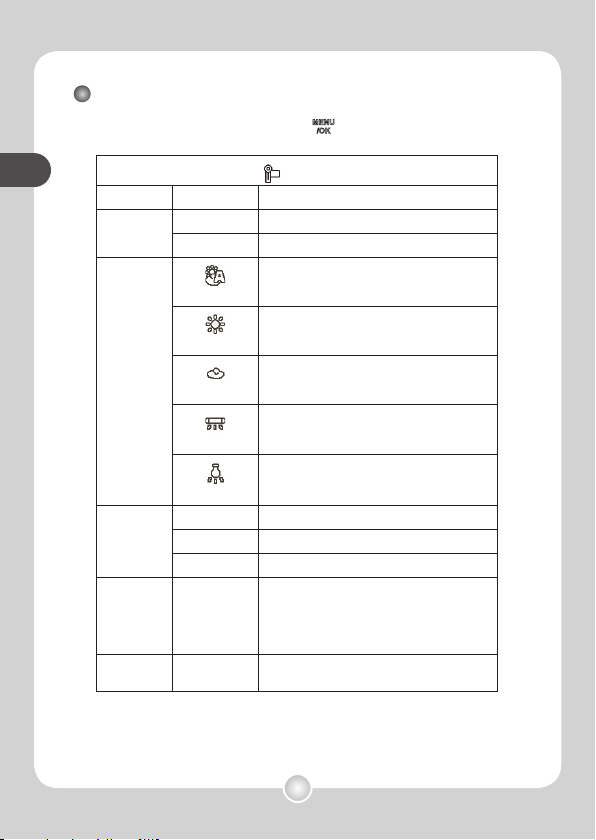
Menu items in DV/DSC mode (1)
Power-on → Press the Menu/OK ( ) button.
( - DV items)
Item Option Description
Movie Size
VGA Set movie resolution to 640x480.
QVGA Set movie resolution to 320x240.
WB
(White Balance)
Auto
The camcorder automatically adjusts white
balance.
Sunny
This setting is suitable for outdoor recording
in sunny weather.
Cloudy
This setting is suitable for recording in cloudy
weather or shady environments.
Fluorescent
This setting is suitable for indoor
recording with fl uorescent lamp lighting, or
environments with high color temperature.
Tungsten
This setting is suitable for indoor recording
with incandescent lamp lighting, or
environments with low color temperature.
Effect
Normal Make recordings in natural color.
Classic Make recordings in sepia-toned color.
Black&White Make recordings in black and white.
EV
(Exposure Value)
+3 ~ -3
Manually adjust the exposure to gain better
effect when the preview image appears too
bright or too dark. A positive value indicates
the image will be brighter than usual; while a
negative value makes the image dimmer.
Stabilizer On/Off
Enabling the stabilizer can reduce image blur
caused by hand shaking.
advanced operations
27
advanced operations
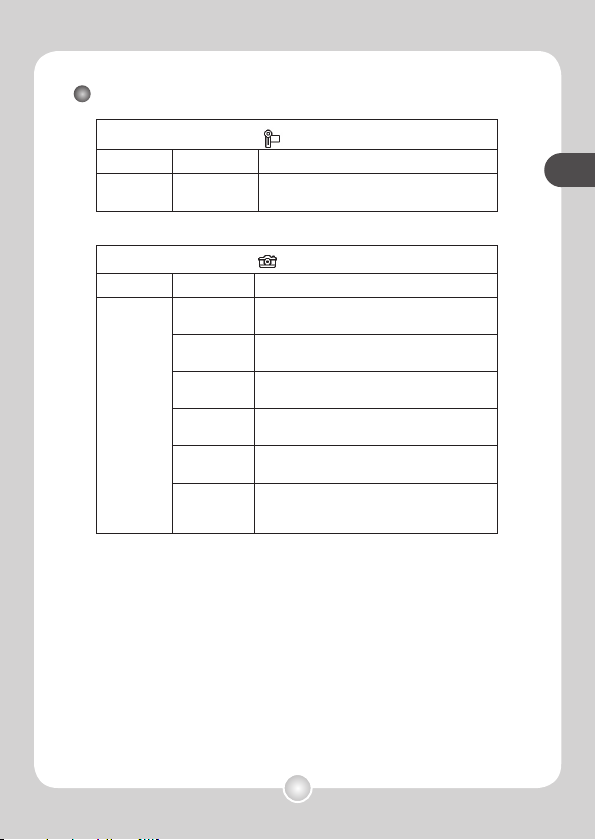
Menu items in DV/DSC mode (2)
( - DV items)
Item Option Description
Night
Scene
On/Off
This setting allows you to record video clips in
a dark background.
( - DSC items)
Item Option Description
Image Size
10M
Set picture resolution to 3584x2688.
Print up to 8”x12” photos.
8M
Set picture resolution to 3264x2448.
Print 8”x10” photos.
6M
Set picture resolution to 2832x2128.
Print 6”x8” photos.
5M
Set picture resolution to 2592x1944.
Print 5”x7” or 6”x8” photos.
3M
Set picture resolution to 2048x1536.
Print 4”x6” or 5”x7” photos.
VGA
Set picture resolution to 640x480.
Taken pictures are suitable for viewing on the
computer screen.
28
advanced operations
advanced operations
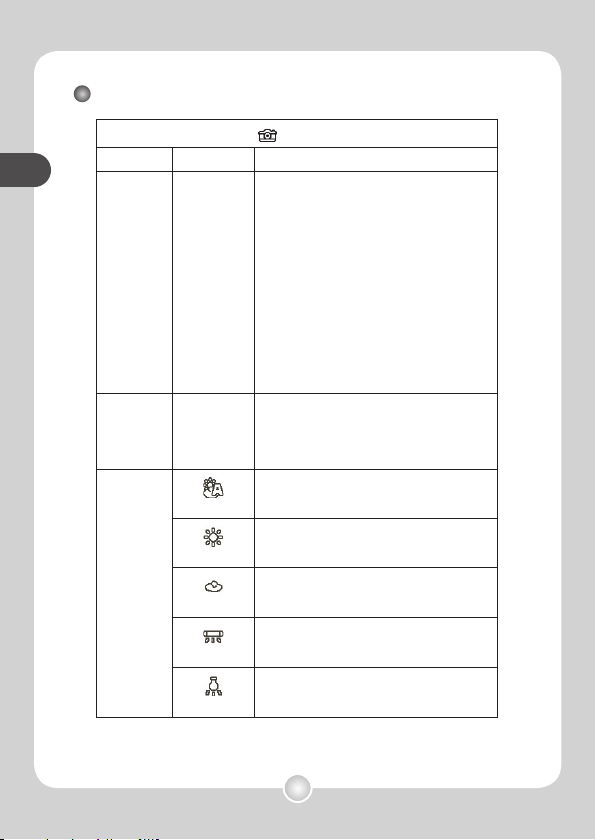
Menu items in DV/DSC mode (3)
( - DSC items)
Item Option Description
Add Voice
Note
On/Off
When enabled, you will be prompted to add
a voice note after every shot. Recording
voice notes lets you add voice memos to
your pictures. Here are some tips on using
this feature:
1. Each voice note lasts up to 10 seconds.
2. You can add the voice note immediately
after every shot or later when you review the
picture in Playback mode.
3. For one picture, only one voice note can
be added. When you review a picture with a
voice note, you can record a new voice note to
replace the previous one.
4. You can delete the voice note in Voice
Recorder mode. The still picture itself will
stay intact.
EV
(Exposure Value)
+3 ~ -3
Manually adjust the exposure to gain better
effect when the preview image appears too
bright or too dark. A positive value indicates
the image will be brighter than usual; while a
negative value makes the image dimmer.
WB
(White Balance)
Auto
The camcorder automatically adjusts white
balance.
Sunny
This setting is suitable for outdoor shooting in
sunny weather.
Cloudy
This setting is suitable for shooting in cloudy
weather or shady environments.
Fluorescent
This setting is suitable for indoor shooting with
fl uorescent lamp lighting, or environments with
high color temperature.
Tungsten
This setting is suitable for indoor shooting with
incandescent lamp lighting, or environments
with low color temperature.
Loading...