


IS-DV2
Table of contents
 Loading...
English
1
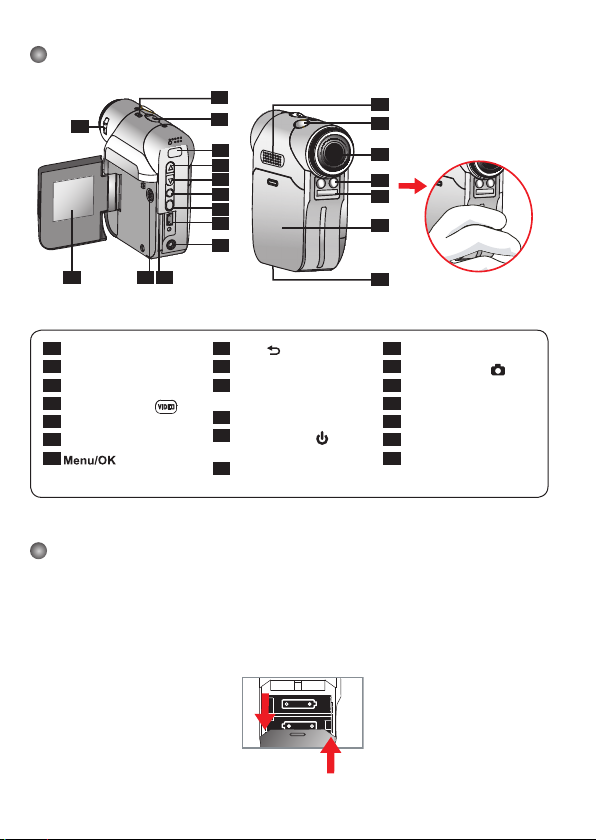
Camcorder Parts
1
Focus switch
2
Microphone
3
Strap hook
4
*Record button ( )
5
Up button (Zoom in)
6
Down button (Zoom out)
7
Button
8
Mode/ button
9
USB Port
10
TV-out Connector/
Earphone
11
SD/MMC Card Slot
12
Power Button (
) /
Video light
13
LCD Panel
14
Speaker
15
Shutter Button ( )
16
Lens
17
Video light
18
Flash strobe
19
Battery cover
20
Tripod Port
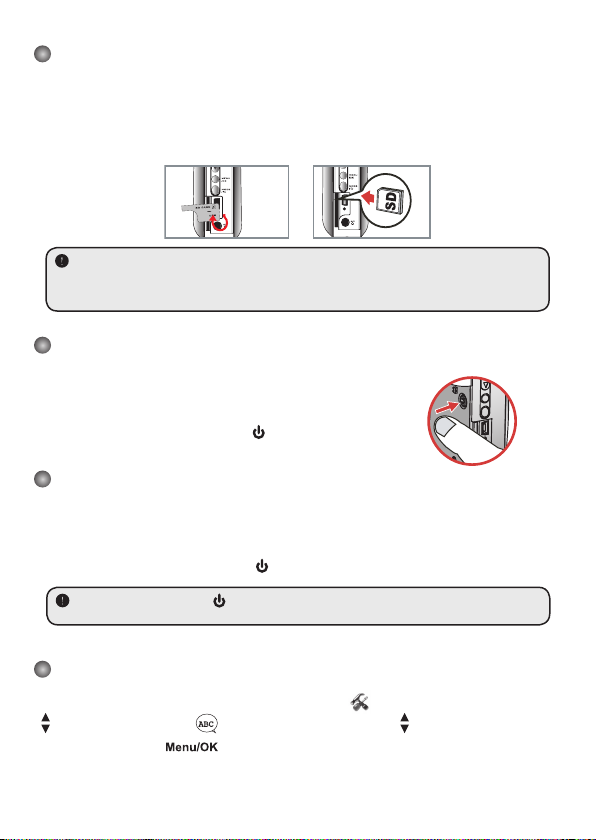
Loading the battery
Please use two AA batteries.
1. Slide open the battery compartment cover as indicated.
2. Load the batteries into the battery compartment wtih + and - ends correctly installed.
3. Replace the cover.
12
3
13
1
19
18
17
16
15
14
9
10
8
6
5
4
11
7
20
2
* Avoid blocking the
strobe.
open
close
2
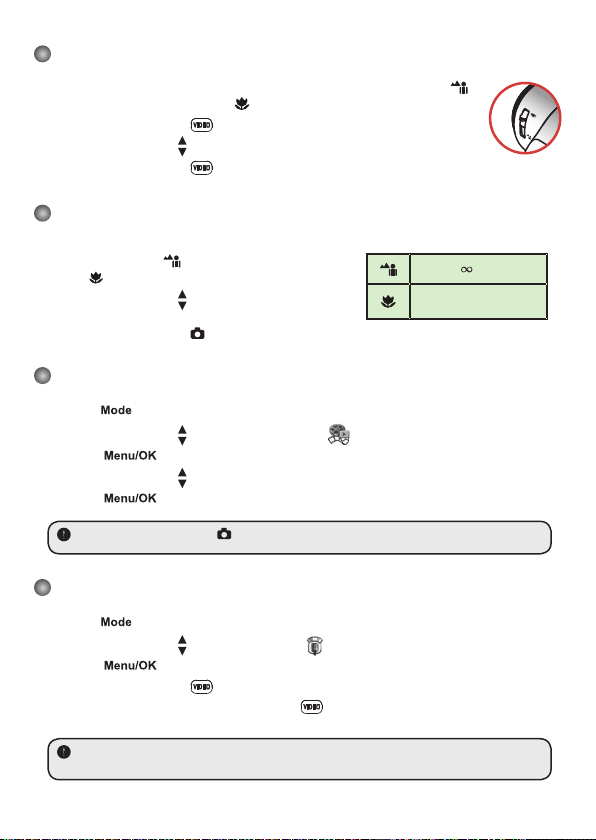
Inserting the SD/MMC card (optional)
1. Lift the SD card cover.
2. Insert the card in the direction of indication until it reaches the end of the slot.
3. When using a SD card, the built-in memory will become inaccessible.
4. To remove the SD card, gently push the card until it pops up.
The serial number of the file name (PICTxxxx) will be counted continuously even
you delete all files on the SD card or insert a new one. If you want to restart the serial
number, plese use the camcorder “Format” function to format the card.
Turning on the camcorder
Open the LCD panel.
OR
Press and hold down the Power button (
) for 3 seconds.
Turning off the camcorder
Close the LCD panel.
OR
Press and hold down the Power button (
) for 3 seconds.
Press the Power button (
) shortly will turn the video light on/off.
Setting Language
Power-on → Press the Mode button → Enter the Setting ( ) mode → Use the Zoom buttons
( ) to select the Language (
ABC
) item → Use the Zoom buttons ( ) to select a suitable
language and press the button to confirm.

3
Reading LCD indicators
Digital Camcorder mode:
1.1x
Playback thumbnail mode:
Playback full mode:
Video REC mode:
1.1x
Focus mode
Flash mode
Photo resolution
Zoom ratio
Number of pictures/files
SD card inserted
Battery life
Play mode
Recording time
Volume
Current/total recordings
Play mode
Highlight box
NightShot
Smart Zoom
File type
Video resolution
Zoom ratio
Recording time
Battery life
Focus mode
Video light
mode
Recording
NightShot
Smart Zoom
SD card inserted
4
Recording a video clip
1. Set the focus to an appropriate setting. Normally, you may set the focus to ( )
for most filming conditions. Select (
) only for close-ups.
2. Press the Record button ( ) to start recording.
3. Use the Zoom buttons ( ) to zoom in or zoom out the screen.
4. Press the Record button ( ) again to stop recording.
Taking a still picture
1. Set the focus to an appropriate setting. Normally, you
may set the focus to ( ) for most filming conditions.
Select ( ) only for close-ups.
2. Use the Zoom buttons ( ) to zoom in or zoom out the
screen.
3. Press the Shutter button ( ) to take a still picture.
Playing back your recordings
1. Press the button.
2. Use the Zoom buttons ( ) to select the Playback ( ) mode.
3. Press the button to enter.
4. Use the Zoom buttons ( ) to shift between files.
5. Press the button to review/play the file.
Press the Shutter button ( ) to delete files.
Recording a voice clip
1. Press the button.
2. Use the Zoom buttons ( ) to select the Voice ( ) mode.
3. Press the button to confirm. (*)
4. Press the Record button ( ) to start recording.
5. When you are done, press the Record button ( ) again to stop recording.
When entering the Voice mode, the remaining recordable time will be displayed on the
LCD.
70cm ~
50cm ~ 70cm
5
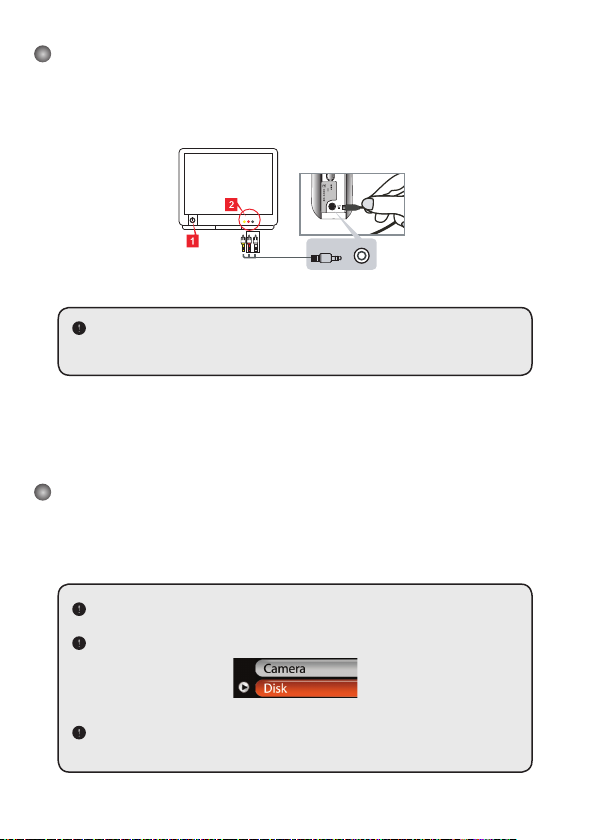
Connecting the camcorder to a TV
Connect your camcorder and TV via the accessory AV cable for real-time display. You can
display your video clips, still pictures, and audio recordings directly on your TV, sharing them
with your friends and family.
Video Audio
AV-Mode
TV
Earphone
TV
OUT
1. Turn on your TV and switch the TV to AV mode.
The TV system is different across countries. If you need to adjust the TV-out
setting, please refer to page 8 for more information. (Taiwan: NTSC; America:
NTSC; Europe: PAL; China: PAL)
2. Connect the audio and video ends of the AV cable to the TV.
3. Turn on the camcorder.
4. Connect the other end of the AV cable to your camcorder.
Connecting the camcorder to your PC
1. Turn on the camcorder.
2. Connect the camcorder to your computer by the USB cable.
The default is set to “Disk” mode. When connected to a PC, the camcorder will
automatically enter Disk (Removable disk) mode.
If you set the USB Mode to “Menu” mode, the following screen will appear.
Please select the desired connection mode.
If you would like to change the setting, please refer to page 9 for more
information.
6
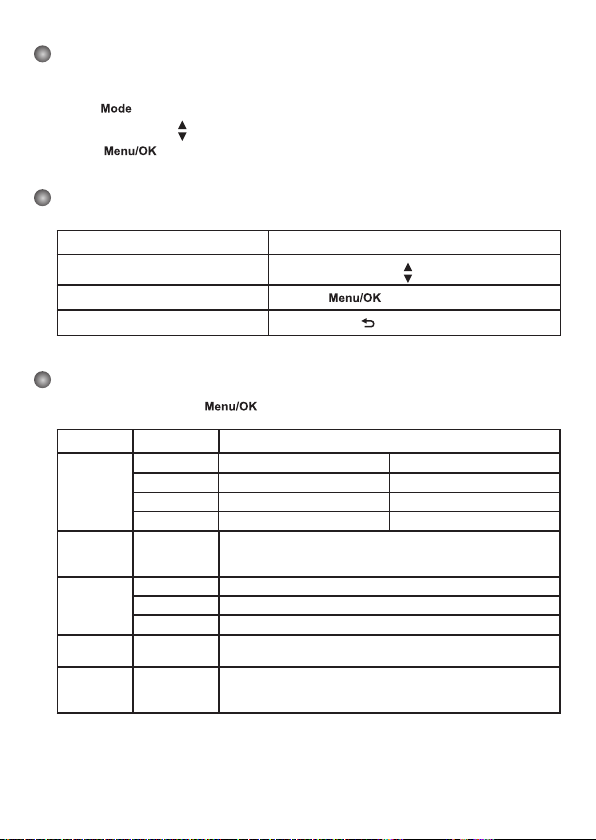
Mode selection
1. Turn on the camcorder.
2. Press the button.
3. Use the Zoom buttons ( ) to select the desired item.
4. Press the button to confirm.
Basic operation
How to... Action
Move the highlight bar
Use the Zoom buttons ( ) to move up or down.
Confirm an item
Press the button.
Exit menu/Go back to upper menu
Press the Mode/ button (when in sub-menu).
Menu items in Camera mode (1)
Power-on → Press the button.
Item Option Description
Resolution
Picture resolution Print photos
1M 1280x960 3x5 in.
3M 2048x1536 4x6 in. or 5x7 in.
6M 2848x2136 6x8 in.
Selftimer On/Off
Enable the selftimer. After the selftimer is turned on, the camcorder
will have ten seconds delay before recording when the Shutter
button is pressed.
Flash
Auto The flash automatically fires when the lighting is insufficient.
On The flash is forced to fire in every shot.
Off The flash is disabled.
* Two-in-One On/Off
This setting allows you to combine two images taken individually
into one photo.
Histogram On/Off
The real-time histogram displays the approximate luminance
distribution on the screen. You may adjust the exposure to gain
better effect.

7
Menu items in Camera mode (2)
Item Option Description
* Photo-
Frame
1 ~ 10
This setting allows you to add customized frames to photos. 10
background frames are available on the LCD monitor.
0 The Photo-Frame function is disabled
Video
VGA Set the video resolution to VGA (640x480 pixels).
QVGA Set the video resolution to QVGA (320x240 pixels).
Stabilizer On/Off Minimize blur caused by hand shake.
Smart Zoom On/Off
This setting allows you to get a clearer image during using the
zoom buttons.
WB
Auto The camcorder automatically adjusts white balance.
Sunny This setting is suitable for outdoor recording in sunny weather.
Cloudy
This setting is suitable for recording in cloudy weather or shady
environments.
Fluorescent
This setting is suitable for indoor recording with fluorescent lamp
lighting, or environments with high color temperature.
Tungsten
This setting is suitable for indoor recording with incandescent lamp
lighting, or environments with low color temperature.
Effect
Normal Make recordings in natural color.
B&W Make recordings in black and white.
Classic Make recordings in sepia-toned color.
Exposure
-2~+2
Manually adjust the exposure to gain better effect when the preview
image appears too bright or too dark. A positive value indicates the
image will be brighter than usual; while a negative value makes the
image dimmer.
NightShot On/Off
This setting allows you to take a photograph with a dark
background. Since the shutter speed will slow down when taking
photographs at a dark place, we recommend using a tripod to
eliminate blurring from hand shake.
Video Light On/Off
The setting allows you to add extra light when the lighting is
insufficient during recording video clips
The Two-in-One and Photo-frame function will be disabled when the resolution is set
to 10M.
8
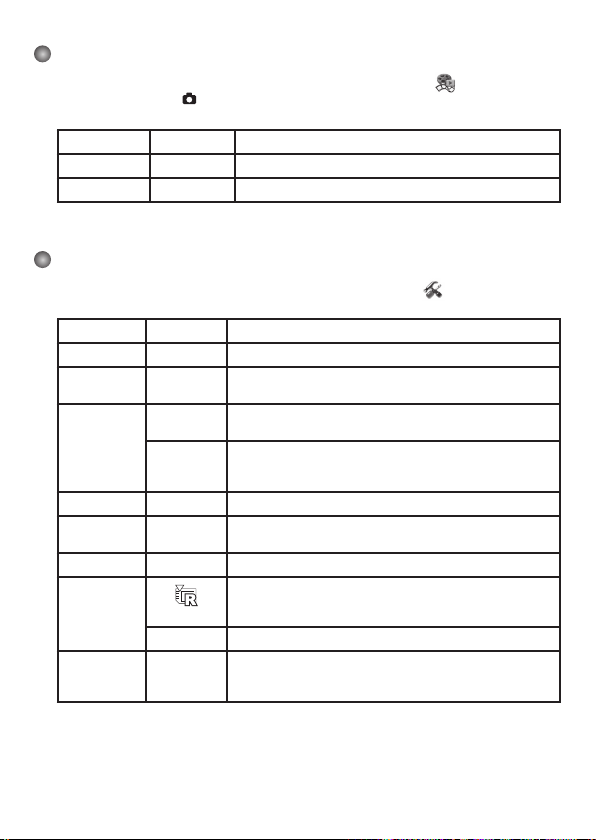
Menu items in Playback mode
Power-on → Press the Mode button → Enter the Playback ( ) mode → Press
the Shutter button ( ).
Item Option Description
Delete One Yes/No Delete current file.
Delete All
Yes/No
Delete all pictures and video/audio files stored in the memory.
Menu items in Setting mode (1)
Power-on → Press the Mode button → Enter the Setting ( ) mode.
Item Option Description
Beep
On/Off
Enable beep sound on/off.
Flicker
50Hz/60Hz
Set flicker frequency to 50Hz or 60Hz. For more information,
please refer to the “Flicker Settings” table.
TV-out
NTSC
Set TV system compatibility to NTSC. This option is suitable for
America, Taiwan, Japan, and Korea areas.
PAL
Set TV system compatibility to PAL. This option is suitable for
Germany, England, Italy, Netherlands, China, Japan, and Hong
Kong.
Icon
On/Off
Enable/disable OSD icons to display on the screen.
LCD Bright
0 ~ 4
Set LCD brightness. A greater value makes the LCD brighter;
while a smaller value makes the LCD dimmer.
Volume
0 ~ 10
Set the volume. (0: mute, 1-10 levels)
Format
Yes
Format the storage medium. Note that all files stored in the
medium will be gone.
The serial number of the file name (PICTxxxx) will be restarted.
No
Cancel action.
Auto Off
Off
1min/3min/
5min
Set how long the camcorder will automatically shut down when
staying inactive. Setting to [Off] will make the camcorder stay
powered on until it runs out of power.

9
Menu items in Setting mode (2)
Item Option Description
Language Lets you select the language used for OSD.
USB Mode
Menu
When connected to a PC, the camcorder displays a menu for
you to choose a desired connection mode.
Camera
When connected to a PC, the camcorder automatically enters
Camera (PC camera) mode.
Disk
When connected to a PC, the camcorder automatically enters
Disk (removable disk) mode.
Start Movie On/Off
Enable/disable the movie sequence when the camcorder is
powered on.
Default On/Off
Restore factory defaults. Note that your current settings will be
overridden.
Flicker Settings
Country England Germany France Italy Spain Russia
Setting 50Hz 50Hz 50Hz 50Hz 50Hz 50Hz
Country Portugal America Taiwan China Japan Korea
Setting 50Hz 60Hz 60Hz 50Hz 50/60Hz 60Hz
Note: The flicker setting is based on the frequency standard of your local power supply.
10
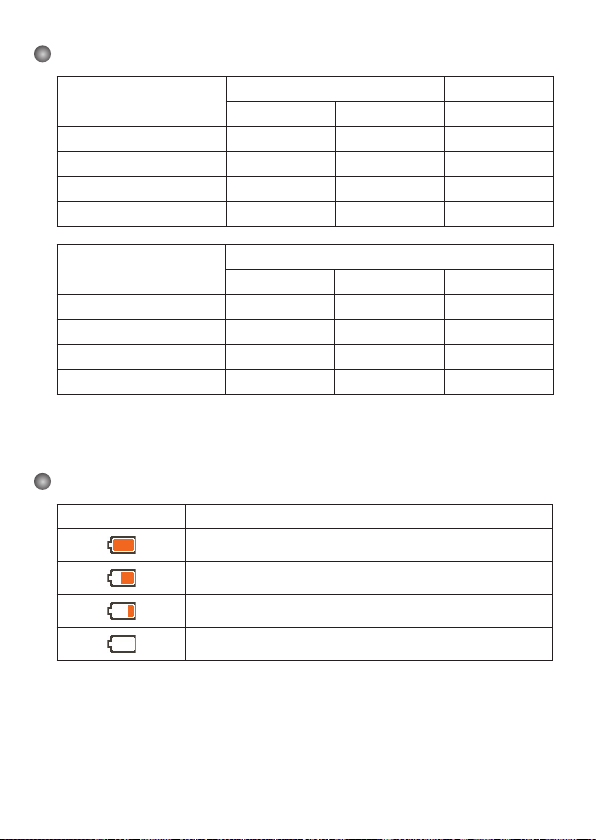
Storage Capacity
Memory
Video (min.)
Audio (min.)
VGA QVGA Maximum
SD/MMC card (128MB) 7 40 85
SD/MMC card (256MB) 20 85 175
SD/MMC card (512MB) 40 175 350
SD/MMC card (1GB) 80 350 720
Memory
Still picture
6M 3M 1M
SD/MMC card (128MB) 150 300 770
SD/MMC card (256MB) 300 620 1540
SD/MMC card (512MB) 600 1230 3080
SD/MMC card (1GB) 1200 2500 6160
Note: The actual value of capacity may vary (up to ± 30%) depending on the color saturation
and complexity of your subject and surroundings.
Battery Life Indicator
Icon Description
Full battery life
Moderate battery life
Low battery life
Empty battery life
Note: To avoid sudden outage of power supply, you are recommended to replace the battery
when the icon indicates low battery life.
Loading...