


DZO-V58
Table of contents
 Loading...
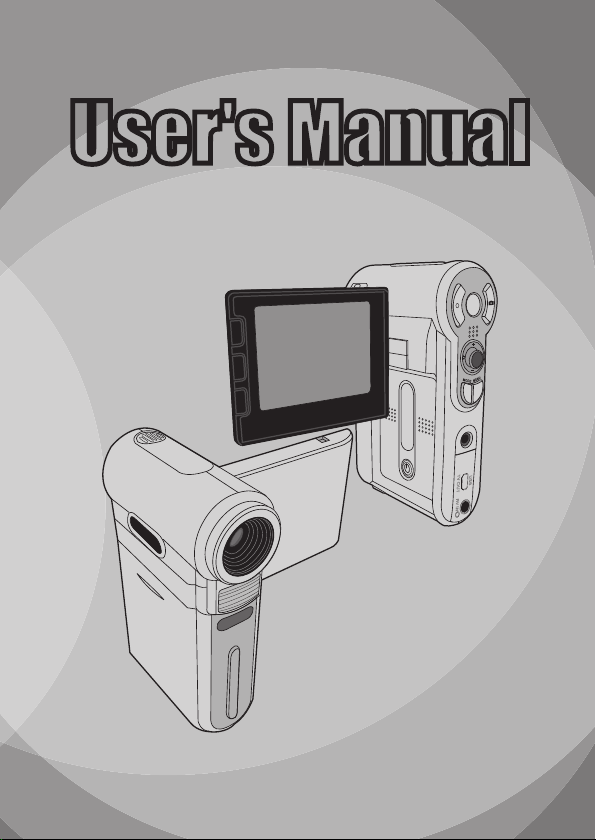
User's Manual
User's Manual
English

FCC Compliance Statement:
This device complies with Part 15 of the FCC Rules. Operation is
subjected to the following two conditions: (1) this device may not cause
harmful interference, and (2) this device must accept any interference
received, including interference that may cause undesired operation.
This equipment has been tested and found to comply with limits for a Class B digital device,
pursuant to Part 15 of the FCC rules. These limits are designed to provide reasonable
protection against harmful interference in residential installations. This equipment generates,
uses, and can radiate radio frequency energy, and if not installed and used in accordance with
the instructions, may cause harmful interference to radio communications.
However, there is no guarantee that interference will not occur in a particular installation. If this
equipment does cause interference to radio or television equipment reception, which can be
determined by turning the equipment off and on, the user is encouraged to try to correct the
interference by one or more of the following measures:
-Reorient or relocate the receiving antenna.
-Move the equipment away from the receiver.
-Plug the equipment into an outlet on a circuit different from that to which the receiver is
connected.
-Consult the dealer or an experienced radio/television technician for additional suggestions.
You are cautioned that any change or modications to the equipment not expressly approved
by the party responsible for compliance could void Your authority to operate such equipment.

Welcome
Dear user, thanks for purchasing this product.
Much investment in time and effort has gone into its development,
and it is our hope that it will give you many years of trouble-free service.
Safety Notice
1. Do not drop, puncture or disassemble the
camera; otherwise the warranty will be voided.
2. Avoid all contact with water, and dry hands
before using.
3. Do not expose the camera to high temperature
or leave it in direct sunlight. Doing so may
damage the camera.
4. Use the camera with care. Avoid pressing hard
on the camera body.
5. For your own safety, avoid using the camera
when there is a storm or lightning.
6. Do not use batteries of different specications.
Doing so may lead to the potential for serious
damage.
7. Remove the battery during long periods
between usage, as a deteriorated battery may
affect the functionality of the camera.
8. Remove the battery if it shows signs of leaking
or distortion.
9. Use only the accessories supplied by the
manufacturer.
10. Keep the camera out of the reach of infants.
1

Table of Contents
Welcome .......................................................................... 1
Safety Notice ................................................................... 1
Table of Contents ........................................................... 2
Getting Started ................................................................4
Knowing your camera parts ..................................................................4
Installing the battery.............................................................................. 5
Using the charger .................................................................................6
Inserting a memory card (optional) .......................................................7
Attaching the carrying strap ..................................................................8
Basic Operations ............................................................ 9
Turning on your camera ........................................................................ 9
Turning off your camera ........................................................................ 9
Using the LCD monitor .........................................................................10
Reading LCD indicators ........................................................................ 11
Setting time and language ....................................................................12
Recording a video clip ..........................................................................13
Taking a still picture ..............................................................................15
Recording a voice clip........................................................................... 16
Recording TV program or DVD ............................................................. 17
Playing back your recordings................................................................ 18
Playing MP3 music ............................................................................... 19
Connecting the camera to a TV ............................................................21
Advanced Operations ....................................................22
Menu operation ..................................................................................... 22
Menu illustration.................................................................................... 22
Menu items in Camera mode................................................................ 23
Menu items in Playback mode .............................................................. 27
2

Table of Contents
Menu items in MP3 mode .....................................................................28
Menu items in Voice mode....................................................................28
Menu items in Setting mode ................................................................. 29
Copying Files to Your PC ............................................... 32
Installing the driver to your PC.............................................................. 32
Connecting the camera to your PC....................................................... 34
Copying les to the PC ......................................................................... 35
Viewing/Playing les on your PC ..........................................................37
File location........................................................................................... 38
Appendix:A .....................................................................39
Troubleshooting ....................................................................................39
Flicker Settings ..................................................................................... 42
System Message .................................................................................. 42
Storage Capacity .................................................................................. 43
Battery Life Indicator ............................................................................. 44
Battery Life............................................................................................ 44
Appendix:B .....................................................................45
Instruction for ArcSoft MediaConverter™ .............................................45
Appendix:C .....................................................................53
Specications........................................................................................ 53
Appendix:D .....................................................................54
System Requirements ..........................................................................54
3

4
Getting Started
Knowing your camera parts
Microphone
Speaker
Battery cover
LCD monitor
Previous button/
Fast backward button
Play/Pause button
Next button/
Fast forward button
Zoom in button
Flash button
OK key
Focus switch
Zoom out button
Record button
Power button
White balance button
Lens
Flash strobe
Front LED indicator
Strap hook
Tripod socket
Bottom view
SD/MMC card slot
(inside the battery cover)
Shutter button
Direction buttons
Menu button
Mode button
Earphone connector
USB connector/
TV OUT connector
AV IN connector
Installing the battery
1 Open the battery cover.
Slide the battery cover open as indicated.
2 Install the battery.
Place the accessory Li-Ion battery into the
compartment. Note that the metallic contacts
must be aligned with the contacts in the
compartment.
3 Replace the cover.
After the battery is properly installed, replace
the battery cover.
Treat the Li-Ion battery with care:
• Keep the battery away from re or high-temperature environment
(over 140ºF or 60ºC).
• Do not drop the battery or try to disassemble it.
• If the battery is not used for long periods, fully discharge and
charge the battery at least once a year to maintain its lifecycle.
Upon using the battery for the rst time, you are recommended to
fully discharge and then charge the battery to ensure its lifecycle.
Purchasing additional batteries:
This camera uses one 8210 Li-Ion battery as power source. You
can purchase the 8210 Li-Ion Rechargeable battery (3.7 volt;
850mAh) at your local shop.
5
6
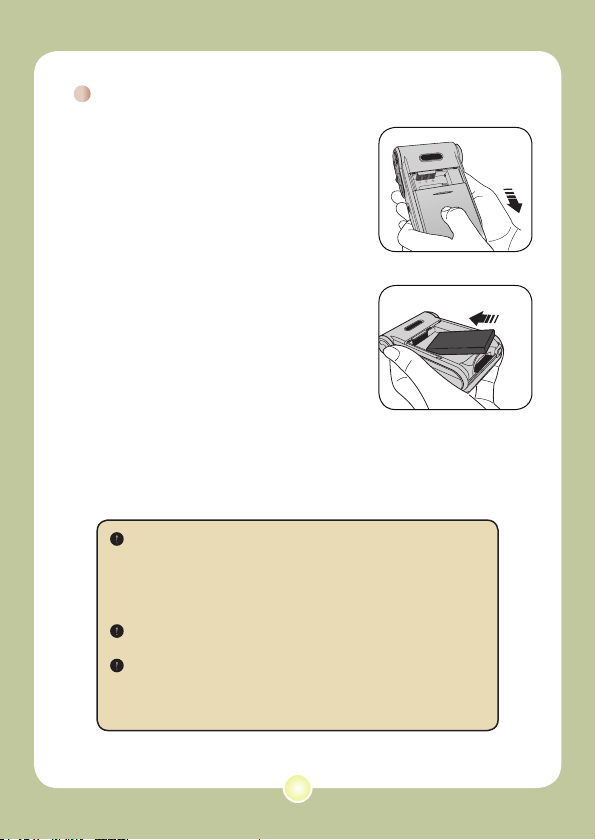
Using the charger
The battery attached is not fully charged. Please charge the
battery at least 4 hours for rst time use.
1 Connect one end of the supplied AC adapter to the
charger stand and the other end to a wall outlet.
2 Place the depleted battery pack into the charger.
Note that the metallic contacts must be aligned with the contacts in the
charger.
Battery pack
Charging indicator
To a wall outlet
Power indicator
3 The charging indicator turns red and the charge
starts.
4 When the charging indicator turns green, the battery
pack is fully charged.
This charger can only be used to charge the accessory battery
pack. Do not use it to charge other unknown batteries.
When in use, do not place the charger near re or in an enclosed
area that retains heat.
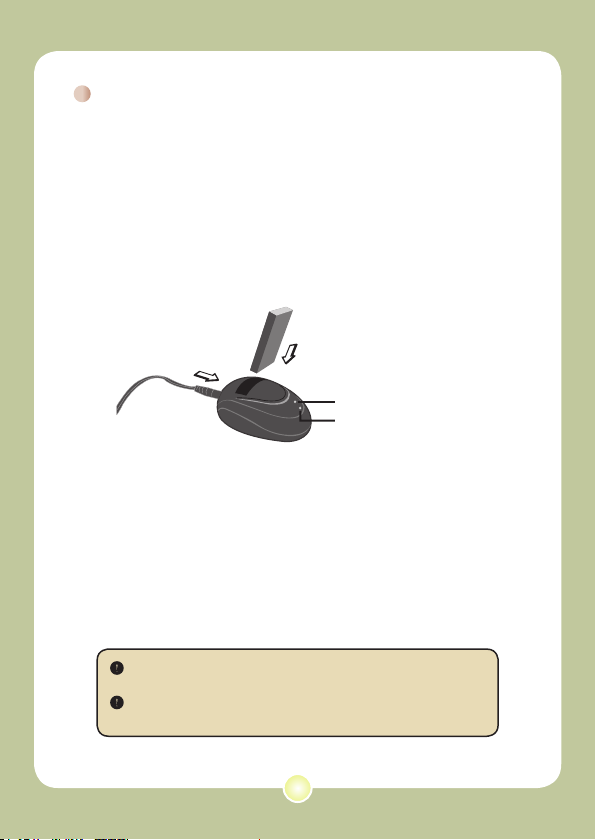
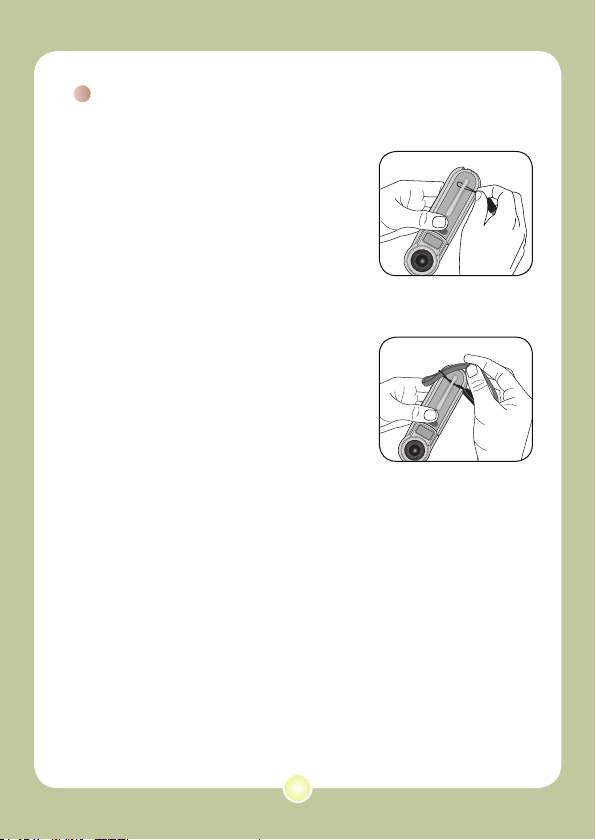
Inserting a memory card (optional)
In addition to the built-in ash
memory, your camera can store data
on a Secure Digital (SD) card or a
MultiMedia card (MMC).
To insert a memory card, do the
followings:
(1) Open the battery cover.
(2) Gently push the card as indicated
until the card reaches the bottom
of the slot.
To remove the memory card, gently
push the card and it will pop up. Then
pull the card out of the slot.
Write protection
The SD card comes with a
write-protect switch. When
the write-protect switch is set
to the Lock position, the card
will become non-writable. To
ensure that the camera can
operate normally, you should
set the write-protect switch
to the Unlock position before
inserting the SD card.
Do not remove the memory card while the camera is processing
data (when the LED is blinking).
When a memory card is inserted, the camera will use the card
as the main storage medium. Files stored in the camera’s built-in
memory will become inaccessible until the card is removed.
7
Attaching the carrying strap
1 Thread one end of the strap into
the strap hook.
2 Thread the strap as illustrated
on the right.
8
Basic Operations
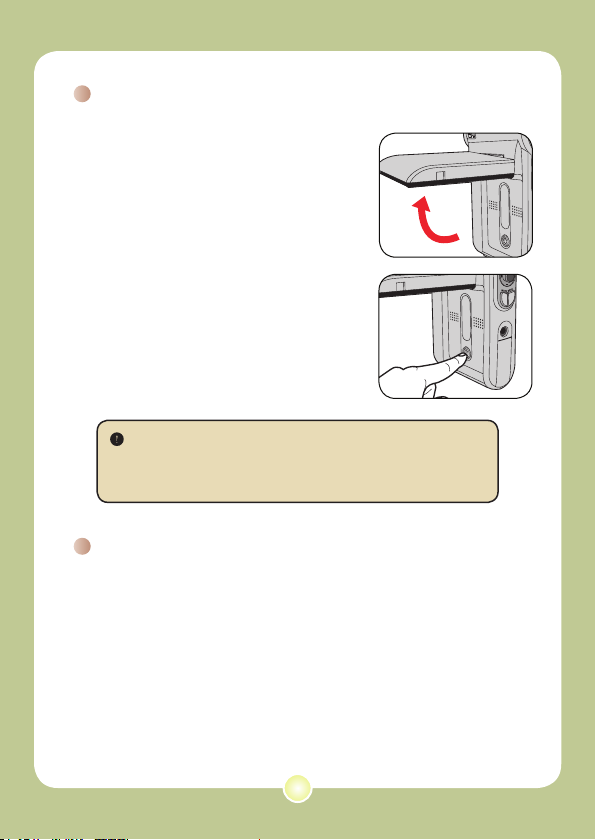
Turning on your camera
Open the LCD monitor and the camera
will be automatically powered on.
OR
When the camera is powered off with
the LCD monitor open, press and hold
down the Power button for 1 second to
turn on the camera.
If the camera is not turned on after pressing the Power button,
please check:
1. The battery pack is well installed in the camera.
2. The battery pack has enough power left.
Turning off your camera
Press and hold down the Power button for 1 ~ 3 seconds to turn
off the camera.
OR
If the camera stays inactive for a long period of time, it may
automatically shut down due to the Auto-Off setting. See page
30 for more information.
9
10
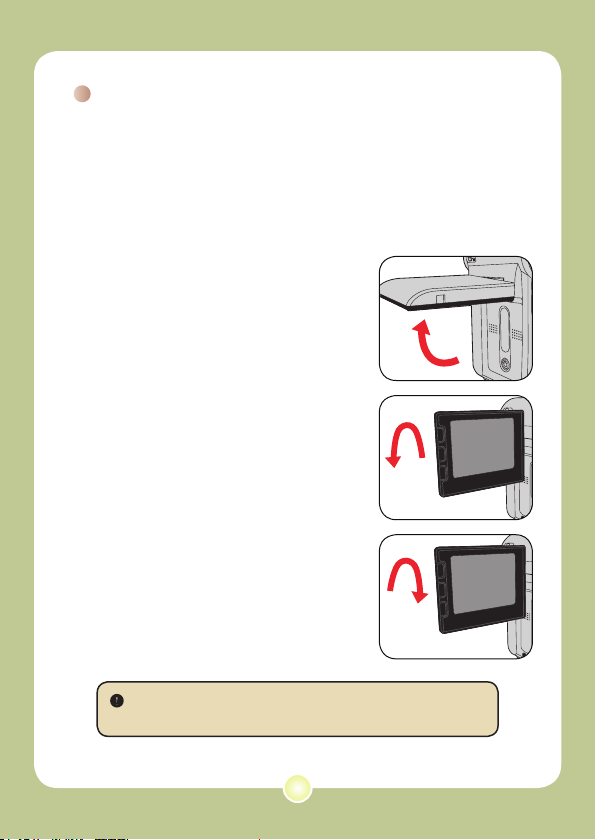
Using the LCD monitor
90°
180°
The LCD monitor can be used to
compose image settings for shooting,
to review recorded les, or to change
menu options.
The LCD monitor can be rotated to the
following positions:
1 Open the LCD monitor.
2 Rotate the LCD monitor.
The LCD monitor can be rotated up to 270
degrees as indicated. You can position the
panel at any angle to serve your lming
purpose.
When the LCD monitor is ipped over, the previewed image on the
LCD will be automatically adjusted.

2.0 0008
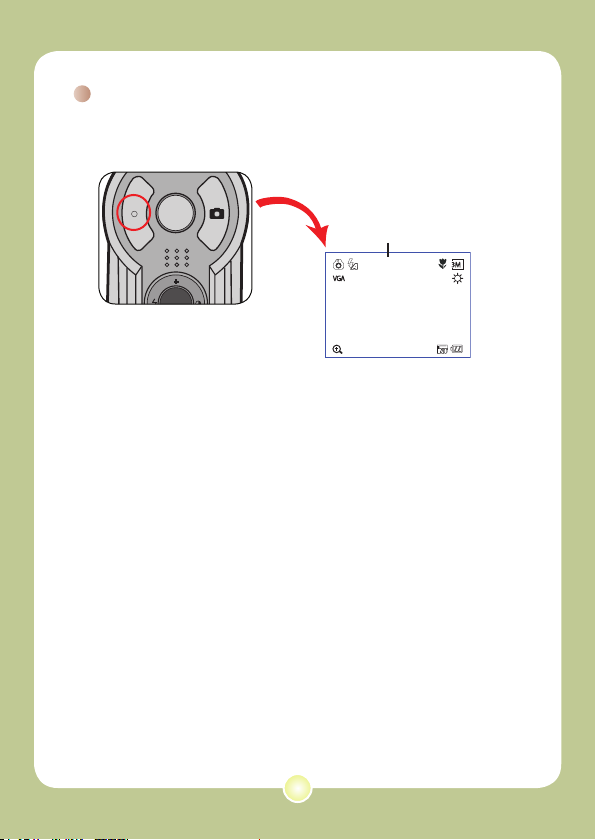
Reading LCD indicators
2.0 0008
0001/0009
MPEG
Digital Camcorder mode:
Flash mode
Selftimer
Mode icon
Video resolution
Zoom ratio
*1 This icon will change according to the storage medium you are using:
: internal memory.
: memory card.
Focus
Photo resolution
White balance
Storage medium*
Battery Life
Number of recordings
Playback mode:
File type
Current / Total recordings
Mode icon
Highlight box
Image thumbnail
Battery Life
Storage medium
1
11

12
Setting time and language
When you power on the camera for the rst time, you are
recommended to adjust the time and language settings.
1 Turn on the camera.
2 Press the Mode button and use the Direction buttons
to select the Setting ( ) mode. Then press the OK
key to enter.
3 Use the Direction buttons to select the Date & Time
( 30 ) item.
4 Press the OK key or move the Direction buttons
toward right to enter the sub-menu.
5 Move the Direction buttons left or right to shift
between items. Move the Direction buttons up or
down to adjust the value. Press the OK key or right
key of the Direction buttons to conrm the setting.
6 Press the Menu button or Mode button to return to
the menu, and then use the Direction buttons to
select the Language (
ABC
) item.
7 Press the OK key or move the Direction buttons
toward right to enter the sub-menu.
8 Use the Direction buttons to select a suitable
language and press the OK key to conrm.

Recording a video clip
1 Adjust the focus.
Set the Focus Switch to an appropriate
setting. Normally, you should set the focus to
( ) for most lming conditions. Select (
) only for close-ups. The focus is adjustable
during recording.
70cm ~ (28” ~ )
50cm ~ 70cm (20” ~ 28”)
2 Zooming
Move the Direction buttons up or down
to zoom in or zoom out the screen. The
maximum magnication is 4X.
The zoom function is also available during recording.
Adjust other advanced settings if necessary. See the section
“Advanced Operations” on page 22 for more information.
Zoom in
Zoom out
13
14
Recording a video clip (continued)
2.0 0008
3 Press the Record button to start recording.
Timer
00:00:07
4 Press the Record button again to stop recording.

Taking a still picture
1 Adjust the focus.
Set the Focus Switch to an appropriate
setting. Normally, you should set the focus
to ( ) for most lming conditions. Select (
) for scenery photos. Select ( ) only for
close-ups.
70cm ~ (28” ~ )
50cm ~ 70cm (20” ~ 28”)
2 Zooming
Use the Zoom button or Up/Down key to
zoom in or zoom out the screen.
Adjust other advanced settings
if necessary. See the section
“Advanced Operations” on page 22
for more information.
3 Press the Shutter button to take
a still picture.
15
Zoom in
Zoom out
16
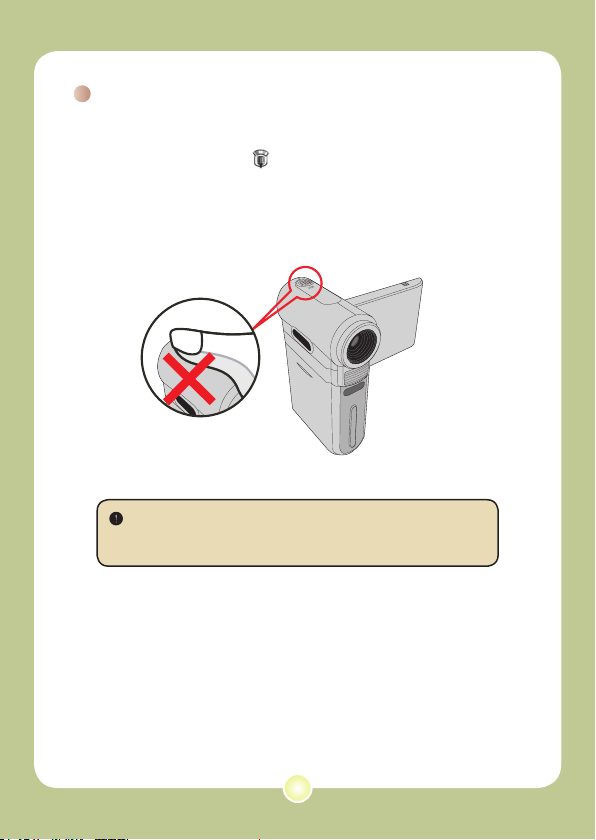
Recording a voice clip
1 Press the Mode button and use the Direction buttons
to select the Voice ( ) mode. Then press the OK
key to enter.
2 Press the Record button to start recording.
Avoid blocking the microphone
Before or during recording, you can move the Direction buttons
toward left or right to adjust microphone sensibility, thus setting the
sound volume of the recording.
3 When you are done, press the Record button again
to stop recording.
Loading...