


Green bagless cleaning performance

2

3

4

5

|
|
|
|
|
|
|
|
|
|
|
|
|
........................................................English |
2–13 |
|||||||||
Thank you for choosing an Electrolux UltraActive vacuum cleaner. This User Manual describes all UltraActive models. Some of the accessories/features may not apply to your specific model. In order to ensure the best results, always use original Electrolux accessories. They have been designed especially for your vacuum cleaner.
............................................................. |
2–13 |
감사합니다. . ,.
................................................... |
14–25 |
Electrolux UltraActiveUltraActive /
用Electrolux
................................................. |
14–25 |
Electrolux UltraActiveUltraActive /
Electrolux
|
|
|
|
|
|
|
|
|
|
|
|
|
|
|
|
|
|
|
|
|
|
|
|
|
|
|
|
|
|
|
|
......................................Bahasa melayu |
26–37 |
|
|
|
|
|
|
|
|
|
|
|
|||
Terima kasih Anda telah memilih pengisap debu Electrolux UltraActive. Petunjuk pengoperasian ini menjelaskan semua model UltraActive. Beberapa aksesori/fitur mungkin tidak tersedia pada model tertentu. Untuk mendapatkan hasil terbaik, gunakan selalu aksesori asli Electrolux. Aksesori tersebut dirancang khusus untuk pengisap debu Anda
............................................................ |
26–37 |
UltraActiveUltraActive /

2
|
|
|
|
3. |
|
|
|
|
10. |
7. |
4. |
|
|
|
|
|
|
16. |
|
|
11. |
|
|
|
|
|
|
|
2. |
|
|
|
1. |
|
|
|
|
|
12. |
|
|
17. |
|
|
|
|
|
|
|
|
|
|
5. |
|
|
15. |
9. |
|
6. |
|
|
||||
18. |
|
|
8. |
|
|
|
|
|
|
|
|
|
|
|
13. |
19. |
|
|
|
|
|
14.
20.
21. |
22. |
23. |
24. |
25. |
26. |
Content |
|
3 |
English |
|
|
Before starting
•Unpack your UltraActive model and the accessory system and check that all accessories are included*.
•Read the Operation Instruction carefully.
•Pay special attention to the Safety advice chapter.
Enjoy your Electrolux UltraActive ! |
|
|
|
|
Table of contents: |
|
|
|
|
How to use the vacuum cleaner.. . . . . . . . . . . . . . . . . . . . . . |
. |
. |
. |
4-5 |
Tips on how to get the best results . . . . . . . . . . . . . . . . . . . . . . . . |
|
|
|
6-7 |
Emptying and cleaning the dust container. . . . . . . . . . . . . . . . . |
. |
. |
. |
. .8 |
Replacing and cleaning the filters.. . . . . . . . . . . . . . . . . . . . . |
. |
. |
. |
. 9 |
Cleaning the nozzles. . . . . . . . . . . . . . . . . . . . . . . . . . . . . . . . . . . . . . . . . . . . . . . . . . . . . . . . |
. . |
. . |
10-11 |
|
Changing the battery in remote handle. . . . . . . . . . . . . . . . . . . |
. |
. |
. |
.11 |
Troubleshooting. . . . . . . . . . . . . . . . . . . . . . . . . . . . . . . . . |
|
|
|
12 |
Safety advice. . . . . . . . . . . . . . . . . . . . . . . . . . . . . . . . |
. |
. |
. |
.13 |
Consumer information and sustainability policy . . . . . . . . . . . . . . . |
. |
. |
. |
13 |
Description of your UltraActive :
1Dust container
2Power adjustment
3Exhaust filter lid
4Exhaust filter
5Power cord
6Ergoshock
7Foam filter (Frame + Filter)
8Motor filter
9AeroPro hose *
10AeroPro classic handle*
11AeroPro 3in1 nozzle
12AeroPro 3in1 accessories clip
13AeroPro telescopic tube *
14AeroPro nozzle
15Standard hose
16Standard handle *
17Interlocked telescopic tube *
18Dust magnet nozzle *
19Power regulation button for models with manual control*
20Display for models with remote control*
21AeroPro ergo handle*
22AeroPro remote control handle *
23AeroPro remote control handle for motorized nozzle*
24AeroPro motorized nozzle*
25Turbo nozzle*
26Parketto nozzle*
*Accessories may vary from model to model.
(see specification sticker on the packaging box)
•UltraActive*. , , .
•.
•.
Electrolux UltraActive . |
|
: |
|
......................................................................... |
4-5 |
...................................................... |
6-7 |
............................................................................. |
8 |
................................................................................... |
9 |
...................................................................................... |
10-11 |
.................................................................... |
11 |
........................................................................................... |
12 |
........................................................................... |
13 |
UltraActive :
2
3
4
5
7 ( + )
9AeroPro *
10AeroPro *
11AeroPro 3in1
12AeroPro 3in1
13AeroPro *
14AeroPro
16*
17*
18*
19*
20*
21AeroPro *
22AeroPro *
23AeroPro *
24AeroPro *
25*
26*
* .
.
eng kor
cn tw
ind thai
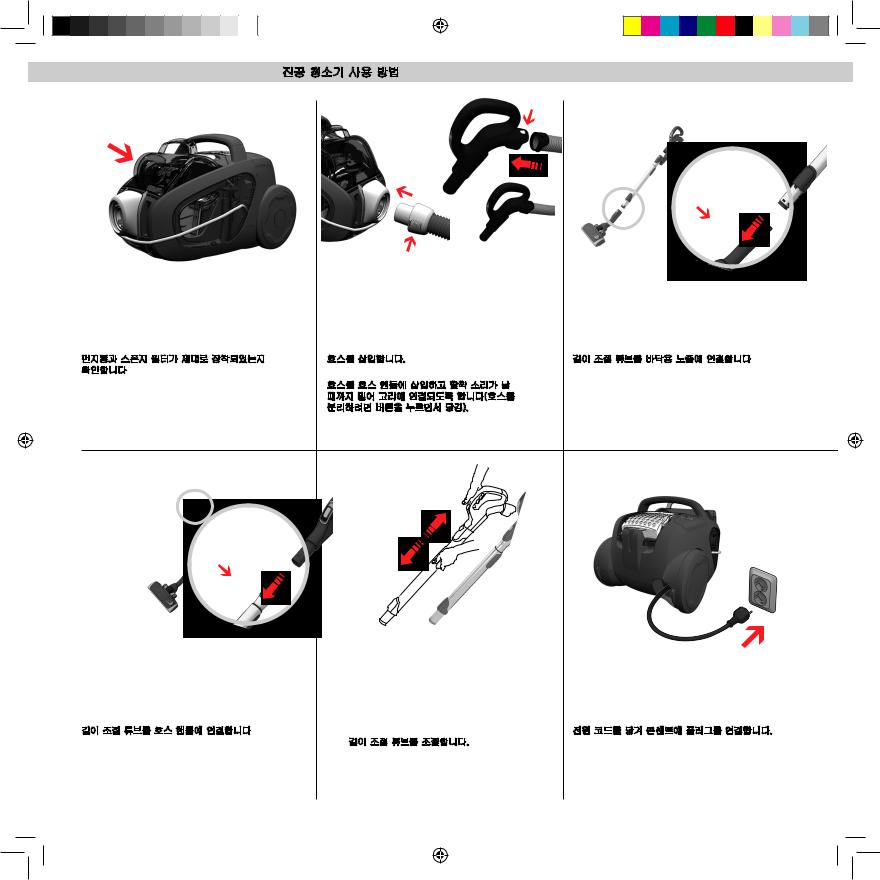
4 How to use the vacuum cleaner
Click
Ensure that the dust container and foam filter are in |
Insert the hose (to remove it, press the release buttons |
Attach the telescopic tube to the floor nozzle (to re- |
place! |
and pull the hose out). |
move it, press the release button and pull the nozzle off). |
|
Insert the hose into the hose handle until the catches |
|
|
click to engage (press the catches to release the hose). |
|
|
. ( |
. |
. |
.) |
. |
|
|
|
|
( |
|
|
). |
|
Click
Attach the telescopic tube to the hose handle (to remove it, press the release button and pull the hose handle out).
Adjust the telescopic tube by holding the lock and pull the handle with the other hand.
Pull out the power cord and plug it into the mains.
. |
|
. |
. |
. |
|
How to use the vacuum cleaner |
5 |
Switch on/off the vacuum cleaner by pushing the ON/ |
Models with remote control can also be operated by |
Adjust suction power. |
OFF button. |
the (ON/OFF) button on the handle. |
Use the slider on the cleaner or the air valve on the han- |
|
|
dle to adjust the suction power. |
. |
|
. |
|
. |
|
|
|
. |
Adjust suction power. (Models with remote control.)
To regulate press ” – ” button (decrease) or ” + ” button (increase)
. ( )
( )
“ – “ ( ) “ + “ ( ).
Models with remote control and AeroPro motorized nozzle. To turn the motorized nozzle on and off, press BRUSH button on the handle. The indicator light on the nozzle will come on when BRUSH is operating.
AeroPro BRUSH() . BRUSH( ).
After vacuuming rewind the power cord by pushing the REWIND button.
REWIND( ).
eng kor
cn tw
ind thai

6 Tips on how to get the best results
Models with manual power regulation:
:
See the reference numbers below to find an optimal performance.
( 1 = MIN ; 5 = MAX )
조절하십시오. ( 1 = ; 5 = )
Models with display and remote control:
:
|
Follow the numbers for |
|
optimal performance. |
|
( 1 = MIN ; 5 = MAX ) |
|
|
|
. |
|
( 1 = ; 5 = ) |
Curtains |
Bookshelves, upholstery, crevices, corners |
, |
, , , |
3in1 3in1
Delicate carpets |
Rugs |
|
Hard floors |
|
|
|
|
|
Brushes up |
Brushes up |
Brushes down |
|
|
|
|
|
. |
. |
. |
Attention: on fur rugs, rugs with long fringes or deep |
Motorized nozzle gives the best dust pick-up and deep |
Brush roller on or off as preferred. |
pile exceeding 15 mm the motorized nozzle should |
cleaning of carpets through the rotating brush roller |
|
have the brush roller off. Press BRUSH button to turn |
agitating the carpet. Do not leave the motorized nozzle |
|
the brush roller off. |
stationary with brush roller on. |
|
: , |
|
. |
15mm |
|
|
. BRUSH( |
. |
|
) . |
. |
|
|
Use Turbo nozzle |
Use Hard floor nozzle |
|
(depending on model) |
(depending on model) |
|
|
. |
|
( ). |
( ) |

Flexible storage:
Store and carry the appliance easily by using the Ergoshock.
Keep the hose in place while storing the vacuum cleaner by extending the elastic bumper cord and placing it across the hose.
Keep the nozzle on the cleaner by using the parking slots on the rear or under the cleaner.
The elastic bumper protects the cleaner from getting scratched at the sharp corners.
Tips on how to get the best results |
7 |
eng kor
:
.
.
.
.
Dust container
Lift out the dust container by pulling the handle straight upwards. |
The dust container must be emptied when it is filled to the MAX |
|
indication mark on the dust container. |
Warning: Do not use the container handle to carry the cleaner ! |
The dust container must never be overfilled. |
. |
MAX( ) |
|
. . |
: . |
|
cn tw
ind thai
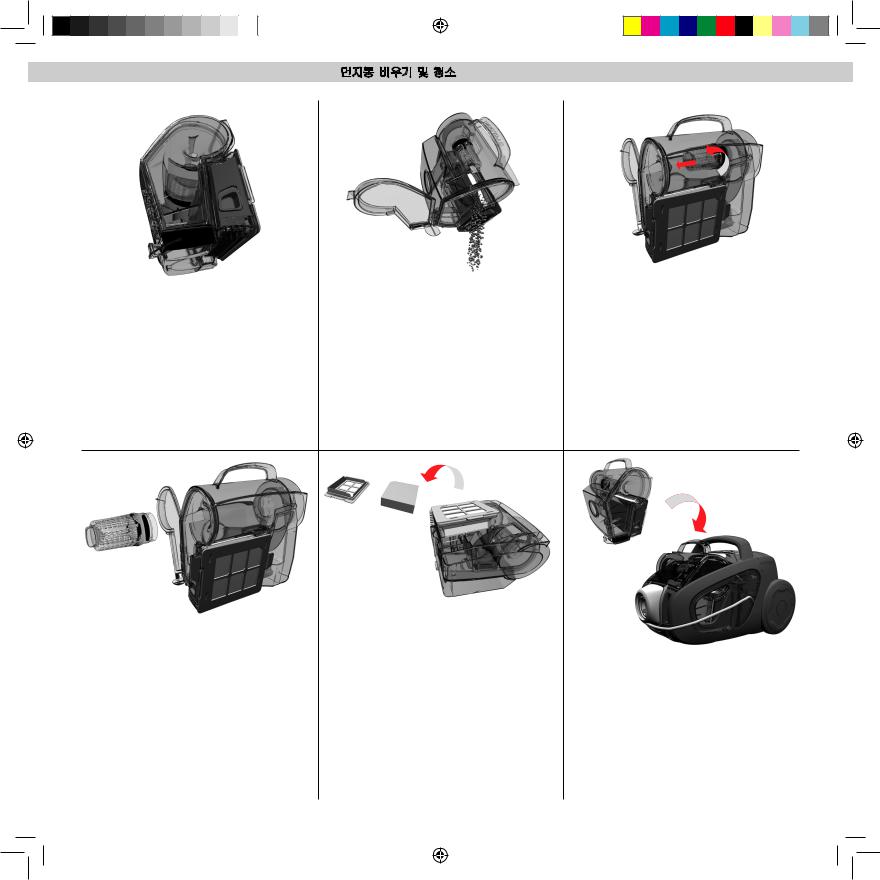
8 Emptying and cleaning the dust container |
|
Open the dust container by pushing the release button downwards.
.
Hold the container over the waste bin and empty it completely. Rinse in lukewarm tap water.
Let dry completely before putting back !
.
Remove the cyclonic filter by pulling out the filter grip.
분리합니다.
Remove the dust and fibres from filter. Clean the cone under the tap.
Let it dry completely before putting it back into the dust container.
...
Clean the foam filter every 3-4 months or when it’s visu- |
Put the dust container back until it clicks into place. |
|
ally dirty. |
|
|
Allow it to dry for 6-12 hours before putting it back. |
|
|
3-4 |
|
|
. |
. |
|
6-12 |
|
|
. |
|
|
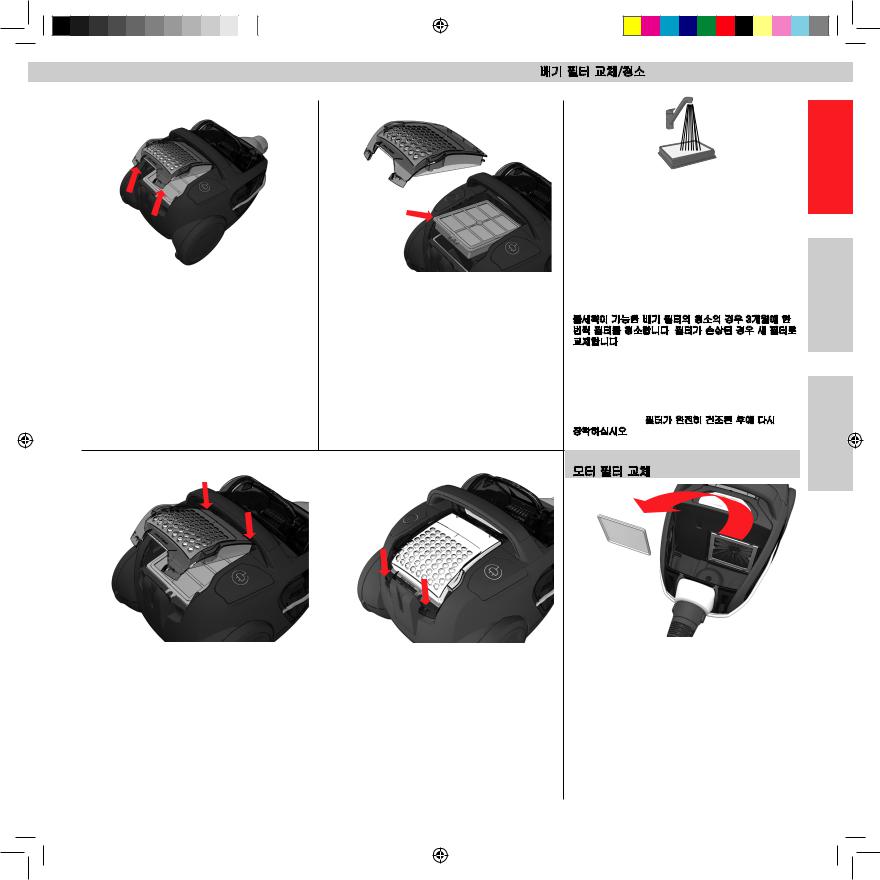
Replacing / Cleaning the exhaust filter / |
9 |
Open the filter lid by pulling the back edge backwards and upwards.
“filter”.
Lift out the filter.
Use Electrolux original filters: EFH12, EFH12W, EFH13W.
.
: EFH12, EFH12W, EFH13W.
To close the lid, insert the front hooks into the rails. |
Push the lid forward and press down. |
|
|
. |
. |
Cleaning the washable exhaust filter
Wash the filter every three months. If the filter is damaged, replace it with a new filter.
Rinse the inside (dirty side) in lukewarm tap water. Tap the filter frame to remove the water. Repeat the process four times.
Note: Do not use cleaning agents and avoid touching the filter surface. Let the filter dry completely before putting back !
3. .
.
..4 .
: ..
Replacing the motor filter
Pull the grip and remove the filter frame. Remove / Clean the filter
Re-assemble filter holder by placing back in the lower part and put the frame in place at the top.
./
.
eng kor
cn tw
ind thai
 Loading...