

Page 1
D Uhrenradio mit Leselampefunktion
NL Klokradio met leeslampfunctie
F Radio réveil avec fonction de lampe de lecture
E Radio despertador con función de lámpara de lectura
I Radiosveglia con funzione luce di lettura
GB Clock Radio with Reading Lamp Function
PL Radio z zegarem i funkcją lampki do czytania
H Órás rádió olvasólámpa funkcióval
UHRENRADIO
MIT LESELAMPE-
FUNKTION
MRC 4147 L
Bedienungsanleitung/Garantie 04
Gebruiksaanwijzing 10
Mode d’emploi 15
Instrucciones de servicio 20
Istruzioni per l’uso 25
Instruction Manual 30
Instrukcja obsługi 35
Használati utasítás 41
Page 2

2
Inhalt
Deutsch
Inhalt
Übersicht der Bedienelemente ....................................... Seite 3
Bedienungsanleitung ........................................................ Seite 4
Technische Daten ............................................................... Seite 8
Garantie ................................................................................ Seite 8
Entsorgung .......................................................................... Seite 9
Italiano
Indice
Elementi di comando. .................................................... Pagina 3
Istruzioni per l’uso............................................................Pagina 25
Dati tecnici ........................................................................ Pagina 29
Smaltimento ..................................................................... Pagina 29
Nederlands
Inhoud
Overzicht van de bedieningselementen. ................... Pagina 3
Gebruiksaanwijzing. ........................................................ Pagina 10
Technische gegevens ..................................................... Pagina 14
Verwijdering .....................................................................Pagina 14
Français
Sommaire
Liste des différents éléments de commande. ..............Page 3
Mode d’emploi ...................................................................Page 15
Données techniques. ........................................................ Page 19
Élimination ........................................................................... Page 19
Español
Indice
Indicación de los elementos de manejo. ................... Página 3
Instrucciones de servicio. ............................................... Página 20
Datos técnicos .................................................................Página 24
Eliminación ....................................................................... Página 24
English
Contents
Overview of the Components ......................................... Page 3
Instruction Manual..............................................................Page 30
Technical Data ..................................................................... Page 34
Disposal ................................................................................ Page 34
Język polski
Spis treści
Przegląd elementów obłsugi .........................................Strona 3
Instrukcja obsługi ..............................................................Strona 35
Dane techniczne ...............................................................Strona 39
Warunki gwarancji ............................................................Strona 39
Usuwanie ............................................................................Strona 40
Magyarul
Tartalom
A kezelőelemek áttekintése ............................................ Oldal 3
Használati utasítás ............................................................. Oldal 41
Műszaki adatok .................................................................. Oldal 45
Hulladékkezelés ................................................................. Oldal 45
Page 3
3
Übersicht der Bedienelemente
Overzicht van de bedieningselementen • Liste des différents éléments de commande
Indicación de los elementos de manejo • Elementi di comando • Overview of the Components
Przegląd elementów obsługi • A kezelőelemek áttekintése
Page 4
4
Deutsch
Bedienungsanleitung
Vielen Dank, dass Sie sich für unser Produkt entschieden
haben. Wir wünschen Ihnen viel Freude mit dem Gerät.
Symbole in dieser Bedienungsanleitung
Wichtige Hinweise für Ihre Sicherheit sind besonders gekennzeichnet. Beachten Sie diese Hinweise unbedingt, um Unfälle
und Schäden am Gerät zu vermeiden:
WARNUNG:
Warnt vor Gefahren für Ihre Gesundheit und zeigt mögliche
Verletzungsrisiken auf.
ACHTUNG:
Weist auf mögliche Gefährdungen für das Gerät oder
andere Gegenstände hin.
HINWEIS: Hebt Tipps und Informationen für Sie hervor.
Allgemeine Sicherheitshinweise
Lesen Sie vor Inbetriebnahme dieses Gerätes die Bedienungsanleitung sehr sorgfältig durch und bewahren Sie diese
inkl. Garantieschein, Kassenbon und nach Möglichkeit den
Karton mit Innenverpackung gut auf. Falls Sie das Gerät an
Dritte weitergeben, geben Sie auch die Bedienungsanleitung
mit.
• Um das Risiko von Feuer oder einem elektrischen Schlag
zu vermeiden, sollten Sie das Gerät nicht Regen oder
Feuchtigkeit aussetzen. Das Gerät nicht in unmittelbarer
Nähe von Wasser betreiben (z.B. Badezimmer, Schwimmbecken, feuchte Keller).
• Das Gerät nicht an extrem heißen, kalten, staubigen oder
feuchten Orten verwenden.
• Benutzen Sie das Gerät ausschließlich für den privaten
und den dafür vorgesehenen Zweck. Dieses Gerät ist
nicht für den gewerblichen Gebrauch bestimmt.
• Achten Sie darauf, dass das Stromkabel nicht geknickt
oder eingeklemmt wird, oder mit Hitzequellen in Berührung kommt.
• Achten Sie darauf, dass das Stromkabel keine Stolperfalle
darstellt.
• Das Netzteil ist nur zur Benutzung in trockenen Räumen
geeignet.
• Berühren Sie das Netzteil oder das Kabel niemals mit
nassen Händen.
• Das Gerät ausschließlich an eine vorschriftsmäßig installierte Steckdose anschließen. Achten Sie darauf, dass die
angegebene Spannung mit der Spannung der Steckdose übereinstimmt.
• Der Netzstecker muss immer gut zu erreichen sein.
• Batterien stets richtig herum einlegen.
• Das Gerät so aufstellen, dass vorhandene Lüftungsöff-
nungen nicht verdeckt werden.
• Verdecken Sie keine Lüftungsöffnungen mit Gegenständen, wie z.B. Zeitschriften, Tischdecken, Vorhängen usw.
• Setzen Sie das Gerät keinem Tropf- oder Spritzwasser aus
und stellen Sie keine mit Flüssigkeiten gefüllten Gefäße,
wie z.B. Blumenvasen auf das Gerät.
• Offene Brandquellen, wie z.B. brennende Kerzen dürfen
nicht auf das Gerät gestellt werden.
• Niemals das Gehäuse des Gerätes öffnen. Durch unsachgemäße Reparaturen können erhebliche Gefahren für
den Benutzer entstehen. Bei Beschädigung des Gerätes,
insbesondere des Netzkabels, das Gerät nicht mehr in
Betrieb nehmen, sondern von einem Fachmann reparie-
ren lassen. Netzkabel regelmäßig auf Beschädigungen
prüfen.
• Ein defektes Netzteil darf nur vom Hersteller, unserem
Kundendienst oder einer ähnlich qualifizierten Person
durch ein gleichwertiges Kabel ersetzt werden, um Gefährdungen zu vermeiden.
• Benutzen Sie das Gerät längere Zeit nicht, ziehen Sie den
Netzstecker aus der Steckdose, bzw. entnehmen Sie die
Batterien.
ACHTUNG:
Das Gerät nicht öffnen! Es befinden sich keine zu wartenden Teile im Inneren des Gerätes.
Diese Symbole können sich ggf. auf dem Gerät befinden
und sollen Sie auf folgendes hinweisen:
Das Blitz-Symbol soll den Benutzer auf Teile
im Inneren des Gerätes hinweisen, die gefährlich hohe Spannungen führen.
Das Symbol mit Ausrufezeichen soll den
Benutzer auf wichtige Bedienungs- oder
Wartungs-Hinweise in den Begleitpapieren
hinweisen.
Kinder und gebrechliche Personen
• Zur Sicherheit Ihrer Kinder lassen Sie keine Verpackungsteile (Plastikbeutel, Karton, Styropor etc.) erreichbar
liegen.
WARNUNG!
Lassen Sie kleine Kinder nicht mit Folie spielen. Es
besteht Erstickungsgefahr!
• Dieses Gerät ist nicht dafür bestimmt, durch Personen
(einschließlich Kinder) mit eingeschränkten physischen,
sensorischen oder geistigen Fähigkeiten oder mangels
Erfahrung und/oder mangels Wissen benutzt zu werden,
es sei denn, sie werden durch eine für ihre Sicherheit
zuständige Person beaufsichtigt oder erhielten von ihr
Anweisungen, wie das Gerät zu benutzen ist.
• Kinder sollten beaufsichtigt werden, um sicherzustellen,
dass sie nicht mit dem Gerät spielen.
Page 5
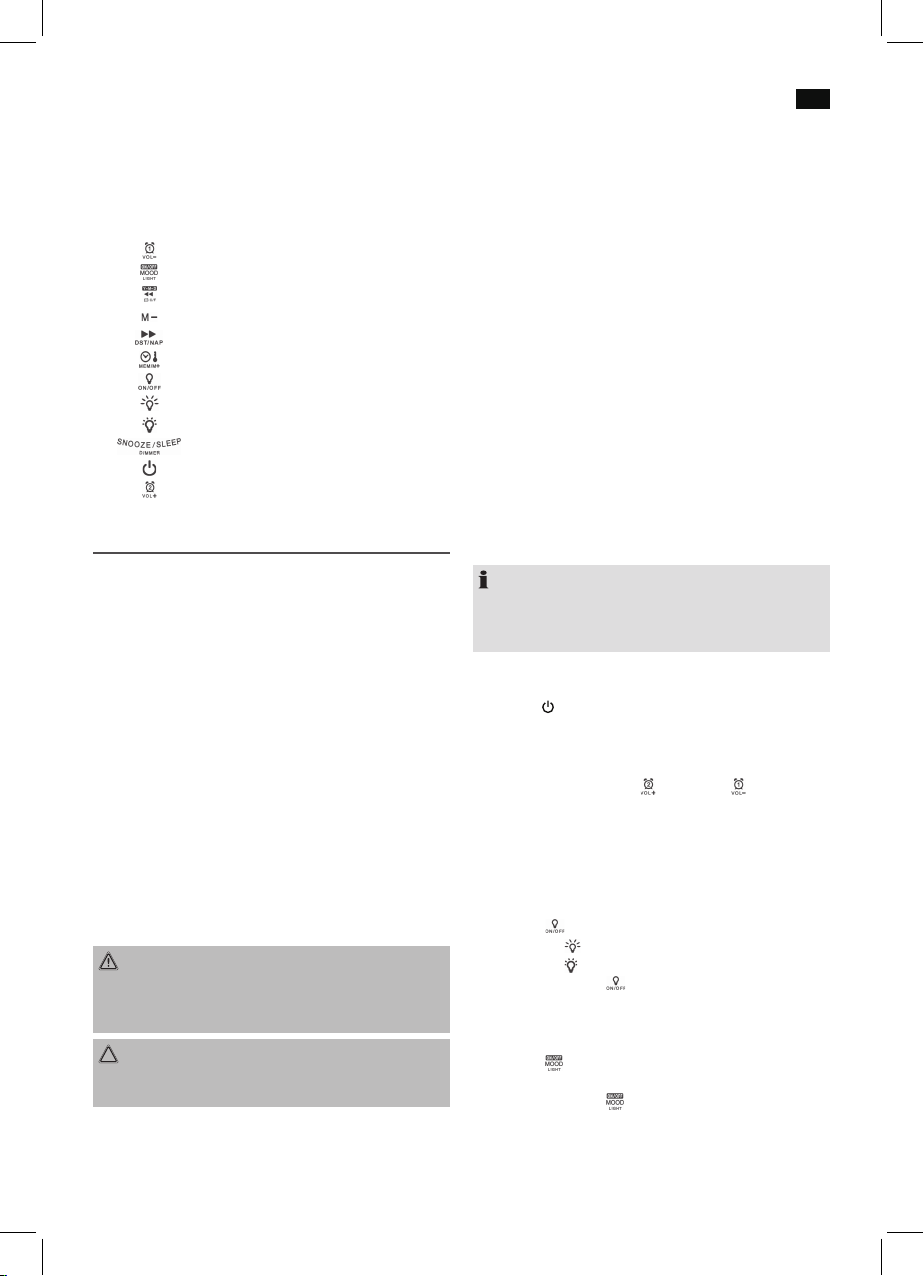
Übersicht der Bedienelemente
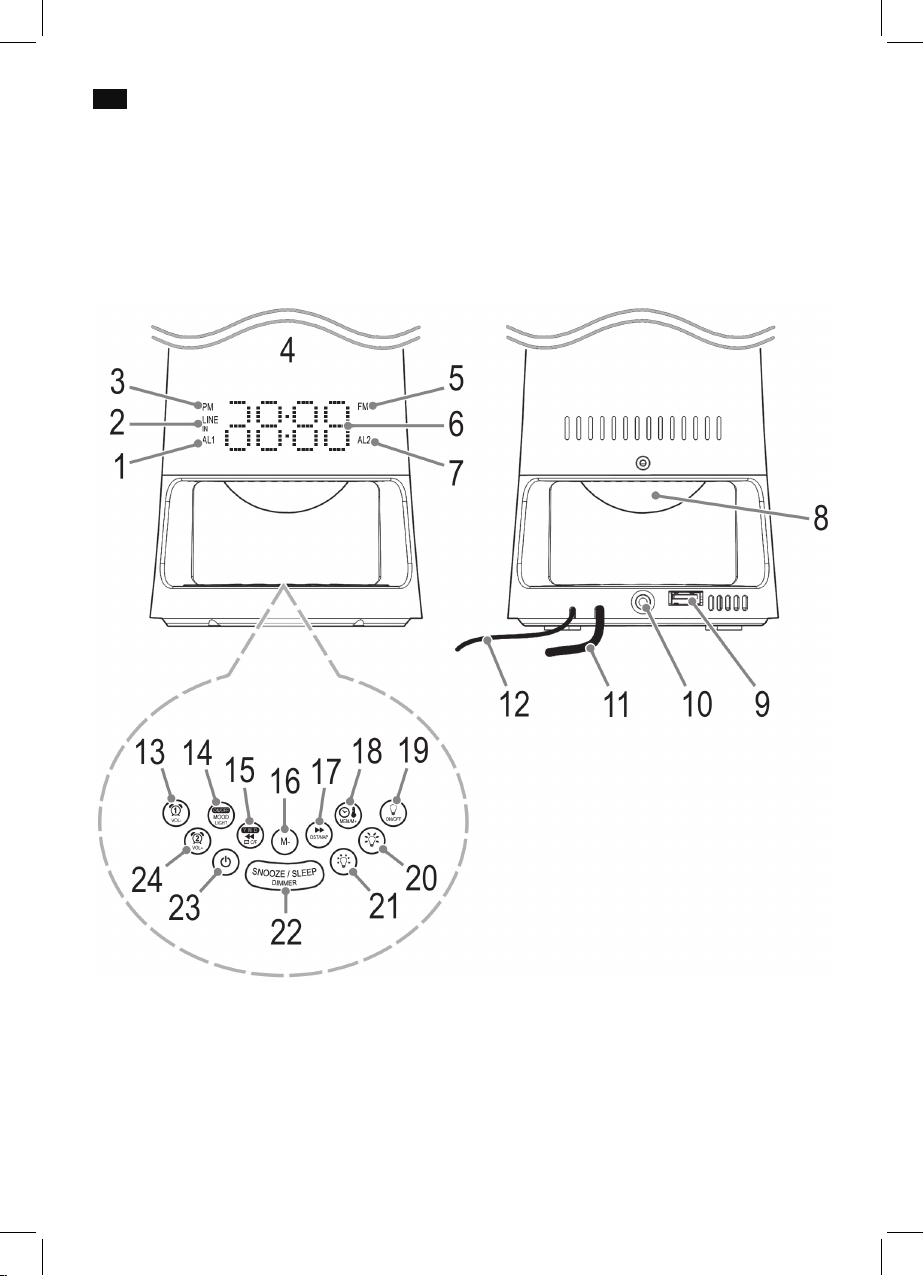
1 AL1 (aktivierte Weckfunktion 1)
2 LINE IN (Audiokabel an LINE IN Buchse ist angeschlos-
sen)
3 PM (Anzeige für „Nachmittags“ bei 12 Std. Anzeige)
4 Lampenschirm
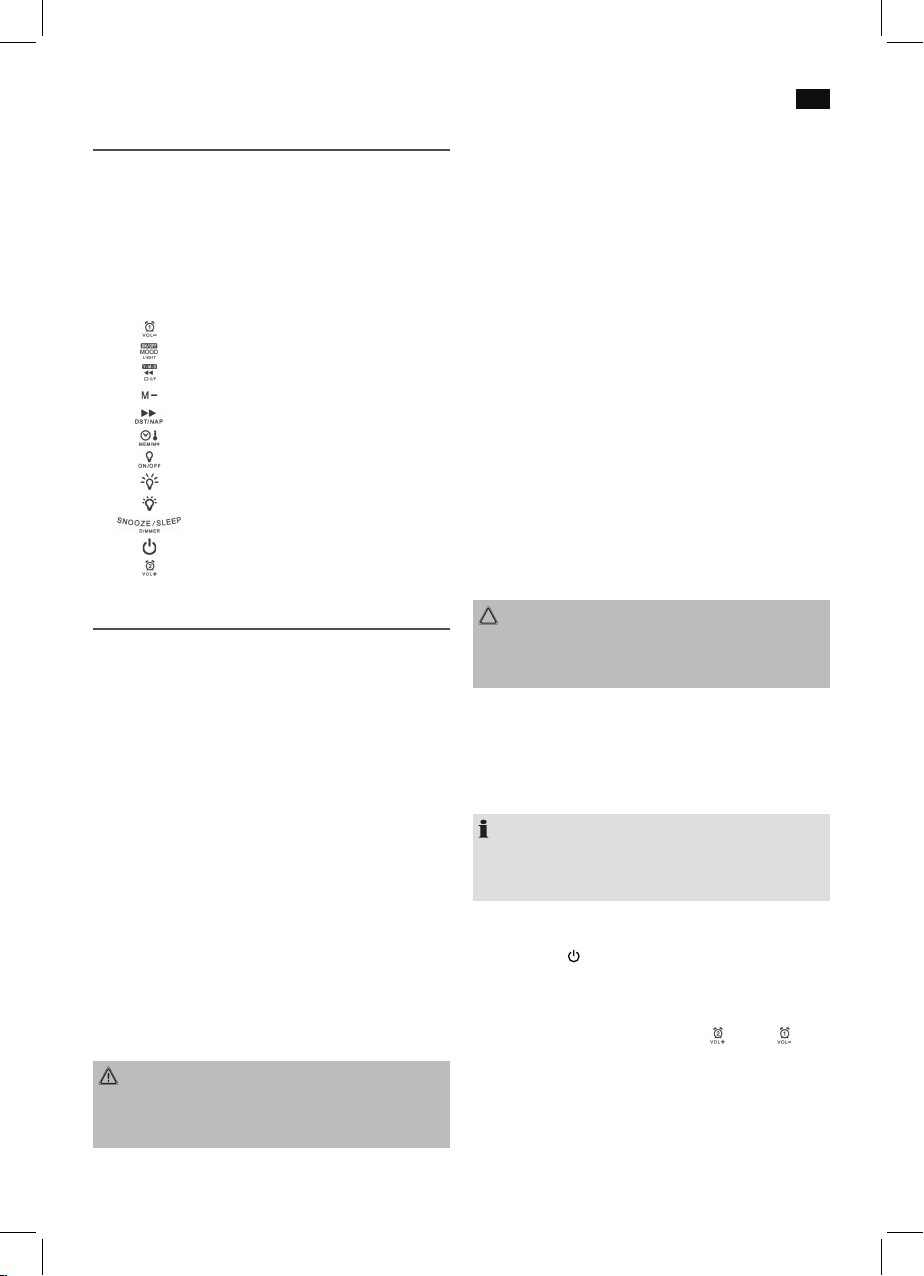
Bedientasten
13
14
15
16
17
18
19
20
21
22
23
24
Lautstärke absenken / Alarm 1 einstellen/aktivieren/deaktivieren
Stimmungslicht ein-/ausschalten
Jahr/Datum anzeigen / Temperatureinheit umschalten
Vorheriger Radiospeicherplatz
Nächsten Radiosender suchen / Sommerzeit/Normalzeit auswählen / Funktion „Nickerchen“
Radiosender abspeichern / nächster Radiospeicherplatz / Temperatur anzeigen
Licht ein-/ausschalten
Lichtintensität erhöhen
Lichtintensität verringern
Schlummer / Einschlaffunktion / Display Helligkeit
Gerät ein-/ausschalten
Lautstärke erhöhen / Alarm 2 einstellen/aktivieren/deaktivieren
5 FM (Radiobetrieb)
6 Display
7 AL2 (aktivierte Weckfunktion 2)
8 Stimmungslicht
9 DC 5V USB CHARGING Buchse
10 LINE IN Buchse
11 Festangeschlossenes Netzteil
12 Wurfantenne (FM)
Deutsch
5
Inbetriebnahme
• Wählen Sie einen geeigneten Standort für das Gerät.
Geeignet wäre eine trockene, ebene, rutschfeste Fläche,
auf der Sie das Gerät gut bedienen können.
• Entfernen Sie, falls vorhanden, die Schutzfolie vom Gerät.
Einlegen der Batterie (Gangreserve)
(Batterie nicht im Lieferumfang enthalten)
Sollte es zu einem Stromausfall kommen oder wird das
Netzteil des Gerätes aus der Steckdose gezogen, werden,
bei eingelegter Gangreservebatterie, die Einstellungen
beibehalten.
1. Öffnen Sie das Batteriefach auf der Unterseite. Entfernen
Sie hierfür die Schraube an der Batteriefachabdeckung
mit einem Kreuzschlitz-Schraubenzieher.
2. Legen Sie 1 Batterie des Typs CR2032, 3V ein. Achten Sie
auf die richtige Polarität (+ muss nach oben zeigen)!
3. Schließen Sie das Batteriefach wieder. Und sichern Sie
das Batteriefach wieder mit der Schraube.
Wird das Gerät längere Zeit nicht benutzt, nehmen Sie die
Batterie aus dem Gerät, um ein „Auslaufen“ von Batteriesäure zu vermeiden.
WARNUNG:
Setzen Sie Batterien keiner hohen Wärme, wie z.B. Sonnenschein, Feuer oder ähnlichem aus. Es besteht Explosions-
gefahr!
ACHTUNG:
Batterien gehören nicht in den Hausmüll. Bitte geben Sie
verbrauchte Batterien bei zuständigen Sammelstellen oder
beim Händler ab.
Stromversorgung
1. Achten Sie darauf, dass die Netzspannung mit den Angaben auf dem Typenschild übereinstimmt.
2. Stecken Sie den Netzstecker in eine vorschriftsmäßig
installierte Schutzkontakt Steckdose.
HINWEIS:
Sofern Sie keine Gangreserve-Batterie eingelegt haben,
gehen die gespeicherten Radiosender und die Uhrzeit
verloren sobald die Stromzufuhr unterbrochen wird.
Gerät ein-/ausschalten
Drücken Sie die
schalten.
Lautstärke
Die Lautstärke stellen Sie mit den Tasten
ein.
Display-Helligkeit (im Standby)
Mit der SNOOZE/SLEEP / DIMMER Taste (22) können Sie die
Helligkeit des Displays einstellen.
Taste (23), um das Gerät ein- bzw. auszu-
(24) und (13)
Page 6

6
Deutsch
Leselampenfunktion
1. Drücken Sie
2. Mit der
Taste (21) verringern Sie die Helligkeit.
3. Um die Funktion wieder auszuschalten, drücken Sie
erneut auf die Taste.
Stimmungslicht
1. Drücken Sie die
einzuschalten. Es erfolgt ein Wechsel der verschiedenen
Farbtöne.
2. Um das Stimmungslicht wieder auszuschalten, drücken
Sie erneut die Taste.
Diverse Informationen anzeigen lassen
1. Schalten Sie das Gerät mit der
2. Drücken Sie wiederholt kurz die Taste (15). Folgenden
Informationen werden nacheinander angezeigt:
Wird die Taste nicht mehr gedrückt, wechselt die Anzeige
nach ca. 5 Sekunden wieder zur Uhrzeit.
Taste (19), um die Funktion einzuschalten.
Taste (20) erhöhen Sie die Helligkeit. Mit der
Taste (14), um das Stimmungslicht (8)
Taste (23) in Standby.
Jahr Datum
HINWEIS:
• Eine Wiedergabe von Audiodateien ist über diese
Buchse nicht möglich.
Uhrzeit einstellen
1. Schalten Sie das Gerät mit der Taste (23) in Standby.
2. Halten Sie die
zeige im Display blinkt.
• Sie können nun nacheinander mit den Tasten
und
Tag, das Uhrzeit-Anzeigenformat (12Hr/24Hr), die
Stunden und Minuten vornehmen.
• Bestätigen Sie Ihre Eingabe jeweils mit der
Die aktuell einzustellende Anzeige blinkt im Display.
HINWEIS:
• Wird innerhalb von ca. 30 Sekunden keine Taste betätigt, werden die Eingaben automatisch gespeichert.
• Bei der 12 Stunden Anzeige erscheint: PM = Nachmittags
Taste (18) gedrückt, bis die Jahresan-
(15) die Einstellungen für das Jahr, den Monat,
Taste.
(17)
Wechsel der Displayanzeige
Sie können sich im Display abwechselnd die folgenden
Einblendungen anzeigen lassen:
Uhrzeit Temperatur
1. Um diese Funktion aktivieren zu können, schalten Sie das
Gerät mit der
2. Halten Sie die Taste (15) gedrückt, bis im Display „ “
kurz angezeigt wird.
Wechsel ausschalten: Halten Sie im Standby und während
die Uhrzeit angezeigt wird, erneut die Taste
Display wird kurz „ “ angezeigt.
Temperaturanzeige zwischen °C (Grad Celsius) und °F
(Grad Fahrenheit) umschalten
1. Schalten Sie das Gerät mit der
2. Drücken Sie die Taste (18), um die Temperatur anzuzeigen.
3. Halten Sie während der Anzeige der Temperatur die
Taste ca. 3 Sekunden gedrückt, um zwischen °C und °F
umzuschalten.
USB Ladebuchse (9)
Über diese Buchse können Sie Ihr Smartphone aufladen.
Verwenden Sie für den Anschluss das USB Kabel Ihres Smartphones.
HINWEIS:
• Auf Grund der verschiedenen Smartphone-Typen, die
heute angeboten werden, und deren unterschiedliche
Ladekapazitäten, ist die Ladedauer abhängig vom verwendeten Smartphone und dessen Betriebszustand.
Taste (23) in Standby.
gedrückt. Im
Taste (23) in Standby.
Sommerzeit-Umschaltung
1. Schalten Sie das Gerät mit der
2. Halten Sie die Taste
Sommerzeit und Normalzeit umzuschalten. Die spätere
Uhrzeit ist die Sommerzeit.
Taste (23) in Standby.
(17) gedrückt, um zwischen der
Sendereinstellung
1. Stimmen Sie mit den Tasten (17) und (15) den
gewünschten Sender ab. Halten Sie eine der Tasten
gedrückt, sucht das Gerät bis zum nächsten Radiosender.
Im Display wird die abgestimmte Frequenz angezeigt.
2. Ist der Empfang zu schwach, verändern Sie die Lage der
Wurfantenne, um den Empfang zu verbessern.
Senderspeicherung
Sie haben die Möglichkeit bis zu 10 Radiosender abzuspeichern.
1. Suchen Sie einen Radiosender wie unter „Sendereinstellung“ beschrieben.
2. Halten Sie die
anzeige blinkt im Display (z.B. P02).
3. Wählen Sie mit den Tasten
gewünschten Speicherplatz aus.
4. Drücken Sie auf die
chern.
Gespeicherte Radiosender anwählen
Drücken Sie im Radiobetrieb wiederholt die
(18/16), um die Speicherplätze durchzuschalten.
Taste (18) gedrückt. Die Speicherplatz-
(17) und (15) den
Taste, um den Sender abzuspei-
/ Taste
Page 7
Weckfunktion
Einstellen der Weckzeit (im Standby)
Sie haben die Möglichkeit zwei Weckzeiten einzustellen. Es
stehen Ihnen dabei jeweils 4 verschiedene Weckoptionen zur
Auswahl: Radio+Licht / Radio / Signalton+Licht / Signalton.
Gehen Sie wie folgt vor:
1. Drücken Sie die
Weckzeit wird angezeigt.
2. Während die Weckzeit angezeigt wird, halten Sie die
Taste ca. 3 Sekunden gedrückt. Die Stunden der aktuell
eingestellten Weckzeit beginnen zu blinken.
3. Nehmen Sie mit den Tasten (17) und (15), die
Einstellungen vor.
4. Drücken Sie die Taste zur Bestätigung. Die Minuten
beginnen zu blinken.
5. Nehmen Sie mit den Tasten
gen vor.
6. Wählen Sie nun aus, an welchen Tagen Sie geweckt
werden wollen. Zur Auswahl stehen:
• 1-5 = Montag – Freitag
• 1-7 = Montag – Sonntag
• 6-7 = Samstag – Sonntag
• 1-1 = Wochentag
6a. Haben Sie die Einstellung 1-1 gewählt:
1. Drücken Sie die
wählen.
2. Treffen Sie Ihre Auswahl mit den Tasten
(1 = Montag, 2 = Dienstag, 3 = Mittwoch, 4 = Donnerstag, 5 = Freitag, 6 = Samstag, 7 = Sonntag)
7. Drücken Sie die
anschließend aus, wie Sie geweckt werden möchten. Zur
Auswahl stehen:
• „bu“ (Signalton):
Beim Erreichen der Weckzeit ertönt ein Signalton.
Der Intervall des Signaltons steigert sich von langsam
zu schnell. Die Lautstärke ist nicht einstellbar. Das
Stimmungslicht (8) schaltet sich automatisch ein.
• Radiofrequenz wird angezeigt:
Sobald Ihre angegebene Weckzeit erreicht wird,
schaltet sich das Radio ein. Es ertönt der zuletzt
eingestellte Sender. Die Lautstärke steigt langsam auf
die eingestellte Lautstärke an. Die Lautstärke kann
nachträglich nicht verändert werden. Das Stimmungslicht (8) schaltet sich automatisch ein.
HINWEIS:
• Die Weckfunktion schaltet sich automatisch nach
30 Minuten bis zum nächsten Tag ab.
• Ist ein Audiokabel in der LINE IN Buchse eingesteckt, werden Sie mit dem Signalton geweckt,
auch wenn Sie „Radio“ gewählt haben.
Taste (13). Die aktuell eingestellte
und die Einstellun-
Taste, um den Wochentag auszu-
und
Taste zur Bestätigung. Wählen Sie
Deutsch
7a. Wenn Sie sich mit einem Radiosender wecken lassen
wollen, wählen Sie die maximale Wecklautstärke mit den
Tasten und aus.
8. Drücken Sie die Taste zur Bestätigung. Wählen Sie an-
schließend aus, mit welcher Lichtintensität (
werden möchten. Die Einstellung „
Funktion.
HINWEIS:
Das Licht im Lampenschirm (4) schaltet sich 30 Min.
vor der eingestellten Weckzeit ein. Die Intensität der
Helligkeit wird langsam gesteigert, beginnend mit der
zuvor eingestellten Intensität.
9. Drücken Sie abschließend noch einmal die
erste Weckzeit ist nun aktiviert.
Zum Einstellen der zweiten Weckzeit, wiederholen Sie die
oberen Schritte jeweils mit der
HINWEIS:
• Bei aktivierter Weckzeit erscheint AL1 (1) bzw. AL2 (7).
• Um sich die eingestellten Weckzeiten kurz anzeigen zu
lassen, drücken Sie die bzw. Taste.
Abstellen des Wecksignals
Zum Abstellen des Wecksignals drücken Sie die
Intervall-Weckautomatik
Die automatisch eingestellte Weckfunktion kann mit der
SNOOZE/SLEEP / DIMMER Taste (22) für ca. 9 Minuten
ausgeschaltet werden.
HINWEIS:
Bei aktivierter Snooze-Funktion blinkt die entsprechende
Meldung AL1 bzw. AL2.
Weckfunktion deaktivieren
1. Schalten Sie das Gerät mit der
2. Um die Weckfunktion zu deaktivieren, halten Sie die
Taste (13) bzw.
bzw. AL2 (7) erlischt.
Taste (24) gedrückt. Die Meldung AL1 (1)
“ deaktiviert diese
Taste (24).
Taste (23) in Standby.
7
) Sie geweckt
Taste. Die
Taste (23).
Verzögertes Ausschalten
Die Funktion verzögertes Ausschalten können Sie im Radiobetrieb verwenden. Das Gerät schaltet sich beim Erreichen
der gewählten Zeit automatisch aus.
• Durch wiederholtes Drücken der SNOOZE/SLEEP /
DIMMER Taste (22) wählen Sie die Zeit aus, nachdem sich
das Gerät ausschaltet. Zur Auswahl stehen: 90, 60, 30 und
15 Minuten. Die Einstellung OFF (aus) deaktiviert diese
Funktion.
• Mit der
Taste (23) kann diese Funktion wieder aufgeho-
ben werden.
Page 8
8
Deutsch
Kurzzeitwecker
Den Kurzzeitwecker können Sie z.B. für ein kleines „Nickerchen“ verwenden. Die Funktion ist nur im Standby möglich.
• Durch wiederholtes Drücken der
Sie die Zeit aus, nachdem das Gerät einen Piepton von
sich gibt. Wählen Sie in 10er-Schritten zwischen 90 bis
10 Minuten bzw. OFF (aus).
• Nach Ablauf der gewählten Zeit, ertönt ein immer schneller werdender Piepton. Mit der Taste (23) schalten Sie
den Piepton aus.
Taste (17) wählen
AUX IN Buchse
(Kabel nicht im Lieferumfang enthalten)
1. Verwenden Sie ggf. einen entsprechenden Adapter (nicht
im Lieferumfang enthalten).
Schließen Sie das externe Gerät wie folgt an:
• Mit einem 3,5 mm Stereo-Klinkenstecker an die LINE
IN Buchse (10).
2. Schalten Sie das Gerät mit der
dung LINE IN erscheint im Display.
3. Starten Sie die Wiedergabe an Ihrer Audioquelle. Über
die Lautsprecher hören Sie die Tonwiedergabe. Mit den
/ Tasten (24/13) können Sie die Lautstärke verändern.
4. Die weitere Vorgehensweise entnehmen Sie bitte der
Bedienungsanleitung der externen Tonquelle.
HINWEIS:
Stellen Sie, falls möglich, die Lautstärke des externen Gerätes auf eine hörgerechte Lautstärke.
AUX IN Betrieb beenden
Ziehen Sie das Kabel aus der AUX IN Buchse. Das Gerät
schaltet wieder in den Radiobetrieb.
Taste (23) ein. Die Mel-
Reinigung
ACHTUNG:
Tauchen Sie das Gerät nicht ins Wasser.
• Ziehen Sie vor der Reinigung den Netzstecker.
• Reinigen Sie das Gerät mit einem leicht feuchten Tuch
ohne Zusatzmittel.
Störungsbehebung
Fehler Ursache Lösung
Gerät lässt sich
nicht bedienen
Gerät blockiert
„hängt fest“
Ziehen Sie für ca. 5 Sekunden den Netzstecker. Schalten Sie das
Gerät anschließend
wieder ein.
Fehler Ursache Lösung
Wecken mit
Signalton, obwohl „Radio“
gewählt wurde
Audiokabel ist in
der LINE IN Buchse eingesteckt
Ziehen Sie das Audiokabel aus der LINE IN
Buchse
Technische Daten
Modell: ...........................................................................MRC 4147 L
Spannungsversorgung: ...............................100-240 V~ 50/60 Hz
Leistungsaufnahme: ...................................................................7 W
Batterie Gangreserve: ..................................................3 V, CR2032
Schutzklasse: ..................................................................................... II
Nettogewicht: ................................................................ca. 0,502 kg
Radioteil:
Frequenzbereiche: ...............................FM 87,5 ~ 108,0 MHz
Technische und gestalterische Änderungen im Zuge stetiger
Produktentwicklungen vorbehalten.
Hinweis zur Richtlinienkonformität
Hiermit erklärt der Hersteller, dass sich das Gerät MRC 4147 L
in Übereinstimmung mit den folgenden Anforderungen befindet:
• Europäische Niederspannungsrichtlinie 2006/95/EG
• EU-Richtlinie für elektromagnetische Verträglichkeit
2004/108/EG
• Ökodesign Richtlinie 2009/125/EG
• RoHS-Richtlinie 2011/65/EG
Garantie
Garantiebedingungen
1. Gegenüber Verbrauchern gewähren wir bei privater
Nutzung des Geräts eine Garantie von 24 Monaten ab
Kaufdatum.
Ist das Gerät zur gewerblichen Nutzung geeignet, ge-
währen wir beim Kauf durch Unternehmer für das Gerät
eine Garantie von 12 Monaten.
Die Garantiezeit für Verbraucher reduziert sich auf 12 Mo-
nate, sofern sie ein zur gewerblichen Nutzung geeignetes
Gerät – auch teilweise – gewerblich nutzen.
2. Voraussetzung für unsere Garantieleistungen sind der
Kauf des Geräts in Deutschland bei einem unserer
Vertragshändler sowie die Übersendung einer Kopie des
Kaufbelegs und dieses Garantiescheins an uns.
Befindet sich das Gerät zum Zeitpunkt des Garantiefalls
im Ausland, muss es auf Kosten des Käufers uns zur
Erbringung der Garantieleistungen zur Verfügung gestellt
werden.
Page 9

3. Mängel müssen innerhalb von 14 Tagen nach Erkennbarkeit uns gegenüber schriftlich angezeigt werden.
Besteht der Garantieanspruch zu Recht, entscheiden wir,
auf welche Art der Schaden/Mangel behoben werden
soll, ob durch Reparatur oder durch Austausch eines
gleichwertigen Geräts.
4. Garantieleistungen werden nicht für Mängel erbracht, die
auf der Nichtbeachtung der Gebrauchsanweisung, un-
sachgemäßer Behandlung oder normaler Abnutzung des
Geräts beruhen. Garantieansprüche sind ferner ausgeschlossen für leicht zerbrechliche Teile, wie zum Beispiel
Glas oder Kunststoff. Schließlich sind Garantieansprüche
ausgeschlossen, wenn nicht von uns autorisierte Stellen
Arbeiten an dem Gerät vornehmen.
5. Durch Garantieleistungen wird die Garantiezeit nicht
verlängert. Es besteht auch kein Anspruch auf neue
Garantieleistungen. Diese Garantieerklärung ist eine
freiwillige Leistung von uns als Hersteller des Geräts.
Die gesetzlichen Gewährleistungsrechte (Nacherfüllung,
Rücktritt, Schadensersatz und Minderung) werden durch
diese Garantie nicht berührt.
Stand 06 2012
Garantieabwicklung
24 Stunden am Tag, 7 Tage in der Woche
Sollte Ihr Gerät innerhalb der Garantiezeit einen Mangel
aufweisen, steht Ihnen die schnellste und komfortabelste
Möglichkeit der Reklamationsanmeldung über unser SLI Internet-Serviceportal zur Verfügung.
www.sli24.de
Bitte melden Sie direkt den Servicevorgang auf unserem
Online Serviceportal www.sli24.de an. Sie erhalten wenige
Sekunden nach Abschluss der Anmeldung ein kostenloses
Versandticket per E-Mail übermittelt. Zusätzlich erhalten Sie
weitere Informationen zur Abwicklung Ihrer Reklamation.
Mit Ihren persönlichen Zugangsdaten, die direkt nach Ihrer
Anmeldung per E-Mail an Sie übermittelt werden, können
Sie den Status Ihres Vorgangs auf unserem Serviceportal
www.sli24.de online verfolgen.
Sie brauchen das kostenlose Versandticket nur noch auf die
Verpackung Ihres gut verpackten Gerätes zu kleben und das
Paket bei der nächsten Annahmestelle der Deutschen Post /
DHL abzugeben. Der Versand erfolgt für Sie kostenlos an
unser Servicecenter bzw. Servicepartner.
So einfach kann Service sein!
1. Anmelden
2. Einpacken
3. Ab zur Post damit
Fertig, so einfach geht es!
Deutsch
Bitte vergessen Sie nicht, dem Gerät eine Kopie Ihres Kaufbeleges (Kassenbon, Rechnung, Lieferschein) als Garantienachweis beizulegen, da wir sonst keine kostenlosen Garantieleistungen erbringen können.
Unser Serviceportal www.sli24.de bietet Ihnen weitere
Leistungen an:
• Downloadbereich für Bedienungsanleitungen
• Downloadbereich für Firmwareupdates
• FAQ’s, die Ihnen Problemlösungen anbieten
• Kontaktformular
• Zugang zu unseren Zubehör- und Ersatzteile-Web-
shops
Auch nach der Garantie sind wir für Sie da! – Kostengünstige Reparaturen zum Festpreis!
Bitte nehmen Sie in keinem Fall eine unfreie Einsendung
Ihres Gerätes vor. Unfreie Lieferungen werden von uns nicht
angenommen. Es entstehen Ihnen damit erhebliche Kosten.
9
Stand 06 2012
Entsorgung
Bedeutung des Symbols „Mülltonne“
Schonen Sie unsere Umwelt, Elektrogeräte gehören nicht in
den Hausmüll.
Nutzen Sie die für die Entsorgung von Elektrogeräten vorgesehenen Sammelstellen und geben dort Ihre Elektrogeräte
ab die Sie nicht mehr benutzen werden.
Sie helfen damit die potenziellen Auswirkungen, durch
falsche Entsorgung, auf die Umwelt und die menschliche
Gesundheit zu vermeiden.
Sie leisten damit Ihren Beitrag zur Wiederverwertung, zum
Recycling und zu anderen Formen der Verwertung von Elektro- und Elektronik-Altgeräten.
Informationen, wo die Geräte zu entsorgen sind, erhalten Sie
über Ihre Kommunen oder die Gemeindeverwaltungen.
Page 10
10
Nederlands
Gebruiksaanwijzing
Dank u voor uw keuze van dit product. We hopen dat u er
veel plezier van beleeft.
Symbolen in deze bedieningshandleiding
Belangrijke aanwijzingen voor uw veiligheid zijn speciaal
gekenmerkt. Neem deze aanwijzingen strikt in acht om
ongevallen en schade aan het apparaat te vermijden:
WAARSCHUWING:
Waarschuwt voor gevaren voor uw gezondheid en toont
mogelijk letselrisico’s.
LET OP:
Wijst op mogelijke gevaren voor het apparaat of andere
voorwerpen.
OPMERKING: Kenmerkt tips en informatie voor u.
Algemene veiligheidsinstructies
Lees vóór de ingebruikname van dit apparaat de handleiding
uiterst zorgvuldig door en bewaar deze goed, samen met het
garantiebewijs, de kassabon en zo mogelijk de doos met de
binnenverpakking. Geef ook de handleiding mee wanneer u
de machine aan derden doorgeeft.
• Voorkom risico’s voor brand en elektrische schokken en
stel het apparaat niet bloot aan regen of vocht. Gebruik
het apparaat niet in de directe nabijheid van water (bijv.
badkamer, zwembad, vochtige kelder).
• Gebruik het apparaat niet op extreem warme of koude,
stoffige of vochtige plaatsen.
• Gebruik het apparaat alleen voor eigen gebruik en het
beoogde doel. Dit apparaat is niet bedoeld voor commercieel gebruik.
• Zorg ervoor dat het netsnoer niet opgerold of bekneld is
of in contact met warmtebronnen is gebracht.
• Zorg ervoor dat het netsnoer geen struikelgevaar oplevert.
• De lichtnetadapter is uitsluitend geschikt voor gebruik in
droge ruimtes.
• Raak de lichtnetadapter of kabel nooit aan met natte
handen.
• Sluit het apparaat uitsluitend aan op een correct geïnstalleerde contactdoos. Let op dat de aangegeven spanning
overeenstemt met de spanning van de contactdoos.
• De stekker moet altd gemakkelk toegankelk zn.
• Plaats de batteren altd correct.
• Plaats het apparaat zodanig dat de aangebrachte lucht-
openingen niet worden afgedekt.
• Dek geen ventilatieopeningen af met voorwerpen zoals
kranten, tafelkleden, gordijnen, enz.
• Bescherm het apparaat tegen druip- of spatwater en
plaats geen vazen gevuld met water, zoals bloemenvazen
op het apparaat.
• Vuurbronnen met open vlam zoals brandende kaarsen
mogen niet op het apparaat worden geplaatst.
• Open nooit de behuizing van het apparaat. Door ondeskundige reparaties kunnen aanzienlijke gevaren voor
de gebruiker ontstaan. Neem het apparaat niet meer in
gebruik wanneer het apparaat - en in het bijzonder de kabel - beschadigingen vertoont, maar laat het eerst door
een vakman repareren. Controleer de kabel regelmatig
op beschadigingen.
• Een defecte kabel mag alleen door de fabrikant, onze
technische dienst of een soortgelijk gekwalificeerd
persoon worden vervangen. Alleen zo kunnen gevaren
vermeden worden.
• Onderbreek de stroomtoevoer of verwder de batteren
wanneer u denkt, het apparaat langere tijd niet te gebruiken.
LET OP:
Open het apparaat niet! Er bevinden zich geen te onderhouden onderdelen in het apparaat.
Volgende symbolen kunnen op uw apparaat zijn aangebracht. Zij hebben de volgende betekenis:
Het bliksemsymbool wijst de gebruiker op
onderdelen in het inwendige van het apparaat die gevaarlijk hoge spanning voeren.
Het symbool met het uitroepteken verwijst
naar belangrijke bedienings- en onderhoudsinstructies in de begeleidende documentatie.
Kinderen en gebrekkige personen
• Laat om veiligheidsredenen geen verpakkingsdelen
(plasticzak, doos, piepschuim, enz.) binnen het bereik van
uw kinderen liggen.
WAARSCHUWING!
Laat kleine kinderen niet met de folie spelen. Er bestaat
gevaar voor verstikking!
• Dit product mag niet worden gebruikt door personen
(inclusief kinderen) met beperkte fysieke, sensorische
of geestelijke vermogens of gebrekkige ervaring en/of
kennis, tenzij een voor hun veiligheid verantwoordelijke
persoon toezicht houdt of hun vooraf instructies gegeven
heeft voor het gebruik van het product.
• Houd toezicht op kinderen om te waarborgen dat ze niet
met het apparaat spelen.
Overzicht van de bedieningselementen
1 AL1 (alarmfunctie 1 geactiveerd)
2 LINE IN (audiokabel aangesloten op de LINE IN-aanslui-
ting)
3 PM (indicatie voor “middag” in 12-uur weergavemodus)
4 Lampekap
Page 11
5 FM (radiomodus)
6 Scherm
7 AL2 (alarmfunctie 2 geactiveerd)
8 Sfeerverlichting
Toetsen voor de bediening
13
14
15
16
17
18
19
20
21
22
23
24
Volume verlagen / instellen/activeren/deactiveren alarm 1
Schakel sfeerverlichting aan/uit
Weergave jaar/datum / selecteren temperatuureenheid
Vorige voorkeuzestation radio
Zoek naar het volgende radiostation / selecteer zomertijd/normale tijd / “dutje”functie
Opslaan radiostation / volgende voorkeuzestation radio / weergave temperatuur
In-/uitschakelen licht
Verhoog de lichtintensiteit
Verlaag de lichtintensiteit
Sluimerfunctie / slaaptimer / helderheid scherm
In-/uitschakelen van het toestel
Volume verhogen / instellen/activeren/deactiveren alarm 2
Nederlands
9 DC 5 V USB-CHARGING-aansluiting
10 LINE IN-aansluiting
11 Vaste lichtnetadapter
12 Draadantenne (FM)
11
Ingebruikname
• Plaats het apparaat op een droog, anti-slip oppervlak
waar u het apparaat makkelijk kunt bedienen.
• Verwder indien aanwezig de beschermfolie.
De batterij plaatsen (Back-up)
(Batterij is niet bijgeleverd bij het apparaat)
In geval van stroomuitval of als de stekker uit het stopcontact
gehaald wordt, zorgen de back-upbatterij ervoor dat de
instellingen behouden blijven.
1. Open de batterijhouder op de onderzijde. Verwijder hiervoor het schroefje van het klepje voor het batterijvak met
een kruisschroevendraaier.
2. Plaats een batterij van het type CR2032, 3 V. Let op de
juiste polariteiten (+ moet aan bovenkant zijn)!
3. Sluit het batterijvak. Schroef het klepje weer op het batterijvak.
Als het apparaat lange tijd niet gebruikt wordt, moeten de
batterij uit het apparaat gehaald worden om lekkage van
batterijvloeistof te voorkomen.
WAARSCHUWING:
Stel de batterijen niet bloot aan intense warmtebronne,
zoals zonlicht, vuur en dergelijke. Er bestaat een risico voor
explosie!
LET OP:
Batterijen horen niet in het huisafval. Geef verbruikte batterijen af bij het gemeentelijke milieupark of bij de handelaar.
Voeding
1. Zorg dat de spanning in overeenstemming is met die op
het indicatieplaatje.
2. Steek de netstekker in een goed geïnstalleerd stopcontact met drie gaten en een stroomvoorziening van.
OPMERKING:
Als er geen batterij voor back-up is geplaatst, worden alle
opgeslagen radiostations en klokinstellingen in geval van
stroomuitval gewist.
Het apparaat aan-/uitschakelen
Druk op de
len.
Volume
Het volume instellen met de
Displayhelderheid (in stand-by)
Gebruik de SNOOZE/SLEEP / DIMMER toets (22) om de
helderheid van het display in te stellen.
Leeslampfunctie
1. Druk de
2. Gebruik de -toets (20) om de helderheid te verhogen.
3. Druk nogmaals de -toets om de functie uit te schake-
Sfeerverlichting
1. Druk de
2. Druk nogmaals de -toets om de sfeerverlichting uit te
-toets (23) om het apparaat aan of uit te schake-
toets (24) en (13).
-toets (19) om de functie in te schakelen.
Gebruik de -toets (21) om de helderheid te verhogen.
len.
-toets (14) om de sfeerverlichting (8) in te
schakelen. Het licht doorloopt verschillende kleuren.
schakelen.
Page 12
12
Nederlands
Weergave van diverse informatie
1. Schakel het apparaat op stand-by met behulp van de
toets (23).
2. Druk kort en herhaaldelijk op de toets (15). De volgende informatie wordt opeenvolgend weergegeven:
Jaar Datum
Als de knop niet langer wordt ingedrukt, zal de display na
ongeveer 5 seconden terug naar de tijd schakelen.
Toggling van het display
Het onderstaande kan wisselend op het display worden
getoond:
Tijd Temperatuur
1. Om deze functie te activeren drukt u op de
om het apparaat in de stand-by te zetten.
2. De
toets (15) ingedrukt houden totdat “ ” kort op
het display verschijnt.
Toggling uitschakelen: Houdt de
bystand en als de tijd van de klok wordt weergegeven weer
ingedrukt. “ ” verschijnt kort op het display.
Temperatuuraanduiding schakelen tussen °C (Celsius) en
°F (Fahrenheit)
1. Schakel het apparaat op stand-by met behulp van de
toets (23).
2. Druk de
3. Terwijl de temperatuur wordt weergegeven, drukt u
ongeveer 3 seconden op de toets om tussen °C en °F
te schakelen.
USB-oplaadaansluiting (9)
U kunt uw smartphone via deze aansluiting opladen. Gebruik
de USB-kabel van uw smartphone voor de aansluiting.
OPMERKING:
• Door de verschillende type smartphone die tegenwoordig beschikbaar zijn, alsmede de verschillende
oplaadcapaciteiten, is de oplaadtijd afhankelijk van de
smartphone en zijn conditie.
• Weergave van audiobestanden via deze aansluiting is
niet mogelijk.
-toets (18) om de temperatuur weer te geven.
-toets in de stand-
toets (23)
Tijd Instellen
1. Gebruik de toets (23) om het apparaat in de stand-by
te schakelen.
2. Houd de
knippert op de display.
• Nu kunt u het jaar, de maand, de dag, het formaat
• In elk van deze gevallen, bevestig de invoer met de
-toets (18) ingedrukt totdat de jaarindicatie
van tijdindicatie (12Hr/24Hr), de uren, en de minuten
instellen met de toetsen
-toets. De huidige in te stellen indicatie knippert
op de display.
(17) en (15).
OPMERKING:
• De invoer wordt automatisch na ongeveer 30 seconden
opgeslagen als er geen toets wordt ingedrukt.
• Het volgende verschnt met de 12 uur display: PM =
Middag
Overschakelen naar zomertijd
1. Gebruik de
te schakelen.
2. Houd de toets (17) ingedrukt om tussen zomer- en
wintertijd te schakelen. De latere tijd is zomertijd.
toets (23) om het apparaat in de stand-by
Zenderinstelling
1. Gebruik de (17) en (15) toets om op de gewenste
zender af te stemmen. Als u de toets ingedrukt houdt,
zoekt het apparaat naar de volgende radiozender. De
display toont de geselecteerde frequentie.
2. Wanneer de ontvangst te zwak is, kunt u deze verbeteren
door de positie van de draadantenne te veranderen.
Voorkeurzenders
U kunt maximaal 10 voorkeurzenders instellen.
1. Zoek naar een zender zoals beschreven in “Zenderinstelling”.
2. De
3. Gebruik de
4. Druk op de
Afstemmen op een voorkeurzender
Druk in de radiomodus herhaaldelijk op de
(18/16) om door de voorkeurzenders te scannen.
toets (18) ingedrukt houden. De indicator van de
voorkeurzender knippert op het display (b.v. P02).
(17) en (15) toetsen om de gewenste
geheugenpositie voor de voorkeurzender te selecteren.
toets om de zender vast te leggen.
/ toets
Wekfunctie
De wektijd instellen (in stand-by positie)
U kunt het twee alarmtijden instellen. Er zijn 4 verschillende
alarmopties beschikbaar: Radio + Licht / Radio / Zoemer +
Licht / Zoemer. Ga als volgt te werk:
1. Druk op de
getoond.
2. De
terwijl de alarmtijd wordt getoond. De uuraanduiding
van de huidige alarmtijd begint te knipperen.
3. Gebruik de toetsen
len.
4. Druk op de
beginnen te knipperen.
5. Gebruik de toetsen
6. Stel nu de dagen in dat u wilt dat het alarm afgaat. De
volgende selecties zijn mogelijk:
toets (13). De huidige alarmtijd wordt
toets ongeveer 3 seconden ingedrukt houden
(17) en (15), voor het instel-
-toets om te bevestigen. De minuten
en voor het instellen.
Page 13
• 1-5 = Maandag tot Vrdag
• 1-7 = Maandag tot Zondag
• 6-7 = Zaterdag tot Zondag
• 1-1 = Een Dag van de Week
6a. Als u de instelling 1-1 hebt geselecteerd:
1. Druk op de
kiezen.
2. Maak uw keus met de toetsen
dag, 2 = Dinsdag, 3 = Woensdag, 4 = Donderdag,
5 = Vrdag, 6 = Zaterdag, 7 = Zondag)
7. Druk op de
gens hoe u gewekt wilt worden. Selecteer uit:
• “bu” (zoemer):
Een zoemgeluid klikt wanneer de alarmtijd wordt
bereikt. De interval van de zoemer loopt op van
langzaam naar snel. Het volume kan niet worden
veranderd. De sfeerverlichting (8) gaat automatisch
aan.
• Radiofrequentie wordt getoond:
Zodra de ingesteld alarmtijd wordt getoond, wordt
de radio ingeschakeld. De laatste voorkeurzender
wordt ingeschakeld. Het volume wordt langzaam
hoger tot het ingesteld volume is bereikt. Het volume
kan niet worden veranderd. De sfeerverlichting (8)
gaat automatisch aan.
OPMERKING:
• De alarmfunctie wordt na 30 minuten automatisch
uitgeschakeld tot de volgende dag.
• Als er een audiokabel is aangesloten op de LINE
IN-aansluiting, wekt het toestel u met de zoemer,
zelfs als u “radio” hebt geselecteerd.
7a. Als u door een radiozender gewekt wilt worden, selec-
teer dan het maximale alarmvolume met de
toetsen.
8. Druk op de toets om te bevestigen. Selecteer dan
de lichtintensiteit (
wordt geannuleerd door te drukken op “ ”.
OPMERKING:
Het lamp in de lampekap (4) gaat 30 minuten voor de
ingestelde alarmtijd aan. De helderheid begint op de
eerder ingestelde intensiteit en neemt geleidelijk toe.
9. Druk tot slot opnieuw op de
is nu geactiveerd.
Om de tweede alarmtijd in te stellen, herhaalt u bovenstaande stappen met de
OPMERKING:
• Als de alarmtd is geactiveerd verschnt er AL1 (1) of
AL2 (7) op het scherm.
• Om de ingestelde wektden kortstondig weer te
geven, drukt u op de
-toets om de dag van de week te
en . (1 = Maan-
toets om te bevestigen. Selecteer vervol-
en
) voor de alarmfunctie. Deze functie
toets. De eerste alarmtijd
toets (24).
respectievelijk de , toets.
Nederlands
Uitschakelen van het weksignaal
Druk op de
Automatische wekinterval
De automatisch ingestelde wekfunctie kan door het indrukken van de SNOOZE/SLEEP / DIMMER-toets (22) ca. 9
minuten worden uitgeschakeld.
OPMERKING:
Als de sluimerfunctie is geactiveerd, knippert AL1 of AL2
op het scherm.
Alarmfunctie uitschakelen
1. Schakel het apparaat naar stand-by met de
2. Om de alarmfunctie te deactiveren, de
-toets (23) om het alarm uit te schakelen.
toets (13) of
toets (24) ingedrukt houden. AL1 (1) of AL2 (7) verdwijnt.
13
toets (23).
Inslaapfunctie
U kunt de vertraagd afsluiten functie gebruiken terwijl de
radio in gebruik is. Het apparaat wordt automatisch uitgeschakeld als de geselecteerde tijd is bereikt.
• Selecteer de td waarna het apparaat uitschakelt door
herhaaldelijk op de SNOOZE/SLEEP / DIMMER-toets
(22) te drukken. De volgende selecties zijn mogelijk: 90,
60, 30, en 15 minuten. De OFF-instelling (uit) deactiveert
deze functie.
• Druk de
ren.
-toets (23) in om deze functie weer te deactive-
Tukje alarm
Het tukje alarm kan gebruikt worden voor bijvoorbeeld een
kort middagslaapje. De functie werkt alleen in de stand-by.
• Druk herhaaldelk op de
waarop het apparaat een geluidstoon laten horen te
selecteren. Selecteer van 90 tot 10 minuten of OFF (uit) in
stappen van 10 minuten.
• Nadat de geselecteerde td is verstreken, is een geluidstoon met oplopend volume to horen. Gebruik de toets
(23) om de geluidstoon uit te schakelen.
toets (17) om de tijd
AUX IN-aansluiting
(Kabel niet meegeleverd)
1. Gebruik indien nodig een geschikte adapter (niet meegeleverd).
Een extern apparaat als volgt aansluiten:
• Met een 3,5 mm stereostekker naar de LINE IN-
ingang (10).
2. Shakel het toestel in met de
verschijnt LINE IN.
-toets (23). Op het scherm
Page 14
14
Nederlands
3. Start het afspelen van uw audiobron. Luister naar het
afspelen van geluid via de luidspreker. U kunt het volume
met behulp van de / toetsen (24/13) aanpassen.
4. Raadpleeg de gebruikershandleiding van de externe
audiobron voor de verdere procedure.
OPMERKING:
Pas het volume van het externe apparaat naar een aangenaam niveau aan.
Dit apparaat is gekeurd conform de op dit moment van toepassing zijnde CE-richtlijnen zoals bijvoorbeeld elektromagnetische compatibiliteit en laagspanningsvoorschriften en is
geconstrueerd volgens de nieuwste veiligheidstechnische
voorschriften.
Stop gebruik AUX IN
Ontkoppel de kabel van de AUX IN-aansluiting. Het toestel
keert terug naar de radiomodus.
Reiniging
LET OP:
Dompel het apparaat nooit onder water.
• Trek vóór de reiniging van het apparaat altd de steker uit
de contactdoos.
• Reinig het apparaat met een enigszins vochtige doek
zonder reinigingsmiddelen.
Probleemoplossing
Probleem Oorzaak Oplossing
Het apparaat
kan niet gebruikt worden
De zoemer
voor het alarm
gaat af, ook al
is er “radio”
geselecteerd
Het apparaat is
geblokkeerd en
“vastgelopen”
Audiokabel aangesloten op de LINE
IN-aansluiting
Trek de stekker
ongeveer 5 seconden
uit het stopcontact.
Schakel het apparaat
dan weer aan.
Ontkoppel de audiokabel van de LINE INaansluiting
Technische gegevens
Model: ............................................................................MRC 4147 L
Spanningstoevoer: ....................................... 100-240 V~ 50/60 Hz
Opgenomen vermogen: ...........................................................7 W
Batterij gangreserve: ....................................................3 V, CR2032
Beschermingsklasse:........................................................................II
Nettogewicht: ............................................................ ong. 0,502 kg
Radio-element:
Frequentiebereiken: ............................FM 87,5 ~ 108,0 MHz
Het recht om technische en ontwerpaanpassingen te maken
in de loop van voortdurende productontwikkeling blijft voorbehouden.
Verwijdering
Betekenis van het symbool “vuilnisemmer”
Bescherm ons milieu, elektrische apparaten horen niet in het
huisafval.
Maak voor het afvoeren van elektrische apparaten gebruik
van de voorgeschreven verzamelpunten en geef daar de
elektrische apparaten af die u niet meer gebruikt.
Daardoor helpt u de potentiële effecten te voorkomen die
een verkeerde afvoer op het milieu en de menselijke gezondheid kunnen hebben.
Op deze wijze levert u uw bijdrage aan het hergebruik, de
recycling en andere verwerkingsvormen voor oude elektronische en elektrische apparaten.
Voor informatie over verzamelpunten voor uw apparaten
kunt u contact opnemen met uw gemeente of gemeenteadministratie.
Page 15

Mode d’emploi
Merci d’avoir choisi notre produit. Nous espérons que vous
saurez profiter votre appareil.
Symboles de ce mode d’emploi
Les informations importantes pour votre sécurité sont particulièrement indiquées. Veillez à bien respecter ces indications
afin d’éviter tout risque d’accident ou d’endommagement
de l’appareil :
AVERTISSEMENT :
Prévient des risques pour votre santé et des risques éventuels de blessure.
ATTENTION :
Indique les risques pour l’appareil ou tout autre appareil.
NOTE : Attire votre attention sur des conseils et informations.
Conseils généraux de sécurité
Lisez attentivement ce mode d’emploi avant de mettre
l’appareil en marche pour la pre-mière fois. Conservez le
mode d’emploi ainsi que le bon de garantie, votre ticket de
caisse et si possible, le carton avec l’emballage se trouvant
à l’intérieur. Si vous remettez l‘appareil à des tiers, veuillez-le
remettre avec son mode d‘emploi.
• Pour éviter tout risque d’incendie ou d’électrocution ne
mettez en aucun cas votre appareil en contact avec la
pluie ou de l’humidité. Ne laissez jamais fonctionner votre
appareil à proximité d’eau (par ex. salle de bains, bassin
de piscine, cave humide).
• N’utilisez pas l’appareil dans des endroits très humides,
poussiéreux, froids ou chauds.
• N’utilisez l’appareil que pour un usage privé et le but
prévu. Cet appareil n’est pas conçu pour une utilisation
commerciale.
• Assurez-vous que le cordon électrique n’est pas entortillé,
coincé ou en contact avec des sources de chaleur.
• Assurez-vous que le cordon électrique ne présente pas
un risque de trébuchement.
• L’adaptateur électrique est uniquement conçu pour une
utilisation dans des endroits secs.
• Ne touchez jamais l’adaptateur électrique ou le cordon
avec les mains humides.
• Ne branchez l’appareil que dans une prise de courant en
bon état de fonctionnement. Veillez à ce que la tension
électrique de l’appareil corresponde à celle indiquée sur
la prise de courant.
• La che électrique doit toujours être facilement acces-
sible.
• Insérez toujours les piles correctement.
• Ne couvrez pas les orices de ventilation avec des objets
tels qu’un journal, une nappe, un rideau, etc.
Français
• N’exposez pas l’appareil aux éclaboussures ou aux
gouttes d’eau et ne placez aucun récipient rempli de
liquide tel que, p.ex. des vases remplis de eurs, sur
l’appareil.
• Des sources d’inammation exposées telles que des
bougies allumées ne doivent pas être placées sur l’appa-
reil.
• N’ouvrez jamais le bloc moteur de l’appareil. Des répa-
rations mal appropriées peuvent entraîner des risques
importants pour l’utilisateur. En cas d’endommagement
de l’appareil, en particulier du câble d’alimentation, ne
mettez plus l’appareil en marche et laissez un spécialiste
se charger de la réparation. Contrôlez régulièrement le
bon état du câble d’alimentation.
• Pour éviter tout risque, seul le fabricant, son service après-
vente ou un spécialiste à qualification similaire sont aptes
à remplacer un câble défectueux par un câble équivalent.
• Si l’appareil n’est pas utiliser pendant assez longtemps,
débranchez le câble d’alimentation ou retirez les piles.
ATTENTION :
N’ouvrez pas l’appareil ! Aucune des pièces se trouvant à
l’intérieur de l’appareil ne peut être réparée.
Vous pouvez éventuellement trouver ces symboles sur
l’appareil, qui ont la signification suivante :
L’éclair indique à l’utilisateur les pièces dangereuses, situées à l’intérieur de l’appareil, qui
conduisent de hautes tensions.
Le point d’exclamation attire l’attention de
l’utilisateur sur les remarques impor-tantes
d’utilisation et d’entretien données dans les
documents de l’appareil.
Enfants et personnes fragiles
• Par mesure de sécurité vis-à-vis des enfants, ne laissez
pas les emballages (sac en plastique, carton, polystyrène)
à leur portée.
AVERTISSEMENT !
Ne pas laisser les jeunes enfants jouer avec le film. Il y a
risque d’étouffement !
• Le present appareil n’est pas destine à être utilize par des
personnes ( y com-pris les enfants ) aux faculties men-
tales, sensorielles ou physiques limitées ou n’ayant pas
l’expérience et/ou les connaissances requises, à moins
d’être sous la surveillance d’une personne responsible de
leur sécurité ou d’avoir reçu par elle des instructions sur le
maniement de l’appareil.
• Les enfants doivent être surveillés an de garantir qu’ils
ne jouent pas avec l’appareil.
15
Page 16

16
Français
Liste des différents éléments de commande
1 AL1 (fonction alarme 1 activée)
2 LINE IN (câble audio branché à la prise LINE IN)
3 PM (indique “après-midi” en mode d’affichage 12
heures)
4 Abat-jour
Boutons de commande
13
14
15
16
17
18
19
20
21
22
23
24
Baisser le volume / régler/activer/désactiver l’alarme 1
Activer/Désactiver l’éclairage d’ambiance
Afficher l’année/la date / sélectionner l’unité de la température
Station de radio précédente préréglée
Aller à la station de radio suivante / sélectionner l’heure d’été/l’heure normale / la fonction “sieste”
Enregistrer une station de radio / aller la station de radio suivante préréglée / afficher la température
Allumer/Éteindre l’éclairage
Augmenter la luminosité
Diminuer la luminosité
Fonction Répétition d’alarme / Minuterie de sommeil / afficher la luminosité
Allumer/Éteindre l’appareil
Monter le volume / régler/activer/désactiver l’alarme 2
5 FM (mode radio)
6 Écran
7 AL2 (fonction alarme 2 activée)
8 Éclairage d’ambiance
9 Port DC 5 V USB CHARGING
10 Prise LINE IN
11 Adaptateur électrique xe
12 Antenne filaire (FM)
Avant la première utilisation
• Sélectionner un emplacement adequate pour l’appareil:
sec, plat et non glissant, où ilpeut être facilement mani-
pulé.
• Retirez le lm de protection, si présent.
Insertion de la Pile (d’ appoint)
(La pile n’est pas incluse avec l’appareil)
En cas de coupure de courant ou si l’appareil est débranché,
les réglages seront conservés grace aux piles.
1. Ouvrez le compartiment des piles situé sous l’appareil.
Pour ce faire, retirez la vis du compartiment à pile à l’aide
d’un tournevis cruciforme.
2. Insérez une pile de type CR2032, 3 V. Respecter la polarité
(+ doit être en haut)!
3. Fermer le compartiment à piles. Fixez à nouveau le
couvercle du compartiment à pile avec la vis.
Si l’appareil n’est pas utilisé pendant de longues périodes,
retirez la pile de celui-ci afin d’éviter les fuites d’acide de pile.
AVERTISSEMENT :
N’exposez pas les piles à une source intense de chaleur
telle que p.ex. le soleil, le feu ou toute autre source simi-
laire. Il y a un risque d’explosion !
ATTENTION :
Ne jetez pas vos piles dans les ordures ménagères. Nous
vous prions de les ramener à un centre de recyclage approprié ou chez le fabricant.
Alimentation électrique
1. Insérezr la prise électrique dans une prise trios points,
correctement installée.
2. S’assurer que la tension correspond aux indications de
l’étiquette de la prise.
NOTE :
Si aucune batterie de sauvegarde n’a été insérée, toutes
les stations de radio mémorisées et tous les paramètres de
l’heure enregistrés seront supprimés en cas de coupures
de courant.
Mettre l’appareil en Marche/Arrêt
Appuyez sur le bouton
marche/arrêt.
Volume
Réglez le volume à l’aide du bouton
Luminosité de l’affichage (en veille)
Utilisez le bouton SNOOZE/SLEEP / DIMMER (22) pour
régler la luminosité de l’affichage.
Fonction de lumière de lecture
1. Appuyez sur le bouton
2. Utilisez le bouton (20) pour augmenter la luminosité.
Utilisez le bouton (21) pour la diminuer.
3. Pour désactiver la fonction, appuyez à nouveau sur le
bouton .
(23) pour mettre l’appareil en
(24) et (13).
(19) pour activer la fonction.
Page 17

Éclairage d’ambiance
1. Appuyez sur le bouton
d’ambiance (8). L’éclairage changera de couleurs.
2. Pour éteindre l’éclairage d’ambiance, appuyez à nouveau
sur le bouton .
Afficher diverses informations
1. Mettez l’appareil en veille avec le bouton
2. Appuyez brièvement sur le bouton (15) plusieurs fois.
Les informations suivantes s’affichent les unes après les
autres :
Si vous n’appuyez plus sur le bouton, l’affichage repasse à
l’heure après environ 5 secondes.
Basculer l’affichage
Les paramètres suivants s’affichent de manière alternative :
Heure Température
1. Pour activer cette fonction, utilisez le bouton
de mettre l’appareil en mode veille.
2. Maintenez le bouton (15) enfoncé, jusqu’à ce que “ ”
apparaisse brièvement sur l’affichage.
Arrêter de basculer : Maintenez le bouton
enfoncé en mode veille et avec l’heure affichée. “
raît brièvement sur l’affichage.
Basculer l’affichage de la température entre °C (Celsius)
et °F (Fahrenheit)
1. Mettez l’appareil en veille avec le bouton
2. Appuyez sur le bouton (18) pour afficher la température.
3. Lorsque la température s’affiche, appuyez sur le bouton
pendant environ 3 secondes pour basculer entre °C
et °F.
Prise de charge USB (9)
Vous pouvez charger votre Smartphone via ce connecteur.
Utilisez le câble USB de votre Smartphone pour brancher.
NOTE :
• Étant donné la variété de types de Smartphone sur le
marché actuel et leurs différentes capacités de charge,
la durée de charge dépend du Smartphone utilisé et
de ses conditions d’utilisation.
• Lire des chiers audio via ce connecteur est impossible.
(14) pour activer l’éclairage
(23).
Année Date
(23) afin
à nouveau
” appa-
(23).
Réglage de l’horloge
1. Utilisez le bouton (23) pour mettre l’appareil en veille.
2. Maintenez le bouton
l’indication de l’année clignote sur l’affichage.
• Vous pouvez à present régler l’année, le mois, le
jour, le format d’affichage de l’heure (12Hr/24Hr), les
(18) enfoncé jusqu’à ce que
Français
heures et les minutes avec les boutons (17) et
(15).
• Dans chaque cas, conrmez l’entrée avec le bouton
. L’indication actuelle devant être réglée clignote
sur l’affichage.
NOTE :
• L’entrée est stockée automatiquement dans les
30 secondes environ si aucun bouton n’est pressé.
• L’heure s’afche au format 12 heures : PM =Après-midi
Affichage de la date et de l’année
1. Utilisez le bouton
2. Appuyez sur le bouton
pendant un court instant. Appuyez à nouveau sur le
bouton pour afficher brièvement la date.
(23) pour mettre l’appareil en veille.
(17) pour afficher la date
17
Réglage des émetteurs
1. Utilisez les boutons (17) et (15) pour régler la
station souhaitée. Si vous maintenez un des boutons
enfoncé, l’appareil recherche la prochaine station radio.
L’affichage montre la fréquence qui a été réglée.
2. Lorsque la reception est faible, modifies la situation de
l’antenne exible pour amélio-rer la réception.
Stations préréglées
Vous pouvez prérégler jusqu’à 10 stations radio.
1. Recherchez une station comme décrit sous “Réglage des
émetteurs”.
2. Maintenez le bouton
l’emplacement préréglé clignote sur l’écran (p.ex. P02).
3. Utilisez les boutons
la mémoire de station préréglée souhaitée.
4. Appuyez sur le bouton
Régler la station préréglée
Appuyez plusieurs fois sur le bouton
mode radio pour balayer les mémoires de station préréglées.
(18) enfoncé. L’indicateur de
(17) et (15) pour sélectionner
pour prérégler la station.
/ (18/16) en
Fonction réveil
Programmation du réveil (en veille)
Vous pouvez régler deux heures d’alarme. Vous disposez
de 4 options d’alarme différentes : Radio + Lumière / Radio /
Signal sonore + Lumière / Signal sonore. Suivez la procedure
ci-dessous :
1. Appuyez sur le bouton
ment réglée s’affiche.
2. Maintenez le bouton enfoncé pendant environ
3 secondes lorsque l’heure de l’alarme s’affiche. Les
heures de l’heure d’alarme actuellement réglée commencent à clignoter.
(13). L’heure d’alarme actuelle-
Page 18

18
Français
3. Utilisez les boutons (17) et (15) pour le réglage.
4. Appuyez sur le bouton pour confirmer. Les minutes
commencent à clignoter.
5. Utilisez les boutons
6. Sélectionnez à present les jours où vous souhaitez que
l’alarme retentisse. Les sélec-tions suivantes peuvent être
effectuées:
• 1-5 = Lundi au Vendredi
• 1-7 = Lundi au Dimanche
• 6-7 = Samedi et Dimanche
• 1-1 = Jour de la semaine
6a. Lorsque vous avez sélectionné le réglage 1-1 :
1. Appuyez sur le bouton
de la semaine.
2. Effectuez votre sélection avec les boutons
. (1 = Lundi, 2 = Mardi, 3 = Mercredi, 4 = Jeudi,
5 = Vendredi, 6 = Samedi, 7 = Dimanche)
7. Appuyez sur le bouton
nez votre mode de réveil. Sélectionnez parmi :
• “bu“ (avertisseur) :
Un avertisseur sonore retentit lorsque l’heure d’alarme
est atteinte. L’intervalle de l’avertisseur sonore
augmente petit à petit. Vous ne pouvez pas régler le
volume. L’éclairage d’ambiance (8) s’allume automatiquement.
• La fréquence radio s’affiche :
Dès que votre heure d’alarme réglée s’affiche, la
radio s’allume. La dernière station réglée se lit. Le
volume augmente doucement au niveau réglé. Vous
ne pouvez pas régler le volume. L’éclairage d’ambiance (8) s’allume automatiquement.
NOTE :
• La fonction de l’alarme s’éteint automatiquement
au bout de 30 minutes jusqu’au jour suivant.
• Si un câble audio est branché à la prise LINE IN,
l’appareil déclenchera l’avertisseur sonore pour
vous réveiller, même si vous avez sélectionné
“radio”.
7a. Si vous souhaitez être reveille par une station radio,
sélectionnez le volume de l’alarme maximal à l’aide des
boutons
8. Appuyez sur le bouton pour confirmer. Puis, sélectionnez la luminosité ( ) pour la fonction de l’alarme.
Sélectionner “ ” annulera cette fonction.
NOTE :
La lumière à l’intérieur de l’abat-jour (4) s’allumera
30 minutes avant l’heure d’alarme préréglée. La luminosité augmentera progressivement, en commençant par
le niveau de luminosité précédemment réglé.
9. Puis, appuyez à nouveau sur le bouton
heure d’alarme est maintenant activée.
et .
et pour le réglage.
pour sélectionner le jour
et
pour confirmer. Puis, sélection-
. La première
Pour régler la deuxième heure d’alarme, répétez les étapes
ci-dessus avec le bouton (24).
NOTE :
• Si l’heure d’alarme a été activée, AL1 (1) ou AL2 (7)
s’affichera.
• Pour afcher brièvement les heures d’alarme dénies,
appuyez sur les boutons et .
Suppression du signal de réveil
Appuyez sur le bouton
Réveil automatique à intervalles
La function réveil réglée automatiquement peut être stoppée pour env. 9 minutes àl’aide de la touche SNOOZE/
SLEEP / DIMMER (22).
NOTE :
AL1 ou AL2 clignotera sur l’écran si la fonction de répétition
d’alarme a été activée.
Désactiver la fonction alarme
1. Mettez l’appareil en veille avec le bouton
2. Pour désactiver la fonction d’alarme, maintenez le bouton
(13) ou button (24) enfoncé. AL1 (1) ou AL2 (7)
disparaîtra.
(23) pour arrêter l’alarme.
(23).
Arrêt différé
Vous pouvez utiliser cette function pour retarder l’arrêt du
fonctionnement de la radio. L’appareil s’éteint automatiquement, lorsque le délai sélectionné est écoulé.
• Sélectionnez le temps auquel l’appareil doit s’éteindre
en appuyant sur le bouton SNOOZE/SLEEP / DIMMER
(22) de manière répétée. Les selections suivantes peuvent
être effectuées: 90, 60, 30, and 15 minutes. Le réglage
OFF (arrêt) désactive cette fonction.
• Vous pouvez désactiver cette function en enfonçant la
touche
(23).
Alarme Sieste
L’alarme pour la sieste s’utilise pour, p. ex. une petite “sieste”.
La function ne s’utilise qu’en veille.
• Appuyez plusieurs fois sur le bouton
sélectionner l’heure après laquelle l’appareil émettra un
bip sonore. Sélectionnez entre 90 et 10 minutes ou OFF
(arrêt) par tranche de 10 minutes.
• Une fois l’heure sélectionnée écoulée, un bip sonore de
plus en plus rapide retentira. Utilisez le bouton (23)
pour éteindre le bip sonore.
(17) pour
Page 19

Prise AUX IN
(Câble non inclus)
1. Si besoin est, utilisez un adaptateur approprié (non
fourni).
Connectez l’appareil externe comme suit :
• Avec une prise Jack stéréo 3,5 branchée à la prise
LINE IN (10).
2. Allumez l’appareil à l’aide du bouton
s’affiche.
3. Démarrez la lecture de votre source audio. Ecoutez le son
via le haut-parleur. Vous pouvez régler le volume à l’aide
des boutons / (24/13).
4. Dans la suite de la procédure, référez-vous au mode
d’emploi de la source audio externe.
NOTE :
Si possible, réglez le volume de l’appareil externe à un
niveau confortable.
Arrêter le fonctionnement AUX IN
Débranchez le câble de la prise AUX IN. L’appareil reviendra
en mode radio.
(23). LINE IN
Français
19
Données techniques
Modèle : .........................................................................MRC 4147 L
Alimentation : ................................................ 100-240 V~ 50/60 Hz
Consommation : ..........................................................................7 W
Pile relais : ........................................................................3 V, CR2032
Classe de protection :......................................................................II
Poids net : ..............................................................approx. 0,502 kg
Partie radio :
Gammes de fréquence : ..................... FM 87,5 ~ 108,0 MHz
Nous nous réservons le droit d’apporter des modifications
techniques ainsi que des modifications de conception dans
le cadre du développement continu de nos produits.
Cet appareil a été contrôlé d’après toutes les directives européennes actuelles applicables, comme par exemple concernant la compatibilité électromagnétique et la basse tension.
Cet appareil a été fabriqué en respect des réglementations
techniques de sécurité les plus récentes.
Nettoyage
ATTENTION :
Ne plongez jamais l’appareil dans l’eau.
• Débranchez toujours l’appareil avant de le nettoyer.
• Lavez l’appareil avec un torchon légèrement humide sans
détergent.
Dépannage
Problème Cause Solution
L’appareil ne
peut pas fonctionner
La répétition
d’alarme est
activée alors
que “radio” a
été sélectionné
L’appareil est bloqué et “suspendu”
Câble audio branché à la prise LINE
IN
Retirez la fiche
électrique pendant
5 secondes. Puis,
rallumez l’appareil.
Débranchez le câble
audio de la prise LINE
IN
Élimination
Signification du symbole “Élimination“
Protégez votre environnement, ne jetez pas vos appareils
électriques avec les ordures ménagères.
Utilisez, pour l’élimination de vos appareils électriques, les
bornes de collecte prévues à cet effet où vous pouvez vous
débarrasser des appareils que vous n’utilisez plus.
Vous contribuez ainsi à éviter les impacts potentiels dans
l’environnement et sur la santé de chacun, causés par une
mauvaise élimination de ces déchets.
Vous contribuez aussi au recyclage sous toutes ses formes
des appareils électriques et électroniques usagés.
Vous trouverez toutes les informations sur les bornes d’élimination des appareils auprès de votre commune ou de
l’administration de votre communauté.
Page 20

20
Español
Instrucciones de servicio
Le agradecemos la confianza depositada en este producto y
esperamos que disfrute de su uso.
Símbolos en este manual de instrucciones
Advertencias importantes para su seguridad están señaladas
en especial. Siga estas advertencias incondicionalmente,
para evitar accidentes y daños en el aparato:
AVISO:
Advierte ante los peligros para su salud y demuestra posibles riesgos de herida.
ATENCIÓN:
Indica los posibles riesgos para el aparato u otros objetos.
NOTA: Pone en relieve consejos e informaciones para
usted.
• No obture las aperturas de ventilación con objetos como
• No exponga el dispositivo a goteo ni salpicaduras de
• Las fuentes de ignición expuestas, como las velas encen-
• Jamás se abrirá la carcasa del cuerpo del aparato. Las
• Sólo el fabricante, nuestro servicio posventa o un técnico
• Saque de la toma de corriente la clavija de conectar a
Indicaciones generales de seguridad
Antes de la puesta en servicio de este aparato lea detenidamente el manual de instrucciones y guarde éste bien
incluido la garantía, el recibo de pago y si es posible también
el cartón de embalaje con el embalaje interior. En caso de
dejar el aparato a terceros, también entregue el manual de
instrucciones.
• Vd. no debe dejar expuesto el aparato ni a la lluvia ni a
la humedad, a fin de disminuir así el riesgo de incendio
o de sacudida eléctrica. Por tanto, no debe utilizar el
aparato cerca de agua – por ejemplo, cerca de la bañera,
de una piscina o de un sótano húmedo.
• No use el dispositivo en lugares con extremos de calor,
frío, polvo o humedad.
• Use el dispositivo exclusivamente para uso particular
y con la finalidad pretendida. Este dispositivo no está
diseñado para uso comercial.
• Asegúrese de que el cable de alimentación no se enganche, quede atrapado o entre en contacto con fuentes de
calor.
• Asegúrese de que el cable de alimentación no represente riesgos de tropiezo.
• El adaptador de alimentación sólo es adecuado para su
uso en lugares secos.
• Nunca toque el adaptador de alimentación o el cable
con las manos mojadas.
• El aparato se ha de conectar únicamente a una caja de
toma de corriente instalada reglamentariamente. Cerciórese de que la tensión indicada concuerda con la tensión
de la caja de enchufe.
• El cable de alimentación debe estar siempre accesible.
• Introduzca las baterías correctamente.
• El aparato se ha de dejar puesto de modo que no se
tapen los oricios de aireación existentes.
Estos símbolos pueden encontrarse en caso dado en el
aparato, y son para indicar lo siguiente:
Niños y personas débiles
• Para la seguridad de sus niños no deje material de emba-
• Este equipo no está destinado al uso por personas (niños
• Los infantiles deberían ser vigilados, para asegurar que
periódicos, manteles, cortinas, etc.
agua, ni coloque objetos llenos de agua, como jarrones,
sobre el dispositivo.
didas, no deben ponerse sobre el dispositivo.
reparaciones mal hechas pueden generar considerables
peligros para el usuario. En caso de estar deteriorado el
aparato, en especial el cable de conectar a red, ya no se
ha de poner más en servicio el aparato, sino que se hará
que lo repare un especialista. Controle periódicamente el
cable de conexión a red para ver si se ha deteriorado.
con una cualificación similar pueden cambiar un cable
defectuoso por otro similar, para evitar todo tipo de
riesgo.
la red o bien quite las pilas cuando no se vaya a usar el
aparato durante largo tiempo.
ATENCIÓN:
¡No abra el dispositivo! No hay piezas que requieran
mantenimiento dentro del dispositivo.
El símbolo del rayo advierte al usuario que
hay componentes internos del aparato que
pueden tener tensiones peligrosamente altas.
El símbolo con el signo de exclamación
advierte al usuario que hay instrucciones de
manejo y de mantenimiento importantes en
la documentación que va adjunta.
laje (Bolsas de plástico, cartón, poliestireno etc.) a su
alcance.
¡AVISO!
No deje jugar a los niños con la lamina. ¡Existe peligro
de asfixia!
incluidos) que tengan capacidades físicas, sensóricas
o mentales limitadas o una falta de experiencia y/o
conocimientos. Sólo pueden utilizar el equipo si una
persona responsable por su seguridad se les vigile o se
les instruye sobre el uso.
no jueguen con el aparato.
Page 21

Indicación de los elementos de manejo
1 AL1 (función de alarma 1 activada)
2 LINE IN (cable de audio conectado a la toma LINE IN)
3 PM (indicación para “tarde” en el modo de visualización
de 12 horas)
4 Sombra de la lámpara
Botones de control
13
14
15
16
17
18
19
20
21
22
23
24
Reducir el volumen / ajustes/activar/desactivar alarma 1
Encender/apagar la luz tenue
Mostrar año/fecha / seleccionar unidad de temperatura
Emisora anterior preseleccionada
Buscar siguiente emisora de radio / seleccionar horario de verano/horario normal / función "siesta"
Guardar emisora de radio / siguiente emisora predeterminada / mostrar la temperatura
Encender/apagar la luz
Aumentar la intensidad de la luz
Disminuir la intensidad de la luz
Función de repetición de alarma / temporizador de apagado / brillo de la pantalla
Encender/Apagar el dispositivo
Aumentar el volumen / ajustes/activar/desactivar alarma 2
5 FM (modo de radio)
6 Pantalla
7 AL2 (función de alarma 2 activada)
8 Luz tenue
9 Puerto DC 5V USB CHARGING
10 Clavija LINE IN
11 Adaptador de corriente fijo
12 Antena de alambre (FM)
Español
21
Puesta en marcha
• Seleccione un lugar adecuado para el dispositivo, como
una zona seca, uniforme y no deslizante en la que pueda
usarlo fácilmente.
• Retire la película protectora, si hay.
Introducir batería (reserva)
(Batería no incluida con el dispositivo)
En caso de un corte de corriente o si se desenchufa el dispo-
sitivo, con las batería de reserva introducidas, se conservará
la configuración.
1. Abra el compartimiento de baterías de la parte inferior
del dispositivo. Retire del compartimiento el tornillo de la
tapa de la batería con un destornillador Phillips.
2. Introduzca una batería tipo CR2032 de 3 V. Tenga en
cuenta la polaridad correcta (+debe estar encima)!
3. Cierre el compartimiento de las baterías. Fije de nuevo la
tapa del compartimiento de batería con el tornillo.
Si el dispositivo no se usa durante un periodo prolongado de
tiempo, retire la batería del dispositivo para evitar fugas del
ácido de la batería.
AVISO:
No exponga las baterías a calor intenso, como la luz del
sol, el fuego o similares. Riesgo de explosión.
ATENCIÓN:
Las baterías no se deben tirar a la basura doméstica. Por favor lleve las baterías usadas a sitios especiales de recogida
o a su concesionario.
Alimentación
1. Asegúrese de que la tensión de la corriente coincida con
los valores de la etiqueta identificadora.
2. Introduzca el enchufe de corriente en una toma adecuada.
NOTA:
Si no se ha introducido una batería de reserva, todas las
emisoras de radio almacenadas y los ajustes del reloj se
borrarán en caso de corte en el suministro eléctrico.
Encender/apagar la unidad
Pulse el botón
Volumen
Ajuste el volumen con el botón
Brillo de la pantalla (en espera)
Use el botón SNOOZE/SLEEP / DIMMER (22) para ajustar el
brillo de pantalla.
(23) para encender o apagar el equipo.
(24) y (13).
Page 22

22
Español
Función de luz de lectura
1. Pulse el botón
2. Use el botón
(21) para reducir el brillo.
3. Para desactivar la función, pulse de nuevo el botón .
Luz tenue
1. Pulse el botón
rá en diferentes colores.
2. Para desactivar la luz, pulse de nuevo el botón .
Visualización de información diversa
1. Conecte el dispositivo para pasar al modo en espera con
el botón
2. Presionar brevemente el botón (15) de manera repeti-
da. Se visualiza la información en el orden siguiente:
Si el botón no se presiona durante más tiempo, la pantalla
volverá de nuevo a la hora transcurridos 5 segundos.
Cambiar la pantalla
Los siguientes datos pueden mostrarse alternativamente en
pantalla:
1. Para activar esta función, use el botón
el dispositivo en espera.
2. Mantenga pulsado el botón (15) hasta que aparezca
brevemente “ ” en pantalla.
Apagar el cambio: Mantenga pulsado el botón
en modo espera mientras se visualiza la hora del reloj. Aparecerá brevemente “ ” en pantalla.
(19) para activar la función.
(20) para aumentar el brillo. Use el botón
(14) para activar la luz (8). La luz alterna-
(23).
Año Fecha
Hora Temperatura
(23) para poner
de nuevo
Configurar el reloj
1. Use el botón (23) para poner el dispositivo en espera.
2. Mantenga pulsado el botón
ción de año de la pantalla parpadee.
• Ahora puede congurar el año, el mes, el día, el for-
mato de indicación de hora (12 Hr /24 Hr), las horas y
los minutos con los botones
• En cada caso, conrme la entrada con el botón .
La indicación que se configurará en cada momento
parpadea en la pantalla.
NOTA:
• La entrada se guarda automáticamente en aproximadamente 30 segundos cuando no se pulse ningún
botón.
• Aparecerá lo siguiente con la pantalla de 12 horas:
PM = Tarde
Cambiar a horario de verano
1. Use el botón
2. Mantenga pulsado el botón (17) para cambiar entre
horario de verano y normal. El horario más adelantado es
el horario de verano.
(23) para poner el dispositivo en espera.
(18) hasta que la indica-
(17) y (15).
Regulación de la emisora
1. Use los botones (17) y (15) para sintonizar la emisora deseada. Si mantiene pulsado uno de los botones,
el dispositivo buscará la siguiente emisora de radio. La
pantalla mostrará la frecuencia sintonizada.
2. Si la recepción es demasiada débil, cambie la posición
de la antena de cable, para mejorar la recepción.
Cambiar la indicación de temperatura entre ºC (Celsius) y
ºF (Fahrenheit)
1. Conecte el dispositivo a modo en espera con el botón
(23).
2. Pulse el botón (18) para mostrar la temperatura.
3. Mientras se visualiza la temperatura, pulse el botón
durante 3 segundos para cambiar entre °C y °F.
Toma de carga USB (9)
Podrá cargar su Smartphone a través de esta toma. Utilice el
cable USB de su Smartphone para realizar la conexión.
NOTA:
• Debido a los diferentes tipos de Smartphone disponibles en la actualidad y sus diferentes capacidades de
carga, la duración del proceso de carga dependerá del
Smartphone y sus condiciones de funcionamiento.
• La reproducción de cheros de audio a través de este
conector no sera posible.
Emisoras preestablecidas
Puede memorizar hasta 10 emisoras de radio.
1. Busque una emisora como se describe en “Regulación
de la emisora”.
2. Mantenga pulsado el botón
cación de memoria parpadea en la pantalla (p.ej., P02).
3. Use los botones
memoria de emisora deseada.
4. Pulse el botón
Sintonizar las emisoras preestablecidas
Pulse el botón
radio para explorar las memorias de emisora preestablecida.
(17) y (15) para seleccionar la
para memorizar la emisora.
/ (18/16) repetidametne en modo
(18). El indicador de ubi-
Función de llamada
Regulación de la hora de despertar (en espera)
Puede establecer dos horas de alarma. Hay cuatro opciones diferentes de alarma disponibles: Radio + luz / Radio /
Timbre +luz / Timbre. Proceda del modo siguiente:
Page 23

1. Pulse el botón (13). Se mostrará la hora de alarma
establecida actualmente.
2. Mantenga pulsado el botón durante aprox. 3 segun-
dos cuando se muestre la hora de alarma. La hora de la
alarma establecida actualmente comenzará a parpadear.
3. Use los botones (17) y (15) para configurar.
4. Pulse el botón para confirmar. Los minutos comenzarán a parpadear.
5. Use los botones
6. Seleccione los días en que quiera que suene la alarma.
Puede realizar las selecciones siguientes:
• 1-5 = Lunes a viernes
• 1-7 = Lunes a domingo
• 6-7 = Sábado y domingo
• 1-1 = Día de la semana
6a. Cuando seleccione la configuración 1-1:
1. Pulse el botón
na.
2. Realice la selección con los botones
Lunes,
2 = Martes, 3 = Miércoles, 4 = Jueves, 5 = Viernes,
6 = Sábado, 7 = Domingo)
7. Pulse el botón
que quiera despertarse. Puede seleccionar entre:
• “bu” (timbre):
Sonará un timbre cuando se llegue a la hora de
alarma. El intervalo del timbre aumenta, de lento a
rápido. El volumen no puede ajustarse. La luz tenue (8)
se activa automáticamente.
• Mostrar frecuencia de radio:
En cuanto se llegue a la hora de alarma, la radio se
enciende. Se reproduce la última emisora establecida. El volumen aumentará lentamente hasta el volumen seleccionado. El volumen no puede ajustarse.
La luz tenue (8) se activa automáticamente.
NOTA:
• La función de alarma se apaga automáticamente
pasados 30 minutos hasta el día siguiente.
• Si hay un cable de audio conectado a la toma LINE
IN, el dispositivo le despertará con el timbre incluso
si se ha seleccionado “radio”.
7a. Si quiere despertar con una emisora de radio, seleccione
el volumen máximo de la alarma usando los botones
y .
8. Pulse el botón para confirmar. A continuación, seleccione la intensidad de la luz ( ) para la función de alarma.
Al seleccionar “ “ se cancela esta función.
NOTE:
La luz dentro de la pantalla de la lámpara (4) se encenderá 30 minutos antes de la hora de alarma preestablecida. El brillo aumentará gradualmente, comenzando
por el nivel de intensidad ajustado previamente.
y para configurar.
para seleccionar el día de la sema-
y . (1 =
para confirmar. Seleccione la forma en
Español
9. Para terminar, pulse otra vez el botón . La primera
alarma estará activada.
Para establecer la segunda hora de alarma, repita los pasos
anteriores con el botón
NOTE:
• Si se ha activado la hora de la alarma, AL 1 (1) o AL 2 (7)
aparecerá en la pantalla.
• Para visualizar brevemente las horas de alarma programadas, pulse el botón
Parada de la señal de llamada
Pulse el botón
Espertador automático en intervalo
La función regulada del despertar automático se puede
apagar para aprox. 9 minutos con el botón SNOOZE/SLEEP/
DIMMER (22).
NOTA:
AL 1 o AL 2 parpadearán en la pantalla si se ha activado la
función de repetición de alarma.
Desactivar la función de alarma
1. Cambie el dispositivo al modo en espera con el botón
(23).
2. Para desactivar la función de alarma, mantenga pulsado
el botón
rán.
(13) o 24). AL 1 (1) o AL 2 (7) desaparece-
(24).
y respectivamente.
(23) para detener la alarma.
23
Desconexión retrasada
Puede usar esta función para programar el apagado en funcionamiento de radio. La unidad se apaga automáticamente
cuando se llega a la hora seleccionada.
• Seleccione la hora tras la que se apagará la unidad
pulsando repetidamente el botón SNOOZE/SLEEP /
DIMMER (22). Puede realizar las selecciones siguientes:
90, 60, 30, y 15 minutos. La posición OFF (apagado)
desactiva esta función.
• Con el botón
(23) se puede desactivar esta function.
Alarma de siesta
La alarma de siesta puede usarse, por ejemplo, para una
siesta corta. La función solamente actúa en espera.
• Pulse repetidamente el botón
el tiempo tras el que el dispositivo sonará. Seleccione
entre 90 y 10 minutos o OFF (apagado) en pasos de
10 minutos.
• Cuando haya transcurrido el tiempo seleccionado, sonará
un pitido cada vez más rápido. Pulse el botón (23) para
apagar el pitido.
(17) para seleccionar
Page 24

24
Español
Clavija AUX IN
(Cable no incluido)
1. Si fuera necesario, emplee un adaptador apropiado (no
incluido con el producto).
Conecte el dispositivo externo del modo siguiente:
• Con una toma estéreo de 3,5 mm a la toma LINE IN
(10).
2. Encienda el dispositivo utilizando el botón
IN aparece en la pantalla.
3. Inicie la reproducción en la fuente de audio. Escuche la
reproducción por el altavoz. Puede ajustar el volumen
usando los botones / (24/13).
4. Para otras operaciones, consulte el manual del usuario
de la fuente de audio externa.
NOTA:
Ponga el volumen del dispositivo externo a un nivel cómodo en la medida de lo posible.
Detener la función AUX IN
Desconecte el cable de la toma AUX IN. El dispositivo volverá al modo de radio.
(23). LINE
Limpieza
ATENCIÓN:
No sumerja el aparato en agua.
• Antes de cada limpieza saque el enchufe de la caja de
enchufe.
• Debe limpiar el aparato con un paño poco humedecido
y sin detergentes.
Solución de problemas
Problema Causa Solución
La unidad no
puede usarse
La alarma suena
con timbre
aunque se ha
seleccionado
"radio"
La unidad está
bloqueada y “se
cuelga”
Cable de audio
conectado a la
toma LINE IN
Desenchufe de la red
durante unos 5 segundos. Luego encienda
de nuevo el aparato.
Desconecte el cable
de audio de la toma
AUX IN
Datos técnicos
Modelo: ..........................................................................MRC 4147 L
Suministro de tensión: .................................100-240 V~ 50/60 Hz
Consumo de energía: ................................................................7 W
Pila de reserva: ...............................................................3 V, CR2032
Clase de protección: ........................................................................II
Peso neto: ................................................................ aprox. 0,502 kg
Componente de radio:
Gama de frecuencias: .........................FM 87,5 ~ 108,0 MHz
El derecho de realizar modificaciones técnicas y de diseño en
el curso del desarrollo continuo del producto está reservado.
Este aparato se ha examinado según las normativas actuales
y vigentes de la Comunidad Europea, como p.ej. compatibilidad electromagnética y directiva de baja tensión y se ha
construido según las más nuevas especificaciones en razón
de la seguridad.
Eliminación
Significado del símbolo “Cubo de basura”
Proteja nuestro medio ambiente, aparatos eléctricos no
forman parte de la basura doméstica.
Haga uso de los centros de recogida previstos para la eliminación de aparatos eléctricos y entregue allí sus aparatos
eléctricos que no vaya a utilizar más.
Ayudará en evitar las potenciales consecuencias, a causa de
una erronéa eliminación de desechos, para el medio ambiente y la salud humana.
Con ello, contribuirá a la recuperación, al reciclado y a otras
formas de reutilización de los aparatos viejos eléctricos y
electrónicos.
La información cómo se debe eliminar los aparatos, se obtiene en su ayuntamiento o su administración municipal.
Page 25

Istruzioni per l’uso
Grazie per aver scelto il nostro prodotto. Vi auguriamo un
buon utilizzo del dispositivo.
Simboli per questo manuale di istruzioni per l’uso
Le indicazioni importanti per la propria sicurezza sono indicati
appropriatamente. Osservare assolutamente queste indicazioni, per evitare incidenti e danni all’apparecchio:
AVVISO:
Previene i rischi della propria salute ed indica possibili rischi
di ferite.
ATTENZIONE:
Indica possibili pericoli per l’apparecchio o altri oggetti.
NOTA: Mette in risalto consigli ed informazioni.
Norme di sicurezza generali
Prima di mettere in funzione questo apparecchio, leggere
molto attentamente le istruzioni per l’uso e conservarle con
cura unitamente al certificato di garanzia, allo scontrino e, se
possibile, alla scatola di cartone con la confezione interna. Se
passate l‘apparecchio a terzi, consegnate anche le istruzioni
per l‘uso.
• Per evitare il rischio di incendio o di scosse, non si deve
mai tenere l’apparecchio sotto la pioggia o in ambienti
umidi. Quindi non usare l’apparecchio nelle immediate
vicinanze di acqua, per esempio in prossimità di una
vasca, di una piscina o in una cantina umida.
• Non usare il dispositivo in ambienti estremamente caldi,
freddi, impolverati o umidi.
• Usare il dispositivo solo per uso private e secondo lo scopo previsto. Questo dispositivo non è previsto per scopo
commerciale.
• Assicurarsi che il cavo di corrente non sia piegato, incastrato o messo a contatto con fonti di calore.
• Assicurarsi che il cavo di corrente non rappresenti un
pericolo di inciampo.
• L’adattatore di corrente è adatto solo per stanze asciutte.
• Non toccare l’adattatore di corrente o cavo con mani
bagnate.
• Collegare l’apparecchio esclusivamente ad una presa
installata a norma. Fare attenzione a che la tensione
indicata corrisponda alla tensione della presa.
• Il cavo di corrente deve essere sempre facilmente accessibile.
• Inserire sempre correttamente le batterie.
• Collocare l’apparecchio in modo che le aperture per
l’aerazione esistenti non vengano coperte.
• Non coprire le aperture di ventilazione con oggetti come
giornali, strofinacci, tende, ecc.
Italiano
• Non esporre il dispositivo a perdite o schizzi d’acqua e
non mettere recipiente con liquidi, ad es. vasi con fiori,
sul dispositivo.
• Fonti di accensione esposte come candele che bruciano
non devono essere messe sul dispositivo.
• Non togliere mai la protezione dell’apparecchio. Riparazioni non a regola d’arte possono causare notevoli
pericoli per l’utente. Se l’apparecchio presenta danni,
soprattutto nella zona del cavo di collegamento, non
metterlo più in funzione, ma farlo riparare prima da un
esperto. Esaminare regolarmente il cavo di collegamento
alla rete per verificare che non ci siano danni.
• Un cavo di collegamento difettoso può essere sostituito
con un cavo equivalente solo dal produttore, dal nostro
servizio assistenza o da persone similmente qualificate, al
fine di evitare pericoli.
• Se l’apparecchio non viene usato per un periodo di tempo prolungato, togliere il blocchetto alimentatore dalla
presa ovvero estrarre le batterie.
CAUTION:
Non aprire il dispositivo! Non ci sono parti aggiustabili da
parte dell’utente all’interno del dispositivo.
Questi simboli possono trovarsi eventualmente sull’apparecchio e rimandano ai seguenti elementi:
Il simbolo del lampo fa presente all’utente la
presenza di pezzi all’interno dell’apparecchio
che possono produrre alte tensioni pericolose.
Il simbolo con il punto esclamativo fa
presente all’utente la presenza di importanti
avvertenze per l’uso e la manutenzione nei
fogli di accompagnamento dell’apparecchio.
Bambini e persone fragili
• Per sicurezza tenere l’imballaggio (sacchetto di plastica,
scatola, polistirolo, ecc.) fuori dalla portata dei bambini.
AVVISO!
Non lasciar giocare i bambini piccoli con la pellicola.
Pericolo di soffocamento!
• Quest’apparecchio non è destinato all’uso da parte
di persone (compresi i bambini) con capacità fisiche,
psichiche, sensorie o intellettive limitate, o da persone
sprovviste della necessaria esperienza e conoscenza, ad
eccezione del fatto che ciò avvenga sotto la sorveglianza
di una persona responsabile ed addetta alla loro sicurezza, o che ricevano da questa persona istruzioni su come
debba essere utilizzato l’apparecchio.
• Evitare che i bambini giochino con l’apparecchio.
25
Page 26

26
Italiano
Elementi di comando
1 AL1 (funzione sveglia 1 attivata)
2 LINE IN (cavo audio connesso alla presa LINE IN)
3 PM (indica “pomeriggio” in modalità modalità di visualiz-
zazione 12 ore)
4 Ombra della lampada
Tasti di controllo
13
14
15
16
17
18
19
20
21
22
23
24
Reduci volume / imposta/attiva/disattiva allarme 1
Attiva/disattiva luce d’atmosfera
Mostra anno/data / seleziona unità di temperatura
Preimpostazione radio precedente
Cerca stazione radio successiva / seleziona ora legale/ora normale / funzione “pisolino”
Salva stazione radio / preimpostazione radio successiva / mostra la temperatura
Attiva/disattiva luce
Aumenta intensità luminosa
Diminuisci intensità luminosa
Funzione Snooze / timer sleep / mostra luminosità
Attiva/disattiva dispositivo
Aumenta volume / imposta/attiva/disattiva sveglia 2
5 FM (modalità radio)
6 Display
7 AL2 (funzione sveglia 2 attivata)
8 Luce d’atmosfera
9 Porta DC 5V CHARGING USB
10 Porta LINE IN
11 Adattatore di corrente fisso
12 Antenna di corrente (FM)
Messa in esercizio
• Scegliere un luogo idoneo per il dispositivo, cioè un’area
asciutta, regolare e non scivolosa in cui si può facilmente
utilizzare il dispositivo.
• Togliere la pellicola protettiva, se presente.
Come inserire le batteria (Backup)
(La batteria non sono incluse nel dispositivo.)
In caso di interruzione di corrente o se il dispositivo viene
scollegato, con le batteria di backup inserite, le impostazioni
saranno mantenute.
1. Aprire il vano pile sopra il dispositivo. Rimuovere la vite
del coperchio del vano batteria con un giravite Philips.
2. Inserire una batteria di tipo CR2032, 3 V. Far attenzione a
rispettare la corretta polarità (+ deve trovarsi in alto)!
3. Chiudere il vano della batteria. Bloccare nuovamente il
coperchio del vano batteria con la vite.
Se il dispositivo non è utilizzato per lungo tempo, rimuovere
la batteria dal dispositivo per evitare perdite dell’acido della
batteria.
AVVISO:
Non esporre le batterie a nessuna fonte di calore intense
come ad esempio luce solare diretta, fuoco o simili. C’è
rischio di esplosione!
ATTENZIONE:
Non gettare le batterie nei rifiuti domestici. Buttare le
batterie usate negli appositi contenitori o restituirle al
negoziante.
Alimentazione
1. Accertarsi che il voltaggio di rete corrisponda con le cifre
presenti sulla targhetta del dispositivo.
2. Inserire la spina di rete in una presa a tre spine correttamente installata.
NOTA:
Se non è stata inserita alcuna batteria di backup, tutte le
stazioni radio salvate e le impostazioni dell’orologio saranno cancellate nel caso di interruzioni di corrente.
Accensione/spegnimento dell’unità
Premere il tasto
Volume
Regolare il volume con i tasti
Luminosità del display (in standby)
Utilizzare il tasto SNOOZE/SLEEP / DIMMER (22) per regolare
la luminosità del display.
Lettura della funzione luminosa
1. Premere il tasto
2. Usare il tasto (20) per aumentare la luminosità. Usare il
tasto (21) per ridurre la luminosità.
3. Per disattivare la funzione, premere di nuovo il tasto .
Luce d’atmosfera
1. Premere il tasto
La luce alternerà diversi colori.
(23) per accendere o spegnere l’unità.
(24) e (13).
(19) per attivare la funzione.
(14) per attivare la luce d’atmosfera (8).
Page 27

2. Per disattivare la luce d’atmosfera, premere di nuovo il
tasto .
Visualizzazione di informazioni diverse
1. Passare il dispositivo a standby usando il tasto
2. Premere per breve tempo e ripetutamente il tasto
Le seguenti informazioni sono visualizzate in successivo:
Anno Data
Se il tasto non è più premuto, il display tornerà all’ora dopo
circa 5 secondi.
Finestre a scorrimento sul display
Il display può visualizzare alternativamente:
Ora Temperatura
1. Per attivare questa funzione, utilizzare il tasto
portare l’apparecchio in standby.
2. Tenere premuto il tasto (15), finché il display non visualizza brevemente “ ”.
Spegnimento scorrimento automatico: Premere e tenere
di nuovo premuto il tasto
dell’orologio visualizzato. Il display visualizza brevemente
“ ”.
Sul display la temperatura passa da gradi °C (Celsius) a °F
(Fahrenheit) e viceversa
1. Passare il dispositivo in standby usando il tasto
2. Premere il tasto (18) per visualizzare la temperatura.
3. Quando la temperature è visualizzata, premere il tasto
per circa 3 secondi per selezionare °C e °F.
Presa di ricarica USB (9)
È possible caricare lo Smartphone tramite questo spinotto.
Utilizzare il cavo USB dello Smartphone per eseguire il collegamento.
NOTA:
• A causa dei diversi tipi di Smartphone offerti attualmente e alle loro diverse capacità di ricarica, la durata
di carica dipende dallo Smartphone utilizzato e dalle
condizioni di funzionamento.
• Non è possible effettuare la riproduzione di le audio
con questo connettore.
se in standby e con l’orario
(23).
(15).
(23) per
(23).
Impostazione dell’orario
1. Utilizzare il tasto (23) per portare l’apparecchio in standby.
2. Tenere premuto il tasto
lampeggia sul display.
• Ora è possibile impostare l’anno, il mese, il giorno, il
formato di visualizzazione dell’orario (12Hr/24Hr), le
ore e i minuti con i tasti
(18) finché l’indicazione
(17) e (15).
Italiano
• In ogni caso, confermare l’immissione con il tasto
. L’indicazione corrente da impostare lampeggia
sul display.
NOTA:
• L’immissione viene memorizzata automaticamente
entro 30 secondi se non viene premuto alcun tasto.
• Quanto segue comparirà con display a 12 ore:
PM = pomeriggio
Passaggio all’ora legale
1. Utilizzare il tasto
by.
2. Tenere premuto il tasto (17) per impostare l’orario
legale o l’ora normale. L’orario più “tardo” è quello legale.
(23) per portare l’apparecchio in stand-
27
Scelta del trasmettitore
1. Utilizzare i tasti (17) e (15) per sintonizzare la
stazione desiderata, Se si tiene premuto uno dei tasti,
l’apparecchio ricerca la stazione radio successiva. Il
display mostra la frequenza sintonizzata.
2. Se la ricezione è troppo debole, per migliorarla cambiare
la posizione dell‘antenna a filo.
Stazioni preselezionate
È possibile preselezionare max 10 stazioni radio.
1. Cercare una stazione come indicato in “Scelta del trasmettitore”.
2. Tenere premuto il tasto
lezionata lampeggia sul display (e.g. P02).
3. Utilizzare i tasti
memoria stazione preselezionata desiderata.
4. Premere il tasto
Sintonizzazione stazione preimpostata
Premere il tasto
radio per effettuare la scansione memoria stazione preselezionata.
/ (18/16) ripetutamente nel modo
(18). La spia ubicazione prese-
(17) e (15) per selezionare la
per preselezionare la stazione.
Funzione sveglia
Impostazione della sveglia (in standby)
È possibile impostare due orari della sveglia. Sono disponibili
4 diverse opzioni di allarme: radio + luce / radio / cicalino +
luce / cicalino. Procedere come descritto di seguito:
1. Premere il tasto
impostato attualmente.
2. Tenere premuto il tasto per circa 3 secondi quando
viene visualizzato l’orario allarme. L’orario dell’allarme
attualmente selezionato comincia a lampeggiare.
3. Usare i tasti (17) e (15) per eseguire l’impostazione.
(13). Viene visualizzato l’orario allarme
Page 28

28
Italiano
4. Premere il tasto per confermare. I minuti iniziano a
lampeggiare.
5. Usare i tasti
6. Ora selezionare i giorni in cui si desidera far suonare la
sveglia. È possibile effettuare le seguenti selezioni:
• 1-5 = dal lunedì al venerdì
• 1-7 = dal lunedì alla domenica
• 6-7 = sabato e domenica
• 1-1 = giorno della settimana
6a. Se è stata selezionata l’impostazione 1-1:
1. Premere il tasto
settimana.
2. Effettuare la selezione con i tasti
(1 = lunedì, 2 = martedì 3 = mercoledì, 4 = giovedì,
5 = venerdì, 6 = sabato, 7 = domenica)
7. Premere il tasto
desidera essere svegliati. Selezionare da:
• “bu” (cicalino):
Si sente un cicalino quando viene raggiunto l’orario
allarme. L’intervallo cicalino aumenta da lento a
rapido. Il volume non può essere regolato. La luce
d’atmosfera (8) si attiva automaticamente.
• Viene visualizzata la frequenza radio:
Non appena viene visualizzato l’orario allarme sele-
zionato, la radio si accende. Viene riprodotta l’ultima
stazione impostata. Il volume aumenta lentamente
no al volume impostato. Il volume non può essere
regolato. La luce d’atmosfera (8) si attiva automaticamente.
NOTA:
• La funzione allarme si disattiva automaticamente
dopo 30 minuti fino al giorno successivo.
• Se si college un cavo audio al jack LINE IN, il dispositivo vi sveglierà con il buzzer, anche se è stata
selezionata “radio”.
7a. Se si desidera essere svegliati da una stazione radio,
selezionare il volume max allarme con i tasti
8. Premere il tasto per confermare. Selezionare poi l’intensità luminosa ( ) per la funzione sveglia. Selezionando
“ ” si annulla questa funzione.
NOTA:
La luce all’interno della forma della lampada (4) si attiverà 30 minuti prima dell’orario della sveglia preimpostato. La luminosità aumenterà gradualmente, cominciando col livello di intensità precedentemente impostato.
9. Infine, premere nuovamente il tasto
il primo orario allarme.
Per impostare il secondo orario allarme, ripeterei punti precedent con il tasto
e per eseguire l’impostazione.
per selezionare il giorno della
e .
per confermare. Selezionare come si
e .
. Viene ora attivato
(24).
NOTA:
• Se l’orario della sveglia è stato attivato, AL1 (1) o AL2 (7)
comparirà sul display.
• Per visualizzare brevemente gli orari di allarme impostati, premere il tasto
Spegnere il segnale della sveglia
Premere il tasto
Allarme ad intervalli
L’allarme inserito automaticamente si può spegnere con il
tasto SNOOZE/SLEEP / DIMMER (22) per ca. 9 minuti.
NOTA:
AL1 o AL2 lampeggeranno sul display se la funzione snooze è stata disattivata.
Disattivazione della funzione sveglia
1. Passare il dispositivo in standby con il tasto
2. Per disattivare la funzione allarme, tenere premuto il tasto
(13) o (24). AL1 (1) o AL2 (7) scompariranno.
e .
(23) per interrompere la sveglia.
(23).
Spegnimento a tempo
È possibile usare la funzione per spegnimento ritardato con
funzione radio. L’unità si spegne automaticamente al raggiun-
gimento dellìorario selezionato.
• Selezionare l’orario dopo il quale l’unità si spegne
premendo ripetutamente il tasto SNOOZE/SLEEP /
DIMMER (22). È possibile effettuare le seguenti selezioni:
90, 60, 30 e 15 minuti. L’impostazione OFF (spegnimento)
disattiva questa funzione.
• Con il tasto
(23) si può annullare questa funzione.
Allarme “sonnellino”
L’allarme “sonnellino” può essere utilizzato per un breve
sonnellino. Questa funzione è attiva soltanto in standby.
• Premere ripetutamente il tasto
l’orario dopo il quale l’apparecchio deve attivare il beep.
Selezionare da 90 a 10 minuti oppure OFF (spegnimento)
a intervalli di 10 minuti.
• Al raggiungimento dell’orario selezionato, si ode un
rapido beep che aumenta d’intensità. Utilizzare il tasto
(23) per disattivare il beep.
(17) per selezionare
Jack AUX IN
(cavo non incluso)
1. All’occorrenza, utilizzare un adattatore adatto (non inclu-
so).
Page 29

Connettere il dispositivo esterno come di seguito:
• Collegare un cavo 3,5 stereo alla presa LINE IN (10).
2. Attivare il dispositivo usando il tasto (23). LINE IN
compare sul display.
3. Avviare la riproduzione della fonte audio. Ascoltare la
riproduzione audio tramite l’altoparlante. Potete regolare
il volume usando i tasti / (24/13).
4. Per la procedura fate riferimento al manual dell’utente
della fonte audio esterna.
NOTA:
Se possibile, regolare il volume dell’unità esterna ad un
livello comodo.
Interrompere il funzionamento AUX IN
Scollegare il cavo dal jack AUX IN. Il dispositivo tornerà in
modalità radio.
Pulizia
ATTENZIONE:
Non immergete l’apparecchio in acqua.
• Prima di pulire estraete la spina.
• Pulite l’apparecchio con un panno leggermente inumidi-
to senza additivi.
Risoluzione di problemi
Italiano
Questo apparecchio è stato controllato sulla base di tutte le
direttive CE attuali in vigore in questo settore, quali per esempio la normativa in materia di compatibilità elettromagnetica
e la direttiva in materia di bassa tensione, ed è stato costruito
conformemente alle norme di sicurezza più moderne.
29
Smaltimento
Significato del simbolo “Eliminazione”
Salvaguardare l’ambiente, gli elettrodomestici non vanno
eliminati come rifiuti domestici.
Per l’eliminazione degli elettrodomestici, fare uso dei posti di
raccolta previsti per questo tipo e porre quegli elettrodomestici che non sono più in uso.
Si contribuisce così ad evitare un effetto potenziale sull’
ambiente e sulla salute, dovuto magari ad una eliminazione
sbagliata.
Questo signica un contributo personale alla riutilizzazione, al
riciclaggio e altre forme di utilizzazione di elettrodomestici ed
apparecchi elettronici usati.
Si possono trovare le corrispondenti informazioni sugli appositi luoghi di raccolta, nelle amministrazioni dei comuni.
Problema Causa Soluzione
L'unità non può
essere utilizzata
La sveglia suona con cicalino
sebbene sia
stato selezionato “radio”
L'unità è bloccata e
“resta sospesa”
Cavo audio connesso al jack LINE
IN
Tirare la spina per
circa 5 secondi. Poi
accendere di nuovo il
dispositivo.
Scollegare il cavo
audio dal jack LINE IN
Dati tecnici
Modello: .........................................................................MRC 4147 L
Alimentazione rete: ......................................100-240 V~ 50/60 Hz
Consumo di energia: ..................................................................7 W
Batterie di riserva: ..........................................................3 V, CR2032
Classe di protezione: ....................................................................... II
Peso netto: .....................................................................ca. 0, 502 kg
Componente della radio:
Gamma di frequenza: .........................FM 87,5 ~ 108,0 MHz
Si riserva il diritto di apportare modifiche tecniche e di design
nel corso dello sviluppo del prodotto.
Page 30

30
English
Instruction Manual
Thank you for choosing our product. We hope you will enjoy
using the appliance.
Symbols in these Instructions for Use
Important information for your safety is specially marked. It is
essential to comply with these instructions in order to avoid
accidents and prevent damage to the machine:
WARNING:
This warns you of dangers to your health and indicates possible injury risks.
CAUTION:
This refers to possible hazards to the machine or other
objects.
NOTE: This highlights tips and information.
General Safety Instructions
Read the operating instructions carefully before putting the
appliance into operation and keep the instructions including
the warranty, the receipt and, if possible, the box with the internal packing. If you give this device to other people, please
also pass on the operating instructions.
• To avoid the risk of re or an electric shock, you should
not expose the device to rain or moisture. Consequently,
do not use the device in the immediate vicinity of water
- for example near a bath tub, a swimming pool or in a
damp cellar.
• Do not use the device in extremely hot, cold, dusty or
damp places.
• Only use the device for private use and the intended
purpose. This device is not intended for commercial use.
• Ensure that the power cord is not kinked, trapped or
brought into contact with heat sources.
• Ensure that the power cord does not present a tripping
hazard.
• The power adapter is only suitable for use in dry rooms.
• Never touch the power adapter or cable with wet hands.
• Only connect the device at a properly installed plug
socket. Pay attention that the specified voltage corresponds to the voltage of the plug socket.
• The power cord must always be easily accessible.
• Always insert the batteries correctly.
• Assemble the device in such a way that the available
ventilation openings are not covered.
• Do not cover up any ventilation openings with objects
such as newspapers, tablecloths, curtains, etc.
• This appliance shall not be exposed to dripping or
splashing water and that no object filled with liquids such
as vases shall be placed on apparatus.
• Exposed ignition sources such as burning candles may
not be placed onto the device.
• Never open the housing of the device. Incorrect repairs
can constitute a considerable risk for the user. Should the
device become damaged, in particular the mains supply
cable, do not operate the device any longer, but rather
have it repaired by an expert. Check the mains supply
cable regularly for damage.
• For safety reasons a broken or damaged mains lead may
only be replaced by an equivalent lead from the manufacturer, our customer service department or a similary
qualified person.
• If the device is not used for a longer period, remove the
plug connector from the plug socket or take out the batteries.
CAUTION:
Do not open the device! There are no serviceable parts
inside the device.
These symbols may be found on the machine and are
intended to indicate the following:
The lightning symbol should advise the user
of parts in the inside of the device which carry
dangerously high voltage levels.
The symbol with an exclamation mark should
advise the user of important operation or
maintenance instructions in the accompanying documentation.
Children and Frail Individuals
• In order to ensure your children’s safety, please keep all
packaging (plastic bags, boxes, polystyrene etc.) out of
their reach.
WARNING!
Do not allow small children to play with the foil. There is
a danger of suffocation!
• This device is not intended to be used by individuals
(including children) who have restricted physical, sensory
or mental abilities and/or insufficient knowledge and/or
experience, unless they are supervised by an individual
who is responsible for their safety or have received
instructions on how to use the device.
• Children should be supervised at all times in order to
ensure that they do not play with the device.
Overview of the Components
1 AL1 (alarm function 1 activated)
2 LINE IN (audio cable connected to LINE IN jack)
3 PM (indication for “afternoon” in 12-hour display mode)
4 Lamp shade
5 FM (radio mode)
Page 31

6 Display
7 AL2 (alarm function 2 activated)
8 Mood light
Control buttons
13
14
15
16
17
18
19
20
21
22
23
24
Reduce volume / set/activate/deactivate alarm 1
Turn mood light on/off
Display year/date / select temperature unit
Previous radio preset
Search next radio station / select summer time/normal time / “nap” function
Save radio station / next radio preset / display the temperature
Turn the light on/off
Increase light intensity
Decrease light intensity
Snooze function / sleep timer / display brightness
Turn device on/off
Increase volume / set/activate/deactivate alarm 2
9 DC 5V USB CHARGING port
10 LINE IN jack
11 Fixed power adapter
12 Wire antenna (FM)
English
31
Putting into function
• Select a proper place for the device such as a dry, and
even non slip area where you can easily operate the
device.
• Remove the protective lm, if any.
Inserting the Battery (Backup)
(Battery is not included with the device)
In case of a power cut or if the device is unplugged, with
backup battery inserted, the settings will be kept.
1. Open the battery compartment at the bottom. Remove
for this the screw of the battery compartment lid with a
Phillips screwdriver.
2. Insert one battery of the type CR2032, 3 V. Mind the correct polarity (+ must be at the top)!
3. Close the battery case. Secure the battery compartment
lid again with the screw.
If the device is not used for an extended period of time,
remove the Battery from the device to avoid any leaking of
battery acid.
WARNING:
The batteries shall not be exposed to excessive heat such
as sunshine, fire or the like. Danger of explosion!
CAUTION:
Batteries are not to be disposed of together with domestic
wastes. Dispose of the used batteries at the relevant collection bin or at your dealer’s.
Power supply
1. Make sure the grid voltage corresponds to the figures on
the rating plate.
2. Insert the grid plug into a properly installed power socket.
NOTE:
If no backup battery has been inserted, all stored radio
stations and clock settings will be deleted in the event of
power interruptions.
Switching the Unit On/Off
Press the
Volume
Adjust the volume with the
Display Brightness (in standby)
Use the SNOOZE/SLEEP / DIMMER button (22) to adjust the
display brightness.
Reading light function
1. Press the
2. Use the
3. In order to turn off the function, press the
Mood light
1. Press the
2. In order to turn off the mood light, press the button
button (23) to switch the unit on or off.
(24) and (13).
button (19) to turn on the function.
button (20) to increase the brightness. Use the
button (21) to reduce the brightness.
button
again.
button (14) to turn on the mood light (8). The
light will alternate in different colors.
again.
Page 32

32
English
Displaying diverse information
1. Switch the device to standby using the
2. Briefly press the
information is displayed in succession:
If the button is no longer pressed, the display will switch back
to time after about 5 seconds.
Toggling the display
The following can be shown alternatingly on the display:
1. In order to activate this function, use the
switch the device to standby.
2. Keep the
briefly on the display.
Switch off toggling: Press and hold the
when in standby and with the clock time displayed. “ ”
appears briefly on the display.
Toggle temperature display between °C (Celsius) and °F
(Fahrenheit)
1. Switch the device to standby using the
2. Press the button (18) to display the temperature.
3. While the temperature is displayed, press the
for about 3 seconds to switch between °C and °F.
USB Charging Socket (9)
You can charge your Smartphone through this jack. Use the
USB cable of your Smartphone for the connection.
NOTE:
• Due to the different Smartphone types that are offered
today, and their different charging capacities, the loading duration is dependent on the Smartphone used
and its operating condition.
• A playback of audio-les through this connector is not
possible.
button (15) repeatedly. The following
Year Date
Time Temperature
button (15) pressed, until “ ” appears
button (23).
button (23) to
button again
button (23).
button
Setting the Clock
1. Use the button (23) to switch the device to standby.
2. Hold the
tion on the display flashes.
• Now you can set the year, the month, the day, the
• In each case, conrm the input with the button.
NOTE:
• The input is stored automatically within approximately
30 seconds when no button is pressed.
• The following will appear with the 12 hour display:
PM = Afternoon
button (18) depressed until the year indica-
time display format (12Hr/24Hr), the hours, and the
minutes with the buttons
The current indication to be set flashes on the display.
(17) and (15).
Switching to Summer Time
1. Use the
2. Keep the button
button (23) to switch the device to standby.
(17) depressed to switch between
summer time and normal time. The later time is summer
time.
Radio station tuning
1. Use the (17) and (15) buttons to tune the desired
station. If you keep one of the buttons pressed, the de-
vice searches for the next radio station. The display shows
the tuned frequency.
2. If reception is too weak, change the position of the dipole
antenna in order to improve the reception.
Preset stations
You can preset up to 10 radio stations.
1. Search for a station as described under “Radio station
tuning”.
2. Keep the
indicator flashes on the display (e.g. P02).
3. Use the
preset station memory.
4. Press the
Tune into the preset station
Press the
scan through the preset station memory.
button (18) pressed. The preset location
(17) and (15) buttons to select the desired
button to preset the station.
/ button (18/16) repeatedly in radio mode to
Alarm function
Setting of the Alarm (in standby)
You can set two alarm times. 4 different alarm options are
available: Radio + Light / Radio / Buzzer + Light / Buzzer.
Proceed as follows:
1. Press the
shown.
2. Keep the button pressed for approx. 3 seconds when
the alarm time is displayed. The hours of the currently set
alarm time start to flash.
3. Use the buttons (17) and (15) for setting.
4. Press the button for confirmation. The minutes start to
flash.
5. Use the buttons
6. Now select the days you want the alarm to sound. The
following selections can be made:
• 1-5 = Monday to Friday
• 1-7 = Monday to Sunday
• 6-7 = Saturday and Sunday
• 1-1 = Weekday
6a. When you have selected the setting 1-1:
1. Press the
2. Make your selection with the buttons
button (13). The currently set alarm time is
and for setting.
button to select the weekday.
and .
(1 = Monday, 2 = Tuesday, 3 = Wednesday, 4 =
Thursday, 5 = Friday, 6 = Saturday, 7 = Sunday)
Page 33

7. Press the button to confirm. Then select how you want
to be awakened. Select from:
• “bu” (buzzer):
A buzzer sounds when the alarm time is reached.
The buzzer interval increases from slow to fast. The
volume cannot be adjusted. The mood light (8) turns
on automatically.
• Radio frequency is displayed:
As soon as your set alarm time is shown, the radio
switches on. The last set station is played. The volume
increases slowly to the set volume. The volume
cannot be adjusted. The mood light (8) turns on
automatically.
NOTE:
• The alarm function turns off automatically after
30 minutes until the next day.
• If an audio cable is connected to the LINE IN jack,
the device will wake you with the buzzer, even if you
have selected “radio”.
7a. If you want to be awakened by a radio station, select the
maximum alarm volume using the
8. Press the
intensity (
cancel this function.
The light inside the lamp shade (4) will turn on 30 minutes
prior to the pre-set alarm time. The brightness will
gradually increase, starting at the intensity level previously set.
9. Finally, press the
now activated.
To set the second alarm time, repeat the above steps with
the
NOTE:
• If the alarm time has been activated, AL1 (1) or AL2 (7)
will appear in the display.
• In order to briey display the set alarm times, press the
Turning off the Alarm
Press the
Automatic Alarm Interval
The automatically set alarm function can be shut off for ap-
proximately 9 minutes with the SNOOZE/SLEEP / DIMMER
button (22).
NOTE:
AL1 or AL2 will flash in the display if the snooze function has
been activated.
button to confirm. Then select the light
) for the alarm function. Selecting “ ” will
NOTE:
button again. The first alarm time is
button (24).
, respectively the button.
button (23) to stop the alarm.
and buttons.
English
Deactivate the Alarm Function
1. Switch the device to standby with the
2. To deactivate the alarm function, keep the
or
button (24) pressed. AL1 (1) or AL2 (7) will disappear.
button (23).
33
button (13)
Delayed Shut-Off
You can use the function for delayed power-off with radio
operation. The unit is switched off automatically when the
selected time is reached.
• Select the time after which the unit is switched off by
repeatedly pressing the SNOOZE/SLEEP / DIMMER
button (22). The following selections can be made: 90, 60,
30, and 15 minutes. The OFF setting (off) deactivates this
function.
• This function can be cancelled with the
button (23).
Nap alarm
The nap alarm can be used for e.g. a short “nap”. The function only operates in standby.
• Press the
after which the device will beep. Select from 90 to 10 minutes or OFF (off) in steps of 10 minutes.
• After the selected time has elapsed, an increasingly fast
beep will sound. Use the button (23) to turn off the
beep.
button repeatedly (17) to select the time
AUX IN jack
(Cable not included)
1. If required, use a suitable adapter (not included).
Connect the external device as follows:
• With a 3.5 mm stereo jack plug to the LINE IN socket
(10).
2. Turn the device on using the
pears in the display.
3. Start the playback of your audio source. Listen to the
sound playback via the speaker. You can adjust the
volume using the / buttons (24/13).
4. For the further procedure, please refer to the user manual
of the external audio source.
NOTE:
If possible, adjust the volume of the external unit to a comfortable level.
Stop AUX IN operation
Disconnect the cable from the AUX IN jack. The device will
return to radio mode.
button (23). LINE IN ap-
Page 34

34
English
Cleaning
CAUTION:
Do not dip the appliance in water.
• Remove the plug before cleaning.
• Clean the appliance with a slightly humid cloth without
any additives.
Troubleshooting
Problem Cause Solution
The unit cannot
be operated
Alarm sounds
with buzzer
although “radio” has been
selected
The unit is blocked
and “hangs”
Audio cable connected to LINE IN
jack
Pull the mains plug out
for about 5 seconds.
Then turn the device
on again.
Disconnect the audio
cable from the LINE
IN jack
Technical Data
Model: ............................................................................MRC 4147 L
Power supply: ................................................ 100-240 V~ 50/60 Hz
Power consumption:...................................................................7 W
Battery power reserve: .................................................3 V, CR2032
Protection class: ................................................................................ II
Net weight: ............................................................approx. 0.502 kg
Radio section:
Frequency ranges: ............................... FM 87.5 ~ 108.0 MHz
The right to make technical and design modifications in
the course of continuous product development remains
reserved.
This device has been tested according to all relevant current
CE guidelines,such as electromagnetic compatibility and low
voltage directives, and has been constructed in accordance
with the latest safety regulations.
Disposal
Meaning of the “Dustbin” Symbol
Protect our environment: do not dispose of electrical equipment in the domestic waste.
Please return any electrical equipment that you will no longer
use to the collection points provided for their disposal.
This helps avoid the potential effects of incorrect disposal on
the environment and human health.
This will contribute to the recycling and other forms of reutilisation of electrical and electronic equipment.
Information concerning where the equipment can be disposed of can be obtained from your local authority.
Page 35

Instrukcja obsługi
Dziękujemy za wybór naszego produktu. Mamy nadzieję, że
korzystanie z urządzenia sprawi Państwu radość.
Symbole użyte w tej instrukcji obsługi
Ważne informacje dotyczące bezpieczeństwa użytkownika są
specjalnie wyróżnione. Koniecznie stosuj się do tych wskazówek, aby uniknąć wypadków i uszkodzenia urządzenia:
OSTRZEŻENIE:
Ostrzega przed zagrożeniami dla zdrowia i wskazuje na
potencjalne ryzyka obrażeń.
UWAGA:
Wskazuje na potencjalne zagrożenia dla urządzenia lub
innych przedmiotów.
WSKAZÓWKA:
Wyróżnia porady i informacje ważne dla użytkownika.
Ogólne wskazówki bezpieczeństwa
Przed uruchomieniem urządzenia proszę bardzo dokładnie
przeczytać instrukcję obsługi. Proszę zachować ją wraz z kartą
gwarancyjną, paragonem i w miarę możliwości również kartonem z opakowaniem wewnętrznym. Przekazując urządzenie
innej osobie, oddaj jej także instrukcję obsługi.
• Urządzenie chronić należy przed deszczem i wilgocią,
aby zapobiec groźbie pożaru lub porażeniu prądem. Nie
należy go więc używać w pobliżu wody, a więc przykładowo w pobliżu wanny, basenu lub w zawilgoconej piwnicy.
• Urządzenia nie należy używać w bardzo gorących, zimnych, zakurzonych ani wilgotnych miejscach.
• Z urządzenia należy korzystać wyłącznie do celów prywatnych i zgodnie z przeznaczeniem. Urządzenie to nie jest
przeznaczone do użytku komercyjnego.
• Kabel zasilający nie powinien być poskręcany, przytrzaśnięty ani nie powinien stykać się ze źródłami ciepła.
• Poprowadzenie kabla zasilającego nie powinno grozić
potknięciem.
• Zasilacz nadaje się tylko do użytku w pomieszczeniach
zamkniętych i suchych.
• Nigdy nie dotykać zasilacza ani kabla mokrymi rękami.
• Urządzenie należy podłączyć tylko i wyłącznie do przepi-
sowo zamontowanego gniazdka. Proszę zwrócić uwagę
na to, żeby podane napięcie zgadzało się z napięciem w
gniazdku.
• Kabel zasilający musi być zawsze łatwo dostępny.
• Baterie należy zawsze wkładać w odpowiedni sposób.
• Urządzenie należy w taki sposób ustawić, żeby istniejące
otwory wentylacyjne nie zostały przykryte.
• Nie należy zasłaniać otworów wentylacyjnych przedmiotami, takimi jak gazety, obrusy, firanki itp.
Język polski
• Urządzenia nie należy wystawiać na działanie kapiącej
ani rozchlapującej się wody, a także nie należy na nim
stawiać naczyń wypełnionych płynami, takich jak wazony z
kwiatami.
• Na urządzeniu nie należy stawiać źródeł otwartego ognia,
takich jak zapalone świeczki.
• Nigdy nie wolno otwierać obudowy urządzenia. Niefachowo przeprowadzone naprawy mogą być groźne w
skutkach dla użytkownika. Przy uszkodzeniu urządzenia, w
szczególności kabla sieciowego, urządzenie nie może być
używane dopóki nie zostanie naprawione przez osobę z
wymaganymi uprawnieniami. Przewód zasilający należy
regularnie sprawdzać, czy nie jest uszkodzony.
• W razie awarii proszę nie naprawiać urządzenia samemu
lecz skorzystać z pomocy autoryzowanego specjalisty.
Jeżeli przewód zasilający nieodłączalny ulegnie uszkodzeniu, to powinien on być wymieniony u wytwórcy lub w
specjalnym zakładzie naprawczym albo przez wykwalifikowaną osobę w celu uniknięcia zagrożenia.
• Jeżeli urządzenie nie będzie przez dłuższy czas używane,
należy wyciągnąć wtyczkę z gniazdka lub wyjąć baterie.
UWAGA:
Nie otwierać urządzenia! W środku urządzenia nie ma
żadnych części wymagających obsługi.
Poniższe symbole mogą znajdować się na urządzeniu i mają
zwracać Państwa uwagę na:
Symbol błyskawicy ma zwrócić uwagę
użytkownika na znajdujące się we wnętrzu
urządzenia części, które są pod niebezpiecznie wysokim napięciem.
Symbol z wykrzyknikiem ma zwrócić uwagę
użytkownika na znajdujące się w załączonych
dokumentach ważne wskazówki związane z
obsługą i konserwacją urządzenia.
Dzieci i osoby niepełnosprawne
• Dla bezpieczeństwa dzieci proszę nie zostawiać swobodnie dostępnych części opakowania (torby plastikowe,
kartony, styropian itp.).
OSTRZEŻENIE!
Nie pozwalaj dzieciom bawić się folią. Niebezpieczeństwo uduszenia!
• To urządzenie nie może być używane przez osoby (w tym
dzieci) o ograniczonych możliwościach fizycznych, motorycznych lub umysłowych lub nie posiadające niezbędnego doświadczenia i/lub wiedzy. Użytkowanie urządzenia
przez takie osoby jest możliwe wyłącznie pod nadzorem
opiekuna lub po otrzymaniu wskazówek dotyczących
używania urządzenia.
• Nie pozwalaj dzieciom bawić się urządzeniem.
35
Page 36

36
Język polski
Przegląd elementów obsługi
1 AL1 (aktywna funkcja 1 alarmu)
2 LINE IN (kabel audio podłączony do gniazdka typu jack
LINE IN)
3 PM (wskazanie “popołudnia” w 12-godzinnymr trybie
wyświetlania)
4 Klosz lampy
Przyciski sterujące
13
14
15
16
17
18
19
20
21
22
23
24
Zmniejsz głośność / ustaw/aktywuj/deaktywuj alarm 1
Włącz/wyłącz światło nastrojowe
Wyświetl rok/datę / wybierz jednostkę temperatury
Poprzednie ustawienie radia
Szukaj następnej stacji radiowej / wybierz czas letni/czas zwykły / funkcja “drzemki”
Zapisz stację radiową/następne ustawienie radia/wyświetl temperaturę
Włącz/wyłącz światło
Zwiększ natężenie światła
Zmniejsz natężenie światła
Funkcja drzemki / timer snu / jasność wyświetlacza
Włącz/wyłącz urządzenie
Zwiększ głośność / ustaw/aktywuj/deatywuj alarm 2
5 FM (tryb radiowy)
6 Wyświetlacz
7 AL2 (aktywna funkcja 2 alarmu)
8 Światło nastrojowe
9 Port DC 5V USB CHARGING (ładowanie)
10 Gniazdko typu jack LINE IN
11 Wbudowany zasilacz
12 Antena przewodowa (FM)
Uruchomienie
• Wybrać odpowiednie miejsce dla urządzenia, np. suche,
niezbyt śliskie miejsce, gdzie można łatwo je obsługiwać.
• Usunąć folię ochronną, jeśli jest.
Wkładanie baterii (rezerwowej)
(Baterii nie ma w zestawie z urządzeniem)
W razie odcięcia zasilania lub jeśli urządzenie jest odłączone,
z wstawionymi bate-riami, wszelkie ustawienia zostaną zachowane.
1. Otwórz znajdującą się na spodzie urządzenia komorę
baterii. Odkręcić śrubkę przytrzymującą pokrywę komory
baterii.
2. Włożyć baterię typu CR2032, 3 V. Uwzględnić prawidłowe
ułożenie biegunów (+ musi być na górze)!
3. Zamknąć komorę baterii. Przykręcić pokrywę komory
baterii na miejsce.
Jeśli urządzenie nie będzie przez dłuższy czas używane, wyjąć
baterie, aby uniknąć wycieku kwasu akumulatorowego.
OSTRZEŻENIE:
Baterii nie należy wystawiać na działanie silnych źródeł ciepła, takich jak światło słoneczne, ogień itp. Istnieje ryzyko
wybuchu!
UWAGA:
Baterii nie należy wrzucać do zwykłych domowych śmieci.
Zużyte baterie proszę oddać do punktu zbiórki odpadów
specjalnych lub do punktu sprzedaży.
Zasilanie
1. Upewnij się, że napięcie zasilania odpowiada wartościom
na tabliczce znamionowej.
2. Włóż wtyczkę z bolcami do odpowiednio zainstalowanego trójwtykowego gniazda.
WSKAZÓWKA:
Jeśli nie ma włożonej baterii podtrzymującej napięcie, w
przypadku przerwy w zasilaniu wszystkie zapamiętane stacje
radiowe zostaną skasowane.
Włączanie/wyłączanie urządzenia
Wcisnąć przycisk
Siła głosu
Wyregulować głośność za pomocą przycisku
(13).
Jasność wyświetlacza (w pogotowiu)
Za pomocą przycisku SNOOZE/SLEEP / DIMMER (22) wyregulować jasność wyświetlacza.
Funkcja światła do czytania
1. Nacisnąć przycisk
2. Użyć przycisku (20) w celu zwiększenia jasności.
Wcisnąć przycisk (21), aby zmniejszyć jasność.
3. W celu wyłączenia tej funkcji należy ponownie wcisnąć
przycisk .
(23), aby włączyć lub wyłączyć urządzenie.
(24) oraz
(19), aby włączyć funkcję.
Page 37

Światło nastrojowe
1. Nacisnąć przycisk
światła (8). Lampa będzie się świeciła, zmieniając kolory
światła.
2. W celu wyłączenia światła nastrojowego należy jeszcze raz
nacisnąć przycisk
Wyświetlanie informacji o stacji
1. Przełączyć urządzenie w tryb gotowości za pomocą przycisku
2. Kilkukrotnie na krótko wcisnąć przycisk (15). Kolejno
Jeśli przycisk nie jest wciśnięty zbyt długo, po około 5 sekundach na wyświetlaczu ponownie pojawi się bieżący czas.
Przełączanie wyświetlacza
Poniższe teksty mogą pojawiać się na zmianę na wyświetlaczu:
1. Aby aktywować funkcję, użyć przycisku
2. Trzymać przycisk (15) wciśnięty, aż „ ” pojawi się na
Wyłączanie funkcji przełączania: A Wcisnąć i przytrzymać
przycisk
aktualnym czasie. „ ” na wyświetlaczu pojawia się na
krótko.
Przełączanie wyświetlenia temperatury między °C (Celsjusz) a °F (Fahrenheit)
1. Przełączyć urządzenie w tryb gotowości za pomocą przy-
2. Wcisnąć przycisk (18) w celu wyświetlenia temperatury.
3. Gdy urządzenie wyświetla już temperaturę, należy naci-
Gniazdko ładowania USB (9)
Poprzez to gniazdko jack można doładować smartfon. Należy
użyć kabla USB w smartfonie dla tego połączenia.
• Z powodu różnych typów smartfonów, jakie dzisiaj są
• Nie jest możliwe odtwarzanie plików audio poprzez
(23).
wyświetlą się następujące informacje:
czyć urządzenie do trybu czuwania.
krótko na wyświetlaczu.
ponownie w trybie pogotowia przy wyświetlanym
cisku
(23).
snąć przycisk przez około 3 sekundy, aby przełączyć °C
na °F i odwrotnie.
WSKAZÓWKA:
oferowane oraz różnych możliwości ładowania, czas
trwania ładowania zależy od używanego smartfona oraz
jego stanu.
złącze.
(14) w celu włączenia nastrojowego
.
Rok Dzień
Czas Temperatura
(23) aby przełą-
Język polski
37
Ustawienia zegara
1. Za pomocą przycisku (23) przełączyć urządzenie do
trybu czuwania.
2. Wcisnąć i przytrzymać przycisk
pojawienia się na wyświetlaczu wskazania.
• Można teraz ustawić rok, miesiąc, dzień, format
wyświetlania godziny (12 Hr/24 Hr), godzinę i minuty –
za pomocą przycisków
• Każdy wybór należy potwierdzić wciskając przycisk .
Aktualnie ustawiany element mruga na wyświetlaczu.
WSKAZÓWKA:
• Wprowadzona wartość zostanie zapisana automatycznie po upływie ok. 30 sekund, jeśli nie zostanie wciśnięty
żaden przycisk.
• Wraz z 12-godzinnym trybem wyświetlania pojawi się
następujący skrót: PM= po południu
Przełączanie na czas letni
1. Za pomocą przycisku
trybu czuwania.
2. Wcisnąć i przytrzymać przycisk (17), aby przełączać
pomiędzy czasem letnim i zimowym. Kolejny czas to czas
letni.
(23) przełączyć urządzenie do
(18) do momentu
(17) oraz (15).
Ustawianie wybranej stacji
1. Za pomocą przycisków (17) oraz (15) należy
dostroić wybraną stację. Jeśli trzymamy jeden z przycisków dociśnięty, urządzenie szuka kolejnej stacji radiowej.
Wyświetlacz pokazuje dostrajaną częstotliwość.
2. Jeżeli odbiór jest zbyt słaby, zmień położenie anteny, aby
go poprawić.
Wstępne ustawianie stacji
Urządzenie może ustawić do 10 stacji radiowych.
1. Wyszukiwanie stacji opisane jest w rozdziale „Ustawianie
wybranej stacji”.
2. Trzymać przycisk
wskaźnik lokalizacji miga na wyświetlaczu (np. P02).
3. Za pomocą przycisków
wybrać w pamięci wstępnie ustawioną stację.
4. Nacisnąć przycisk
Dostrajanie wstępnie ustawionej stacji
Nacisnąć przycisk
wym, aby przeskanować wstępnie ustawioną pamięć stacji.
(18) wciśnięty. Wstępnie ustawiony
(17) oraz (15) należy
aby Wstępnie ustawić stację.
/ (18/16) kilkakrotnie w trybie radio-
Page 38

38
Język polski
Funkcja budzenia
Ustawianie czasu budzenia (w trybie pogotowia)
Zegar posiada możliwość ustawienia dwóch czasów dla załączenia się alarmu. Dostępne są 4 różne opcje alarmu: Radio +
Światło /Radio / Brzęczyk + Światło / Brzęczyk. Należy postępować według wskazówek:
1. Nacisnąć przycisk
ustawiony na bieżąco.
2. Przytrzymać przycisk wciśnięty przez około 3 sekund,
kiedy wyświetlany jest czas alarmu. Godziny alarmu ustawionego na bieżąco zaczynają migać.
3. Za pomocą przycisków (17) i (15), ustawić żądaną
godzinę.
4. Wcisnąć przycisk , aby potwierdzić. Wartość minut
zacznie migać.
5. Za pomocą przycisków
6. Wybrać dni, w które alarm ma się uruchamiać. Można
dokonać następujących wyborów:
• 1-5 = od poniedziałku do piątku
• 1-7 = od poniedziałku do niedzieli
• 6-7 = sobota i niedziela
• 1-1 = dzień tygodnia
6a. W przypadku wybrania trybu 1-1:
1. Wcisnąć przycisk
2. Wyboru należy dokonać przyciskami
(1 = poniedziałek, 2 = wtorek, 3 = środa, 4 = czwartek,
5 = piątek, 6 = sobota, 7 = niedziela)
7. Nacisnąć przycisk
sposób budzenia. Wybrać z:
• „bu” (brzęczyk- sygnalizator dźwiękowy):
Rozlega się dźwięk brzęczyka, kiedy jest godzina
ustawionego alarmu. Odstępy w brzęczyku rosną
od powolnych do szybkich. Brak regulacji głośności.
Automatycznie włączy się światło nastrojowe (8).
• Częstotliwość radiowa:
Kiedy jest godzina ustawionego alarmu, włącza się
radio. Włącza się ostatnia ustawiona stacja. Głośność
powoli rośnie do wybranego poziomu. Brak regulacji
głośności. Automatycznie włączy się światło nastrojowe (8).
WSKAZÓWKA:
• Funkcja alarmu wyłącza się automatycznie po
30 minutach do następnego dnia.
• Jeśli kabel audio jest podłączony do gniazdka
typu jack LINE IN, urządzenie obudzi użytkownika
brzęczykiem, nawet przy wybraniu funkcji “radia”.
7a. Jeśli chcemy budzenia za pomocą stacji radiowej, należy
wybrać maksymalną głośność alarmu za pomocą przycisków
8. Nacisnąć przycisk aby potwierdzić. Następnie wybrać
natężenie światła ( ) dla funkcji alarmu. Wybór “ ”
wyłączy tę funkcję.
(13). Pokazany jest czas alarmu
i , ustawić żądaną godzinę.
, aby wybrać dzień tygodnia.
i .
aby potwierdzić. Następnie wybrać
oraz .
WSKAZÓWKA:
Światło wewnątrz klosza lampy (4) wyłączy się na 30
minut przed przed ustawionym czasem alarmu. Jasność
światła będzie stopniowo wzrastała, począwszy od
wcześniej ustawionego poziomu natężenia.
9. Na koniec ponownie nacisnąć przycisk
pierwszy alarm.
Aby ustawić drugi czas alarmu, powtórzyć powyższe kroki za
pomocą przycisku
WSKAZÓWKA:
• Jeśli został uaktywniony czas alarmu, na wyświetlaczu
pojawi się AL1 (1) lub AL2 (7).
• W celu wyświetlenia na chwilę ustawionego czasu alarmu należy nacisnąć przycisk
Wyłączanie sygnału budzenia
Aby wyłączyć alarm, należy wcisnąć przycisk
Interwałowa automatyka budzenia
Automatycznie włączona funkcja budzenia, poprzez wciśnięcie przycisku SNOOZE/SLEEP / DIMMER (22) może zostać
przerwana na ok. 9 minut.
WSKAZÓWKA:
Na wyświetlaczu zacznie migać AL1 lub AL2, jeśli uaktywniła
się funkcja drzemki.
Wyłączenie funkcji alarmu
1. Przełączyć urządzenie w tryb gotowości za pomocą przycisku
2. Aby dezaktywować funkcję alarmu, trzymać przycisk (13)
lub
(24) wciśnięty. AL1 (1) lub AL2 (7) zniknie.
(24).
(23).
. Uaktywnia się
a następnie przycisk .
(23).
Opóźnione wyłączanie
Radio posiada funkcję wyłączenia z opóźnieniem. Urządzenie
wyłączy się automatycznie po upływie określonego czasu.
• Wybrać żądany okres czasu wciskając wielokrotnie przycisk SNOOZE/SLEEP / DIMMER (22). Można dokonać
następujących wyborów: 90, 60, 30 i 15 minut. Ustawienie
OFF (wyłączenia) dezaktywuje tę funkcję.
• Po wciśnięciu klawisza
wotne ustawienie.
(23) zostaje przywrócone pier-
Alarm drzemki
Alarm drzemki może być użyty np. na krótką „drzemkę”.
Funkcja działa tylko w stanie czuwania.
• Nacisnąć przycisk
po którym urządzenie będzie sygnalizować. Wybrać od
90 do 10 minut lub OFF (wyłączona) w etapach co
10 minut.
(17) kilkakrotnie, aby wybrać czas,
Page 39

• Po upływie wybranego czasu, będzie pojawiał się szybko
rosnący sygnał dźwiękowy. Za pomocą przycisku (23)
wyłączyć sygnał dźwiękowy.
Gniazdko typu jack AUX IN
(Kabel nie jest dołączony)
1. W razie konieczności użyj odpowiedniej przejściówki (nie
jest dołączona).
Podłącz urządzenie zewnętrzne w następujący sposób:
• Podłącz wtyczkę stereo 3,5 mm do gniazda LINE IN
(10).
2. Włączyć urządzenie przyciskiem
pojawi się LINE IN.
3. Rozpocznij odtwarzanie za pomocą źródła dźwięku.
Dźwięk będzie odtwarzany przez głośnik. Za pomocą
przycisków / (24/13) można dostosować głośność.
4. Informacje o dalszych czynnościach można znaleźć w
podręczniku użytkownika zewnętrznego źródła dźwięku.
WSKAZÓWKA:
O ile to możliwe, należy ustawić odpowiedni poziom głośności urządzenia zewnętrznego.
Zatrzymanie pracy AUX IN
Odłączyć kabel z gniazdka typu jack AUX IN. Urządzenie
powróci do trybu radia.
(23), Na wyświetlaczu
Czyszczenie
UWAGA:
Proszę nie wsadzać urządzenia do wody.
• Przed czyszczeniem urządzenia proszę wyłączyć je z sieci.
• Urządzenie proszę czyścić używając lekko zwilżonej ścierki
bez środków czyszczących.
Usuwanie usterek
Problem Przyczyna Rozwiązanie
Nie można włączyć urządzenia
Alarm jest
słyszalny jako
głos brzęczyka
pomimo wyboru opcji “radio”
Urządzenie „zawiesiło się”
Do gniazdka typu
jack LINE IN jest
podłączony przewód audio
Wyciągnąć wtyczkę z
gniazda elektrycznego, na około 5 sekund.
Następnie ponownie
włączyć urządzenie.
Odłączyć przewód
audio od gniazdka
typu jack LINE IN
Język polski
39
Dane techniczne
Model: ............................................................................MRC 4147 L
Napięcie zasilające: ...................................... 100-240 V~ 50/60 Hz
Pobór mocy: .................................................................................7 W
Bateria rezerwowa: ........................................................3 V, CR2032
Stopień ochrony: .............................................................................. II
Masa netto: ................................................................... ok. 0, 502 kg
Radio:
Zakresy częstotliwości:.........................FM 87,5 ~ 108,0 MHz
Zastrzegamy sobie prawo wprowadzania zmian technicznych
i projektowych w trakcie ciągłego rozwoju produktu.
Niniejsze urządzenie odpowiada wymaganiom normy bezpieczeństwa użytkowania oraz spełnia wymagania dyrektywy
niskonapięciowej i kompatybilności elektromagnetycznej.
Warunki gwarancji
Przyznajemy 24 miesiące gwarancji na produkt licząc od daty
zakupu.
W tym okresie będziemy bezpłatnie usuwać w terminie 14 dni
od daty dostarczenia wadliwego sprzętu z kartą gwarancyjną
do miejsca zakupu wszystkie uszkodzenia powstałe w tym
urządzeniu na skutek wady materiałów lub wadliwego wykonania, naprawiając oraz wymieniając wadliwe części lub (jeśli
uznamy za stosowne) wymieniając całe urządzenie na nowe.
Sprzęt do naprawy powinien być dostarczony w komplecie
wraz z dowodem zakupu oraz z ważną kartą gwarancyjną do
sprzedawcy w miarę możliwości w oryginalnym opakowaniu
lub innym odpowiednim dla zabezpieczenia przed uszkodzeniem. W razie braku kompletnego opakowania fabrycznego,
ryzyko uszkodzenia sprzętu podczas transportu do i z miejsca
zakupu ponosi reklamujący.
Naprawa gwarancyjna nie dotyczy czynności przewidzianych
w instrukcji obsługi, do wykonania których zobowiązany jest
użytkownik we własnym zakresie i na własny koszt.
Gwarancja nie obejmuje:
• mechanicznych, termicznych, chemicznych uszkodzeń
sprzętu i wywołanych nimi wad,
• uszkodzeń powstałych w wyniku działania sił zewnętrznych
takich jak wyładowania atmosferyczne, zmiana napięcia
zasilania i innych zdarzeń losowych,
• nieprawidłowego ustawienia wartości napięcia elektrycznego, zasilanie z nieodpowiedniego gniazda zasilania,
• sznurów połączeniowych, sieciowych, żarówek, baterii,
akumulatorów,
• uszkodzeń wyrobu powstałych w wyniku niewłaściwego
lub niezgodnego z instrukcją jego użytkowania, przechowywania, konserwacji, samowolnego zrywania plomb oraz
wszelkich przeróbek i zmian konstrukcyjnych dokonanych
przez użytkownika lub osoby niepowołane,
Page 40

40
Język polski
• roszczeń z tytułu parametrów technicznych wyrobu, o ile
są one zgodne z podanymi przez producenta,
• prawidłowego zużycia i uszkodzeń, które mają nieistotny
wpływ na wartość lub działanie tego urządzenia.
Karta gwarancyjna bez pieczątki sklepu, daty sprzedaży, nie
wypełniona, źle wypełniona, ze śladami poprawek, nieczytelna wskutek zniszczenia, bez możliwości ustalenia miejsca
sprzedaży oraz dołączonego dowodu zakupu jest nieważna.
Korzystanie z usług gwarancyjnych nie jest możliwe po upływie daty ważności gwarancji. Gwarancja na części lub całe
urządzenie, które są wymieniane kończy się, wraz z końcem
gwarancji na to urządzenie.
Wszystkie inne roszczenia, wliczając w to odszkodowania są
wykluczone chyba, że prawo przewiduje inaczej. Roszczenia
wykraczające poza tą umowę nie są uwzględniane przez tą
gwarancję.
Gwarancja na sprzedany towar konsumpcyjny nie wyłącza, nie
ogranicza ani nie zawiesza uprawnień kupującego wynikających z niezgodności towaru z umową.
Gwarancja oraz zawarte w niej warunki obowiązują na terenie
Rzeczpospolitej Polskiej.
Dystrybutor:
CTC Clatronic Sp. z o.o
ul. Opolska 1 a karczów
49 - 120 Dąbrowa
Usuwanie
Znaczenie symbolu „Pojemnik na śmieci“
Proszę oszczędzać nasze środowisko, sprzęt elektryczny nie
należy do śmieci domowych.
Proszę korzystać z punktów zbiorczych, przewidzianych do
zdawania sprzętu elektrycznego, i tam proszę oddawać sprzęt
elektryczny, którego już nie będą Państwo używać.
Tym sposobem pomagają Państwo unikać potencjalnych następstw niewłaściwego usuwania odpadów, mających wpływ
na środowisko i zdrowie ludzi.
Tą drogą przyczyniają się Państwo do ponownego użycia, do
recyklingu i do innych form wykorzystania starego sprzętu
elektrycznego i elektronicznego.
Informacje, gdzie można zdać sprzęt, otrzymają Państwo w
swoich urzędach komunalnych lub w administracji gminy.
Page 41

Használati utasítás
Köszönjük, hogy a termékünket választotta. Reméljük, elégedetten használja majd a készüléket.
A használati útmutatóban található szimbólumok
Az Ön biztonságára vonatkozó utasítások kifejezetten meg
vannak különböztetve. Kérjük, mindenképpen ügyeljen
ezekre annak érdekében, hogy elkerülje a baleseteket és a
készülék károsodását:
FIGYELMEZTETÉS:
Egészségét károsító veszélyforrásokra figyelmeztet és
rámutat a lehetséges sérülési lehetőségekre.
VIGYÁZAT:
Lehetéges veszélyre utal, mely a készülékben vagy más
tárgyakban kárt tehet.
MEGJEGYZÉS: Tippeket és információkat emel ki.
Általános biztonsági rendszabályok
A készülék használatba vétele előtt gondosan olvassa végig
a használati utasítást, és őrizze meg a garancialevéllel, a
pénztári nyugtával és lehetőleg a csomagolókartonnal, ill. az
abban lévő bélésanyaggal együtt! Amennyiben a készüléket
harmadik személynek adja tovább, a használati útmutatót is
adja a készülékhez.
• A tűzkeletkezés vagy az áramütés kockázatának elkerülése végett ne tegye ki a készüléket esőnek vagy nedvességnek! Ne működtesse a készüléket víz közvetlen
közelében (pl. fürdőszobában, úszómedence mellett,
nedves pincében).
• Ne használja a készüléket nagyon forró, hideg, poros
vagy nedves helyeken.
• A készülék csak magáncélra és rendeltetésének megfelelően használható. A készülék nem alkalmas kereskedelmi
használatra.
• Ügyeljen arra, hogy a tápkábel ne legyen meghajolva,
kicsípve, illetve ne kerüljön érintkezésbe hőforrásokkal.
• Győződjön meg arról, hogy a tápkábelben senki nem
eshet el.
• A tápadapter csak száraz helyiségben használható.
• Ne érintse meg a tápadaptert vagy a kábelt nedves
kézzel.
• Mindig csak előírásszerűen szerelt konnektorba csatlakoztassa a készüléket! Ügyeljen rá, hogy a megadott
feszültség egyezzen a hálózati feszültséggel!
• A tápkábelnek mindig könnyen hozzáférhetőnek kell
lennie.
• Mindig megfelelően helyezze be az elemeket.
• A készüléket úgy szerelje össze, hogy a szellőzőnyílások
ne legyenek elzárva.
Magyarul
• Ne takarja le a szellőzőnyílásokat különböző tárgyakkal,
pl. újságokkal, asztalterítővel, függönnyel stb.
• Ne tegye ki a készüléket csepegő vagy fröccsenő víznek
és ne helyezzen folyadékokkal töltött edényeket, pl.
virágvázát a készülékre.
• Nyílt lángforrások, pl. égő gyertyák nem helyezhetők a
készülékre.
• Soha ne nyissa ki a készülék burkolatát! A szakszerűtlen
javítások jelentős veszély forrásai lehetnek a használók
számára. Ha a készülék, különösen a hálózati csatlakozó
kábel megsérült, a készüléket nem szabad üzembe
helyezni, hanem előbb szakemberrel meg kell javíttatni.
Rendszeresen ellenőrizendő, hogy a hálózati csatlakozó
kábelen nincs-e sérülés.
• Veszélyhelyzetek elkerülése végett a hibás csatlakozó
kábelt csak a gyártóval, a mi vevőszolgálatunkkal vagy
hasonló szakképzettségű más személlyel szabad pótoltatni azonos értékű kábellel.
• Ha hosszabb időn át nem használja a készüléket, húzza ki
a csatlakozó dugaszt a konnektorból, ill. vegye ki belőle
az elemeket!
VIGYÁZAT:
Ne nyissa fel a készüléket! A készülékben nem található
javítható alkatrész.
Adott esetben a készüléken az alábbi szimbólumokat láthatja,
amelyek a következőkre hívják fel az Ön figyelmét:
A villám-szimbólum olyan alkatrészekre
figyelmeztet a készülék belsejében, amelyek
veszélyesen nagy feszültséget vezetnek.
A felkiáltójellel ellátott szimbólum a kísérőpapírokban található fontos kezelési vagy karbantartási útmutatásokra hívja fel a használó
figyelmét.
Gyermekek és legyengült személyek
• Gyermekei biztonsága érdekében ne hagyja általuk
elérhető helyen a csomagolóelemeket (műanyag zacskó,
karton, sztiropor stb.).
FIGYELMEZTETÉS!
Kisgyermekeket ne engedjen a fóliával játszani. Fulladás veszélye állhat fenn!
• A készülék nem arra való, hogy korlátozott zikai, érzékszervi vagy szellemi képességű személyek (beleértve a
gyerekeket is) vagy tapasztalat ill. tudás hiányában használják, kivéve, ha biztonságukért felelős személye felügyel
rájuk vagy utasításokat kaptak arra vonatkozólag, hogy
hogyan kell használni a készüléket.
• Gyermekeket nem szabad felügyelet nélkül hagyni,
nehogy játsszanak a készülékkel.
41
Page 42

42
Magyarul
A kezelőelemek áttekintése
1 AL1 (1. ébresztő funkció aktiválva van)
2 LINE IN (audiokábel van csatlakoztatva a LINE IN aljzatba)
3 PM (a „délután” jelzése a 12 órás kijelzés esetén)
4 Lámpabúra
5 FM (rádió üzemmód)
Vezérlőgombok
13
14
15
16
17
18
19
20
21
22
23
24
Hangerő csökkentése / 1. ébresztő beállítása/aktiválása/deaktiválása
Hangulatvilágítás be-/kikapcsolása
Év/dátum kijelzése / hőmérsékleti mértékegység kiválasztása
Tárolt rádiómemória
Következő rádiócsatorna keresése / nyári időszámítás/normál idő / „szundi” funkció kiválasztása
Rádióállomás mentése / következő rádiómemória / hőmérséklet megjelenítése
Lámpa be-/kikapcsolása
Lámpa intenzitás növelése
Lámpa intenzitás csökkentése
Szundi funkció / elalvás időzítő / kijelzős fényereje
Készülék be-/kikapcsolása
Hangerő növelése / 2. ébresztő beállítása/aktiválása/deaktiválása
6 Kijelző
7 AL2 (2. ébresztő funkció aktiválva van)
8 Hangulatvilágítás
9 DC 5 V USB CHARGING töltőport
10 LINE IN csatlakozó
11 Rögzített tápadapter
12 Vezetékantenna (FM)
Üzembe helyezés
• Válasszon egy megfelelő helyet a készülék számára, egy
száraz, sima, nem csúszó felületet, ahol könnyen tudja
használni a készüléket.
• Ha van, távolítsa el a védőfóliát.
Az Elemek Behelyezése (biztonsági tápforrás)
(Az elemek nincsenek a készülékhez mellékelve)
Áramszünet, vagy a készülék kihúzása esetén, ha be van he-
lyezve a tartalék tápot biztosító elem, a beállítások megmaradnak.
1. Nyissa fel az elemtartó fedelét alul. Ehhez egy Philips
csavarhúzóval csavarja ki a csavart az elemtartó fedeléből.
2. Helyezzen bee egy CR2032 3 V-os elemet. Figyeljen a
helyes polaritásra (+ jelzésnek felül kell lennie)!
3. Zárja vissza az elemtartót. A csavarral rögzítse újra az
elemtartó fedelét.
Ha készüléket hosszabb ideig nem használja, vegye ki az
elemeket a készülékből, nehogy megfolyjanak.
FIGYELMEZTETÉS:
Ne tegye ki az elemeket semmilyen intenzív hőforrásnak,
mint napfény, tűz vagy hasonló. Robbanásveszélyt okozhat!
VIGYÁZAT:
A használt elem nem a háztartási szemétbe való! Adja le a
használt elemeket az illetékes gyűjtőhelyen vagy a kereskedőnél.
Áramellátás
1. Ellenőrizze, hogy az áramforrás megfelel a készülék törzslapján előírt követelményeknek.
2. Csatlakoztassa a dugaszt egy megfelelően felszerelt
háromvillás aljzatba.
MEGJEGYZÉS:
Ha nincs tartalékelem behelyezve, áramkimaradás esetén
az összes tárolt rádióállomás és az óra beállítása is törlődni
fog.
A készülék be-/kikapcsolása
Nyomja meg a
sához.
Hangerő
Állítsa be a hangerőt a
Kijelző fényereje (készenléti üzemmódban)
A SNOOZE/SLEEP / DIMMER gomb (22) segítségével állítsa
be a kijelző fényerejét.
Olvasólámpa funkció
1. Nyomja meg az
hoz.
2. A gombbal (20) növelje a fényerőt. A gombbal (21)
csökkentse a fényerőt.
3. A funkció kikapcsolásához nyomja meg újra az gombot.
gombot (23) a készülék be-vagy kikapcsolá-
(24) és a (13) gombbal.
gombot (19) a funkció bekapcsolásá-
Page 43

Hangulatvilágítás
1. Nyomja meg a
kapcsolásához. A lámpa különböző színekben váltakozva
fog világítani.
2. A hangulatvilágítás kikapcsolásához nyomja meg újra a
gombot.
Különböző információk megjelenítése
1. Kapcsolja a készüléket készenléti üzemmódba a
gombbal (23).
2. Röviden nyomja meg többször egymás után a gombot (15). A következő információk lesznek megjelenítve
egymás után:
Ha nem történik gombnyomás, a kijelző 5 másodperc után
visszavált az idő megjelenítésre.
gombot (14) a hangulatvilágítás (8) be-
Év Dátum
Magyarul
Az óra beállítása
1. Nyomja meg a gombot (23) a készülék készenléti
üzemmódba kapcsolásához.
2. Tartsa lenyomva a
nem villog a kijelzőn.
• Most beállíthatja az évet, a hónapot, a napot, az idő-
kijelzés formátumát (12Hr/24Hr), az órát és a percet a
(17) és a (15) gombok segítségével.
• Minden esetben erősítse meg a bevitelt a gomb-
bal. Az éppen beállított érték villog a kijelzőn.
MEGJEGYZÉS:
• A bevitel körülbelül 30 másodperc eltelte után automatikusan tárolódik, ha nem nyom meg egy gombot sem.
• A következő jelenik meg a 12 órás kijelzéssel:
PM = Délután
gombot (18) amíg az év kijelzés
43
A kijelző váltása
A következők jeleníthetők meg váltakozva a kijelzőn:
Idő Hőmérséklet
1. A funkció aktiválásához a
kapcsolja készenléti üzemmódba a készüléket.
2. Tartsa lenyomva a
rövid időre meg nem jelenik a kijelzőn.
A kijelző váltásának kikapcsolása: Nyomja meg újra és
tartsa lenyomva a
és az óra van megjelenítve. Az „ ” felirat jelenik meg rövid
időre a kijelzőn.
Hőmérsékletkijelzés megjelenítésének váltása °C (Celsius)
és °F (Fahrenheit) között
1. Kapcsolja a készüléket készenléti üzemmódba a
gombbal (23).
2. Nyomja meg a gombot (18) a hőmérséklet megjelenítéséhez.
3. A hőmérséklet megjelenítése közben nyomja meg körülbelül 3 másodpercre a gombot a °C és a °F közötti
váltáshoz.
USB töltőaljzat (9)
A csatlakozón segítségével töltheti okostelefonját. Az
okostelefonja USB kábelét használja a csatlakoztatáshoz.
MEGJEGYZÉS:
• A kereskedelemi forgalomban lévő okostelefonok
különböző típusai és az eltérő töltési teljesítményigény
miatt a töltési időtartam függ a használt okostelefontól
és a működési körülményeitől.
• Hangfájlok lejátszása a csatlakozón át nem lehetséges.
gombot, amikor készenléti módban van
gomb (23) megnyomásával
gombot (15), amíg az „ ” felirat
Váltás nyári időszámításra
1. Nyomja meg a
üzemmódba kapcsolásához.
2. Tartsa lenyomva a gombot
és a normál idő közötti váltáshoz. A későbbi idő a nyári
időszámítás szerinti idő.
gombot (23) a készülék készenléti
(17) a nyári időszámítás
Adóbeállítás
1. A (17) és (15) gombok segítségével hangolja be a
kívánt állomást. Ha benyomva tartja valamelyik gombot, a
készülék megkeresi a következő rádióállomást. A kijelzőn
a behangolt frekvencia jelenik meg.
2. Ha túl gyenge a vétel, változtassa meg a vezetékes antenna helyzetét, hogy javítsa vele a vételt.
Tárolt állomások
Maximum 10 rádióállomás tárolható.
1. Keressen egy állomást az „Rádióadók behangolása”
részben leírtak szerint.
2. Tartsa benyomva a
fénye villog a kijelzőn (pl. P02).
3. A
4. Nyomja meg a
Tárolt állomás behívása
Nyomja meg többször a
üzemmódban a tárolt rádióállomások léptetéséhez.
(17) és a (15) gombok segítségével válassza ki a
kívánt állomásmemóriát.
tárolt rádióállomások közé.
gombot (18). A tárolási hely jelző-
gombot az állomás mentéséhez a
/ gombot (18/16) rádió
Page 44

44
Magyarul
Ébresztési funkció
Az ébresztési idő beállítása (készenléti üzemmódban)
Két ébresztési időt állíthat be. 4 különböző ébresztési opció
érhető el: Rádió + fény / Rádió / Hangjelzés + Fény / Hangjelzés. Ehhez járjon el a következő módon:
1. Nyomja meg az
ébresztési idő látható.
2. Tartsa benyomva az gombot kb. 3 másodpercig az
ébresztési idő megjelenítésekor. Az aktuálisan beállított
ébresztési idő órája villogni kezd.
3. A beállításhoz használja a (17) és (15) gombokat.
4. Nyomja meg az gombot a megerősítéshez. A percek
kezdenek villogni.
5. A beállításhoz használja a
6. Most válassza ki azokat a napokat, amelyeken szeretné,
hogy az ébresztő ébressze. Az alábbi lehetőségek közül
választhat:
• 1-5 = Hétfőtől péntekig
• 1-7 = Hétfőtől vasárnapig
• 6-7 = Szombat és vasárnap
• 1-1 = Hétköznap
6a. Ha az 1-1. beállítást választja:
1. Nyomja meg az
sához.
2. Végezze el a kiválasztást a
(1 = hétfő, 2 = kedd, 3 = szerda, 4 = csütörtök, 5 =
péntek, 6 = szombat, 7 = vasárnap)
7. Nyomja meg az
válassza ki, hogyan történjen az ébresztés. A következőkből választhat:
• „bu” (hangjelzés):
Egy hangjelzés hallható az ébresztési idő elérésekor.
A hangjelzés sűrűsége folyamatosan nő. A hangerő
nem módosítható. A hangulatvilágítás (8) automatikusan bekapcsol.
• A rádió frekvenciája látható:
Amint megjelenik a beállított ébresztési idő, a rádió
bekapcsol. Az utoljára beállított állomás szólal meg.
A hangerő lassan növekszik a beállított hangerőre.
A hangerő nem módosítható. A hangulatvilágítás (8)
automatikusan bekapcsol.
MEGJEGYZÉS:
• Az ébresztési funkció 30 perc után automatikusan
kikapcsol a következő napig.
• Ha egy audiokábel van csatlakoztatva a LINE IN
aljzatba, a készülék a hangjelzéssel fogja ébreszteni
akkor is, ha a „rádió” van kiválasztva.
7a. Ha azt szeretné, hogy egy rádióállomás ébressze, válassza
a maximális ébresztési hangerőt a
segítségével.
8. Nyomja meg az gombot a megerősítéshez. Ezután
válassza ki a lámpa intenzitását ( ) az ébresztő funkcióhoz.
Az „ ” lehetőség kiválasztásával kikapcsolja a funkciót.
gombot (13). Az aktuálisan beállított
és gombokat.
gombot a hétköznapok kiválasztá-
és gombokkal.
gombot a megerősítéshez. Ezután
és gombok
MEGJEGYZÉS:
A lámpaburában (4) lévő lámpa az előre beállított
ébresztési idő előtt 30 perccel bekapcsol. A fényerő
fokozatosan nő majd, az előzőleg beállított intenzitási
szinttől kezdve.
9. Végül nyomja meg újra az
ébresztési idő be van kapcsolva.
A második ébresztési idő beállításához ismételje meg a fenti
lépéseket az
MEGJEGYZÉS:
• Ha az ébresztési idő aktiválásra került, az AL1 (1) vagy az
• A beállított ébresztési idők rövid megjelenítéséhez
Az ébresztés leállítása
Nyomja meg a
Intervallumos ébresztésismétlő automatika
Az automatikusan beállított ébresztő funkciót a SNOOZE/
SLEEP / DIMMER gombbal (22) kb. 9 percre ki lehet kapcsolni.
MEGJEGYZÉS:
Az AL1 vagy az AL2 villogni fog a kijelzőn, ha a szundi
funkció aktiválva lett.
Az ébresztési funkció kikapcsolása
1. Kapcsolja a készüléket készenléti üzemmódba a
gombbal (23).
2. Az ébresztési funkció kikapcsolásához tartsa benyomva az
felirat eltűnik.
gombbal (24).
AL2 (7) fog megjelenni a kijelzőn.
nyomja meg az
gombot (23) az ébresztés leállításához.
(13) vagy az gombot (24). Az AL1 (1) vagy az AL2 (7)
gombot. Most az első
, illetve a gombot.
Késleltetett kikapcsolás
A funkciót használhatja a rádió késleltetett kikapcsolására. A
készülék a beállított idő elérésekor automatikusan kikapcsol.
• A SNOOZE/SLEEP / DIMMER gomb (22) többszöri
megnyomásával válassza ki azt az időtartamot, hogy
mikor kapcsoljon ki a készülék. A következő lehetőségek
közül választhat: 90, 60, 30 és 15 perc. Az OFF beállítás (ki)
deaktiválja a funkciót.
• Ezt a funkciót a
gombbal (23) ismét meg lehet szüntetni.
Rövid alvás ébresztő
A rövid alvás ébresztés használható például egy kisebb „szunyókálás” esetén. A funkció csak készenléti üzemmódban
működik.
• Nyomja meg többször egymás után a
az idő beállításához, aminek letelte után a készülék sípolni
gombot (17)
Page 45

kezd. Válasszon a 90 - 10 perc vagy az OFF (ki) beállítások
között 10 perces ugrásokkal.
• A kiválasztott idő elteltekor egy folyamatosan erősödő sípolás lesz hallható. A gomb (23) segítségével kapcsolja
ki a hangjelzést.
AUX IN aljzat
(a kábel nincs mellékelve)
1. Szüksgé esetén használjon adaptert (nincs a csomagban).
A következő módon csatlakoztassa a külső eszközöket:
• Egy 3,5 mm-es sztereó csatlakozóval a LINE IN aljzat-
ba (10).
2. Kapcsolja be a készüléket a
felirat jelenik meg a kijelzőn.
3. Indítsa el a hangforrás lejátszását. Hallgassa a hangot a
hangszórókon át. A hangerőt a / gombok (24/13)
segítségével állíthatja be.
4. További műveletekhez lásd a külső hangforrás használati
útmutatóját.
MEGJEGYZÉS:
Ha lehetséges, állítsa be a külső készülék hangerejét egy
kényelmes szintre.
AUX IN használat leállítása
Húzza ki a kábelt az AUX IN aljzatból. A készülék visszavált
rádió módra.
gombbal (23). A LINE IN
Tisztítás
VIGYÁZAT:
Ne mártsa a készüléket vízbe.
• Tisztítás előtt húzza ki a dugaszt a konnektorból.
• Enyhén nedves ruhával, adalékszer nélkül tisztítsa a készü-
léket.
Hibaelhárítás
Probléma Ok Megoldás
A készülék nem
működtethető
Az ébresztő
hangjelzéssel
ébreszt, még ha
a „rádió” van is
kiválasztva
A készülék blokkolva van és „lefagyott”
Audiokábel van
csatlakoztatva a
LINE IN aljzatba.
Kb. 5 másodpercre
húzza ki a dugaszt az
elektromos aljzatból.
Ezután kapcsolja be
újra a készüléket.
Húzza ki a kábelt a
LINE IN aljzatból.
Magyarul
45
Műszaki adatok
Modell: ...........................................................................MRC 4147 L
Feszültségellátás: ......................................... 100-240 V~ 50/60 Hz
Teljesítményfelvétel:....................................................................7 W
Elem menettartaléka: ...................................................3 V, CR2032
Védelmi osztály: ................................................................................II
Nettó súly: ......................................................................kb. 0,502 kg
Rádiórész:
Frekvenciatartományok: .....................FM 87,5 ~ 108,0 MHz
A műszaki és kivitelezési módosítások jogát a folyamatos
termékfejlesztés miatt fenntartjuk.
Ezt a készüléket az Európa Tanács minden vonatkozó aktuális
irányelve szerint (pl. elektromágnesesség-elviselő képesség
vagy kisfeszültség-elviselő képesség) ellenőriztük, és a legújabb biztonságtechnikai előírások szerint készült.
Hulladékkezelés
A „kuka“ piktogram jelentése
Kímélje környezetünket, az elektromos készülékek nem a háztartási szemétbe valók.
Használja az elektromos készülékek ártalmatlanítására kijelölt
gyűjtőhelyeket, ott adja le azokat az elektromos készülékeit,
amelyeket többé már nem kíván használni.
Ezzel segítséget nyújt ahhoz, hogy elkerülhetők legyenek
azok a hatások, amelyeket a helytelen „szemétre dobás“
gyakorolhat a környezetre és az emberi egészségre.
Ezzel hozzájárul az újrahasznosításhoz, a recyclinghoz és a
kiöregedett elektromos és elektronikus készülékek értékesítésének egyéb formáihoz.
Az önkormányzatoknál vagy a polgármesteri hivatalokban
tájékoztatást kaphat arról, hogy hova viheti a kiselejtezett
készülékeket.
Page 46

MRC 4147 L
Elektro-technische Vertriebsges. mbH
www.etv.de
Stand 01/15
 Loading...