


 Loading...
NL |
Gebruiksaanwijzing |
2 |
MSC2544S |
EN |
Magnetron |
|
|
User Manual |
20 |
|
|
FR |
Microwave Oven |
|
|
Notice d'utilisation |
37 |
|
|
DE |
Four à micro-ondes |
|
|
Benutzerinformation |
56 |
|
|
PT |
Mikrowellenofen |
|
|
Manual de instruções |
75 |
|
|
ES |
Forno microondas |
|
|
Manual de instrucciones |
94 |
|
|
|
Horno de microondas |
|
|

2 www.aeg.com
INHOUDSOPGAVE
1. |
VEILIGHEIDSINFORMATIE....................................................................................... |
3 |
|
2. |
VEILIGHEIDSVOORSCHRIFTEN.............................................................................. |
6 |
|
3. |
BESCHRIJVING VAN HET PRODUCT..................................................................... |
7 |
|
4. |
VOORDAT U HET APPARAAT VOOR DE EERSTE KEER GEBRUIKT................... |
8 |
|
5. |
DAGELIJKS GEBRUIK............................................................................................... |
9 |
|
6. |
AUTOMATISCHE PROGRAMMA'S....................................................................... |
13 |
|
7. |
GEBRUIK VAN DE ACCESSOIRES......................................................................... |
14 |
|
8. |
EXTRA FUNCTIES................................................................................................... |
14 |
|
9. |
AANWIJZINGEN EN TIPS...................................................................................... |
15 |
|
10. |
ONDERHOUD EN REINIGING............................................................................ |
16 |
|
11. |
PROBLEEMOPLOSSING...................................................................................... |
16 |
|
12. |
MONTAGE ........................................................................................................... |
18 |
|
VOOR PERFECTE RESULTATEN
Bedankt dat u voor dit AEG-product heeft gekozen. Dit apparaat is ontworpen om vele jaren uitstekend te presteren, met innovatieve technologieën die het leven gemakkelijker helpen maken met functies die gewone apparaten wellicht niet hebben. Neem een paar minuten de tijd om het door te lezen zodat u er optimaal van kunt profiteren.
Ga naar onze website voor:
Advies over gebruik, brochures, het oplossen van problemen en onderhoudsinformatie:
www.aeg.com/webselfservice
Registreer uw product voor een betere service: www.registeraeg.com
Koop accessoires, verbruiksartikelen en originele reserveonderdelen voor uw apparaat:
www.aeg.com/shop
KLANTENSERVICE
Gebruik altijd originele onderdelen.
Als u contact opneemt met de klantenservice zorg dat u de volgende gegevens bij de hand hebt: model, productnummer, serienummer.
Deze informatie wordt vermeld op het typeplaatje.
 Waarschuwing / Belangrijke veiligheidsinformatie
 Algemene informatie en tips
  Milieu-informatie
Wijzigingen voorbehouden.

NEDERLANDS 3
1.  VEILIGHEIDSINFORMATIE
Lees zorgvuldig de meegeleverde instructies voor installatie en gebruik van het apparaat. De fabrikant is niet verantwoordelijk voor letsel en schade veroorzaakt door een foutieve installatie. Bewaar de instructies van het apparaat voor toekomstig gebruik.
1.1 Veiligheid van kinderen en kwetsbare mensen
WAARSCHUWING!
Gevaar voor verstikking, letsel of permanente invaliditeit.
•Dit apparaat kan worden gebruikt door kinderen van 8 jaar en ouder en door mensen met beperkte lichamelijke, zintuiglijke of verstandelijke vermogens of een gebrek aan ervaring en kennis, indien zij onder toezicht staan of instructies hebben gekregen over het veilig gebruiken van het apparaat en indien zij de eventuele gevaren begrijpen.
•Laat kinderen niet met het apparaat spelen. Kinderen jonger dan 3 jaar moeten niet zonder toezicht in de buurt van het apparaat worden gelaten.
•Houd alle verpakkingsmaterialen uit de buurt van kinderen.
•Houd kinderen en huisdieren uit de buurt van het apparaat als het in werking is of afkoelt. Het apparaat is heet.
•Als het apparaat is uitgerust met een kinderbeveiliging, raden wij aan dit te activeren.
•Reiniging en onderhoud mag niet worden uitgevoerd door kinderen zonder toezicht.
•Houd het apparaat en de snoeren buiten het bereik van kinderen jonger dan 8 jaar.
1.2 Algemene veiligheid
•Dit apparaat is bedoeld voor huishoudelijk gebruik of gelijksoortige toepassingen zoals:
4www.aeg.com
–boerderijen, personeelskeukens in winkels, kantoren of andere werkomgevingen
–Door gasten in hotels, motels, bed&breakfasts en andere woonomgevingen
•Van binnen wordt het apparaat heet als het in werking is. Raak de verwarmingselementen in het apparaat niet aan. Gebruik altijd ovenhandschoenen om accessoires of kookgerei te plaatsen of verwijderen.
•Gebruik geen stoomreiniger om het apparaat schoon te maken.
•Schakel het apparaat uit en trek de stekker uit het stopcontact voordat u onderhoudshandelingen verricht.
•Als de deur, scharnieren/handgrepen of deurafdichtingen zijn beschadigd, mag het apparaat niet worden gebruikt tot hij is gerepareerd door een vakkundig persoon.
•Als de voedingskabel beschadigd is, moet de fabrikant, een erkende serviceverlener of een gekwalificeerd persoon deze vervangen teneinde gevaarlijke situaties te voorkomen.
•Alleen een vakkundig persoon kan onderhoudsof reparatiewerkzaamheden uitvoeren waarvoor de afdekking moet worden verwijderd die beschermd tegen blootstelling aan magnetronenergie.
•Bedien het apparaat niet met een externe timer of een apart afstandbedieningssysteem.
•Verwarm geen vloeistoffen of andere levensmiddelen in afgesloten houders. Deze kunnen dan ontploffen.
•Gebruik alleen hulpstukken die geschikt zijn voor gebruik in de magnetron.
•Let bij het opwarmen van voedsel in plastic of papieren houders op het apparaat vanwege de mogelijkheid tot zelfontbranding.
•Het apparaat is bedoeld voor het opwarmen van voedsel en dranken. Het drogen van levensmiddelen of kleding en het opwarmen van warmhoudpads,
NEDERLANDS 5
slippers, sponzen, vochtige doekjes en dergelijke kan leiden tot letsel, zelfontbranding of brand.
•Als rook wordt waargenomen, zet dan het apparaat uit of trek de stekker uit het stopcontact en houd de deur gesloten om vlammen te doven.
•Het in de magnetron opwarmen van dranken kan ertoe leiden dat het langer duurt voordat het kookpunt wordt bereikt. Pas op als u de houder uit de magnetron haalt.
•De inhoud van melkflesjes en potjes babyvoeding moet worden geroerd of geschud en de temperatuur moet voor consumptie worden gecontroleerd om brandwonden te voorkomen.
•Eieren in de schaal en hele hardgekookte eieren mogen niet in het apparaat worden opgewarmd omdat ze dan kunnen ontploffen, zelfs nadat de magnetronverwarming is beëindigd.
•Het apparaat moet regelmatig worden gereinigd en voedselresten dienen te worden verwijderd.
•Het niet schoonhouden van het apparaat kan leiden tot beschadigingen aan het oppervlak hetgeen weer een negatief effect kan hebben op de levensduur van het apparaat wat weer kan leiden tot een gevaarlijke situatie.
•De temperatuur van de toegankelijke oppervlakken kan hoog zijn als het apparaat in werking is
•De magnetron moet niet in een kast worden geplaatst tenzij het is getest in een kast.
•De achterkant van het apparaat moet tegen de muur worden geplaatst.
•Gebruik nooit agressieve reinigingsmiddelen of scherpe metalen schrapers om de glazen deur schoon te maken, deze kunnen krassen veroorzaken op het oppervlak, waardoor het glas zou kunnen breken.
•Let op de minimumafmetingen van de kast (indien van toepassing). Raadpleeg het hoofdstuk Montage.
•Het apparaat moet bediend worden met een geopende decoratieve deur (indien van toepassing).
6www.aeg.com
2.VEILIGHEIDSVOORSCHRIFTEN
2.1 Montage
WAARSCHUWING!
Alleen een erkende installatietechnicus mag het apparaat installeren.
•Verwijder alle verpakkingsmaterialen.
•Installeer en gebruik geen beschadigd apparaat.
•Volg de installatie-instructies op die zijn meegeleverd met het apparaat.
•Wees voorzichtig met het verplaatsen van het apparaat, het is zwaar. Draag altijd veiligheidshandschoenen.
•Trek het apparaat nooit aan de handgreep van zijn plaats.
•Houd de minimumafstand naar andere apparaten en units in acht.
•Zorg ervoor dat het apparaat onder en naast veilige installaties wordt geïnstalleerd.
•De zijkanten van het apparaat moeten naast apparaten of units staan van dezelfde hoogte.
2.2Aansluiting aan het elektriciteitsnet
WAARSCHUWING!
Gevaar voor brand en elektrische schokken.
•Alle elektrische aansluitingen moeten door een gediplomeerd elektromonteur worden gemaakt.
•Dit apparaat moet worden aangesloten op een geaard stopcontact.
•Controleer of de elektrische informatie op het typeplaatje overeenkomt met de stroomvoorziening. Zo niet, neem dan contact op met een elektromonteur.
•Zorg ervoor dat een eventueel verlengsnoer waarop het apparaat is aangesloten, geaard is.
•Zorg dat u de hoofdstekker en kabel niet beschadigt. Neem contact op met de service-afdeling of een elektromonteur om een beschadigde hoofdkabel te vervangen.
•Trek niet aan het netsnoer om het apparaat los te koppelen. Trek altijd aan de stekker.
2.3 Gebruik
WAARSCHUWING!
Gevaar op letsel, brandwonden, elektrische schokken of een explosie.
•De specificatie van het apparaat mag niet worden veranderd.
•Laat het apparaat tijdens het gebruik niet onbeheerd achter.
•Oefen geen kracht uit op een geopende deur.
•Zorg ervoor dat de ventilatieopeningen niet geblokkeerd zijn.
•Gebruik het apparaat niet als werkoppervlak en gebruik de ovenruimte niet als opslagplek.
2.4 Onderhoud en reiniging
WAARSCHUWING!
Gevaar voor letsel, brand en schade aan het apparaat.
•Schakel het apparaat uit en trek de stekker uit het stopcontact voordat u onderhoudshandelingen verricht.
•Reinig het apparaat regelmatig om te voorkomen dat het materiaal van het oppervlak achteruitgaat.
•Zorg ervoor dat er geen voedselresten of resten schoonmaakmiddel ophopen op de afdichtoppervlakken van de deur.
•Resterend vet of voedsel in het apparaat kan brand veroorzaken.
•Maak het apparaat schoon met een vochtige, zachte doek. Gebruik alleen neutrale schoonmaakmiddelen. Gebruik geen schuurmiddelen, schuursponsjes, oplosmiddelen of metalen voorwerpen.
•Raadpleeg als u een ovenspray gebruikt eerst de aanwijzingen op de verpakking.
|
|
NEDERLANDS 7 |
2.5 Verwijdering |
• Haal de stekker uit het stopcontact. |
|
|
WAARSCHUWING! |
• Snij het netsnoer van het apparaat af |
|
en gooi dit weg. |
|
|
||
|
Gevaar voor letsel of |
|
|
|
|
|
verstikking. |
|
3. BESCHRIJVING VAN HET PRODUCT
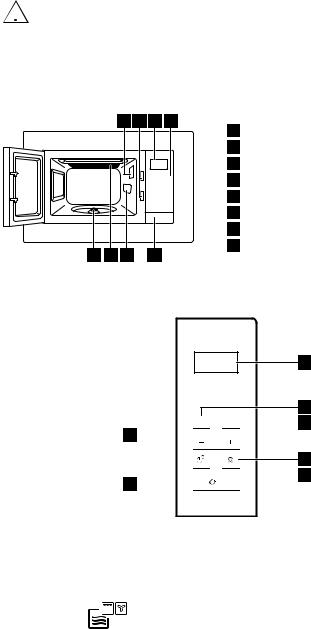
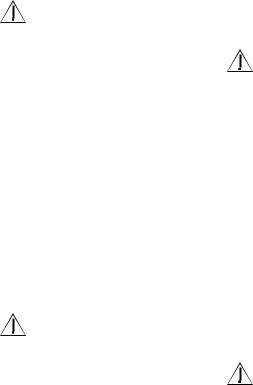
3.1 Algemeen overzicht
1 |
2 |
3 |
4 |
Lampje |
|
|
|
|
|
|
|
|
|
Veiligheidvergrendelingssysteem |
|
|
|
|
Weergave |
|
|
|
|
Bedieningspaneel |
|
|
|
|
Deuropener |
|
|
|
|
Afdekking voor microgolfgeleider |
|
|
|
|
Grillen |
Schacht draaiplateau
8 |
7 |
6 |
5 |
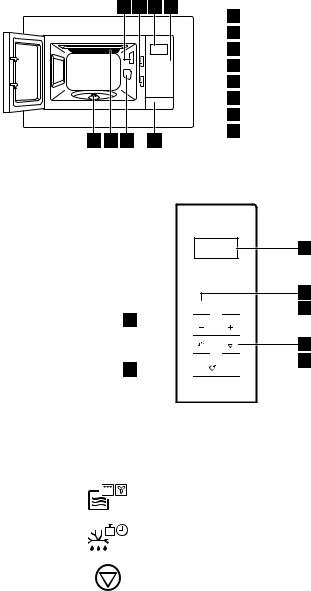
3.2 Bedieningspaneel
1
2


 3 7
3 7 
4
 5 6
5 6 

|
|
Symbool |
|
Functie |
Beschrijving |
|
|
|
|
|
|
|
|
|
|
Display |
Toont de instellingen en de |
|
1 |
|
— |
||
|
|
|
huidige tijd. |
||
|
|
|
|
|
|
|
|
|
|
|
|
|
|
|
|
Functietoets |
Om magnetron / grill / convec- |
|
2 |
|
|
|
tieoven / combi-koken in te |
|
|
|
|
|
stellen. |
|
|
|
|
|
|
8 www.aeg.com
|
|
Symbool |
Functie |
Beschrijving |
|
|
|
|
|
|
|
|
Ontdooien |
Voedsel ontdooien op gewicht |
|
3 |
|
|
of tijd. |
|
|
|
|
|
|
|
|
|
|
|
|
|
Stop / Wissen |
Om het apparaat uit te schake- |
|
4 |
|
|
len of kookinstellingen te ver- |
|
|
|
|
wijderen. |
5
6
Klok |
Om de klok en de keukenwek- |
|
ker in te stellen. |
Start / +30 sec |
Om het apparaat te starten of |
|
de kooktijd te verlengen met |
|
30 seconden op vol vermogen. |
|
|
Instellingstoetsen |
Om de tijd, het gewicht of de |
|
7 |
, |
temperatuur of automatische |
|
|
bereiding in te stellen. |
|
|
|
|
|
|
|
|
|
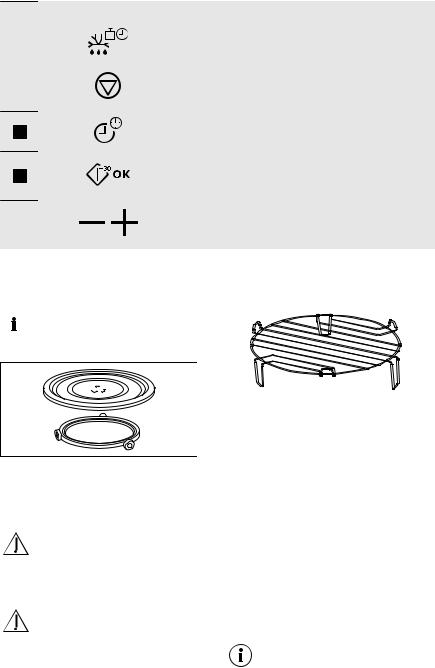
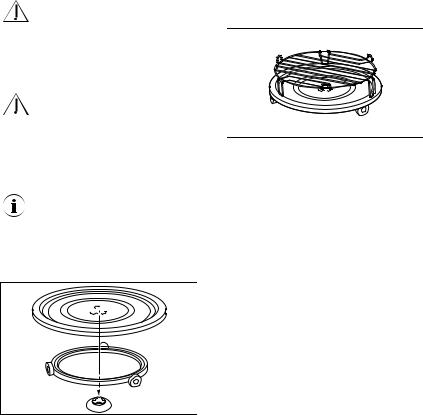
3.3 Accessoires
Set draaiplateau
Glazen plateau en wieltjes.
Grillrooster
Gebruik altijd het draaiplateau om voedsel in de magnetron te bereiden.
Gebruiken voor:
• grillen
• combinatiekoken
• convectiekoken
4. VOORDAT U HET APPARAAT VOOR DE EERSTE KEER GEBRUIKT
WAARSCHUWING!
Raadpleeg de hoofdstukken Veiligheid.
4.1 Eerste reiniging
LET OP!
Zie het hoofdstuk 'Onderhoud en reiniging'.
•Verwijder alle onderdelen en extra verpakking uit de magnetron.
•Reinig het apparaat voor het eerste gebruik.
4.2 Tijd instellen
Na aansluiting van het apparaat op het stopcontact of na een stroomstoring, toont het display 0:00 en klinkt er een geluidssignaal.
U kunt de tijd instellen in 24uursinstelling.
1. Druk tweemaal op  .
.

2.Druk op de Instellingstoetsen om de uren in te stellen.
3.Druk op  om te bevestigen.
4.Druk op de Instellingstoetsen om de minuten in te stellen.
5.Druk op  om te bevestigen.
5.DAGELIJKS GEBRUIK
WAARSCHUWING!
Raadpleeg de hoofdstukken
Veiligheid.
5.1 Algemene informatie over het gebruik van het apparaat
•Laat het voedsel na het uitschakelen van het apparaat enkele minuten rusten.
•Verwijder de verpakking van aluminiumfolie, metalen bakjes, enz. voordat u het voedsel bereidt.
Meer
•Kook het eten zo mogelijk bedekt met materiaal dat geschikt is voor gebruik in de magnetron. Bereid voedsel slechts zonder het te bedekken als u een korst wilt behouden
•Zorg dat u de gerechten niet te lang kookt, door het vermogen en de tijd te hoog in te stellen. Het voedsel kan uitdrogen, verbranden of op sommige plekken hard worden.
•Gebruik het apparaat niet om eieren in hun schaal en slakken te bereiden, omdat ze kunnen barsten. Bij gebakken eieren, moet u het eigeel eerst doorprikken.
•Prik eten met 'vel' of 'schil', zoals aardappelen, tomaten, worstjes, een paar keer met een vork in voordat u het in de magnetron plaatst, zodat het eten niet barst.
•Voor gekoeld of bevroren eten is een langere bereidingstijd nodig.
•Gerechten met saus moeten van tijd tot tijd worden geroerd.
•Groenten met een stevige structuur, zoals wortel, doperwten of bloemkool, moeten in water worden gekookt.
•Draai grotere stukken halverwege de bereidingstijd om.
NEDERLANDS 9
Druk op  om de instellingen te annuleren.
•Snij groenten zo mogelijk in stukjes van gelijke grootte.
•Gebruik platte, brede schalen of borden.
•Gebruik geen kookgerei gemaakt van porselein, keramisch materiaal of aardewerk met kleine gaatjes, bijv. op handgrepen of ongeglazuurde bodems. Er kan vocht in de openingen komen, waardoor het kookgerei bij verhitting kan barsten.
•De glazen bodem is een ruimte voor het opwarmen van voedsel of vloeistoffen. Deze is noodzakelijk voor de werking van de magnetron.
Vlees, gevogelte, vis ontdooien
•Leg het bevroren, ingepakte voedsel op een klein, omgedraaid bord met een bakje eronder zodat het dooiwater in het bakje valt.
•Draai het voedsel halverwege de ontdooitijd om. Verdeel de stukken zo mogelijk opnieuw en verwijder de stukken die al zijn ontdooid.
Boter, gebakjes, kwark ontdooien
•Ontdooi nooit volledig in het apparaat, maar bij kamertemperatuur. Dit geeft een meer gelijkmatig resultaat. Verwijder metalen of aluminium verpakking of onderdelen volledig voordat u begint te ontdooien.
Fruit, groenten ontdooien
•Ontdooi fruit en groenten, die verder als rauw bereid worden, nooit volledig in het apparaat. Laat ze bij kamertemperatuur ontdooien.
•U kunt een hoger magnetronvermogen gebruiken om fruit en groenten te bereiden zonder ze eerst te ontdooien.
Kant-en-klaarmaaltijden
•U kunt alleen kant-en-klaar maaltijden in het apparaat bereiden als de verpakking geschikt is voor gebruik in de magnetron.

10 www.aeg.com |
|
|
|
|
|
|
• U moet de op de verpakking |
|
verwijderen en plastic folie |
|
|||
|
afgedrukte instructies van de fabrikant |
doorprikken). |
|
|
|
|
|
opvolgen (bijv. metalen afdekking |
|
|
|
|
|
Geschikt kookgerei en materialen |
|
|
|
|
|
|
|
|
|
|
|
|
|
|
Materiaal van de pannen |
|
Magnetron |
|
|
Grillen / |
|
|
|
|
|
|
Hete |
|
|
Ontdooien Verwar- |
Meer |
|||
|
|
lucht |
||||
|
|
|
mings- |
|
|
|
|
|
|
|
|
|
|
|
|
|
|
|
|
|
|
Ovenbestendig glas en porselein (zon- |
X |
X |
X |
X |
|
|
der metalen onderdelen, bijv. Pyrex, |
|
|
|
|
|
|
hittebestendig glas) |
|
|
|
|
|
|
|
|
|
|
|
|
|
Non-ovenbestendig glas en porse- |
X |
-- |
-- |
|
-- |
|
lein 1) |
|
|
|
|
|
|
Glas en glaskeramiek gemaakt van |
X |
X |
X |
X |
|
|
ovenbestendig/vriesbestendig materi- |
|
|
|
|
|
|
aal (bijv. Arcoflam), grillrooster |
|
|
|
|
|
|
|
|
|
|
|
|
|
Keramisch 2), aardenwerk2) |
X |
X |
X |
-- |
|
|
Hittebestendig plastic tot 200 °C 3) |
X |
X |
X |
-- |
|
|
Karton, papier |
X |
-- |
-- |
|
-- |
|
|
|
|
|
|
|
|
Huishoudfolie |
X |
-- |
-- |
|
-- |
|
|
|
|
|
|
|
|
Bakpapier met magnetronveilige af- |
X |
X |
X |
-- |
|
|
dichting 3) |
|
|
|
|
|
|
Ovenschotels gemaakt van metaal, |
-- |
-- |
-- |
|
X |
|
d.w.z. email, gietijzer |
|
|
|
|
|
|
|
|
|
|
|
|
|
Bakvormen, zwarte lak of siliconen- |
-- |
-- |
-- |
|
X |
|
laag 3) |
|
|
|
|
|
|
Bakplaat |
-- |
-- |
-- |
|
X |
|
|
|
|
|
|
|
|
Braadkookgerei, bijv. Crostino of |
-- |
X |
X |
-- |
|
|
Crunch-bord |
|
|
|
|
|
|
|
|
|
|
|
|
|
Kant-en-klare maaltijden in de verpak- |
X |
X |
X |
X |
|
|
king 3) |
|
|
|
|
|
1)Zonder zilveren, gouden, platinum of metalen laag/versieringen
2)Zonder quartz of metalen onderdelen, of glas dat metalen bevat
3)U dient de instructies van de fabrikant over de maximum temperaturen na te leven.
X geschikt
-- niet geschikt
5.2 De magnetron aanen uitzetten
LET OP!
Stel de magnetron nooit in werking als er geen voedsel is geplaatst.
1.Druk op 
 .
.
2.Druk op de Instellingstoetsen om het vermogen in te stellen.
3.Druk op 
 om te bevestigen.
4.Druk op de Instellingstoetsen om de tijd in te stellen.
5.Druk op 
 om te bevestigen en de magnetron in te schakelen.
Om de actuele tijd te controleren terwijl de magnetron in werking in,
drukt u op  . Gedurende 3 seconden wordt de tijd weergegeven.
NEDERLANDS 11
Om de instelling van het vermogen te controleren terwijl de magnetron in
werking in, drukt u op 
 . Gedurende 3 seconden wordt de tijd weergegeven.
De magnetron uitschakelen:
•wacht tot de magnetron automatisch uitschakelt als de tijd is afgelopen.
•de deur openen. De magnetron stopt automatisch. Sluit de deur en druk op

 om door te gaan met de bereiding. Gebruik deze optie om het voedsel te controleren.
•druk op  .
.
Indien de magnetron automatisch uitschakelt, geeft hij een geluidssignaal.
5.3 Tabel vermogensinstelling
Druk op de |
Vermogeninstelling |
Geschat percentage vermogen |
Functietoets |
|
|
|
|
|
1 keer |
P100 |
100 % |
|
|
|
2 keer |
P 80 |
80 % |
|
|
|
3 keer |
P 50 |
50 % |
|
|
|
4 keer |
P 30 |
30 % |
|
|
|
5 keer |
P 10 |
10 % |
|
|
|
Overige functies |
|
|
|
|
|
Druk op de |
Vermogeninstelling |
Functiemodus |
Functietoets |
|
|
|
|
|
|
|
Grillen |
|
|
|
6 keer |
G – 1 |
Grote grill |
|
|
|
|
Combinatiekoken |
|
|
|
|
7 keer |
C – 1 |
Magnetron, Hete lucht |
|
|
|
8 keer |
C – 2 |
Magnetron, grill |
|
|
|
9 keer |
C – 3 |
Grill, Hete lucht |
|
|
|
12 www.aeg.com
Druk op de |
Vermogeninstelling |
Functiemodus |
Functietoets |
|
|
|
|
|
10 keer |
C – 4 |
Magnetron, grill, hete lucht |
|
|
|
|
Koken met hete lucht |
|
|
|
|
11 – 20 keer |
130 °C – 220 °C |
Koken met hete lucht bij vaste temperatuur |
|
|
|
5.4 Snelle start
De maximale bereidingstijd is 95 minuten.
U kunt de magnetron op de volgende manieren snel activeren.
•Druk op 
 om de magnetron gedurende 30 seconden op vol vermogen te activeren.
De bereidingstijd wordt met 30 seconden verhoogd met iedere extra druk op de knop.
•Eenmaal  indrukken. Stel de bereidingstijd in met de
Instellingstoetsen. Druk op 
 om de magnetron op vol vermogen te activeren.
5.5Ontdooien
U kunt uit 2 ontdooiwijzen kiezen:
•Gewichtontdooien
•Tijdontdooien
Gebruik ontdooien gewicht niet voor voedsel dat meer dan 20 minuten uit de vriezer is genomen, of voor ingevroren kant-en-klaar voedsel.
Om ontdooien gewicht te activeren moet u tussen de 100 en 2.000 g voedsel gebruiken.
Om voedsel van minder dan 200 g te ontdooien legt u dit aan de rand van het draaiplateau.
1.Druk eenmaal op 

 om te ontdooien op gewicht of tweemaal om te ontdooien op tijd.
2.Druk op de Instellingstoetsen om de tijd of het gewicht in te stellen. Voor ontdooien per gewicht wordt de tijd automatisch ingesteld.
3.Druk op 
 om te bevestigen en de magnetron in te schakelen.
5.6 Meerfasekoken
Als één van deze fases ontdooien is, stelt u dit in als de eerste fase.
U kunt voedsel in maximaal 3 fases bereiden.
Bereid alle bevroren gerechten in 2 fasen.
1.Druk op 

 en stel de ontdooimodus in.
2.Druk op de Instellingstoetsen om de ontdooiingstijd of het -gewicht in te stellen.
3.Eenmaal 
 indrukken.
4.Druk op de Instellingstoetsen of druk
herhaaldelijk op 
 om een functie of vermogen in te stellen.
5.Druk op 
 om te bevestigen.
6.Druk op de Instellingstoetsen om de bereidingstijd in te stellen.
7.Druk op 
 om te bevestigen en de magnetron in te schakelen.
Na iedere fase klinkt er een geluidssignaal.
5.7 Koken met hete lucht
Warm voor een beter resultaat de magnetron voor op de juiste temperatuur alvorens het voedsel te plaatsen.
1.Druk herhaaldelijk op 
 om een heteluchtkookfunctie in te stellen.

2.Druk op 
 om te bevestigen.
3.Druk 
 weer in om de magnetron in te schakelen.
U hoort een geluidssignaal als de temperatuur is ingesteld en knippert op het display.
Sla deze stap over om te koken zonder voorverwarming.
4.Als het voorverwarmen voltooid is, plaatst u het voedsel.
5.Druk op de Instellingstoetsen om de tijd in te stellen.
U kunt de bereidingstijd alleen ingeven als de magnetron is voorverwarmd. Als u binnen 5 minuten geen bereidingstijd ingeeft, hoort u 5 geluidssignalen en activeert de magnetron de standbymodus.
NEDERLANDS 13
6.Druk op 
 om te bevestigen en de magnetron in te schakelen.
5.8 Grillen en combinatiekoken
1.Druk herhaaldelijk op 
 om de grill of het combinatiekoken te selecteren.
2.Druk op 
 om te bevestigen.
3.Druk op de Instellingstoetsen om de tijd in te stellen.
4.Druk op 
 om te bevestigen en de magnetron in te schakelen.
Na de helft van de bereidingstijd klinkt er een geluidssignaal. U kunt het voedsel dan omdraaien.
6. AUTOMATISCHE PROGRAMMA'S
WAARSCHUWING!
Raadpleeg de hoofdstukken
Veiligheid.
6.1 Auto-cooking
Gebruik deze functie om met gemak uw favoriete gerecht te bereiden. De magnetron stelt de optimale instellingen automatisch in.
1.Druk herhaaldelijk op  om het gewenste menu in te stellen.
2.Druk op 
 om te bevestigen.
3.Druk op de Instellingstoetsen om het gewicht in te stellen.
4.Druk op 
 om te bevestigen en de magnetron in te schakelen.
Menu |
Gewicht |
|
|
A - 1 |
150 g |
Automa- |
250 g |
tisch opwar- |
350 g |
men |
450 g |
|
600 g |
|
|
A - 2 |
1 kopje |
Drank |
|
|
|
Menu |
Gewicht |
|
|
A - 3 |
200 g |
Pizza |
300 g |
|
400 g |
|
|
A - 4 |
50 g |
Popcorn |
100 g |
|
|
A - 5 |
500 g |
Kip |
750 g |
|
1.000 g |
|
1.200 g |
|
|
A - 6 |
150 g |
Vlees |
300 g |
|
450 g |
|
600 g |
|
|
A - 7 |
230 g |
Aardappel |
460 g |
|
690 g |
|
|
A - 8 |
150 g |
Groente |
350 g |
|
500 g |
|
|
14 www.aeg.com
Menu |
Gewicht |
|
Menu |
Gewicht |
|
|
|
|
|
A - 9 |
150 g |
|
A - 10 |
50 g (voeg 450 ml water toe) |
Vis |
250 g |
|
Pastascho100 g (voeg 800 ml water |
|
|
350 g |
|
tel |
toe) |
|
450 g |
|
|
150 g (voeg 1200 ml water |
|
650 g |
|
|
toe) |
|
|
|
|
|
7. GEBRUIK VAN DE ACCESSOIRES
WAARSCHUWING!
Raadpleeg de hoofdstukken Veiligheid.
7.1 Het plaatsen van het draaiplateau
LET OP!
Bereid geen voedsel zonder het draaiplateau en de wieltjes. Gebruik alleen de draaiplateauset meegeleverd met de magnetron.
Bereid nooit voedsel direct op het glazen draaiplateau.
7.2 Het grillrek plaatsen
Plaats het grillrek op het draaiplateau.
1.Plaats de wieltjes rond de schacht van het draaiplateau.
2.Plaats het glazen plateau op de wieltjes
8.EXTRA FUNCTIES
8.1 Kinderslot
Het kinderslot voorkomt dat de magnetron per ongeluk in werking wordt gesteld.
Druk  gedurende 3 seconden in.
Er klinkt een geluidssignaal.
Als het kinderslot actief is, toont het display  .
.
8.2 Kookwekker
U kunt maximaal 95 minuten instellen.
Als de kookwekkerfunctie actief is, kan er geen ander programma worden ingesteld.
1.Druk op  .
.
2.Druk op de Instellingstoetsen om de tijd in te stellen.
NEDERLANDS 15
3.Druk op 
 om te bevestigen. De Kookwekker stopt als u de deur
opent of het apparaat pauzeert. Als u het koken voortzet gaat de kookwekker terug naar de vorige ingestelde tijd.
Nadat de ingstelde tijd is verstreken, klinkt er een geluidssignaal.
9. AANWIJZINGEN EN TIPS
WAARSCHUWING!
Raadpleeg de hoofdstukken
Veiligheid.
9.1 Tips voor de magnetron
Probleem |
oplossing |
U kunt de gegevens over de hoeveelZoek naar gelijksoortig eten. Verhoog of verlaag heid voedselbereiding niet vinden. de bereidingstijd aan de hand van deze richtlijn:
Een dubbele hoeveelheid = bijna een dubbele bereidingstijd,de helft van de hoeveelheid = de helft van de bereidingstijd
Het eten is te droog.
Verlaag de bereidingstijd of selecteer een lager magnetronvermogen.
Het eten is nog steeds niet ontdooid, Stel een langere bereidingstijd in of selecteer een heet of gekookt nadat de bereidingshoger magnetronvermogen. Voor grotere ge-
tijd is verstreken. |
rechten is meer tijd nodig. |
|
|
Als de bereidingstijd is verstreken, is |
Kies de volgende keer een lager vermogen en |
het eten aan de rand verbrand, maar |
een langere bereidingstijd. Roer vloeistoffen hal- |
in het midden nog steeds niet gaar. |
verwege de bereidingstijd even door, bijv. soe- |
|
pen. |
|
|
U krijgt betere resultaten met rijst als u een platte, brede schaal gebruikt.
9.2 Ontdooien
Ontdooi braadstukken altijd met de vetkant omlaaag.
Ontdooi afgedekt vlees niet want dit kan leiden tot bereiden in plaats van ontdooien.
Ontdooi heel gevogelte altijd met de borstkant omlaag.
9.3 Koken
Haal gekoeld vlees en gevogelte minstens 30 minuten voor bereiden uit de koelkast.
Bewaar het vlees, gevogelte en groente afgedekt tot de bereiding.
Doe een beetje olie of vloeibare boter op de vis.
Alle groenten moeten op vol vermogen gekookt worden.
Voeg per 250 g groenten 30 - 45 ml koud water toe.

16 www.aeg.com
Snijd de verse groente in stukken van gelijke grootte. Alle groenten afgedekt in de container koken.
9.4 Opwarmen
Volg bij het opwarmen van verpakte kant-en-klaar maaltijden altijd de instructies op de verpakking.
9.5 Grill
Voor het grillen van vlakke levensmiddelen in het midden van het grillrek.
Draai het voedsel halverwege de ingestelde tijd om en grill verder.
9.6 Combinatiekoken
Gebruik Combinatiekoken om bepaald voedsel krokant te houden.
Draai het voedsel halverwege de ingestelde tijd om en ga verder.
Er bestaan 4 modi voor Combikoken. Elke modus combineert de functies van de magnetron, de grill en convectie met verschillende duuren vermogensstanden.
9.7 Koken met hete lucht
U kunt eten bereiden zoals in een gewone oven.
Er worden geen magnetrons gebruikt.
10. ONDERHOUD EN REINIGING
WAARSCHUWING!
Raadpleeg de hoofdstukken
Veiligheid.
10.1 Opmerkingen over schoonmaken
•Maak de voorkant van het apparaat schoon met een zachte doek en een warm sopje.
•Gebruik voor metalen oppervlakken een universeel reinigingsmiddel.
•Reinig de binnenkant van het apparaat na elk gebruik. Vuil laat zich dan het makkelijkst verwijderen en kan niet aanbranden.
•Verwijder hardnekkig vuil met een speciale reiniger.
•Maak alle accessoires schoon en laat ze drogen. Gebruik een zachte doek en een warm sopje en een reinigingsmiddel.
•Om de moelijk te verwijderen restjes te verwijderen, kook een glas water gedurende 2 tot 3 minuten op de hoogste magnetronstand.
•Om geurtjes te verwijderen, meng een glas water met 2 theelepels citroensap en kook gedurende 5 minuten op de hoogste magnetronstand.
11. PROBLEEMOPLOSSING
WAARSCHUWING!
Raadpleeg de hoofdstukken Veiligheid.
|
|
NEDERLANDS 17 |
11.1 Wat moet u doen als… |
|
|
|
|
|
Probleem |
Mogelijke oorzaak |
Oplossing |
|
|
|
Het apparaat werkt |
Het apparaat is uitgeschakeld. |
Schakel het apparaat in. |
niet. |
|
|
|
|
|
Het apparaat werkt |
De stekker zit niet in het stop- |
Sluit het apparaat aan op het |
niet. |
contact. |
stroomnet. |
|
|
|
Het apparaat werkt |
De zekering in de zekeringkast |
Controleer de zekering. Als de |
niet. |
is doorgebrand. |
zekering meer dan een keer |
|
|
doorslaat, raadpleegt u een be- |
|
|
voegde elektricien. |
|
|
|
Het apparaat werkt |
De deur is niet goed gesloten. |
Zorg ervoor dat de deur niet |
niet. |
|
wordt geblokkeerd. |
|
|
|
Het lampje brandt |
Het lampje is stuk. |
De lamp moet worden vervan- |
niet. |
|
gen. |
|
|
|
Op het display ver- |
Het kinderslot is actief. |
Deactiveer het kinderslot. Houd |
schijnt . |
|
3 seconden ingedrukt. |
|
|
|
Er ontstaan vonken in |
Er zitten metalen schalen of ser- |
Haal het servies uit het appa- |
de ovenruimte. |
vies met een metalen randje in |
raat. |
|
het apparaat. |
|
|
|
|
Er ontstaan vonken in |
Er zit metalen bestek of alumini- |
Zorg ervoor dat het bestek en |
de ovenruimte. |
umfolie dat de binnenwanden |
de folie de binnenwanden niet |
|
raakt in het apparaat. |
raakt. |
|
|
|
Het draaiplateau |
Er zit vuil of iets anders onder |
Controleer het gedeelte onder |
maakt een krassend |
het glazen draaiplateau. |
het glazen draaiplateau. |
of schurend geluid. |
|
|
|
|
|
Het apparaat stopt |
Er is een storing. |
Bel de klantenservice als deze |
met werken zonder |
|
situatie blijft bestaan. |
duidelijke reden. |
|
|
|
|
|
11.2 Onderhoudsgegevens
Als u niet zelf het probleem kunt verhelpen, neem dan contact op met uw verkoper of de serviceafdeling.
De contactgegevens van het servicecentrum staan op het typeplaatje.
Het typeplaatje bevindt zich op het apparaat. Verwijder het typeplaatje niet van het apparaat.
Wij adviseren u om de gegevens hier te noteren:
Model (MOD.) ........................................
Productnummer (PNC) ........................................
Serienummer (S.N.) ........................................
18 www.aeg.com
12. MONTAGE
WAARSCHUWING!
Raadpleeg de hoofdstukken
Veiligheid.
12.1 Algemene informatie
LET OP!
Blokkeer de luchtopeningen niet. Als u dat wel doet, kan het apparaat oververhit raken.
LET OP!
Sluit het apparaat niet aan op adapters of verlengsnoeren. Hierdoor kan overbelasting en brandgevaar ontstaan.
LET OP!
De minimale installatiehoogte is 85 cm.
•De magnetron is uitsluitend bestemd voor inbouwtoepassingen. Het apparaat moet op een stabiel en vlak oppervlak worden geplaatst.
•De kast mag geen achterwand hebben op de plaats waar de magnetron zich bevindt.
•Houd de magnetron uit de buurt van stoom, hete lucht en water.
•Als de magnetron te dicht bij de tv en radio staat, kan het signaal worden verstoord.
•Activeer na vervoer van het apparaat bij koud weer de magnetron niet direct na de installatie. Laat het apparaat een tijdje op kamertemperatuur komen en absorbeer de warmte.
12.2 Elektrische installatie
WAARSCHUWING!
De elektrische installatie mag uitsluitend worden uitgevoerd door een gekwalificeerd persoon.
De fabrikant is niet verantwoordelijk indien u deze veiligheidsmaatregelen uit hoofdstuk 'Veiligheidsinformatie' niet opvolgt.
Deze magnetron wordt geleverd met een netsnoer en stekker.
De kabel heeft geaarde bedrading met een geaarde stekker. De stekker moet in een stopcontact worden gestoken dat goed is geïnstalleerd en geaard. Bij kortsluiting vermindert de aarding de kans op het krijgen van een elektrische schok.
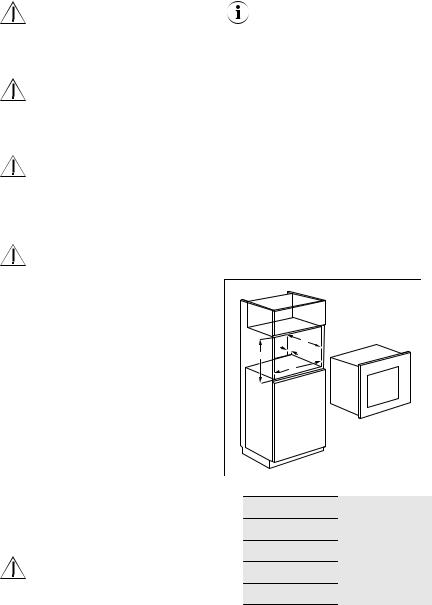
12.3 De magnetron installeren
1.Controleer of de afmetingen van het meubel voldoen aan de montageafmetingen.
C |
|
D |
|
A |
|
B |
|
Montageafmetingen |
|
Afmetingen |
mm |
A |
450 + 2 |
B |
560 + 8 |
C |
550 |
D |
45 |
2.Als de kastdiepte groter dan 300 mm is, plaats het sjabloon op de onderkant van de kast en controleer of het past. Zo ja, markeer de schroefpunten. Verwijder het
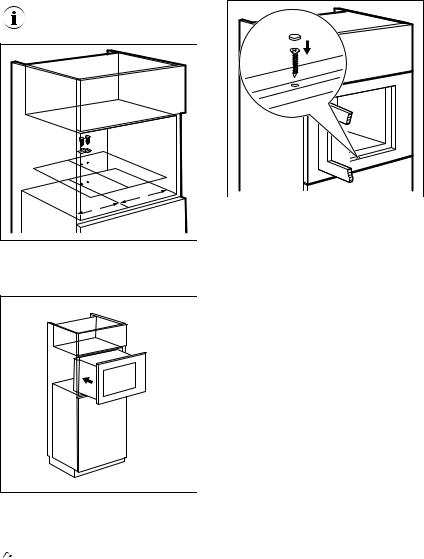
sjabloon en bevestig de beugel d.m.v. de schroeven op de gemarkeerde plaats.
Sla deze stap over als de kastdiepte 300 mm is.
= |
= |
3.De magnetron installeren. Als u de beugel bevestigd hebt, zorg er dan voor dat hij aan de achterkant van het apparaat vastzit.
NEDERLANDS 19
4.Open de deur en bevestig de magnetron aan de kast met een schroef.
13. MILIEUBESCHERMING
Recycle de materialen met het symbool
 . Gooi de verpakking in een geschikte verzamelcontainer om het te recyclen. Help om het milieu en de volksgezondheid te beschermen en recycle het afval van elektrische en elektronische apparaten. Gooi apparaten
gemarkeerd met het symbool  niet weg met het huishoudelijk afval. Breng het product naar het milieustation bij u in de buurt of neem contact op met de gemeente.

20 www.aeg.com
CONTENTS
1. |
SAFETY INFORMATION......................................................................................... |
21 |
|
2. |
SAFETY INSTRUCTIONS........................................................................................ |
23 |
|
3. |
PRODUCT DESCRIPTION...................................................................................... |
25 |
|
4. |
BEFORE FIRST USE................................................................................................. |
26 |
|
5. |
DAILY USE................................................................................................................ |
27 |
|
6. |
AUTOMATIC PROGRAMMES................................................................................ |
31 |
|
7. |
USING THE ACCESSORIES.................................................................................... |
31 |
|
8. |
ADDITIONAL FUNCTIONS.................................................................................... |
32 |
|
9. |
HINTS AND TIPS..................................................................................................... |
32 |
|
10. |
CARE AND CLEANING........................................................................................ |
33 |
|
11. |
TROUBLESHOOTING........................................................................................... |
33 |
|
12. |
INSTALLATION..................................................................................................... |
35 |
|
FOR PERFECT RESULTS
Thank you for choosing this AEG product. We have created it to give you impeccable performance for many years, with innovative technologies that help make life simpler features you might not find on ordinary appliances. Please spend a few minutes reading to get the very best from it.
Visit our website for:
Get usage advice, brochures, trouble shooter, service information: www.aeg.com/webselfservice
Register your product for better service:
www.registeraeg.com
Buy Accessories, Consumables and Original spare parts for your appliance:
www.aeg.com/shop
CUSTOMER CARE AND SERVICE
Always use original spare parts.
When contacting our Authorised Service Centre, ensure that you have the following data available: Model, PNC, Serial Number.
The information can be found on the rating plate.  Warning / Caution-Safety information
 General information and tips
  Environmental information
Subject to change without notice.
ENGLISH 21
1.  SAFETY INFORMATION
Before the installation and use of the appliance, carefully read the supplied instructions. The manufacturer is not responsible if an incorrect installation and use causes injuries and damages. Always keep the instructions with the appliance for future reference.
1.1 Children and vulnerable people safety
WARNING!
Risk of suffocation, injury or permanent disability.
•This appliance can be used by children aged from 8 years and above and persons with reduced physical, sensory or mental capabilities or lack of experience and knowledge if they have been given supervision or instruction concerning use of the appliance in a safe way and understand the hazards involved.
•Do not let children play with the appliance.
Children under 3 years must not be left unsupervised in the vicinity of the appliance.
•Keep all packaging away from children.
•Keep children and pets away from the appliance when it operates or when it cools down. Accessible parts are hot.
•If the appliance has a child safety device, we recommend you activate it.
•Cleaning and user maintenance shall not be made by children without supervision.
•Keep the appliance and its cord out of reach of children less than 8 years.
1.2 General Safety
•This appliance is intended to be used in household and similar applications such as:
–Farm houses; staff kitchen areas in shops, offices and other working environments;
22www.aeg.com
–By clients in hotels, motels, bed and breakfast and other residential type environments
•Internally the appliance becomes hot when in operation. Do not touch the heating elements that are in the appliance. Always use oven gloves to remove or put in accessories or ovenware.
•Do not use a steam cleaner to clean the appliance.
•Before maintenance, deactivate the appliance and disconnect the mains plug from the mains socket.
•If the door or door seals are damaged, the appliance must not be operated until it has been repaired by a qualified person.
•If the supply cord is damaged, it must be replaced by the manufacturer, its Authorised Service Centre or similarly qualified persons in order to avoid a hazard.
•Only a qualified person can carry out any service or repair operation that involves the removal of a cover which gives protection against exposure to microwave energy.
•Do not operate the appliance by means of an external timer or separate remote-control system.
•Do not heat liquids and other foods in sealed containers. They are liable to explode.
•Only use utensils that are suitable for use in microwave ovens.
•When heating food in plastic or paper containers, keep an eye on the appliance due to the possibility of ignition.
•The appliance is intended for heating food and beverages. Drying of food or clothing and heating of warming pads, slippers, sponges, damp cloth and similar may lead to risk of injury, ignition or fire.
•If smoke is emitted, switch off or unplug the appliance and keep the door closed in order to stifle any flames.
•Microwave heating of beverages can result in delayed eruptive boiling. Care must be taken when handling the container.

ENGLISH 23
•The contents of feeding bottles and baby food jars shall be stirred or shaken and the temperature checked before consumption, in order to avoid burns.
•Eggs in their shell and whole hard-boiled eggs should not be heated in the appliance since they may explode, even after microwave heating has ended.
•The appliance should be cleaned regularly and any food deposits removed.
•Failure to maintain the appliance in a clean condition could lead to deterioration of the surface that could adversely affect the life of the appliance and possibly result in a hazardous situation.
•The temperature of accessible surfaces may be high when the appliance is operating.
•The microwave oven shall not be placed in a cabinet unless it has been tested in a cabinet.
•The rear surface of appliances shall be placed against a wall.
•Do not use harsh abrasive cleaners or sharp metal scrapers to clean the glass door since they can scratch the surface, which may result in shattering of the glass.
•Pay attention to the minimum dimensions of the cabinet (if applicable). Refer to the installation chapter.
•The appliance must be operated with the decorative door open (if applicable).
2.SAFETY INSTRUCTIONS
2.1 Installation
WARNING!
Only a qualified person must install this appliance.
•Remove all the packaging.
•Do not install or use a damaged appliance.
•Obey the installation instruction supplied with the appliance.
•Always be careful when you move the appliance because it is heavy. Always wear safety gloves.
•Do not pull the appliance by the handle.
•Keep the minimum distance from the other appliances and units.
•Make sure that the appliance is installed below and adjacent safe structures.
•The sides of the appliance must stay adjacent to appliances or to units with the same height.
24www.aeg.com
2.2Electrical Connection
WARNING!
Risk of fire and electrical shock.
•All electrical connections should be made by a qualified electrician.
•The appliance must be earthed.
•Make sure that the electrical information on the rating plate agrees with the power supply. If not, contact an electrician.
•If the appliance is connected to the socket via an extension cord, make sure the cord is earthed.
•Make sure not to cause damage to the mains plug and to the mains cable. Contact the Service or an electrician to change a damaged mains cable.
•Do not pull the mains cable to disconnect the appliance. Always pull the mains plug.
2.3 Use
WARNING!
Risk of injury, burns and electrical shock or explosion.
•Do not change the specification of this appliance.
•Do not let the appliance stay unattended during operation.
•Do not apply pressure on the open door.
•Make sure that the ventilation openings are not blocked.
•Do not use the appliance as a work surface and do not use the cavity for storage purposes.
2.4 Care and Cleaning
WARNING!
Risk of injury, fire, or damage to the appliance.
•Before maintenance, deactivate the appliance and disconnect the mains plug from the mains socket.
•Clean regularly the appliance to prevent the deterioration of the surface material.
•Do not allow food spills or cleaner residue to accumulate on door sealing surfaces.
•Remaining fat or food in the appliance can cause fire.
•Clean the appliance with a moist soft cloth. Only use neutral detergents. Do not use abrasive products, abrasive cleaning pads, solvents or metal objects.
•If you use an oven spray, obey the safety instructions on the packaging.
2.5 Disposal
WARNING!
Risk of injury or suffocation.
•Disconnect the appliance from the mains supply.
•Cut off the mains cable and discard it.
ENGLISH 25
3.PRODUCT DESCRIPTION
3.1General overview
1 |
2 |
3 |
4 |
Lamp |
|
|
|
|
|
|
|
|
|
Safety interlock system |
|
|
|
|
Display |
|
|
|
|
Control panel |
|
|
|
|
Door opener |
|
|
|
|
Waveguide cover |
|
|
|
|
Grill |
Turntable shaft
8 |
7 |
6 |
5 |
3.2 Control Panel
1
2


 3 7
3 7 
4
 5 6
5 6 

|
|
Symbol |
|
Function |
Description |
|
|
|
|
|
|
|
|
|
|
Display |
Shows the settings and current |
|
1 |
|
— |
||
|
|
|
time. |
||
|
|
|
|
|
|
|
|
|
|
|
|
|
|
|
|
Function pad |
To set the microwave / grill / |
|
2 |
|
|
|
convection / combi cooking. |
|
|
|
|
|
|
|
|
|
|
Defrosting |
To defrost food by weight or |
|
3 |
|
|
|
time. |
|
|
|
|
|
|
|
|
|
|
Stop / Clear |
To deactivate the appliance or |
|
4 |
|
|
|
delete the cooking settings. |
|
|
|
|
|
|
26 www.aeg.com
|
|
Symbol |
Function |
Description |
|
|
|
|
|
|
|
|
Clock |
To set the clock and Kitchen |
|
5 |
|
|
timer. |
|
|
|
|
|
|
|
|
Start / +30 sec |
To start the appliance or in- |
|
6 |
|
|
crease the cooking time for 30 |
|
|
|
|
seconds at full power. |
|
|
|
|
|
|
|
|
Setting pads |
To set the time, weight, tem- |
|
7 |
|
, |
perature or Auto cooking func- |
|
|
|
tion. |
|
|
|
|
|
|
|
|
|
|
|
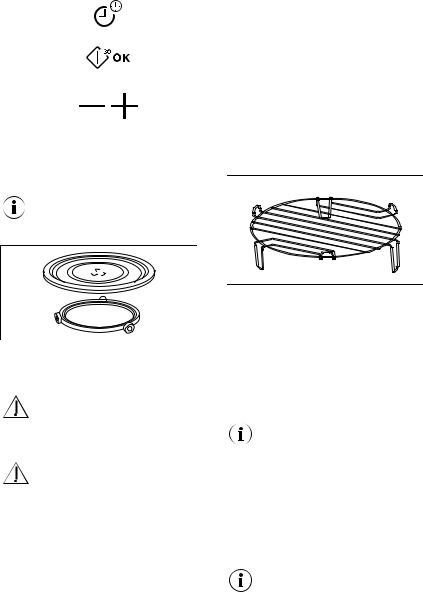
3.3 Accessories
Turntable set
Glass cooking tray and roller guide.
Grill Rack
Always use the turntable set to prepare food in the microwave.
Use for:
• grilling food
• combi cooking
• convection cooking
4. BEFORE FIRST USE
WARNING!
Refer to Safety chapters.
4.1 Initial Cleaning
CAUTION!
Refer to chapter "Care and
Cleaning".
•Remove all the parts and additional packaging from the microwave.
•Clean the appliance before first use.
4.2Setting the time
When you connect the appliance to the electrical supply or after a power cut, the
display shows 0:00 and an acoustic signal sounds.
You can set the time in a 24 hour clock system.
1.Press  twice.
2.Press the Setting pads to set the hours.
3.Press  to confirm.
4.Press the Setting pads to set the minutes.
5.Press  to confirm.
To cancel the settings press  .
.

ENGLISH 27
5. DAILY USE
WARNING!
Refer to Safety chapters.
5.1 General information about using the appliance
•After you deactivate the appliance, let the food stand for some minutes.
•Remove the aluminium foil packaging, metal containers, etc. before you prepare the food.
Cooking
•If possible, cook food covered with material suitable for use in the microwave. Only cook food without a cover if you want to keep it crusty
•Do not overcook the dishes by setting the power and time too high. The food can dry out, burn or catch fire in some places.
•Do not use the appliance to cook eggs or snails in their shells, because they can explode. With fried eggs, pierce the yolks first.
•Prick food with "skin" or "peel", such as potatoes, tomatoes, sausages, with a fork several times before cooking so that the food does not explode.
•For chilled or frozen food, set a longer cooking time.
•Dishes which contain sauce must be stirred from time to time.
•Vegetables that have a firm structure, such as carrots, peas or cauliflower, must be cooked in water.
•Turn larger pieces after half of the cooking time.
•If possible, cut vegetables into similarsized pieces.
•Use flat, wide dishes.
•Do not use cookware made of porcelain, ceramic or earthenware
Suitable cookware and materials
with small holes, e. g. on handles or unglazed bottoms. Moisture going into the holes can cause the cookware to crack when it is heated.
•The glass cooking tray is a work space for heating food or liquids. It is necessary for the operation of the microwave.
Defrosting meat, poultry, fish
•Put the frozen, unwrapped food on a small upturned plate with a container below it so that the defrosting liquid collects in the container.
•Turn the food after half of the defrosting time. If possible, divide and then remove the pieces that started to defrost.
Defrosting butter, portions of gateau, quark
•Do not fully defrost the food in the appliance, but let it defrost at room temperature. This gives a more even result. Fully remove all metal or aluminium packaging before defrosting.
Defrosting fruit, vegetables
•Do not fully defrost fruit and vegetables, which are to be further prepared while raw, in the appliance. Let them defrost at room temperature.
•You can use a higher microwave power to cook fruit and vegetables without defrosting them first.
Ready meals
•You can prepare ready meals in the appliance only if their packaging is suitable for microwave use.
•You must follow the manufacturer's instructions printed on the packaging (e.g. remove the metal cover and pierce the plastic film).
Cookware / Material |
Microwave |
|
Grilling / |
|
|
|
|
|
Convec- |
|
Defrosting |
Heating |
Cooking |
|
|
tion |
|||
|
|
|
|
|
|
|
|
|
|
Ovenproof glass and porcelain (with no X |
X |
X |
X |
|
metal components, e. g. Pyrex, heat- |
|
|
|
|
proof glass) |
|
|
|
|
|
|
|
|
|

28 www.aeg.com
Cookware / Material |
|
Microwave |
|
Grilling / |
|
|
|
|
Convec- |
|
Defrosting |
Heating |
Cooking |
|
|
tion |
|||
|
|
|
|
|
|
|
|
|
|
Non-ovenproof glass and porcelain 1) |
X |
-- |
-- |
-- |
Glass and glass ceramic made of oven- |
X |
X |
X |
X |
proof/frost-proof material (e. g. Arco- |
|
|
|
|
flam), grill shelf |
|
|
|
|
|
|
|
|
|
Ceramic 2), earthenware 2) |
X |
X |
X |
-- |
Heat-resistant plastic up to 200 °C 3) |
X |
X |
X |
-- |
Cardboard, paper |
X |
-- |
-- |
-- |
|
|
|
|
|
Clingfilm |
X |
-- |
-- |
-- |
|
|
|
|
|
Roasting film with microwave safe clo- |
X |
X |
X |
-- |
sure 3) |
|
|
|
|
Roasting dishes made of metal, e. g. |
-- |
-- |
-- |
X |
enamel, cast iron |
|
|
|
|
|
|
|
|
|
Baking tins, black lacquer or silicon- |
-- |
-- |
-- |
X |
coated 3) |
|
|
|
|
Baking tray |
-- |
-- |
-- |
X |
|
|
|
|
|
Browning cookware, e. g. Crisp pan or |
-- |
X |
X |
-- |
Crunch plate |
|
|
|
|
|
|
|
|
|
Ready meals in packaging 3) |
X |
X |
X |
X |
1)With no silver, gold, platinum or metal plating / decorations
2)Without quartz or metal components, or glazes which contain metals
3)You must follow the manufacturer’s instructions about the maximum temperatures.
X suitable
-- not suitable
5.2 Activating and deactivating the microwave
CAUTION!
Do not let the microwave operate if there is no food in it.
1.Press 
 .
.
2.Press the Setting pads to set the power level.
3.Press 
 to confirm.
4.Press the Setting pads to set the time.
5.Press 
 to confirm and activate the microwave.
To check the current time, while the microwave
operates, press  . The time is displayed for 3 seconds.
To check the power setting, while the microwave
operates, press 
 . The time is displayed for 3 seconds.

To deactivate the microwave:
•wait until the microwave deactivates automatically, when the time comes to an end.
•open the door. The microwave stops automatically. Close the door and
press 
 to continue to cook. Use this option to inspect food.
5.3 Power setting table
ENGLISH 29
• press  .
.
When the microwave deactivates automatically, an acoustic signal sounds.
Press the |
Power setting |
Approximate Percentage of Power |
Function but- |
|
|
ton |
|
|
|
|
|
1 time |
P100 |
100 % |
|
|
|
2 times |
P 80 |
80 % |
|
|
|
3 times |
P 50 |
50 % |
|
|
|
4 times |
P 30 |
30 % |
|
|
|
5 times |
P 10 |
10 % |
|
|
|
Other functions |
|
|
|
|
|
Press the |
Power setting |
Function mode |
Function but- |
|
|
ton |
|
|
|
|
|
|
|
Grill |
|
|
|
6 times |
G – 1 |
Full Grill |
|
|
|
|
|
Combi Cooking |
|
|
|
7 times |
C – 1 |
Microwaves, Convection |
|
|
|
8 times |
C – 2 |
Microwaves, Grill |
|
|
|
9 times |
C – 3 |
Grill, Convection |
|
|
|
10 times |
C – 4 |
Microwaves, Grill, Convection |
|
|
|
|
|
Convection Cooking |
|
|
|
11 – 20 times |
130 °C – 220 °C |
Convection cooking at set temperature |
|
|
|
5.4 Quick Start
The maximum cooking time is 95 minutes.
You can quickly activate the microwave in the following ways.
•Press 
 to activate the microwave for 30 seconds at full power.
The cooking time increases by 30 seconds with each additional press of the button.
•Press  once. Set the cooking time with the Setting pads. Press
30 www.aeg.com

 to activate the microwave at full power.
5.5 Defrosting
You can choose between 2 defrosting modes:
•Weight defrosting
•Time defrosting
Do not use weight defrosting on food that is left out of the freezer for more than 20 minutes, or for frozen ready-made food.
To activate weight defrosting you must use more than 100 g of food and less than 2000 g.
To defrost less than 200g of food place it on the edge of the turntable.
1.Press 

 once to set the weight defrosting and twice to set the time defrosting.
2.Press the Setting pads to set the time or weight.
For weight defrosting the time is set automatically.
3.Press 
 to confirm and activate the microwave.
5.6 Multistage cooking
If one stage is defrosting, set it as the first stage.
You can cook food in maximum 3 stages. Cook all frozen foods in 2 stages.
1.Press 
 and set the defrosting mode.
2.Press the Setting pads to set the defrosting time or weight.
3.Press 
 once.
once.
4.Press the Setting pads or repeatedly
press 
 to set a function or power level.
5.Press 
 to confirm.
6.Press Setting pads to set the cooking time.
7.Press 
 to confirm and activate the microwave.
After each step an acoustic signal sounds.
5.7 Convection Cooking
For better result preheat the microwave to the right temperature before inserting the food.
1.Repeatedly press 
 to set a Convection cooking function.
2.Press 
 to confirm.
3.Press 
 again to activate the microwave.
When you hear an acoustic signal, the temperature is set and flashes on the display.
Skip this step to cook without preheating.
4.When the preheating ends put in the food.
5.Press the Setting pads to set the time.
You can input the cooking time only when the microwave is preheated. If you do not input the cooking time in 5 minutes, 5 acoustic signals sound and the microwave activates standby mode.
6.Press 
 to confirm and activate the microwave.
5.8 Grilling and Combi
Cooking
1.Repeatedly press 
 to set the Grilling or Combi Cooking function.
2.Press 
 to confirm.
3.Press the Setting pads to set the time.
4.Press 
 to confirm and activate the microwave.
An acoustic signal sounds after half of the cooking time passes. You can turn over the food.
Loading...