


MCD256-M

MCD256
User Manual
Microwave Oven

2
Dear Customer
Thank you for choosing one of our high-quality
products.
With this appliance you will experience the
perfect combination of functional design and
cutting edge technology.
Convince yourself that our appliances are
engineered to deliver the best performance
and control - indeed we are setting the highest
standards of excellence.
In addition to this you find environmental and
energy saving aspects as an integral part of
our products.
To ensure optimal and regular performance of
your appliance please read this instruction
manual carefully. It will enable you to navigate
all processes perfectly and most efficiently.
To refer to this manual any time you need to,
we recommend you to keep it in a safe place.
And please pass it to any future owner of the
appliance.
We wish you much joy with your new
appliance.
Contents
Safety information 4
Product description 9
Accessories 10
Before first use 11
Operation 12
Programme charts 16
Hints and tips 17
Care and cleaning 18
Technical data 19
Installation 20
Environmental information 22
European guarantee 22
Service 83
The following symbols are used in this
user manual:
Important information concerning
your personal safety and
information on how to avoid
damaging the appliance.
General information and tips
3
Environmental information
4
Safety information
The built-in safety interlock switches
prevent the microwave oven from
operating when the door is open.
Do not tamper with them, or attempt
to operate the oven with the door open
as open door operation can result in
exposure to microwave energy.
Do not allow food spills or cleaner
residue to accumulate on door sealing
surfaces. See the Cleaning and Care
section for cleaning instructions.
It is particularly important that the
oven door closes properly and that
there is no damage to the: (1) door
(warped), (2) hinges and latches
(broken or insecure), (3) door seals and
sealing surface.
Warning: If the door, hinges/latches
or door seals are damaged, the
microwave must not be operated
until it has been repaired by an
authorized service person.
Warning: It is hazardous for anyone
except factory trained service
personnel to service or make
adjustments to this oven. Contact
your nearest authorised service
agent if service should be required.
Do not remove the outer case, door or
control panel at any time. Doing so may
cause exposure to extremely high voltage.
Install or locate this oven only in
accordance with ‘installation instructions’
found in this manual.
Use the appliance for its intended use
as described in this manual. Do not use
corrosive chemicals in this appliance.
This type of oven is specifically designed
to heat, cook, or defrost food. It is not
designed for industrial or laboratory use
neither for commercial use as this will
invalidate the guarantee.
Do not operate the oven empty. If food
or water is not present to absorb the
microwave energy, the magnetron tube
can be damaged.
Do not store this appliance outdoors.
Do not use this product near water.
Do not attempt to dry clothing or
newspapers in the microwave oven.
These items can ignite.
Do not use the cavity for storage
purposes. Do not leave paper products,
cooking utensils, or food in the cavity
when not in use.
Microwave oven is a Group 2 ISM
equipment in which radio frequency
energy is intentionally generated and
used in the form of electromagnetic
radiation for the treatment of material.
This oven is a Class B equipment
suitable for use in domestic
establishments and in establishments
directly connected to a low voltage
power supply network which supplies
buildings used for domestic purposes.
5
The microwave oven shall not be
placed in a cabinet unless it has been
tested in a cabinet.
Warning: If smoke is observed,
switch off or unplug the appliance
and keep the door closed in order
to stifle any flames. Never use
water.
Warning: Only allow children or
infirm persons to use the
microwave, without supervision,
when adequate instructions have
been given so that the child or
infirm person is able to use the
microwave in a safe way and
understand the hazards of
improper use.
It is quite normal for steam to be
emitted around the door, or for misting
to occur on the door, or even for water
droplets to appear below the door
during the cooking cycle. This is merely
condensation from the heat of the food
and does not affect the safety of your
oven. The door is not intended to seal
the oven cavity completely.
Do not force the turntable to rotate by
hand. This may cause malfunctioning.
Arcing in the oven during microwave
operation usually occurs from use of
metallic utensils. Continuous arcing,
however, can damage the unit. Stop
the programme and check the utensil.
Care should be taken not to obstruct
any air vents located on the top, rear,
side and bottom of the oven.
Warning: Do not use this oven for
commercial purposes. This oven is
made for domestic use only.
Unpacking
When you unpack the oven, check that
the product is free from damage.
Damage or any missing parts must be
reported immediately to the retailer.
The oven, parts of the oven or the
accessories may be wrapped by a
protection foil. If so, you must remove
this foil before using the oven. Do not
leave packing material so that small
children can play with it. This can be
hazardous.
Utensil safety
Most glass, glass ceramic and heat-
resistant glassware utensils are
excellent for use in the microwave oven.
Although microwave energy will not
heat most glass and ceramic items,
these utensils can become hot as heat
transfers from the food to th e container.
The use of oven gloves to remove
dishes is recommended.
6
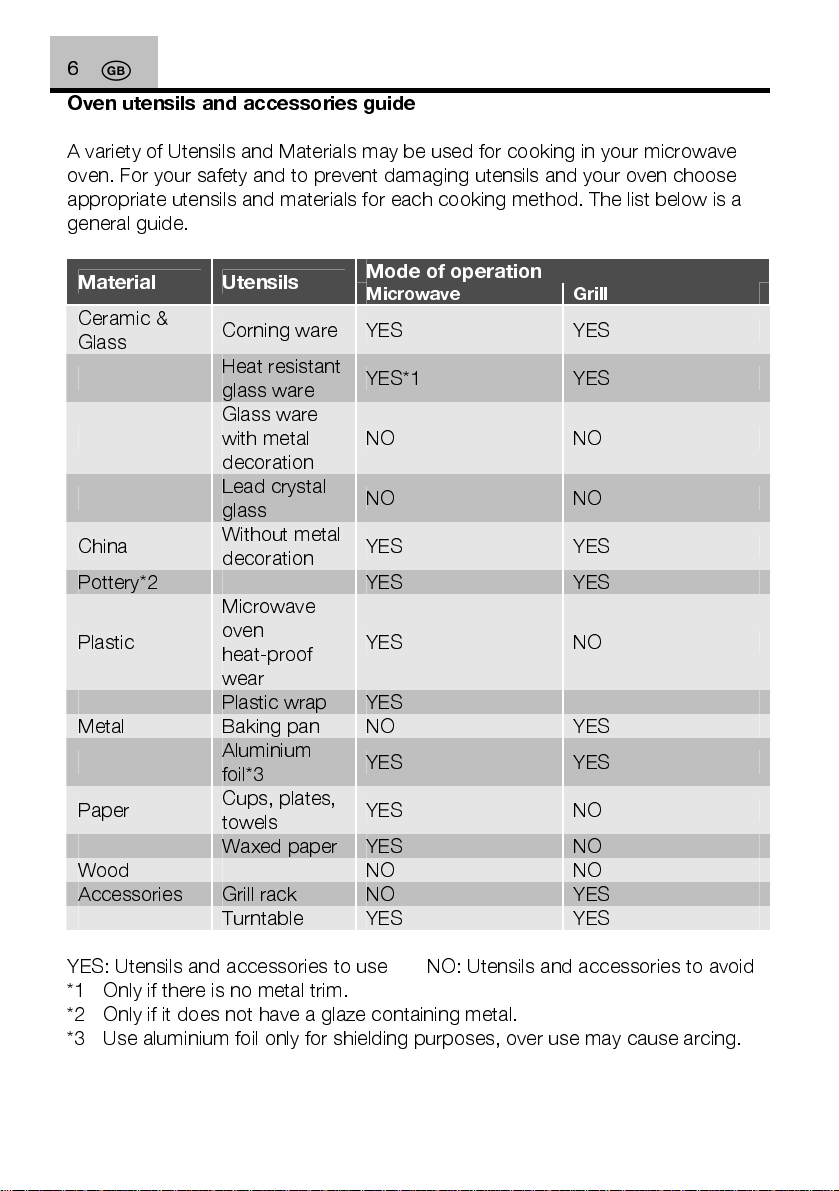
Oven utensils and accessories guide
A variety of Utensils and Materials may be used for cooking in your microwave
oven. For your safety and to prevent damaging utensils and your oven choose
appropriate utensils and materials for each cooking method. The list below is a
general guide.
Material Utensils
Ceramic &
Glass
Corning ware YES
Heat resistant
glass ware
Mode of operation
Microwave Grill
YES*1
YES
YES
Glass ware
China
Pottery*2
with metal
decoration
Lead crystal
glass
Without metal
decoration
NO
NO
YES
YES
NO
NO
YES
YES
Microwave
Plastic
Metal
Paper
Wood
Accessories
oven
heat-proof
wear
Plastic wrap YES
Baking pan
Aluminium
foil*3
Cups, plates,
towels
Waxed paper YES
Grill rack
Turntable
YES
NO YES
YES
YES
NO
NO YES
YES
NO
YES
NO
NO
NO
YES
YES: Utensils and accessories to use NO: Utensils and accessories to avoid
*1 Only if there is no metal trim.
*2 Only if it does not have a glaze containing metal.
*3 Use aluminium foil only for shielding purposes, over use may cause arcing.
Testing suitability of cookware
Utensils should be checked to ensure they
are suitable for use in Microwave Ovens.
Place the cookware in the microwave
along with a glass half full of water. Heat on
full power for one minute. If the cookware
feels hot, you should not use it. If it is just
slightly warm, you can use it for reheating
but not for cooking. If the dish is room
temperature, it is suitable for microwave
cooking.
Paper napkins, wax paper, paper towels,
plates, cups, cartons, freezer wrap and
cardboard are great convenience utensils.
Always be sure containers are filled with
food to absorb energy and thus avoid the
possibility of overheating or ignition.
Many plastic dishes, cups, freezer
containers and plastic wraps may be used
in the microwave oven. Follow
manufacturer’s instructions when using
plastics in the oven. Avoid using plastic
utensils with foods that have high fat or
sugar content since these foods reach high
temperatures and could melt some plastics.
Do not leave oven unattended, and look
at it from time to time when heating or
cooking food in plastic, paper or other
combustible containers.
Metal utensils and utensils with metallic
trim should not be used in the microwave
oven, unless specifically recommended for
microwave use.
Containers with restricted openings, such
as bottles, should not be used for
microwave cooking.
Use caution when removing a lid or cover
from a dish to avoid steam burns.
Foil containers
Shallow foil containers may safely be used
to reheat foods in your microwave oven
providing the following rules are observed:
7
1. Foil containers should not be more
than 3 cms (1 1/4”) deep.
2. Foil lids must not be used.
3. The foil containers must be at least
two-thirds full of food. Empty
containers must never be used.
4. Foil containers should be used singly
in the microwave oven and should
not be allowed to touch the sides. If
your oven has a metal turntable or
cooking rack, the foil container
should be placed on an upturned
ovenproof plate.
5. Foil containers should never be re-
used in the microwave oven.
If the microwave oven has been in use for
15 minutes or more, allow it to cool before
using it again.
The container and turntable may become
hot during use; take great care when
removing either from the oven. It is
advisable to use an oven cloth or glove
when doing so.
Remember when using an aluminium foil
container that the reheating or cooking
times may be longer than you are used to,
always ensure that the food is piping hot
before serving.
Food safety
Do not heat food in a can in the microwave
oven. Always remove the food to a suitable
container.
Deep fat frying should not be done in the
microwave oven, because the fat
temperature cannot be controlled,
hazardous situations can result.
Popcorn may be prepared in the
microwave oven, but only in special
packages or utensils designed specifically
for this purpose. This cooking operation
should never be unattended.
Pierce foods with non-porous skins or
membranes to prevent steam build-up and
8
bursting. Apples, potatoes, chicken livers,
and egg yolks are examples of items that
should be pierced.
The contents of feeding bottles and baby
food jars are to be stirred or shaken and the
temperature is to be checked before
consumption, in order to avoid burns.
Warning: Liquids or other foods must
not be heated in sealed containers
since they are liable to explode.
Warning: Microwave heating of
beverages can result in delayed
eruptive boiling; therefore care must be
taken when handling the container.
Warning: When heating liquids, e.g.
soups, sauces and beverages in your
microwave oven, overheating the liquid
beyond boiling point can occur without
evidence of bubbling. This could result
in a sudden boil over of the hot liquid.
To prevent this possibility the following
steps should be taken:
Avoid using straight-sided containers
with narrow necks.
Do not overheat.
Stir the liquid before placing the container
in the oven and again halfway through the
heating time.
After heating, allow standing in the oven
for a short time, stirring again before
carefully removing the container.
Warning: Some products such as
whole eggs and sealed containers – for
example, closed glass jars – may
explode and should not be heated in
this oven. Occasionally, poached eggs
may explode during cooking. Always
pierce the yolk, then cover and allow
the standing time of one minute before
removing cover.
Safety instructions when cooking with
grill or combination modes.
The glass-viewing window may break if
water is spilled on it during grill cooking.
Be sure to use an oven glove when
loading and unloading the oven. Containers
get very hot in the oven, so be careful not
to burn yourself. The turntable and metal
rack also get very hot so be sure to use an
oven glove when handling them.
Do not touch the inner or outer viewing
window with metal components when
loading or unloading the oven. The inside of
the door and oven get very hot so take care
when attending food in the oven.
Do not put the turntable or containers in
cold water or try to cool them quickly after
use.
Do not place items on top of the cabinet.
The top of the cabinet gets very hot, so
anything placed on it may be damaged by
the heat.
Preheat your oven only when using the
Grill mode, never when using microwave or
combination modes (Microwave + Grill)
Keep these instructions!
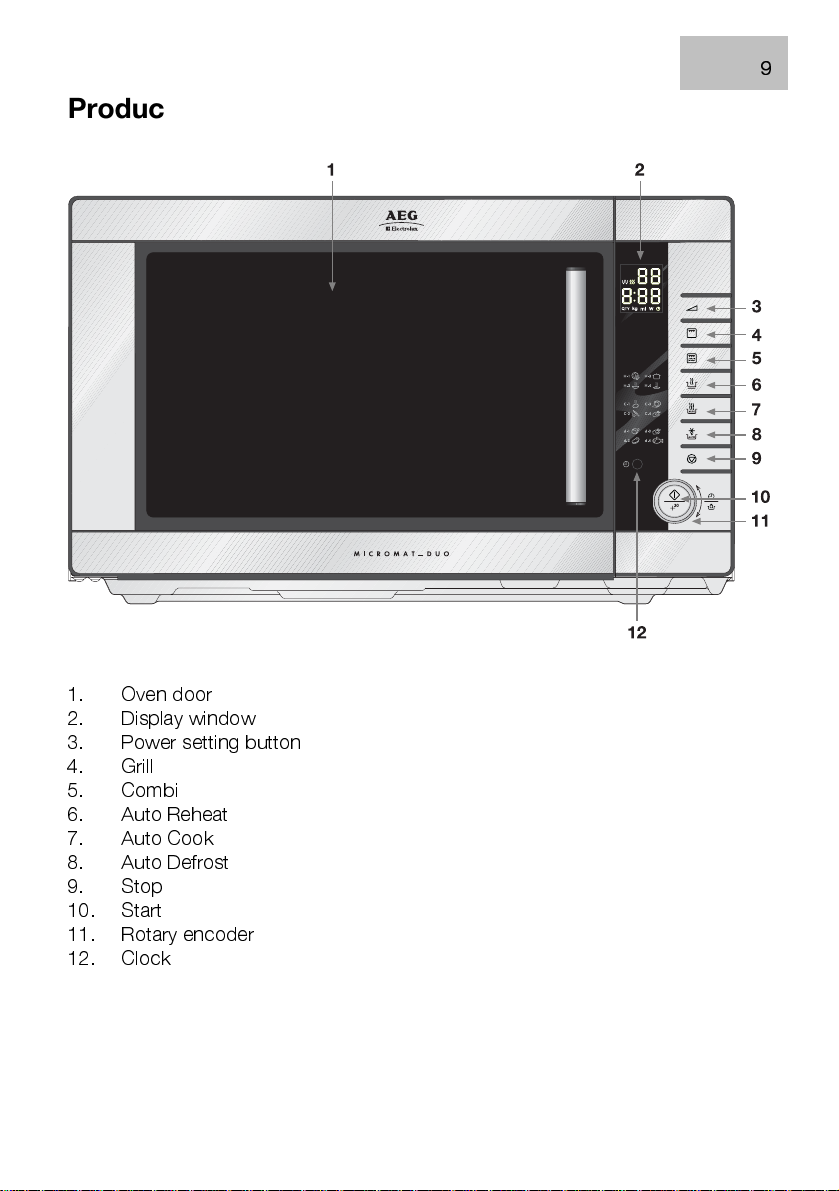
Product description
1. Oven door
2.
Display window
3.
Power setting button
4.
Grill
5.
Combi
6.
Auto Reheat
7.
Auto Cook
8.
Auto Defrost
9.
Stop
10.
Start
11.
Rotary encoder
12.
Clock
9

10
Accessories
Turntable support
Glass turntable
Turntable installation
1.
Place the turntable support on the
cavity Bottom.
2.
Place the turntable on top of the
turntable support as shown in the
diagram. Make sure that turntable
hub is securely locked in the
turntable shaft. Never place the
turntable upside down.
•
Both turntable and turntable
support must always be used
during cooking.
•
All food and containers of food are
always placed on this turntable for
cooking.
•
This turntable rotates clockwise
and anticlockwise; this is normal.
Before first use
Setting the clock
When your oven is plugged in for the
first time or when power resumes after
a power interruption, the display
window will show " : 0 "
1.
Touch the Clock button twice.
2.
Set the time to " 4:00 " using the
setting control knob
3.
Touch the Clock Button
4.
Set the time to " 4:30 " using the
setting control knob
5.
Touch the Clock button. (The Time
will now be set)
Child safety lock
This oven has a safety feature which
prevents the accidental running of the
oven by a child. After the lock has been
set, no part of the microwave oven will
operate until the child lock feature has
been cancelled.
1.
Touch the ' Stop ' button for 3
seconds. ‘L’ will appear in the
display.
To cancel the child lock, simply touch
the ' Stop ' button for 3 seconds.
To stop the oven
There are two way to stop the oven
whilst it is in use.
11
1.
Press the Stop/Clear button
•
You may restart the oven by
pressing the Start button
•
Pressing Stop/Clear again will
reset the current programme
2.
Open the door
•
You may restart the oven by
closing the door and pressing
the Start button
•
Pressing Stop/Clear again will
cancel the current programme
Timer
1.
Touch the Clock button once.
2.
Set the required time using the
setting control knob
3.
Press Start
The timer will countdown. No
microwave function will be in operation
12
Operation
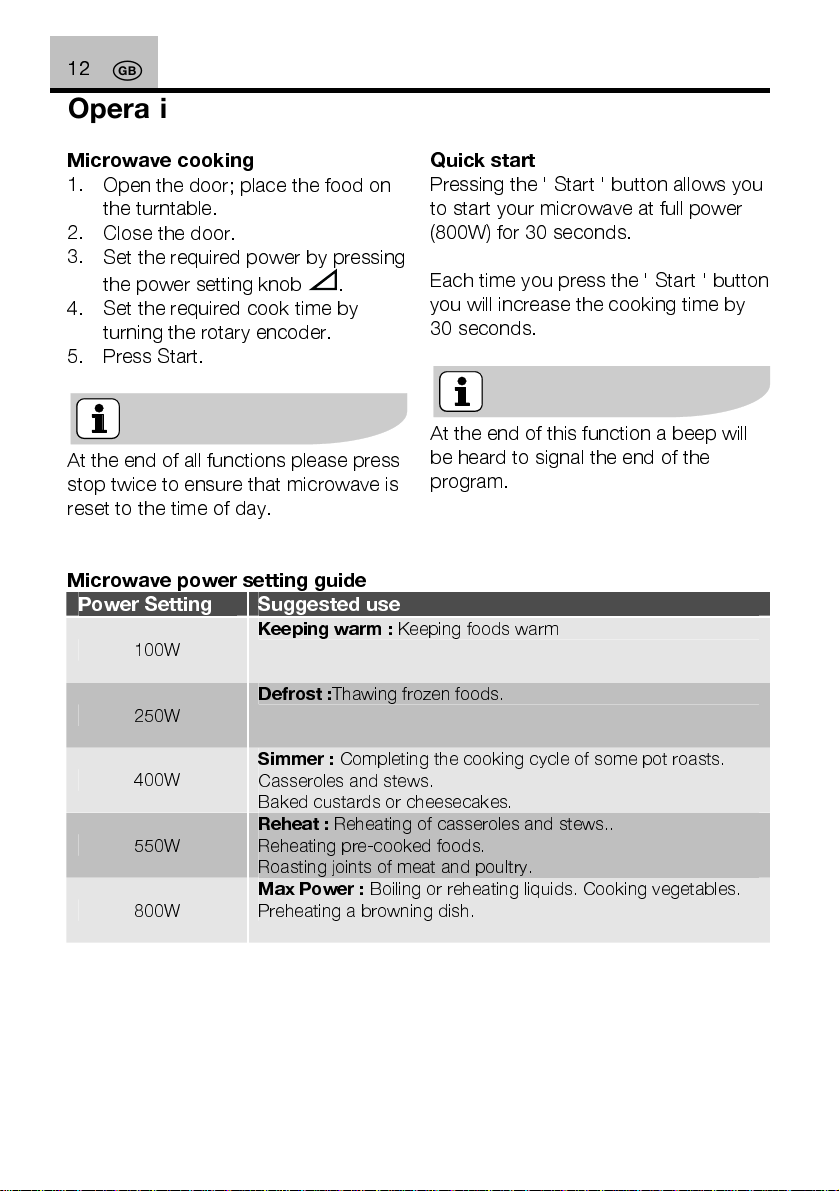
Microwave cooking
1.
Open the door; place the food on
the turntable.
2.
Close the door.
3.
Set the required power by pressing
the power setting knob
4.
Set the required cook time by
turning the rotary encoder.
5.
Press Start.
At the end of all functions please press
stop twice to ensure that microwave is
reset to the time of day.
Microwave power setting guide
Power Setting Suggested use
Keeping warm : Keeping foods warm
100W
.
Quick start
Pressing the ' Start ' button allows you
to start your microwave at full power
(800W) for 30 seconds.
Each time you press the ' Start ' button
you will increase the cooking time by
30 seconds.
At the end of this function a beep will
be heard to signal the end of the
program.
250W
400W
550W
800W
Defrost :
Simmer :
Casseroles and stews.
Baked custards or cheesecakes.
Reheat :
Reheating pre-cooked foods.
Roasting joints of meat and poultry.
Max Power : Boiling or reheating liquids. Cooking vegetables.
Preheating a browning dish.
Thawing frozen foods.
Completing the cooking cycle of some pot roasts.
Reheating of casseroles and stews..

13
Auto defrost
For manual defrosting select the
defrost power setting
To defrost
1.
Open the door, place the food on
the turntable.
2.
Press the ' Auto Defrost ' button
until the desired programme is
reached.
3.
Turn the setting control knob until
the required quantity is reached.
4.
Close the door.
5.
Press Start (The oven begins
defrosting.)
.
To speed up the defrosting of dense
foods over 450g (1lb), the oven may be
started on full power
1 - 3 minutes, and then reduced to
defrost
At the end of this function a beep will
be heard to signal the end of the
program.
Selection Chart for Auto Defrost functions :-
until defrosting is complete.
for
Defrosting Tips
It is better to underestimate defrosting
time if you are unsure. Food will
continue to defrost during the standing
time.
Separate food as soon as possible.
Turn large items, e.g. joints, halfway
through the defrosting time.
Remove any thawed food as soon as
possible.
Remove or open any packaging
before defrosting.
Place food in a larger container than
that which it was frozen in, this will
allow for easy stirring.
Begin thawing poultry, breast side
down and turn over halfway through
defrosting time or at pause. Delicate
areas such as wing tips can be
shielded with small pieces of smooth
foil.
Standing time is very important,
particularly for large, dense foods
which cannot be stirred to ensure that
the centre is completely defrosted
before cooking.
Auto Programme Press Button Display Portion Size / Time
Meat Joint X 1
Meat Chops X 2
Poultry X 3
Fish X 4
d - 1
d - 2
d - 3
d - 4
0.2kg – 2.0kg
0.2kg – 2.0kg
0.2kg – 2.0kg
0.2kg – 2.0kg
14
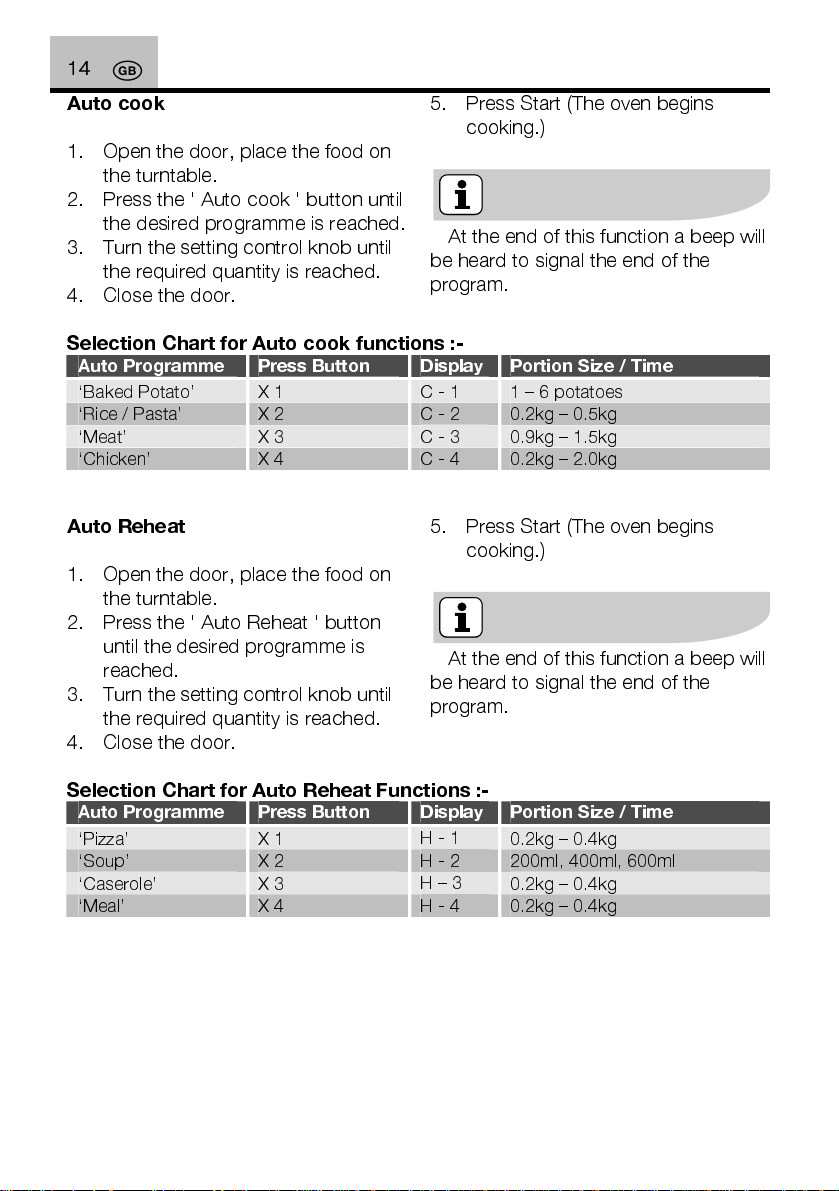
Auto cook
1.
Open the door, place the food on
Press Start (The oven begins
5.
cooking.)
the turntable.
2.
Press the ' Auto cook ' button until
the desired programme is reached.
3.
Turn the setting control knob until
the required quantity is reached.
4.
Close the door.
At the end of this function a beep will
be heard to signal the end of the
program.
Selection Chart for Auto cook functions :-
Auto Programme Press Button Display Portion Size / Time
‘Baked Potato’ X 1
‘Rice / Pasta’ X 2
‘Meat’ X 3
‘Chicken’ X 4
C - 1
C - 2
C - 3
C - 4
1 – 6 potatoes
0.2kg – 0.5kg
0.9kg – 1.5kg
0.2kg – 2.0kg
Auto Reheat
1.
Open the door, place the food on
the turntable.
2.
Press the ' Auto Reheat ' button
until the desired programme is
reached.
3.
Turn the setting control knob until
the required quantity is reached.
4.
Close the door.
Selection Chart for Auto Reheat Functions :-
Auto Programme Press Button Display Portion Size / Time
‘Pizza’ X 1
‘Soup’ X 2
‘Caserole’ X 3
‘Meal’ X 4
5.
Press Start (The oven begins
cooking.)
At the end of this function a beep will
be heard to signal the end of the
program.
H - 1
H - 2
H – 3
H - 4
0.2kg – 0.4kg
200ml, 400ml, 600ml
0.2kg – 0.4kg
0.2kg – 0.4kg
15
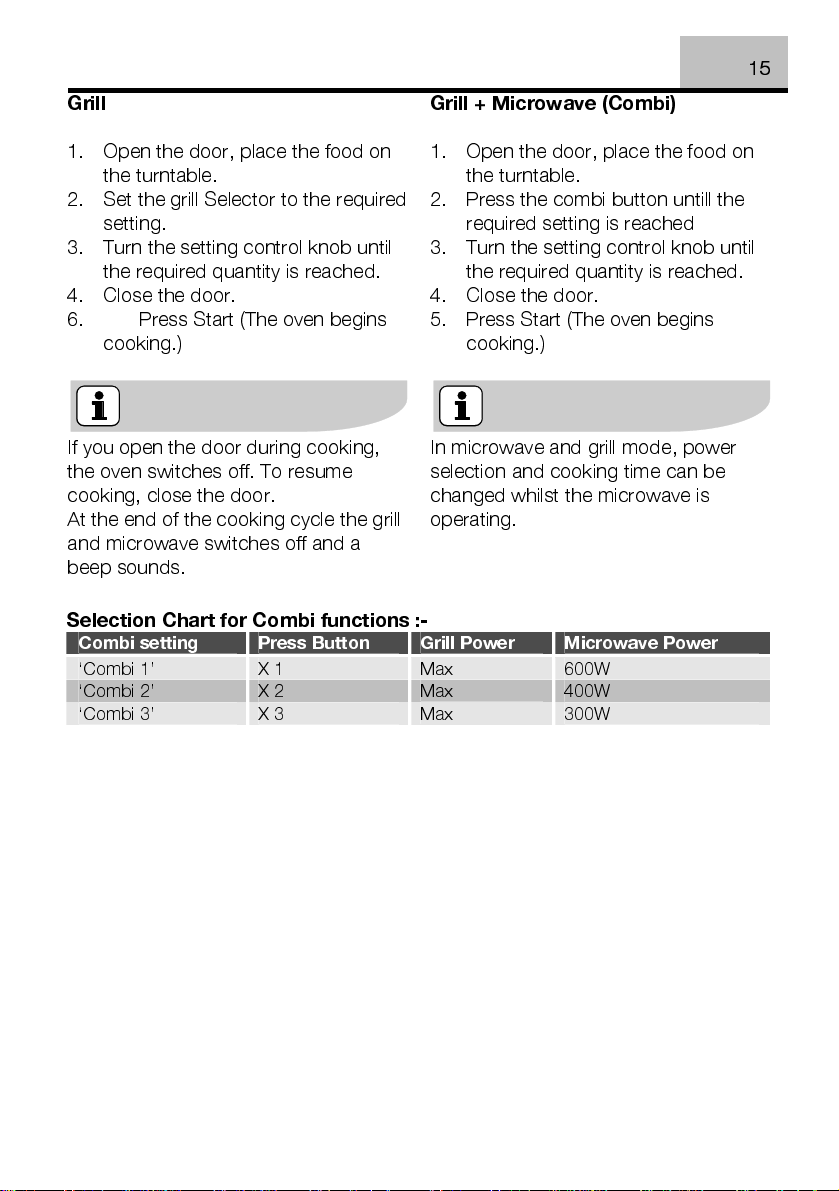
Grill
1.
Open the door, place the food on
the turntable.
2.
Set the grill Selector to the required
setting.
3.
Turn the setting control knob until
the required quantity is reached.
4.
Close the door.
6.
Press Start (The oven begins
cooking.)
If you open the door during cooking,
the oven switches off. To resume
cooking, close the door.
At the end of the cooking cycle the grill
and microwave switches off and a
beep sounds.
Grill + Microwave (Combi)
1.
Open the door, place the food on
the turntable.
2.
Press the combi button untill the
required setting is reached
3.
Turn the setting control knob until
the required quantity is reached.
4.
Close the door.
5.
Press Start (The oven begins
cooking.)
In microwave and grill mode, power
selection and cooking time can be
changed whilst the microwave is
operating.
Selection Chart for Combi functions :-
Combi setting Press Button Grill Power Microwave Power
‘Combi 1’ X 1
‘Combi 2’ X 2
‘Combi 3’ X 3
Max
Max
Max
600W
400W
300W

16
Programme charts
Recommendations for defrosting
Food Preparation
Small loaf Place on microwave-proof rack
or kitchen paper.
Turn over halfway through
defrosting time.
Sliced large
loaf
2 slices Place on kitchen paper. 45–60 sec. 5 min.
1 bread roll Place on kitchen paper. 45–60 sec. 5 min.
2 bread rolls Place on kitchen paper. 1–11/2 min. 5 min.
Gateau 450g Remove from packaging, place
Cheesecake
450g
Pie 450g
(cooked)
Pastry 450g Remove from packaging, place
Butter 250g
(1 packet)
225g
Soft berry
fruits
400g Plated
meal
Vegetables It is not necessary to defrost
Place on microwave-proof rack
or kitchen paper.
Turn over halfway through
defrosting time.
on plate.
Remove from packaging, place
on plate.
Remove from packaging, place
on plate.
on plate.
If foil wrapped, remove from
wrapper and place on a plate
Place in a single layer in a
shallow dish.
Cover with a plate or non P.V.C.
cling film.
To reheat, microwave on full
power for 3–4 minutes.
vegetables before cooking. All
vegetables can be thawed and
cooked on full power.
Defrost
time
8–10 min. 10–15 min.
10–13 min. 10 min
9–11 min. 15–30 min.
9–11 min. 15–30 min.
7– 9 min. 15–30 min.
7– 9 min. 15–30 min.
3– 4 min. 5–10 min.
5– 6 min. 5–10 min.
7– 8 min 5–10 min.
Standing
time
Hints and tips
Always keep the oven clean – avoid
spillovers and do not forget to clean
under the glass tray and the inside of
the door.
Preferably use round or oval
casseroles with a lid when cooking in
your microwave oven.
Do not use metal or metal decorated
casseroles. Certain plastic materials
can melt and be warped by hot food.
Cover the food when cooking. Use a
glass lid, a plate or greaseproof paper.
Pastry, bread and the like can be
defrosted directly in a breadbasket or
on a paper towel.
If frozen food is heated in it’s
packaging, the packaging should be
opened.
Packaging containing metal or metal
decoration must not be used unless
specifically recommended for use in
the microwave. Remove metal clips
and wire ties.
Smaller pieces of aluminium foil can
be used to cover parts that easily over
cook such as chicken legs.
Food with peel or skin should be
pierced with a fork – e.g. potatoes and
sausages. Do not boil eggs in the
microwave oven as they can explode.
Put large, thick pieces close to the
edge of the casserole and try to cut the
food in to even sized pieces. Always
place the food in the centre of the oven.
The food will be evenly cooked if you
stir or turn it a few times.
Always set a shorter cooking time
than indicated in your recipe to avoid
17
over cooking. The larger the amount of
food the longer it takes.
Use little or no water for vegetables.
Use less salt and spices than for
‘normal’ cooking.
Season afterwards.
Allow a few minutes ‘standing’ time
after the oven has switched off to
ensure complete and even cooking
results.
Always ensure food is piping hot
throughout before serving.
Use potholders or gloves when
taking dishes and food from the oven.
Melting Chocolate
Break 100g of chocolate into
squares, place in A bowl and heat on
high power for 1-2 minutes and stir
well.
Softening or Melting Butter
Melting takes a few seconds on high
power. Softening is best done more
gently on low power.
Freshen or Warm Bread
Use medium power for few seconds.
Peeling Garlic easily
Heat 3 or 4 cloves of garlic on high
power for 15 seconds. Squeeze at
one end until the clove pops out.
Fruit Juice
Citrus fruits will yield more juice if
they are heated on high power for 15
seconds before squeezing.
Cooking Porridge
Porridge is easily cooked in the
serving dish with no sticky pan to
wash. Follow food manufacturers’
recommendations

18
Care and cleaning
The oven must always be clean.
Residue of food from spillovers or
spatters will attract microwave energy
causing it to burn on. This could
reduce the efficiency of the oven and
may cause bad odours.
Do not attempt to tamper with or
make any adjustments or repairs to any
part of the oven.
Repairs should only be done by a
qualified service technician.
Be sure the oven is off or the unit is
unplugged before cleaning.
Cleaning the accessories (turntable,
support and Grill rack)
Clean them with mild detergent after
removing them for the cavity. Turntable
support should be carefully handled.
The inside of the oven and turntable
get very hot; so do not touch them
immediately after use.
Cleaning the interior
Always keep the inside of the oven
clean. Wipe up spillovers and food
spatters immediately. Deposits that are
allowed to remain on the oven walls,
door seal and door surface will absorb
microwave energy, reduce the
efficiency of the oven, and possibly
damage the oven interior. Use mild,
liquid detergent, warm water and a s oft,
clean cloth to remove deposits from
the base of the oven. For the side of
the oven use a soft damp cloth only, no
liquids should be used near the venting
holes.
Never use abrasive cleaners,
commercial oven cleaners or steel
wool pads on any part of the
microwave oven.
To loosen difficult deposits, boil a
cup of water in the microwave oven for
2 or 3 minutes.
Never use a knife or any utensil
to remove deposits from the oven
surfaces.
To remove odours from the oven
interior, boil a cup of water plus 2
tablespoons of lemon juice for 5
minutes.
Cleaning the door seals
Wipe up spillovers and food spatters
immediately. Deposits that are allowed
to remain on the door seals will absorb
microwave energy, reduce the
efficiency of the oven, and possibly
damage the oven interior. You can only
use mild, liquid detergent, warm water
and a soft, clean cloth to remove
deposits from the door seals.
19
Cleaning the exterior
Open the oven door when cleaning the
control panel. This will prevent the oven
from being turned on accidentally. You
should clean outside surfaces of the
oven with mild liquid detergent and
water followed by a wiping with clear
water to remove any excess detergent.
Dry with a soft cloth.
Spray-on window cleaners or all-
purpose spray-on kitchen cleaners can
also be used. Never use abrasive
cleaners, scouring pads or harsh
chemicals on outside surfaces of your
oven. To prevent damage to the
working parts, do not allow water to
seep into ventilation openings.
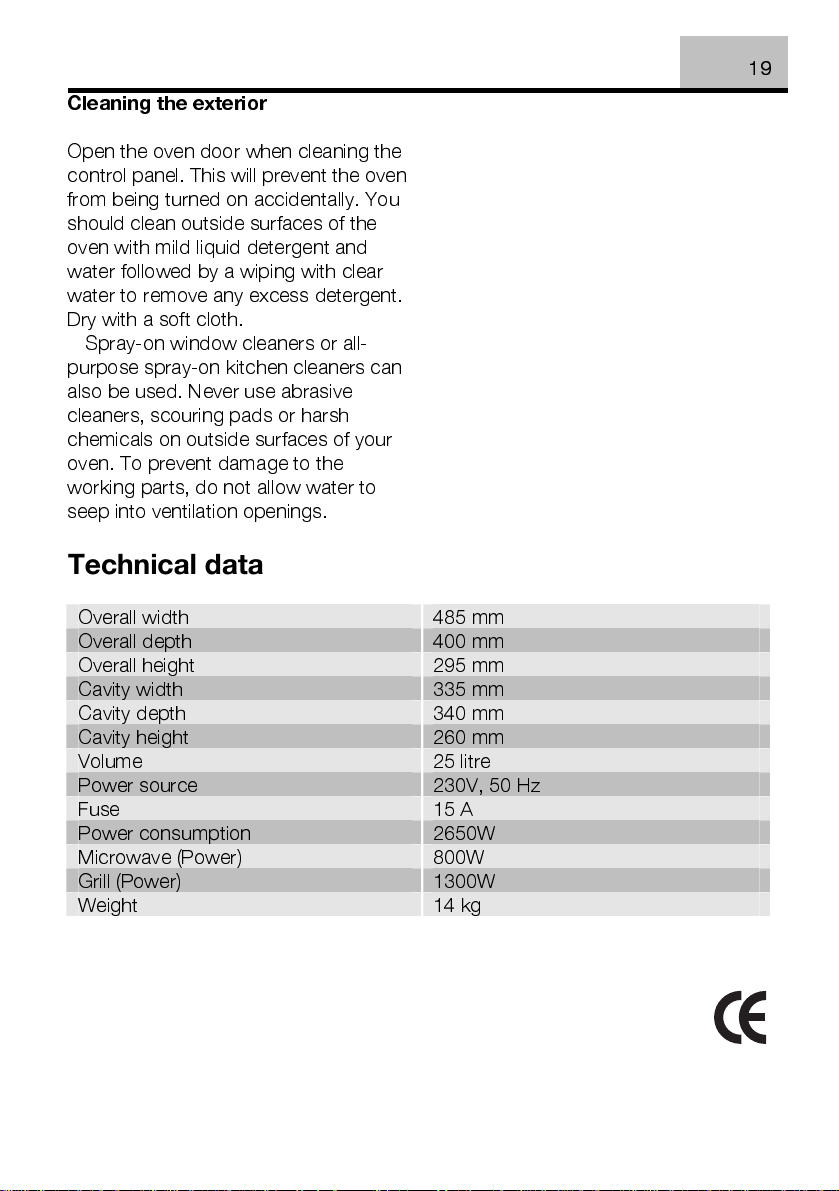
Technical data
Overall width 485 mm
Overall depth 400 mm
Overall height 295 mm
Cavity width 335 mm
Cavity depth 340 mm
Cavity height 260 mm
Volume 25 litre
Power source 230V, 50 Hz
Fuse 15 A
Power consumption 2650W
Microwave (Power) 800W
Grill (Power) 1300W
Weight 14 kg

20
Installation
1.
Remove any promotion label from
the door.
2.
The oven should be installed on a
flat, level surface. The surface must
be strong enough to safely bear
the weight (13.5 kg) of the oven,
and the contents. To avoid the
possibility of causing vibration or
noise the oven must be in a stable
position.
3.
Keep the oven away from heat and
water. Exposure to heat and water
can lower oven efficiency and lead
to malfunctioning, so be sure to
install the oven away from heat and
water sources.
4.
Do not block air vents on the top
and the sides of the cabinet and
also do not place any articles on
the top of the oven. If air vents are
blocked during operation, the oven
may overheat, and this may lead to
malfunctioning. Hot air escapes
from the vents so be sure not to
obstruct it or let curtains come
between the oven and the rear wall.
5.
Place the oven as far away from
radios and TV’s as possible. This
oven does conform to EEC
requirements of radio interference
suppression, but some interference
may occur if it is placed too close
to a radio or TV, so keep them as
far apart as possible.
6.
If positioned in a corner, leave a
gap of at least 15cm from the walls
and 15cm above the microwave.
The oven can be placed almost
anywhere in the kitchen. Make sure the
oven is placed on a flat, level surface
and that vents as well as the surface
underneath the oven are not blocked
(for sufficient ventilation).
Connecting to the mains
The oven is delivered with the power
cord and a plug for 230V, 50Hz,
earthed socket outlet.
Earth protection minimises the risks
should a short circuit occur. Check to
ensure the voltage of the oven matches
the supply.
If the oven is connected to the
socket via an extension cord, make
sure the cord is earthed.
This appliance must not be used on
a non-earth protected power
supply.
Contact an electrician if you are
uncertain regarding electrical
connection of the oven or provision
of earth protection of the
supply.

This appliance must be earthed. If
this appliance is fitted with a non-
rewireable plug for which your
socket is unsuitable, the plug
should be cut off and the
appropriate plug fitted. If it is
necessary to change the fuse in a
non-rewireable plug, the fuse cover
must be refitted. If the fuse cover is
lost or damaged, the plug must not
be used until a replacement is
obtained.
Electrical connections
WARNING! THIS APPLIANCE MUST
BE EARTHED.
The manufacturer declines any
liability should this safety measure
not be observed.
If the plug that is fitted to your
appliance is not suitable for your
socket outlet, please contact service
force.
21
22
Environmental information
The symbol
its packaging indicates that this
product may not be treated as
household waste. Instead it shall be
handed over to the applicable
collection point for the recycling of
electrical and electronic equipment. By
ensuring this product is disposed of
correctly, you will help prevent potential
negative consequences for the
environment and human health, which
could otherwise be caused by
inappropriate waste handling of this
product. For more detailed information
about recycling of this product, please
contact your local city office, your
household waste disposal service or
the shop where you purchased the
product.
European guarantee
This appliance is guaranteed by Electrolux
in each of the countries listed below for the
period specified in the appliance guarantee
or otherwise by law. If you move from one
of these countries to another of the
countries listed below the appliance
guarantee will move with you subject to the
following qualifications: -
•
The appliance guarantee starts from the
date you first purchased the appliance
which will be evidenced by production of
a valid purchase document issued by the
seller of the appliance.
•
The appliance guarantee is for the same
period and to the same extent for labour
and parts as exists in your new country
of residence for this particular model or
range of appliances.
on the product or on
•
The appliance guarantee is personal to
the original purchaser of the appliance
and cannot be transferred to another
user.
•
The appliance is installed and used in
accordance with instructions issued by
Electrolux and is only used within the
home, i.e. is not used for commercial
purposes.
•
The appliance is installed in accordance
with all relevant regulations in force
within your new country of residence.
The provisions of this European Guarantee do
not affect any of the rights granted to you by law.

I
23
I
Gentile Cliente,
Grazie per aver scelto i nostri prodotti di alta
qualità.
Con questa apparecchiatura sperimenterete la
perfetta combinazione fra il design funzionale
e la tecnologia d’avanguardia.
Le nostre apparecchiature sono state
progettate per avere le migliori prestazioni e il
massimo controllo raggiungendo i più alti
standard di eccellenza.
Inoltre, e’ parte integrante dei nostri prodotti
l’attenzione per gli aspetti ambientali e per il
risparmio energetico.
Per assicurare prestazioni ottimali e un
corretto utilizzo della vostra apparecchiatura,
Vi invitiamo a leggere attentamente questo
libretto istruzioni.
Vi permetterà di seguire tutte le fasi di utilizzo
perfettamente e nel modo più efficace.
Per consultare questo libretto ogni volta che lo
desiderate, Vi consigliamo di tenerlo in un
luogo a portata di mano. Ricordatevi di
consegnarlo ad eventuali futuri proprietari
dell’apparecchiatura.

24
I
Indice
Norme di sicurezza 25
Il forno a microonde 30
Accessori 31
Come regolare l'ora 32
Cottura a microonde 33
Istruzioni per lo scongelamento 37
Consigli pratici 38
Manutenzione e pulizia 40
Dati tecnici 41
Installazione 42
Informazioni in materia di sicurezza
ambientale 44
Garanzia Europea 44
Service 83
In questo manuale sono riportati i
seguenti simboli:
Informazioni importanti relative
alla prevenzione dei rischi per la
salute perso-nale e dei danni alle
apparecchiature.
Informazioni e consigli generali
Informazioni in materia di
sicurezza ambientale
I
25
Norme di sicurezza
•
I ganci di chiusura a scatto
impediscono il funzionamento del
forno a microonde quando lo
sportello è aperto.
•
Quindi questi ganci non vanno
manomessi, né si dovrà tentare di
far funzionare il forno con lo
sportello aperto, perché in questo
caso potrebbe risultare
un'esposizione all'energia delle
microonde.
•
Non lasciare che sulle guarnizioni
dello sportello si depositino residui
di cibo o resti di detergente. Per
indicazioni sulla pulizia del forno,
vedi il capitolo Manutenzione e
Pulizia.
•
E' di primaria importanza che il
forno si possa chiudere
perfettamente e che non ci siano
danni a: (1) sportello (deformato),
(2) cerniere e chiusure (rotte o
instabili), (3) o cornici interno porta.
Qualora si riscontrassero danni
sullo sportello, sulle
cerniere/chiusure dello sportello, il
forno non dovrà essere utilizzato
finchè non verrà riparato da
personale del servizio assistenza
autorizzato.
E' rischioso far effettuare
operazioni di manutenzione a
persone che non siano tecnici del
servizio assistenza . In caso di
necessità, contattare il più vicino
centro di assistenza tecnica
autorizzato.
•
Non rimuovere mai l'involucro
esterno del forno, né lo sportello o
il quadro comandi. Tali operazioni
porterebbero ad un'esposizione a
tensioni estremamente elevate.
•
Installare o collocare questo forno
seguendo scrupolosamente le
"istruzioni d'installazione" che
troverete in questo libretto.
•
Usare questo elettrodomestico
esclusivamente per gli scopi
descritti nel presente libretto. Non
usare mai sostanze chimiche
corrosive. Questo tipo di forno è
stato progettato specificatamente
per riscaldare, cuocere o
scongelare alimenti. Quindi non è
stato progettato per essere usato a
livello industriale o in laboratori, né
per scopi commerciali, dal
momento che tali usi andrebbero
ad invalidare la garanzia.
•
Non far mai funzionare il forno
vuoto. Se nel forno non ci sono né
cibo né acqua ad assorbire
26
I
l'energia delle microonde, il
magnetron potrebbe danneggiarsi.
•
Non conservare questo
apparecchio all'esterno. Non usare
mai questo forno vicino all'acqua.
•
Non tentare di asciugare indumenti
o giornali nel forno, perché questi
articoli potrebbero prender fuoco.
•
Non usare il vano di cottura del
forno come ripostiglio. Quando non
si usa il forno, non lasciare articoli
di carta, utensili, o alimenti nel vano
di cottura.
Se si nota del fumo, spegnere
l'apparecchio o staccarlo dalla rete
e tenere lo sportello chiuso onde
soffocare eventuali fiamme. Mai
usare acqua.
Non permettete ai bambini l’utilizzo
del forno
Sicurezza nell'uso degli utensili
•
La maggior parte delle stoviglie in
vetro, vetroceramica o in vetro
termoresistente sono eccellenti per
il forno a microonde. Sebbene
l'energia delle microonde non vada
a riscaldare la maggior parte degli
utensili in vetro e ceramica, queste
stoviglie si possono comunque
riscaldare, dal momento che il
calore si strasferisce dall'alimento
al recipiente. Quindi si consiglia
l'uso di guanti da cucina per
togliere i piatti dal forno.
Prova della conformità degli
utensili di cottura
•
Mettere le stoviglie nel forno a
microonde con un bicchiere per
metà pieno d'acqua. Far andare il
forno al livello di potenza 100% per
un minuto. Se le stoviglie scottano,
non si possono usare. Se invece
sono solo leggermente calde,
allora si potranno usare per
riscaldare, ma non per cucinare.
Se infine il piatto è a temperatura
ambiente, esso è adatto per la
cottura a microonde.
•
Tovaglioli di carta, carta paraffinata,
piatti, tazze di carta, scatole di
cartone, involucri per congelatore
ed articoli in cartone sono utensili
di grande utilità. Accertarsi sempre
che i recipienti siano riempiti con gli
alimenti affinché possano assorbire
l'energia delle microonde ed evitare
così la possibilità di surriscaldarsi.
•
Nel forno a microonde si possono
usare molti piatti, tazze, contenitori
in plastica, nonché altri involucri in
plastica. Quando si usano articoli
di plastica nel forno, seguire
sempre le istruzioni del produttore.
Evitare di usare stoviglie in plastica
quando si devono trattare alimenti
con un elevato contenuto di grassi
o zuccheri, dal momento che
questi raggiungono temperature
elevate e possono fondere alcune
resine plastiche.

•
Quando si riscaldano o si cuociono
alimenti in recipienti di plastica,
carta o di altro materiale
combustibile, non si può lasciare il
forno incustodito. Se si nota del
fumo, tenere lo sportello chiuso,
spegnere il forno e staccare la
spina finchè non cessa di emettere
fumo.
•
Non mettere in forno stoviglie in
metallo o con bordi metallici, a
meno che non siano
specificatamente indicate per la
cottura a microonde.
•
Nella cottura a microonde non
usate recipienti con aperture
strette, come bottiglie.
•
Prestare la massima cautela nel
togliere un coperchio o una
copertura da un piatto, onde
evitare di scottarsi con il vapore.
Recipienti in carta metallizzata
In questo forno a microonde si
potranno, in tutta sicurezza, riscaldare
alimenti in vassoi di carta metallizzata,
purché si osservino le seguenti
istruzioni:
1.
i recipienti in carta metallizzata non
dovranno avere una profondità
superiore a 3 cm (1 1/4”).
2.
Non si potranno usare coperchi in
carta metallizzata.
3.
I recipienti in carta metallizzata
vanno riempiti di cibo per almeno
due terzi. Non si dovranno mai
usare contenitori vuoti.
4.
I contenitori in carta metallizzata
vanno usati individualmente nel
forno a microonde e non dovranno
entrare in contatto con le pareti del
vano di cottura. Se il forno è dotato
di piatto rotante o griglia di cottura
in metallo, bisognerà sistemare il
recipiente in carta metallizzata
sopra un piatto capovolto.
5.
Non riutilizzare mai nel forno a
microonde recipienti in carta
metallizzata già usati.
6.
Se si è utilizzato il forno a
microonde per 15 minuti o oltre,
attendere che si raffreddi prima di
usarlo di nuovo.
7.
Il recipiente ed il piatto rotante si
possono riscaldare durante il loro
uso, quindi prestare grande cautela
nel toglierli dal forno. E'
consigliabile usare presine o guanti
da forno.
8.
Ricordarsi che, quando si usa un
contenitore in carta alluminizzata, i
tempi di cottura o di riscalda-
mento possono essere più lunghi
del solito, accertarsi sempre che le
pietanze siano fumanti prima di
servire.
Sicurezza negli alimenti
•
Non riscaldare in forno cibi in
scatola. Togliere sempre l'alimento
e versarlo in un recipiente adatto.
•
Nel forno a microonde non si
possono friggere alimenti in molto
grasso, perché non si può
controllare la temperatura del
grasso e ne possono risultare
situazioni pericolose.
I
27
 Loading...