


Waschautomaten
Automatic Washing Machines
Lave-linge
Lavatrici
Wasautomaat
Lavadoras
Aufstellund Anschlußanweisung
für Waschautomaten mit gewölbter Blende
Installation and connection instructions for automatic washing machines with vaulted front cover
Installation et raccordements des lave-linge à bandeau bombé
Instruzioni di installazione e collegamento per lavatrici con pannello rigonfiato
Opstellingsen aansluitvoorschrift
voor wasautomaten met gewelfd voorpaneel
Instrucciones para la instalación y la conexión de lavadoras con panel curvado

Contents |
|
Important Safety Information . . . . . . . . . . . . . . . . . . . . . . . . . . . . . . . . . . . . |
15 |
Appliance Dimensions . . . . . . . . . . . . . . . . . . . . . . . . . . . . . . . . . . . . . . . . . . . |
16 |
Front and Side Views . . . . . . . . . . . . . . . . . . . . . . . . . . . . . . . . . . . . . . . . . . . . . |
16 |
Rear View . . . . . . . . . . . . . . . . . . . . . . . . . . . . . . . . . . . . . . . . . . . . . . . . . . . . . . |
16 |
Appliance Installation . . . . . . . . . . . . . . . . . . . . . . . . . . . . . . . . . . . . . . . . . . . |
17 |
Appliance Transit . . . . . . . . . . . . . . . . . . . . . . . . . . . . . . . . . . . . . . . . . . . . . . . . |
17 |
Removing Transit Packaging . . . . . . . . . . . . . . . . . . . . . . . . . . . . . . . . . . . . . . . |
18 |
Installation-Site Preparation . . . . . . . . . . . . . . . . . . . . . . . . . . . . . . . . . . . . . . |
19 |
Levelling the Appliance . . . . . . . . . . . . . . . . . . . . . . . . . . . . . . . . . . . . . . . . . . . |
19 |
Self Adjusting Foot . . . . . . . . . . . . . . . . . . . . . . . . . . . . . . . . . . . . . . . . . . . . . . |
19 |
Electrical Connection . . . . . . . . . . . . . . . . . . . . . . . . . . . . . . . . . . . . . . . . . . . |
20 |
Water Connection . . . . . . . . . . . . . . . . . . . . . . . . . . . . . . . . . . . . . . . . . . . . . . |
22 |
Water Pressure . . . . . . . . . . . . . . . . . . . . . . . . . . . . . . . . . . . . . . . . . . . . . . . . . . |
22 |
Inlet Hose Connection . . . . . . . . . . . . . . . . . . . . . . . . . . . . . . . . . . . . . . . . . . . . |
22 |
Water Drainage . . . . . . . . . . . . . . . . . . . . . . . . . . . . . . . . . . . . . . . . . . . . . . . . . |
25 |
AEG Service Force . . . . . . . . . . . . . . . . . . . . . . . . . . . . . . . . . . . . . . . . . . . . . . |
26 |
Printed on environment-friendly paper.
AEG – putting words into action.
14

1 Important Safety Information
The safety of AEG appliances is in accordance with recognised technological standards and appliance safety legislation. We nevertheless feel that it is important to acquaint you with the following safety guidelines.
•This appliance is heavy, care should be taken when moving it.
•When moving, do not tip the washing machine onto it’s front or left hand side (viewed from the front). This is to prevent the possibility of electrical components becoming wet.
•Before installation inspect the machine for transport damage. Do not connect the appliance if it is damaged – contact your retailer.
•Ensure all packaging and transit bolts/bar have been removed, see „Removing of Transit Packaging“. Failure to remove packaging and transit bolt/bar may cause serious damage to the product or property.
•Any plumbing work required to install this appliance should be carried out by a qualified plumber or competent person.
•Any electrical work required to install this appliance should be carried out by a qualified electrician or competent person.
•Check the electricity supply is the same as that indicated on the rating plate of the appliance.
•Should the appliance mains cable need to be adapted for any reason this should only be carried out by a qualified/competent person.
•In the case of a permanent connection it is necessary that you install a double pole switch between the appliance and the electricity supply (mains), with a minimum gap of 3 mm between the switch contacts and of a type suitable for the required load in compliance with the electrical regulations.
•The switch must not break the yellow and green earth cable at any point.
•Care must be taken to ensure that the appliance does not stand on the electrical supply cable.
•The installation should comply with local water authority and building regulations requirements.
•Appliances designed for cold water connection must not be connected to hot water.
15

Appliance Dimensions |
|
Front and Side Views |
|
|
950 |
598 |
592 |
|
+10 -5 |
|
850 |
+10 -5 |
|
10 |
100 |
|
50 |
|
575 |
Rear View |
|
Appliances with cold water connection only |
|
16 |
|
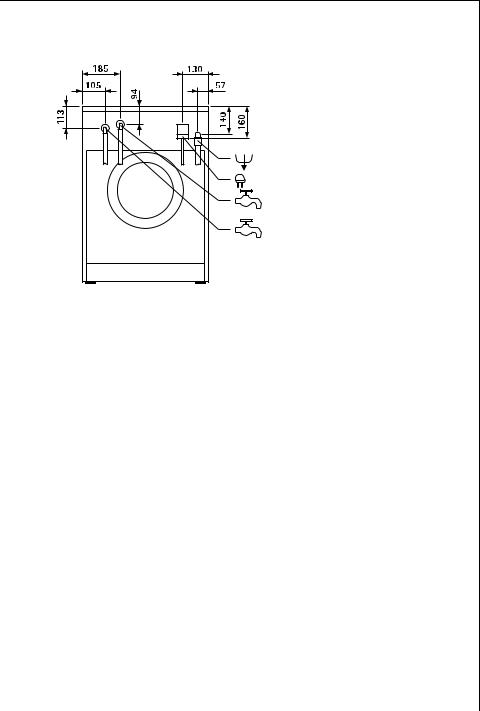
Appliances with hot and cold water connections
Hot water inlet
Cold water inlet
Appliance Installation
3 The appliance worktop must not be removed to gain a height reduction when installing under a kitchen worktop.
Appliance Transit
•To prevent electrical components becoming wet when moving the appliance, do not tip the washing machine onto it’s front or the left hand side (viewed from the front).
•Do not transport the appliance without the transit packaging/bolts/ bar in place. Transporting the appliance without the transport packaging/bolts/bar in place may cause damage to the product.
•Never lift the appliance by the door.
•The appliance is heavy, care must be taken when moving it.
17
 Loading...