


Gourmet 6 Co ee Maker
CM6-1-5ST

EN |
|
|
|
|
|
|
|
|
BG |
|
|
|
|
|
|
|
|
DE |
|
|
|
|
|
|
|
9 |
|
1 |
|
|
|
|
|
|
|
ES |
|
|
|
|
|
|
|
|
2 |
|
3 |
|
|
|
|
|
|
GR |
|
|
8 |
|
|
|
||
|
|
7 |
|
|
|
10 |
||
|
|
|
|
|
|
|
||
FR |
|
|
4 |
|
|
|
|
|
|
|
|
|
|
|
|
||
NL |
|
|
5a |
|
|
|
|
11 |
|
|
|
|
|
|
|
||
PT |
|
|
5 |
|
|
|
|
|
|
|
|
|
|
|
|
|
|
|
|
|
6 |
|
|
|
|
|
|
|
16 |
|
|
|
17 |
|
|
|
|
15 |
|
|
|
17a |
|
18 |
|
|
|
|
|
|
|
||
|
|
13 |
17b |
|
14 |
12 |
|
|
|
|
|
|
|
|
|
||
|
19 |
20 |
21 |
22 |
23 |
24 |
25 |
26 |
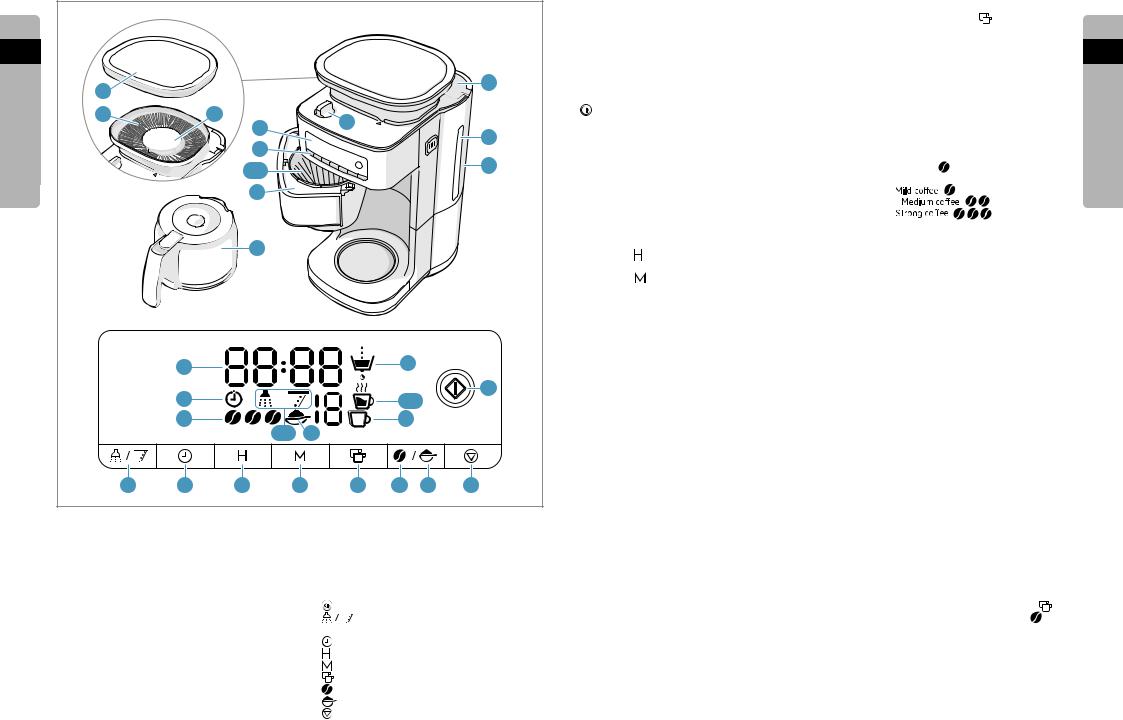
Components |
14. Indicator co ee powder |
|||
1. Lid for the co ee bean compartment |
15. Indicator timer |
|||
2. Co ee bean compartment |
16. Indicator time |
|||
3. Grinder (top part removable) |
17. Indicator operation (flashing) |
|||
4. Control panel |
17a. Indicator keep warm-function |
|||
5. Filter compartment |
18. |
start button with operating lamp |
||
5a. Filter insert |
19. |
|
|
Descaling/cleaning of shaft |
6. Glass jug with lid |
20. |
Setting pre-set time |
||
7. Display |
21. |
Setting the hours |
||
8. Grinding fineness dial |
22. |
Setting the minutes |
||
9. Water tank lid |
23. |
Setting the number of cups |
||
10. Fill-level indicator |
24. |
Setting co ee strength |
||
11. Water tank |
25. |
Making co ee with co ee powder |
||
12. Indicator number of cups |
26. |
Cancel button |
||
13. Indicator co ee strength
Getting started
Wipe the device with a clean, damp cloth. Rinse the glass jug (6) and the filter insert (5a) with a little mild detergent and water.
Prior to preparing co ee for the first time, perform one brew with water only. Fill the freshwater tank up to the top cup marking with cold water. Close the lid. Press to start the appliance. Allow the water to flow through into the co ee jug. When brewing is finished, empty the co ee jug.
Handling and Operation
Setting the time
As soon as the appliance is plugged into a socket, the display lighting turns on and the time display
12:00 flashes. The clock has a 24-hour time format. Set the hours by long pressing;
For both hours & minutes.
1.Keep the  button pressed to set the hours (21).
2.Keep the button pressed to set the minutes (22). The time is saved until a new time is set or the device has been disconnected from the power supply.
Filling the water tank
1.Open the water tank lid (9).
2.Pour the quantity of water required for the number of cups you want (maximum 10 cups) into the water tank (11).
3.Close the water tank lid.
Adding co ee beans
1.Take o the lid of the co ee bean compartment (1). Ensure that the water tank is closed so that no co ee beans can fall into the water tank.
2.Fill the co ee bean compartment (2) with co ee beans. Do not overfill.
3.Place the lid back on the co ee bean compartment.
Setting the Grinding Fineness
Move the dial for the grinding fineness (8) to the position you want fine/medium/coarse.
When you switch to another grinding strength, there will still be co ee powder with the previous grinding strength in the grinder shaft. The grinder shaft may need to be cleaned beforehand. (see chapter Cleaning the Grinder Shaft)
Inserting the Filter
1.Open the filter compartment (5).
2.Insert a paper filter into the filter compartment (5a). Close the filter compartment. It must engage.
Setting the Number of Cups
Keep pressing the button until the display (7) shows the number of cups you want (12).
The selected number of cups is saved until a new number of cups is set or the device has been disconnected from the power supply. All of the water in the water tank is always used up, regardless of the set number of cups or co ee strength.
Setting the Co ee Strength
The co ee strength can be set when making co ee with co ee beans. To do this, keep pressing the button (24) until the co ee strength (13) you want is shown on the display.
-Mild co ee
-Medium co ee

-Strong co ee


The selected co ee strength is saved until a new co ee strength is set or the device has been disconnected from the power supply.
Keep-Warm Function
The device has an automatic keep-warm function. The hotplate remains switched on for 40 minutes after each brewing process. After the brewing process the keep warm icon (17a) in the display will be lit. To end the keep-warm function prematurely, press the button (26) to cancel.
Drip Stop
The device has a drip stop which prevents co ee from dripping out of the filter when the jug has been removed from the device. When the device is in operation, the filter compartment (5) must be closed and the jug with lid placed must be placed beneath the filter compartment. During the brewing process, the jug must not be removed from the device for longer than 30 seconds as otherwise the filter could overflow.
Preparation
Making co ee with co ee beans
1.Fill the water tank.
2.Fill the co ee bean compartment.
3.Set the grinding fineness you want.
4.Open the filter compartment and insert a paper filter. Close the filter compartment.
5.Set the desired number of cups by pressing
6.Set the desired co ee strength with the button .
.
7.Press the button (18) to switch on the grinder and start the brewing process.
EN
BG
DE
ES
GR
FR
NL
PT

EN
BG
DE
ES
GR
FR
NL
PT
If the brewing process is to be aborted prematurely, press the button (26). The operating lamp goes out and the device will abort the brewing process.
Making Co ee with Co ee Powder
1.Fill the water tank.
2.Open the filter compartment and insert a paper filter. Add the quantity of co ee powder you want. Close the filter compartment.
3.Set the desired number of cups with the button
4.Press the button. The symbol (14) appears on the display.
5.Press the button (18) to start the brewing process.
If the brewing process is to be aborted prematurely, press the button (26). The operating lamp goes out and the device will abort the brewing process.
Making co ee with a pre-set time
To make co ee with a pre-set time, the clock needs to be set (see “Setting the time”).
1.Make preparations according to your preference, co ee beans or co ee powder. Pour in water and insert a filter.
2.Set the desired number of cups with the button .
.
3.For making co ee with co ee powder, press the button before the timer is set.
The symbol (14) appears on the display.
4.Press the timer button until the indicator time (16) flashes on the display.
5.Use the and
and buttons to set the start time you want. For making co ee with co ee beans, use the button (24) to set the co ee strength you want.
6.To activate the pre-set time, press the start button again. The symbol (15) appears on the display.
The pre-set time is activated.
Once the pre-set time is reached, the device switches on automatically. The operating lamp lights up and the (17) symbol flashes on the display.
Deactivating the pre-set time
To deactivate the pre-set time setting, press the CANCEL button (26). The symbol (15) goes out and the programming is deactivated. However, the pre-set time is retained and can be reactivated at any time until a new pre-set time is programmed or the device has been disconnected from the power supply.
Cleaning and Care
Do not use any toxic, corrosive or abrasive cleaning agents or scouring sponges to clean the device. These can damage the surface.
1.Clean the filter insert and the glass jug after every use with mild detergent and warm water or in the dishwasher.
2.If necessary, wipe down the co ee bean compartment
(2) and the lid (1) with a damp cloth.
3.Wipe down the housing with a damp cloth. If necessary, use a little mild detergent to remove more intense soiling.
Cleaning the Grinder Shaft
1.Remove the co ee beans from the co ee bean compartment (2). (Apart from the few beans that you cannot reach by hand.)
2.Insert a paper filter into the filter insert.
3.Press the button (18) to switch on the device.
The grinding process will start.
4.Once the rest of the co ee beans have been ground - you can tell this from the change in the grinding noise – stop the grinding process by pressing the button (26) again.
5.Take out the co ee bean compartment: To do this, turn it a little anticlockwise until it disengages. Lift it o .
6.Move the grinding fineness dial (8) to the OPEN position.
7.Pull out the top part of the grinder (3) by the small handle.
8.Clean the grinder shaft and the grinder with the cleaning brush that is supplied.
9.Reinsert the top part of the grinder and press it down. Make sure it is in the correct position (arrow marking). Fold the handle down again.
10.Adjust the grinding fineness dial back to a grinding fineness. The grinder is locked again.
11.Place on the co ee bean compartment at an angle and turn it clockwise a little until it engages.
12.Open the filter compartment (5) to remove the paper filter.
13.To clean the grinder shaft from below: Press the
button (19) until the symbol  occurs. Press the button (18). The co ee powder tunnel gate will open. Open the filter compartment, use the brush to clean the residue inside, close the filter compartment, press the button (26) to close the co ee powder tunnel gate.
Descaling
As a precaution we recommend descaling after 60 uses. Use only environmentally friendly descaling agent and always follow the manufacturer´s instructions.
Fill the water tank with water and descaling agent. Place the jug with lid on the warming place. Wait 15 minutes then press descaling button


 and press START to start the appliance. Let the water run through. Perform two more brewing cycles with water only to allow appliance to rinse through properly.
SAFETY ADVICE
This appliance is not intended for use by persons (including children) with reduced physical, sensory or mental capabilities, or lack of experience and knowledge, unless they have been given supervision or instruction concerning use of the appliance by a person responsible for their safety.
Children should be supervised to ensure that they do not play with the appliance.
This appliance can be used by children aged from 8 years and above and persons with reduced physical, sensory or mental capabilities or lack of experience and knowledge if they have been given supervision or instruction concerning use of the appliance in a safe way and understand the hazards involved. Children shall not play with the appliance.
Cleaning and user maintenance shall not be made by children without supervision.
The appliance may only be connected to a power supply whose voltage and frequency comply with the specifications on the rating plate! Never use or pick up the appliance if – the supply cord is damaged, – the housing is damaged. The appliance must only be connected to an earthed socket.
If necessary an extension cable suitable for 10 A can be used. If the appliance or the supply cord is damaged, it must be replaced by the manufacturer, its service agent or similarly qualified person, in order to avoid hazard.
Always place the appliance on a flat, level surface.
Never leave the appliance unattended while connected to the supply mains.
The appliance must be switched off and the mains plug withdrawn each time after use, before cleaning and maintenance.
The appliance and accessories become hot during operation. Use only designated handles and knobs. Allow to cool down before or storage.
The mains cable must not come into contact with any hot parts of the appliance.
Do not immerse the appliance in water or any other liquid. Do not exceed the maximum filling volume as indicated on the appliances. Do not use or place the appliance on a hot surface or near source of heat.
This appliance is intended to be used in household and similar applications such as:
–staff kitchen areas in shops, offices and other working environments;
–farm houses;
–by clients in hotels, motels and other residential type environments;
–bed and breakfast type environments.
The coffee maker shall not be placed in a cabinet when in use.
No action is needed to adapt the product to 50 or 60Hz.
The product will adjust itself.
 DISPOSAL
Recycle the materials with the symbol. Put the packaging in applicable containers to recycle it. Help protect the environment and human health and to recycle waste of electrical and electronic appliances.
This symbol on the product indicates that this product contains a battery which shall not be disposed with normal household waste. This symbol on the product or
on its packaging indicates that the product may not be treated as household waste. To recycle your product, please take it to an official collection point or to an AEG service center that can remove and recycle the battery and electric parts in a safe and professional way. Follow your country’s rules for the separate collection of electrical products and
rechargeable batteries.
AEG reserves the right to change products, information and specifications without notice.
EN
BG
DE
ES
GR
FR
NL
PT
|
|
|
|
|
|
|
|
|
|
|
|
|
|
|
|
|
|||||
EN |
|
|
|
|
|
|
|
|
• . |
• |
•, |
|
EN |
||||||||
|
|
|
|
|
|
|
|
(6) |
(7) |
|
|
(12). |
|||||||||
|
|
|
|
|
|
|
|
|
|
||||||||||||
BG |
|
|
|
|
|
|
|
|
(5a) |
|
, |
|
BG |
||||||||
|
|
|
|
|
|
|
|
. |
|
• |
|
||||||||||
|
|
|
|
|
|
|
|
|
|
|
|
||||||||||
DE |
|
|
|
|
|
|
|
|
• , |
- ƒ . ˆ |
DE |
||||||||||
|
|
|
|
|
|
|
9 |
. • |
|||||||||||||
|
|
|
|
|
|
|
ƒ , |
||||||||||||||
|
1 |
|
|
|
|
|
|
- |
|
||||||||||||
ES |
|
|
|
|
|
|
|
|
|
ES |
|||||||||||
|
|
|
|
|
|
|
|
• . • . •, |
|||||||||||||
|
|
|
|
|
|
|
|
. |
|
|
|
|
|
|
|
||||||
|
2 |
3 |
|
|
8 |
|
|
|
. |
|
|
|
|
|
|
|
|
||||
GR |
|
|
|
|
|
|
|
|
|
|
|
|
|
GR |
|||||||
|
|
7 |
|
|
|
|
. |
|
|
|
|
||||||||||
|
|
|
|
|
|
|
10 |
- , . |
|
|
|
|
|||||||||
FR |
|
|
4 |
|
|
|
|
|
, |
FR |
|||||||||||
|
|
|
|
|
|
|
|
||||||||||||||
NL |
|
|
5a |
|
|
|
|
11 |
. • • |
NL |
|||||||||||
|
|
|
|
|
|
|
|
|
|
• |
(24) |
|
|||||||||
|
|
|
|
|
|
|
|
|
|
(13) . |
|
||||||||||
PT |
|
|
5 |
|
|
|
|
|
– ( |
|
) |
|
|
|
|
PT |
|||||
|
|
|
|
|
|
|
€ • - , |
|
|
|
|
|
|||||||||
|
|
|
|
|
|
|
|
– ( |
|
|
) |
|
|
|
|||||||
|
|
|
|
|
|
|
|
|
- 12:00 |
– ( |
|
|
) |
|
|
|
|
||||
|
|
|
|
|
|
|
|
|
. ‚ 24- . |
, |
|
||||||||||
|
|
|
|
|
|
|
|
|
• ; |
• |
|
|
|||||||||
|
|
|
6 |
|
|
|
|
|
, •. |
- ƒ . |
|
|
|
|
|||||||
|
|
|
|
|
|
|
|
|
1. • |
|
• , |
|
|
|
|
|
|
|
|
|
|
|
|
|
|
|
|
|
|
|
(21). |
• , |
|
|
|
||||||||
|
|
|
|
|
|
|
|
|
2. • |
|
† • • |
|
|||||||||
|
|
|
|
|
|
|
|
|
• (22). |
|
|
|
|||||||||
|
|
|
|
|
|
|
|
|
|
|
. • - |
|
|||||||||
|
|
|
|
|
|
|
|
|
‚ , |
|
|||||||||||
|
|
|
|
|
|
|
|
|
40 • • . |
|
|||||||||||
|
|
|
|
|
|
|
|
|
• - ƒ . |
|
|||||||||||
|
|
|
|
|
|
|
|
|
• |
|
|||||||||||
|
|
|
|
|
|
|
|
|
|
|
|
|
|
||||||||
|
|
|
|
|
|
|
|
|
|
(17a) |
. |
|
|||||||||
|
|
|
|
|
|
|
|
|
• • • |
|
|
||||||||||
|
|
|
|
|
|
|
|
|
1. (9). |
|
|||||||||||
|
|
16 |
|
|
|
17 |
|
|
, • (26) . |
|
|||||||||||
|
|
|
|
|
|
|
2. • , ƒ |
|
|
|
|
|
|
|
|
|
|||||
|
|
|
|
|
|
|
|
|
|
(- 10 ) |
• |
|
|
|
|
||||||
|
|
15 |
|
|
|
17a |
|
18 |
(11). |
† , |
|
||||||||||
|
|
|
|
|
|
|
3. • . |
, |
|
||||||||||||
|
|
13 |
|
|
|
12 |
|
|
|
•. • , |
|
||||||||||
|
|
17b |
14 |
|
|
|
(5) |
|
|||||||||||||
|
|
|
|
|
|
|
1. …ƒ (1). |
|
|
||||||||||||
|
|
|
|
|
|
|
|
|
† , , |
. • • |
|
||||||||||
|
|
|
|
|
|
|
|
|
|
• |
|
||||||||||
|
|
|
|
|
|
|
|
|
. |
|
30 •, • |
|
|||||||||
|
19 |
20 |
21 |
22 |
23 |
24 |
25 |
26 |
2. • (2) |
. |
|
|
|
|
|
|
|
||||
|
|
|
|
|
|
|
|
|
. • . |
• |
|
|
|
|
|
|
|
||||
|
|
|
|
|
|
|
|
|
3. • ƒ• |
|
|
|
|
|
|
|
|||||
|
|
|
|
|
|
|
|
|
. |
|
|
|
|
|
|
|
|
|
|
|
|
|
|
|
13. |
|
|
• |
|
|
|
||||||||||||
1. |
14. |
|
1. • . |
|
|
|
|
||||||||||||||
|
• (8) |
|
|
|
|
||||||||||||||||
2. |
|
15. |
|
|
|
|
|
|
|||||||||||||
|
|
|
|
, |
-/-/ |
2. • . |
|
|
|
|
|||||||||||
3. ( |
|
16. |
|
|
. |
|
|
3. • |
. |
|
|||||||||||
|
) |
|
|
17. ( ) |
• , |
4. |
|
||||||||||||||
4. K |
|
|
17a. • • „ “ |
|
|
ƒ . • . |
|
||||||||||||||
5. |
|
18. |
• • |
. … |
5. • |
|
, . |
|
|||||||||||||
5a. |
|
|
19. |
/ |
|
6. • |
|
• . |
|
||||||||||||
6. |
|
|
|
|
. ( |
„• |
7. • • (18), - |
|
|
|
|||||||||||
7. |
|
|
20. • |
“) |
|
• . |
|
||||||||||||||
8. |
|
21. |
• |
|
|
|
|
|
|
|
|
|
|
|
|
|
|
||||
9. |
|
22. |
• • |
|
|
|
|
|
|
|
|
|
|
|
|||||||
10. |
|
23. |
• |
|
|
1. (5). |
|
|
|
|
|
|
|
|
|
||||||
11. |
|
|
24. • |
|
|
|
|
|
|
|
|
|
|
||||||||
|
|
|
2. • ƒ |
|
|
|
|
|
|
|
|
|
|||||||||
12. |
|
25. |
• |
|
|
|
|
|
|
|
|
|
|||||||||
|
(5a). |
|
|
|
|
|
|
|
|
|
|
|
|||||||||
|
|
|
|
26. |
•• |
|
|
|
|
|
|
|
|
|
|
|
|
|
|||
|
|
|
|
|
|
• . ‡ |
|
|
|
|
|
|
|
|
|
||||||
|
|
|
|
|
|
|
|
|
|
|
|
|
|
|
|
|
|
||||
|
|
|
|
|
|
|
|
|
ƒ . |
|
|
|
|
|
|
|
|
|
|
|
|

EN
BG
DE
ES
GR
FR
NL
PT
‰ •
• , • (26). •
• .
•
1.• .
ƒ .
. • . 3. • • .
4.•  •. (14)
.
5.• • (18), •
.
‰ •
• ,
• (26). •
• • .
•
•
( „• “).
1. •
, . •
.
2. • |
• . |
||
3. • |
|||
|
•, . |
||
(14) . |
|||
4. • • |
|
||
(16) . |
|||
5. |
|
•, |
|
. • |
|||
, |
• (24), |
||
|
. |
||
6. • ,
•  .
.
(15) .
• .
ˆ •
- .
(17) .
•
, • CANCEL (26).
(15)
. •
,
•
- ƒ .
• • •
• ,
•. ‡ • ƒ .
1. •
•
, .
2.‰ ƒ ,
(2) (1) .
3.• . ‰
ƒ ,
-
.
(2). ( ,
.)
2.• ƒ
3. • • (18), - •. € • .
, -
• – •
• (26).
5.: • •
, . • .
6.• (8)
OPEN ( ‡ˆ Š• ).
7.(3)
.
8.•
.
9.•
•. † ,
( ). • .
10.•
.
- .
11.•
, ƒ .
12.(5),
ƒ .
13.• •: • • (19), 
• • (18). € •
ƒ. ,
, •
, ,
• (26), •
ƒ.
•
60 • .
ƒ
• • .
•
. •
ĥ . 15
•, •

 START ( ‡‰ ‡)
•. .
•
, • .
СЪВЕТ ОТНОСНО БЕЗОПАСНОСТТА
Тозиуредможедасеизползваотдецанавъзрастот |
ддръжка. |
8 и повечегодини, и отхора с намаленифизическ |
|
и, сетивниилиумствениспособности, или с липса |
Уредът и аксесоаритесенагряватповременарабо |
наопит и знания, акоим е осигуреннадзорилиинст |
та. Използвайтесамоопределенизацелтадръжки |
рукцияотносноизползванетонауредапобезопасен |
и копчета. Оставетедасеохладипредидаприбере |
начин и теразбиратсвързанитеопасности. Децат |
тезасъхранение. Главнияткабелнетрябвадавлиз |
анетрябвадаиграят с уреда. |
а в контакт с горещичастинауреда. |
Почистването и потребителскатаподдръжканетр |
Непотапяйтеуредавъвводаили в другатечност. Н |
ябвадасеизвършватотдецабезнадзор. |
епревишавайтемаксималнияобемнапълнене, как |
|
то е указанонауредите. Неизползвайте и непоста |
Уредътможедабъдесвързансамокъмзахранване, |
вяйтеуредавърхугорещаповърхностилиблизодои |
чиетонапрежение и честотаотговарятнаспецифи |
зточникнатоплина. |
кациитенатабелата с работнипоказатели! Никога |
|
неизползвайте и невдигайтеуреда, ако: – захранв |
Тозиуред е предназначенсамозадомашноползва |
ащияткабел е повреден, – корпусът е повреден. |
не. Производителятнеможедапоеменикакваотгов |
Уредъттрябвадабъдесвързансамокъмзаземенко |
орностзаевентуалнищети, причинениотнеправил |
нтакт. |
наилинеточнаупотреба. |
Принеобходимостможедасеизползваудължителе |
Тозиуред е предназначензаупотреба в домакинс |
нкабел, подходящза 10 A. Акоуредътилизахранв |
твото и сходниприложениякатонапример: |
ащияткабелсаповредени, тойтрябвадабъдезаме |
– кухненскизонизаперсонала в магазини, офиси |
ненотпроизводителя, неговиясервизенпредстави |
и другиработнисреди; |
телилиподобноквалифициранолице, задасеизбег |
– къщивъвферми; |
неопасност. |
– отклиенти в хотели, мотели и другисредиотрез |
|
идентентип; |
Винагипоставяйтеуредавърхуравна и плоскапов |
– средитипнощувка и закуска. |
ърхност. |
Кафе-машинатанетрябвада е поставена в шкаф, |
|
|
Никоганеоставяйтеуредабезнадзор, докато е свъ |
когатосеизползва. |
рзанкъмелектрическатамрежа. |
Несанеобходимидействиязаадаптираненапродук |
|
такъм 50 или 60 Hz. |
Уредъттрябвадасеизключи и щепселътдасеизва |
Продуктътщесерегулирасам. |
дивсекипътследупотреба, предипочистване и по |
|
 ДЕПОНИРАНЕ
Рециклирайтематериалитесъссимвола. Поставетеопако вката в подходящиконтейнери, зада я рециклирате. По могнетезаопазванетонаоколнатасреда и човешкотоздр аве, и зарециклиранетонаотпадъциотелектрически и ел ектронниуреди.
Тозисимволвърхупродуктапоказва, четозипродуктсъдър жабатерия, коятонетрябвадасеизхвърлязаедно с обикн овенитебитовиотпадъци. Тозисимволвърхупродуктаили
наопаковкатамупоказва, чепродуктътнеможедасетретир акатодомакинскиотпадъци. Задарециклиратевашияпро дукт, моля, занесетего в официаленпунктзасъбиранена отпадъциили в сервизенцентърна AEG, койтоможедапр емахне и рециклирабатерията и електрическитечастипо безопасен и професионаленначин. Следвайтеправилат анавашатастраназаразделносъбираненаелектрическип родукти и акумулаторнибатерии.
AEG сизапазваправотодапроменяпродукти, информация и спецификации безпредизвестие.
EN
BG
DE
ES
GR
FR
NL
PT

EN |
|
|
|
|
|
|
|
|
BG |
|
|
|
|
|
|
|
|
DE |
|
|
|
|
|
|
|
9 |
|
1 |
|
|
|
|
|
|
|
ES |
|
|
|
|
|
|
|
|
2 |
|
3 |
|
|
|
|
|
|
GR |
|
|
8 |
|
|
|
||
|
|
7 |
|
|
|
10 |
||
|
|
|
|
|
|
|
||
FR |
|
|
4 |
|
|
|
|
|
|
|
|
|
|
|
|
||
NL |
|
|
5a |
|
|
|
|
11 |
|
|
|
|
|
|
|
||
PT |
|
|
5 |
|
|
|
|
|
|
|
|
|
|
|
|
|
|
|
|
|
6 |
|
|
|
|
|
|
|
16 |
|
|
|
17 |
|
|
|
|
15 |
|
|
|
17a |
|
18 |
|
|
|
|
|
|
|
||
|
|
13 |
17b |
|
14 |
12 |
|
|
|
|
|
|
|
|
|
||
|
19 |
20 |
21 |
22 |
23 |
24 |
25 |
26 |
|
Bestandteile |
|
|
|
|
|
|
|
|
15. Anzeige Timer |
|||
|
16. Anzeige Zeit |
|||
3. Mühle (oberes Teil abnehmbar) |
17. Anzeige Betrieb (blinkend) |
|||
4. Bedienfeld |
17a. Anzeige Warmhaltefunktion |
|||
5. Filterfach |
18. |
Startknopf mit Betriebslampe |
||
5a. Filtereinsatz |
19. |
|
|
Entkalkung / Schaftreinigung |
6. Glaskanne mit Deckel |
20. |
Einstellung vorgegebene Zeit |
||
7. Display |
21. |
Einstellung der Stunden |
||
8. Einstellrad für Mahlstärke |
22. |
Einstellung der Minuten |
||
9. Deckel für Wassertank |
23. |
Einstellung Tassenanzahl |
||
10. Füllstand-Anzeiger |
24. |
|
|
|
11. Wassertank |
25. |
|
|
|
12. Anzeige Tassenanzahl |
26. |
Löschtaste |
||
Inbetriebnahme
Wischen Sie das Gerät mit einem sauberen, feuchten Tuch ab. Spülen Sie die Glaskanne (6) und den Filtereinsatz (5a) mit etwas mildem Reinigungsmittel und Wasser ab.
nur Wasser durchlaufen. Füllen Sie den Frischwassertank bis zur oberen Tassenmarkierung mit kaltem Wasser. Schließen Sie den Deckel. Drücken Sie um das Gerät
laufen. Wenn alles Wasser durchgelaufen ist, leeren Sie die
Handhabung und Betrieb
Einstellung der Uhrzeit
Sobald das Gerät an eine Steckdose angeschlossen ist, schaltet sich die Displaybeleuchtung ein und die Zeitanzeige 12:00 blinkt. Die Uhr zeigt die Zeit im 24-Stunden-Format an. Stellen Sie die Stunden durch langes Drücken ein;
Sowohl für Stunden als auch Minuten.
1.Halten Sie die Taste gedrückt, um die Stunden einzustellen (21).
2.Halten Sie die Taste gedrückt, um die Minuten einzustellen (22).
Die Zeit wird gespeichert, bis eine andere Zeit eingestellt oder das Gerät von der Steckdose getrennt wird.
Füllen des Wasserbehälters
2.Gießen Sie die für die gewünschte Tassenanzahl erforderliche Menge Wasser (maximal 10 Tassen) in den Wassertank (11).
3.Schließen Sie den Wassertankdeckel.
Stellen Sie sicher, dass der Wassertank geschlossen
können.
Füllen Sie es nicht übermäßig.
Einstellen der Mahlstärke
Bewegen Sie den Drehknopf für die Mahlstärke (8) an die gewünschte Position für Fein / Mittel / Grob.
Wenn Sie auf eine andere Mahlstärke umschalten,
vorherigen Mahlstärke im Mühlenschaft. Der Schaft muss möglicherweise vorher gereinigt werden. (siehe Kapitel „Reinigen des Schafts“)
Einsetzen des Filters
2. Setzen Sie einen Papierfilter in das Filterfach (5a) ein. Schließen Sie das Filterfach. Es muss einrasten.
Einstellen der Tassenanzahl
Halten Sie die Taste gedrückt, bis das Display
(7) die gewünschte Tassenanzahl anzeigt (12).
Die ausgewählte Tassenanzahl wird gespeichert, bis eine neue Tassenanzahl eingestellt wird oder das Gerät von der Steckdose getrennt wird. Das gesamte Wasser im Wassertank wird immer aufgebraucht, unabhängig von der 
Taste
 (13) auf dem Display angezeigt wird.
Steckdose getrennt wird.
Warmhaltefunktion
Das Gerät verfügt über eine automatische Warmhaltefunktion. Die Kochplatte bleibt nach jedem Brühvorgang 40 Minuten lang eingeschaltet. Nach dem Brühen leuchtet das Warmhalte-Symbol (17a) auf dem Display. Um die Warmhaltefunktion vorher zu beenden, drücken Sie die Taste (26), um abzubrechen.
Tropfstopp
Das Gerät verfügt über einen Tropfstopp, der verhindert,
Gerät entfernt wurde. Wenn das Gerät in Betrieb ist, muss das Filterfach (5) geschlossen und die Kanne mit dem Deckel unter dem Filterfach platziert werden. Während des Brühvorgangs darf die Kanne nicht länger als 30 Sekunden aus dem Gerät entfernt werden, da sonst der Filter überlaufen kann.
Zubereitung
1. Füllen Sie den Wassertank.
3. Stellen Sie die gewünschte Mahlstärke ein.
Papierfilter ein. Schließen Sie das Filterfach.
5. Drücken Sie, um die gewünschte Tassenanzahl einzustellen
Taste ein .
.
7. Drücken Sie die Taste (18), um die Mühle einzuschalten und den Brühvorgang zu beginnen.
EN
BG
DE
ES
GR
FR
NL
PT
 Loading...