


Mixed fuel cooker
INSTRUCTION BOOK
CKG5060W
CKG5060S
AU
2
Important Safety Information
These warnings are provided in the interest of safety. You MUST read them carefully before installing or using the appliance.
Keep this instruction book for future reference and ensure it is passed on to any new owner.
Installation
•The work of installation must be carried out by competent and qualified installers according to the regulations in force.
•The appliance must be installed at a minimum distance of 50 cm from curtains or other combustible material.
•Any modifications to the domestic electric mains, which may be necessary for the installation of the appliance, should only be carried out by qualified electrician.
•This cooker is heavy. Take care when moving it.
•Remove all packaging before using the cooker.
•Ensure that the electrical supply complies with the type stated on the rating plate, located near the gas supply pipe.
•It is dangerous to modify, or attempt to modify, the characteristics of this appliance.
•This appliance cannot be positioned on a base.
•If the supply cord is damaged, it shall be replaced by a special cord or assembly available from Authorised Electrolux Service Centre.
•The NON-TIP DEVICE must be fitted according to instructions to prevent the cooker from tipping, for example by a child climbing onto the open oven door.
Child Safety
•This appliance has been designed for use by adults. Supervise children to ensure they do not attempt to play with it.
•This appliance is not intended for use by young children of infirm persons unless they have been adequately supervised to ensure they can use the appliance safely.
•The cooker gets hot when it is in use and retains heat for a long period after use. Children should be kept away until it has cooled.
•Children can also injure themselves by pulling pans or pots off the cooker, they should be supervised at all times to ensure their safety.
•Burners, plates, grills and pans remain hot for a long time after being switched off. Supervise children at all times when in use paying attention that they do not touch surfaces or remain in the vicinity of the appliance when in use or when not completely cooled.
During use
•This cooker is intended for domestic cooking only. It is not designed for commercial or industrial purposes.
•This appliance is not connected to a combustion products evacuation device. It shall be installed and connected in accordance with current installation regulations.
3
Particular attention shall be given to the relevant requirements regarding ventilation.
•When in uses a gas cooker will produce heat and moisture in the room in which it has been installed. Ensure there is a continuous air supply, keeping air vents in good condition or installing a cooker hood with a venting hose.
•Ensure that air can circulate around the gas appliance. Poor ventilation can produce a lack of oxygen.
•Do not use this cooker if it is in contact with water. Do not operate the cooker with wet hands.
•Always grill with the oven door closed.
•The grill pan will become hot during use, always use oven gloves when removing or replacing a hot grill pan.
•During use the appliance becomes hot. Care should be taken to avoid touching heating elements inside the oven.
•DO NOT store or use gasoline or other flammable vapours, liquids or items in the vicinity of this or any other appliance.
•Do not spray aerosols in the vicinity of this appliance while it is in operation.
•To facilitate ignition, light the burner before placing the pan on the grill.
•After having lit the burner check that the flame is regular.
•Always lower the flame or turn it off before removing the pan.
4
•Unstable or deformed pans should not be placed on the burners in order to avoid accidents caused by upsetting or boiling over.
•Ensure the control knobs are in the ‘OFF’ position when not in use.
•When using other electrical appliances, ensure the cable does not come into contact with the hot surfaces of the cooker.
•Unstable or misshapen pans should not be used on the hob hotplates as unstable pans can cause an accident by tipping or spillage.
•Never leave the cooker unattended when cooking with oil and fats.
•This cooker should be kept clean at all times. A build-up of fats or foodstuffs could result in a fire.
•Only clean this oven in accordance with the instructions.
•In case of repairs, do not attempt to correct yourself. Repairs carried out by unqualified persons can cause damage. Contact the nearest Assistance Centre and use only original spare parts.
•WARNING – Ensure that the appliance is switched off before replacing the lamp to avoid the possibility of electric shock.
•Always stand back from the oven when opening the oven door, to allow any build-up of steam or heat to release.
•Where this appliance is installed in marine craft or in caravans, it shall NOT be used as a space heater.
•Always ensure that the oven vent, which is located at the centre back of the hob, is left unobstructed to ensure ventilation of the oven cavity.
•Perishable food, plastic items and aerosols may be affected by heat and should not be stored above the cooker.
•Before maintenance or cleaning disconnect the appliance and allow cooling.
•Never use steam or high-pressure steam cleaners to clean the appliance.
•Do no store flammable materials (e.g. aerosols, plastic aprons, paper baking sheets etc) in the warming drawer, it is only intended for warming of plates and baking trays.
•Be careful when removing items from the warming drawer, as they may be hot.
Service
•This cooker should only be repaired or serviced by an authorised Electrolux Service Engineer and only genuine approved spare parts should be used.
 Environmental Information
•After installation, please dispose of the packaging with due regard to safety and the environment.
•When disposing of an old appliance, make it unusable, by cutting off the cable.
Your safety is of paramount importance. Therefore, if you are unsure about any of the meanings of these WARNINGS, contact the Customer Care Department.
These instructions are only valid in the country whose symbol appears on this instruction’s cover.
This product should not be treated as household waste. Instead it should be handed over to the applicable collection point for the recycling of electrical and electronic equipment. By ensuring this product is disposed of correctly, you will help prevent potential negative consequences for the environment and human health, which could otherwise be caused by inappropriate waste handling of this product. For more detailed information about recycling of this product, please contact your local city office, your household waste disposal service or the shop where you purchased the product.
5

Contents
Instructions for the Installer
Technical features |
7 |
Location |
8 |
The safety equipment |
9 |
Installation |
11 |
Adaptation to different type of gas |
13 |
Electrical connections |
16 |
Instructions for the User |
|
Use and care |
18 |
Use of appliance |
19 |
Before the first use of the oven |
19 |
Electric oven |
20 |
Oven function control knob |
20 |
Using the Conventional Oven |
21 |
Hints and Tips |
21 |
Grilling |
22 |
Using the Fan Oven |
22 |
Defrosting |
23 |
Oven Cooking Chart |
24 |
Roasting/Grilling Chart |
25 |
Using the Hob |
26 |
Maintenance and Cleaning |
30 |
Oven bulb replacement |
33 |
Something Not Working |
34 |
Electrolux Warranty |
36 |
Guide to Use the Instructions
The symbols below will guide you when reading the instruction book
Safety instructions
Step by Step Operation
Advice and recommendations
Environmental Information
6

Instructions for the Installer
Technical features
Dimensions |
|
Height |
|
|
|
900 mm |
||
|
|
|
|
Width |
|
|
|
500 mm |
|
|
|
|
Depth |
|
|
|
600 mm |
|
|
|
|
Oven Capacity |
|
45 l |
||
|
|
|
|
|
|
|
|
|
Hob |
|
|
|
|
Natural Gas |
U-LPG, |
||
|
|
|
|
(1.00kPa) |
(2.60kPa) |
|||
|
|
|
|
|
|
|
||
|
|
|
|
Front Left |
|
Semi-rapid |
7.0 |
6.5 |
|
|
|
|
Back Left |
|
Semi-rapid |
7.0 |
6.5 |
|
|
|
|
Front Right |
|
Rapid |
10.5 |
10.5 |
|
|
|
|
Back Right |
|
Aux |
4.2 |
4.0 |
|
|
|
|
|
|
Total |
28.7 |
27.5 |
Oven |
|
Top element |
|
|
|
1000 W |
||
|
|
|
|
Bottom element |
|
925 W |
||
|
|
|
|
Grill element |
|
|
|
1925 W |
|
|
|
|
Convection fan |
|
60 W |
||
|
|
|
|
Light in the oven |
Lamp 25W type E14 |
|||
|
|
|
|
Cleaning |
|
|
|
manual |
|
|
|
|
|
|
|
||
|
|
|
|
Total oven rating |
|
1960 W |
||
|
|
|
|
|
|
|
||
Supply |
|
Rated voltage |
|
230-240 V |
||||
|
|
|
|
Rated frequency |
|
50 Hz |
||
Accessories |
|
Oven grid (2 pieces) |
|
|
||||
|
|
|
|
Roasting tray + roasting grid |
|
|
||
|
|
|
|
|
|
|
||
|
|
|
|
Total cooker rating |
|
1960,6 W |
||
|
|
|
|
|
|
|
||
|
|
This |
appliance is |
manufactured |
|
|
||
|
|
|
|
|||||
|
|
|
|
|||||
according to the following EEC directives: |
|
|
||||||
73/23/EEC; |
90/683 EEC; |
89/336/EEC; |
|
|
||||
93/68/EEC; 90/396 EEC, current edition. |
|
|
||||||
7
Location
 Qualified tradespersons must carry out installation work on the cooker. The cooker is heavy. Certain edges and corners, which will not normally be exposed, may be sharp. USE GLOVES when moving the cooker.
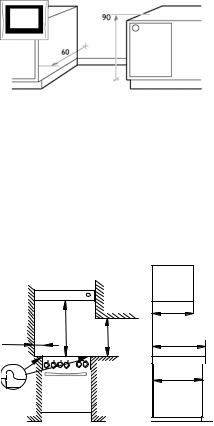
Before installing the cooker, you should check that its dimensions correspond to the rest of your kitchen units. Measure the height of the worktop from floor to top surface of the worktop, and the cooker depth from the wall to the front edge of the cooker (see picture). The cooker must also be installed in conformity with the following standards.
If a 10A power socket or hard wiring is required for installation, a licenced electrician must install it.
 Carry out installation as described in the Installation Requirement chapter – paragraph 2.4 of AG101-2000.
Gas installation must be carried out by a qualified gas fitter in accordance with AG101-2000. Choose a location free of draughts and open doors and clear of combustible materials or other fire hazards such as curtains, etc.
The location should ensure convenience of operation and service. Any adjacent cabinets or walls must not exceed the cooker’s sides height (see fig.).
The cooker may be located in a kitchen or dining room, but not in a bathroom or shower room. The levelling feet fitted to the appliance can be adjusted to achieve a nominal height to hotplate of 900mm + 10mm.
8
|
|
|
max 400 |
150 |
690 |
500 |
min 600 |
|
|
|
min 570 |
 The cooker should be installed only on the floor, it is not suitable for installation on a base.
The safety equipment
Leveling the cooker
The appliance is provided with adjustable small feet placed in the back and front corners of the base. Never pull the appliance by the oven handle.
By adjusting the small feet it is possible to change the height of the appliance so as to ensure a better leveling with other surfaces and a uniform distribution of the liquids contained in pans or pots.
To check whether the cooker is level, use a spirit level on the hob surround. Check the level first front to back and then side to side.
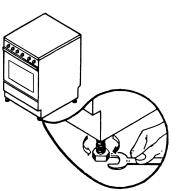
Non-tip device
 When installing the cooker it is compulsory to install the nontip device. The non-tip device should be fitted, to prevent the cooker from tipping if subjected to an abnormal loading, for example by a child climbing on to an open oven door. The non-tip device can only provide protection when the cooker is pushed into its normal position.
Before fitting the non-tip device, make sure the cooker has been leveled.
9
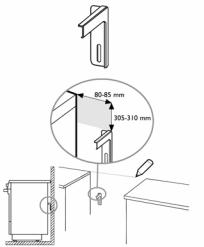
Draw a line on the wall – after leveling the cooker – along the top edge of the hob (see illustration).
The measurements shown can be applied when the non-tip device is fitted on the left (see illustration).
Measure and mark where the non-tip device is to be placed. Attach the bracket to the wall with the fixings that are recommended for your wall type and then check that the bracket is secure enough to hold the cooker in place with weight applied to the open cooker door.
Due to the large range of wall types and different fixings required for each type, the fixings are not supplied, so the appropriate fixings should be obtained from a hardware store.
NOTE! If the space between kitchen units is wider than the cooker, you will need to alter the measurements shown in the illustration if the cooker is to be centered.
If you alter the measurements, remember to align the cooker correctly when pushing it into place, so that the non-tip device enters the hole on the cooker rear.
10
Installation
Important
Qualified personnel must install this cooker. The manufacturer will not accept liability, should the above instructions or any of the other safety instructions incorporated in this book be ignored.
Regulations
This appliance shall be installed in accordance with the manufacturer’s installation instructions, local gas fitting regulations, municipal building codes, AS5601 (AG601) and any other relevant statutory regulations.
Rating label
The rating label is located on the lower front frame of the cooker upon opening the door. This appliance is suitable for Natural and Universal LPG. Ensure that the gas supply matches the rating label. A duplicate data label has been supplied with this appliance, which must be attached to readily available adjacent surface on installation.
Ventilation
Ventilation must be in accordance with AS5601 (AG601) Installation Code. In general, the appliance should have adequate ventilation for complete combustion of gas and to maintain temperature of immediate surroundings within safe limits.
Connection to the gas supply
Gas connection must be carried out by a licensed gas fitter and in conformity with the regulations in force. The appliance leaves the factory tested and regulated for the type of gas indicated on the plate, which is situated in the lower position near the gas connection tube.
Ascertain that the type of gas with which the appliance will be supplied is the same as that indicated on the plate.
If different carry out all the operations according to the indications cited in the paragraph “adaptation of different types of gas”.
For a maximum output and minimum consumption ascertain that the pressure of the gas used the values indicated in the table of “burners characteristics”.
The joint is mounted on the intake area of the pipe, fitted with a filleted nut G1/2”, between the sealing components. Screw the parts without forcing, turn the joint in the direction required and then tighten everything.
11
Connection
Carry out the connection to the gas plant only by means of a rigid metallic pipe conforming to the regulations in force. This appliance is NOT suitable for connection with a flexible hose assembly.
The joint for the entry of the gas into the appliance is threaded G1/2”.
Carry out the connection avoiding any type of stress on the appliance or gas piping.
Natural gas appliances must be fitted with a pressure regulator installed at the inlet connection. The gas pressure is pre-set and the gas regulator non-adjustable.
For U-LPG the same pressure regulator may be used by removing the centre insert and setting it for U-LPG setting (remove and reinsert plastic insert inverted). Alternatively it can be used without the regulator and set by adjustments made via the regulator fitted at the domestic U-LPG cylinder.
12
 Loading...