


3B SCIENTIFIC® PHYSICS
Solar-Grundlagenset 8461200
Bedienungsanleitung
09/06 SP
|
|
|
1 |
Halterung für Messkörper |
6 |
6 |
|
2 |
Solar-Messkörper |
|
3 |
Dämmgehäuse |
||
|
|
|
4 |
Acrylglasplatte |
6 |
|
6 |
5 |
Klemme |
|
6 |
Thermometer |
||
|
|
|
1 |
2 |
3 |
4 |
5 |
1. Sicherheitshinweise
Die Thermometer sind empfindliche Geräte aus Glas. Es besteht Bruchgefahr!
•Keinen mechanischen Belastungen aussetzen.
•Nicht fallen lassen.
2. Beschreibung
Das Solar-Grundlagenset ist ein Gerätesatz für Experimente zur Nutzung der Sonnenenergie.
Der Gerätesatz besteht aus vier Solar-Messkörpern mit unterschiedlicher Oberflächenbeschichtung, vier Thermometern, zwei Haltern, zwei Wärmedämmgehäusen und einer Abdeckung zur Demonstration des Treibhauseffekts.
Vier in ca. 25 Minuten durchführbare Messreihen demonstrieren eindrucksvoll den Temperaturverlauf und die maximale Temperatur in den Messkörpern.
Die Lieferung erfolgt in einem stabilen Aufbewahrungskasten aus Karton.
3. Lieferumfang / Technische Daten
4 |
Solar-Messkörper |
|
|
Material: |
Kupfer |
|
Abmessungen: |
60 mm x 60 mm |
|
Farbe: |
1 x weiß, 3 x schwarz |
|
Masse: |
ca. 50 g |
2 Dämmgehäuse |
|
|
|
Material: |
Schaumstoff |
|
Abmessungen: |
12 x 12 x 5 cm3 |
1 |
Acrylglasplatte |
10 cm x 10 cm |
4 |
Thermometer |
-10°C – +100°C |
2 |
Halterungen für Messkörper |
|
2 Klemmen |
|
|
1 |
Aufbewahrungskasten |
|
1
4. Versuchsaufbau |
|
|
|
Empfohlenes Zubehör: |
|
Halogenleuchte mit Stiel, 500 W |
8476712 |
Plattenfuß |
8614110 |
•Messkörper in den Haltern und den Dämmgehäusen positionieren. Die glatte, farbige Seite zeigt zur Lichtquelle.
•Thermometer durch die Bohrung im Halter bzw. Dämmgehäuse ins Sackloch an der Rückseite des Messkörpers stecken.
•An einem Dämmgehäuse die Acrylglasplatte mittels der Klemmen fixieren.
•Messkörper im gleichen Abstand und Winkel zur Lichtquelle positionieren.
Wenn das Experiment im Sonnenlicht durchgeführt wird, kann der Messkörper im Halter durch Schrägstellung in den Einfallswinkel der Sonne gebracht werden.
Falls das Experiment nicht im Sonnenlicht durchgeführt werden kann, wird als „Ersatzsonne“ eine 500 W Halogenleuchte benötigt.
5.Versuchsdurchführung
•Die Halogenleuchte in einem Abstand von ca. 65 cm vor den Messkörpern aufbauen. Die Beleuchtung entspricht sommerlicher Sonnenbestrahlung.
•Thermometer vor Experiment ablesen und Wert notieren.
•Leuchte einschalten.
•Temperatur im Minutenabstand ablesen und tabellieren.
Die verschiedenen Messkörper erreichen nach unterschiedlicher Zeit ihre Maximaltemperatur.
Der abgedeckte Messkörper erreicht nach ca. 25 min. seine Maximaltemperatur.
Das Experiment kann nach Erreichen der Höchsttemperatur abgebrochen werden.
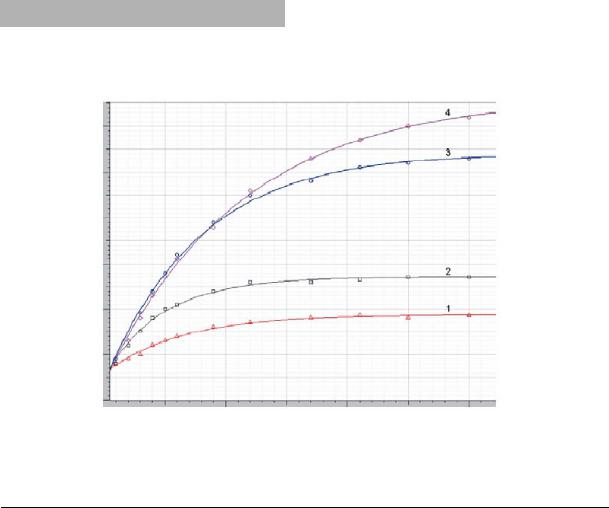
Es ist gut zu erkennen (Fig. 1), dass schwarze Flächen zu einem wesentlich höheren Temperaturanstieg führen als weiße.
Die Wärmedämmung im Dämmgehäuse verhindert Energieverluste an der Rückseite des Messkörpers. Die zusätzliche Acrylglasplatte verbessert die Ausnutzung der Strahlungsleistung, da der „Treibhauseffekt“ eine Abkühlung des Messkörpers durch Luftkonvektion und langwellige Abstrahlung auf der Vorderseite verhindert. Dieser „Treibhauseffekt“ kompensiert sogar die Absorptionsverluste in der Acrylglasplatte, die sich in der geringeren Anfangssteigung der Messkurve darstellen. Der wärmegedämmte und mit einer Abdeckung versehene schwarze Messkörper vereint in sich alle physikalischen Merkmale eines Solarkollektors für die Warmwasserbereitung.
Fig. 1 Temperaturanstieg in den Solar-Messkörpern
1. weiß, 2. schwarz, 3. schwarz gedämmt, 4. schwarz gedämmt mit Acrylglasplatte
Elwe Didactic GmbH • Steinfelsstr. 6 • 08248 Klingenthal • Deutschland • www.elwedidactic.com 3B Scientific GmbH • Rudorffweg 8 • 21031 Hamburg • Deutschland • www.3bscientific.com Technische Änderungen vorbehalten

3B SCIENTIFIC® PHYSICS
Basic solar energy set 8461200
Instruction sheet
09/06 SP
|
|
|
1 |
Holder for metering panel |
6 |
6 |
|
2 |
Solar metering panel |
|
3 |
Insulating case |
||
|
|
|
4 |
Acrylic plate |
6 |
|
6 |
5 |
Clamp |
|
6 |
Thermometer |
||
|
|
|
1 |
2 |
3 |
4 |
5 |
1. Safety instructions
The thermometers are sensitive instruments, made from glass. Caution, they are fragile!
•Do not expose to mechanical stress.
•Do not drop.
2. Description
The basic solar energy set is an equipment set for experiments on utilisation of solar energy.
The equipment set consists of four solar metering panels of varied surface coating, four thermometers, two holders, two thermal insulating cases and a cover for demonstration of the greenhouse effect.
Four series of measurements, which can be done within approximately 25 min., impressively demonstrate the change in temperature over time and the maximum temperature that can be reached inside the metering panels.
The equipment is delivered in a sturdy cardboard storage box.
3. Scope of delivery and technical data
4 |
Solar metering panels |
|
|
Material: |
Copper |
|
Dimensions: |
60 mm x 60 mm |
|
Colour: |
1 white, 3 black |
|
Weight: |
50 g approx. |
2 |
Insulating cases |
|
|
Material: |
Foam |
|
Dimensions: 1 |
2 x 12 x 5 cm |
1 |
Acrylic plate |
10 x 10 cm |
4 |
Thermometers |
-10°C – +100°C |
2 |
Holders for metering panels |
|
2 |
Clamps |
|
1 |
Storage box |
|
1
4. Experimental set-up |
|
|
|
Recommended accessories: |
|
Halogen lamp with stem, 500 W |
8476712 |
Support base |
8614110 |
•Position the metering panels inside the holders and the insulating cases. The smooth, coloured side should point towards the light source.
•Put the thermometer through the drill hole in the holder or the insulating case, respectively, and into the bottom hole at the rear of the metering panel.
•Mount the acrylic plate with the clamps to one of the insulating cases.
•Position the metering panels at the same distance and angle to the light source.
If the experiment is conducted in direct sunlight, the metering panel can be slanted in the holder to match the angle of the sunbeams.
If the experiment cannot be conducted in direct sunlight, a 500 W halogen lamp has to be used as a substitute.
5.Experimental protocol
•Position the halogen lamp at a distance of approximately 65 cm from the metering panels. The illumination is then as bright as summer sunshine.
•Read thermometer before the experiment, and take a note of the reading.
•Switch on lamp.
•Read the temperature every minute, and enter it into a table.
The various metering panels reach their maximum temperature within different periods of time.
The covered metering panel reaches its maximum temperature after approximately 25 min.
The experiment can be halted once the maximum temperature has been reached.
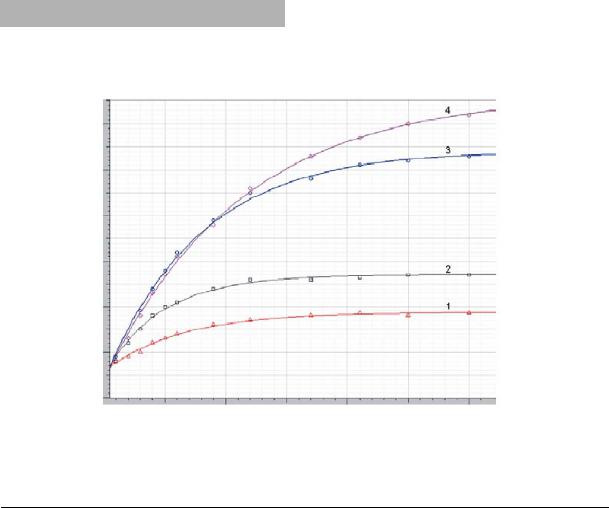
It can easily be seen (Fig. 1) that black surfaces lead to a much higher rate of temperature increase than white ones.
The thermal insulation of the insulating case prevents energy losses from the rear of the metering panel. Adding the acrylic plate improves utilisation of the radiant power, since the “greenhouse effect” prevents cooling of the meter panel by atmospheric convection and by long-wave heat dissipation from the front. This ”greenhouse effect” even compensates for the losses due to absorption by the acrylic plate, which are reflected in the slightly shallower initial slope of the measured curve. The black metering panel, furnished with thermal insulation and a cover, has all the physical attributes of a solar collector panel for a hot water heater.
Fig. 1 Temperature increase in the solar meter panels
1. white, 2. black, 3. black, insulated, 4. black, insulated, with acrylic plate
Elwe Didactic GmbH • Steinfelsstr. 6 • 08248 Klingenthal • Germany • www.elwedidactic.com 3B Scientific GmbH • Rudorffweg 8 • 21031 Hamburg • Germany • www.3bscientific.com Subject to technical amendments
 Loading...